gearbox SKODA SUPERB 2015 3.G / (B8/3V) User Guide
[x] Cancel search | Manufacturer: SKODA, Model Year: 2015, Model line: SUPERB, Model: SKODA SUPERB 2015 3.G / (B8/3V)Pages: 276, PDF Size: 42.14 MB
Page 189 of 276

WARNINGSliding cargo can significantly adversely affect stability and driving safety -
risk of accident!
Trailer load
The permissible trailer load must not be exceeded under any circumstances.Permissible trailer load - SuperbEngineGearboxPermissible trailer load, braked (kg)Permissible trailer load, unbraked (kg)Gradients of up to 12 %Gradients of up to 8 % a)1.4 l/92 kW TSIMG16001800680
1.4 l/110 kW TSI ACT
MG16001900690MG 4x418002000750DSG160019007101.4 l/110 kW TSIMG16001900690DSG160019007001.8 l/132 kW TSIMG18002000730DSG180020007402.0 l/162 kW TSIDSG200020007502.0 l/206 kW TSIDSG 4x422002200750
1.6 l/88 kW TDI CR
MG15001800730MG (GreenLine)15001800740DSG15001800740
2.0 l/110 kW TDI CR
MG20002000740MG 4x422002200750DSG200020007502.0 l/130 kW TDI CRDSG20002000750
2.0 l/140 kW TDI CR
MG20002000750DSG20002100750DSG 4x422002200750a)
Only valid for some countries.
187Hitch and trailer
Page 190 of 276

Permissible trailer load - Superb EstateEngineGearboxPermissible trailer load, braked (kg)Permissible trailer load, unbraked (kg)Gradients of up to 12 %Gradients of up to 8 %a)1.4 l/92 kW TSIMG16001800690
1.4 l/110 kW TSI ACT
MG16001900700MG 4x418002000750DSG160019007201.4 l/110 kW TSIMG16001900700DSG160019007101.8 l/132 kW TSIMG18002000740DSG180020007502.0 l/162 kW TSIDSG200020007502.0 l/206 kW TSIDSG 4x422002200750
1.6 l/88 kW TDI CR
MG15001800740MG (GreenLine)15001800750DSG15001800750
2.0 l/110 kW TDI CR
MG20002000750MG 4x422002200750DSG200020007502.0 l/130 kW TDI CRDSG20002000750
2.0 l/140 kW TDI CR
MG20002000750DSG20002100750DSG 4x422002200750a)
Only valid for some countries.
WARNINGNever exceed the maximum permissible axle and draw bar load or the per-
missible weight of the trailer - risk of accident!
Towing a trailer
Driving speed
For reasons of safety do not drive more than 100 km / h when the towing vehi-
cle is a passenger car of category M1.
For reasons of safety do not drive more than 80 km / h when the towing vehi-
cle is a lorry of category N1.
Immediately reduce your speed as soon as even the slightest swaying of the
trailer is detected. Never attempt to stop the trailer from “swaying” by acceler-
ating.
Brakes
Apply the brakes in good time! If the trailer is fitted with a trailer brake, apply
the brakes gently at first, then brake firmly. This will avoid brake jolts resulting
from the trailer wheels locking. 188Driving
Page 234 of 276

Vehicles with automatic transmission may be towed in with a tow bar or a tow
rope or with the front wheels raised. If the vehicle is raised at rear, the auto-
matic gearbox is damaged! If possible, the vehicle should be towed with the
engine running or at least with the ignition on.
Driver of the tow vehicle›
Engage the clutch gently when starting off or depress the accelerator partic-
ularly gently if the vehicle is fitted with an automatic gearbox.
›
Only then approach correctly when the rope is taut.
The maximum towing speed is 50 km/h.
Driver of the towed vehicle
›
Switch on the ignition so that the steering wheel is not locked and so that
the turn-signal lights, windscreen wipers and windscreen washer system can
be used.
›
Take the vehicle out of gear or move the selector lever into position N if the
vehicle is fitted with an automatic gearbox.
Please note that the brake servo unit and power steering only operate if the
engine is running. If the engine is not running, significantly more physical force
is required to depress the brake pedal and steer the vehicle.
If using a tow rope, ensure that it is always kept taught.
General information for the towing process
Both drivers should be familiar with the problems which might occur while a vehicle is being towed. Unskilled drivers should not attempt to tow in another
vehicle or to be towed in.
The vehicle must be transported on a special breakdown vehicle or trailer if it
is not possible to tow in the vehicle in the way described or if the towing dis-
tance is greater than 50 km.
If the gearbox has no oil, your vehicle must be towed with the front axle raised
clear of the ground or on a breakdown vehicle or trailer.
To protect both vehicles when tow-starting or towing, the tow rope should be elastic. Thus one should only use plastic fibre rope or a rope made out of a
similarly elastic material.
Attach the tow rope or the tow bar to the towing eyes » page 232 or
» page 233 to the detachable ball head of the towing device » page 184 .
WARNING■
When towing, exercise increased caution.■Do not use spiral rope for towing » Fig. 251- , the towing eye may un-
screw from the vehicle - risk of accident.■
Ensure tow rope is not twisted - risk of accident.
CAUTION
■ Do not start engine by towing - there is a risk of damaging the engine parts.
The battery from another vehicle can be used as a jump-start aid » page 230,
Jump-starting .■
There is always a risk of excessive stresses and damage resulting at the
points to which you attach the tow rope or tow bar when you attempt to tow a
vehicle which is not standing on a paved road.
Note
We recommend using a tow rope from ŠKODA Original Accessories, which is
available from a ŠKODA Partner.
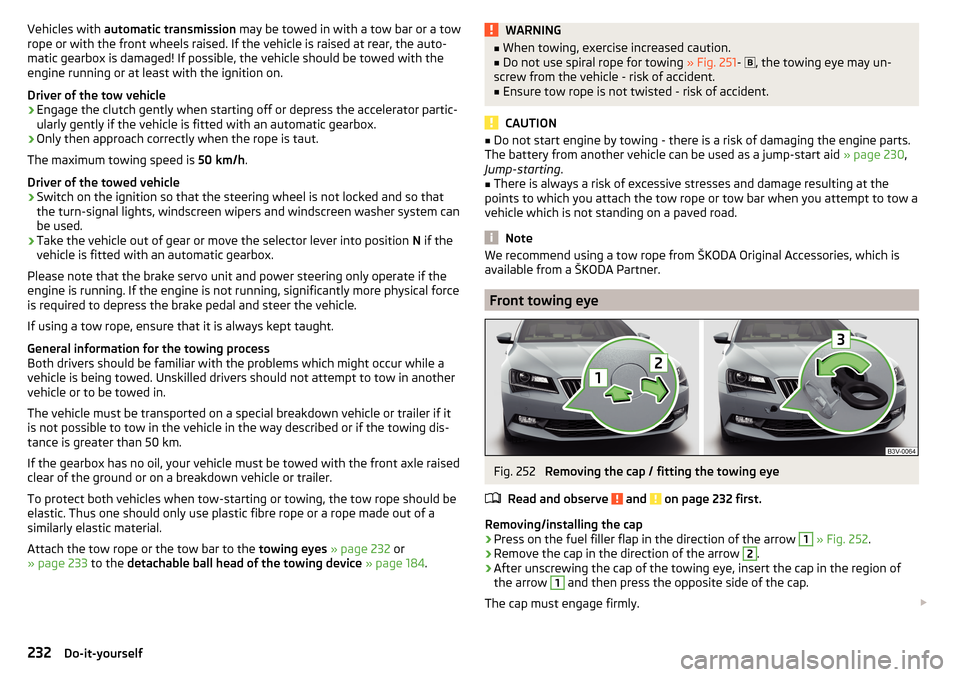
Front towing eye
Fig. 252
Removing the cap / fitting the towing eye
Read and observe
and on page 232 first.
Removing/installing the cap
›
Press on the fuel filler flap in the direction of the arrow
1
» Fig. 252 .
›
Remove the cap in the direction of the arrow
2
.
›
After unscrewing the cap of the towing eye, insert the cap in the region of
the arrow
1
and then press the opposite side of the cap.
The cap must engage firmly.
232Do-it-yourself
Page 242 of 276

Installing the storage compartment›Raise the storage compartment in the direction of the arrow 4.›
Overcome the resistance of the detents
A
.
›
Insert the brake control linkage in the opposite direction to arrow
2
.
›
Lock the brake control linkage in the opposite direction to arrow
1
.
›
Close the storage compartment.
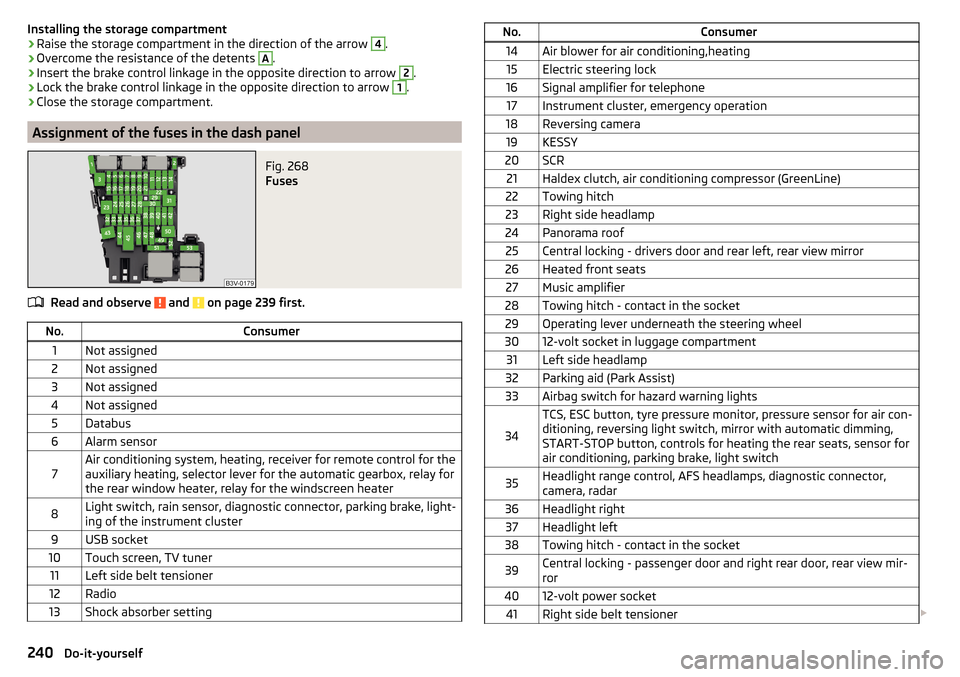
Assignment of the fuses in the dash panel
Fig. 268
Fuses
Read and observe and on page 239 first.
No.Consumer1Not assigned2Not assigned3Not assigned4Not assigned5Databus6Alarm sensor7Air conditioning system, heating, receiver for remote control for the
auxiliary heating, selector lever for the automatic gearbox, relay for
the rear window heater, relay for the windscreen heater8Light switch, rain sensor, diagnostic connector, parking brake, light-
ing of the instrument cluster9USB socket10Touch screen, TV tuner11Left side belt tensioner12Radio13Shock absorber settingNo.Consumer14Air blower for air conditioning,heating15Electric steering lock16Signal amplifier for telephone17Instrument cluster, emergency operation18Reversing camera19KESSY20SCR21Haldex clutch, air conditioning compressor (GreenLine)22Towing hitch23Right side headlamp24Panorama roof25Central locking - drivers door and rear left, rear view mirror26Heated front seats27Music amplifier28Towing hitch - contact in the socket29Operating lever underneath the steering wheel3012-volt socket in luggage compartment31Left side headlamp32Parking aid (Park Assist)33Airbag switch for hazard warning lights
34
TCS, ESC button, tyre pressure monitor, pressure sensor for air con-
ditioning, reversing light switch, mirror with automatic dimming,
START-STOP button, controls for heating the rear seats, sensor for
air conditioning, parking brake, light switch35Headlight range control, AFS headlamps, diagnostic connector,
camera, radar36Headlight right37Headlight left38Towing hitch - contact in the socket39Central locking - passenger door and right rear door, rear view mir-
ror4012-volt power socket41Right side belt tensioner 240Do-it-yourself
Page 243 of 276

No.Consumer42Boot lid, headlight washers, windscreen washer system43Visor for gas discharge bulbs, interior lighting44Towing hitch - contact in the socket45Operating the seat adjustment46230-Volt power socket47Rear window wiper48Blind spot detection49Coil on starter relay, clutch pedal switch50Opening the boot lid51Heating of the rear seats52Cooling of the front seats53Relay for rear window heater
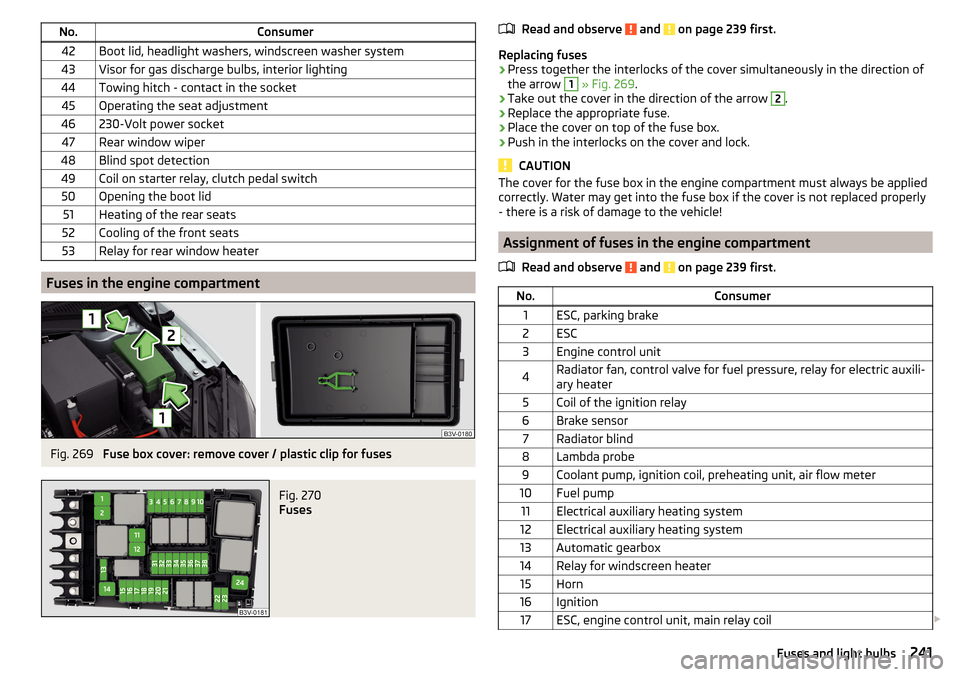
Fuses in the engine compartment
Fig. 269
Fuse box cover: remove cover / plastic clip for fuses
Fig. 270
Fuses
Read and observe and on page 239 first.
Replacing fuses
›
Press together the interlocks of the cover simultaneously in the direction of
the arrow
1
» Fig. 269 .
›
Take out the cover in the direction of the arrow
2
.
›
Replace the appropriate fuse.
›
Place the cover on top of the fuse box.
›
Push in the interlocks on the cover and lock.
CAUTION
The cover for the fuse box in the engine compartment must always be applied
correctly. Water may get into the fuse box if the cover is not replaced properly
- there is a risk of damage to the vehicle!
Assignment of fuses in the engine compartment
Read and observe
and on page 239 first.
No.Consumer1ESC, parking brake2ESC3Engine control unit4Radiator fan, control valve for fuel pressure, relay for electric auxili-
ary heater5Coil of the ignition relay6Brake sensor7Radiator blind8Lambda probe9Coolant pump, ignition coil, preheating unit, air flow meter10Fuel pump11Electrical auxiliary heating system12Electrical auxiliary heating system13Automatic gearbox14Relay for windscreen heater15Horn16Ignition17ESC, engine control unit, main relay coil 241Fuses and light bulbs
Page 248 of 276

Technical data
Technical data
Basic vehicle data
Introduction
This chapter contains information on the following subjects:
Vehicle characteristics
246
Operating weight
247
Payload
248
Measurement of fuel consumption and CO 2 emissions according to ECE
Regulations and EU Directives
248
Dimensions - Superb
249
Dimensions - Superb estate
250
Overhang angle
251
The details given in the vehicle's technical documentation always take prece-
dence over the details in the Owner's Manual.
The listed performance values were determined without performance-reduc- ing equipment, e.g. air conditioning system.
The values given have been determined in accordance with the rules and con-
ditions specified in statutory or technical regulations for determining opera-
tional and technical data for motor vehicles.
The values listed are for the basic model without any optional equipment.
Vehicle characteristicsFig. 277
Vehicle data sticker/type plate
Vehicle data sticker
The vehicle data sticker » Fig. 277 -
is located on the base of the luggage
compartment and is also fixed into the service schedule.
The vehicle data sticker contains the following data. Vehicle identification number (VIN)
Vehicle type
Gearbox code/paint number/interior equipment/engine output/engine code
Partial vehicle description
Approved tyre diameter in inches 1)
The approved tyres and rim sizes for your vehicle are listed in the vehicle's
technical documentation (the so called COC document) and this also states the
declaration of conformity.
Type plate
The type plate » Fig. 277 -
is located at the bottom of the B-pillar on the
right driver's side.
The type plate contains the following data. Manufacturer
Vehicle identification number (VIN)
Maximum permissible gross weight
Maximum permissible towed weight (towing vehicle and trailer)
1234567891)
Only valid for some countries.
246Technical data
Page 258 of 276

Index
A
abroad lead-free petrol
202
Abroad Headlights
72
ABS Operation
144
Warning light34
ACC163
Acceptance and recycling of used vehicles193
Accessories190
Adaptive chassis control Warning light
41
Adaptive Chassis Control171
Adaptive cruise control automatic stop-start
165
Information messages168
Operation164
Operation Overview165
Set/change the desired speed166
special driving conditions167
Start control166
Stop/resume control166
Adaptive Cruise Control163
Radar sensor143
Set the clearance level167
Adaptive headlight see xenon headlight
69
AdBlue204, 205
refilling204
replenish205
Warning light39
Adjust Auxiliary heating (auxiliary heating and ventila- tion)
124
AdjustingExterior mirrors80
Steering wheel9
Adjusting the seats8
Adjustment Front seats
81
Headlight beam67
Headrests87
Seats82
Advance warning / emergency braking Warning light
41
AHL see xenon headlight
69
Air-conditioning system Air outlet vents
122
Airbag14
Deactivating19
Deactivating the front passenger airbag19
Deployment15
Front airbag15
Head airbag18
Knee airbag17
Modifications and damage to the airbag system 192
Side airbag
17
Warning light35
Airbag system14
Air conditioning118
Air distribution control122
Climatronic120
Manual air conditioning119
Air distribution control122
Air outlet vents122
Alarm Enable/disable
57
Switch off57
Trailer189
Triggering57
Alcantara cleaning
199
Anodized partsRefer to vehicle maintenance196
Anti-lock braking system (ABS)144
Anti-theft alarm system Enable/disable
57
Trailer189
Anti-theft wheel bolts225
Armrest Front
85
rear98
Rear86
artificial leather199
Ashtray103
removal104
Assistant for blind spot monitoring177
Activation / deactivation178
Driving conditions and warnings178
Information messages179
Operation177
Assistant for emergencies179
Operating conditions180
Operation180
Assist systems142
Auto-check control41
Auto Hold146
Warning light37
Auto Hold function146
Warning light37
Automatic Distance Control Warning light
33
Warning lights40
Automatic driving lamp control69
Automatic gearbox Selector lever-emergency unlocking
237
Selector lever lock137
Starting-off and driving138
Tiptronic137
Using the selector lever136
Automatic gearbox modes136
Automatic load deactivation216
256Index
Page 266 of 276

Reversing cameraLens care197
Revolutions counter29
Roller blind Luggage compartment cover
109
Roof Load
118
Roof rack117
mounting points118
Roof load118
Rubber seals196
Running-in Brake linings
139
Engine139
Tyres139
S
SAFE See Safe securing system
55
SAFELOCK See Safe securing system
55
Safe securing system55
Safety8
Child safety20
Child safety seats20
Correct seated position8
Headrests87
i-Size25
ISOFIX23
TOP TETHER25
Save electrical energy139
Save fuel139
Screens see Sun screen in the rear doors
77
Seals Vehicle care
196
Seat belt height adjustment
12
Warning light33, 37
Seat belts11
Belt tensioners14
fastening and unfastening13
Seatbelts Inertia reels
13
Seat belts reversible
14
The physical principle of a head-on collision12
Seat electrical adjustment82
Seats Convenience features of passenger seat
82
Electrical adjustment82
Folding front passenger seat84
Front armrest85
Front seat adjustment81
Headrests87
Heated front seats89
Manual adjustment82
Memory Function of the electrically adjustable seat
83
Rear armrest86
Rear heated seats90
Rear seat backrests85
Storing in memory of remote control key83
Seats and head restraint81
see Automatic gearbox Manual gear shifting on the multifunctionsteering wheel
137
see Instrument cluster see Instrument cluster
28
Select drive mode Individual mode settings
173
Mode selection and Infotainment display173
Select driving mode Eco mode
172
Individual mode172
Mode comfort171
Sport mode172
Selector lever Refer to Selector lever
136
Selector lever lockWarning light37
Service191
Service interval display49
Warning light41
Setting Positions of the variable loading floor
115
Seat belt height12
Settings Interior mirror
79
Setting the Clock
31
Side airbag17
Side compartments in the luggage compart- ment
112
sliding/tilting roof Sunblind
66
Sliding/tilting roof Closing
64
Sliding / tilting roof Malfunction
65
Malfunction of the sun blind66
Sliding/tilting roof Opening and tilting
64
Operation64
SmartGate Connect by searching for a Wi-Fi network
50
introductory information50
Password/PIN code change51
Setting51
Wi-Fi Direct51
SmartLink see Infotainment
4
Snow chains221
Sockets 12 volt socket in luggage compartment
101
12 volt socket inside100
230 V101
264Index