radio SKODA SUPERB 2015 3.G / (B8/3V) User Guide
[x] Cancel search | Manufacturer: SKODA, Model Year: 2015, Model line: SUPERB, Model: SKODA SUPERB 2015 3.G / (B8/3V)Pages: 276, PDF Size: 42.14 MB
Page 216 of 276

WARNING■The use of open flames and light should be avoided.■Smoking and radio triggering activities should be avoided.■
Never use a damaged vehicle battery – risk of explosion!
■
Never charge a frozen or thawed vehicle battery – risk of explosion and
chemical burns!
■
Replace a frozen vehicle battery.
■
Never jump-start vehicle batteries with an electrolyte level that is too low
– risk of explosion and caustic burns.
CAUTION
■ Improper handling of the vehicle battery may cause damage.■Ensure that battery acid does not come into contact with the bodywork – risk
of damage to the paintwork.■
If the vehicle has not been driven for more than 3 to 4 weeks, the battery will
discharge. Prevent the battery from discharging by disconnecting the battery's
negative terminal
or continuously charging the battery with a very low
charging current.
■
Do not place the battery in direct daylight in order to protect the vehicle bat-
tery housing from the effects of ultra-violet light.
■
If the vehicle is frequently used for making short trips, the vehicle battery
will not have time to charge up sufficiently and may discharge.
Note
■ We recommend having all work on the vehicle battery carried out by a spe-
cialist garage.■
You should replace batteries older than 5 years.
Opening the cover
Fig. 233
Polyester cover of vehicle bat-
tery
Read and observe and on page 213 first.
The battery is located in the engine compartment. For some equipment var- iants, it is located underneath a polyester cover » Fig. 233.
›
Fold out the cover on the battery in the direction of the arrow.
The battery cover is installed in reverse order.
Checking the battery electrolyte level
Fig. 234
Vehicle battery: Electrolyte level
indicator
Read and observe and on page 213 first.
On vehicles with a vehicle battery fitted with a colour indicator, the electrolyte
level can be determined by looking at the change in colour of this display.
Air bubbles can influence the colour of the indicator. For this reason carefully
knock on the indicator before carrying out the check.
Check
Black colour - electrolyte level is correct.
Colourless or light yellow colour - electrolyte level too low, the battery must be
replaced.
For technical reasons, on vehicles with the description “AGM”, the electrolyte
level cannot be checked.
Vehicles with the START-STOP system are fitted with a battery control unit for
checking the energy level for the recurring engine starts.
We recommend that you have the acid level checked regularly by a specialist
garage, especially in the following cases. ▶ High external temperatures.
▶ Longer day trips.
▶ After each charge.
214General Maintenance
Page 237 of 276

Synchronising the remote controlRead and observe
on page 234 first.
If the vehicle does not unlock when pressing the remote control, the key may
not be synchronised. This can occur when the buttons on the remote control
key are actuated a number of times outside of the operative range of the
equipment or the battery in the remote control key has been replaced.
Synchronise the key as follows.
›
Press any button on the remote control key.
›
Unlock the door with the key in the lock cylinder within 1 minute of pressing the button.
replace battery in the remote control the auxiliary heating
(auxiliary heating)
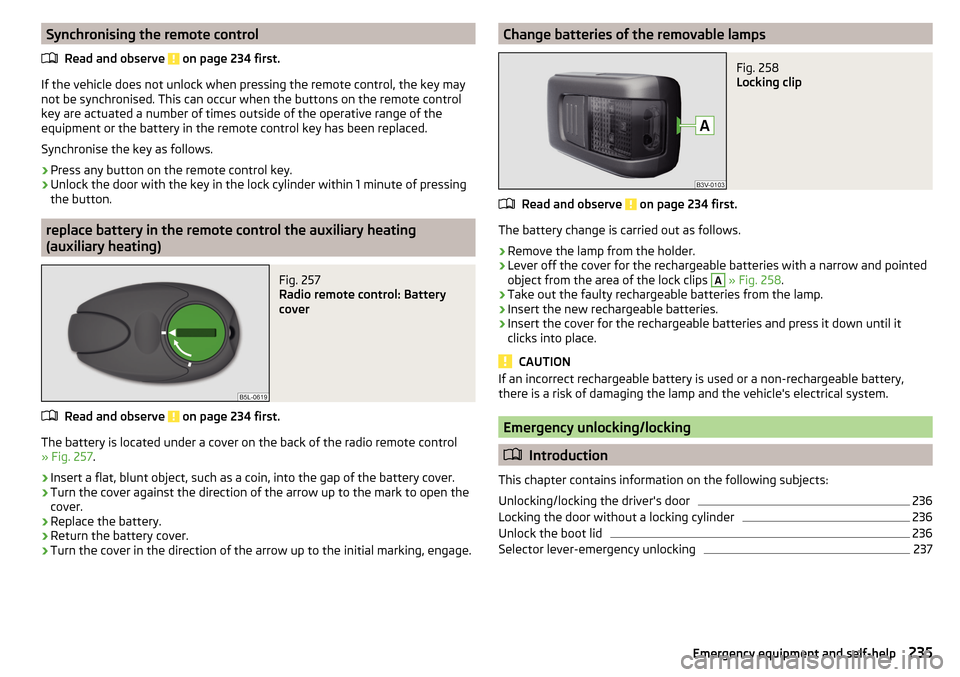
Fig. 257
Radio remote control: Battery
cover
Read and observe on page 234 first.
The battery is located under a cover on the back of the radio remote control
» Fig. 257 .
›
Insert a flat, blunt object, such as a coin, into the gap of the battery cover.
›
Turn the cover against the direction of the arrow up to the mark to open the
cover.
›
Replace the battery.
›
Return the battery cover.
›
Turn the cover in the direction of the arrow up to the initial marking, engage.
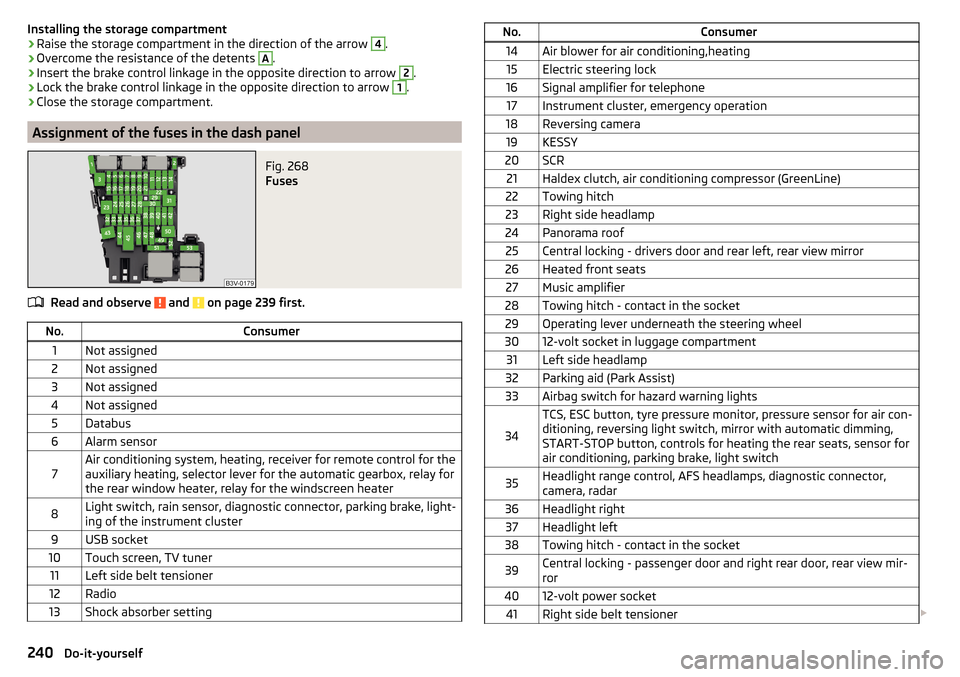
Change batteries of the removable lampsFig. 258
Locking clip
Read and observe on page 234 first.
The battery change is carried out as follows.
›
Remove the lamp from the holder.
›
Lever off the cover for the rechargeable batteries with a narrow and pointed
object from the area of the lock clips
A
» Fig. 258 .
›
Take out the faulty rechargeable batteries from the lamp.
›
Insert the new rechargeable batteries.
›
Insert the cover for the rechargeable batteries and press it down until it
clicks into place.
CAUTION
If an incorrect rechargeable battery is used or a non-rechargeable battery,
there is a risk of damaging the lamp and the vehicle's electrical system.
Emergency unlocking/locking
Introduction
This chapter contains information on the following subjects:
Unlocking/locking the driver's door
236
Locking the door without a locking cylinder
236
Unlock the boot lid
236
Selector lever-emergency unlocking
237235Emergency equipment and self-help
Page 242 of 276

Installing the storage compartment›Raise the storage compartment in the direction of the arrow 4.›
Overcome the resistance of the detents
A
.
›
Insert the brake control linkage in the opposite direction to arrow
2
.
›
Lock the brake control linkage in the opposite direction to arrow
1
.
›
Close the storage compartment.
Assignment of the fuses in the dash panel
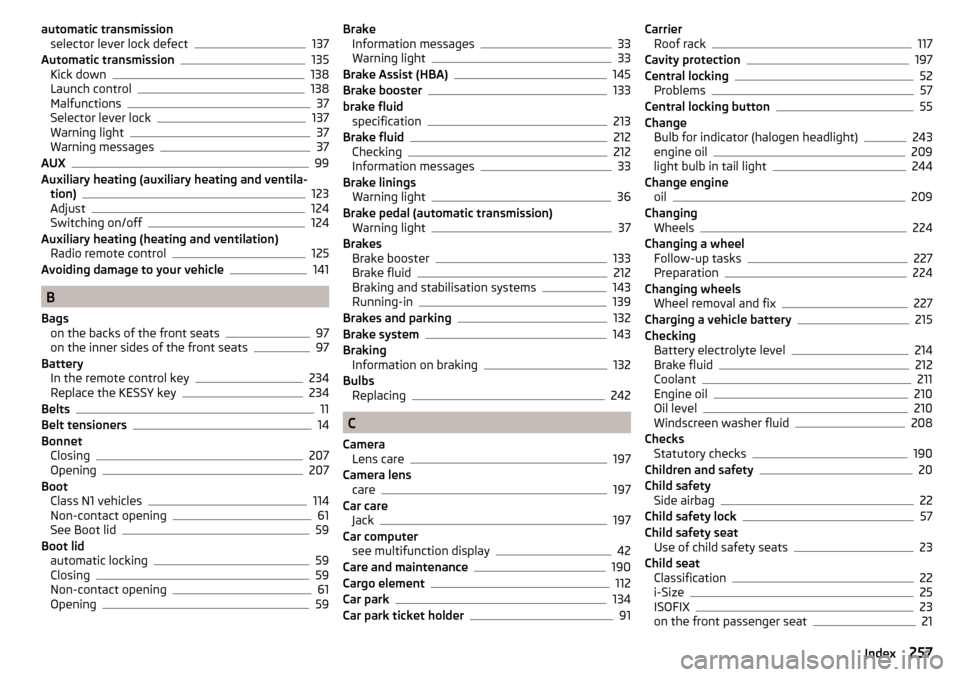
Fig. 268
Fuses
Read and observe and on page 239 first.
No.Consumer1Not assigned2Not assigned3Not assigned4Not assigned5Databus6Alarm sensor7Air conditioning system, heating, receiver for remote control for the
auxiliary heating, selector lever for the automatic gearbox, relay for
the rear window heater, relay for the windscreen heater8Light switch, rain sensor, diagnostic connector, parking brake, light-
ing of the instrument cluster9USB socket10Touch screen, TV tuner11Left side belt tensioner12Radio13Shock absorber settingNo.Consumer14Air blower for air conditioning,heating15Electric steering lock16Signal amplifier for telephone17Instrument cluster, emergency operation18Reversing camera19KESSY20SCR21Haldex clutch, air conditioning compressor (GreenLine)22Towing hitch23Right side headlamp24Panorama roof25Central locking - drivers door and rear left, rear view mirror26Heated front seats27Music amplifier28Towing hitch - contact in the socket29Operating lever underneath the steering wheel3012-volt socket in luggage compartment31Left side headlamp32Parking aid (Park Assist)33Airbag switch for hazard warning lights
34
TCS, ESC button, tyre pressure monitor, pressure sensor for air con-
ditioning, reversing light switch, mirror with automatic dimming,
START-STOP button, controls for heating the rear seats, sensor for
air conditioning, parking brake, light switch35Headlight range control, AFS headlamps, diagnostic connector,
camera, radar36Headlight right37Headlight left38Towing hitch - contact in the socket39Central locking - passenger door and right rear door, rear view mir-
ror4012-volt power socket41Right side belt tensioner 240Do-it-yourself
Page 259 of 276

automatic transmissionselector lever lock defect137
Automatic transmission135
Kick down138
Launch control138
Malfunctions37
Selector lever lock137
Warning light37
Warning messages37
AUX99
Auxiliary heating (auxiliary heating and ventila- tion)
123
Adjust124
Switching on/off124
Auxiliary heating (heating and ventilation) Radio remote control
125
Avoiding damage to your vehicle141
B
Bags on the backs of the front seats
97
on the inner sides of the front seats97
Battery In the remote control key
234
Replace the KESSY key234
Belts11
Belt tensioners14
Bonnet Closing
207
Opening207
Boot Class N1 vehicles
114
Non-contact opening61
See Boot lid59
Boot lid automatic locking
59
Closing59
Non-contact opening61
Opening59
Brake Information messages33
Warning light33
Brake Assist (HBA)145
Brake booster133
brake fluid specification
213
Brake fluid212
Checking212
Information messages33
Brake linings Warning light
36
Brake pedal (automatic transmission) Warning light
37
Brakes Brake booster
133
Brake fluid212
Braking and stabilisation systems143
Running-in139
Brakes and parking132
Brake system143
Braking Information on braking
132
Bulbs Replacing
242
C
Camera Lens care
197
Camera lens care
197
Car care Jack
197
Car computer see multifunction display
42
Care and maintenance190
Cargo element112
Car park134
Car park ticket holder91
Carrier Roof rack117
Cavity protection197
Central locking52
Problems57
Central locking button55
Change Bulb for indicator (halogen headlight)
243
engine oil209
light bulb in tail light244
Change engine oil
209
Changing Wheels
224
Changing a wheel Follow-up tasks
227
Preparation224
Changing wheels Wheel removal and fix
227
Charging a vehicle battery215
Checking Battery electrolyte level
214
Brake fluid212
Coolant211
Engine oil210
Oil level210
Windscreen washer fluid208
Checks Statutory checks
190
Children and safety20
Child safety Side airbag
22
Child safety lock57
Child safety seat Use of child safety seats
23
Child seat Classification
22
i-Size25
ISOFIX23
on the front passenger seat21
257Index
Page 265 of 276

Parking assistanceActivation / deactivation149
Display in the Infotainment display148
Parking brake133
Warning light32
Parking brake - Auto Hold function Warning light
37
Parking lights67
ParkPilot147
Park the vehicle see Parking
134
Part replacement190
Passive safety Before setting off
8
Driving safety8
Passive Safety8
Pedals135
Footmats135
Petrol see fuel
202
Phone box92
Plastic parts196
Polishing vehicle paint work see vehicle care
195
Power limit sliding/tilting roof
65
Power steering Warning light
33
Practical equipment Reflective vest
223
Practical features 12 volt socket in luggage compartment
101
12 volt socket inside100
Pockets on the backs of the front seats97
Pockets on the inner sides of the front seats97
Seat backrest with long cargo channel86
Storage compartment for umbrella97
Storage compartment under passenger seat96
Waste container93
Proactive passenger protection173
Warning light35
ProActive passenger protection Function
174
Protective films195
Puncture repair kit228
R
Radiator blind
140
Radiator fan208
Radio see Infotainment
4
Radio remote control Auxiliary heating (heating and ventilation)
125
Raising the vehicle226
Rear Interior light
74
Rear-view mirror Exterior mirrors
80
Fold in passenger mirror80
Synchronous adjustment of the rear-view mir- ror
80
Rear fog light70
Warning light34
Rear mirror79
Rear Traffic Alert149
Activation / deactivation151
Information messages151
Operation150
Rear View Camera151
Activation / deactivation152
Function keys153
Guidelines and roadway153
Mode - driving up to a trailer / distance moni- toring
155
Mode - monitor the area behind the vehicle155
Mode - parallel parking154
Mode - traverse parking154
Operation152
Rear view mirror Interior mirror79
Rear window - heater75
Refuelling201
Fuel201
Remote control Locking
53
Replacing the battery234
Synchronisation process235
Unlocking53
Remote control key Replacing the battery
234
Removable lamp Change the lamp battery
235
Removable light Removing light
114
Removable through-loading bag98
Repairs and technical alterations190
Replace Bulb for dipped beam (Halogen-headlamp)
243
Bulb for main beam (Halogen-headlamp)243
the battery in the auxiliary heating (auxiliary heating) in the remote control
235
Replacing Bulb for the fog light
244
Bulb in rear light245
Bulbs242
Fuses238
Fuses – engine compartment241
Fuses – LHD239
Fuses – RHD239
Rear window wiper blade238
Vehicle battery215
windscreen wiper blades237
Replenishing Coolant
212
Engine oil210
Windscreen washer fluid208
Reversible seat belts14
263Index