maintenance SKODA SUPERB 2015 3.G / (B8/3V) Owner's Guide
[x] Cancel search | Manufacturer: SKODA, Model Year: 2015, Model line: SUPERB, Model: SKODA SUPERB 2015 3.G / (B8/3V)Pages: 276, PDF Size: 42.14 MB
Page 214 of 276
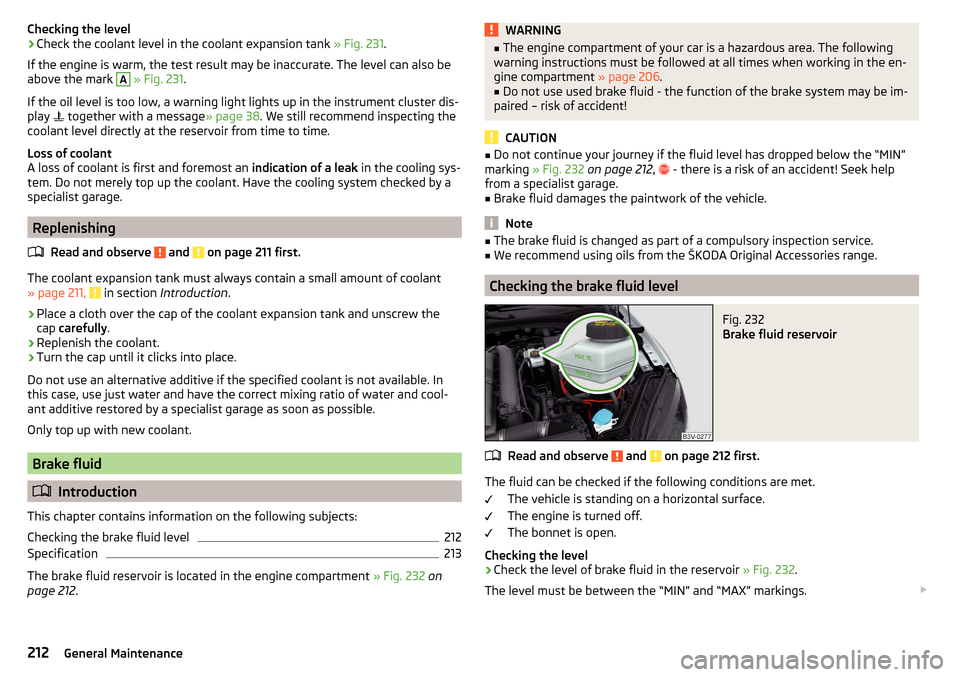
Checking the level›Check the coolant level in the coolant expansion tank » Fig. 231.
If the engine is warm, the test result may be inaccurate. The level can also be
above the mark A
» Fig. 231 .
If the oil level is too low, a warning light lights up in the instrument cluster dis-
play
together with a message » page 38. We still recommend inspecting the
coolant level directly at the reservoir from time to time.
Loss of coolant
A loss of coolant is first and foremost an indication of a leak in the cooling sys-
tem. Do not merely top up the coolant. Have the cooling system checked by a
specialist garage.
Replenishing
Read and observe
and on page 211 first.
The coolant expansion tank must always contain a small amount of coolant» page 211, in section Introduction .
›
Place a cloth over the cap of the coolant expansion tank and unscrew the
cap carefully .
›
Replenish the coolant.
›
Turn the cap until it clicks into place.
Do not use an alternative additive if the specified coolant is not available. In
this case, use just water and have the correct mixing ratio of water and cool-
ant additive restored by a specialist garage as soon as possible.
Only top up with new coolant.
Brake fluid
Introduction
This chapter contains information on the following subjects:
Checking the brake fluid level
212
Specification
213
The brake fluid reservoir is located in the engine compartment » Fig. 232 on
page 212 .
WARNING■
The engine compartment of your car is a hazardous area. The following
warning instructions must be followed at all times when working in the en-
gine compartment » page 206.■
Do not use used brake fluid - the function of the brake system may be im-
paired – risk of accident!
CAUTION
■ Do not continue your journey if the fluid level has dropped below the “MIN”
marking » Fig. 232 on page 212 , - there is a risk of an accident! Seek help
from a specialist garage.■
Brake fluid damages the paintwork of the vehicle.
Note
■ The brake fluid is changed as part of a compulsory inspection service.■We recommend using oils from the ŠKODA Original Accessories range.
Checking the brake fluid level
Fig. 232
Brake fluid reservoir
Read and observe and on page 212 first.
The fluid can be checked if the following conditions are met.
The vehicle is standing on a horizontal surface.
The engine is turned off.
The bonnet is open.
Checking the level
›
Check the level of brake fluid in the reservoir » Fig. 232.
The level must be between the “MIN” and “MAX” markings.
212General Maintenance
Page 216 of 276

WARNING■The use of open flames and light should be avoided.■Smoking and radio triggering activities should be avoided.■
Never use a damaged vehicle battery – risk of explosion!
■
Never charge a frozen or thawed vehicle battery – risk of explosion and
chemical burns!
■
Replace a frozen vehicle battery.
■
Never jump-start vehicle batteries with an electrolyte level that is too low
– risk of explosion and caustic burns.
CAUTION
■ Improper handling of the vehicle battery may cause damage.■Ensure that battery acid does not come into contact with the bodywork – risk
of damage to the paintwork.■
If the vehicle has not been driven for more than 3 to 4 weeks, the battery will
discharge. Prevent the battery from discharging by disconnecting the battery's
negative terminal
or continuously charging the battery with a very low
charging current.
■
Do not place the battery in direct daylight in order to protect the vehicle bat-
tery housing from the effects of ultra-violet light.
■
If the vehicle is frequently used for making short trips, the vehicle battery
will not have time to charge up sufficiently and may discharge.
Note
■ We recommend having all work on the vehicle battery carried out by a spe-
cialist garage.■
You should replace batteries older than 5 years.
Opening the cover
Fig. 233
Polyester cover of vehicle bat-
tery
Read and observe and on page 213 first.
The battery is located in the engine compartment. For some equipment var- iants, it is located underneath a polyester cover » Fig. 233.
›
Fold out the cover on the battery in the direction of the arrow.
The battery cover is installed in reverse order.
Checking the battery electrolyte level
Fig. 234
Vehicle battery: Electrolyte level
indicator
Read and observe and on page 213 first.
On vehicles with a vehicle battery fitted with a colour indicator, the electrolyte
level can be determined by looking at the change in colour of this display.
Air bubbles can influence the colour of the indicator. For this reason carefully
knock on the indicator before carrying out the check.
Check
Black colour - electrolyte level is correct.
Colourless or light yellow colour - electrolyte level too low, the battery must be
replaced.
For technical reasons, on vehicles with the description “AGM”, the electrolyte
level cannot be checked.
Vehicles with the START-STOP system are fitted with a battery control unit for
checking the energy level for the recurring engine starts.
We recommend that you have the acid level checked regularly by a specialist
garage, especially in the following cases. ▶ High external temperatures.
▶ Longer day trips.
▶ After each charge.
214General Maintenance
Page 218 of 276
›First, disconnect the negative terminal
first, then the positive terminal
of the battery.
Connecting›
First, connect the positive
first, then the negative
battery terminal.
After disconnecting and re-connecting the vehicle battery, the following func-
tions or devices are partially or completely inoperative.
Function / deviceOperating measureElectric window lifters» page 64Panorama sliding/tilting roof» page 65Sun screen» page 66Time setting» page 31
CAUTION
■ Disconnect the vehicle battery only with the ignition turned off - there is a
risk of damaging the electrical system of the vehicle.■
Under no circumstances must the battery cables be connected incorrectly –
risk of a cable fire.
Note
■ After disconnecting and re-connecting the vehicle battery, we recommend
having the vehicle checked by a specialist to ensure that the full functionality
of all electrical systems is guaranteed.■
The data of the multi-function display will be reset.
Automatic load deactivation
Read and observe
and on page 213 first.
The vehicle's electrical system automatically prevents the battery from dis-
charging when the battery is being heavily used. This manifests itself by the
following. ▶ The idling speed is raised to allow the generator to deliver more electricity to
the electrical system.
▶ Where necessary, large convenience consumers such as seat heaters and
rear window heaters have their power limited or are shut off completely in
the event of an emergency.
CAUTION■ Despite such intervention by the vehicle electric system management, the
vehicle battery may be drained. For example, when the ignition is switched on
a long time with the engine turned off or the side or parking lights are turned
on during longer parking.■
Consumers that are supplied via a 12-V power socket can cause the vehicle
battery to discharge when the ignition is switched off.
Note
Driving comfort is not impaired by consumers being deactivated. The driver is
often not aware of it having taken place.216General Maintenance
Page 220 of 276
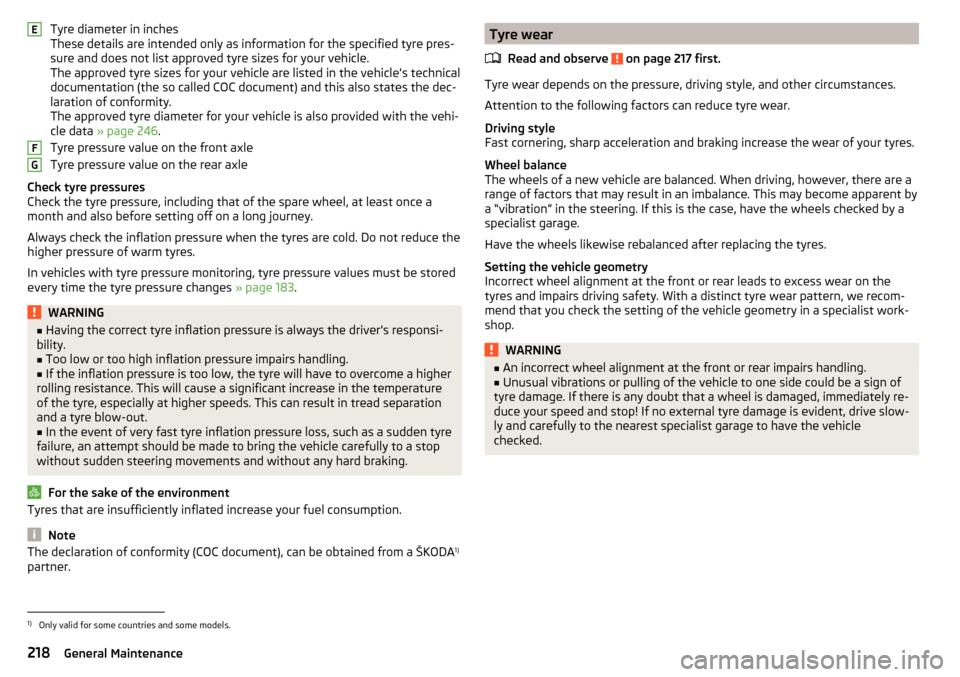
Tyre diameter in inches
These details are intended only as information for the specified tyre pres-
sure and does not list approved tyre sizes for your vehicle.
The approved tyre sizes for your vehicle are listed in the vehicle's technical
documentation (the so called COC document) and this also states the dec-
laration of conformity.
The approved tyre diameter for your vehicle is also provided with the vehi-
cle data » page 246 .
Tyre pressure value on the front axle
Tyre pressure value on the rear axle
Check tyre pressures
Check the tyre pressure, including that of the spare wheel, at least once a
month and also before setting off on a long journey.
Always check the inflation pressure when the tyres are cold. Do not reduce the
higher pressure of warm tyres.
In vehicles with tyre pressure monitoring, tyre pressure values must be stored
every time the tyre pressure changes » page 183.WARNING■
Having the correct tyre inflation pressure is always the driver's responsi-
bility.■
Too low or too high inflation pressure impairs handling.
■
If the inflation pressure is too low, the tyre will have to overcome a higher
rolling resistance. This will cause a significant increase in the temperature
of the tyre, especially at higher speeds. This can result in tread separation
and a tyre blow-out.
■
In the event of very fast tyre inflation pressure loss, such as a sudden tyre
failure, an attempt should be made to bring the vehicle carefully to a stop
without sudden steering movements and without any hard braking.
For the sake of the environment
Tyres that are insufficiently inflated increase your fuel consumption.
Note
The declaration of conformity (COC document), can be obtained from a ŠKODA 1)
partner.EFGTyre wear
Read and observe
on page 217 first.
Tyre wear depends on the pressure, driving style, and other circumstances.
Attention to the following factors can reduce tyre wear.
Driving style
Fast cornering, sharp acceleration and braking increase the wear of your tyres.
Wheel balance
The wheels of a new vehicle are balanced. When driving, however, there are a
range of factors that may result in an imbalance. This may become apparent by
a “vibration” in the steering. If this is the case, have the wheels checked by a
specialist garage.
Have the wheels likewise rebalanced after replacing the tyres.
Setting the vehicle geometry
Incorrect wheel alignment at the front or rear leads to excess wear on the
tyres and impairs driving safety. With a distinct tyre wear pattern, we recom-
mend that you check the setting of the vehicle geometry in a specialist work-
shop.
WARNING■ An incorrect wheel alignment at the front or rear impairs handling.■Unusual vibrations or pulling of the vehicle to one side could be a sign of
tyre damage. If there is any doubt that a wheel is damaged, immediately re-
duce your speed and stop! If no external tyre damage is evident, drive slow-
ly and carefully to the nearest specialist garage to have the vehicle
checked.1)
Only valid for some countries and some models.
218General Maintenance
Page 222 of 276
Please note the following if you intend to use the temporary spare wheel.▶ The warning label must not be covered after installing the wheel.
▶ Be particularly observant when driving.
▶ The emergency spare is inflated to the maximum inflation pressure for the
vehicle » page 217 .
▶ The tyre inflation pressure of the spare wheel R 18 is 4.2 bar.
▶ Only use this temporary spare wheel to reach the nearest specialist garage,
since it is not intended for permanent use.
If you need to use a spare wheel, make sure to fit a standard wheel of the ap-
propriate dimensions and design as soon as possible.
In vehicles with tyre pressure monitoring, save tyre pressure values » page 183.WARNING■
Never drive with more than one spare wheel mounted!■Only use the spare wheel while absolutely necessary.■
Avoid accelerating at full throttle, sharp braking and fast cornering.
■
The snow chains cannot be used on the spare wheel.
■
If the dimensions or design of the temporary spare wheel differ from the
tyres fitted, never drive faster than 80 km/h (or 50 mph).
■
Never use the emergency spare wheel if it is damaged.
■
Observe instructions on the warning sign of the emergency wheel.
Tyre label
Read and observe
on page 217 first.
Only use radial tyres of the same type, size (rolling circumference) and tread
pattern on one axle on all four wheels.
When mounting new tires the tires have to be replaced axle by axle.
Explanation of tyre markings
For example 215/60 R 16 95 V means:
215Tyre width in mm60Height/width ratio in %RCode letter for the type of tyre – Radial16Diameter of wheel in inches95load indexVSpeed symbolThe date of manufacture is stated on the tyre wall (possibly on the inside).
For example DOT ... 10 15... means, for example, that the tyre was manufac-
tured in the 10th week of 2015.
Load index
The load index indicates the maximum permissible load for each individual
tyre.load index919293949596979899Load
(In kg)615630650670690710730750775
Speed symbol
The maximum speed symbol indicates the maximum permissible vehicle speed
with fitted tyres in each category.
speed
symbolMTUHVWYMaximum speed
(in km/h)130190200210240270300WARNING■ Never exceed the maximum permissible load bearing capacity of moun-
ted tyres.■
Never exceed the maximum permissible speed for the mounted tyres.
Winter operation
Introduction
This chapter contains information on the following subjects:
Winter tyres
221
Snow chains
221
Do not use alloy rims with bevelled or polished surfaces during the winter. The
rim surface does not have sufficient corrosion protection and could be perma-
nently damaged (e.g. through grit).
220General Maintenance
Page 258 of 276
Index
A
abroad lead-free petrol
202
Abroad Headlights
72
ABS Operation
144
Warning light34
ACC163
Acceptance and recycling of used vehicles193
Accessories190
Adaptive chassis control Warning light
41
Adaptive Chassis Control171
Adaptive cruise control automatic stop-start
165
Information messages168
Operation164
Operation Overview165
Set/change the desired speed166
special driving conditions167
Start control166
Stop/resume control166
Adaptive Cruise Control163
Radar sensor143
Set the clearance level167
Adaptive headlight see xenon headlight
69
AdBlue204, 205
refilling204
replenish205
Warning light39
Adjust Auxiliary heating (auxiliary heating and ventila- tion)
124
AdjustingExterior mirrors80
Steering wheel9
Adjusting the seats8
Adjustment Front seats
81
Headlight beam67
Headrests87
Seats82
Advance warning / emergency braking Warning light
41
AHL see xenon headlight
69
Air-conditioning system Air outlet vents
122
Airbag14
Deactivating19
Deactivating the front passenger airbag19
Deployment15
Front airbag15
Head airbag18
Knee airbag17
Modifications and damage to the airbag system 192
Side airbag
17
Warning light35
Airbag system14
Air conditioning118
Air distribution control122
Climatronic120
Manual air conditioning119
Air distribution control122
Air outlet vents122
Alarm Enable/disable
57
Switch off57
Trailer189
Triggering57
Alcantara cleaning
199
Anodized partsRefer to vehicle maintenance196
Anti-lock braking system (ABS)144
Anti-theft alarm system Enable/disable
57
Trailer189
Anti-theft wheel bolts225
Armrest Front
85
rear98
Rear86
artificial leather199
Ashtray103
removal104
Assistant for blind spot monitoring177
Activation / deactivation178
Driving conditions and warnings178
Information messages179
Operation177
Assistant for emergencies179
Operating conditions180
Operation180
Assist systems142
Auto-check control41
Auto Hold146
Warning light37
Auto Hold function146
Warning light37
Automatic Distance Control Warning light
33
Warning lights40
Automatic driving lamp control69
Automatic gearbox Selector lever-emergency unlocking
237
Selector lever lock137
Starting-off and driving138
Tiptronic137
Using the selector lever136
Automatic gearbox modes136
Automatic load deactivation216
256Index
Page 259 of 276
automatic transmissionselector lever lock defect137
Automatic transmission135
Kick down138
Launch control138
Malfunctions37
Selector lever lock137
Warning light37
Warning messages37
AUX99
Auxiliary heating (auxiliary heating and ventila- tion)
123
Adjust124
Switching on/off124
Auxiliary heating (heating and ventilation) Radio remote control
125
Avoiding damage to your vehicle141
B
Bags on the backs of the front seats
97
on the inner sides of the front seats97
Battery In the remote control key
234
Replace the KESSY key234
Belts11
Belt tensioners14
Bonnet Closing
207
Opening207
Boot Class N1 vehicles
114
Non-contact opening61
See Boot lid59
Boot lid automatic locking
59
Closing59
Non-contact opening61
Opening59
Brake Information messages33
Warning light33
Brake Assist (HBA)145
Brake booster133
brake fluid specification
213
Brake fluid212
Checking212
Information messages33
Brake linings Warning light
36
Brake pedal (automatic transmission) Warning light
37
Brakes Brake booster
133
Brake fluid212
Braking and stabilisation systems143
Running-in139
Brakes and parking132
Brake system143
Braking Information on braking
132
Bulbs Replacing
242
C
Camera Lens care
197
Camera lens care
197
Car care Jack
197
Car computer see multifunction display
42
Care and maintenance190
Cargo element112
Car park134
Car park ticket holder91
Carrier Roof rack117
Cavity protection197
Central locking52
Problems57
Central locking button55
Change Bulb for indicator (halogen headlight)
243
engine oil209
light bulb in tail light244
Change engine oil
209
Changing Wheels
224
Changing a wheel Follow-up tasks
227
Preparation224
Changing wheels Wheel removal and fix
227
Charging a vehicle battery215
Checking Battery electrolyte level
214
Brake fluid212
Coolant211
Engine oil210
Oil level210
Windscreen washer fluid208
Checks Statutory checks
190
Children and safety20
Child safety Side airbag
22
Child safety lock57
Child safety seat Use of child safety seats
23
Child seat Classification
22
i-Size25
ISOFIX23
on the front passenger seat21
257Index
Page 260 of 276

TOP TETHER25
Use of child safety seats i-Size25
Use of ISOFIX child seats24
Chrome parts Refer to vehicle maintenance
196
Cigarette lighter102
Clean Anodized parts
196
Chrome parts196
Cleaning Alcantara
199
and maintaining belts200
artificial leather199
headlight glasses197
materials199
natural leather199
plastic parts196
seats covers of the electrically heated seats200
wheels197
Cleaning safety belt
200
Cleaning seat covers
200
Cleaning the interior artificial leather
199
Seat covers200
Cleaning the vehicle exterior Camera lens
197
Cavity protection197
Decorative films195
Door locking cylinder197
Headlight glasses197
Protective films195
Under-body protection198
wheels197
Windows and external mirrors196
Cleaning vehicle193
Cleaning vehicle exterior194
Anodized parts196
Chrome parts196
Plastic parts196
Rubber seals196
Vehicle paint work195
Wiper blades198
Clean interior Safety belt
200
Climatronic air distribution control
122
Automatic operation121
Operating elements120
Clothes hook96
Cockpit 12 volt power outlet
100
Ashtray103
Cigarette lighter102
General view27
Lighting74
storage compartments90
useful equipment90
Comfort operation Window
63
COMING HOME71
compartments90
Component protection192
Components of the puncture repair kits228
Computer see multifunction display
42
Convenience operation sliding / tilting roof
65
convenience turn signal68
Coolant210
Checking211
Information messages38
Replenishing212
Temperature gauge30
Warning light38
CORNER see Headlights with CORNER function
71
Correct routing of seat belt
12
Correct seated position8
Front passenger10
Rear seats10
Correct seat position Driver
9
Counter for distance driven31
Crew Protect Assist173
cruise control operation
160
operation description161
Cruise Control System160
Cup holders92
D
DAY LIGHT see Daylight running lights
68
Daylight running lights68
DCC171
Warning light41
De-icing windows
196
De-icing the windscreen and rear window75
Deactivating an airbag19
Decorative films195
Delayed locking of the boot lid see boot lid
59
Diesel refer to Fuel
203
Diesel fuel Operation in winter
203
Diesel particulate filter39
information messages39
Digital Clock31
Dipstick210
Disconnecting and reconnecting vehicle battery
215
Display29
Compass points48
Coolant temperature30
258Index
Page 263 of 276
Interior lightFront74
Interior lighting Ambient lighting
75
Interior monitor58
iPad holder behind the head restraint
104
Handling104
in the rear armrest105
ISOFIX23
J
Jack
223
- fit226
Maintenance197
Jump-starting230
K
KESSY Boot lid
61
Locking54
Unlocking54
Virtual pedal61
Key Start the engine
127
Stopping the engine127
Switch off the ignition127
Switch on the ignition127
Key CAR see Infotainment
4
key for KESSY Remove emergency key
54
Key for KESSY Replacing the battery
234
Knee airbag17
L
Lamp failure Warning light
39
LampsWarning light39
Lane Assist see Lane Departure Warning
174
Warning light36
Lane Departure Warning174
Activation / deactivation176
Information messages176
Operation175
Leather Natural leather care
199
LEAVING HOME71
Lever Main beam
68
Turn signal68
Levers Windscreen wipers
78
Light Cockpit
74
COMING HOME / LEAVING HOME71
Fog Lights70
Headlamp Assistant72
Headlights with CORNER function71
Rear fog light70
Replacing bulbs242
travel mode70
Xenon headlight69
Light Assist72
lighting entry space
75
Lighting Luggage compartment
105
Lights67
Automatic driving lamp control69
Daylight running68
Hazard warning light system71
Headlight flasher68
Headlight range adjustment67
Low beam67
Main beam68
Parking lights67, 72
Switching on and off67
Turn signal68
Warning lights31
Load248
Locking Individual settings
56
KESSY54
Remote control53
Locking and unlocking the vehicle from the in- side
55
Locking the door without a locking cylinder Emergency
236
Long cargo channel86
Low beam67
Low temperature warning light Warning light
40
Low tyre pressure warning refer to the tyre pressure monitoring
183
Luggage compartment105
Cover108
Fastening elements106
Fix floor covering108
Fixing nets107
floor covering on both sides108
foldable hook107
Lighting105
Luggage net108
Net partition116
removable light114
Roll-up cover109
Side pockets112
Storage compartments under the floor cover- ing
113
tray with cargo element112
unlock manually236
Unlock the boot lid236
Variable loading floor115
261Index
Page 264 of 276
Luggage compartment cover108
Roll-up cover109
Luggage compartment lid58
Luggage net108
Luggage storage Multi-function pocket
111
M
Main beam
68
Warning light37
Maintenance see vehicle care
195
Manual air conditioning Air distribution control
122
Controls119
Manual gear changing see gear changing
135
Manually adjusting seats82
MAXI DOT display45
Main menu45
Menu item assist systems48
Menu item Audio47
Menu item navigation47
Menu item telephone47
Operation46
MAXI DOT see MAXI DOT display
45
Maximum permissible weights
246
MCB145
Media AUX
99
see Infotainment4
USB99
Memory44
Memory Function for the seat83
Mirror Exterior mirrors80
Interior mirror79
Make-up76
MODE button see driving mode selection
171
Modifications190
Modifications and technical alterations Airbags
192
Service191
Spoiler192
Multi-function display operation
43
Multi-function pocket111
Multi collision brake (MCB)145
Multifunction display Functions
42
Information43
Memory44
Multifunction steering wheel Operation
46
Multimedia AUX
99
USB99
N
N1
114
Nameplate246
Navigation see Infotainment
4
Net partition116
behind the front seats116
behind the rarer seats116
Removing and refitting the housing117
Nets107
Non-contact boot lid opening61
Notes for driving with repaired tyres230
Notes on using wheels217
O
Oil See Engine oil
210
Warning messages38
Oil pressure Warning messages
38
On-board computer see multifunction display
42
Operating weight247
Operation in winter Diesel fuel
203
Vehicle battery214
Original accessories191
Overhang angle251
Overview Engine compartment
208
Warning lights31
P
Park assist Departing from a parallel parking space
159
Information messages159
Park Assist155
Automatic brake assist159
Operation156
Park forward158
Parking space search157
Reverse parking157
Switch to park mode157
Parking134
Park Assist155
Parking aid147
Rear Traffic Alert149
Rear View Camera151
Parking aid147
Automatic system activation when moving for- ward
149
Function147
262Index