stop start SKODA SUPERB 2015 3.G / (B8/3V) Owner's Guide
[x] Cancel search | Manufacturer: SKODA, Model Year: 2015, Model line: SUPERB, Model: SKODA SUPERB 2015 3.G / (B8/3V)Pages: 276, PDF Size: 42.14 MB
Page 157 of 276
›Stop the vehicle and steer opposite until the yellow lines 6 the red line 8fade into each other (required roadway alignment). Hold the steering wheel
in this position.
Orientation lines are displayed » Fig. 187 on page 153 in the display.›
Carefully move backwards.
›
Stop the vehicle when
appears the display, or at a safe distance from the
obstacle situated behind the vehicle.
Note
The guidance in the parking space is cancelled due to the system when the
steering wheel is set for a period of time against the required road direction.
The parking is to be started again.
Mode - driving up to a trailer / distance monitoring
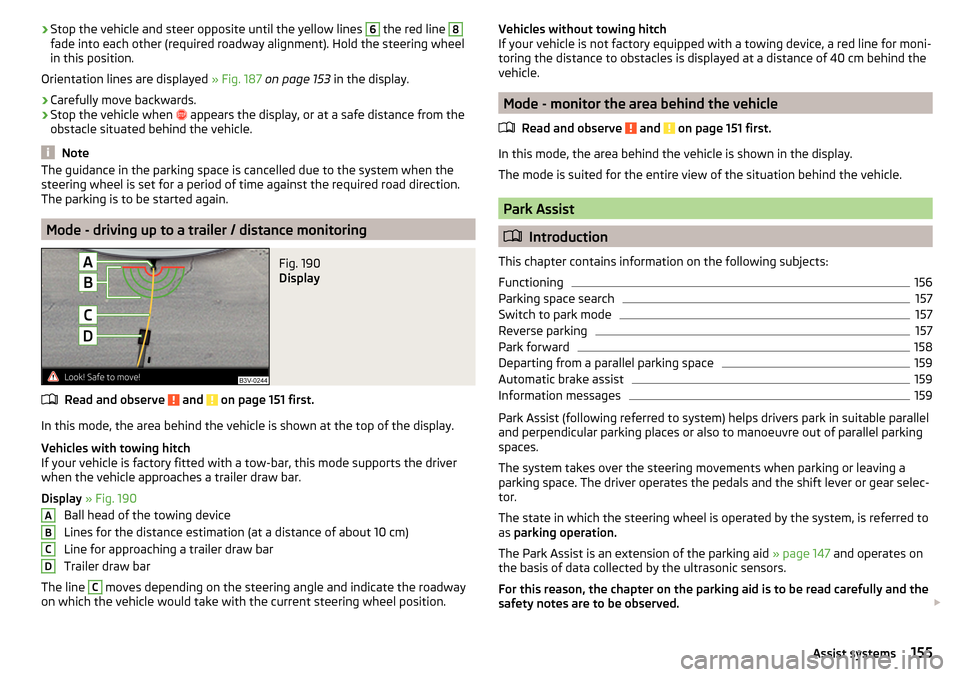
Fig. 190
Display
Read and observe and on page 151 first.
In this mode, the area behind the vehicle is shown at the top of the display.
Vehicles with towing hitch
If your vehicle is factory fitted with a tow-bar, this mode supports the driver
when the vehicle approaches a trailer draw bar.
Display » Fig. 190
Ball head of the towing device
Lines for the distance estimation (at a distance of about 10 cm)
Line for approaching a trailer draw bar
Trailer draw bar
The line
C
moves depending on the steering angle and indicate the roadway
on which the vehicle would take with the current steering wheel position.
ABCDVehicles without towing hitch
If your vehicle is not factory equipped with a towing device, a red line for moni-
toring the distance to obstacles is displayed at a distance of 40 cm behind the
vehicle.
Mode - monitor the area behind the vehicle
Read and observe
and on page 151 first.
In this mode, the area behind the vehicle is shown in the display.
The mode is suited for the entire view of the situation behind the vehicle.
Park Assist
Introduction
This chapter contains information on the following subjects:
Functioning
156
Parking space search
157
Switch to park mode
157
Reverse parking
157
Park forward
158
Departing from a parallel parking space
159
Automatic brake assist
159
Information messages
159
Park Assist (following referred to system) helps drivers park in suitable parallel
and perpendicular parking places or also to manoeuvre out of parallel parking
spaces.
The system takes over the steering movements when parking or leaving a
parking space. The driver operates the pedals and the shift lever or gear selec-
tor.
The state in which the steering wheel is operated by the system, is referred to
as parking operation.
The Park Assist is an extension of the parking aid » page 147 and operates on
the basis of data collected by the ultrasonic sensors.
For this reason, the chapter on the parking aid is to be read carefully and the safety notes are to be observed.
155Assist systems
Page 158 of 276
WARNING■The general information relating to the use of assistance systems must
be observed » page 142, in section Introduction .■
During the parking process, the system automatically performs rapid
steering movements. While it is doing so, do not place your hands between
the steering wheel – risk of injury!
■
During a parking manoeuvre on loose or slippery surfaces (gravel, snow,
ice, etc.) you may stray from the calculated road. It is therefore recommen-
ded that you do not use the system in such situations.
CAUTION
The correct evaluation of the parking space and the parking procedure de-
pends on the circumference of the wheels on the vehicle.■
The system only works correctly if the vehicle is fitted with the wheel size
approved by the manufacturer.
■
Abstain from using the system when the vehicle is fitted with snow chains or
a temporary spare wheel.
■
If wheels other than those approved by the manufacturer are mounted, the
resulting position of the vehicle in the parking space can differ slightly. This
can be avoided by readjusting the system at a specialist garage.
CAUTION
If other vehicles are parked behind the kerb or on it, the system can also guide
your vehicle beyond the kerb or onto it. Ensure that the wheels or the wheel
rims of your vehicle are not damaged and if necessary intervene in time.
Note
■ We recommend performing the parking at a safe speed to about 5 km / h.■The driver can stop the parking process at any time by pressing the symbol
key » Fig. 191
on page 156 or by a driver steering intervention.FunctioningFig. 191
System button
Read and observe and on page 156 first.
The system support is provided in the following manner.
▶ While the parking space search is going on, a measurement and evaluation of
the parking space size is completed.
▶ The display of the instrument cluster (hereinafter only display) shows suita-
ble parking spaces and a parking mode is recommended.
▶ The display shows instructions and information before the start and during
the parking.
▶ The road way is calculated that the vehicle uses during the parking.
▶ The front wheels are automatically rotated during the parking.
Conditions for the system function
The system can look for a parking space only if the following basic conditions
are met.
The system is activated.
The vehicle speed is less than 40 km / h (parallel parking).
The vehicle speed is less than 20 km / h (transverse parking).
The distance to a number of parked vehicles is approximately 0.5 - 1.5 m.
The TCS is activated » page 143, Braking and stabilisation systems .
The system can only carry out the parking if the following basic conditions are
met.
The vehicle is travelling less than about 7 km/h.
The parking procedure takes less than 6 minutes.
There is no driver intervention in the automatic steering operation.
Activation/deactivation
The system can be enabled or disabled by pressing the symbol key » Fig. 191
.
156Driving
Page 160 of 276
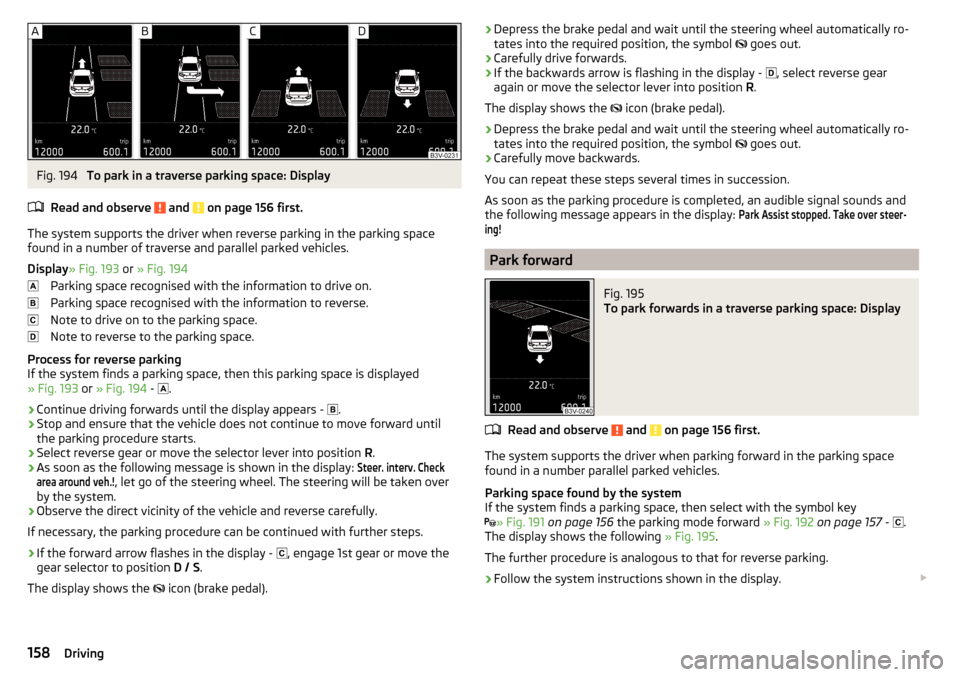
Fig. 194
To park in a traverse parking space: Display
Read and observe
and on page 156 first.
The system supports the driver when reverse parking in the parking space
found in a number of traverse and parallel parked vehicles.
Display » Fig. 193 or » Fig. 194
Parking space recognised with the information to drive on.
Parking space recognised with the information to reverse.
Note to drive on to the parking space.
Note to reverse to the parking space.
Process for reverse parking
If the system finds a parking space, then this parking space is displayed
» Fig. 193 or » Fig. 194 -
.
›
Continue driving forwards until the display appears -
.
›
Stop and ensure that the vehicle does not continue to move forward until
the parking procedure starts.
›
Select reverse gear or move the selector lever into position R.
›
As soon as the following message is shown in the display:
Steer. interv. Checkarea around veh.!
, let go of the steering wheel. The steering will be taken over
by the system.
›
Observe the direct vicinity of the vehicle and reverse carefully.
If necessary, the parking procedure can be continued with further steps.
›
If the forward arrow flashes in the display - , engage 1st gear or move the
gear selector to position D / S.
The display shows the icon (brake pedal).
›Depress the brake pedal and wait until the steering wheel automatically ro-
tates into the required position, the symbol goes out.›
Carefully drive forwards.
›
If the backwards arrow is flashing in the display -
, select reverse gear
again or move the selector lever into position R.
The display shows the
icon (brake pedal).
›
Depress the brake pedal and wait until the steering wheel automatically ro-
tates into the required position, the symbol
goes out.
›
Carefully move backwards.
You can repeat these steps several times in succession.
As soon as the parking procedure is completed, an audible signal sounds and
the following message appears in the display:
Park Assist stopped. Take over steer-ing!
Park forward
Fig. 195
To park forwards in a traverse parking space: Display
Read and observe and on page 156 first.
The system supports the driver when parking forward in the parking space
found in a number parallel parked vehicles.
Parking space found by the system
If the system finds a parking space, then select with the symbol key
» Fig. 191
on page 156 the parking mode forward » Fig. 192 on page 157 -
.
The display shows the following » Fig. 195.
The further procedure is analogous to that for reverse parking.
›
Follow the system instructions shown in the display.
158Driving
Page 165 of 276
Operation descriptionFig. 201
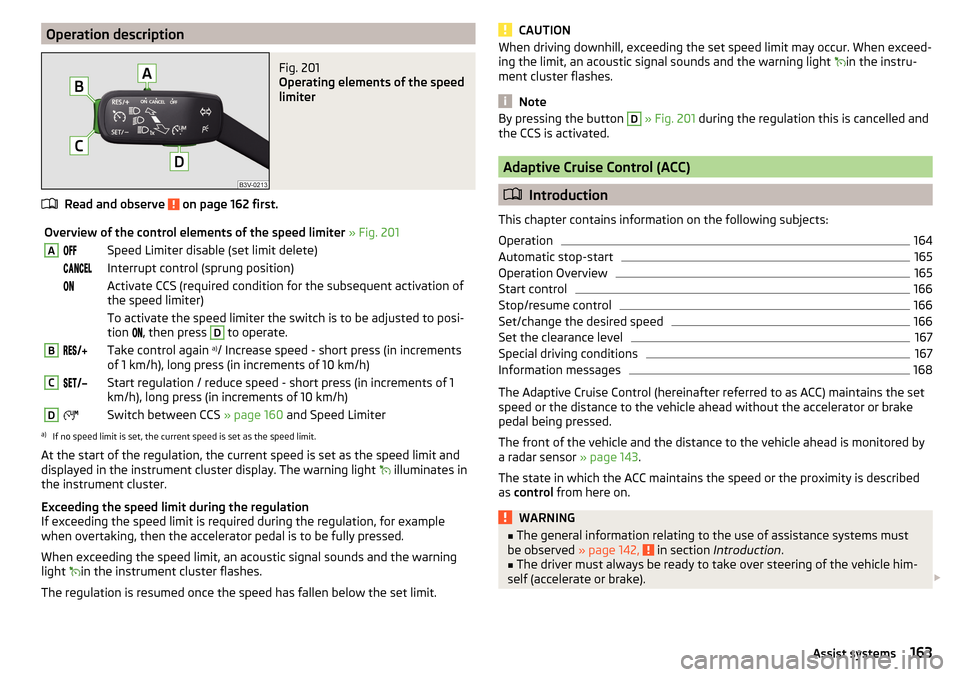
Operating elements of the speed
limiter
Read and observe on page 162 first.
Overview of the control elements of the speed limiter » Fig. 201ASpeed Limiter disable (set limit delete) Interrupt control (sprung position) Activate CCS (required condition for the subsequent activation of
the speed limiter) To activate the speed limiter the switch is to be adjusted to posi-
tion
, then press D
to operate.
BTake control again a)
/ Increase speed - short press (in increments
of 1 km/h), long press (in increments of 10 km/h)CStart regulation / reduce speed - short press (in increments of 1
km/h), long press (in increments of 10 km/h)DSwitch between CCS » page 160 and Speed Limitera)
If no speed limit is set, the current speed is set as the speed limit.
At the start of the regulation, the current speed is set as the speed limit and
displayed in the instrument cluster display. The warning light illuminates in
the instrument cluster.
Exceeding the speed limit during the regulation
If exceeding the speed limit is required during the regulation, for example
when overtaking, then the accelerator pedal is to be fully pressed.
When exceeding the speed limit, an acoustic signal sounds and the warning
light in the instrument cluster flashes.
The regulation is resumed once the speed has fallen below the set limit.
CAUTIONWhen driving downhill, exceeding the set speed limit may occur. When exceed-
ing the limit, an acoustic signal sounds and the warning light in the instru-
ment cluster flashes.
Note
By pressing the button D » Fig. 201 during the regulation this is cancelled and
the CCS is activated.
Adaptive Cruise Control (ACC)
Introduction
This chapter contains information on the following subjects:
Operation
164
Automatic stop-start
165
Operation Overview
165
Start control
166
Stop/resume control
166
Set/change the desired speed
166
Set the clearance level
167
Special driving conditions
167
Information messages
168
The Adaptive Cruise Control (hereinafter referred to as ACC) maintains the set
speed or the distance to the vehicle ahead without the accelerator or brake
pedal being pressed.
The front of the vehicle and the distance to the vehicle ahead is monitored by
a radar sensor » page 143.
The state in which the ACC maintains the speed or the proximity is described
as control from here on.
WARNING■
The general information relating to the use of assistance systems must
be observed » page 142, in section Introduction .■
The driver must always be ready to take over steering of the vehicle him-
self (accelerate or brake).
163Assist systems
Page 167 of 276
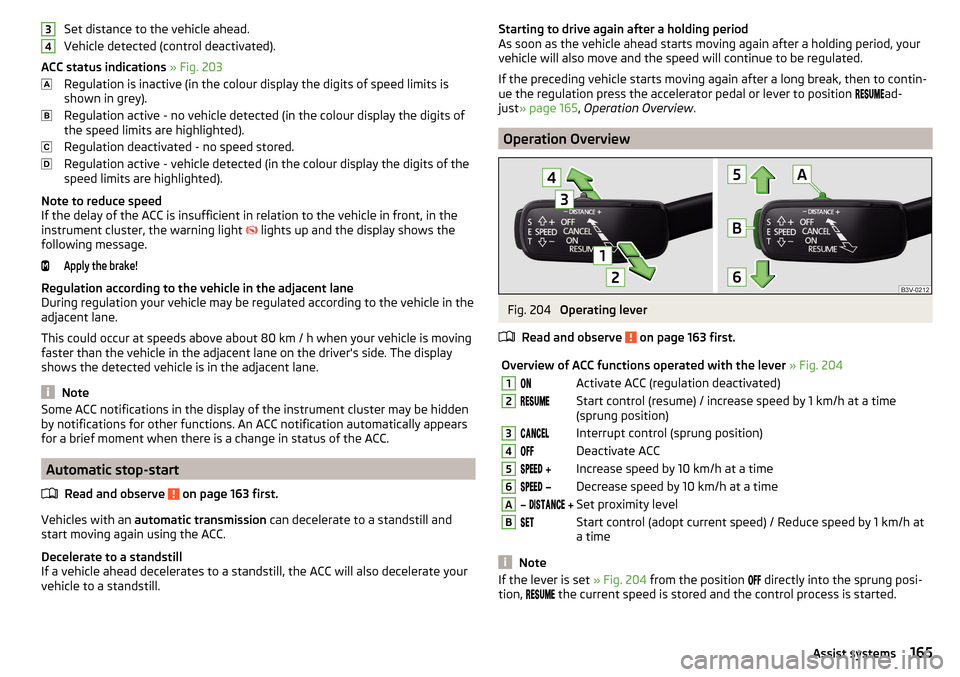
Set distance to the vehicle ahead.
Vehicle detected (control deactivated).
ACC status indications » Fig. 203
Regulation is inactive (in the colour display the digits of speed limits is
shown in grey).
Regulation active - no vehicle detected (in the colour display the digits of
the speed limits are highlighted).
Regulation deactivated - no speed stored.
Regulation active - vehicle detected (in the colour display the digits of the
speed limits are highlighted).
Note to reduce speed
If the delay of the ACC is insufficient in relation to the vehicle in front, in the instrument cluster, the warning light lights up and the display shows the
following message.Apply the brake!
Regulation according to the vehicle in the adjacent lane
During regulation your vehicle may be regulated according to the vehicle in the adjacent lane.
This could occur at speeds above about 80 km / h when your vehicle is moving
faster than the vehicle in the adjacent lane on the driver's side. The display
shows the detected vehicle is in the adjacent lane.
Note
Some ACC notifications in the display of the instrument cluster may be hidden
by notifications for other functions. An ACC notification automatically appears
for a brief moment when there is a change in status of the ACC.
Automatic stop-start
Read and observe
on page 163 first.
Vehicles with an automatic transmission can decelerate to a standstill and
start moving again using the ACC.
Decelerate to a standstill
If a vehicle ahead decelerates to a standstill, the ACC will also decelerate your
vehicle to a standstill.
34Starting to drive again after a holding period
As soon as the vehicle ahead starts moving again after a holding period, your
vehicle will also move and the speed will continue to be regulated.
If the preceding vehicle starts moving again after a long break, then to contin-
ue the regulation press the accelerator pedal or lever to position
ad-
just » page 165 , Operation Overview .
Operation Overview
Fig. 204
Operating lever
Read and observe
on page 163 first.
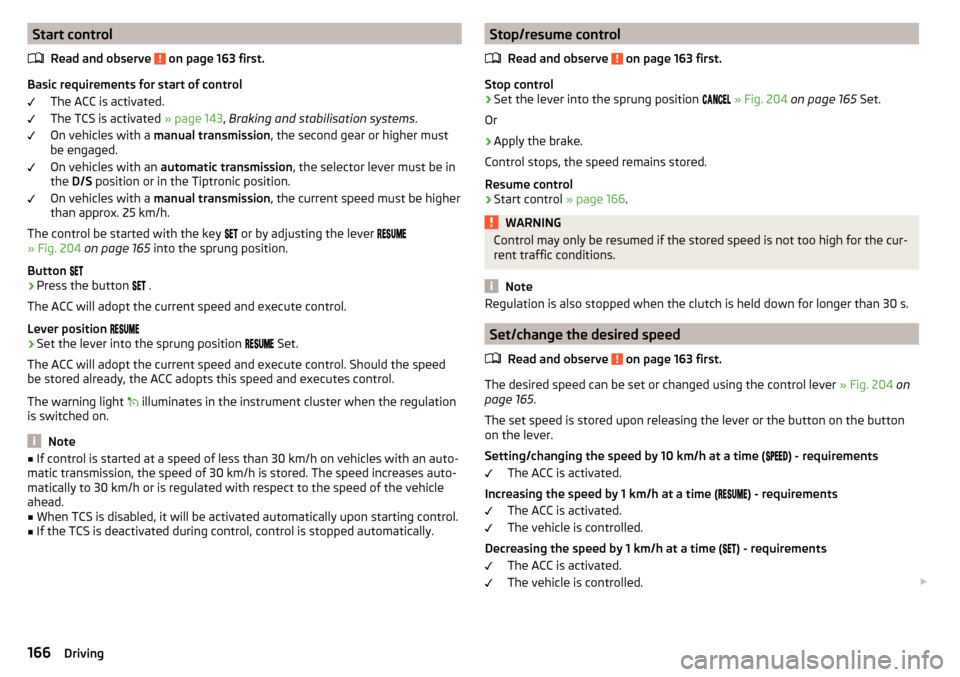
Overview of ACC functions operated with the lever » Fig. 2041Activate ACC (regulation deactivated)2Start control (resume) / increase speed by 1 km/h at a time
(sprung position)3Interrupt control (sprung position)4Deactivate ACC5 Increase speed by 10 km/h at a time6 Decrease speed by 10 km/h at a timeA Set proximity levelBStart control (adopt current speed) / Reduce speed by 1 km/h at
a time
Note
If the lever is set » Fig. 204 from the position directly into the sprung posi-
tion, the current speed is stored and the control process is started.165Assist systems
Page 168 of 276
Start controlRead and observe
on page 163 first.
Basic requirements for start of control The ACC is activated.
The TCS is activated » page 143, Braking and stabilisation systems .
On vehicles with a manual transmission , the second gear or higher must
be engaged.
On vehicles with an automatic transmission , the selector lever must be in
the D/S position or in the Tiptronic position.
On vehicles with a manual transmission , the current speed must be higher
than approx. 25 km/h.
The control be started with the key or by adjusting the lever
» Fig. 204 on page 165 into the sprung position.
Button
›
Press the button .
The ACC will adopt the current speed and execute control.
Lever position
›
Set the lever into the sprung position Set.
The ACC will adopt the current speed and execute control. Should the speed be stored already, the ACC adopts this speed and executes control.
The warning light illuminates in the instrument cluster when the regulation
is switched on.
Note
■ If control is started at a speed of less than 30 km/h on vehicles with an auto-
matic transmission, the speed of 30 km/h is stored. The speed increases auto-
matically to 30 km/h or is regulated with respect to the speed of the vehicle
ahead.■
When TCS is disabled, it will be activated automatically upon starting control.
■
If the TCS is deactivated during control, control is stopped automatically.
Stop/resume control
Read and observe
on page 163 first.
Stop control
›
Set the lever into the sprung position
» Fig. 204 on page 165 Set.
Or
›
Apply the brake.
Control stops, the speed remains stored.
Resume control
›
Start control » page 166.
WARNINGControl may only be resumed if the stored speed is not too high for the cur-
rent traffic conditions.
Note
Regulation is also stopped when the clutch is held down for longer than 30 s.
Set/change the desired speed
Read and observe
on page 163 first.
The desired speed can be set or changed using the control lever » Fig. 204 on
page 165 .
The set speed is stored upon releasing the lever or the button on the button
on the lever.
Setting/changing the speed by 10 km/h at a time (
) - requirements
The ACC is activated.
Increasing the speed by 1 km/h at a time (
) - requirements
The ACC is activated.
The vehicle is controlled.
Decreasing the speed by 1 km/h at a time (
) - requirements
The ACC is activated.
The vehicle is controlled.
166Driving
Page 169 of 276
Changing the speed by adopting the current speed () - requirements
The ACC is activated.
The vehicle is moving at a speed other than that which is stored.
Note
■
If during control the speed is increased by pressing the accelerator, control is
temporarily stopped. Upon releasing the accelerator, control is automatically
resumed.■
If during control the speed is reduced by applying the brake, control is stop-
ped. Control needs to be restarted in order to resume » page 166.
■
If the vehicle is controlled by a lower speed than the stored speed, then
the current speed is stored the first time the key is pressed. Press the key
again
and the speed is reduced in increments of 1 km/h.
Set the clearance level
Read and observe
on page 163 first.
The proximity to the vehicle ahead can be set with the lever » Fig. 204 on
page 165 or in the Infotainment » Owner´s Manual Infotainment , chapter CAR -
Vehicle settings .
Setting by means of the lever
›
Set the switch to the spring-loaded position or to -
» Fig. 204 on
page 165 .
The display of the instrument cluster shows line
2
» Fig. 202 on page 164 ,
which indicates the proximity.
›
Using the switch set line
2
on the lever to the desired distance level.
Note
■
If the proximity is changed in infotainment, the change will only come into
effect after a subsequent activation of the ACC.■
The proximity is dependent on the speed. The higher the speed, the greater
the proximity to the vehicle ahead.
■
On wet roads, a longer time interval to the vehicle ahead should always be
selected than on dry roads.
Special driving conditionsFig. 205
Special conditions: Cornering / narrow vehicles or vehicles trav-
elling side by side
Fig. 206
Special conditions: Lane changes of other vehicles / stationary
vehicles
Read and observe
on page 163 first.
The following and similar situations require special attention of the driver.
When cornering
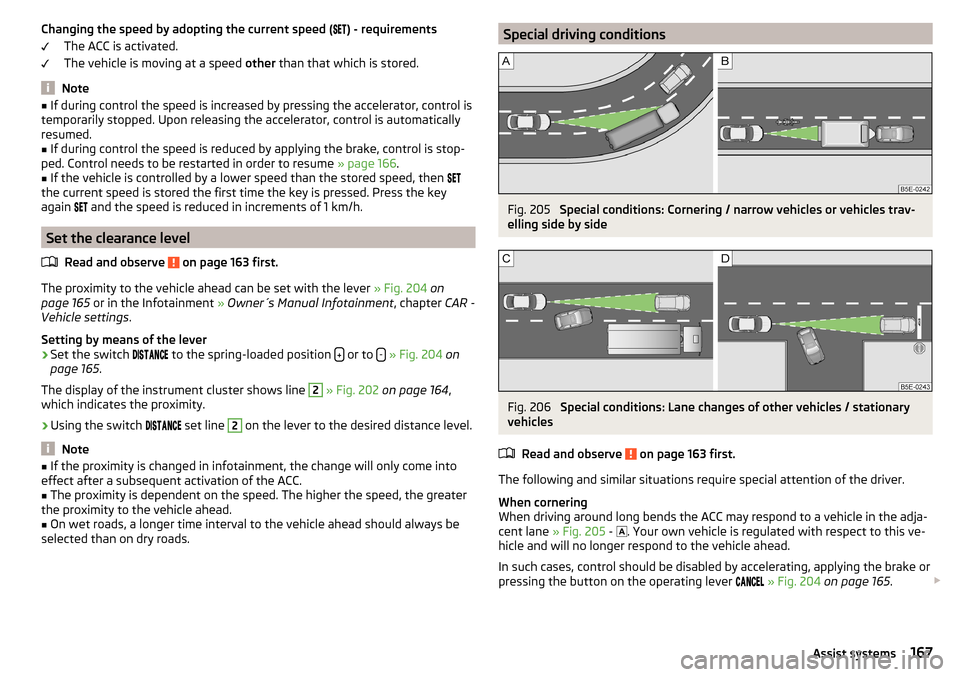
When driving around long bends the ACC may respond to a vehicle in the adja-
cent lane » Fig. 205 -
. Your own vehicle is regulated with respect to this ve-
hicle and will no longer respond to the vehicle ahead.
In such cases, control should be disabled by accelerating, applying the brake or
pressing the button on the operating lever
» Fig. 204 on page 165 .
167Assist systems
Page 170 of 276
Narrow vehicles or vehicles travelling side by side
Narrow vehicles or vehicles travelling side by side are not detected by the ra-
dar sensor until they are within the sensor's range » Fig. 205 -
.
If necessary, slow down the car by applying the brake.
Other vehicles changing lanes
Vehicles that change onto the lane with a small proximity » Fig. 206 -
do not
have to be detected by the radar sensor in time. The result may be a delayed
ACC response.
If necessary, slow down the car by applying the brake.
Stationary vehicles
The ACC does not detect stationary objects! When a vehicle detected by the
ACC turns or sheers off and there is a stationary vehicle in front of this vehicle,
» Fig. 206 -
the ACC does not respond to the stationary vehicle.
In such cases, take over the steering and stop the vehicle by applying the foot
brake.
When overtaking
When your vehicle is being controlled (the speed is lower than that which is
stored) and the indicator is activated, the ACC interprets this situation as
meaning that the driver intends to overtake. The ACC automatically acceler-
ates the vehicle, thereby reducing the proximity to a vehicle ahead.
If the vehicle changes to the fast lane and no vehicle is detected ahead, the
ACC accelerates until the set speed is reached and then keeps it constant.
Acceleration can be cancelled at any time by touch on the brake pedal or
pressing the button on the lever
» Fig. 204 on page 165 .
Vehicles with special load or special body parts
Other vehicles with a load or with body parts protruding from the sides, back
or top of the vehicle contour may not be detected by the ACC.
Control should therefore be disabled whenever you are driving behind or over-
taking such a vehicle.
Towing a trailer
When towing, or in when another accessory is connected to the trailer socket
the ACC control is set with a lower rate. The manner of driving should there-
fore be adapted to this limitation.Information messages
Read and observe
on page 163 first.
The warning symbols are shown in the instrument cluster display.
ACC: no sensor view!
The sensor cover or the sensor is covered or dirty.
Stop the car, switch off the engine and clean the sensor cover or remove the
obstacle » Fig. 174 on page 143 .
If this message appears in winter, the cause can be snow covering the sensor.
The ACC is functional again after the snow melts away from the sensor.
If the message appears again after starting the engine, the position of the lev- er should be
» Fig. 204 on page 165 adjusted.
ACC not available.
The ACC is not available for an unknown reason.
Stop the vehicle, switch off the engine and then start it again. If the ACC is still
not available, push the lever into position . Seek help from a specialist ga-
rage.
Error: ACC
There is an ACC system error.
Push the lever into position / press. Seek help from a specialist garage.
Speed limit
Increase the speed accordingly and start control
» page 166.
Front Assist
Introduction
This chapter contains information on the following subjects:
Operation
169
Distance warning (dangerous distance)
169
Warning and automatic braking
169
Disable/enable
170
Information messages
171
168Driving
Page 172 of 276
With automatic braking the symbol appears » Fig. 208 in the display.
Advance warning
If the system detects a risk of collision, the symbol
» Fig. 208 appears in the
display and you will hear an acoustic signal.
At the same time, the braking system is prepared for possible emergency brak- ing.
The pre-warning display can occur in the following situations.
▶ If there is a risk of collision with a moving obstacle in a driving speed range of
about 30 km/h to about 210 km/h.
▶ There is a risk of a collision with a stationary moving obstacle in a vehicle
speed range of approximately 30 km/h to about 85 km/h.
With a warning the brake pedal must be pressed or the moving obstacle is to
be avoided!
Acute alert
If the driver does not react to the advance warning, the system briefly applies
the brake automatically via an active brake intervention to draw attention to
the potential danger of a collision again.
Automatic Braking
If the driver fails to respond to the acute warning, the system starts to apply
the brakes automatically with increasing stopping power in several stages.
Brake assist
If the driver brakes inadequate with an impending collision, the system auto-
matically increases braking force.
The braking assistance only occurs as long as the brake pedal is being firmly
pressed down.
Note
■ If an automatic brake intervention is triggered by the system, the pressure in
the brake system increases and the brake pedal cannot be operated with the
normal pedal stroke.■
The automatic braking interventions can be cancelled by pressing the accel-
erator pedal or by steering intervention.
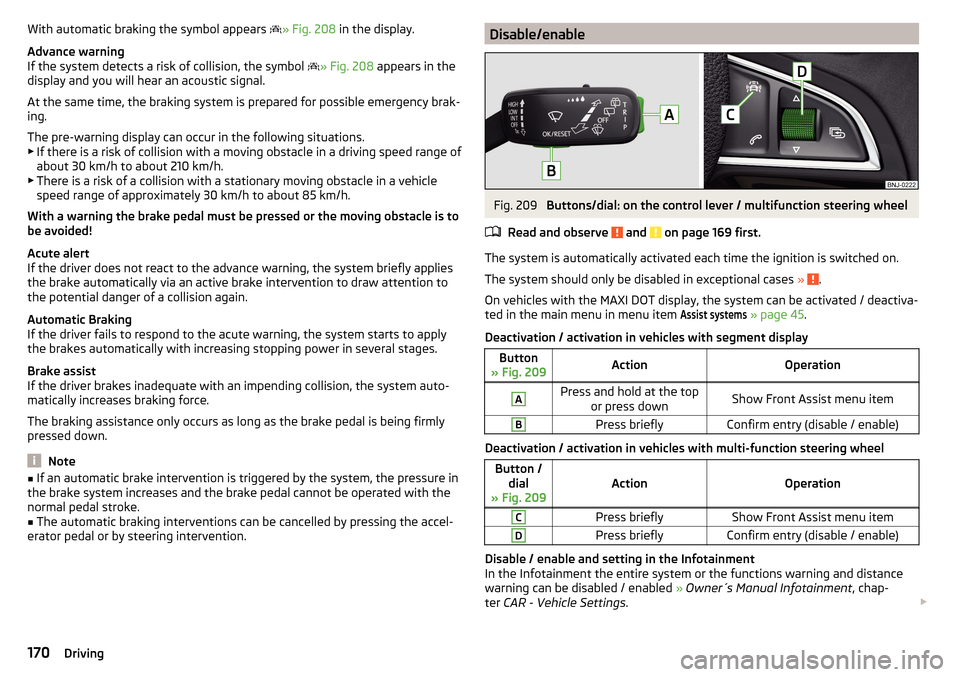
Disable/enableFig. 209
Buttons/dial: on the control lever / multifunction steering wheel
Read and observe
and on page 169 first.
The system is automatically activated each time the ignition is switched on. The system should only be disabled in exceptional cases »
.
On vehicles with the MAXI DOT display, the system can be activated / deactiva-
ted in the main menu in menu item
Assist systems
» page 45 .
Deactivation / activation in vehicles with segment display
Button
» Fig. 209ActionOperationAPress and hold at the top or press downShow Front Assist menu itemBPress brieflyConfirm entry (disable / enable)
Deactivation / activation in vehicles with multi-function steering wheel
Button /dial
» Fig. 209ActionOperation
CPress brieflyShow Front Assist menu itemDPress brieflyConfirm entry (disable / enable)
Disable / enable and setting in the Infotainment
In the Infotainment the entire system or the functions warning and distance warning can be disabled / enabled » Owner´s Manual Infotainment , chap-
ter CAR - Vehicle Settings .
170Driving
Page 173 of 276
f the distance-warning function was deactivated before the ignition was
switched off, it remains deactivated after the ignition is switched on again.WARNINGIn the following situations, Front Assist should be switched off for safety
reasons.■
When the vehicle is being towed away.
■
When the vehicle is on a rolling test bench.
■
If an unfounded warning or a system action was taken.
■
When on a truck, or a car ferry service or similar.
Information messages
Read and observe
and on page 169 first.
The warning symbols are shown in the instrument cluster display.
Front Assist: no sensor view.FRONT ASSIST NO SENSOR VIEW
The sensor cover or the sensor is covered or dirty.
Stop the car, switch off the engine and clean the sensor cover or remove the
obstacle » Fig. 174 on page 143 .
If this message appears in winter, the cause can be snow covering the sensor.
The system is functional again after the snow melts away from the sensor.
Front Assist not available.FRONT ASSIST NOT AVAILABLE
The system is not available for an unknown reason.
Stop the vehicle, switch off the engine and then start it again.
If after engine start the message persists, then the help of a professional or- ganisation is required.
Selection of the driving mode(Driving Mode Selection)
Introduction
This chapter contains information on the following subjects:
Adaptive Chassis Control (DCC)
171
Mode
Comfort171Normal172Sport
mode172Eco
mode
172Individual
mode
172
Mode selection and Infotainment display
173
Mode settings
Individual173
By selecting the driving mode, the driving behaviour can be adapted to the de-
sired mode of operation.
The following modes are available
Comfort
,
Normal
,
Sport
,
Eco
and
Individual
.
The mode
Comfort
is only available on vehicles with adaptive chassis control
(DCC).
WARNINGPlease take note of the general points relating to the use of assistance
systems » page 142, in section Introduction .
Note
The set driving mode remains stored even after switching the ignition on and
off.
Adaptive Chassis Control (DCC)
Read and observe
on page 171 first.
The adaptive chassis control (following known as DCC) provides the ability toadjust the shock characteristics for the sporty, normal or comfortable driving
when the corresponding control mode is selected.
The DCC evaluates steering response and road conditions while driving contin-
uously and adjusts the suspension behaviour within the selected driving mode
accordingly.
Mode
Comfort
Read and observe on page 171 first.
This mode is suitable for driving on roads with poorer surface or for long mo- torway journeys.
171Assist systems