refuelling SKODA SUPERB 2015 3.G / (B8/3V) Owner's Manual
[x] Cancel search | Manufacturer: SKODA, Model Year: 2015, Model line: SUPERB, Model: SKODA SUPERB 2015 3.G / (B8/3V)Pages: 276, PDF Size: 42.14 MB
Page 38 of 276
If, after a short drive, the indicator light does not go out, there is a system er-
ror.
Seek help from a specialist garage.
Other incidents
The illumination of the warning light
can have the following reasons.
▶ The vehicle is loaded on one side. Distribute loads as evenly as possible.
▶ The wheels of one axle are loaded more heavily (e.g. when towing a trailer or
when driving uphill or downhill).
▶ Snow chains are mounted.
▶ A wheel has been changed.
CAUTION
Under certain circumstances (e.g. sporty style of driving, wintry or unpaved
roads) the warning light can be delayed or does not light up at all.
Brake linings
Read and observe
on page 32 first.
illuminates - the brake pads are worn.
Check brake pad!BRAKE PADS PLEASE CHECK
Seek help from a specialist garage.
Fuel reserve
Read and observe
on page 32 first.
illuminates – the fuel level in the fuel tank is at the reserve level (approxi-
mately 6 litres).
Please refuel. Range:PLEASE REFUEL RANGE …
An audible signal sounds as a warning.
Note
The text in the display goes out after refuelling and driving a short distance. Lane departure warning (Lane Assist)
Read and observe
on page 32 first.
The warning lights
indicates the state of the Lane Assist system.
More information about the Lane Assist System » page 174.
Turn signal system
Read and observe
on page 32 first.
flashes – the left turn signal is switched on.
flashes – the right turn signal is switched on.
If there is a fault in the turn signal system, the warning light flashes at twice
its normal rate. This does not apply when towing a trailer.
When the hazard warning light system is switched on, this will cause all of the
turn signal lights as well as both warning lights to flash.
Trailer turn signal lights
Read and observe
on page 32 first.
flashes – the trailer turn signal lights are switched on.
If a trailer is hitched and the warning light is not flashing, one of the trailer
turn signal lights has failed.
An example message in the display of the instrument cluster
Trailer: check left turn signal!TRAILER TURN SIG_ CHECK LEFT
Check the trailer bulbs.
Fog lights
Read and observe
on page 32 first.
illuminates – the fog lights are switched on.
36Using the system
Page 47 of 276

Long-term ( ) And “2” ( )
The memory gathers driving information from any number of individual jour-
neys up to a total of 99 hours and 59 minutes driving or 9,999 kilometres driv-
en.
The indicator is automatically set back to zero if one of the indicated values is
exceeded.Since refuel
(
) or “3” (
)
The memory gathers driving information since the last refuelling.
The memory is erased automatically the next time you fill up.
Select memory
▶ Select the driving data information desired.
▶ Confirm details again to select the desired memory.
Resetting ▶ Select the driving data information desired.
▶ Select the desired memory.
▶ Reset the selected memory with a long acknowledgement (holding pressed).
Note
Disconnecting the vehicle battery will delete all memory data.
MAXI DOT display
Introduction
This chapter contains information on the following subjects:
Main menu
45
Operation using the operating lever
46
Operation using the multifunction steering wheel
46
Menu item
Navigation47
Menu item
Audio47
Menu item
Telephone47
Menu item
Assist systems48
Compass point display
48
Eco-tips
49
The MAXI DOT display (following as display) is a user interface which, depend-
ing on the equipment configuration, delivers information about the Infotain-
ment, the multifunction display, the assistance systems etc.
WARNINGConcentrate fully at all times on your driving! As the driver you are fully re-
sponsible for the operation of your vehicle.
Main menu
Read and observe
on page 45 first.
Call up the main menu
›
Press and hold the button
A
on the operating lever » Fig. 32 on page 46 .
or
›
Press and hold the dial
G
on the multifunction steering wheel » Fig. 33 on
page 46 .
Main menu items (depending on vehicle equipment) ■
Driving data
» page 42
■
Assist systems
» page 48
■
Navigation
» page 47
■
Audio
» page 47
■
Telephone
» page 47 ;
■
Vehicle
» page 41 , Auto-check control
The menus can be opened using the buttons on the control lever » Fig. 32 on
page 46 or on the multi-function steering wheel » Fig. 33 on page 46 .
Note
■
If warning messages are displayed, these messages must first be confirmed
to access the main menu.■
The travel mode can be set in the Infotainment » Owner´s Manual Infotain-
ment , chapter Vehicle settings (SETUP button) .
45Information system
Page 126 of 276
WARNING■The auxiliary heating (auxiliary heating and ventilation) (following as aux.
heating) must never be operated in closed rooms (e.g. garages) – risk of
poisoning!■
The auxiliary heating must not be allowed to run during refuelling – risk
of fire.
■
The exhaust pipe of the auxiliary heating is located on the underside of
the vehicle. If you want to use the heater, do not switch off the car in pla-
ces where the exhaust fumes can come into contact with flammable mate-
rials such as dry grass, undergrowth, leaves, spilled fuel etc. -. risk of fire.
CAUTION
■ The exhaust pipe of the auxiliary heating, which is located on the underside
of the vehicle, must not be clogged and the exhaust flow must not be blocked.■
If the auxiliary heating is running, the vehicle battery discharges.
■
The air inlet in front of the windscreen must be free (e.g. of ice, snow or
leaves) to ensure that the auxiliary heating operates properly.
Note
■ The auxiliary heating only switches the blower on, if it has achieved a coolant
temperature of approx. 50 °C.■
At low outside temperatures, this can result in a formation of water vapour in
the area of the engine compartment. This is quite normal and is not an operat-
ing problem.
■
So that warm air can flow into the vehicle interior after switching on the aux.
heating, you must maintain the comfort temperature normally selected by you,
leave the fan switched on and leave the air outlet vents in open. It is recom-
mended to put the air flow in the position
or
.
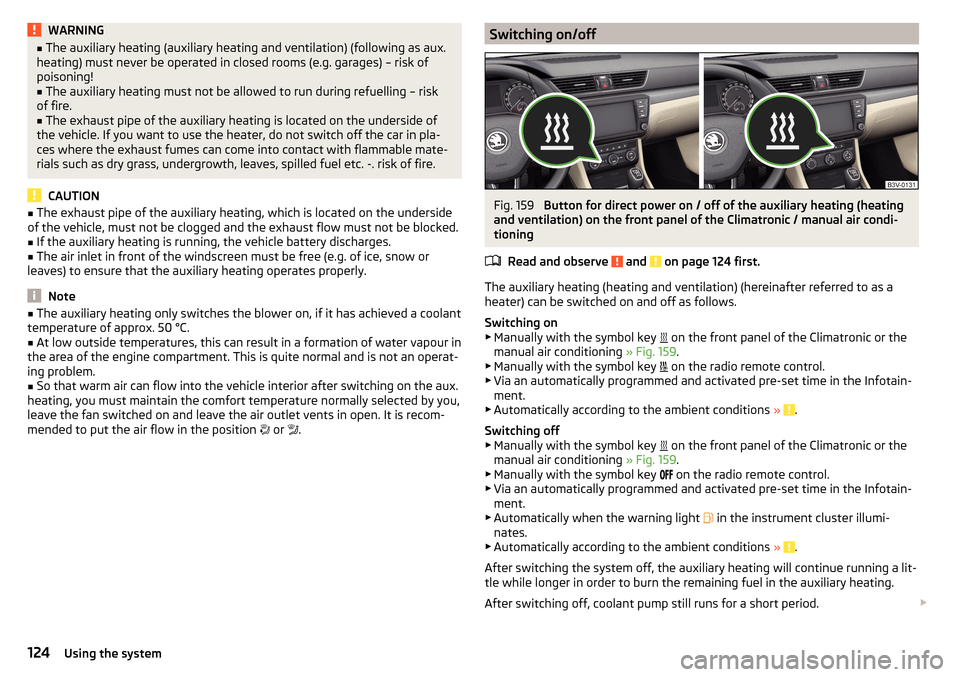
Switching on/offFig. 159
Button for direct power on / off of the auxiliary heating (heating
and ventilation) on the front panel of the Climatronic / manual air condi-
tioning
Read and observe
and on page 124 first.
The auxiliary heating (heating and ventilation) (hereinafter referred to as a
heater) can be switched on and off as follows.
Switching on
▶ Manually with the symbol key on the front panel of the Climatronic or the
manual air conditioning » Fig. 159.
▶ Manually with the symbol key on the radio remote control.
▶ Via an automatically programmed and activated pre-set time in the Infotain-
ment.
▶ Automatically according to the ambient conditions »
.
Switching off
▶ Manually with the symbol key on the front panel of the Climatronic or the
manual air conditioning » Fig. 159.
▶ Manually with the symbol key on the radio remote control.
▶ Via an automatically programmed and activated pre-set time in the Infotain-
ment.
▶ Automatically when the warning light in the instrument cluster illumi-
nates.
▶ Automatically according to the ambient conditions »
.
After switching the system off, the auxiliary heating will continue running a lit-
tle while longer in order to burn the remaining fuel in the auxiliary heating.
After switching off, coolant pump still runs for a short period.
124Using the system
Page 203 of 276
Inspecting and replenishing
Fuel
Introduction
This chapter contains information on the following subjects:
Petrol and diesel refuelling
201
Lead-free petrol
202
Diesel fuel
203
The correct fuel grades for your vehicle are specified on the inside of the fuel
filler flap » Fig. 224 on page 201 .
WARNING■
The operating instructions of the refuelling system must always be fol-
lowed.■
Do not smoke when refuelling and do not use a mobile phone.
■
Fuel vapours are explosive - can be fatal!
CAUTION
■ Never drive until the fuel tank is completely empty! The irregular supply of
fuel can cause misfiring, which can result in damage to parts of the engine and
the exhaust system.■
Immediately remove any fuel that has spilled onto the vehicle's paintwork –
risk of paint damage.
■
If the vehicle was not purchased in the country where it was intended to be
operated, you should check whether the fuel specified by the manufacturer is
offered in the country where the vehicle will be operated. You should also per-
haps check whether the manufacturer has recommended a different fuel for
operation of the vehicle in the corresponding country. If no prescribed fuel is
available, then you must check whether it is permitted by the manufacturer to
operate the vehicle with another fuel type.
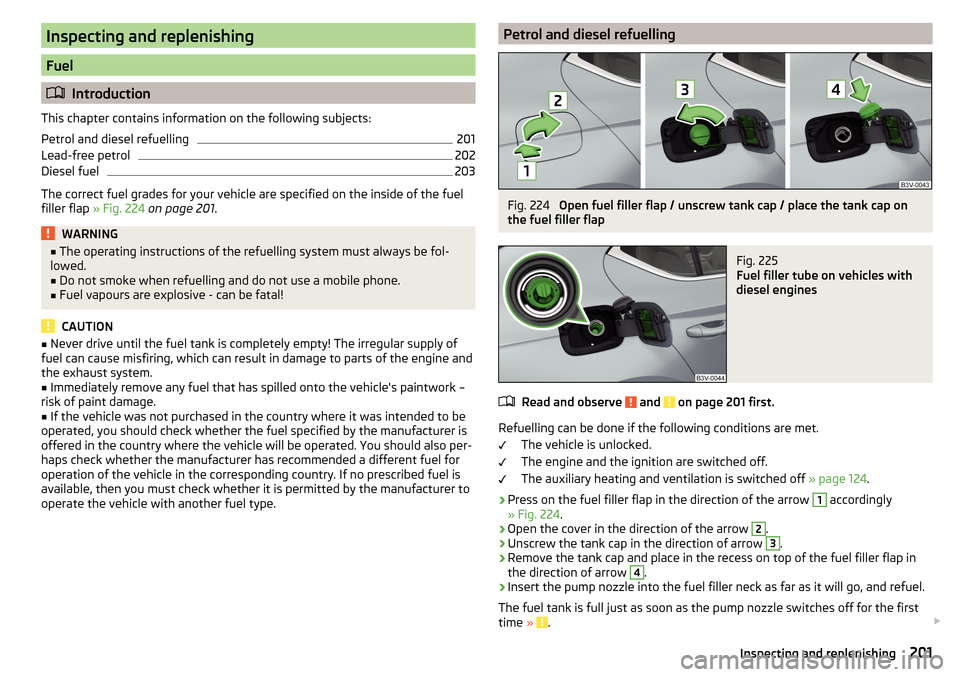
Petrol and diesel refuellingFig. 224
Open fuel filler flap / unscrew tank cap / place the tank cap on
the fuel filler flap
Fig. 225
Fuel filler tube on vehicles with
diesel engines
Read and observe and on page 201 first.
Refuelling can be done if the following conditions are met.
The vehicle is unlocked.
The engine and the ignition are switched off.
The auxiliary heating and ventilation is switched off » page 124.
›
Press on the fuel filler flap in the direction of the arrow
1
accordingly
» Fig. 224 .
›
Open the cover in the direction of the arrow
2
.
›
Unscrew the tank cap in the direction of arrow
3
.
›
Remove the tank cap and place in the recess on top of the fuel filler flap in
the direction of arrow
4
.
›
Insert the pump nozzle into the fuel filler neck as far as it will go, and refuel.
The fuel tank is full just as soon as the pump nozzle switches off for the first
time »
.
201Inspecting and replenishing
Page 204 of 276
›Remove the pump nozzle from the fuel filler neck and put it back in the
pump.›
Place the filler cap onto the fuel filler neck and turn it in the opposite direc-
tion to the arrow until it securely engages
3
.
›
Close the fuel filler flap until it clicks into place.
Check that the fuel filler flap is closed properly.
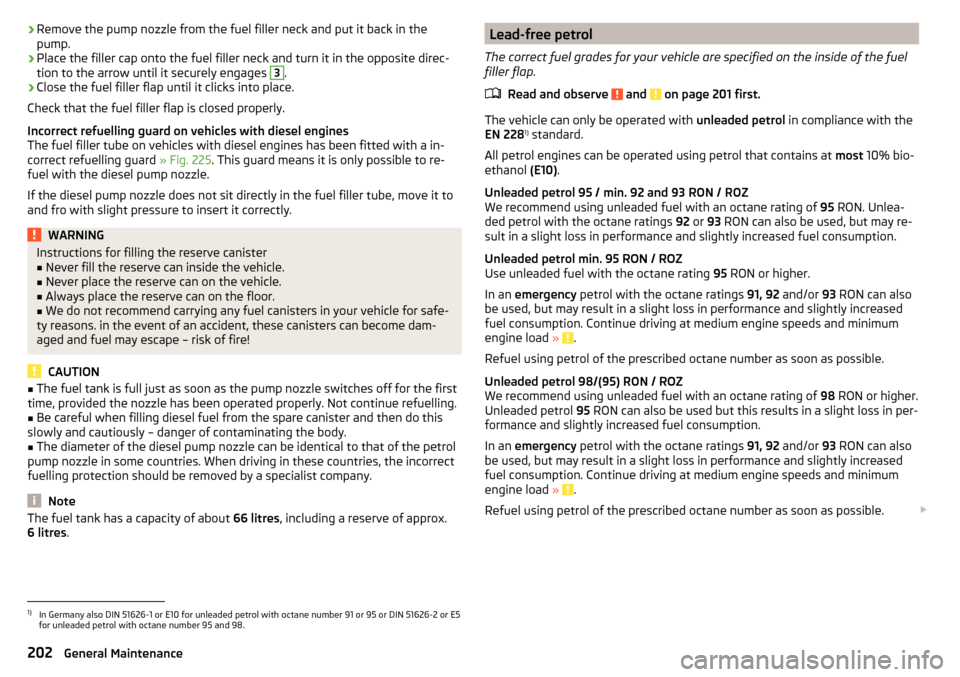
Incorrect refuelling guard on vehicles with diesel engines
The fuel filler tube on vehicles with diesel engines has been fitted with a in-
correct refuelling guard » Fig. 225. This guard means it is only possible to re-
fuel with the diesel pump nozzle.
If the diesel pump nozzle does not sit directly in the fuel filler tube, move it to
and fro with slight pressure to insert it correctly.
WARNINGInstructions for filling the reserve canister■Never fill the reserve can inside the vehicle.■
Never place the reserve can on the vehicle.
■
Always place the reserve can on the floor.
■
We do not recommend carrying any fuel canisters in your vehicle for safe-
ty reasons. in the event of an accident, these canisters can become dam-
aged and fuel may escape – risk of fire!
CAUTION
■ The fuel tank is full just as soon as the pump nozzle switches off for the first
time, provided the nozzle has been operated properly. Not continue refuelling.■
Be careful when filling diesel fuel from the spare canister and then do this
slowly and cautiously – danger of contaminating the body.
■
The diameter of the diesel pump nozzle can be identical to that of the petrol
pump nozzle in some countries. When driving in these countries, the incorrect
fuelling protection should be removed by a specialist company.
Note
The fuel tank has a capacity of about 66 litres, including a reserve of approx.
6 litres .Lead-free petrol
The correct fuel grades for your vehicle are specified on the inside of the fuel
filler flap.
Read and observe
and on page 201 first.
The vehicle can only be operated with unleaded petrol in compliance with the
EN 228 1)
standard.
All petrol engines can be operated using petrol that contains at most 10% bio-
ethanol (E10).
Unleaded petrol 95 / min. 92 and 93 RON / ROZ
We recommend using unleaded fuel with an octane rating of 95 RON. Unlea-
ded petrol with the octane ratings 92 or 93 RON can also be used, but may re-
sult in a slight loss in performance and slightly increased fuel consumption.
Unleaded petrol min. 95 RON / ROZ
Use unleaded fuel with the octane rating 95 RON or higher.
In an emergency petrol with the octane ratings 91, 92 and/or 93 RON can also
be used, but may result in a slight loss in performance and slightly increased
fuel consumption. Continue driving at medium engine speeds and minimum
engine load »
.
Refuel using petrol of the prescribed octane number as soon as possible.
Unleaded petrol 98/(95) RON / ROZ
We recommend using unleaded fuel with an octane rating of 98 RON or higher.
Unleaded petrol 95 RON can also be used but this results in a slight loss in per-
formance and slightly increased fuel consumption.
In an emergency petrol with the octane ratings 91, 92 and/or 93 RON can also
be used, but may result in a slight loss in performance and slightly increased
fuel consumption. Continue driving at medium engine speeds and minimum
engine load »
.
Refuel using petrol of the prescribed octane number as soon as possible.
1)
In Germany also DIN 51626-1 or E10 for unleaded petrol with octane number 91 or 95 or DIN 51626-2 or E5
for unleaded petrol with octane number 95 and 98.
202General Maintenance
Page 207 of 276
Note■The AdBlue ®
solution freezes at a temperature of -11° C and lower. The sys-
tem has a heater to ensure the operability at low temperatures.■
We recommend purchasing AdBlue ®
refill bottles from the ŠKODA original
parts.
■
AdBlue ®
is a registered trademark of the VDA. AdBlue ®
is also known as AUS
32 (Aqueous Urea Solution) or DEF (Diesel Exhaust Fluid).
Tank and level check
Read and observe
and on page 204 first.
Tank
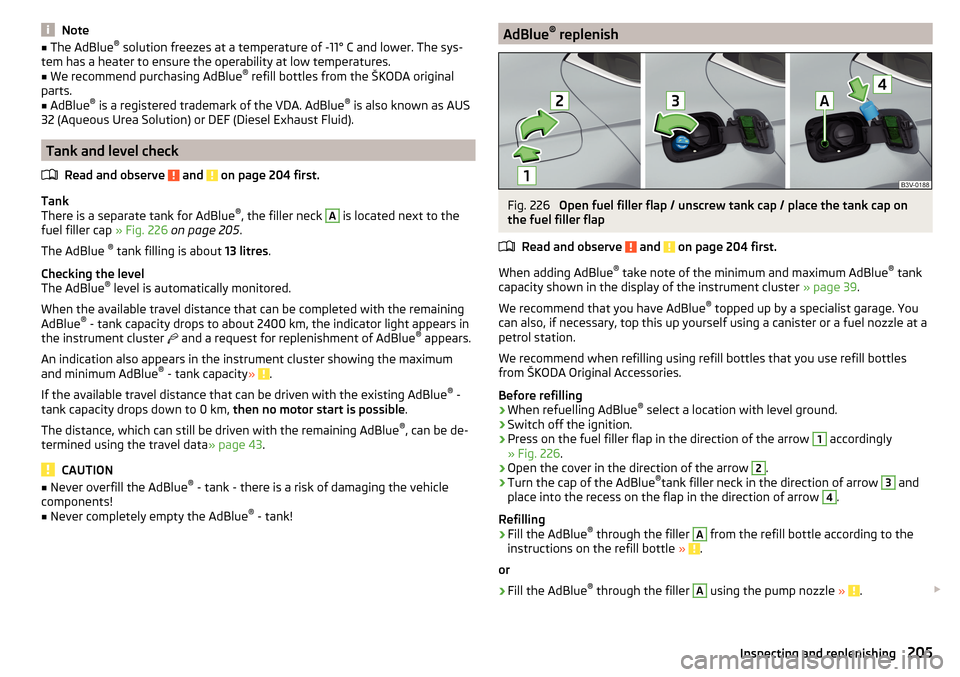
There is a separate tank for AdBlue ®
, the filler neck
A
is located next to the
fuel filler cap » Fig. 226 on page 205 .
The AdBlue ®
tank filling is about 13 litres.
Checking the level
The AdBlue ®
level is automatically monitored.
When the available travel distance that can be completed with the remaining
AdBlue ®
- tank capacity drops to about 2400 km, the indicator light appears in
the instrument cluster and a request for replenishment of AdBlue ®
appears.
An indication also appears in the instrument cluster showing the maximum
and minimum AdBlue ®
- tank capacity »
.
If the available travel distance that can be driven with the existing AdBlue ®
-
tank capacity drops down to 0 km, then no motor start is possible.
The distance, which can still be driven with the remaining AdBlue ®
, can be de-
termined using the travel data » page 43.
CAUTION
■
Never overfill the AdBlue ®
- tank - there is a risk of damaging the vehicle
components!■
Never completely empty the AdBlue ®
- tank!
AdBlue ®
replenishFig. 226
Open fuel filler flap / unscrew tank cap / place the tank cap on
the fuel filler flap
Read and observe
and on page 204 first.
When adding AdBlue ®
take note of the minimum and maximum AdBlue ®
tank
capacity shown in the display of the instrument cluster » page 39.
We recommend that you have AdBlue ®
topped up by a specialist garage. You
can also, if necessary, top this up yourself using a canister or a fuel nozzle at a
petrol station.
We recommend when refilling using refill bottles that you use refill bottles
from ŠKODA Original Accessories.
Before refilling
›
When refuelling AdBlue ®
select a location with level ground.
›
Switch off the ignition.
›
Press on the fuel filler flap in the direction of the arrow
1
accordingly
» Fig. 226 .
›
Open the cover in the direction of the arrow
2
.
›
Turn the cap of the AdBlue ®
tank filler neck in the direction of arrow
3
and
place into the recess on the flap in the direction of arrow
4
.
Refilling
›
Fill the AdBlue ®
through the filler
A
from the refill bottle according to the
instructions on the refill bottle » .
or
›
Fill the AdBlue ®
through the filler
A
using the pump nozzle » .
205Inspecting and replenishing
Page 262 of 276
Footmats135
see footmats135
Force limit Electric boot lid
59
Power windows63
Sliding/tilting roof64
Front airbag15
Front Assist168
Disable/enable170
Distance warning169
Information messages171
Operation169
Radar sensor143
Warning and automatic braking169
Warning light40, 41
Front door warning light75
Front seats81
fuel lead-free petrol
202
Fuel201
Diesel203
Fuel gauge30
refer to Fuel201
Refuelling201
Warning light36
Fuel consumption248
Fuel filter Warning messages
40
Fuel reserve Warning light
36
Fuses Assignment
238
Assignment of fuses in the dash panel240
Colour coding238
Fuse assignment in the engine compartment241
Plastic clip241
Replacing238
G
Gear change Gear recommendation
42
Information on the selected gear42
Gear changing Gear stick
135
General view Cockpit
27
Genuine parts191
Glasses compartment95
Glow plug system Warning light
34
H
Hazard warning light system
71
HBA145
Head airbag18
Headlamp assistant Warning icon
40
Headlamp Assistant72
Headlight cleaning system Headlight cleaning system
78
Headlights Bulb arrangement
243
Driving abroad72
Headlight cleaning system78
Headlights with CORNER function71
Headrest removing and installing
87
Headrests87
Height adjustment87
Heater Windscreen and rear window
75
Heating118
Air distribution control122
Controls119
Exterior mirrors80
Seats88
HHC145
Hill Start Assist (HHC)145
Hitch184
Drawback load184
Hook107
Horn27
I
i-Size
25
Ice scrapers196
Ignition lock127
Immobilizer126
Individual settings Locking
56
Unlocking56
Inertia reel13
Information system41
Compass point display48
Door warning41
Eco-tips49
Gear recommendation42
MAXI DOT display45
Multifunction display42
operation43
Service interval display49
Information system operation43
Infotainment4
Instrument cluster28
Auto-check control41
Counter for distance driven31
Display29
Fuel gauge30
Overview29
Revolutions counter29
Temperature gauge30
Warning lights31
Interior care198
Natural leather199
260Index
Page 265 of 276
Parking assistanceActivation / deactivation149
Display in the Infotainment display148
Parking brake133
Warning light32
Parking brake - Auto Hold function Warning light
37
Parking lights67
ParkPilot147
Park the vehicle see Parking
134
Part replacement190
Passive safety Before setting off
8
Driving safety8
Passive Safety8
Pedals135
Footmats135
Petrol see fuel
202
Phone box92
Plastic parts196
Polishing vehicle paint work see vehicle care
195
Power limit sliding/tilting roof
65
Power steering Warning light
33
Practical equipment Reflective vest
223
Practical features 12 volt socket in luggage compartment
101
12 volt socket inside100
Pockets on the backs of the front seats97
Pockets on the inner sides of the front seats97
Seat backrest with long cargo channel86
Storage compartment for umbrella97
Storage compartment under passenger seat96
Waste container93
Proactive passenger protection173
Warning light35
ProActive passenger protection Function
174
Protective films195
Puncture repair kit228
R
Radiator blind
140
Radiator fan208
Radio see Infotainment
4
Radio remote control Auxiliary heating (heating and ventilation)
125
Raising the vehicle226
Rear Interior light
74
Rear-view mirror Exterior mirrors
80
Fold in passenger mirror80
Synchronous adjustment of the rear-view mir- ror
80
Rear fog light70
Warning light34
Rear mirror79
Rear Traffic Alert149
Activation / deactivation151
Information messages151
Operation150
Rear View Camera151
Activation / deactivation152
Function keys153
Guidelines and roadway153
Mode - driving up to a trailer / distance moni- toring
155
Mode - monitor the area behind the vehicle155
Mode - parallel parking154
Mode - traverse parking154
Operation152
Rear view mirror Interior mirror79
Rear window - heater75
Refuelling201
Fuel201
Remote control Locking
53
Replacing the battery234
Synchronisation process235
Unlocking53
Remote control key Replacing the battery
234
Removable lamp Change the lamp battery
235
Removable light Removing light
114
Removable through-loading bag98
Repairs and technical alterations190
Replace Bulb for dipped beam (Halogen-headlamp)
243
Bulb for main beam (Halogen-headlamp)243
the battery in the auxiliary heating (auxiliary heating) in the remote control
235
Replacing Bulb for the fog light
244
Bulb in rear light245
Bulbs242
Fuses238
Fuses – engine compartment241
Fuses – LHD239
Fuses – RHD239
Rear window wiper blade238
Vehicle battery215
windscreen wiper blades237
Replenishing Coolant
212
Engine oil210
Windscreen washer fluid208
Reversible seat belts14
263Index