CAN SKODA SUPERB 2015 3.G / (B8/3V) Owner's Manual
[x] Cancel search | Manufacturer: SKODA, Model Year: 2015, Model line: SUPERB, Model: SKODA SUPERB 2015 3.G / (B8/3V)Pages: 276, PDF Size: 42.14 MB
Page 6 of 276
On-board literature
You will always find this Owner's Manual and the Service Plan included in the
on-board literature for your vehicle.
Depending on the equipment, the on-board literature can also include the In-
fotainment Owner´s Manual and in some countries also the brochure On the
road .
Owner's Manual
These Owner´s Manual apply to all body variants of the vehicle and all related
model versions as well as all equipment levels .
This Owner's Manual describes all possible equipment variants without identi-
fying them as special equipment, model variants or market-dependent equip-
ment. Consequently, this vehicle does not contain all of the equipment com-
ponents described in this Owner's Manual.
The level of equipment in your vehicle refers to your purchase contract for the vehicle. For any questions regarding the scope of equipment, please contact a
ŠKODA Partner.
The Pictures in this Owner's Manual are for illustrative purposes only. The il-
lustrations can differ in minor details from your vehicle; they are only intended
to provide general information.
ŠKODA AUTO a.s. pursues a policy of ongoing product and model development
with all vehicles. Changes in terms of supply scope are possible at any time
with regard to design, equipment and technology. The information listed in
this Owner's Manual corresponds to the information available at the time of
going to press.
Therefore legal claims cannot be made based on the technical data, illustra-
tions and information contained in this Owner's Manual.
We recommend that the web pages that are referred to in this Owner's Man-
ual are displayed using the classic view. If the web pages are displayed using
the mobile view, they may not contain all necessary information.
Service schedule
The service schedule includes the documentation of the vehicle handover,
warranty information and service events.
Infotainment Owner´s Manual
The Infotainment Owner's Manual contains a description of the Infotainment
service and possibly also some functions and vehicle systems.On-the-road brochure
The On The Move brochure contains the importer's customer service number
and the service number in the individual countries as well as the emergency
numbers.
Online user manualsFig. 1
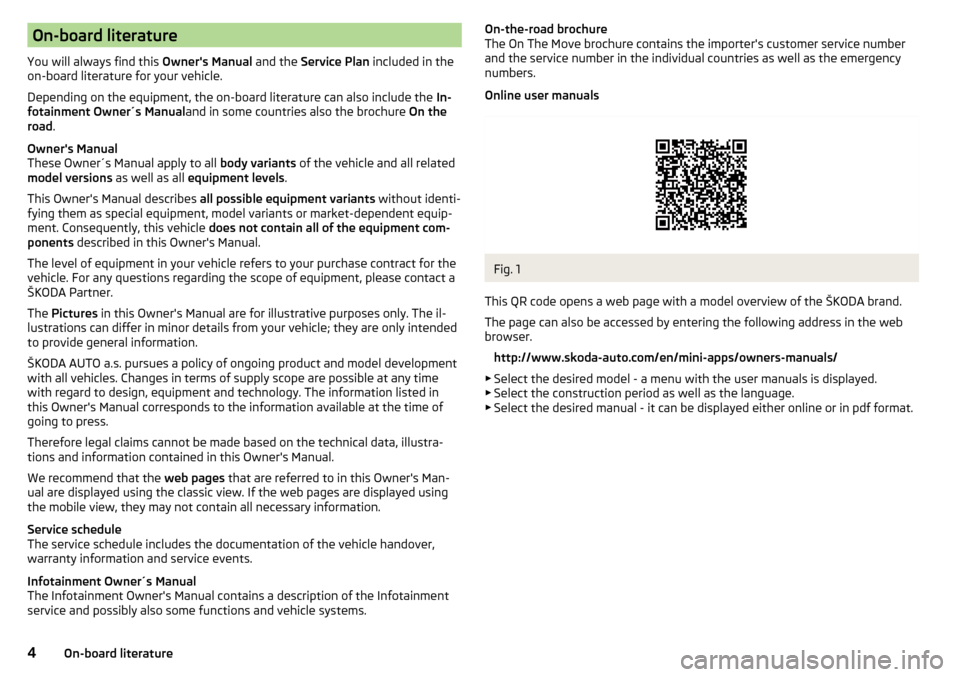
This QR code opens a web page with a model overview of the ŠKODA brand.
The page can also be accessed by entering the following address in the web
browser.
http://www.skoda-auto.com/en/mini-apps/owners-manuals/
▶ Select the desired model - a menu with the user manuals is displayed.
▶ Select the construction period as well as the language.
▶ Select the desired manual - it can be displayed either online or in pdf format.
4On-board literature
Page 7 of 276
Notes
Terms used
The on-board literature contains the following terms relating to the service
work for your vehicle. - Workshop - a workshop that carries out specialist service tasks
for ŠKODA vehicles. A specialist can be a ŠKODA Partner, a ŠKODA Serv-
ice Partner, or an independent workshop.
- a workshop that has been contractually authorised
by the manufacturer or its sales partner to perform service tasks on
ŠKODA vehicles and to sell ŠKODA Genuine Parts.
- a company that has been authorised by the manufacturer
or its sales partner to sell new ŠKODA vehicles and, when applicable, to service them using ŠKODA Genuine Parts and sell ŠKODA Genuine Parts.
Explanation of symbols
An overview of the symbols used in the Owner's Manual and a brief explana-
tion of their meaning.Reference to the introductory module of a chapter with important infor-
mation and safety warningsContinuation of the module on the next pageSituations in which the vehicle must be stopped as soon as possible®Registered trademarkTelephone operation in the MAXI DOT displayText display in the segment displayWARNINGTexts with this symbol draw attention to threats of a serious accident, in-
jury or loss of life .
CAUTION
Texts with this symbol draw attention to the risk of vehicle damage or possible
inoperability of some systems.
For the sake of the environment
Texts with this symbol contain information on environmental protection as
well as tips for economical operation.“Specialist”“ŠKODA service partner”“ŠKODA partner”NoteTexts with this symbol contain additional information.5Notes
Page 10 of 276
Safety
Passive Safety
General information
Introduction
This chapter contains information on the following subjects:
Before setting off
8
Driving safety
8
In this section of the instructions you will find important information, tips and
notes on the subject of passive safety.
We have combined everything here which you should be familiar with, for ex-
ample, regarding seat belts, airbags, safety of children and anything similar.
You can find further information on safety concerning you and those travelling
with you in the following chapters of this Owner's Manual.
The complete on-board literature should therefore always be in the vehicle.
This applies in particular, if you rent out or sell the vehicle.
Before setting off
For your own safety and the safety of the people travelling with you, please
pay attention to the following points before setting off.
▶ Ensure that the lighting and the turn signal system are functioning properly.
▶ Ensure that the function of the wipers and the condition of the wiper blades
are free of any defects.
▶ Ensure that all of the windows offer good visibility to the outside.
▶ Adjust the rear-view mirror so that vision to the rear is guaranteed.
▶ Ensure that the mirrors are not covered.
▶ Check the tyre inflation pressure.
▶ Check the engine oil, brake fluid and coolant level.
▶ Secure all items of luggage.
▶ Do not exceed the permissible axle loads and permissible gross weight of the
vehicle.
▶ Close all doors as well as the bonnet and boot lid.
▶ Ensure that no objects can obstruct the pedals.
▶
Protect children in suitable child seats with correctly fastened seat belts
» page 20 , Transporting children safely .
▶ Adopt the correct seated position » page 8, Correct and safe seated posi-
tion . Tell your passengers to assume the correct seated position.
Driving safety
The driver is fully responsible for himself and passengers, especially children. If
your driving safety is effected, you place yourself and the oncoming traffic at
risk.
The following guidelines must therefore be observed. ▶ Do not become distracted from concentrating on the traffic situation, (e.g. by
your passengers or mobile phone calls).
▶ Never drive when your driving ability is impaired, (e.g. due to medication, al-
cohol or drugs).
▶ Keep to the traffic regulations and the permissible speed limit.
▶ Always adjust the driving speed to the road, traffic and weather conditions.
▶ Take regular breaks on long journeys (at least every two hours).
The following list contains instructions for the Passenger which, if not ob-
served, may cause serious injuries or death. ▶ Do not lean against the dash panel.
▶ Do not put your feet on the dash panel.
The following list contains instructions for all Passengers which, if not ob-
served, may cause serious injuries or death. ▶ Do not sit only on the front part of the seat.
▶ Do not sit facing to the side.
▶ Do not lean out of the window.
▶ Do not put your limbs out of the window.
▶ Do not put your feet on the seat cushion.
Correct and safe seated position
Introduction
This chapter contains information on the following subjects:
Correct seat position of the driver
9
Adjusting the steering wheel position
9
Correct seated position for the front passenger
10
Correct seated position for the passengers in the rear seats
10
8Safety
Page 11 of 276
WARNING■The front seats and all head restraints must be adjusted to match the
body size at all times and the seat belt must always be fastened properly to
provide the most effective levels of protection to the passengers.■
Each occupant must correctly fasten the seat belt belonging to the seat.
Children must be fastened » page 20, Transporting children safely with a
suitable restraint system.
■
By sitting incorrectly, the occupant is risking life-threatening injuries.
■
The seat backrests must not be tilted too far back when driving, as this
will impair the function of the seat belts and of the airbag system – risk of
injury!
Correct seat position of the driver
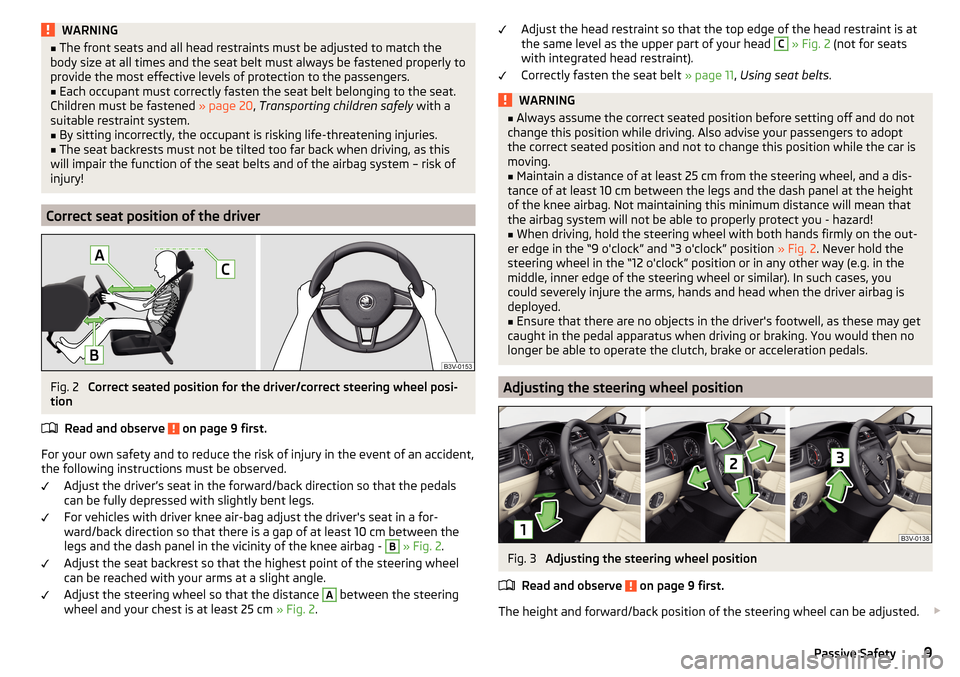
Fig. 2
Correct seated position for the driver/correct steering wheel posi-
tion
Read and observe
on page 9 first.
For your own safety and to reduce the risk of injury in the event of an accident,
the following instructions must be observed.
Adjust the driver’s seat in the forward/back direction so that the pedals
can be fully depressed with slightly bent legs.
For vehicles with driver knee air-bag adjust the driver's seat in a for-
ward/back direction so that there is a gap of at least 10 cm between the
legs and the dash panel in the vicinity of the knee airbag -
B
» Fig. 2 .
Adjust the seat backrest so that the highest point of the steering wheel
can be reached with your arms at a slight angle.
Adjust the steering wheel so that the distance
A
between the steering
wheel and your chest is at least 25 cm » Fig. 2.
Adjust the head restraint so that the top edge of the head restraint is at
the same level as the upper part of your head C » Fig. 2 (not for seats
with integrated head restraint).
Correctly fasten the seat belt » page 11, Using seat belts .WARNING■
Always assume the correct seated position before setting off and do not
change this position while driving. Also advise your passengers to adopt
the correct seated position and not to change this position while the car is
moving.■
Maintain a distance of at least 25 cm from the steering wheel, and a dis-
tance of at least 10 cm between the legs and the dash panel at the height
of the knee airbag. Not maintaining this minimum distance will mean that
the airbag system will not be able to properly protect you - hazard!
■
When driving, hold the steering wheel with both hands firmly on the out-
er edge in the “9 o'clock” and “3 o'clock” position » Fig. 2. Never hold the
steering wheel in the “12 o'clock” position or in any other way (e.g. in the
middle, inner edge of the steering wheel or similar). In such cases, you
could severely injure the arms, hands and head when the driver airbag is
deployed.
■
Ensure that there are no objects in the driver's footwell, as these may get
caught in the pedal apparatus when driving or braking. You would then no
longer be able to operate the clutch, brake or acceleration pedals.
Adjusting the steering wheel position
Fig. 3
Adjusting the steering wheel position
Read and observe
on page 9 first.
The height and forward/back position of the steering wheel can be adjusted.
9Passive Safety
Page 12 of 276
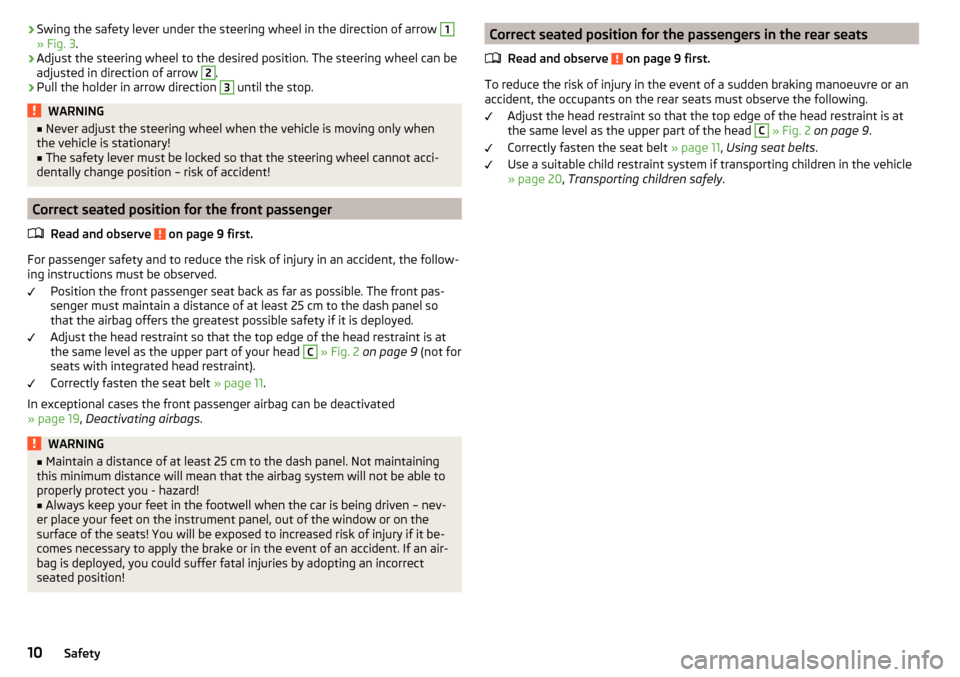
›Swing the safety lever under the steering wheel in the direction of arrow 1» Fig. 3
.›
Adjust the steering wheel to the desired position. The steering wheel can be
adjusted in direction of arrow
2
.
›
Pull the holder in arrow direction
3
until the stop.
WARNING■ Never adjust the steering wheel when the vehicle is moving only when
the vehicle is stationary!■
The safety lever must be locked so that the steering wheel cannot acci-
dentally change position – risk of accident!
Correct seated position for the front passenger
Read and observe
on page 9 first.
For passenger safety and to reduce the risk of injury in an accident, the follow-
ing instructions must be observed.
Position the front passenger seat back as far as possible. The front pas-
senger must maintain a distance of at least 25 cm to the dash panel so
that the airbag offers the greatest possible safety if it is deployed.
Adjust the head restraint so that the top edge of the head restraint is at
the same level as the upper part of your head
C
» Fig. 2 on page 9 (not for
seats with integrated head restraint).
Correctly fasten the seat belt » page 11.
In exceptional cases the front passenger airbag can be deactivated
» page 19 , Deactivating airbags .
WARNING■
Maintain a distance of at least 25 cm to the dash panel. Not maintaining
this minimum distance will mean that the airbag system will not be able to
properly protect you - hazard!■
Always keep your feet in the footwell when the car is being driven – nev-
er place your feet on the instrument panel, out of the window or on the
surface of the seats! You will be exposed to increased risk of injury if it be-
comes necessary to apply the brake or in the event of an accident. If an air-
bag is deployed, you could suffer fatal injuries by adopting an incorrect
seated position!
Correct seated position for the passengers in the rear seats
Read and observe
on page 9 first.
To reduce the risk of injury in the event of a sudden braking manoeuvre or an
accident, the occupants on the rear seats must observe the following.
Adjust the head restraint so that the top edge of the head restraint is at
the same level as the upper part of the head
C
» Fig. 2 on page 9 .
Correctly fasten the seat belt » page 11, Using seat belts .
Use a suitable child restraint system if transporting children in the vehicle
» page 20 , Transporting children safely .
10Safety
Page 13 of 276
Seat belts
Using seat belts
Introduction
This chapter contains information on the following subjects:
The physical principle of a head-on collision
12
Correct routing of seat belt
12
Fastening and unfastening seat belts
13
Seat belts that are fastened correctly offer good protection in the event of an
accident. They reduce the risk of an injury and increase the chance of survival
in the event of a major accident.
Properly fastened seat belts hold occupants to correctly set seats in the right
seat position.
Particular safety aspects must be observed when transporting children in the
vehicle » page 20 .
WARNING■
Fasten your seat belt before each journey - even when driving in town!
This also applies to other passengers - there is a danger of injury!■
Maximum seat belt protection is only achieved if you are correctly seated
» page 8 , Correct and safe seated position .
■
The seat backrests of the front seats must not be tilted too far to the rear
otherwise the seatbelts can lose their effectiveness.
WARNINGInformation on the correct routing of the belt■Always ensure that the webbing of the seat belts is properly routed. Seat
belts which are not correctly adjusted can themselves cause injuries even
in minor accidents.■
Adjust the height of the belt in such a way that the shoulder part of the
belt is roughly positioned across the middle of your shoulder - on no ac-
count across your neck.
WARNING (Continued)■ A seat belt which is hanging too loose can result in injuries as your body is
moved forward by the kinetic energy produced in an accident and is then
suddenly held firm by the belt.■
The belt webbing must not run across solid or fragile objects (e.g. specta-
cles, ball-point pens, bunches of keys etc.). Such objects can cause injury.
WARNINGInformation on dealing with the safety belts■The belt webbing must not be jammed in-between at any point or twis-
ted, or chafe against any sharp edges.■
Make sure you do not catch the seat belt in the door when closing it.
WARNINGInformation on the proper use of safety belts■No two persons (also not children) should ever use a single seat belt to-
gether.■
The lock tongue should only be inserted into the lock which is the correct
one for your seat. Wrong use of the safety belt will reduce its capacity to
protect and the risk of injury increases.
■
The slot of the belt tongue must not be blocked, otherwise the belt
tongue will not lock in place properly.
■
Many layers of clothing and loose clothing (e. g. a winter coat over a jack-
et) do not allow you to be correctly seated and impairs proper operation of
the seat belts.
■
Do not use clamps or other objects to adjust seat belts (e.g. for shorten-
ing the belts for smaller persons).
■
The seat belts for the rear seats can only fulfil their function reliably
when the seat backrests are correctly locked into position » page 85.
WARNINGInformation on the care and maintenance of safety belts■The belt webbing must always be kept clean. Soiled belt webbing may im-
pair proper operation of the inertia reel » page 200.■
The seat belts must not be removed or changed in any way. Do not at-
tempt to repair the seat belts yourself.
11Seat belts
Page 14 of 276
WARNING (Continued)■Check the condition of all the seat belts on a regular basis. If any damage
to the seat belts, seat belt connections, inertia reel or the lock is detected,
the relevant seat belt must be replaced by a specialist garage.■
Damaged seat belts which have been subjected to stress in an accident
and were therefore stretched, must be replaced – this is best done by a
specialist garage. The anchorage points of the belts must also be inspec-
ted. The anchorage points for the belts should also be checked.
The physical principle of a head-on collision
Fig. 4
Driver without a fastened seat belt/rear seat passenger without a
fastened seat belt
Read and observe
on page 11 first.
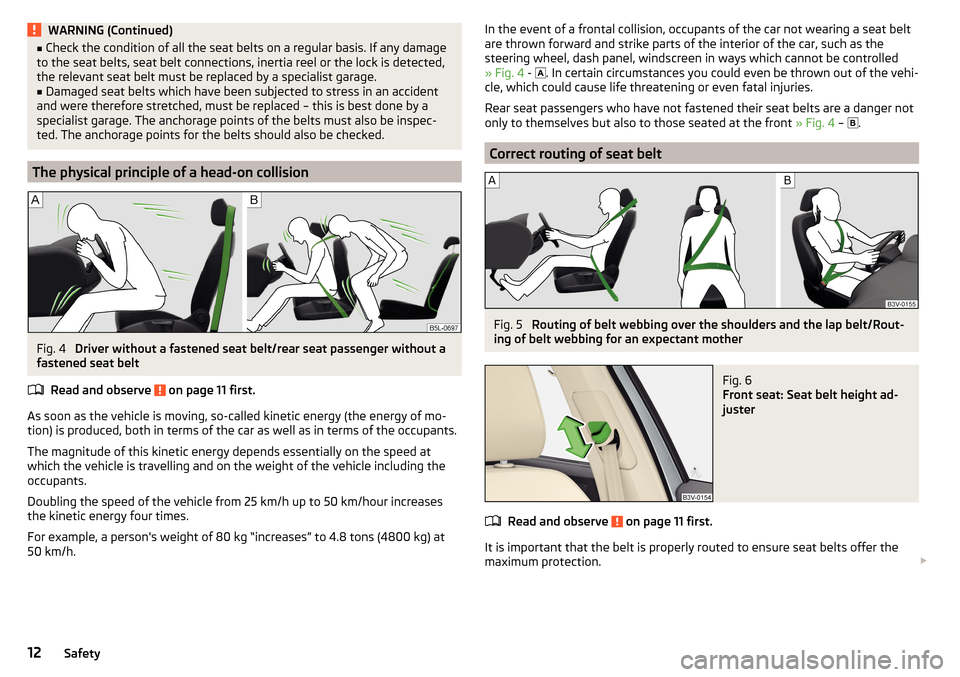
As soon as the vehicle is moving, so-called kinetic energy (the energy of mo-
tion) is produced, both in terms of the car as well as in terms of the occupants.
The magnitude of this kinetic energy depends essentially on the speed at
which the vehicle is travelling and on the weight of the vehicle including the
occupants.
Doubling the speed of the vehicle from 25 km/h up to 50 km/hour increases
the kinetic energy four times.
For example, a person's weight of 80 kg “increases” to 4.8 tons (4800 kg) at
50 km/h.
In the event of a frontal collision, occupants of the car not wearing a seat belt
are thrown forward and strike parts of the interior of the car, such as the
steering wheel, dash panel, windscreen in ways which cannot be controlled
» Fig. 4 -
. In certain circumstances you could even be thrown out of the vehi-
cle, which could cause life threatening or even fatal injuries.
Rear seat passengers who have not fastened their seat belts are a danger not only to themselves but also to those seated at the front » Fig. 4 –
.
Correct routing of seat belt
Fig. 5
Routing of belt webbing over the shoulders and the lap belt/Rout-
ing of belt webbing for an expectant mother
Fig. 6
Front seat: Seat belt height ad-
juster
Read and observe on page 11 first.
It is important that the belt is properly routed to ensure seat belts offer the
maximum protection.
12Safety
Page 15 of 276
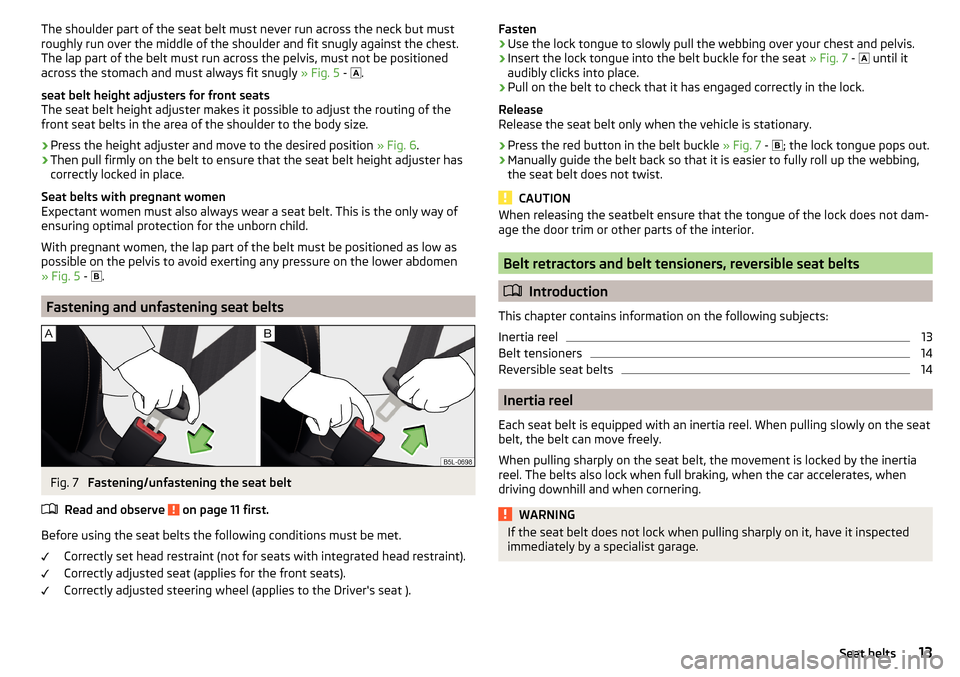
The shoulder part of the seat belt must never run across the neck but must
roughly run over the middle of the shoulder and fit snugly against the chest.
The lap part of the belt must run across the pelvis, must not be positioned
across the stomach and must always fit snugly » Fig. 5 -
.
seat belt height adjusters for front seats
The seat belt height adjuster makes it possible to adjust the routing of the
front seat belts in the area of the shoulder to the body size.›
Press the height adjuster and move to the desired position » Fig. 6.
›
Then pull firmly on the belt to ensure that the seat belt height adjuster has
correctly locked in place.
Seat belts with pregnant women
Expectant women must also always wear a seat belt. This is the only way of ensuring optimal protection for the unborn child.
With pregnant women, the lap part of the belt must be positioned as low as
possible on the pelvis to avoid exerting any pressure on the lower abdomen
» Fig. 5 -
.
Fastening and unfastening seat belts
Fig. 7
Fastening/unfastening the seat belt
Read and observe
on page 11 first.
Before using the seat belts the following conditions must be met. Correctly set head restraint (not for seats with integrated head restraint).
Correctly adjusted seat (applies for the front seats).
Correctly adjusted steering wheel (applies to the Driver's seat ).
Fasten›Use the lock tongue to slowly pull the webbing over your chest and pelvis.›
Insert the lock tongue into the belt buckle for the seat » Fig. 7 -
until it
audibly clicks into place.
›
Pull on the belt to check that it has engaged correctly in the lock.
Release
Release the seat belt only when the vehicle is stationary.
›
Press the red button in the belt buckle » Fig. 7 -
; the lock tongue pops out.
›
Manually guide the belt back so that it is easier to fully roll up the webbing,
the seat belt does not twist.
CAUTION
When releasing the seatbelt ensure that the tongue of the lock does not dam-
age the door trim or other parts of the interior.
Belt retractors and belt tensioners, reversible seat belts
Introduction
This chapter contains information on the following subjects:
Inertia reel
13
Belt tensioners
14
Reversible seat belts
14
Inertia reel
Each seat belt is equipped with an inertia reel. When pulling slowly on the seat
belt, the belt can move freely.
When pulling sharply on the seat belt, the movement is locked by the inertia
reel. The belts also lock when full braking, when the car accelerates, when
driving downhill and when cornering.
WARNINGIf the seat belt does not lock when pulling sharply on it, have it inspected
immediately by a specialist garage.13Seat belts
Page 16 of 276

Belt tensioners
The safety for the driver, front passenger and passengers on the outer rear
seats who are wearing their seat belts , is enhanced by the belt tensioners fit-
ted to the inertia reels on the front and rear external seat belts.
If there is a collision with a certain severity the seat belts are tightened by the
belt tensioner so that unwanted body motion is prevented.
Belt tensioners are not activated in the event of minor collisions, in the case
of a roll-over and also not in accidents in which no major forces are produced.WARNING■ Any work on the belt tensioner system including removal and installation
of system components because of other repair work, must only be carried
out by a specialist garage.■
The protective function of the system is only adequate for a single acci-
dent. If the belt tensioners have been deployed, it is then necessary to re-
place the entire system.
Note
■ The belt tensioners can also be deployed if the seat belts are not fastened.■Smoke is generated when the belt tensioners are deployed. This is not an in-
dication of a fire in the vehicle.
Reversible seat belts
Safety for the driver and front passenger wearing their seat belts is enhanced
by reversible seat belts.
Reversible seat belts are automatically tensioned in critical driving situations
tightly over the body and then released again.
Further information » page 173, Proactive passenger protection (Crew Protect
Assist) .
Airbag system
Description of the airbag system
Introduction
This chapter contains information on the following subjects:
System description
15
Airbag deployment
15
The airbag system supplements the fastened seat belts and provides addition-
al occupant protection in severe frontal and side collisions.
The functional status of the airbag system is indicated by the warning light
in the instrument cluster » page 35.
WARNING■
An airbag can only offer you optimal protection in combination with a
fastened seat belt .■
The airbag is not a substitute for the seat belt, but instead forms part of
the complete passive vehicle safety concept.
■
To ensure passengers are protected with the greatest possible effect
when the airbag is deployed, the front seats must be correctly adjusted to
match the body size » page 8, Correct and safe seated position .
■
If you do not fasten the seat belts when driving, lean too far forward or
adopt an incorrect seated position, you are exposing yourself to increased
risk of injury in the event of an accident.
WARNINGInformation on the use of the airbag system■If there is a fault, have the airbag system checked immediately by a spe-
cialist garage. Otherwise, there is a risk of the airbag not being activated in
the event of an accident.■
No modifications of any kind must be made to parts of the airbag system.
■
Any work on the airbag system including the installation and removal of
system components due to other repair work (e.g. removal of the steering
wheel) must only be carried out by a specialist garage.
■
Never make any changes to the front bumper or the bodywork.
■
Do not manipulate individual parts of the airbag system, as this might re-
sult in the airbag being deployed.
■
The airbag system must then be replaced if the airbag has been deployed.
14Safety
Page 18 of 276
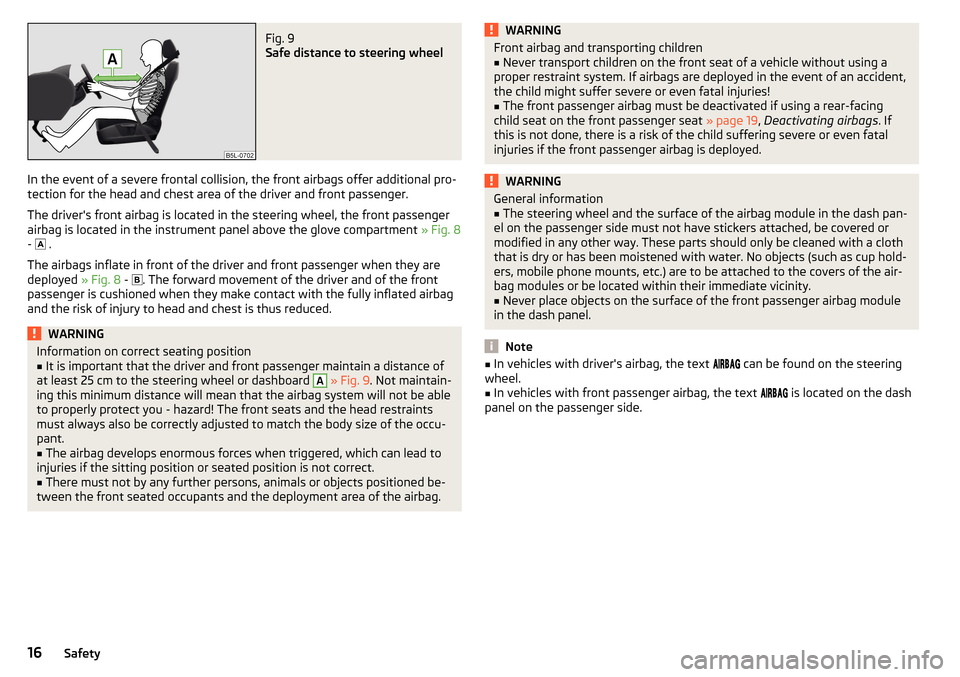
Fig. 9
Safe distance to steering wheel
In the event of a severe frontal collision, the front airbags offer additional pro-
tection for the head and chest area of the driver and front passenger.
The driver's front airbag is located in the steering wheel, the front passenger airbag is located in the instrument panel above the glove compartment » Fig. 8
- .
The airbags inflate in front of the driver and front passenger when they are
deployed » Fig. 8 -
. The forward movement of the driver and of the front
passenger is cushioned when they make contact with the fully inflated airbag
and the risk of injury to head and chest is thus reduced.
WARNINGInformation on correct seating position■It is important that the driver and front passenger maintain a distance of
at least 25 cm to the steering wheel or dashboard A
» Fig. 9 . Not maintain-
ing this minimum distance will mean that the airbag system will not be able
to properly protect you - hazard! The front seats and the head restraints
must always also be correctly adjusted to match the body size of the occu-
pant.
■
The airbag develops enormous forces when triggered, which can lead to
injuries if the sitting position or seated position is not correct.
■
There must not by any further persons, animals or objects positioned be-
tween the front seated occupants and the deployment area of the airbag.
WARNINGFront airbag and transporting children■Never transport children on the front seat of a vehicle without using a
proper restraint system. If airbags are deployed in the event of an accident,
the child might suffer severe or even fatal injuries!■
The front passenger airbag must be deactivated if using a rear-facing
child seat on the front passenger seat » page 19, Deactivating airbags . If
this is not done, there is a risk of the child suffering severe or even fatal
injuries if the front passenger airbag is deployed.
WARNINGGeneral information■The steering wheel and the surface of the airbag module in the dash pan-
el on the passenger side must not have stickers attached, be covered or
modified in any other way. These parts should only be cleaned with a cloth
that is dry or has been moistened with water. No objects (such as cup hold-
ers, mobile phone mounts, etc.) are to be attached to the covers of the air-
bag modules or be located within their immediate vicinity.■
Never place objects on the surface of the front passenger airbag module
in the dash panel.
Note
■ In vehicles with driver's airbag, the text can be found on the steering
wheel.■
In vehicles with front passenger airbag, the text
is located on the dash
panel on the passenger side.
16Safety