display SKODA SUPERB 2015 3.G / (B8/3V) Swing Infotinment Car Radio Manual
[x] Cancel search | Manufacturer: SKODA, Model Year: 2015, Model line: SUPERB, Model: SKODA SUPERB 2015 3.G / (B8/3V)Pages: 43, PDF Size: 4.7 MB
Page 18 of 43
Automatic change from DAB to FM
With bad DAB reception the device tries to find an FM transmitter.
The station name is followed by (
) while the station is being received on the
FM band. The (
) marker disappears when the relevant DAB station can be re-
ceived again.
If a DAB station is also not available in the FM band due to poor reception, the
device will be switched to mute.Media
Operation
Introduction
This chapter contains information on the following subjects:
Main menu
16
Select audio source
17
Playback
17
Folder / track list
17
Multimedia database
18
Media settings
18
The device allows you to play audio files from different media and connected
devices (hereinafter referred to only as “audio sources”).
Main menu
Fig. 6
Media - Main menu
In the main menu the audio source as well as their playback options can be se-
lected.
Display main menu
›
Press the button.
Main Menu - Information and function keys Information on playing track
Playback timeline with a slider
Select the audio source
ABC16Media
Page 19 of 43
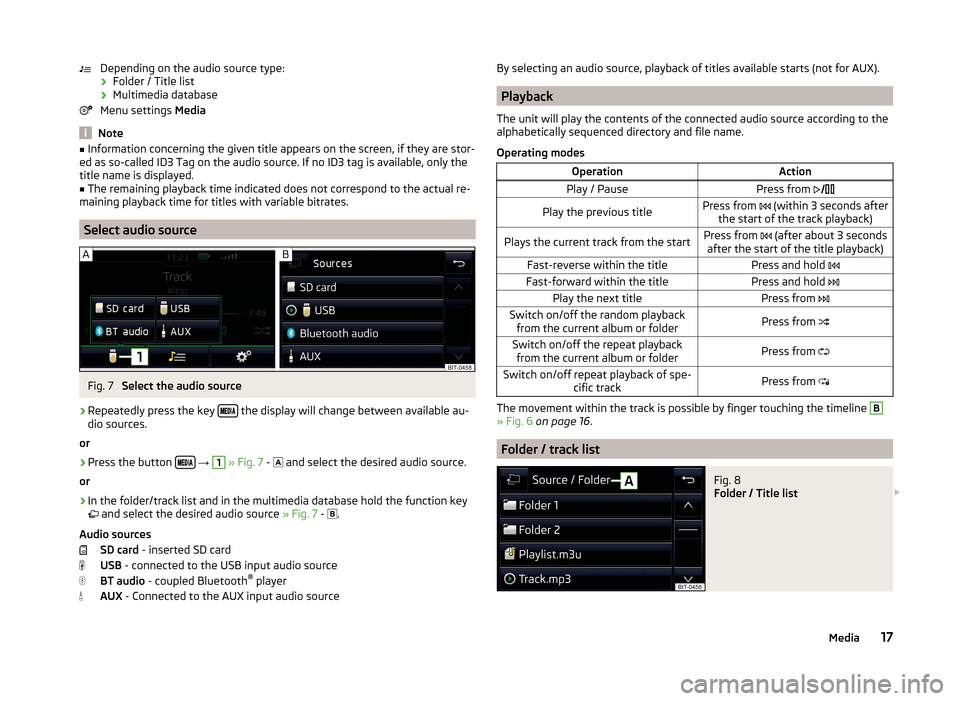
Depending on the audio source type:› Folder / Title list
› Multimedia database
Menu settings Media
Note
■
Information concerning the given title appears on the screen, if they are stor-
ed as so-called ID3 Tag on the audio source. If no ID3 tag is available, only the
title name is displayed.■
The remaining playback time indicated does not correspond to the actual re-
maining playback time for titles with variable bitrates.
Select audio source
Fig. 7
Select the audio source
›
Repeatedly press the key the display will change between available au-
dio sources.
or
›
Press the button
→
1
» Fig. 7 -
and select the desired audio source.
or
›
In the folder/track list and in the multimedia database hold the function key
and select the desired audio source » Fig. 7 -
.
Audio sources SD card - inserted SD card
USB - connected to the USB input audio source
BT audio - coupled Bluetooth ®
player
AUX - Connected to the AUX input audio source
By selecting an audio source, playback of titles available starts (not for AUX).
Playback
The unit will play the contents of the connected audio source according to the
alphabetically sequenced directory and file name.
Operating modes
OperationActionPlay / PausePress from Play the previous titlePress from (within 3 seconds after
the start of the track playback)Plays the current track from the startPress from (after about 3 seconds
after the start of the title playback)Fast-reverse within the titlePress and hold Fast-forward within the titlePress and hold Play the next titlePress from Switch on/off the random playback
from the current album or folderPress from Switch on/off the repeat playback
from the current album or folderPress from Switch on/off repeat playback of spe-
cific trackPress from
The movement within the track is possible by finger touching the timeline
B
» Fig. 6 on page 16 .
Folder / track list
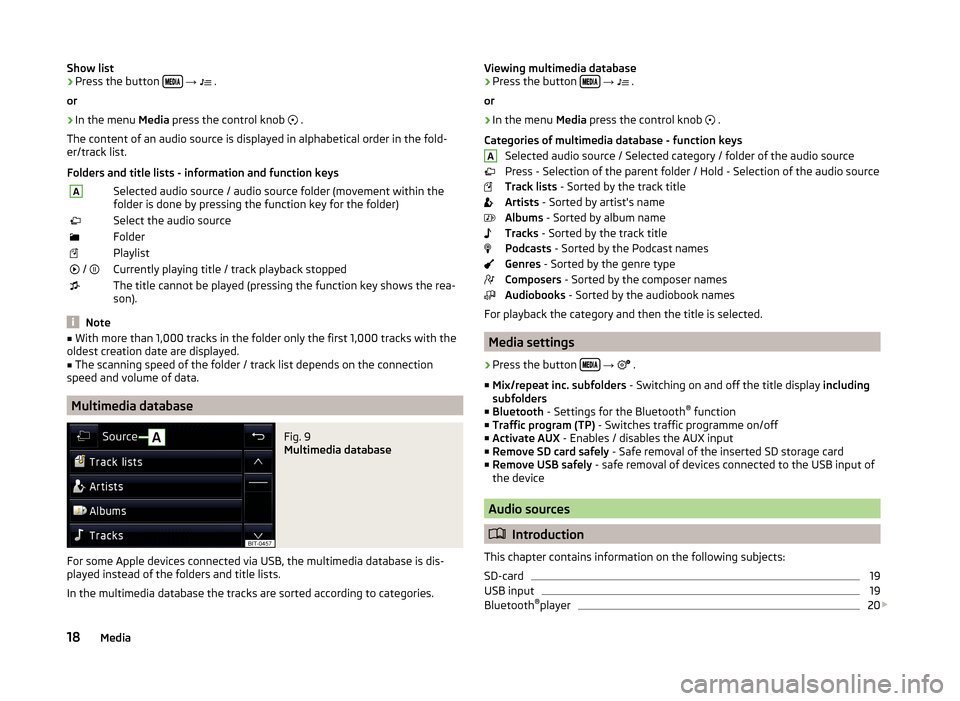
Fig. 8
Folder / Title list
17Media
Page 20 of 43
Show list›Press the button
→ .
or›
In the menu Media press the control knob
.
The content of an audio source is displayed in alphabetical order in the fold-
er/track list.
Folders and title lists - information and function keys
ASelected audio source / audio source folder (movement within the
folder is done by pressing the function key for the folder)Select the audio sourceFolderPlaylist / Currently playing title / track playback stoppedThe title cannot be played (pressing the function key shows the rea-
son).
Note
■ With more than 1,000 tracks in the folder only the first 1,000 tracks with the
oldest creation date are displayed.■
The scanning speed of the folder / track list depends on the connection
speed and volume of data.
Multimedia database
Fig. 9
Multimedia database
For some Apple devices connected via USB, the multimedia database is dis-
played instead of the folders and title lists.
In the multimedia database the tracks are sorted according to categories.
Viewing multimedia database›Press the button
→ .
or›
In the menu Media press the control knob
.
Categories of multimedia database - function keys Selected audio source / Selected category / folder of the audio source
Press - Selection of the parent folder / Hold - Selection of the audio source
Track lists - Sorted by the track title
Artists - Sorted by artist's name
Albums - Sorted by album name
Tracks - Sorted by the track title
Podcasts - Sorted by the Podcast names
Genres - Sorted by the genre type
Composers - Sorted by the composer names
Audiobooks - Sorted by the audiobook names
For playback the category and then the title is selected.
Media settings
›
Press the button
→
.
■ Mix/repeat inc. subfolders - Switching on and off the title display including
subfolders
■ Bluetooth - Settings for the Bluetooth ®
function
■ Traffic program (TP) - Switches traffic programme on/off
■ Activate AUX - Enables / disables the AUX input
■ Remove SD card safely - Safe removal of the inserted SD storage card
■ Remove USB safely - safe removal of devices connected to the USB input of
the device
Audio sources
Introduction
This chapter contains information on the following subjects:
SD-card
19
USB input
19
Bluetooth ®
player
20
A18Media
Page 21 of 43
AUX - input20Supported audio sources and file formats21
The device allows you to play audio files in various formats and to connect dif-
ferent source types » page 21.
WARNING■
Never place audio sources close to the airbags. They could be thrown into
the passenger compartment when the airbags are deployed, injuring the
occupants.■
Never place audio sources on the dash panel, in your hand or on your
knees. They could be thrown into the passenger compartment during sud-
den driving manoeuvres, thereby injuring the occupants.
■
Always route the connection cable of the audio source such that is does
not restrict you when driving.
CAUTION
Do not store any important data on the connected sources. ŠKODA assumes
no responsibility for lost or damaged files or connected audio sources.
SD-card
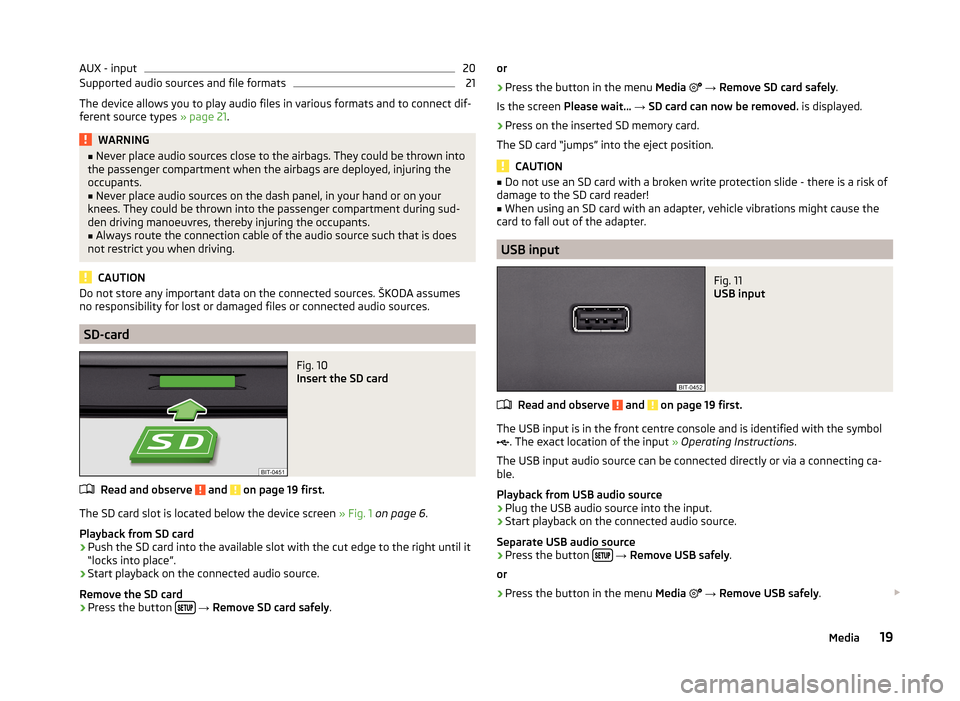
Fig. 10
Insert the SD card
Read and observe and on page 19 first.
The SD card slot is located below the device screen » Fig. 1 on page 6 .
Playback from SD card
›
Push the SD card into the available slot with the cut edge to the right until it
“locks into place”.
›
Start playback on the connected audio source.
Remove the SD card
›
Press the button
→ Remove SD card safely .
or›
Press the button in the menu Media
→ Remove SD card safely .
Is the screen Please wait... → SD card can now be removed. is displayed.
›
Press on the inserted SD memory card.
The SD card “jumps” into the eject position.
CAUTION
■ Do not use an SD card with a broken write protection slide - there is a risk of
damage to the SD card reader!■
When using an SD card with an adapter, vehicle vibrations might cause the
card to fall out of the adapter.
USB input
Fig. 11
USB input
Read and observe and on page 19 first.
The USB input is in the front centre console and is identified with the symbol
. The exact location of the input » Operating Instructions .
The USB input audio source can be connected directly or via a connecting ca-
ble.
Playback from USB audio source
›
Plug the USB audio source into the input.
›
Start playback on the connected audio source.
Separate USB audio source
›
Press the button
→ Remove USB safely .
or
›
Press the button in the menu Media
→ Remove USB safely .
19Media
Page 22 of 43
Is the screen Please wait... → USB device can be removed. is displayed.›
Disconnect the audio source from the corresponding USB input.
Charge USB audio source
With the ignition on after connecting the USB audio source, the charging proc-
ess is automatically started (applies for audio sources where charging via the
USB connector is possible).
Some connected audio sources may not be recognised and cannot be charged.
CAUTION
USB extension cords, or reducers may impair the function of the connected au-
dio source.
Note
We recommend that you use extension cords from ŠKODA Original Accesso-
ries.
Bluetooth ®
player
Read and observe
and on page 19 first.
The unit allows audio files of a connected Bluetooth ®
player to play using the
A2DP and AVRCP audio profile.
Connect the Bluetooth ®
player
›
Connect the player to the device - follow the same instructions as for pairing
the device with a telephone » page 24.
›
Select the audio source
BT audio » page 17 , Select audio source and then
the desired player.
Separate the Bluetooth ®
player
›
Terminate the connection in the list of paired devices » page 25.
If an Apple device is connected as a Bluetooth ®
player, and this is connected to
the USB input, then the Bluetooth ®
connection is dropped.
The following warning message appears in the screen Bluetooth audio (A2DP)
… Connection cancelled.
AUX - inputFig. 12
AUX input
Read and observe and on page 19 first.
The AUX input is located in the centre console and is marked with the lettering
. The exact location of the input
» Operating Instructions .
Connecting AUX audio sources
›
Insert the plug of the audio source in the corresponding well.
›
Select the audio source
AUX » page 17 , Select audio source .
›
Start playback on the connected audio source.
Disconnect AUX audio source
›
Disconnect the connector of the audio source.
CAUTION
■ The AUX input must only be used for audio devices!■If an external audio source is connected to the AUX input, which is equipped
with an adapter for external power supply, the sound may be impaired.
Note
■ The 3.5 mm stereo jack plug is used for the AUX input.■We recommend that you use extension cords from ŠKODA Original Accesso-
ries.20Media
Page 24 of 43
Telephone
Introductory information
Introduction
This chapter contains information on the following subjects:
Telephone
22
Settings
22
Function problems
23
This chapter covers the operation of a Bluetooth ®
device connected to the tel-
ephone.
If a telephone is connected to the device with multiple SIM cards, then calls
can be accepted by all SIM cards of the connected phone.
For outgoing calls, it depends on the type of connected telephone, either only
the primary SIM card or one of the other SIM cards can be selected.
WARNINGThe national legal regulations for using a mobile phone in a vehicle must be
observed.
Telephone
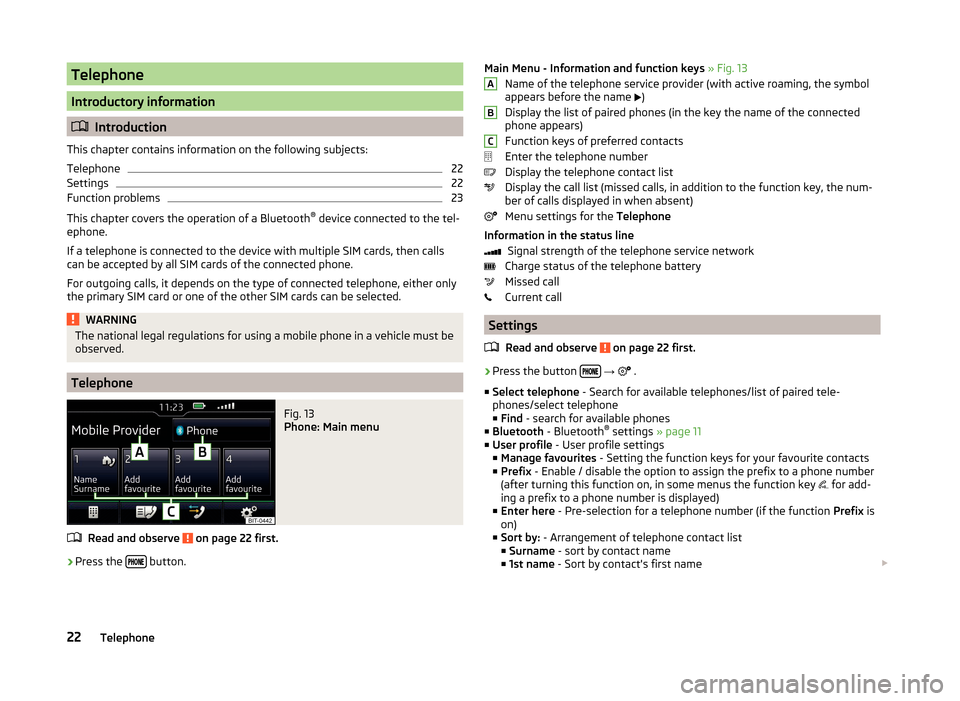
Fig. 13
Phone: Main menu
Read and observe on page 22 first.
›
Press the button.
Main Menu - Information and function keys
» Fig. 13
Name of the telephone service provider (with active roaming, the symbol
appears before the name
)
Display the list of paired phones (in the key the name of the connected
phone appears)
Function keys of preferred contacts
Enter the telephone number
Display the telephone contact list
Display the call list (missed calls, in addition to the function key, the num-
ber of calls displayed in when absent)
Menu settings for the Telephone
Information in the status line Signal strength of the telephone service network
Charge status of the telephone battery
Missed call
Current call
Settings
Read and observe
on page 22 first.
›
Press the button
→
.
■ Select telephone - Search for available telephones/list of paired tele-
phones/select telephone ■ Find - search for available phones
■ Bluetooth - Bluetooth ®
settings » page 11
■ User profile - User profile settings
■ Manage favourites - Setting the function keys for your favourite contacts
■ Prefix - Enable / disable the option to assign the prefix to a phone number
(after turning this function on, in some menus the function key for add-
ing a prefix to a phone number is displayed)
■ Enter here - Pre-selection for a telephone number (if the function Prefix is
on)
■ Sort by: - Arrangement of telephone contact list
■ Surname - sort by contact name
■ 1st name - Sort by contact's first name
ABC22Telephone
Page 26 of 43
During the pairing and connecting process the device can demand the confir-
mation by the Bluetooth ®
profile (e.g., enable contact import, or the connection
of an audio player or similar). The telephone display should be monitored to
confirm any possible request.
Please refer to the compatibility of telephones as well as updates which are
available for the Bluetooth ®
device, and are available on the ŠKODA Internet
pages.
http://infotainment.skoda-auto.com
Telephone search
The telephone is not in the list of paired devices
The telephone can be searched for in one of the following ways.
›
If there is no connected telephone to the device, then press the button →
Find telephone .
›
If there is no telephone connected to the device, then press the button →
→ Find .
A search for available devices starts. After about 30 seconds a list of found de-
vices appears, which is updated up to 1 minute after the start of the search ap-
pears.
›
If you do not want to wait for the display of the list press the function key
Results .
›
Select the desired telephone.
The telephone is in the list of paired devices
If a telephone is connected with the device then proceed in one of the follow- ing ways.
›
Press the button
→
and select the desired phone.
or
›
Press the button
→
Select telephone and select the desired tele-
phone.
or
›
Press the button
→
→ Bluetooth → Paired devices and select the
telephone and a Bluetooth ®
- connection profile » page 25.
Coupling - no telephone connected
›
Press the button
→ Find telephone .
A search for available Bluetooth ®
devices takes place.›
Select the desired telephone.
›
Confirm the pairing.
After pairing confirmation the telephone connects to the device.
Coupling - a telephone connection
›
Press the button
→
→ Find .
A search for available Bluetooth ®
devices takes place.
›
Select the desired telephone.
The following menu appears in the screen.
■ Cancel - Cancel the pairing
■ Replace - Coupling and replacement of the connected telephone
› Select the desired connection type.
› Confirm the pairing.
After pairing confirmation the telephone connects to the device.
Coupling from the telephone
When pairing from the telephone, follow the instructions in the owner's man-
ual of the telephone.
›
Search available Bluetooth ®
devices in your telephone.
›
Select the Bluetooth ®
device unit.
The device is displayed in the telephone to be connected to as SKODA BT .....
... is replaced with the last four symbols of the vehicle identification number
(VIN) of your vehicle.
›
Confirm the pairing request.
›
Confirm the pairing » page 25.
After pairing confirmation the telephone is connected to the device as follows.
If at the moment of pairing another telephone is connected then the newly
paired telephone will just be paired to the device but not connected.
Note
You can change the name of the Bluetooth ®
device » page 11 .24Telephone
Page 27 of 43
Pairing confirmation
Depending on the type of telephone, the pairing confirmation takes place in
one of the following ways.
Confirmation with the pairing from the device
Version 1
› Confirm the 6-digit PIN code displayed on the device screen and the tele-
phone display within 30 seconds on both the device and the telephone.
Version 2
› Confirm the pairing request in the telephone.
› Enter the 4 digit PIN code shown on the unit display into the telephone with-
in 30 seconds 1)
.
Confirmation with the pairing from the telephone
Version 1
› Confirm the pairing request on the device.
› Confirm the 6-digit PIN code displayed on the device screen and the tele-
phone display within 30 seconds on both the device and the telephone.
Version 2 › Enter a 4 digit PIN code into the telephone.
› Confirm the pairing request on the device.
› Enter the same PIN code into the device that is in the telephone and con-
firm 1)
.
Version 3
› Confirm the pairing request on the device.
› The device generates a 4-digit PIN code.
› The PIN code can be changed manually to a 4 - 16 digit code.
› Enter the same PIN code into the telephone that is in the device screen and
confirm 1)
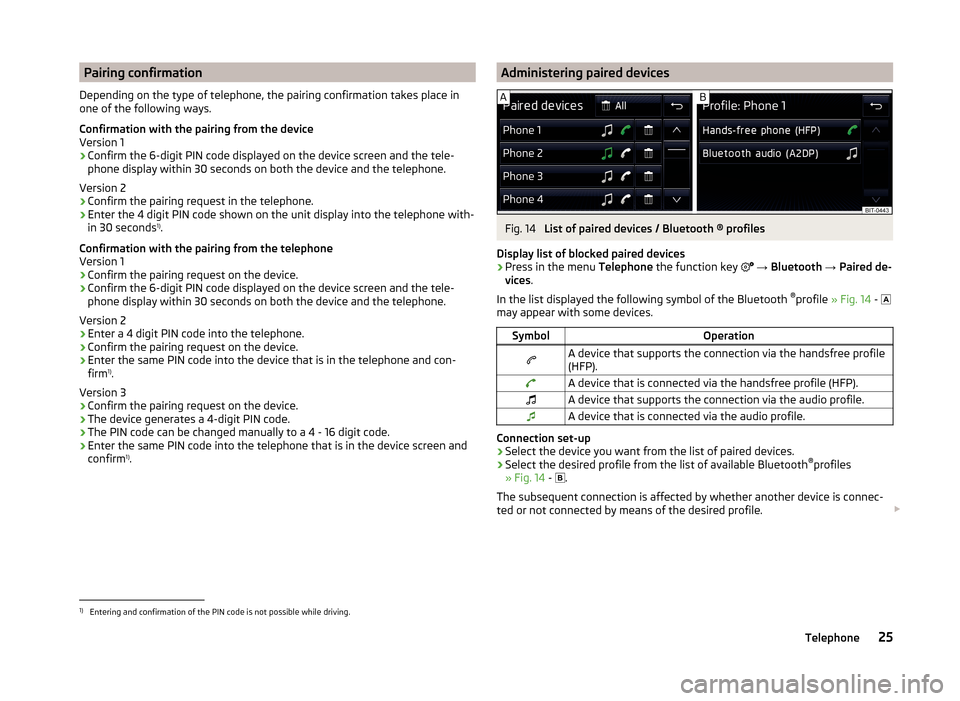
.Administering paired devicesFig. 14
List of paired devices / Bluetooth ® profiles
Display list of blocked paired devices
›
Press in the menu Telephone the function key
→ Bluetooth → Paired de-
vices .
In the list displayed the following symbol of the Bluetooth ®
profile » Fig. 14 -
may appear with some devices.
SymbolOperationA device that supports the connection via the handsfree profile
(HFP).A device that is connected via the handsfree profile (HFP).A device that supports the connection via the audio profile.A device that is connected via the audio profile.
Connection set-up
› Select the device you want from the list of paired devices.
› Select the desired profile from the list of available Bluetooth ®
profiles
» Fig. 14 -
.
The subsequent connection is affected by whether another device is connec-
ted or not connected by means of the desired profile.
1)
Entering and confirmation of the PIN code is not possible while driving.
25Telephone
Page 28 of 43
Disconnection
› Select the device you want from the list of paired devices.
› Select the desired profile from the list of available Bluetooth ®
profiles
» Fig. 14 -
.
› Press the function key
Disconnect .
Delete the paired device
› Select the device you want from the list of paired devices.
- Delete all device
- Delete the desired device
› Confirm the deletion by pressing the function key
Delete.
Note
The audio Bluetooth ®
profile can be turned off/on by pressing the button →
→ Bluetooth → BT audio (A2DP/AVRCP) .
Telephone functions
Introduction
This chapter contains information on the following subjects:
Enter a telephone number and dial
26
List of telephone contacts
27
Manage preferred contacts
27
Call list
28
Telephone conversation
28
Enter a telephone number and dial
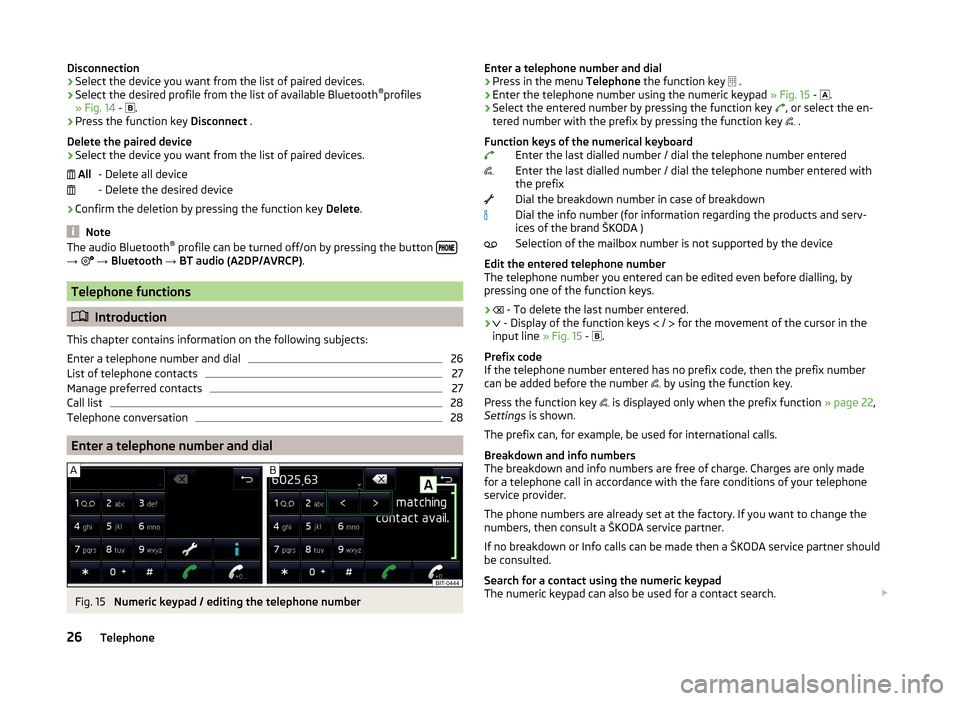
Fig. 15
Numeric keypad / editing the telephone number
AllEnter a telephone number and dial›Press in the menu Telephone the function key .›
Enter the telephone number using the numeric keypad » Fig. 15 -
.
›
Select the entered number by pressing the function key
, or select the en-
tered number with the prefix by pressing the function key
.
Function keys of the numerical keyboard Enter the last dialled number / dial the telephone number entered
Enter the last dialled number / dial the telephone number entered with
the prefix
Dial the breakdown number in case of breakdown
Dial the info number (for information regarding the products and serv-
ices of the brand ŠKODA )
Selection of the mailbox number is not supported by the device
Edit the entered telephone number
The telephone number you entered can be edited even before dialling, by
pressing one of the function keys.
›
- To delete the last number entered.
›
- Display of the function keys
/
for the movement of the cursor in the
input line » Fig. 15 -
.
Prefix code
If the telephone number entered has no prefix code, then the prefix number
can be added before the number by using the function key.
Press the function key is displayed only when the prefix function
» page 22,
Settings is shown.
The prefix can, for example, be used for international calls.
Breakdown and info numbers
The breakdown and info numbers are free of charge. Charges are only made
for a telephone call in accordance with the fare conditions of your telephone
service provider.
The phone numbers are already set at the factory. If you want to change the
numbers, then consult a ŠKODA service partner.
If no breakdown or Info calls can be made then a ŠKODA service partner should
be consulted.
Search for a contact using the numeric keypad
The numeric keypad can also be used for a contact search.
26Telephone
Page 29 of 43
For example, if you enter 32, the unit will display contacts with the letter se-
quence DA, FA, EB, etc. next to the numerical keypad in areas A » Fig. 15 .
List of telephone contacts
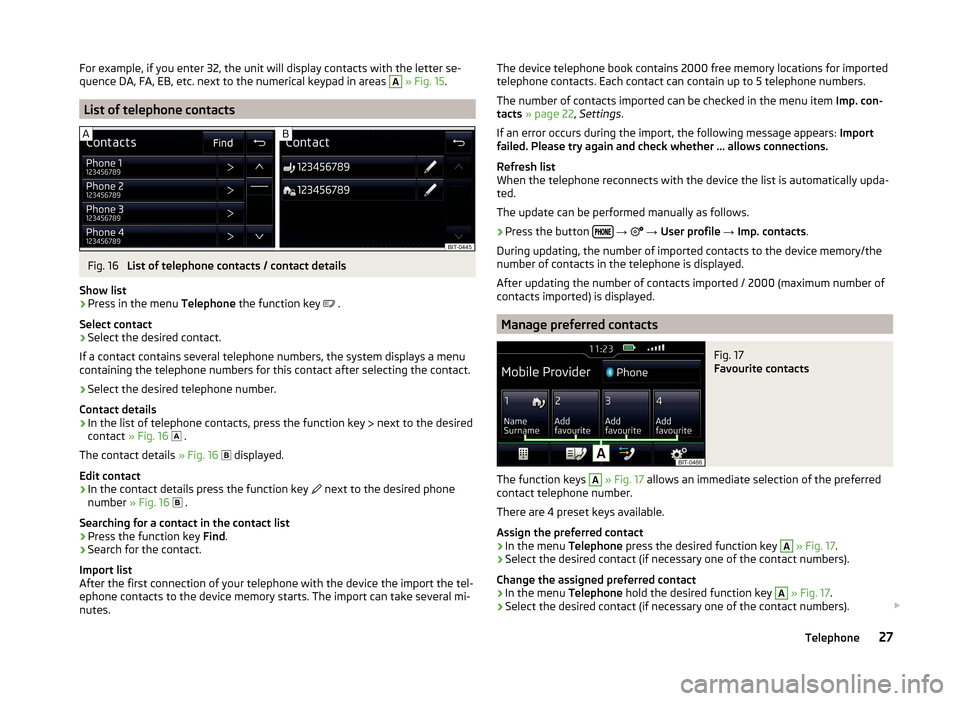
Fig. 16
List of telephone contacts / contact details
Show list
›
Press in the menu Telephone the function key
.
Select contact
›
Select the desired contact.
If a contact contains several telephone numbers, the system displays a menu
containing the telephone numbers for this contact after selecting the contact.
›
Select the desired telephone number.
Contact details
›
In the list of telephone contacts, press the function key next to the desired
contact » Fig. 16
.
The contact details » Fig. 16
displayed.
Edit contact
›
In the contact details press the function key next to the desired phone
number » Fig. 16
.
Searching for a contact in the contact list › Press the function key
Find.
› Search for the contact.
Import list
After the first connection of your telephone with the device the import the tel-
ephone contacts to the device memory starts. The import can take several mi-
nutes.
The device telephone book contains 2000 free memory locations for imported
telephone contacts. Each contact can contain up to 5 telephone numbers.
The number of contacts imported can be checked in the menu item Imp. con-
tacts » page 22 , Settings .
If an error occurs during the import, the following message appears: Import
failed. Please try again and check whether … allows connections.
Refresh list
When the telephone reconnects with the device the list is automatically upda-
ted.
The update can be performed manually as follows.
› Press the button
→
→ User profile → Imp. contacts .
During updating, the number of imported contacts to the device memory/the
number of contacts in the telephone is displayed.
After updating the number of contacts imported / 2000 (maximum number of
contacts imported) is displayed.
Manage preferred contacts
Fig. 17
Favourite contacts
The function keys
A
» Fig. 17 allows an immediate selection of the preferred
contact telephone number.
There are 4 preset keys available.
Assign the preferred contact
›
In the menu Telephone press the desired function key
A
» Fig. 17 .
›
Select the desired contact (if necessary one of the contact numbers).
Change the assigned preferred contact
›
In the menu Telephone hold the desired function key
A
» Fig. 17 .
›
Select the desired contact (if necessary one of the contact numbers).
27Telephone