display SKODA SUPERB 2015 3.G / (B8/3V) Swing Infotinment Car Radio Manual
[x] Cancel search | Manufacturer: SKODA, Model Year: 2015, Model line: SUPERB, Model: SKODA SUPERB 2015 3.G / (B8/3V)Pages: 43, PDF Size: 4.7 MB
Page 5 of 43
Important information about this manual
This Owner's Manual is valid for the different versions of the Infotainment
Swing (hereinafter referred to only as device). The device may differ depending
on the vehicle model, in which it is installed in both its appearance and in the
arrangement of the controls.
This Owner's Manual describes all possible device functions without identify-
ing them as special equipment, model variants or market-dependent equip-
ment. Consequently, the device on this vehicle does not need to contain all of
the functions described in this Owner's Manual.
For example, if the vehicle is not factory equipped with the sound system, the
menu points ŠKODA Surround and Virtual Subwoofer are not displayed in the
sound settings menu.
The availability of some features described in this manual depends on the
type of external devices (for example, phone, music player, etc.).
Information on the compatibility of external devices can be found on ŠKODAIn-
ternet pages http://infotainment.skoda-auto.com .
The Images in these Operating Instructions are for illustrative purposes only.
The illustrations can differ in minor details from your vehicle; they are only in-
tended to provide general information.
ŠKODA AUTO a.s. pursues a policy of ongoing product and model development
with all vehicles. Changes in terms of supply scope are possible at any time
with regard to design, equipment and technology. The information listed in
these Operating Instructions corresponds to the information available at the
time of going to press.
It is therefore not possible for legal claims to be made based on the technical
data, illustrations and information contained in these Operating Instructions.
Declaration of conformity
ŠKODA AUTO a.s. hereby declares that the ŠKODA Infotainment systems meet
the basic requirements and additional provisions of Directive 1999/5/EC with
reference to radio equipment and telecommunications devices.
Applies to Nigeria: ŠKODA AUTO a.s. hereby declares that the “connection and
the use of this communication device is granted by the Nigerian Communica-
tions Commission.”3Important information about this manual
Page 8 of 43
Introductory information
Important notes
Introduction
This chapter contains information on the following subjects:
6WARNING■ Concentrate fully at all times on your driving! As the driver you are fully
responsible for the operation of your vehicle.■
Only use the device in a way that ensures that you are in full control of
your vehicle in every traffic situation - there is a risk of accident!
■
Adjust the volume to ensure that acoustic signals from outside, e.g. sirens
from vehicles which have the right of way, such as police, ambulance and
fire brigade vehicles, can be heard at all time.
■
High volumes can cause hearing damage.
Read and observe on page 6 first.
Some electronic control units are equipped with protection components, which
serve as protective mechanisms, for example, in cases of theft of the ECUs.
When component protection is enabled, the following message appears on the
display Component theft protection: the infotainment system is not fully
available at present. Please switch on the ignition.
If the component protection does not activate by switching on the ignition,
please contact a ŠKODA specialist garage.
Unit overview
Introduction
This chapter contains information on the following subjects:
Description of the device
6
Touch screen
7
Switch the device on/off
7
Adjusting the volume
7This chapter covers the device, the switching on and off and volume control of
the device.
Description of the device
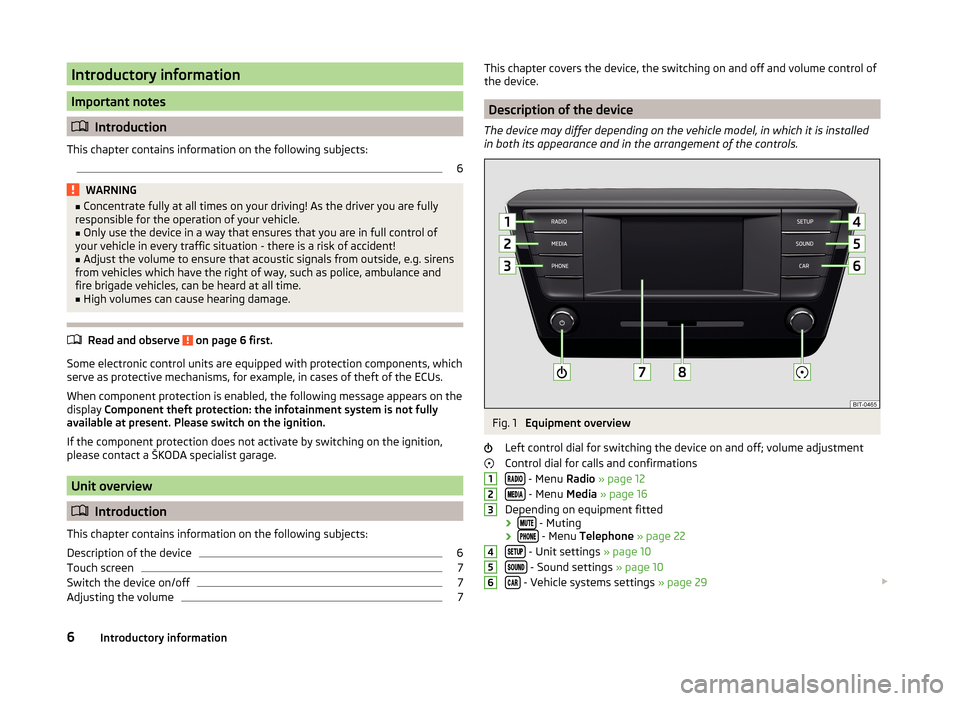
The device may differ depending on the vehicle model, in which it is installed
in both its appearance and in the arrangement of the controls.
Fig. 1
Equipment overview
Left control dial for switching the device on and off; volume adjustment
Control dial for calls and confirmations
- Menu Radio » page 12
- Menu Media » page 16
Depending on equipment fitted
›
- Muting
› - Menu
Telephone » page 22
- Unit settings » page 10
- Sound settings » page 10
- Vehicle systems settings » page 29
1234566Introductory information
Page 9 of 43
Touch screen » page 8
SD card slot » page 19
Touch screen
The device is equipped with a touch screen that can be operated by light fin-
ger pressure on the screen surface.
The brightness level of the screen can be set » page 10.
CAUTION
■
The screen can only be operated by a slight touch of a finger. If there is too
much pressure there is a risk of damage to the screen!■
To protect the screen, you can use a suitable screen protector for touch pads
that does not affect its functionality.
■
Dirt can be removed from the screen by using a soft cloth and, if necessary,
methylated spirits.
Switch the device on/off
Manual Power On/Off
›
Press to switch the device on or off.
Automatic Power On of the device
If the device was not turned off with the control switch
before the ignition
was turned off, it will automatically switch on after the ignition is switched on.
Automatic Power Off of the device
If the vehicle key is pulled out of the ignition lock while the unit is switched on,
the device will switch off automatically.
If the vehicle is fitted with the starter button, the device will switch off auto-
matically after the engine is switched off and the door is opened.
With the ignition off, the device will automatically turn off after about 30 mi-
nutes.
The device turns off automatically under certain circumstances. The device in-
forms you for a few seconds by means of a text message on the device screen.
78› Warning: battery low. Please start the engine or switch off the infotain-
ment system. - The vehicle battery is low. It is recommended you switch off
the device or start the engine.
› Battery almost empty. The Infotainment system will be switched off.
- The
vehicle battery is discharged, the device switches itself off.
› Operating temperature not maintained. The Infotainment system will be
switched off. - The device temperature is too low or too high, the device
switches itself off.
Adjusting the volume
Every change in volume is displayed on the screen.
Increase volume
›
Turn the control to the right.
Decrease volume
›
Turn the control to the left.
Muting
›
Press the key or turn the control to the left and set the volume to 0.
The following symbol appears in the display when the sound is muted .
If at the time of muting a sound is made in the menu Media, then the playback
is interrupted (pause) 1)
.
CAUTION
If the volume is too high sound resonance can occur in the vehicle which can
lead to damaged speakers.1)
Does not apply for AUX.
7Introductory information
Page 10 of 43
Device operation and settings
Device operation
Introduction
This chapter contains information on the following subjects:
Operation principles
8
Alphanumeric with keyboard
9
This chapter covers the touch screen and its operation.
Note
Depending on the equipment, the device can be operated with the operating
lever or via the buttons on the multifunction steering wheel. Additional infor-
mation » Operating Instructions .
Operation principles
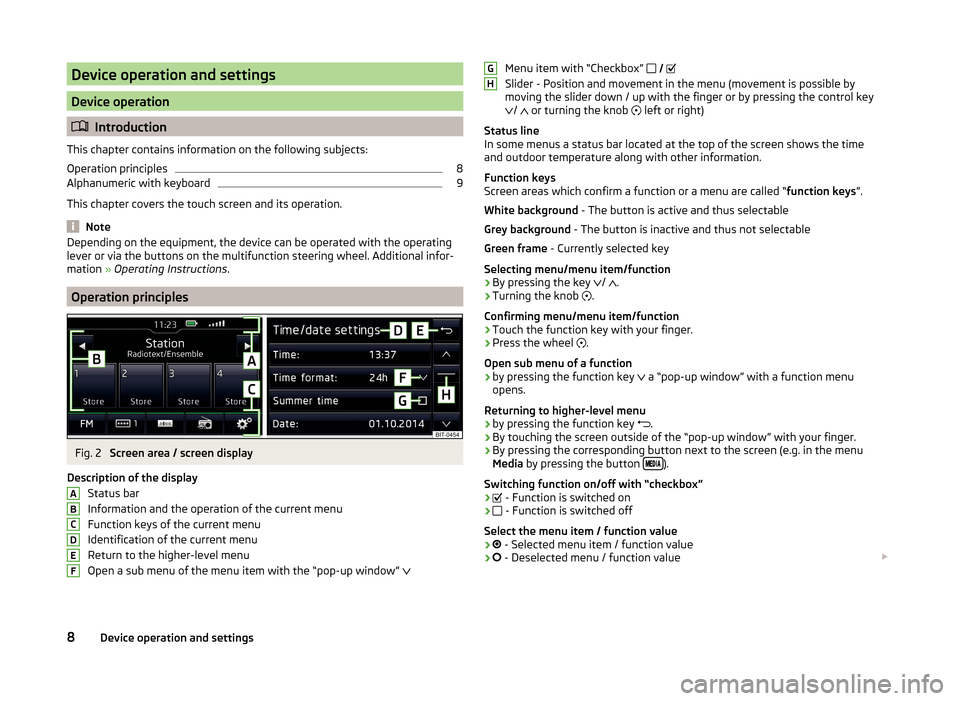
Fig. 2
Screen area / screen display
Description of the display Status bar
Information and the operation of the current menu Function keys of the current menu
Identification of the current menu
Return to the higher-level menu
Open a sub menu of the menu item with the “pop-up window”
ABCDEFMenu item with “Checkbox”
Slider - Position and movement in the menu (movement is possible by
moving the slider down / up with the finger or by pressing the control key
/
or turning the knob
left or right)
Status line
In some menus a status bar located at the top of the screen shows the time and outdoor temperature along with other information.
Function keys
Screen areas which confirm a function or a menu are called “ function keys”.
White background - The button is active and thus selectable
Grey background - The button is inactive and thus not selectable
Green frame - Currently selected key
Selecting menu/menu item/function › By pressing the key
/
.
› Turning the knob
.
Confirming menu/menu item/function
› Touch the function key with your finger.
› Press the wheel
.
Open sub menu of a function
› by pressing the function key
a “pop-up window” with a function menu
opens.
Returning to higher-level menu
› by pressing the function key
.
› By touching the screen outside of the “pop-up window” with your finger.
› By pressing the corresponding button next to the screen (e.g. in the menu
Media by pressing the button
).
Switching function on/off with “checkbox”
›
- Function is switched on
›
- Function is switched off
Select the menu item / function value
›
- Selected menu item / function value
›
- Deselected menu / function value
GH8Device operation and settings
Page 11 of 43
Set value› By pressing the function button with one of the following symbols
, , , ,
,
.
› By touching or moving your finger over the scale.
› Turning the knob
.
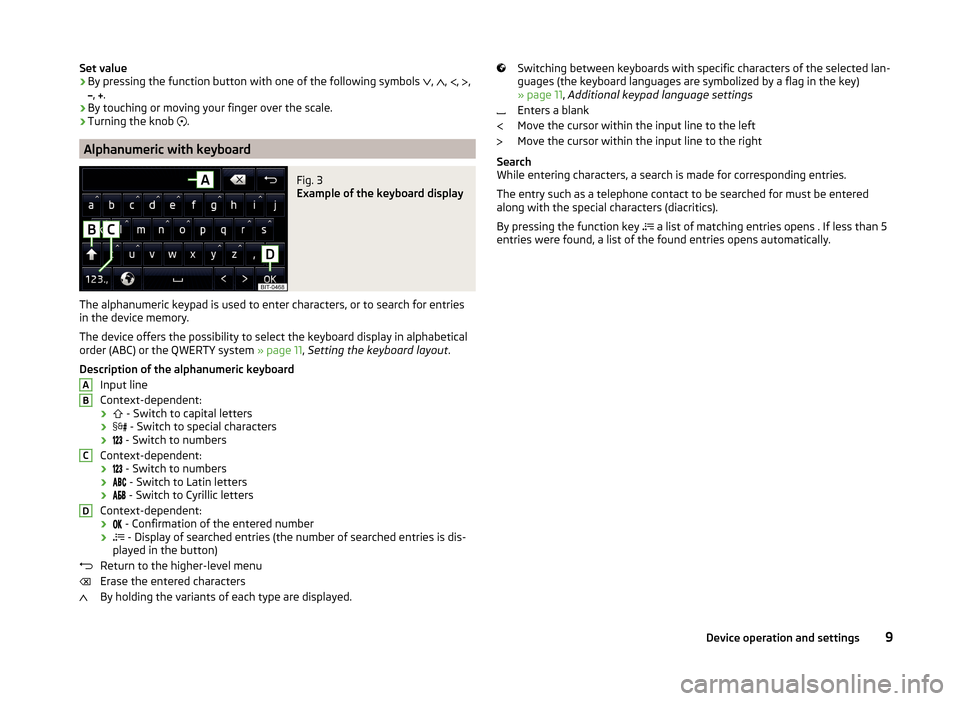
Alphanumeric with keyboard
Fig. 3
Example of the keyboard display
The alphanumeric keypad is used to enter characters, or to search for entries
in the device memory.
The device offers the possibility to select the keyboard display in alphabetical
order (ABC) or the QWERTY system » page 11, Setting the keyboard layout .
Description of the alphanumeric keyboard Input line
Context-dependent: ›
- Switch to capital letters
›
- Switch to special characters
›
- Switch to numbers
Context-dependent: ›
- Switch to numbers
›
- Switch to Latin letters
›
- Switch to Cyrillic letters
Context-dependent: ›
- Confirmation of the entered number
›
- Display of searched entries (the number of searched entries is dis-
played in the button)
Return to the higher-level menu
Erase the entered characters
By holding the variants of each type are displayed.
ABCDSwitching between keyboards with specific characters of the selected lan-
guages (the keyboard languages are symbolized by a flag in the key)
» page 11 , Additional keypad language settings
Enters a blank
Move the cursor within the input line to the left
Move the cursor within the input line to the right
Search
While entering characters, a search is made for corresponding entries.
The entry such as a telephone contact to be searched for must be entered
along with the special characters (diacritics).
By pressing the function key a list of matching entries opens . If less than 5
entries were found, a list of the found entries opens automatically.9Device operation and settings
Page 12 of 43
Unit settings
Setup menu
Introduction
This chapter contains information on the following subjects:
Sound settings
10
Screen settings
10
Time and date settings
10
Setting the device language
10
Setting the keyboard layout
11
Additional keypad language settings
11
Unit settings
11
Safe removal of the data source
11
Restore factory settings
11
Bluetooth ®
settings
11
System information
11
This chapter covers the device settings.
Sound settings
The scope of the following menu is dependent on the vehicle equipment with the sound system.
›
Press the button.
■ Volume - Volume settings
■ Max. switch-on volume - Sets the maximum volume after switching on the
device
■ Announcements - Adjustment of traffic announcements volume (TP)
■ Speed-dep. vol. adjust. - Speed-dependent volume adaptation
■ Lower. entertain. - Lowers the audio volume (e.g. radio volume) with acti-
vated parking aid
■ AUX volume: - Sets the volume for the device connected through AUX
■
BT audio: - Volume settings of the Bluetooth ®
audio profile connected de-
vice
■ iPod: - Volume setting of the connected iPod
■ Balance - Fader - Sets the balance between left and right, front and rear
■ Bass - Mid. - Treble - Setting the equalizer
■ ŠKODA Surround - Switching the surround sound
■ Virtual Subwoofer - Switching the virtual sub woofer
■ Confirmation tone - Switch on/off confirmation tone when touching the
screen
Screen settings
›
Press the button
→ Screen .
■ Screen off (in 10 s) - Enable / disable the automatic power off function 1)
■ Brightness: - Adjusts the brightness of the screen
■ Confirmation tone - Switch on/off audible tone when touching the screen
■ Show clock in stdby mode - Time and date displayed on the screen when the
ignition is switched on and the unit is switched off
Time and date settings
›
Press
→ Time and date .
■ Time: - Time settings
■ Time format: - Set the time format
■ Summer time - Switches the summer setting on/off
■ Date: - Date settings
■ Date format: - Set the date format
Note
With the model Yeti, the time and date settings are done via the MAXI DOT
display. See » Operating Instructions .
Setting the device language
›
Press the button
→ Language .
A menu with languages appears:
1)
The unit turns the screen off when no touch screen is performed or none of the keys are pressed / rota-
ted for more than 10 seconds.
10Unit settings
Page 13 of 43
NoteWith the model Yeti the setting of the device language is done on the MAXI
DOT display. See » Operating Instructions .
Setting the keyboard layout
›
Press the button
→ Keypad: .
■ ABC - Keyboard character assignment in alphabetical order
■ QWERTY - Keyboard character assignment QWERTY system
Additional keypad language settings
›
Press the button
→ More keypad languages .
In this menu, a keyboard language set can be added to allow the entering of
characters other than those in the currently selected language (function but-
ton ).
Unit settings
›
Press the button
→ Units .
■ Distance: - Distance units
■ Speed: - Speed units
■ Temperature: - Temperature units
■ Volume: - Volume units
■ Consumption: - Fuel consumption units
■ CNG consump.: - CNG consumption units
■ Pressure: - Pressure units for tyre pressure
Safe removal of the data source
›
Press the button
→ Remove SD card safely .
Is the screen Please wait... → SD card can now be removed. is displayed.
›
Press on the inserted SD memory card.
The SD card “jumps” into the eject position. or
›
Press the button
→ Remove USB safely .
Is the screen Please wait... → USB device can be removed. is displayed.
›Disconnect the audio source from the corresponding USB input.
Restore factory settings
›
Press the button
→ Factory settings .
In this menu individual settings or all settings can be restored at the same
time.
Bluetooth ®
settings
›
Press the button
→ Bluetooth .
■ Bluetooth - Switch on/off Bluetooth ®
function
■ Visibility: - Switch on/off the visibility of the Bluetooth ®
device for other de-
vices
■ 1st name - Change the device name
■ Paired devices - Display the list of paired Bluetooth ®
Devices
■ Find devices - Searches for available devices
■ BT audio (A2DP/AVRCP) - Turn on/off the ability to connect an audio device
(e.g. MP3 player, tablet etc...)
System information
›
Press the button
→ System information .
■ Update software - Software update (e.g. Bluetooth ®
)
■ Bluetooth: ... - Version number of the Bluetooth ®
software
■ Device part number: ... - Part number of the unit
■ Hardware: ... - Version of the hardware used
■ Software: ... - Version of the software used
The information about available software updates can be found on the ŠKODA
Internet pages www.infotainment.skoda-auto.com .
11Unit settings
Page 14 of 43
Radio
Operation
Introduction
This chapter contains information on the following subjects:
Main menu
12
Broadcasting sector selection
12
List of available stations
13
Search and select available stations
13
Store preferred station
14
Station logos
14
TP Traffic programme
14
The device allows analogue radio reception of FM and AM frequency ranges as
well as DAB digital radio reception.
CAUTION
■ For vehicles with window antennas do not stick foil or metal coated stickers
to the window as this can lead to interference.■
Car parks, tunnels, tall buildings or mountains can interfere with the radio
signal even causing it to fail completely.
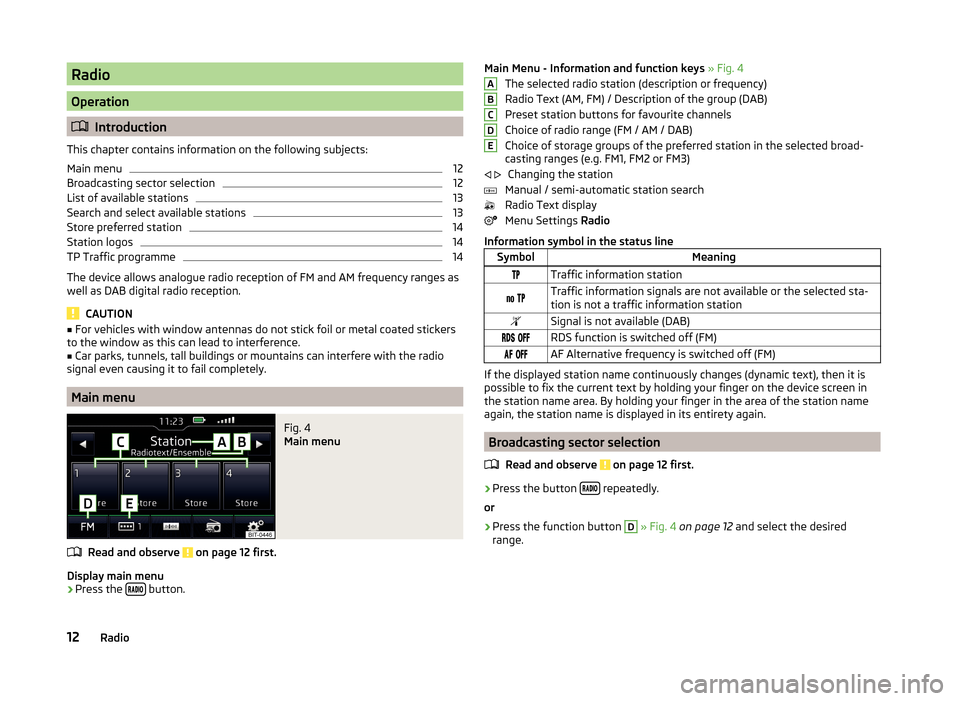
Main menu
Fig. 4
Main menu
Read and observe on page 12 first.
Display main menu
›
Press the button.
Main Menu - Information and function keys
» Fig. 4
The selected radio station (description or frequency)
Radio Text (AM, FM) / Description of the group (DAB)
Preset station buttons for favourite channels
Choice of radio range (FM / AM / DAB)
Choice of storage groups of the preferred station in the selected broad-
casting ranges (e.g. FM1, FM2 or FM3)
Changing the station
Manual / semi-automatic station search
Radio Text display
Menu Settings Radio
Information symbol in the status lineSymbolMeaningTraffic information station Traffic information signals are not available or the selected sta-
tion is not a traffic information stationSignal is not available (DAB) RDS function is switched off (FM) AF Alternative frequency is switched off (FM)
If the displayed station name continuously changes (dynamic text), then it is
possible to fix the current text by holding your finger on the device screen in
the station name area. By holding your finger in the area of the station name
again, the station name is displayed in its entirety again.
Broadcasting sector selection
Read and observe
on page 12 first.
›
Press the button repeatedly.
or
›
Press the function button
D
» Fig. 4 on page 12 and select the desired
range.
ABCDE 12Radio
Page 16 of 43
›Move the slider on the scale of the frequency range by touching with the fin-
ger.
Close the menu for manual search by pressing the controller
.
Select station from the list of available stations›
In the Radio menu, press the function key
or
press the top of the screen.
or
›
In the menu Radio press the control knob
.
The list of available stations opens.
›
Select the desired connection station.
Playback available stations (Scan)
›
In the menu Radio press the control knob
.
The search is started.
This function plays all the available stations in succession for a few seconds
each.
By pressing the control again the search is completed and the current sta-
tion remains set.
Store preferred station
Read and observe
on page 12 first.
For each broadcasting range there are 12 preset buttons to store the preferred
stations. These preset buttons are divided into three memory groups.
A station can be stored in the device memory in one of the following ways.
Store station from the Radio menu
›
In the menu Radio select a station and hold the desired station button
C
» Fig. 4 on page 12 until you hear an acoustic signal.
If a station was already stored in the desired position it is replaced with the
currently selected station.
Save station from the station list
›
In the list of available stations » page 13 hold the function key of the desired
station.
›
Select a storage group.
›
Press the station button.
Station logos
Read and observe
on page 12 first.
The station key of a preferred station can contain the name and the station
logo.
Assign station logo manually
›
In the Radio menu, press the function key
→ Station logos .
›
Press the preset button for the station, which a logo is to be assigned to.
A menu of media (SD card, USB) is displayed.
›
In the relevant media select the logo you want to have.
Remove station logo
›
In the Radio menu, press the function key
→ Station logos .
›
Press the preset button for the station, which a logo is to be removed from.
or
›
Press the button
All to delete the logos of all the station buttons simulta-
neously.
›
Confirm / cancel the removal.
Note
■ The following image formats are supported: jpg, gif, png, bmp.■We recommend a resolution of up to 500 x 500 pixels.
TP Traffic programme
Read and observe
on page 12 first.
The function allows the reception of traffic information.
Switching on/off
›
In the Radio menu, press the function key
.
›
Enable or disable the menu item
Traffic program (TP).
Current traffic reports
During a traffic announcement, the following menu is displayed.
›
Cancel - Interruption of the current traffic report, the TP function remains ac-
tive
›
Deactivate - Interrupt the current traffic report and turn off TP function
14Radio
Page 17 of 43
Note■Should this station not transmit traffic reports or the signal is not available,
then the device automatically searches in the background for another TP sta-
tion.■
During playback in menu Media or a station in the AM radio range, traffic
news is received from the previously selected FM radio range.
Settings
Introduction
This chapter contains information on the following subjects:
Settings
15
Advanced Settings (FM)
15
Advanced Settings (DAB)
15
The basic setting of the Radio menu functions is the same for all broadcast
ranges.
Settings
›
In the Radio menu, press the function key
.
■ Scan - Auto-play all available stations in the current frequency band, each
station for around five seconds
■ Arrow buttons: - Setting the function of the station change (function keys
)
■ Presets - Change between stations stored under the preset buttons
■ Stations - Change between all available stations of the selected broadcast-
ing range
■ Traffic program (TP) - Switches traffic programme on/off
■ Radio text - Switching the text display radio (FM and DAB) on and off
■ Kind of stat. list: - Sort types of radio stations in the station list (DAB)
■ Global - alphanumeric station sorting with the filtering ability according to
the transmitted program type » page 13, PTY- filter
■ Hierarchical - station sorting according to their assigned parent station
groups (Ensemble) - Tree structure of the list
■ Station logos - manual management of station logos
■
Delete presets - Delete the stations stored under preset buttons
■ Advanced settings - further settings that are different depending on the se-
lected broadcasting range(FM and DAB)
Advanced Settings (FM)
›
Select the FM band in the Radio menu, and press the function key
→ Ad-
vanced settings .
■ RDS Regional: - Switch on/off the automatic tracking of related regional sta-
tions
■ Automatic - automatic selection of the station with the best reception at
the moment. If you lose reception the region, the unit will automatically set
another available region.
■ Fixed - Maintains the selected regional station continuously. When the sig-
nal is lost, another regional station must be set manually.
■ Alternative frequency (AF) - Search for alternative frequencies of the station
currently being played to on/off
■ Radio Data System (RDS) - Enable/disable RDS function (receiving additional
information from the station) 1)
■ Sort stations: - Sort types of radio stations in the station list (FM)
■ Group - Sort by transmitted program type
■ ABC - alphabetical order according to station name
Advanced Settings (DAB)
›
Select the DAB band in the Radio menu, and press the function key
→
Advanced settings .
■ DAB traffic messages - Switch on/off DAB announcements
■ Other DAB messages - Switch on/off other announcements (e.g., warnings,
regional weather, sports reports, financial news)
■ DAB station tracking - Switch on/off automatic DAB station tracking on an-
other frequency or in other station groups
■ Auto. DAB - FM switching - switches on/off auto-switching from DAB to the
FM frequency band if the DAB signal is lost
DAB station tracking
When a DAB transmitter is a part of several broadcast stations and if the cur-
rent station group is not available on any other frequency, then when the sig-
nal is poor, the same station will be searched in another channel group.
1)
Only valid for some countries.
15Radio