display SKODA SUPERB 2016 3.G / (B8/3V) Brief Instructions
[x] Cancel search | Manufacturer: SKODA, Model Year: 2016, Model line: SUPERB, Model: SKODA SUPERB 2016 3.G / (B8/3V)Pages: 32, PDF Size: 11.01 MB
Page 8 of 32
Air conditioning system›Climatronic
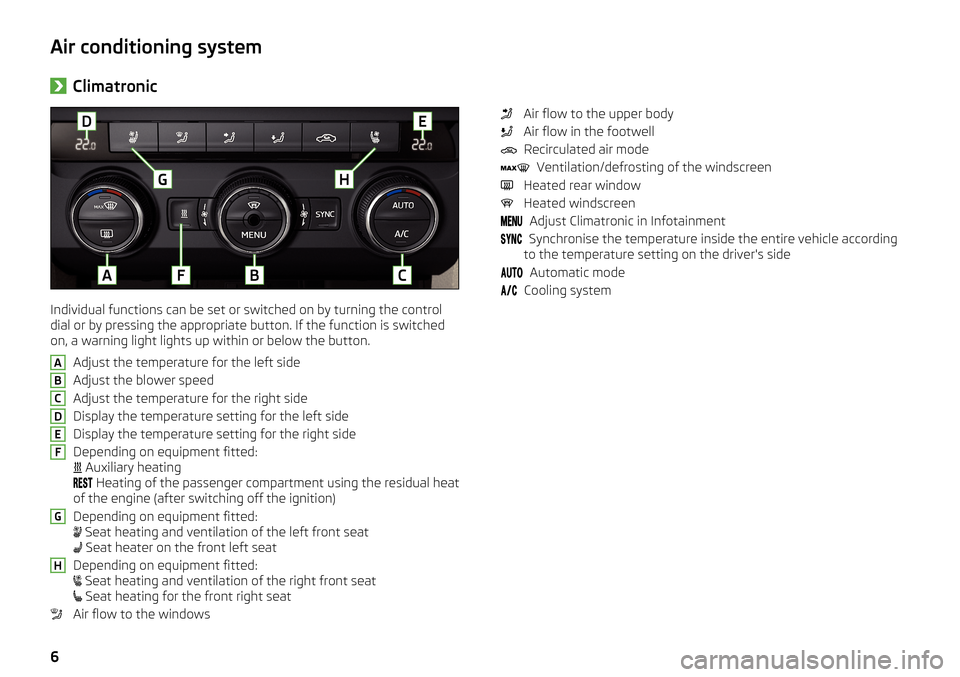
Individual functions can be set or switched on by turning the control
dial or by pressing the appropriate button. If the function is switched
on, a warning light lights up within or below the button.
Adjust the temperature for the left side
Adjust the blower speed
Adjust the temperature for the right side
Display the temperature setting for the left side
Display the temperature setting for the right side
Depending on equipment fitted:
Auxiliary heating
Heating of the passenger compartment using the residual heat
of the engine (after switching off the ignition)
Depending on equipment fitted:
Seat heating and ventilation of the left front seat
Seat heater on the front left seat
Depending on equipment fitted:
Seat heating and ventilation of the right front seat
Seat heating for the front right seat
Air flow to the windows
ABCDEFGHAir flow to the upper body
Air flow in the footwell Recirculated air mode Ventilation/defrosting of the windscreen
Heated rear window
Heated windscreen
Adjust Climatronic in Infotainment
Synchronise the temperature inside the entire vehicle according
to the temperature setting on the driver's side
Automatic mode
Cooling system
6
Page 9 of 32
›Climatronic - Operation of the rear bench seat
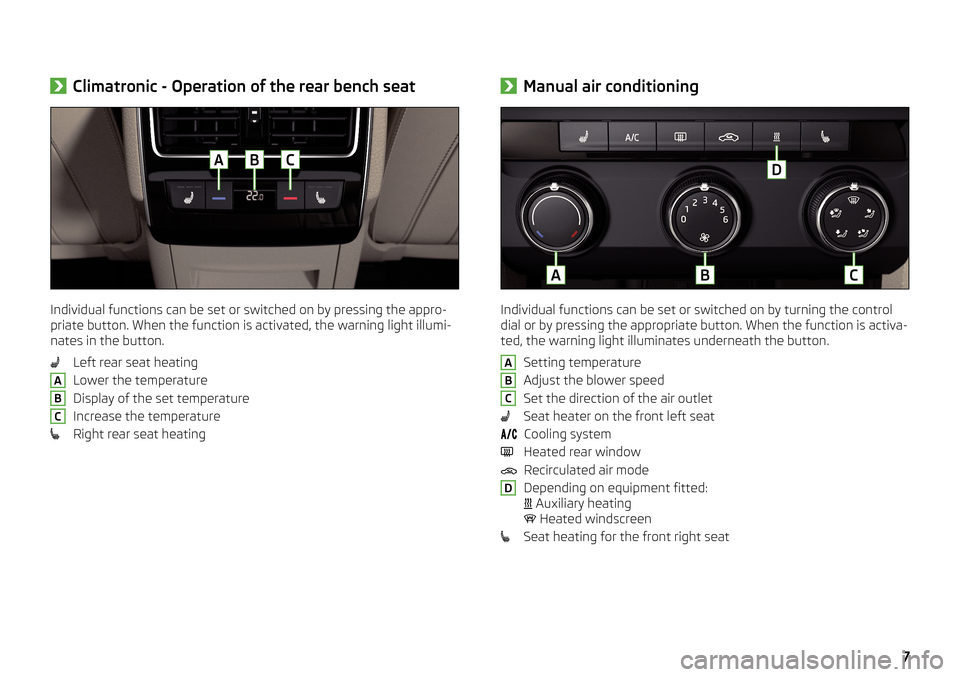
Individual functions can be set or switched on by pressing the appro-
priate button. When the function is activated, the warning light illumi-
nates in the button.
Left rear seat heating
Lower the temperature
Display of the set temperature
Increase the temperature
Right rear seat heating
ABC› Manual air conditioning
Individual functions can be set or switched on by turning the control
dial or by pressing the appropriate button. When the function is activa-
ted, the warning light illuminates underneath the button.
Setting temperature
Adjust the blower speed
Set the direction of the air outlet
Seat heater on the front left seat Cooling system
Heated rear window Recirculated air mode
Depending on equipment fitted:
Auxiliary heating
Heated windscreen
Seat heating for the front right seat
ABCD7
Page 10 of 32
Instrument cluster›Buttons/dials on the multifunction steering wheel
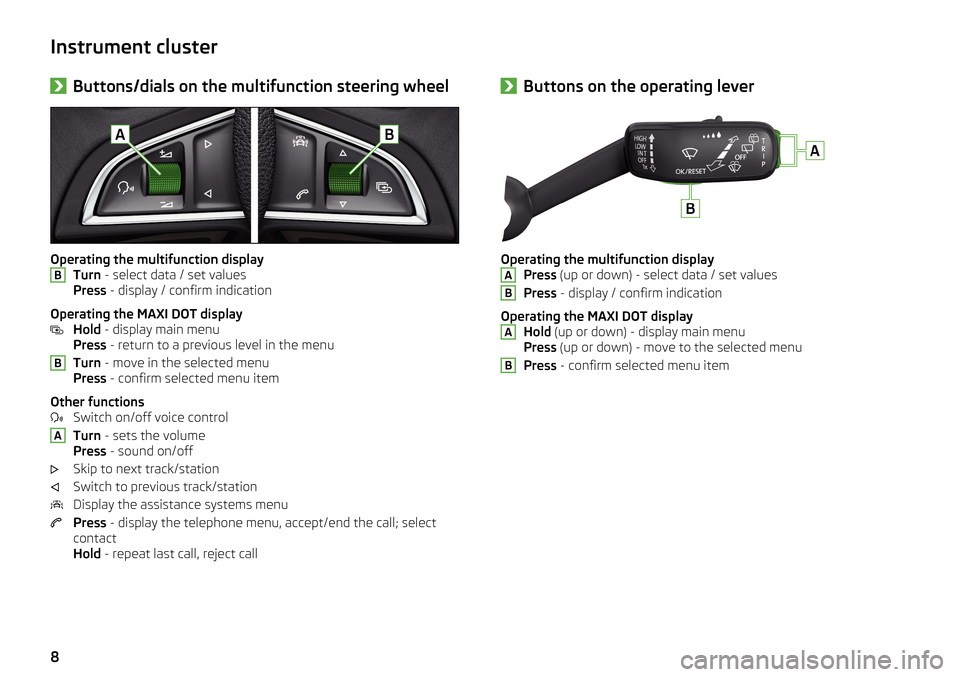
Operating the multifunction display
Turn - select data / set values
Press - display / confirm indication
Operating the MAXI DOT display Hold - display main menu
Press - return to a previous level in the menu
Turn - move in the selected menu
Press - confirm selected menu item
Other functions Switch on/off voice control
Turn - sets the volume
Press - sound on/off
Skip to next track/station
Switch to previous track/station
Display the assistance systems menu
Press - display the telephone menu, accept/end the call; select
contact
Hold - repeat last call, reject call
BBA›Buttons on the operating lever
Operating the multifunction display
Press (up or down) - select data / set values
Press - display / confirm indication
Operating the MAXI DOT display Hold (up or down) - display main menu
Press (up or down) - move to the selected menu
Press - confirm selected menu item
ABAB8
Page 11 of 32

›Setting the time›
Switch-on the ignition.›Press and hold the button
until the
Time
is shown in the
display.
› Release the button and the
system switches to the hour
setting function.›
Press the button again and set
the hours.
›
Wait 4 seconds, the system
switches to the minutes set-
ting.
›
Press the button again and set
the minutes.
›
Wait 4 seconds, the system
switches to the initial setting.
› Show the next service appointment›
Switch-on the ignition.›Press and hold the button
until the
Service
menu item is
shown in the display.
› Release the button, the remain-
ing kilometres or miles and days
are shown on the display until
the next service interval for 4 s.9
Page 14 of 32
Braking and parking›Electric parking brake
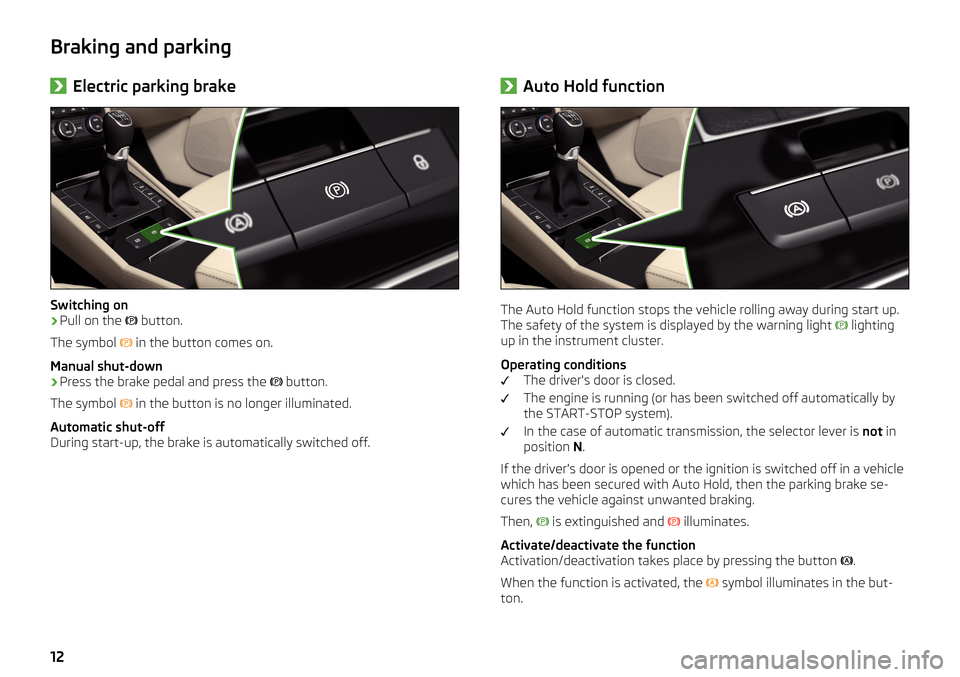
Switching on
›
Pull on the
button.
The symbol
in the button comes on.
Manual shut-down
›
Press the brake pedal and press the
button.
The symbol
in the button is no longer illuminated.
Automatic shut-off
During start-up, the brake is automatically switched off.
› Auto Hold function
The Auto Hold function stops the vehicle rolling away during start up.
The safety of the system is displayed by the warning light
lighting
up in the instrument cluster.
Operating conditions The driver's door is closed.
The engine is running (or has been switched off automatically by
the START-STOP system).
In the case of automatic transmission, the selector lever is not in
position N.
If the driver’s door is opened or the ignition is switched off in a vehicle
which has been secured with Auto Hold, then the parking brake se-
cures the vehicle against unwanted braking.
Then,
is extinguished and
illuminates.
Activate/deactivate the function
Activation/deactivation takes place by pressing the button
.
When the function is activated, the symbol illuminates in the but-
ton.
12
Page 15 of 32

Park Assist systems›Parking aid
The system draws attention to obstacles in the vicinity of the vehicle
via audible signals and coloured labels in the Infotainment screen.
An obstacle at a distance of less than 30 cm
There is an obstacle in the road
A
(the distance to the obstacle
is greater than 30 cm)
An obstacle is located outside of the road
A
(the distance to the
obstacle is greater than 30 cm)
For vehicles only with sensors built into the rear bumper, the system
activation takes place by engaging reverse gear.
For vehicles with sensors built into the front bumper, system activa-
tion by engaging reverse gear, by pressing the button
in the front
centre console or automatically when the vehicle approaches an ob-
stacle at a speed below 10 km/h, when driving forwards.
› Reversing camera
For cars with a reversing camera, the area behind the vehicle and the
following orientation lines are displayed in the Infotainment screen
when reversing.
Distance about 40 cm (safety distance limit)
Distance about 1 m
Distance about 2 m
The lane lines terminate approximately 3 m behind the vehicle
System activation takes place by engaging reverse gear or by pressing
the button
in the front centre console.
ABCD13
Page 16 of 32
›Park Assist
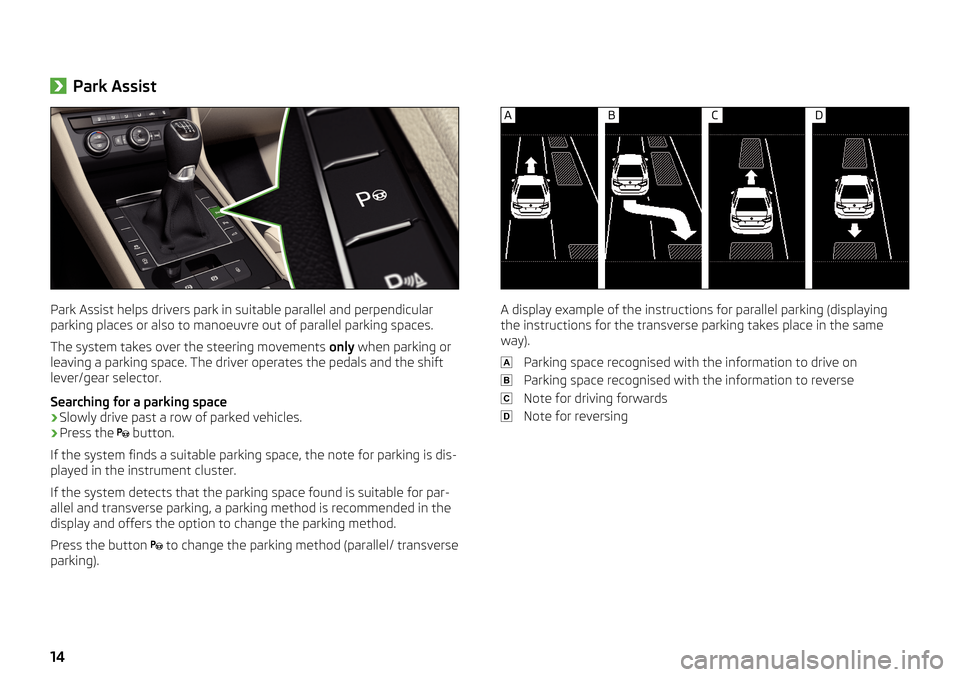
Park Assist helps drivers park in suitable parallel and perpendicular
parking places or also to manoeuvre out of parallel parking spaces.
The system takes over the steering movements only when parking or
leaving a parking space. The driver operates the pedals and the shift
lever/gear selector.
Searching for a parking space
›
Slowly drive past a row of parked vehicles.
›
Press the
button.
If the system finds a suitable parking space, the note for parking is dis-
played in the instrument cluster.
If the system detects that the parking space found is suitable for par-
allel and transverse parking, a parking method is recommended in the
display and offers the option to change the parking method.
Press the button
to change the parking method (parallel/ transverse
parking).
A display example of the instructions for parallel parking (displaying
the instructions for the transverse parking takes place in the same
way).
Parking space recognised with the information to drive on
Parking space recognised with the information to reverse
Note for driving forwards
Note for reversing
14
Page 18 of 32
›Front Assist
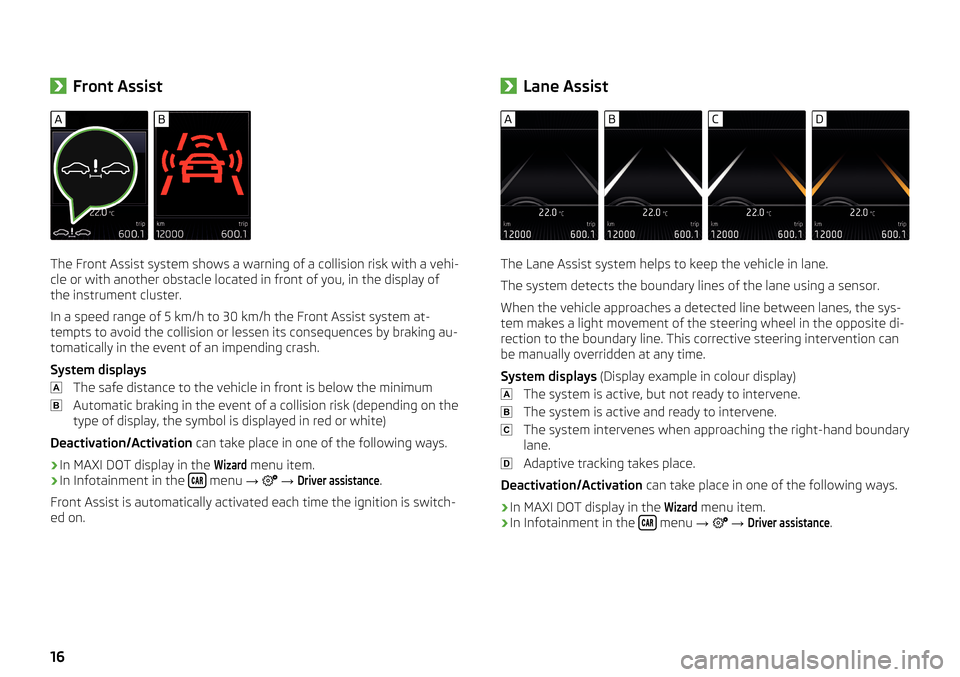
The Front Assist system shows a warning of a collision risk with a vehi-
cle or with another obstacle located in front of you, in the display of
the instrument cluster.
In a speed range of 5 km/h to 30 km/h the Front Assist system at- tempts to avoid the collision or lessen its consequences by braking au-
tomatically in the event of an impending crash.
System displays The safe distance to the vehicle in front is below the minimumAutomatic braking in the event of a collision risk (depending on the
type of display, the symbol is displayed in red or white)
Deactivation/Activation can take place in one of the following ways.
› In MAXI DOT display in the
Wizard
menu item.
› In Infotainment in the
menu
→
→
Driver assistance
.
Front Assist is automatically activated each time the ignition is switch-
ed on.
› Lane Assist
The Lane Assist system helps to keep the vehicle in lane.
The system detects the boundary lines of the lane using a sensor.
When the vehicle approaches a detected line between lanes, the sys-
tem makes a light movement of the steering wheel in the opposite di-
rection to the boundary line. This corrective steering intervention can
be manually overridden at any time.
System displays (Display example in colour display)
The system is active, but not ready to intervene.
The system is active and ready to intervene.
The system intervenes when approaching the right-hand boundary
lane.
Adaptive tracking takes place.
Deactivation/Activation can take place in one of the following ways.
› In MAXI DOT display in the
Wizard
menu item.
› In Infotainment in the
menu
→
→
Driver assistance
.
16
Page 21 of 32
Telephone›Connection conditionsThe ignition is switched on.
The Bluetooth ®
function of Infotainment and the telephone is
switched on.
The visibility of Infotainment and the telephone is switched on.
The phone is in the passenger compartment.
The telephone is compatible with Infotainment.
A list of supported phones can be found on the Internet site
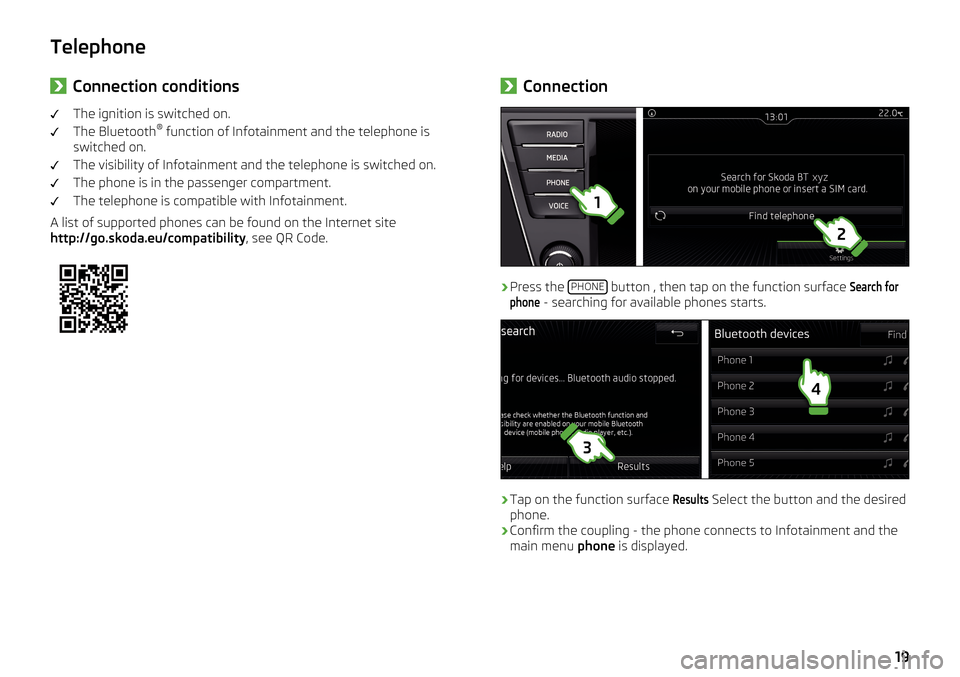
http://go.skoda.eu/compatibility , see QR Code.›Connection›
Press the
PHONE button , then tap on the function surface
Search forphone
- searching for available phones starts.
›
Tap on the function surface
Results
Select the button and the desired
phone.
›
Confirm the coupling - the phone connects to Infotainment and the
main menu phone is displayed.
19
Page 22 of 32
›Phone main menu
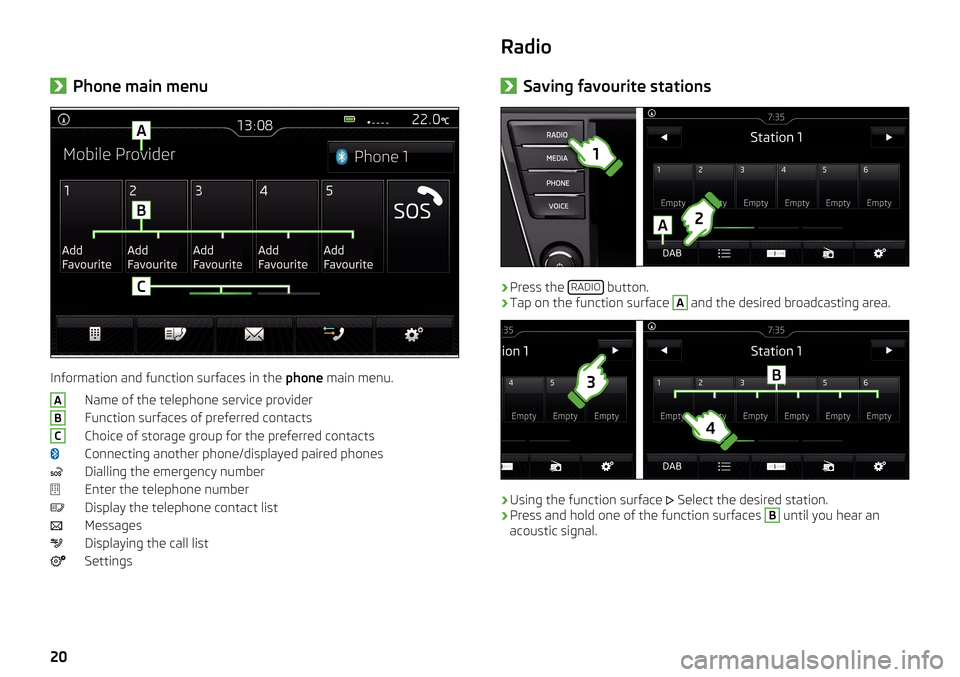
Information and function surfaces in the
phone main menu.
Name of the telephone service provider
Function surfaces of preferred contacts
Choice of storage group for the preferred contacts
Connecting another phone/displayed paired phones
Dialling the emergency number
Enter the telephone number
Display the telephone contact list
Messages
Displaying the call list
Settings
ABCRadio› Saving favourite stations›
Press the
RADIO button.
›
Tap on the function surface
A
and the desired broadcasting area.
›
Using the function surface
Select the desired station.
›
Press and hold one of the function surfaces
B
until you hear an
acoustic signal.
20