change time SKODA SUPERB 2016 3.G / (B8/3V) User Guide
[x] Cancel search | Manufacturer: SKODA, Model Year: 2016, Model line: SUPERB, Model: SKODA SUPERB 2016 3.G / (B8/3V)Pages: 336, PDF Size: 53.89 MB
Page 140 of 336
■Sort Contacts: - Setting the arrangement of the Telephonebook
■By surname
- Sorting by the contact surname
■
By first name
- Sorting by the contact first name
■
Define home address
- Enter the home address
■
Delete My POIs
- Deleting own POI categories (Personal POI)
■
Update "My POIs" (SD/USB)
- Import / update your own POI categories (Personal
POI)
■
Import objectives (SD / USB)
- Import destinations in vCard format
■
Delete user data
- Delete user data (by pressing the function surface
Delete
and
confirm the deletion) ■
Last destinations
- Delete the last destinations
■
Dest. memory
- Delete the stored destinations
■
Routes
- Delete saved routes
■
My points of interest (Personal POI)
- Delete the custom POIs
■
Entered cities
- Delete the history of places already entered via the address
■
Home address
- Delete the stored home address
■
Flagged destination
- Delete the flagged destination
■
Waypoint tour
- Delete items in the Waypoint mode menu (Applies to Info-
tainment Columbus)
■
Most frequent routes
- Deletion of the most travelled routes
Nav. announcements
›
In the Navigation main menu, tap the functional surface
Tap
→
Nav. an-nouncements
.
■
Volume
- Volume control of the nav. announcements
■
Entertainment fading (nav. announce.)
- Setting the fading of the audio volume (e.g.
radio nav. announcements
■
Nav. announcements:
- Setting the playback method of nav. announcements
■
Comprehensive
- All nav. announcements
■
Brief
- Short nav. announcements
■
Congestion only
- Only nav. announcements when a route is changed
■
No navigation sound during call
- Enable / disable non-playback of nav. announce-
ments during a telephone call
■
Note: “My POIs”
- Turn on/off an audible indication when approaching a custom
POI (if supported by the imported custom POI) (applies to Infotainment Co-
lumbus)
Top speeds
›
In the Navigation main menu, tap the functional surface
→
Top speeds
.
The speed limits in the current country are displayed.
With the Note: National border crossed
function switched on, the country-specific
speed limits » page 138, Advanced settings when crossing international bor-
ders are displayed.
Tank options
›
In the Navigation main menu, tap the functional surface
Tap →
Fuel op-tions
.
■
Select preferred fuel station
- Select your preferred fuel station brand (the selec-
ted station brand will be displayed in the first three positions of the list)
■
Fuel warning
-Turn on- / Off the display of a warning message with the option
to visit the nearest petrol station when the fuel level reaches the reserve
area
Version information
›
In the Navigation main menu, tap the function surface
→
Version informa-tion
.
A list of countries shown, for whom navigation data exists, together with the
date of the last update.
An update of the navigation data can be carried out is by tapping the function-
al surface
Update (SD / USB)
.
The information on updating the navigation data is to be obtained from a
ŠKODA partner or on the following ŠKODA Internet pages.
http://go.skoda.eu/updateportal
Advanced settings
›
In the Navigation main menu, tap the functional surface
→
Advanced set-tings
.
■
Time display:
- Select the time display in the status line
■ - Estimated arrival time at destination
■ - Estimated travelling time to the destination
■
Status line
- Selection of the target type, for which the status line, the route
and travel time are displayed (Here it is also determined which destination
type after selecting
→
is displayed in the map)
■ - Route destination
■ - Next waypoint
138Infotainment
Page 142 of 336
■Automatic summer time - switch on/off the automatic daylight savings time
change
■Date:
- Date settings
■
Date format:
- Setting the date format
Setting the Infotainment language
›
Press the button, then tap the function surface
Language
.
›
Select the Infotainment language.
Additional keypad language settings
›
Press the
button, then tap the function surface
Additional keypad languages
.
In this menu, a keyboard language set can be added to allow the entering of
characters other than those in the currently selected language.
Unit settings
›
Press the button, then tap the function surface
Units
.
■
Distance:
- Distance units
■
Speed:
- Speed units
■
Temperature:
- Temperature units
■
Volume:
- Volume units
■
Consumption:
- Fuel consumption units
■
CNG consump.:
- CNG consumption units
■
Pressure:
- Pressure units for tire pressure
Safe removal of the data source
›
Press the button, then tap the function surface
Remove SD card safely
/
Re-move USB Safely
.
The appropriate message concerning the safe removal of the source is dis-
played in the screen.
Now the external source can be removed or separated.
Restore factory settings
›
Press the button, then tap the function surface
Factory settings
.
In this menu individual settings or all settings can be restored at the same
time.
Bluetooth ®
settings›
Press the button, then tap the function surface
Bluetooth
.
■
Bluetooth
- Switch on/off Bluetooth ®
function
■
Visibility:
- Switch on/off the visibility of the Bluetooth ®
device for other Blue-
tooth ®
devices
■
1st name
- Changing the name of the Bluetooth ®
unit
■
Paired devices
- Display the list of coupled Bluetooth ®
Devices
■
Find devices
- Searches for available Bluetooth ®
devices
■
BT audio (A2DP/AVRCP)
- Turn on/off the ability to connect a Bluetooth ®
audio
device (e.g. MP3 player, tablet etc...)
System information
›
Press the button, then tap the function surface
System information
.
■
Update software
- Update software (e.g. Bluetooth ®
)
■ Bluetooth: ... - version number of the Bluetooth ®
software
■ Device part number: ... - Infotainment part number
■ Hardware: ... - Hardware version
■ Software: ... - Software version
The information on available software updates is obtained from a ŠKODA Part-
ner or from the following ŠKODA Internet pages.
http://go.skoda.eu/infotainment
Radio menu settings
Settings for all broadcasting areas
›
Tap the Radio main menu function
surface.
■
Scan
- Automatically play short portions of all available stations of the current
frequency range
■
Arrow buttons:
- Setting the function of the function surfaces
■
Presets
- Change between stations stored under the preset buttons
■
Stations
- Change between all available stations of the selected broadcast-
ing range
■
Traffic program (TP)
- Switches traffic programme on/off
■
Radio text
- Switching the text display radio (FM and DAB) on and off
140Infotainment
Page 168 of 336
Use the SIM card in the external module
Applies to Infotainment Columbus with the SIM card slot in the external mod-
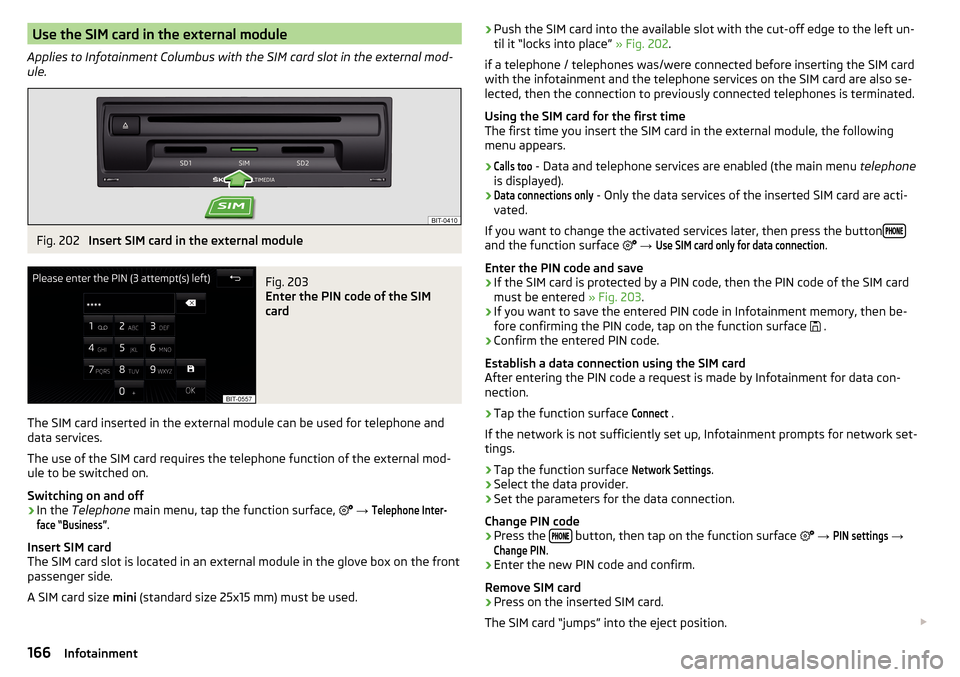
ule.Fig. 202
Insert SIM card in the external module
Fig. 203
Enter the PIN code of the SIM
card
The SIM card inserted in the external module can be used for telephone and
data services.
The use of the SIM card requires the telephone function of the external mod-
ule to be switched on.
Switching on and off
›
In the Telephone main menu, tap the function surface,
→
Telephone Inter-face “Business”
.
Insert SIM card
The SIM card slot is located in an external module in the glove box on the front
passenger side.
A SIM card size mini (standard size 25x15 mm) must be used.
›Push the SIM card into the available slot with the cut-off edge to the left un-
til it “locks into place” » Fig. 202.
if a telephone / telephones was/were connected before inserting the SIM card
with the infotainment and the telephone services on the SIM card are also se-
lected, then the connection to previously connected telephones is terminated.
Using the SIM card for the first time
The first time you insert the SIM card in the external module, the following
menu appears.›Calls too
- Data and telephone services are enabled (the main menu telephone
is displayed).
›Data connections only
- Only the data services of the inserted SIM card are acti-
vated.
If you want to change the activated services later, then press the button
and the function surface
→
Use SIM card only for data connection
.
Enter the PIN code and save
›
If the SIM card is protected by a PIN code, then the PIN code of the SIM card
must be entered » Fig. 203.
›
If you want to save the entered PIN code in Infotainment memory, then be-
fore confirming the PIN code, tap on the function surface .
›
Confirm the entered PIN code.
Establish a data connection using the SIM card
After entering the PIN code a request is made by Infotainment for data con-
nection.
›
Tap the function surface
Connect
.
If the network is not sufficiently set up, Infotainment prompts for network set-
tings.
›
Tap the function surface
Network Settings
.
›
Select the data provider.
›
Set the parameters for the data connection.
Change PIN code
›
Press the button, then tap on the function surface
→
PIN settings
→
Change PIN
.
›
Enter the new PIN code and confirm.
Remove SIM card
›
Press on the inserted SIM card.
The SIM card “jumps” into the eject position.
166Infotainment
Page 187 of 336
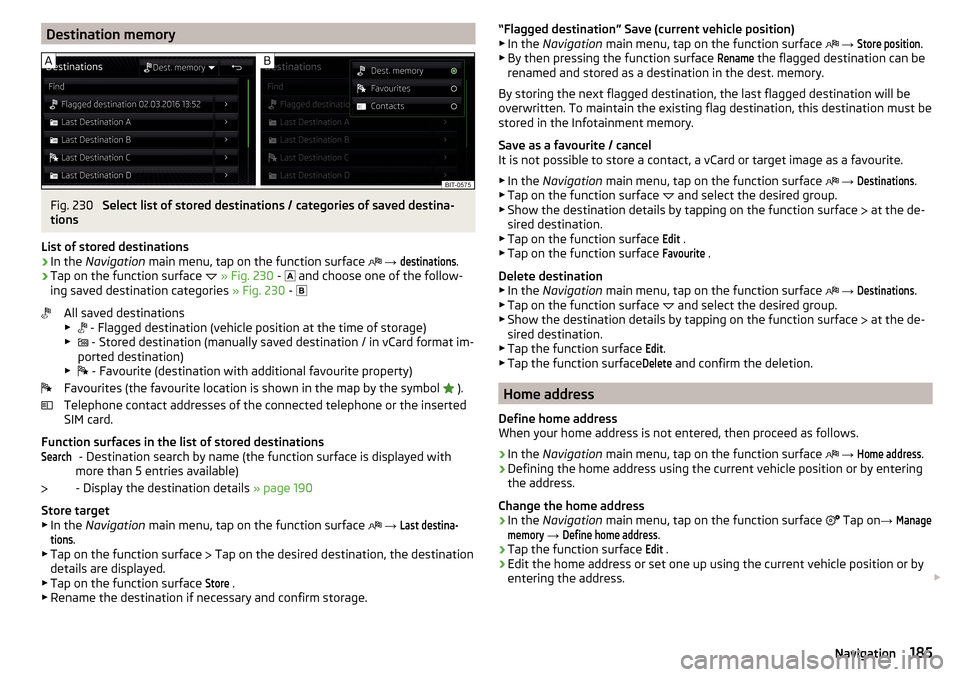
Destination memoryFig. 230
Select list of stored destinations / categories of saved destina-
tions
List of stored destinations
›
In the Navigation main menu, tap on the function surface
→
destinations
.
›
Tap on the function surface
» Fig. 230 -
and choose one of the follow-
ing saved destination categories » Fig. 230 -
All saved destinations
▶ - Flagged destination (vehicle position at the time of storage)
▶ - Stored destination (manually saved destination / in vCard format im-
ported destination)
▶ - Favourite (destination with additional favourite property)
Favourites (the favourite location is shown in the map by the symbol ).
Telephone contact addresses of the connected telephone or the inserted
SIM card.
Function surfaces in the list of stored destinations - Destination search by name (the function surface is displayed with
more than 5 entries available)
- Display the destination details » page 190
Store target
▶ In the Navigation main menu, tap on the function surface
→
Last destina-tions
.
▶ Tap on the function surface Tap on the desired destination, the destination
details are displayed.
▶ Tap on the function surface
Store
.
▶ Rename the destination if necessary and confirm storage.
Search“Flagged destination” Save (current vehicle position)
▶ In the Navigation main menu, tap on the function surface → Store position
.
▶ By then pressing the function surface
Rename
the flagged destination can be
renamed and stored as a destination in the dest. memory.
By storing the next flagged destination, the last flagged destination will be
overwritten. To maintain the existing flag destination, this destination must be
stored in the Infotainment memory.
Save as a favourite / cancel
It is not possible to store a contact, a vCard or target image as a favourite.
▶ In the Navigation main menu, tap on the function surface
→
Destinations
.
▶ Tap on the function surface and select the desired group.
▶ Show the destination details by tapping on the function surface at the de-
sired destination.
▶ Tap on the function surface
Edit
.
▶ Tap on the function surface
Favourite
.
Delete destination ▶ In the Navigation main menu, tap on the function surface
→
Destinations
.
▶ Tap on the function surface and select the desired group.
▶ Show the destination details by tapping on the function surface at the de-
sired destination.
▶ Tap the function surface
Edit
.
▶ Tap the function surface
Delete
and confirm the deletion.
Home address
Define home address
When your home address is not entered, then proceed as follows.
›
In the Navigation main menu, tap on the function surface
→
Home address
.
›
Defining the home address using the current vehicle position or by entering
the address.
Change the home address
›
In the Navigation main menu, tap on the function surface
Tap on
→
Managememory
→
Define home address
.
›
Tap the function surface
Edit
.
›
Edit the home address or set one up using the current vehicle position or by
entering the address.
185Navigation
Page 192 of 336
›Press the
button, then tap on the function surface
→ Driver assistance →Speed warning:
.
For trailer towing , we recommend that you activate detection of road signs
relevant to trailers.›
Press the button, then tap on the function surface
Tap →
Driver assis-tance
→
Show road signs relevant to trailers
.
Route guidance
Introduction to the subject
A route is created by starting route guidance to a destination. Additional inter-
mediate destinations can be added to the route.
The route guidance takes place as follows
▶ Through graphical driving instructions in the Infotainment display screen and
in the display of the instrument cluster.
▶ With navigation announcements.
Infotainment tries to allow for continued guidance even if the navigation data
is incomplete or there is no data at all for the given area.
The route is recalculated each time if you ignore driving recommendations or
change the route.
CAUTION
The nav. announcements provided may vary from the actual situations, e.g.
due to out-of-date navigation data.
Destination details
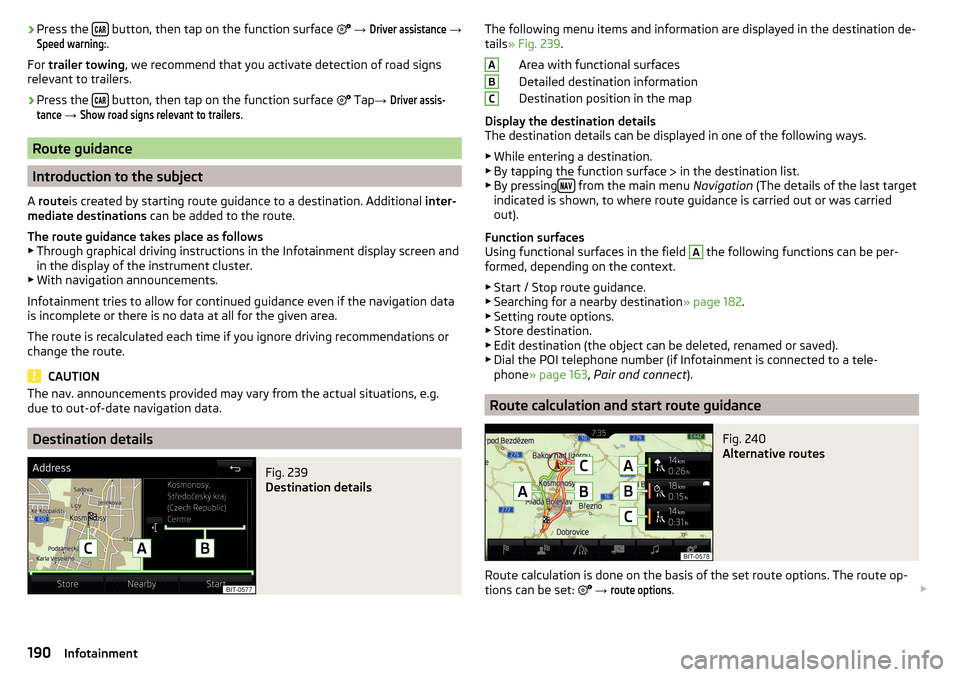
Fig. 239
Destination details
The following menu items and information are displayed in the destination de-
tails » Fig. 239 .
Area with functional surfaces
Detailed destination information
Destination position in the map
Display the destination details
The destination details can be displayed in one of the following ways.
▶ While entering a destination.
▶ By tapping the function surface
in the destination list.
▶ By pressing
from the main menu
Navigation (The details of the last target
indicated is shown, to where route guidance is carried out or was carried
out).
Function surfaces
Using functional surfaces in the field
A
the following functions can be per-
formed, depending on the context.
▶ Start / Stop route guidance.
▶ Searching for a nearby destination » page 182.
▶ Setting route options.
▶ Store destination.
▶ Edit destination (the object can be deleted, renamed or saved).
▶ Dial the POI telephone number (if Infotainment is connected to a tele-
phone » page 163 , Pair and connect ).
Route calculation and start route guidance
Fig. 240
Alternative routes
Route calculation is done on the basis of the set route options. The route op-
tions can be set:
→
route options
.
ABC190Infotainment
Page 195 of 336
›In the
Navigation main menu, tap the functional surface → Route details .
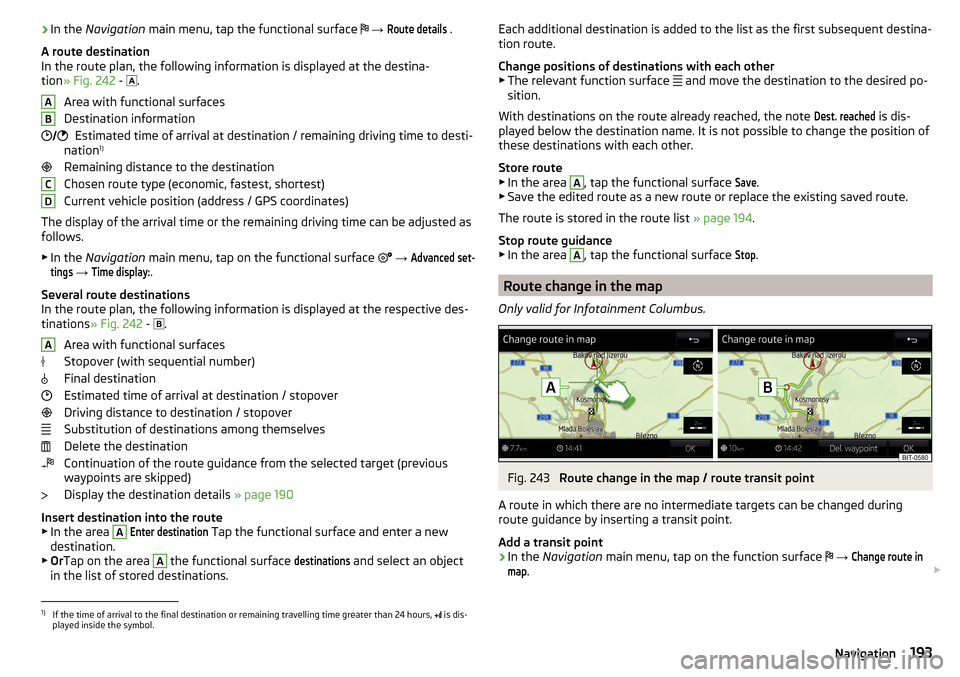
A route destination
In the route plan, the following information is displayed at the destina-
tion » Fig. 242 -
.
Area with functional surfaces
Destination information Estimated time of arrival at destination / remaining driving time to desti-
nation 1)
Remaining distance to the destination
Chosen route type (economic, fastest, shortest)
Current vehicle position (address / GPS coordinates)
The display of the arrival time or the remaining driving time can be adjusted as
follows.
▶ In the Navigation main menu, tap on the functional surface
→ Advanced set-tings
→
Time display:
.
Several route destinations
In the route plan, the following information is displayed at the respective des- tinations » Fig. 242 -
.
Area with functional surfaces
Stopover (with sequential number)
Final destination
Estimated time of arrival at destination / stopover
Driving distance to destination / stopover
Substitution of destinations among themselves
Delete the destination
Continuation of the route guidance from the selected target (previous
waypoints are skipped)
Display the destination details » page 190
Insert destination into the route ▶ In the area
A
Enter destination
Tap the functional surface and enter a new
destination.
▶ Or Tap on the area
A
the functional surface
destinations
and select an object
in the list of stored destinations.
AB CDAEach additional destination is added to the list as the first subsequent destina-
tion route.
Change positions of destinations with each other
▶ The relevant function surface
and move the destination to the desired po-
sition.
With destinations on the route already reached, the note Dest. reached
is dis-
played below the destination name. It is not possible to change the position of
these destinations with each other.
Store route ▶ In the area
A
, tap the functional surface
Save
.
▶ Save the edited route as a new route or replace the existing saved route.
The route is stored in the route list » page 194.
Stop route guidance ▶ In the area
A
, tap the functional surface
Stop
.
Route change in the map
Only valid for Infotainment Columbus.
Fig. 243
Route change in the map / route transit point
A route in which there are no intermediate targets can be changed during
route guidance by inserting a transit point.
Add a transit point
›
In the Navigation main menu, tap on the function surface
→
Change route inmap
.
1)
If the time of arrival to the final destination or remaining travelling time greater than 24 hours,
is dis-
played inside the symbol.
193Navigation
Page 209 of 336

WARNING (Continued)■If the vehicle stalls, with engine running, in the D, S , R or Tiptronic mode,
then the vehicle must be prevented from rolling away by means of the
brake pedal, parking brake or using the Auto Hold function. Even when the
engine is idling, the power transmission is never completely interrupted –
the vehicle creeps.■
When leaving the vehicle, the selector lever must always be set to P .
Otherwise, the vehicle could start to move - risk of accident.
CAUTION
■ If you want to move the selector lever from position N to position D / S whilst
driving, the engine must be running at idling speed.■
When stopping on a slope, never try to hold the vehicle using the accelerator
pedal – this may lead to gear damage.
Select selector lever position
Fig. 259
Selector lever settings / display
Read and observe and on page 206 first.
The selector lever can be moved through shifting to one of the following posi-
tions » Fig. 259 . In some positions you have to push the locking button
» page 207 , Selector lever lock .
When the ignition is switched on, the gearbox mode and the currently selected
gear are indicated in the display » Fig. 259.
Park - the position can be set only when the vehicle is at a standstill.
The drive wheels are mechanically locked.
Reverse gear - the position can be set only when the vehicle is at a stand-
still and the engine is at idling speed.
Neutral (idle position) - the power transmission to the drive wheels is in-
terrupted.
PRNForward mode / sports programme - the gear change takes place in the
position S at higher engine speeds than in mode D
(Sprung position) - choice between positions D and S
If the Sport driving mode is selected with the engine running » page 240, Se-
lect the driving mode (Driving Mode Selection) , the transmission is automati-
cally set in the S mode.
E – Economical driving mode
If the driving mode Eco or Individual (engine - Eco) » page 240 is selected and
the selection lever is in the setting D/S, the transmission is automatically set
to mode E. This mode cannot be selected with the selector lever.
The forwards mode is switched up or down automatically in mode E at lower
engine speeds than in mode D.
Selector lever lock
Fig. 260
Shift lock button
Read and observe and on page 206 first.
The selector lever is locked in mode P and N to prevent that the forward driv-
ing is selected accidentally, thereby setting the vehicle in motion.
The selector lever is locked only when the vehicle is stationary and at speeds
up to 5 km/h.
The selector lever lock is indicated by the illumination of the warning light.
Release the gear selector lever from P mode or N
›
Press the brake pedal and the lock button at the same time in the direction
of
1
» Fig. 260 .
To move the selector lever from mode N to D / S only the brake pedal is press-
ed.
D/S207Starting-off and Driving
Page 210 of 336
The selector lever is not locked when quickly moving across the position N
(e.g. from R to D/S ). This, for example, helps to rock out a vehicle that is stuck,
e.g. in a bank of snow. The selector lever lock will engage if the lever is in posi-
tion N for more than approx. 2 seconds without the brake pedal being de-
pressed.
If it is not possible to release the gear selector from mode P in the usual man-
ner, then this can be emergency unlocked » page 293.
Note
If you want to switch the selector lever from mode P to mode D/S or vice ver-
sa, move the selector lever quickly. This prevents that you accidentally select
mode R or N.
Manual shifting of gears (Tiptronic)
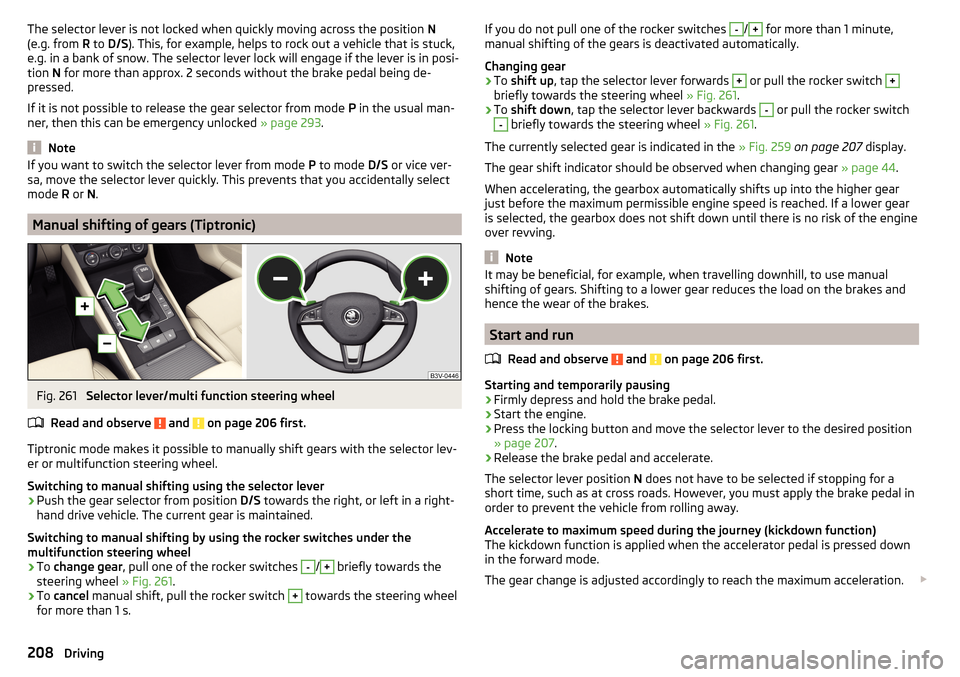
Fig. 261
Selector lever/multi function steering wheel
Read and observe
and on page 206 first.
Tiptronic mode makes it possible to manually shift gears with the selector lev-
er or multifunction steering wheel.
Switching to manual shifting using the selector lever
›
Push the gear selector from position D/S towards the right, or left in a right-
hand drive vehicle. The current gear is maintained.
Switching to manual shifting by using the rocker switches under the
multifunction steering wheel
›
To change gear , pull one of the rocker switches
-
/
+
briefly towards the
steering wheel » Fig. 261.
›
To cancel manual shift, pull the rocker switch
+
towards the steering wheel
for more than 1 s.
If you do not pull one of the rocker switches -/+ for more than 1 minute,
manual shifting of the gears is deactivated automatically.
Changing gear›
To shift up , tap the selector lever forwards
+
or pull the rocker switch
+
briefly towards the steering wheel » Fig. 261.
›
To shift down , tap the selector lever backwards
-
or pull the rocker switch
-
briefly towards the steering wheel » Fig. 261.
The currently selected gear is indicated in the » Fig. 259 on page 207 display.
The gear shift indicator should be observed when changing gear » page 44.
When accelerating, the gearbox automatically shifts up into the higher gear
just before the maximum permissible engine speed is reached. If a lower gear
is selected, the gearbox does not shift down until there is no risk of the engine
over revving.
Note
It may be beneficial, for example, when travelling downhill, to use manual
shifting of gears. Shifting to a lower gear reduces the load on the brakes and
hence the wear of the brakes.
Start and run
Read and observe
and on page 206 first.
Starting and temporarily pausing
›
Firmly depress and hold the brake pedal.
›
Start the engine.
›
Press the locking button and move the selector lever to the desired position
» page 207 .
›
Release the brake pedal and accelerate.
The selector lever position N does not have to be selected if stopping for a
short time, such as at cross roads. However, you must apply the brake pedal in
order to prevent the vehicle from rolling away.
Accelerate to maximum speed during the journey (kickdown function)
The kickdown function is applied when the accelerator pedal is pressed down
in the forward mode.
The gear change is adjusted accordingly to reach the maximum acceleration.
208Driving
Page 219 of 336
Note■If with Version 3 vehicles not all fields around the vehicle silhouette are ac-
tive after activation the vehicle should be moved forwards or backwards.■
The signal tones for front obstacle recognition are factory-set to be higher
than for rear obstacle recognition.
■
The setting of the acoustic signals is stored (depending on the Infotainment
type) in the active user account personalisation » page 49.
Display in Infotainment screen
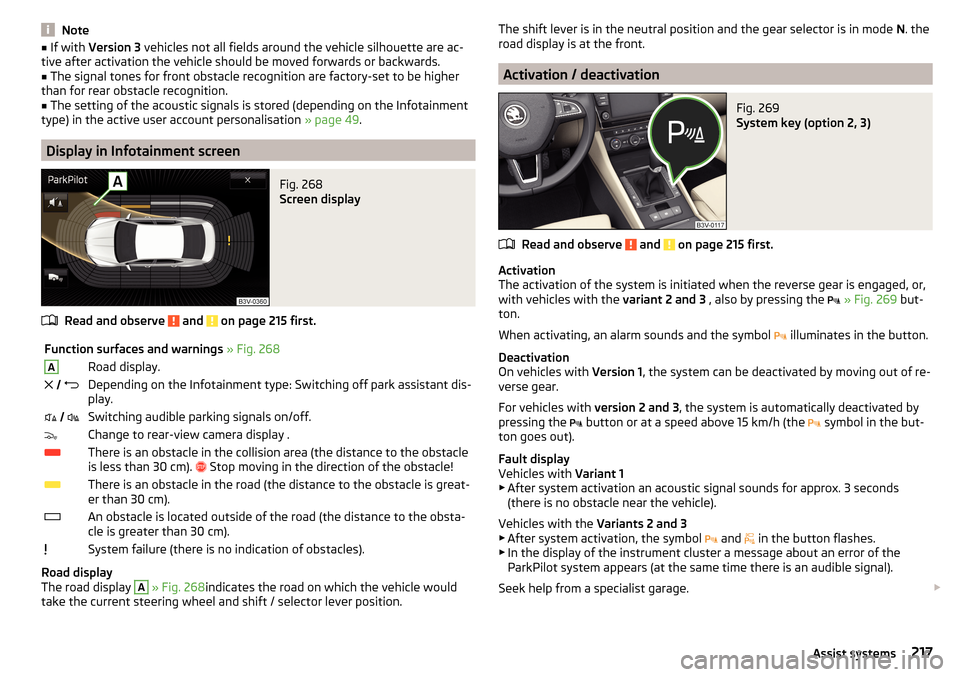
Fig. 268
Screen display
Read and observe and on page 215 first.
Function surfaces and warnings » Fig. 268ARoad display. Depending on the Infotainment type: Switching off park assistant dis-
play. Switching audible parking signals on/off.Change to rear-view camera display .There is an obstacle in the collision area (the distance to the obstacle
is less than 30 cm).
Stop moving in the direction of the obstacle!There is an obstacle in the road (the distance to the obstacle is great-
er than 30 cm).An obstacle is located outside of the road (the distance to the obsta-
cle is greater than 30 cm).System failure (there is no indication of obstacles).
Road display
The road display
A
» Fig. 268 indicates the road on which the vehicle would
take the current steering wheel and shift / selector lever position.
The shift lever is in the neutral position and the gear selector is in mode N. the
road display is at the front.
Activation / deactivation
Fig. 269
System key (option 2, 3)
Read and observe and on page 215 first.
Activation
The activation of the system is initiated when the reverse gear is engaged, or,
with vehicles with the variant 2 and 3 , also by pressing the
» Fig. 269 but-
ton.
When activating, an alarm sounds and the symbol illuminates in the button.
Deactivation
On vehicles with Version 1, the system can be deactivated by moving out of re-
verse gear.
For vehicles with version 2 and 3, the system is automatically deactivated by
pressing the button or at a speed above 15 km/h (the
symbol in the but-
ton goes out).
Fault display
Vehicles with Variant 1
▶ After system activation an acoustic signal sounds for approx. 3 seconds
(there is no obstacle near the vehicle).
Vehicles with the Variants 2 and 3
▶ After system activation, the symbol and
in the button flashes.
▶ In the display of the instrument cluster a message about an error of the
ParkPilot system appears (at the same time there is an audible signal).
Seek help from a specialist garage.
217Assist systems
Page 238 of 336
Set/change the desired speedRead and observe
on page 233 first.
The desired speed can be set or changed using the control lever » Fig. 296 on
page 235 .
Setting/changing the speed by increments of 10 km/h at a time (
) - re-
quirements
The ACC is activated.
Increasing/reducing the speed by increments of 1 km/h at a time (
/
-
requirements
The ACC is activated.
Vehicle control takes place.
Changing the speed by adopting the current speed ( ) - requirements
The ACC is activated.
The vehicle is moving at a speed other than that which is stored.
Note
■
If during control the speed is increased by pressing the accelerator, control is
temporarily stopped. Upon releasing the accelerator, control is automatically
resumed.■
If during control the speed is reduced by applying the brake, control is stop-
ped. Control needs to be restarted in order to resume » page 235.
■
If the vehicle is controlled by a lower speed than the stored speed, then
the current speed is stored by pressing the button again
and the speed is
reduced in increments of 1 km/h.
Set the clearance level
Read and observe
on page 233 first.
The proximity to the vehicle ahead can be set with the lever » Fig. 296 on
page 235 or in Infotainment » page 233, Settings in Infotainment .
Setting by means of the lever
›
Set the switch Adjust in the spring-tensioned position
or
» Fig. 296
on page 235 .
The display of the instrument cluster shows line
2
» Fig. 294 on page 234 ,
which indicates the proximity.
› Using the switch
on the lever, adjust the line 2 to the desired dis-
tance.
Note
■ If the proximity is changed in infotainment, the change will only come into
effect after a subsequent activation of the ACC.■
The higher the speed, the greater the proximity to the vehicle ahead.
■
The adjustment of the distance is stored (depending on the Infotainment
type) in the active user account personalisation » page 49.
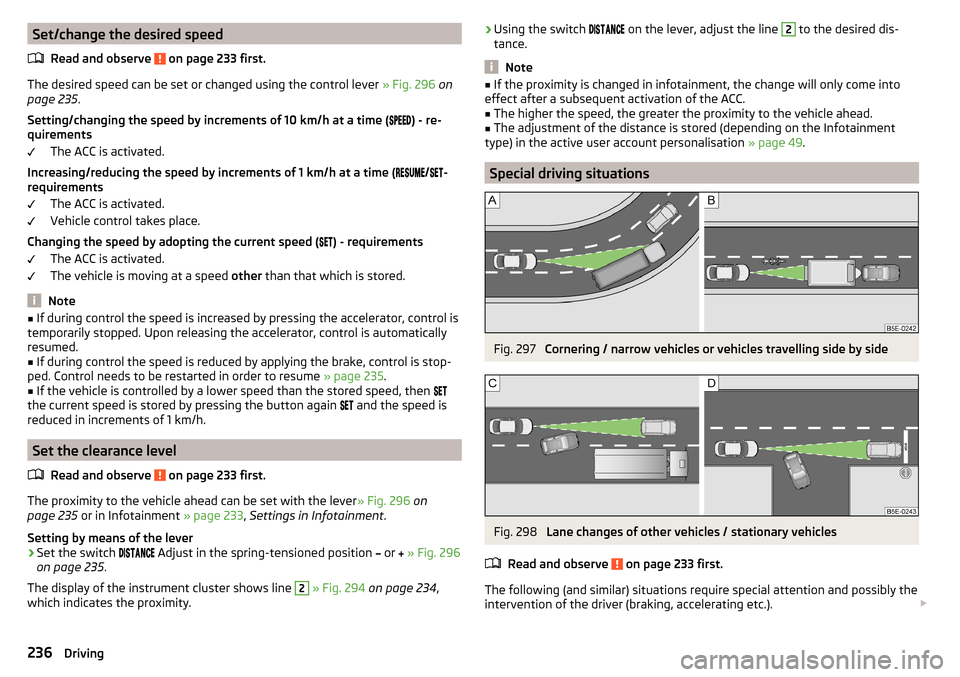
Special driving situations
Fig. 297
Cornering / narrow vehicles or vehicles travelling side by side
Fig. 298
Lane changes of other vehicles / stationary vehicles
Read and observe
on page 233 first.
The following (and similar) situations require special attention and possibly the intervention of the driver (braking, accelerating etc.).
236Driving