change time SKODA SUPERB 2016 3.G / (B8/3V) Owner's Guide
[x] Cancel search | Manufacturer: SKODA, Model Year: 2016, Model line: SUPERB, Model: SKODA SUPERB 2016 3.G / (B8/3V)Pages: 336, PDF Size: 53.89 MB
Page 239 of 336
When cornering
When driving into or driving out of long corners, it could be that a vehicle is
travelling in the adjacent lane and is scanned by the radar » Fig. 297 -
. The
host vehicle is then controlled according to this vehicle.
Narrow vehicles or vehicles travelling side by side
A narrow or offset vehicle driving can only be recognized by the ACC if this is
located in the scanning range of the radar » Fig. 297 -
.
Other vehicles changing lanes
Vehicles that change onto the lane with a small distance » Fig. 298 -
may not
be detected by ACC in good time.
Stationary vehicles
The ACC does not detect stationary objects! When a vehicle detected by the
ACC turns or sheers off and there is a stationary vehicle in front of this vehi-
cle, » Fig. 298 -
the ACC does not respond to the stationary vehicle.
Vehicles with special load or special body parts
Other vehicles with a load or with body parts protruding from the sides, back
or top of the vehicle contour may not be detected by the ACC.
Overtaking and towing
Read and observe
on page 233 first.
When overtaking
When your vehicle is being controlled at a speed that is lower than the set
speed and the turn signal is operated, ACC assesses this situation as meaning
that the driver wishes to overtake. The ACC automatically accelerates the vehi-
cle, thereby reducing the proximity to a vehicle ahead.
If your vehicle changes to the overtaking lane and no vehicle is detected
ahead, ACC accelerates until the set speed is reached and then keeps it con-
stant.
Acceleration can be cancelled at any time by touch on the brake pedal or
pressing the button on the lever
» Fig. 296 on page 235 .
Towing a trailer
When towing, or if another accessory is connected to the trailer socket, ACC
control is set with a lower rate. The manner of driving should therefore be
adapted to this limitation.
Malfunctions
Read and observe
on page 233 first.
If, for some unknown reason, ACC is not available, the warning light
appears
in the display of the instrument cluster and an appropriate message is shown.
Sensor covered / dirty
If the sensor cover or the sensor is dirty or covered, a message appears on the
instrument cluster display stating there is no sensor view. Clean the sensor
cover or remove the obstacles » Fig. 264 on page 212 .
If there is no sensor view in the winter, the snow on the sensor under the cov- er could be the reason. The ACC is functional again after the snow melts away
from the sensor.
ACC not available
If the ACC is currently unavailable, a message concerning the unavailability ap-
pears. Stop the vehicle, switch off the engine and then start it again. If ACC
continues to be unavailable, seek the assistance of a specialist garage.
ACC fault
With an ACC fault, an error message appears. Seek help from a specialist ga-
rage.
Front Assist
Introduction
This chapter contains information on the following subjects:
Settings in Infotainment
238
Operation
238
Distance warning
238
Warning and automatic braking
238
Deactivation/activation
239
Malfunctions
240
The Front Assist (hereinafter referred to as the system) warns you of the dan-
ger of a collision with a vehicle or another obstacle in front of the vehicle, and
tries to avoid a collision or mitigate its consequences by automatically applying
the brakes where necessary.
The area in front of the vehicle is monitored by a radar sensor » page 212.
237Assist systems
Page 249 of 336
WARNINGThe traffic signs may not be displayed or displayed incorrectly in the system
e.g. in the following situations.■
When visibility is poor, (e.g. fog, heavy rain, thick snowfall).
■
The sensor is blinded by the sun or oncoming traffic.
■
The field of view of the sensor is limited by an obstacle or a preceding ve-
hicle.
■
Travelling at high speed.
■
The traffic signs are covered (e.g. by trees, snow or dirt).
■
The traffic signs are not standard (round with a red border) or are dam-
aged.
■
The traffic signs are attached to flashing neon signs.
■
The traffic signs were changed (the navigation data are out of date).
Note
The system is only available in some countries.
Settings in Infotainment
Read and observe
on page 246 first.
›
Press the button, then tap on the function surface
→
Driver assistance
.
■ Dynamic Road Sign Display - Settings for the Dynamic Road Sign Display
■
Show in instrument cluster
- Activation/deactivation of the additional traffic
signs in the display of the instrument cluster
■
Speed warning:
» page 240 - Setting a warning when exceeding the speed
limit
■
Warning at over
- Setting warning timing with the option to exceed the speed
limit in a range from 0 to 20 km / h
■ Trailer recognition
■
Show road signs relevant to trailers
- Activating / deactivating display of road
signs relevant to trailers
■
Use for route calculation
- Activation / deactivation of taking the trailer into ac-
count for route calculation in navigation
■
Maximum speed for trailer
- Set the top speed for towing a trailer
OperationFig. 306
Sensor for Dynamic Road Sign
Display
Fig. 307
Instrument cluster display: Display examples
Read and observe
on page 246 first.
Description of indications and displayed traffic signs
Display » Fig. 307Display of detected traffic signs » page 46, Driving data (Multifunction
display)Additional display (monochromatic display)Additional display (colour display)
The system can display the following (vertical) traffic signs where identified. ▶ Speed limit.
▶ Overtaking prohibited.
Additional signs, such as 'when wet' or signs which only apply for a limited
time can also be displayed.
The system displays only traffic signs that are in the “viewing area” of the sen-
sor » Fig. 306 .
247Assist systems
Page 258 of 336
General Maintenance
Care and maintenance
Service work, adjustments and technical alterations
Introduction
This chapter contains information on the following subjects:
Vehicle operating under different weather conditions
256
Statutory checks
256
ŠKODA Service Partner
256
ŠKODA Original parts
257
ŠKODA Original accessories
257
Spoiler
257
Component protection
257
Airbags
257
Acceptance and recycling of used vehicles
258
The instructions and guidelines from ŠKODA AUTO must be observed when
carrying out any modifications, repairs or technical alterations to your vehicle.
Adhering to these instructions and guidelines helps ensure road safety and
helps keep your vehicle in a good technical condition.
WARNING■ Adjustments, repairs and technical changes to the vehicle are to be car-
ried out only by a specialist garage. Improperly conducted work (including
work on the electronic components and their software) can cause faults -
there is a risk of accidents and increased wear on parts!■
We advise you only to use ŠKODA Original Accessories and ŠKODA Origi-
nal Parts which have been expressly approved for use on your vehicle. Reli-
ability, safety and suitability for your vehicle are guaranteed with these.
■
ŠKODA AUTO cannot assume any liability for products which have not
been approved by ŠKODA even though these may be products with a type
approval or have been approved by a nationally recognised testing labora-
tory.
Vehicle operating under different weather conditions
Read and observe
on page 256 first.
If you would like to operate your vehicle in countries other than those with itsintended weather conditions, you should contact a ŠKODA Partner. They will
advise you if certain precautions need to be taken to ensure the full function-
ing of the vehicle or to prevent damage (e.g. coolant / battery replacement
etc.).
Statutory checks
Read and observe
on page 256 first.
Many countries have legislation requiring the operational reliability and road-worthiness and/or exhaust gas properties of a vehicle to be tested at specific
intervals. These tests can be carried out by workshops or testing stations that
have been legally authorized for this purpose.
Upon request, the ŠKODA Service Partners can prepare the vehicle for the
tests or have this carried out.
Even if you want to take your vehicle to an officially approved test centre for
prior checking in preparation for a legally required test, we recommend that
you consult the service consultant of your ŠKODA Service Partner beforehand.
ŠKODA Service Partner
Read and observe
on page 256 first.
All ŠKODA Service Partners operate according to the most recent guidelinesand instructions from ŠKODA AUTO . All service and repair work is therefore
carried out on time and at the appropriate quality. Adhering to these instruc-
tions and guidelines helps ensure road safety and helps keep your vehicle in a
good technical condition.
We therefore advise you to have all modifications, repairs and technical altera-
tions to your vehicle carried out by a ŠKODA Service Partner.
256General Maintenance
Page 260 of 336
WARNING■No changes may be made to parts of the airbag system, the front bumper
and the body.■
Any work on the airbag system including the installation and removal of
system components due to other repair work (e.g. removal of the steering
wheel) must only be carried out by a specialist garage.
■
Do not manipulate individual parts of the airbag system, as this might re-
sult in the airbag being deployed.
■
If the airbag is triggered, the airbag system must be exchanged.
WARNINGThe airbag system operates using pressure sensors located in the front
doors. For this reason, no adjustments may be carried out to the doors or
door panels (e.g. installation of additional loudspeakers). The resulting
damage can negatively affect the function of the airbag system - there is a
risk of accidents and fatal injuries! The following guidelines must be ob-
served.■
Any work on the front doors and their door panels must be carried out by
a specialist garage.
■
Never drive with removed inner door panels or openings in the panels.
Acceptance and recycling of used vehicles
Read and observe
on page 256 first.
All new ŠKODA vehicles are 95% recyclable.
Service intervals
Introduction
This chapter contains information on the following subjects:
Overview of service intervals
259
Fixed service intervals QI1 - QI4
259
Flexible service interval QI6
259
Digital Service Plan
260
The service interval display in the display of the instrument cluster will remind
you to carry out every service stipulated by the manufacturer at the right time
in order to prevent you from forgetting them » page 49.
The completion of services can be verified through the printed verification
from the digital service schedule and the respective receipts.
The specified service intervals are tailored to normal operating conditions.
In the case of difficult operating conditions, it is necessary to have some serv-
ice work performed before the date of the next service or between the speci-
fied service intervals. This applies mainly to the cleaning or the replacement of
the air filter insert in regions with heavy dust pollution as well as checking and
replacing the toothed belt, but also to vehicles with diesel particle filters,
which can put greater strain on the engine oil.
The following is understood under difficult conditions:
▶ Fuel containing sulphur.
▶ Frequent short trips.
▶ Longer periods of engine idling (e.g. taxis).
▶ Operation in areas with heavy dust pollution.
▶ Frequent trailer operation.
▶ Predominantly stop-and-go traffic as is often the case in city driving, for ex-
ample.
▶ Operation predominantly during winter.
You will be told at the specialist garage whether the operating conditions of your vehicle may make it necessary for service work to be carried out between
the normal service intervals.
Different service charges may apply from the particular scope of work required,
depending on the vehicle type and equipment and the status of your vehicle.
Note
■ The customer is responsible for covering the cost of all services including
changing or replenishing the oil, even during the warranty period, unless sta-
ted otherwise in the ŠKODA AUTO. warranty terms or other agreements.■
You will be informed about the current service scopes for the particular serv-
ice work by the specialist garage.
258General Maintenance
Page 272 of 336
Windscreen washer fluidFig. 320
Windscreen washer fluid reservoir
Read and observe
and on page 268 first.
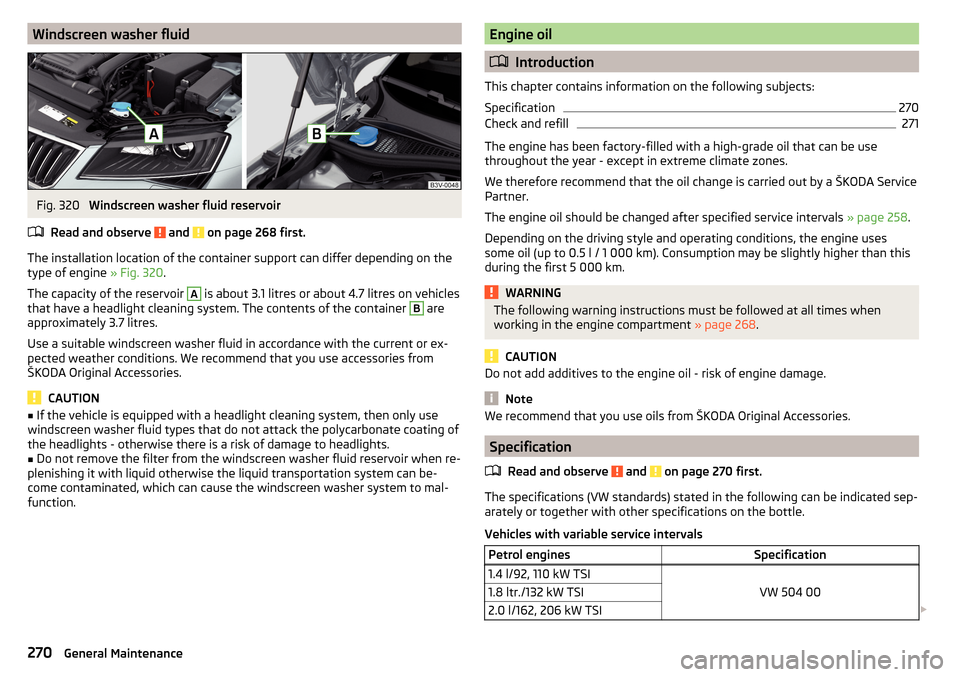
The installation location of the container support can differ depending on the
type of engine » Fig. 320.
The capacity of the reservoir
A
is about 3.1 litres or about 4.7 litres on vehicles
that have a headlight cleaning system. The contents of the container
B
are
approximately 3.7 litres.
Use a suitable windscreen washer fluid in accordance with the current or ex-
pected weather conditions. We recommend that you use accessories from
ŠKODA Original Accessories.
CAUTION
■ If the vehicle is equipped with a headlight cleaning system, then only use
windscreen washer fluid types that do not attack the polycarbonate coating of
the headlights - otherwise there is a risk of damage to headlights.■
Do not remove the filter from the windscreen washer fluid reservoir when re-
plenishing it with liquid otherwise the liquid transportation system can be-
come contaminated, which can cause the windscreen washer system to mal-
function.
Engine oil
Introduction
This chapter contains information on the following subjects:
Specification
270
Check and refill
271
The engine has been factory-filled with a high-grade oil that can be use
throughout the year - except in extreme climate zones.
We therefore recommend that the oil change is carried out by a ŠKODA Service
Partner.
The engine oil should be changed after specified service intervals » page 258.
Depending on the driving style and operating conditions, the engine uses
some oil (up to 0.5 l / 1 000 km). Consumption may be slightly higher than this
during the first 5 000 km.
WARNINGThe following warning instructions must be followed at all times when
working in the engine compartment » page 268.
CAUTION
Do not add additives to the engine oil - risk of engine damage.
Note
We recommend that you use oils from ŠKODA Original Accessories.
Specification
Read and observe
and on page 270 first.
The specifications (VW standards) stated in the following can be indicated sep-arately or together with other specifications on the bottle.
Vehicles with variable service intervals
Petrol enginesSpecification1.4 l/92, 110 kW TSI
VW 504 00
1.8 ltr./132 kW TSI2.0 l/162, 206 kW TSI 270General Maintenance
Page 275 of 336
Brake fluidFig. 323
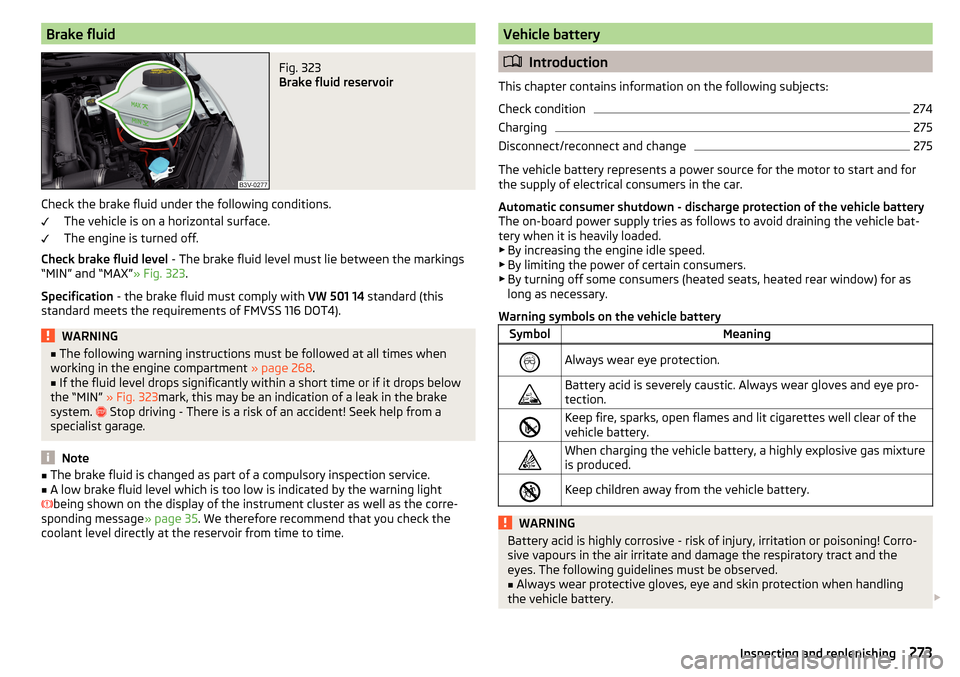
Brake fluid reservoir
Check the brake fluid under the following conditions.The vehicle is on a horizontal surface.
The engine is turned off.
Check brake fluid level - The brake fluid level must lie between the markings
“MIN” and “MAX” » Fig. 323.
Specification - the brake fluid must comply with VW 501 14 standard (this
standard meets the requirements of FMVSS 116 DOT4).
WARNING■ The following warning instructions must be followed at all times when
working in the engine compartment » page 268.■
If the fluid level drops significantly within a short time or if it drops below
the “MIN” » Fig. 323mark, this may be an indication of a leak in the brake
system.
Stop driving - There is a risk of an accident! Seek help from a
specialist garage.
Note
■ The brake fluid is changed as part of a compulsory inspection service.■A low brake fluid level which is too low is indicated by the warning light
being shown on the display of the instrument cluster as well as the corre-
sponding message » page 35. We therefore recommend that you check the
coolant level directly at the reservoir from time to time.Vehicle battery
Introduction
This chapter contains information on the following subjects:
Check condition
274
Charging
275
Disconnect/reconnect and change
275
The vehicle battery represents a power source for the motor to start and for the supply of electrical consumers in the car.
Automatic consumer shutdown - discharge protection of the vehicle battery
The on-board power supply tries as follows to avoid draining the vehicle bat-
tery when it is heavily loaded.
▶ By increasing the engine idle speed.
▶ By limiting the power of certain consumers.
▶ By turning off some consumers (heated seats, heated rear window) for as
long as necessary.
Warning symbols on the vehicle battery
SymbolMeaningAlways wear eye protection.Battery acid is severely caustic. Always wear gloves and eye pro-
tection.Keep fire, sparks, open flames and lit cigarettes well clear of the
vehicle battery.When charging the vehicle battery, a highly explosive gas mixture
is produced.Keep children away from the vehicle battery.WARNINGBattery acid is highly corrosive - risk of injury, irritation or poisoning! Corro-
sive vapours in the air irritate and damage the respiratory tract and the
eyes. The following guidelines must be observed.■
Always wear protective gloves, eye and skin protection when handling
the vehicle battery.
273Inspecting and replenishing
Page 277 of 336
ChargingRead and observe
and on page 273 first.
Only charge the vehicle battery when the ignition and all consumers are
switched off.
Refer to the instructions of the charger manufacturer.
Charging
›
For vehicles with START-STOP system or auxiliary heating, connect the
terminal of the charger on the
pole of the battery, the
terminal of the
charger to the earth point of the engine » page 288.
›
For vehicles without START-STOP system or auxiliary heating, connect the
terminals of the charger to the corresponding battery poles ( at
.
at
).
›
Plug the mains cable of the charger into the power socket and switch on the
device.
›
After charging has been successful: Switch off the charger and remove the
mains cable from the power socket.
›
Disconnect the terminals of the charger from the vehicle battery.
A charging current of 0.1 multiple of the total vehicle battery capacity (or low-
er) must be used until full charging is achieved.
WARNING■ When charging the vehicle battery, hydrogen is released - risk of explo-
sion. An explosion can be caused from sparks or connection or releasing
the cable plug while the ignition is on.■
The so-called “quick charging” of the vehicle battery is dangerous and re-
quires a special charger and specialist knowledge. Therefore, have“Quick
loading” carried out by a specialist garage.
Disconnect/reconnect and change
Read and observe
and on page 273 first.
The new vehicle battery must have the same capacity, voltage, current and the
same size as the original Battery.
We recommend you have the battery replaced by a specialist garage.
›
To disconnect the battery, switch off the ignition and disconnect first the
negative terminal , and only after this the positive
.
›To
connect the battery, first connect the positive terminal , and only after
this the negative terminal .
After disconnecting and re-connecting the vehicle battery, the following func-
tions or devices are partially or completely inoperative.Function / deviceOperating measurePower windows» page 64Panorama sliding/tilting roof» page 65Sun screen» page 66Time setting» page 44
CAUTION
■ Disconnect the vehicle battery only with the ignition turned off - there is a
risk of damaging the electrical system of the vehicle.■
Before disconnecting the battery, close the electric tailgate, all the windows,
the sliding / tilting roof and the electric sunshade - otherwise malfunctions of
equipment elements may occur.
■
Under no circumstances must the connection cables be connected incorrect-
ly – risk of fire.
Note
After disconnecting and re-connecting the vehicle battery, we recommend
having the vehicle checked by a specialist to ensure that the full functionality
of all electrical systems is guaranteed.275Inspecting and replenishing
Page 279 of 336
Tyre pressureFig. 325
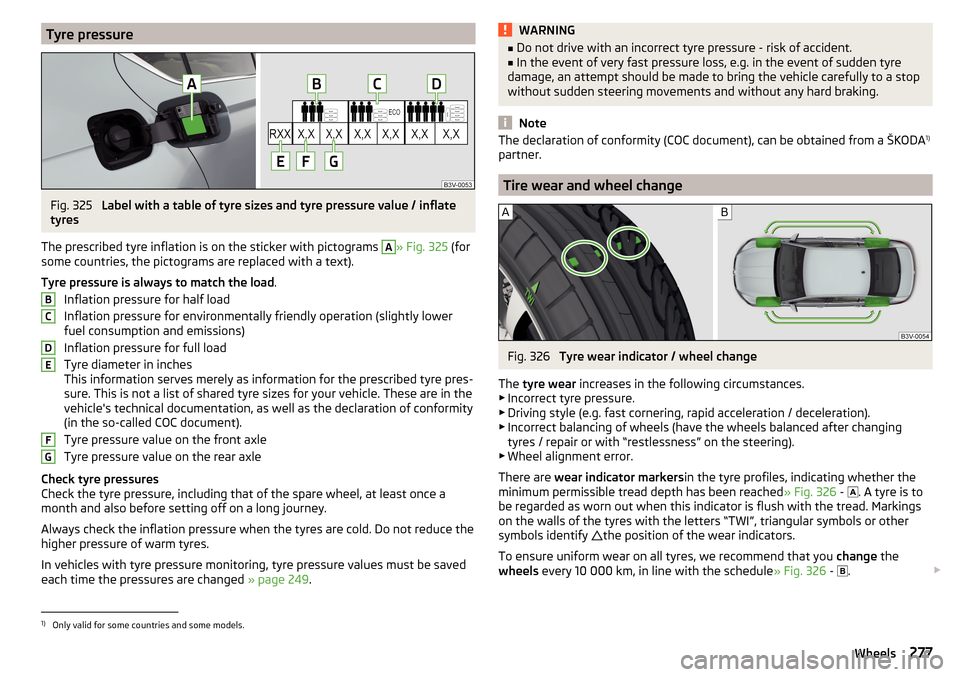
Label with a table of tyre sizes and tyre pressure value / inflate
tyres
The prescribed tyre inflation is on the sticker with pictograms
A
» Fig. 325 (for
some countries, the pictograms are replaced with a text).
Tyre pressure is always to match the load .
Inflation pressure for half load
Inflation pressure for environmentally friendly operation (slightly lower
fuel consumption and emissions)
Inflation pressure for full load
Tyre diameter in inches
This information serves merely as information for the prescribed tyre pres-
sure. This is not a list of shared tyre sizes for your vehicle. These are in the
vehicle's technical documentation, as well as the declaration of conformity
(in the so-called COC document).
Tyre pressure value on the front axle
Tyre pressure value on the rear axle
Check tyre pressures
Check the tyre pressure, including that of the spare wheel, at least once a
month and also before setting off on a long journey.
Always check the inflation pressure when the tyres are cold. Do not reduce the
higher pressure of warm tyres.
In vehicles with tyre pressure monitoring, tyre pressure values must be saved
each time the pressures are changed » page 249.
BCDEFGWARNING■
Do not drive with an incorrect tyre pressure - risk of accident.■In the event of very fast pressure loss, e.g. in the event of sudden tyre
damage, an attempt should be made to bring the vehicle carefully to a stop
without sudden steering movements and without any hard braking.
Note
The declaration of conformity (COC document), can be obtained from a ŠKODA 1)
partner.
Tire wear and wheel change
Fig. 326
Tyre wear indicator / wheel change
The tyre wear increases in the following circumstances.
▶ Incorrect tyre pressure.
▶ Driving style (e.g. fast cornering, rapid acceleration / deceleration).
▶ Incorrect balancing of wheels (have the wheels balanced after changing
tyres / repair or with “restlessness” on the steering).
▶ Wheel alignment error.
There are wear indicator markers in the tyre profiles, indicating whether the
minimum permissible tread depth has been reached » Fig. 326 -
. A tyre is to
be regarded as worn out when this indicator is flush with the tread. Markings
on the walls of the tyres with the letters “TWI”, triangular symbols or other
symbols identify the position of the wear indicators.
To ensure uniform wear on all tyres, we recommend that you change the
wheels every 10 000 km, in line with the schedule » Fig. 326 -
.
1)
Only valid for some countries and some models.
277Wheels
Page 280 of 336
WARNING■Change when they are worn down to the wear indicators at the latest -
risk of accident.■
Improper wheel alignment affects the driving behaviour - there is an acci-
dent.
■
Unusual vibrations or “pulling” of the vehicle to one side could be a sign
of tyre damage. Reduce speed and stop! If no tyre damage is evident, seek
the assistance of a specialist garage.
Spare wheel
Use the emergency spare wheel only to reach the nearest specialist garage, as
it is not intended for permanent use .
A warning label is displayed on the rim of the temporary spare wheel.
Please note the following if you intend to use the temporary spare wheel. ▶ Do not cover the signs.
▶ Be particularly observant when driving.
▶ Inflate the temporary spare wheel to the maximum inflation pressure for the
vehicle » page 277 (the prescribed tyre pressure of the spare wheel R 18 is
4.2 bar).
In vehicles with tyre pressure monitoring, save the tyre pressure values in the
system » page 249 .
WARNING■
Never drive with more than one spare wheel mounted!■When driving with the temporary spare wheel at full throttle acceleration,
avoid sharp braking and fast cornering.■
Do not use snow chains on the temporary spare wheel.
■
Observe instructions on the warning sign of the emergency wheel.
Tyre marking
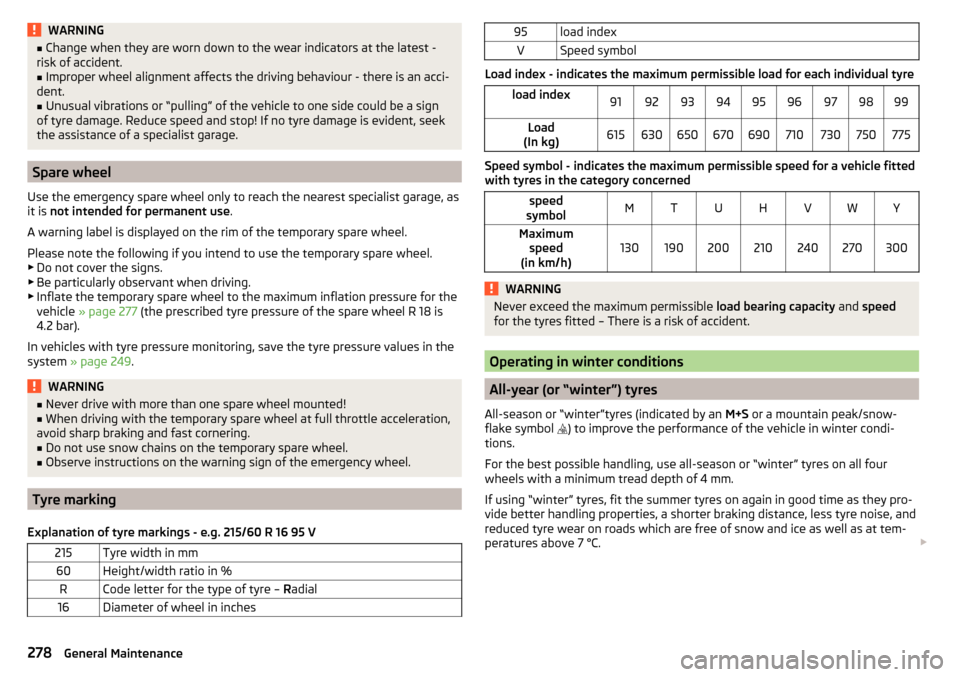
Explanation of tyre markings - e.g. 215/60 R 16 95 V
215Tyre width in mm60Height/width ratio in %RCode letter for the type of tyre – Radial16Diameter of wheel in inches95load indexVSpeed symbol
Load index - indicates the maximum permissible load for each individual tyre
load index919293949596979899Load
(In kg)615630650670690710730750775
Speed symbol - indicates the maximum permissible speed for a vehicle fitted
with tyres in the category concerned
speed
symbolMTUHVWYMaximum speed
(in km/h)130190200210240270300WARNINGNever exceed the maximum permissible load bearing capacity and speed
for the tyres fitted – There is a risk of accident.
Operating in winter conditions
All-year (or “winter”) tyres
All-season or “winter”tyres (indicated by an M+S or a mountain peak/snow-
flake symbol ) to improve the performance of the vehicle in winter condi-
tions.
For the best possible handling, use all-season or “winter” tyres on all four
wheels with a minimum tread depth of 4 mm.
If using “winter” tyres, fit the summer tyres on again in good time as they pro-
vide better handling properties, a shorter braking distance, less tyre noise, and
reduced tyre wear on roads which are free of snow and ice as well as at tem-
peratures above 7 °C.
278General Maintenance
Page 322 of 336
Navigation menu item48
Operation45
Telephone menu item48
Maximum speed309
MCB215
Media Audio source
149
AUX90, 150
Bluetooth Audio151
Browser148
CD / DVD149
Compatible sources152, 153
File formats152, 153
Foreword146
Jukebox151
List148
Main menu146
Multimedia database148
Operation146
Playback operation147
Requirements and Restrictions152, 153
safe removal of the data source133
Safe removal of the data source140
SD card150
Select audio source146
Settings135
Set to141
USB90, 150
Voice control128
WLAN151
Media Command Control
159
Main menu158
Supported formats160
Memory47
Memory Function for the seat81
Menu Setup
131, 139
Mirror77
Vanity75
MirrorLink®178
Connection establishment179
Disconnection179
Function issues179
Main menu179
Operation179
MODE button See driving mode
240
Modes of the automatic transmission207
Modifications and technical alterations256
Most common routes192
MSR213
Multi-function pocket108
Multi-media AUX
150
Multicollision brake (MCB)215
Multifunction display Functions
46
Information46
Memory47
Multifunction steering wheel45
Multimedia USB
150
Multimedia database148
Mute127
My destinations186
My POIs186
N
N1
109
navigation Destination on the map
184
Map orientation188
Navigation Abort route guidance
192
Additional windows182
Advanced settings138
Alternative route137
Contacts185
Demo mode138, 191
Destination address183
Destination details190
destination memory185
Destination presentation in the split screen189
Destination representation187
Dynamic route137
Edit route192
Favourites185
Final destinations184
Finish route guidance192
Foreword180
GPS180
Graphical driving recommendations191
Home address185
Image with GPS187
Import destination186
Imported destinations137
Intermediate target190
Main menu181
Manage memory137
Map137
Map alignment189
Map scale188
Most common routes192
My destinations186
Navigation data181
Nav. announcements138, 192
Options for map display187
Options for map display in the split screen189
Preferred route type137
Route190
Route calculation190
Route change193
Route display187
Route display in the split screen189
Route guidance190
Route information192
Route list194
Route options137
320Index