lock SKODA SUPERB 2016 3.G / (B8/3V) User Guide
[x] Cancel search | Manufacturer: SKODA, Model Year: 2016, Model line: SUPERB, Model: SKODA SUPERB 2016 3.G / (B8/3V)Pages: 336, PDF Size: 53.89 MB
Page 29 of 336

GroupSize class of
the child seat a)Front passenger seat
b)Rear seats outsideRear seat middle
1
9-18 kg
D
XIL
IUFX
CBB1A2
15-25 kg-XILX3
22-36 kg-XILXa)
The size category is shown on the label attached to the child seat.
b)
If the front passenger seat is fitted with system attachment points, it is suitable for the installation of an
child seat with “Semi-Universal” approval.
ILThe seat is suitable for installation of a
child seat with the “Semi-Universal” approval. The “Semi-Universal” category means that the child seat
with the
system is approved for your vehicle. Observe the list of vehicles that comes with the child seat.IUFThe seat is suitable for the use of approved forward-facing child seats in the “Universal” weight group category.XThe seat is not fitted with system attachment points.Using child seats with the systemFront passenger seatRear seats outsideRear seat middleXi-UX
The seat is suitable for forward and backward facing
child seats of
the category “Universal”.
The seat is not suitable for the
child seat of the category “Universal”.
i-UXAttachment points of the systemFig. 16
Attachment points of the
-system
is a fastening system, which restricts the movement of the upper part
of the child seat.
The locking eyes
A
for attaching the belt of a child seat with the
sys-
tem are located on the rear side of the outer rear seat backrests » Fig. 16.
Some country-specific models can also be equipped with a locking eye
B
on
the back of the middle rear seat backrest » Fig. 16.
27Transporting children safely
Page 30 of 336

WARNING■Always refer to the instructions from the manufacturer of the child seat
when installing and removing a child seat with the system.■
Only use child seats with the
system on the seats with the at-
tachment points.
■
Only ever attach one belt from the child seat to a locking eye.
28Safety
Page 33 of 336
Using the system
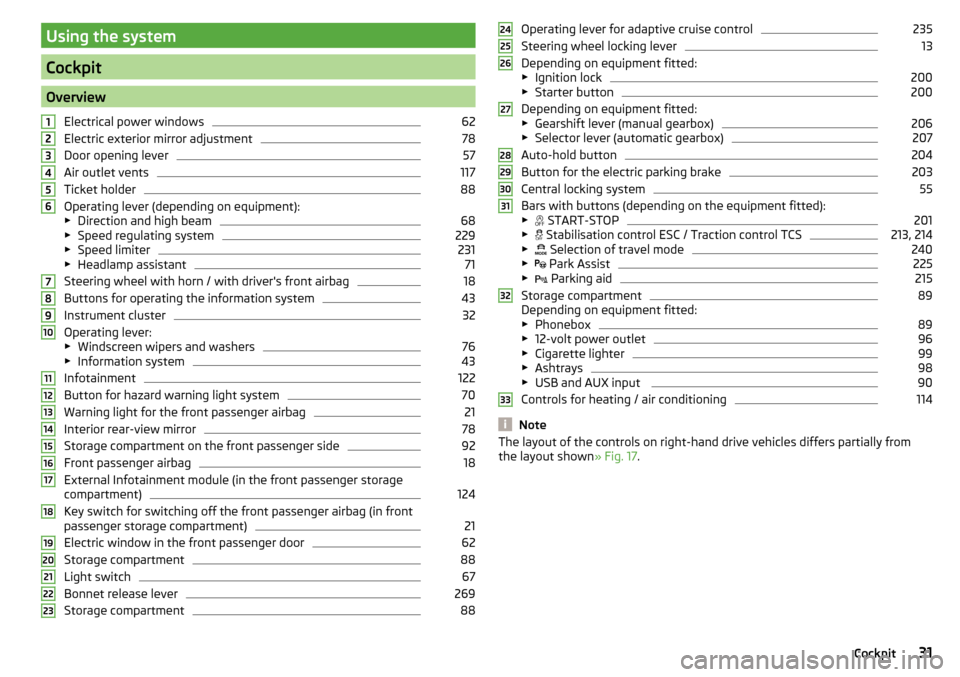
Cockpit
OverviewElectrical power windows
62
Electric exterior mirror adjustment
78
Door opening lever
57
Air outlet vents
117
Ticket holder
88
Operating lever (depending on equipment):
▶ Direction and high beam
68
▶Speed regulating system
229
▶Speed limiter
231
▶Headlamp assistant
71
Steering wheel with horn / with driver's front airbag
18
Buttons for operating the information system
43
Instrument cluster
32
Operating lever:
▶ Windscreen wipers and washers
76
▶Information system
43
Infotainment
122
Button for hazard warning light system
70
Warning light for the front passenger airbag
21
Interior rear-view mirror
78
Storage compartment on the front passenger side
92
Front passenger airbag
18
External Infotainment module (in the front passenger storage
compartment)
124
Key switch for switching off the front passenger airbag (in front
passenger storage compartment)
21
Electric window in the front passenger door
62
Storage compartment
88
Light switch
67
Bonnet release lever
269
Storage compartment
881234567891011121314151617181920212223Operating lever for adaptive cruise control235
Steering wheel locking lever
13
Depending on equipment fitted:
▶ Ignition lock
200
▶Starter button
200
Depending on equipment fitted:
▶ Gearshift lever (manual gearbox)
206
▶Selector lever (automatic gearbox)
207
Auto-hold button
204
Button for the electric parking brake
203
Central locking system
55
Bars with buttons (depending on the equipment fitted):
▶ START-STOP
201
▶
Stabilisation control ESC / Traction control TCS
213, 214
▶
Selection of travel mode
240
▶
Park Assist
225
▶
Parking aid
215
Storage compartment
89
Depending on equipment fitted:
▶ Phonebox
89
▶12-volt power outlet
96
▶Cigarette lighter
99
▶Ashtrays
98
▶USB and AUX input
90
Controls for heating / air conditioning
114
Note
The layout of the controls on right-hand drive vehicles differs partially from
the layout shown » Fig. 17.2425262728293031323331Cockpit
Page 35 of 336
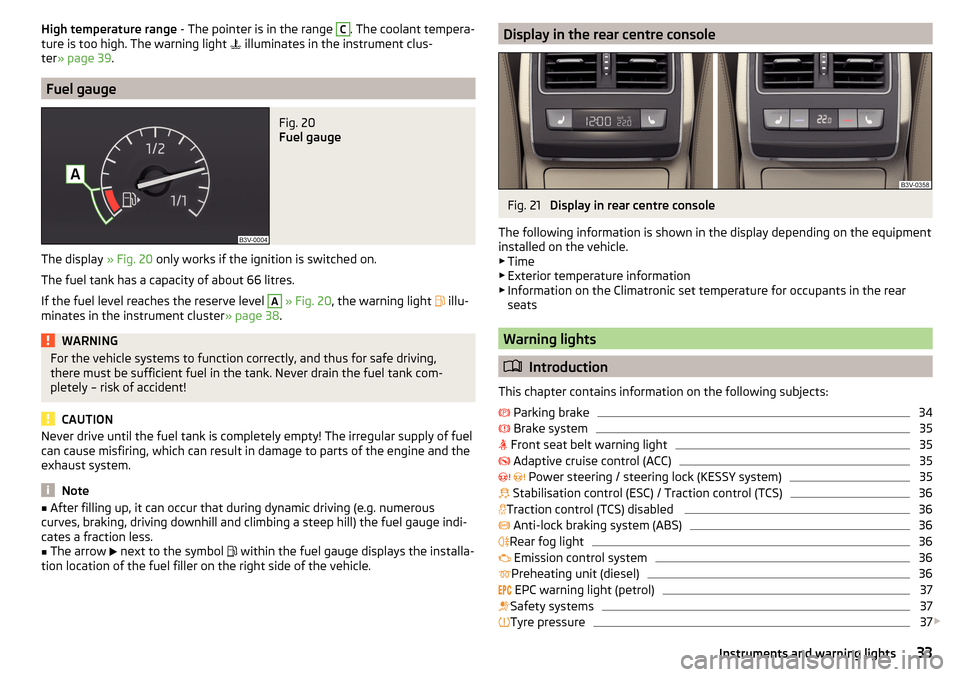
High temperature range - The pointer is in the range C. The coolant tempera-
ture is too high. The warning light illuminates in the instrument clus-
ter » page 39 .
Fuel gauge
Fig. 20
Fuel gauge
The display » Fig. 20 only works if the ignition is switched on.
The fuel tank has a capacity of about 66 litres.
If the fuel level reaches the reserve level
A
» Fig. 20 , the warning light
illu-
minates in the instrument cluster » page 38.
WARNINGFor the vehicle systems to function correctly, and thus for safe driving,
there must be sufficient fuel in the tank. Never drain the fuel tank com-
pletely – risk of accident!
CAUTION
Never drive until the fuel tank is completely empty! The irregular supply of fuel
can cause misfiring, which can result in damage to parts of the engine and the
exhaust system.
Note
■ After filling up, it can occur that during dynamic driving (e.g. numerous
curves, braking, driving downhill and climbing a steep hill) the fuel gauge indi-
cates a fraction less.■
The arrow
next to the symbol
within the fuel gauge displays the installa-
tion location of the fuel filler on the right side of the vehicle.
Display in the rear centre consoleFig. 21
Display in rear centre console
The following information is shown in the display depending on the equipment
installed on the vehicle.
▶ Time
▶ Exterior temperature information
▶ Information on the Climatronic set temperature for occupants in the rear
seats
Warning lights
Introduction
This chapter contains information on the following subjects:
Parking brake
34
Brake system
35
Front seat belt warning light
35
Adaptive cruise control (ACC)
35
Power steering / steering lock (KESSY system)
35
Stabilisation control (ESC) / Traction control (TCS)
36
Traction control (TCS) disabled
36
Anti-lock braking system (ABS)
36
Rear fog light
36
Emission control system
36
Preheating unit (diesel)
36
EPC warning light (petrol)
37
Safety systems
37
Tyre pressure
37
33Instruments and warning lights
Page 37 of 336
Parking on a slope that is too steep Illumi-
nates
Parking brake: Gradient too steep. Log book!GRADIENT TOO STEEP
▶ Find a parking space on a flat surface or on a slope that is not so steep.
Brake system
Read and observe
on page 34 first.
illuminates – the brake fluid level in the brake system is too low.
▶ Stop the vehicle, switch off the engine, and check the level of the brake fluid
» page 273 .
WARNING■
If warning light illuminates simultaneously with warning light
» page 36 , Anti-lock braking system (ABS) , stop driving! Seek help
from a specialist garage.■
A fault to the ABS system or the braking system can increase the vehi-
cle's braking distance – risk of accident!
Front seat belt warning light
Read and observe
on page 34 first.
lights up - the driver or front passenger has not fastened their seat belt.
At a speed of more than approximately 30 km/h, the warning light flashes
and an audible warning sounds at the same time.
If the seat belt is not fastened by the driver or front passenger during the next
approx. 2 minutes, the warning signal is deactivated and the warning light
illuminates permanently.
Adaptive cruise control (ACC)
Read and observe
on page 34 first.
illuminates - the ACC delay is not sufficient.
▶ Apply the brake.
For more information about the ACC system » page 233.
Power steering / steering lock (KESSY system)
Read and observe
on page 34 first.
Fault in the power steering
lights up – this indicates a complete failure of the power steering and the
steering assist is no longer working (significantly higher steering forces).
lights up – this indicates a partial failure of the power steering and the
steering forces can be greater.
▶ Seek help from a specialist garage.
Steering lock defect (KESSY system)
An audible signal sounds as a warning.
flashes
Steering column lock faulty. Stop!STOP VEHICLE STEERING FAULTY
▶ Park the vehicle, and
stop driving . After switching off the ignition, it is no
longer possible to lock the steering, to activate the electrical components
(e.g. Infotainment ), to switch on the ignition again and to start the engine.
Seek help from a specialist garage.
flashes
Steering lock: Workshop!STEERING WORKSHOP
▶ You can drive on, exercising appropriate caution. Seek assistance from a spe-
cialist garage immediately.
Steering column lock not unlocked (System KESSY)
flashes
Move the steering wheel!MOVE STEERING WHEEL
▶ Move the steering wheel slightly back and forth, thereby facilitating unlock-
ing the steering lock.
▶ If the steering does also not unlock then, the help of a specialist garage is
required.
Disconnecting the vehicle battery
If the vehicle's battery has been disconnected and reconnected, the indicator
light comes on after switching on the ignition.
The warning light should go out after driving a short distance.
If, after the motor is restarted and a short drive, the indicator light does not go
out, there is a system error.
35Instruments and warning lights
Page 38 of 336
▶You can drive on, exercising appropriate caution. Seek assistance from a spe-
cialist garage immediately.
Stabilisation control (ESC) / Traction control (TCS)
Read and observe
on page 34 first.
flashes – the ESC or TCS is currently active.
lights up – there is an ESC or TCS fault.
▶ You can drive on, exercising appropriate caution. Seek assistance from a spe-
cialist garage immediately.
If the warning light comes on after starting the engine, the TCS may be
switched off for technical reasons. ▶ Switch the ignition off and on again.
If the warning light does not illuminate after you switch the engine back on,
the TCS is fully functional again.
Disconnecting the vehicle battery
If the vehicle's battery has been disconnected and reconnected, the indicator
light comes on after switching on the ignition.
The warning light should go out after driving a short distance.
If, after a short drive, the indicator light does not go out, there is a system er- ror.
▶ You can drive on, exercising appropriate caution. Seek assistance from a spe-
cialist garage immediately.
For more information on the ESC system » page 213 or TCS system
» page 214 .
Traction control (TCS) disabled
Read and observe
on page 34 first.
illuminates – the TCS system is disabled.
Anti-lock braking system (ABS)
Read and observe
on page 34 first.
lights up – there is an ABS fault.
The vehicle will only be braked by the normal brake system without the ABS.
▶ You can drive on, exercising appropriate caution. Seek assistance from a spe-
cialist garage immediately.WARNING■ If warning light illuminates simultaneously with warning light
» page 35 , Brake system , stop driving! Seek help from a specialist ga-
rage.■
A fault to the ABS system or the braking system can increase the vehi-
cle's braking distance – risk of accident!
Rear fog light
Read and observe
on page 34 first.
lights up – the rear fog light is switched on.
Emission control system
Read and observe
on page 34 first.
lights up – there is a fault in the emission control system. The system
makes it possible to drive on in emergency mode - there may be a noticeable
reduction in engine performance.
▶ You can drive on, exercising appropriate caution. Seek assistance from a spe-
cialist garage immediately.
Preheating unit (diesel)
Read and observe
on page 34 first.
flashes – there is a fault in the engine management system. The system
makes possible operation emergency mode - there may be a noticeable reduc-
tion in engine performance.
There is a fault in the glow plug system if the warning light does not come
on or illuminates continuously.
▶ You can drive on, exercising appropriate caution. Seek assistance from a spe-
cialist garage immediately.
36Using the system
Page 45 of 336
Information system
Driver information system
Introduction
This chapter contains information on the following subjects:
Display in the instrument cluster
43
Setting the clock
44
Gear recommendation
44
Vehicle condition
44
Display in the instrument cluster
Fig. 22
Display types: MAXI DOT / Segment Display
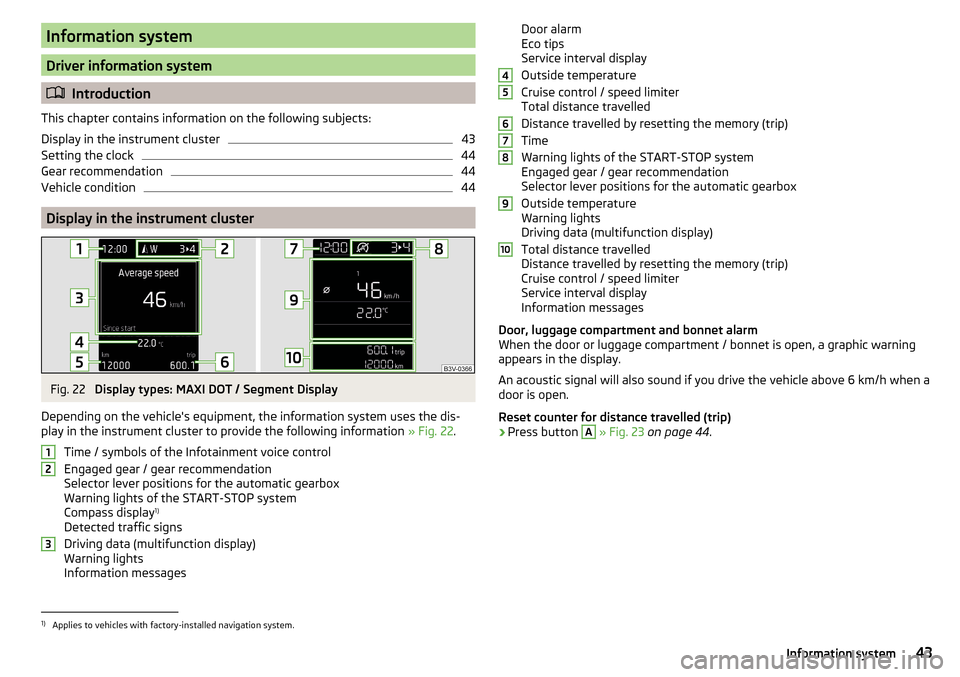
Depending on the vehicle's equipment, the information system uses the dis-
play in the instrument cluster to provide the following information » Fig. 22.
Time / symbols of the Infotainment voice control
Engaged gear / gear recommendation
Selector lever positions for the automatic gearbox
Warning lights of the START-STOP system
Compass display 1)
Detected traffic signs
Driving data (multifunction display)
Warning lights
Information messages
123Door alarm
Eco tips
Service interval display
Outside temperature
Cruise control / speed limiter
Total distance travelled
Distance travelled by resetting the memory (trip)
Time
Warning lights of the START-STOP system
Engaged gear / gear recommendation
Selector lever positions for the automatic gearbox
Outside temperature
Warning lights
Driving data (multifunction display)
Total distance travelled
Distance travelled by resetting the memory (trip)
Cruise control / speed limiter
Service interval display
Information messages
Door, luggage compartment and bonnet alarm
When the door or luggage compartment / bonnet is open, a graphic warning
appears in the display.
An acoustic signal will also sound if you drive the vehicle above 6 km/h when a
door is open.
Reset counter for distance travelled (trip)›
Press button
A
» Fig. 23 on page 44 .
456789101)
Applies to vehicles with factory-installed navigation system.
43Information system
Page 46 of 336
Setting the clockFig. 23
Button in the instrument cluster
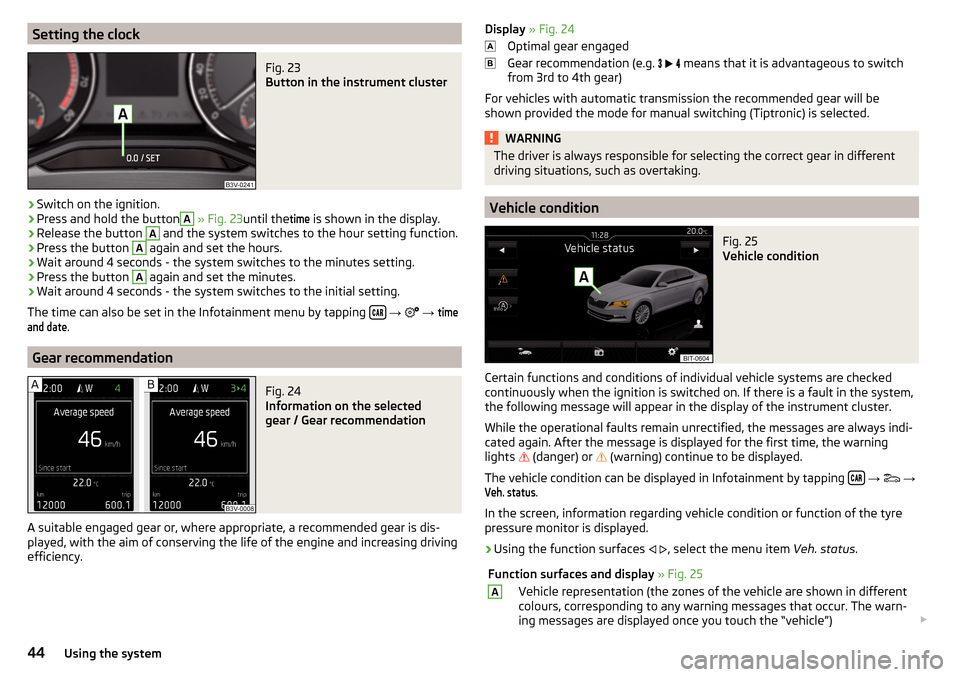
›
Switch on the ignition.
›
Press and hold the button
A
» Fig. 23 until the
time
is shown in the display.
›
Release the button
A
and the system switches to the hour setting function.
›
Press the button
A
again and set the hours.
›
Wait around 4 seconds - the system switches to the minutes setting.
›
Press the button
A
again and set the minutes.
›
Wait around 4 seconds - the system switches to the initial setting.
The time can also be set in the Infotainment menu by tapping
→
→
timeand date
.
Gear recommendation
Fig. 24
Information on the selected
gear / Gear recommendation
A suitable engaged gear or, where appropriate, a recommended gear is dis-
played, with the aim of conserving the life of the engine and increasing driving
efficiency.
Display » Fig. 24
Optimal gear engaged
Gear recommendation (e.g.
means that it is advantageous to switch
from 3rd to 4th gear)
For vehicles with automatic transmission the recommended gear will be
shown provided the mode for manual switching (Tiptronic) is selected.WARNINGThe driver is always responsible for selecting the correct gear in different
driving situations, such as overtaking.
Vehicle condition
Fig. 25
Vehicle condition
Certain functions and conditions of individual vehicle systems are checked
continuously when the ignition is switched on. If there is a fault in the system,
the following message will appear in the display of the instrument cluster.
While the operational faults remain unrectified, the messages are always indi-
cated again. After the message is displayed for the first time, the warning
lights
(danger) or
(warning) continue to be displayed.
The vehicle condition can be displayed in Infotainment by tapping
→
→
Veh. status
.
In the screen, information regarding vehicle condition or function of the tyre
pressure monitor is displayed.
›
Using the function surfaces
, select the menu item Veh. status.
Function surfaces and display » Fig. 25AVehicle representation (the zones of the vehicle are shown in different
colours, corresponding to any warning messages that occur. The warn-
ing messages are displayed once you touch the “vehicle”) 44Using the system
Page 52 of 336
FunctionFig. 31
Switching to a different user account
Read and observe on page 49 first.
After unlocking the vehicle and opening the driver's door, all the personalised
functions are adjusted according to the user account that is assigned to the
key which was used to unlock the vehicle.
Any change to the set personalised functions is automatically stored in the ac- tive user account.
As part of the personalisation, three default user accounts as well as a
guest
account are provided.
Switch to a different user account
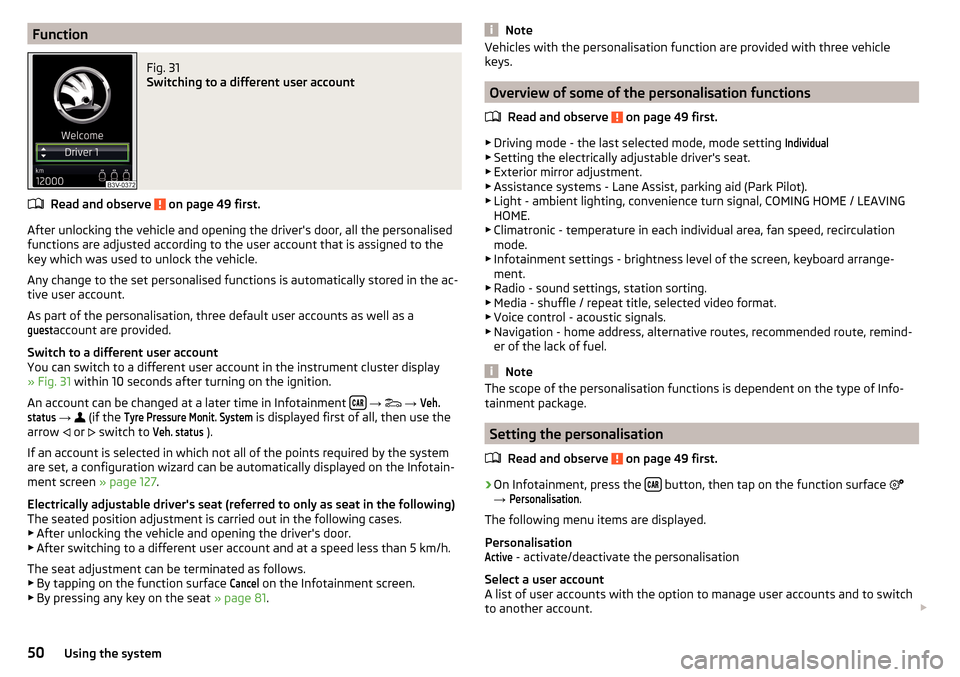
You can switch to a different user account in the instrument cluster display
» Fig. 31 within 10 seconds after turning on the ignition.
An account can be changed at a later time in Infotainment
→
→
Veh.status
→
(if the
Tyre Pressure Monit. System
is displayed first of all, then use the
arrow or
switch to
Veh. status
).
If an account is selected in which not all of the points required by the system
are set, a configuration wizard can be automatically displayed on the Infotain-
ment screen » page 127.
Electrically adjustable driver's seat (referred to only as seat in the following)
The seated position adjustment is carried out in the following cases. ▶ After unlocking the vehicle and opening the driver's door.
▶ After switching to a different user account and at a speed less than 5 km/h.
The seat adjustment can be terminated as follows.
▶ By tapping on the function surface
Cancel
on the Infotainment screen.
▶ By pressing any key on the seat » page 81.
NoteVehicles with the personalisation function are provided with three vehicle
keys.
Overview of some of the personalisation functions
Read and observe
on page 49 first.
▶Driving mode - the last selected mode, mode setting
Individual
▶Setting the electrically adjustable driver's seat.
▶ Exterior mirror adjustment.
▶ Assistance systems - Lane Assist, parking aid (Park Pilot).
▶ Light - ambient lighting, convenience turn signal, COMING HOME / LEAVING
HOME.
▶ Climatronic - temperature in each individual area, fan speed, recirculation
mode.
▶ Infotainment settings - brightness level of the screen, keyboard arrange-
ment.
▶ Radio - sound settings, station sorting.
▶ Media - shuffle / repeat title, selected video format.
▶ Voice control - acoustic signals.
▶ Navigation - home address, alternative routes, recommended route, remind-
er of the lack of fuel.
Note
The scope of the personalisation functions is dependent on the type of Info-
tainment package.
Setting the personalisation
Read and observe
on page 49 first.
›
On Infotainment, press the button, then tap on the function surface
→
Personalisation
.
The following menu items are displayed.
Personalisation
Active
- activate/deactivate the personalisation
Select a user account
A list of user accounts with the option to manage user accounts and to switch
to another account.
50Using the system
Page 55 of 336
›Restart SmartGate by tapping on the “Reboot” 1)
button.
Changing the PIN code for the Wi-Fi Direct connection›
Open the SmartGate web interface » page 52.
›
In the menu item “WiFi Direct PIN:”, enter the new PIN code (6 digits).
›
Confirm the PIN code change by tapping on the “Save” button.
›
Restart SmartGate by tapping on the “Reboot” 1 )
button.
Note
If you have forgotten your password/PIN code for connecting to SmartGate,
SmartGate must be reset to the factory settings in a specialist workshop.Unlocking and opening
Unlocking and locking
Introduction
This chapter contains information on the following subjects:
Unlocking/locking with the remote control key
54
Remove KESSY emergency key
54
Locking / unlocking - KESSY
55
Locking/unlocking the vehicle with the central locking button
55
SafeLock
56
Individual settings
56
Open / close door
57
Child safety lock
57
Malfunctions
57
The vehicle is equipped with a central locking system which makes it possible
to unlock / lock all the doors, the fuel filler flap and boot lid simultaneously.
The door unlocking can be adjusted individually » page 56.
The unlocking of the vehicle is displayed by the turn signal lights flashing
twice.
If you unlock the vehicle and do not open a door or the boot lid within the next
45 seconds, the vehicle will lock again automatically.
The locking of the vehicle is displayed by the turn signal lights flashing once.
If the driver's door has been opened, the vehicle cannot be locked.
If the doors or the boot lid remain open after the vehicle has been locked, the turn signal lights do not flash until they have been closed.
1)
If the “Reboot” button is not displayed, you must manually restore the web browser display.
53Unlocking and opening