start stop button SKODA SUPERB 2016 3.G / (B8/3V) Owner's Guide
[x] Cancel search | Manufacturer: SKODA, Model Year: 2016, Model line: SUPERB, Model: SKODA SUPERB 2016 3.G / (B8/3V)Pages: 336, PDF Size: 53.89 MB
Page 228 of 336
WARNING■The general information relating to the use of assistance systems must
be observed » page 212, in section Introduction .■
During the parking process, the system automatically performs rapid
steering movements. While it is doing so, do not place your hands between
the steering wheel – risk of injury!
■
During a parking manoeuvre on loose or slippery surfaces (gravel, snow,
ice, etc.) you may stray from the calculated road. It is therefore recommen-
ded that you do not use the system in such situations.
CAUTION
The correct evaluation of the parking space and the parking procedure de-
pends on the circumference of the wheels on the vehicle.■
The system only works correctly if the vehicle is fitted with the wheel size
approved by ŠKODA AUTO.
■
Abstain from using the system when the vehicle is fitted with snow chains or
a temporary spare wheel.
■
If wheels other than those approved by ŠKODA AUTO are fitted, the resulting
position of the vehicle in the parking space can differ slightly. This can be avoi-
ded by readjusting the system at a specialist garage.
CAUTION
If other vehicles are parked behind or on the curb, the system can drive your
vehicle over the kerb or up to the kerb - there is a risk of damage to the
wheels. If necessary, intervene in good time.
Note
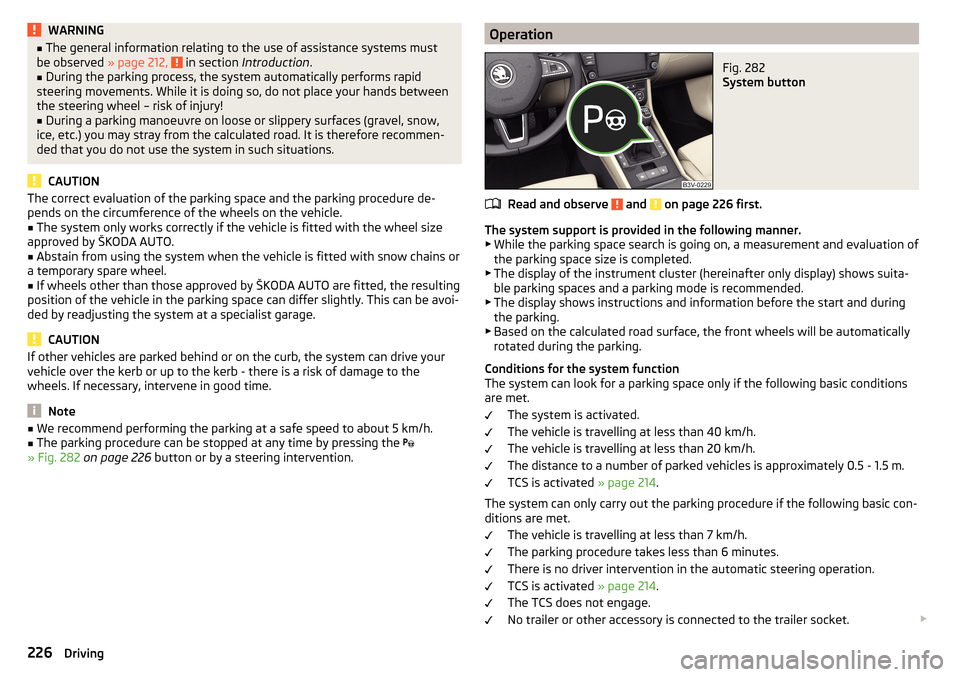
■ We recommend performing the parking at a safe speed to about 5 km/h.■The parking procedure can be stopped at any time by pressing the
» Fig. 282 on page 226 button or by a steering intervention.OperationFig. 282
System button
Read and observe and on page 226 first.
The system support is provided in the following manner.
▶ While the parking space search is going on, a measurement and evaluation of
the parking space size is completed.
▶ The display of the instrument cluster (hereinafter only display) shows suita-
ble parking spaces and a parking mode is recommended.
▶ The display shows instructions and information before the start and during
the parking.
▶ Based on the calculated road surface, the front wheels will be automatically
rotated during the parking.
Conditions for the system function
The system can look for a parking space only if the following basic conditions
are met.
The system is activated.
The vehicle is travelling at less than 40 km/h.
The vehicle is travelling at less than 20 km/h.
The distance to a number of parked vehicles is approximately 0.5 - 1.5 m.
TCS is activated » page 214.
The system can only carry out the parking procedure if the following basic con-
ditions are met.
The vehicle is travelling at less than 7 km/h.
The parking procedure takes less than 6 minutes.
There is no driver intervention in the automatic steering operation.
TCS is activated » page 214.
The TCS does not engage.
No trailer or other accessory is connected to the trailer socket.
226Driving
Page 230 of 336
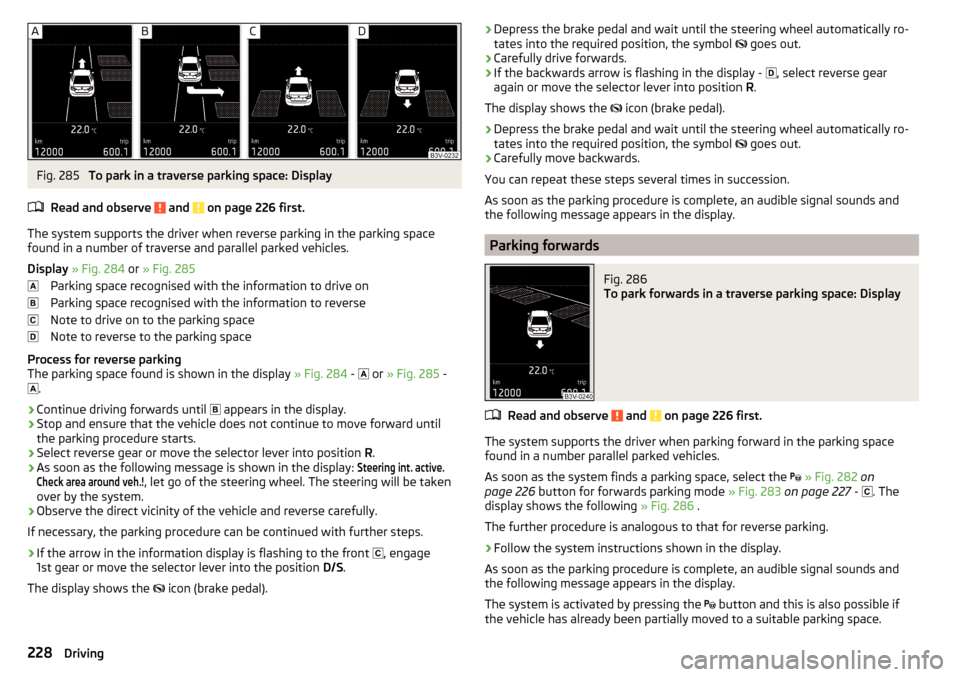
Fig. 285
To park in a traverse parking space: Display
Read and observe
and on page 226 first.
The system supports the driver when reverse parking in the parking space
found in a number of traverse and parallel parked vehicles.
Display » Fig. 284 or » Fig. 285
Parking space recognised with the information to drive on
Parking space recognised with the information to reverse
Note to drive on to the parking space
Note to reverse to the parking space
Process for reverse parking
The parking space found is shown in the display » Fig. 284 -
or
» Fig. 285 -
.
›
Continue driving forwards until
appears in the display.
›
Stop and ensure that the vehicle does not continue to move forward until
the parking procedure starts.
›
Select reverse gear or move the selector lever into position R.
›
As soon as the following message is shown in the display:
Steering int. active.Check area around veh.!
, let go of the steering wheel. The steering will be taken
over by the system.
›
Observe the direct vicinity of the vehicle and reverse carefully.
If necessary, the parking procedure can be continued with further steps.
›
If the arrow in the information display is flashing to the front , engage
1st gear or move the selector lever into the position D/S.
The display shows the icon (brake pedal).
›Depress the brake pedal and wait until the steering wheel automatically ro-
tates into the required position, the symbol goes out.›
Carefully drive forwards.
›
If the backwards arrow is flashing in the display -
, select reverse gear
again or move the selector lever into position R.
The display shows the
icon (brake pedal).
›
Depress the brake pedal and wait until the steering wheel automatically ro-
tates into the required position, the symbol
goes out.
›
Carefully move backwards.
You can repeat these steps several times in succession.
As soon as the parking procedure is complete, an audible signal sounds and the following message appears in the display.
Parking forwards
Fig. 286
To park forwards in a traverse parking space: Display
Read and observe and on page 226 first.
The system supports the driver when parking forward in the parking space
found in a number parallel parked vehicles.
As soon as the system finds a parking space, select the
» Fig. 282 on
page 226 button for forwards parking mode » Fig. 283 on page 227 -
. The
display shows the following » Fig. 286 .
The further procedure is analogous to that for reverse parking.
›
Follow the system instructions shown in the display.
As soon as the parking procedure is complete, an audible signal sounds and
the following message appears in the display.
The system is activated by pressing the button and this is also possible if
the vehicle has already been partially moved to a suitable parking space.
228Driving
Page 235 of 336
Adaptive Cruise Control (ACC)
Introduction
This chapter contains information on the following subjects:
Settings in Infotainment
233
Operation
234
Automatic stopping and starting
234
Operation overview
235
Start control
235
Stop/resume control
235
Set/change the desired speed
236
Set the clearance level
236
Special driving situations
236
Overtaking and towing
237
Malfunctions
237
The Adaptive Cruise Control (hereinafter referred to as ACC) maintains the set
speed or the distance to the vehicle ahead without the accelerator or brake
pedal being pressed.
The front of the vehicle and the distance to the vehicle ahead is monitored by
a radar sensor » page 212.
The state in which the ACC maintains the speed or the proximity is described
as control from here on.
WARNING■
The general information relating to the use of assistance systems must
be observed » page 212, in section Introduction .■
The driver must always be ready to take over the operation of the accel-
erator and brake pedal.
■
The ACC does not react when approaching a stationary obstacle, such as
traffic jams, vehicle breakdowns or vehicles waiting at a traffic light.
■
The ACC does not respond to crossing or oncoming objects.
■
If the ACC does not decelerate fast enough, immediately apply the vehi-
cle's foot brake.
WARNINGFor safety reasons, do not use the ACC under the following conditions.■When driving in turning lanes, motorway exits or construction sites, to
avoid an unwanted acceleration to the stored speed.■
When visibility is poor, (e.g. fog, heavy rain, thick snowfall).
■
When road conditions are poor (e.g. ice, slippery road, gravel, dirt road).
■
Driving in “sharp” corners or in steep gradients / on steep inclines.
■
When driving through places where metal objects (such as metal build-
ings, railway tracks, etc.) can be found.
■
When driving through very divided and enclosed spaces (such as large-ca-
pacity garages, car ferries, tunnels and the like.).
Note
■ The ACC is designed primarily for use on motorways.■The ACC reduces the speed by automatically releasing the accelerator or by
means of a braking procedure as appropriate. If the brakes are used for an au-
tomatic speed reduction at any moments, then the brake light illuminates.■
In case of failure of more than one brake light on the vehicle or on the con-
nected trailer, the ACC becomes unavailable.
■
The control automatically cancels the engagement of the brake supportive
assistance systems (e.g. ESC) or when the maximum permitted engine speed is
exceeded.
Settings in Infotainment
Read and observe
on page 233 first.
›
Press the button, then tap on the function surface
→
Driver assistance
.
■ ACC (adaptive cruise control) - Setting for the adaptive cruise control
■
Driving progr.:
- Set the vehicle acceleration when adaptive cruise control is
activated 1)
■
Last selec. Distance
- Switch on/off of the last distance selected
■
Distance:
- Set the distance monitoring to the vehicles ahead
1)
This can be set in the menu on vehicles with a travel mode option as follows » page 240 .
233Assist systems
Page 237 of 336
If the preceding vehicle starts moving again after a long break, then to contin-
ue the regulation press the accelerator pedal or lever to set the lever in
» page 235 position.
Operation overview
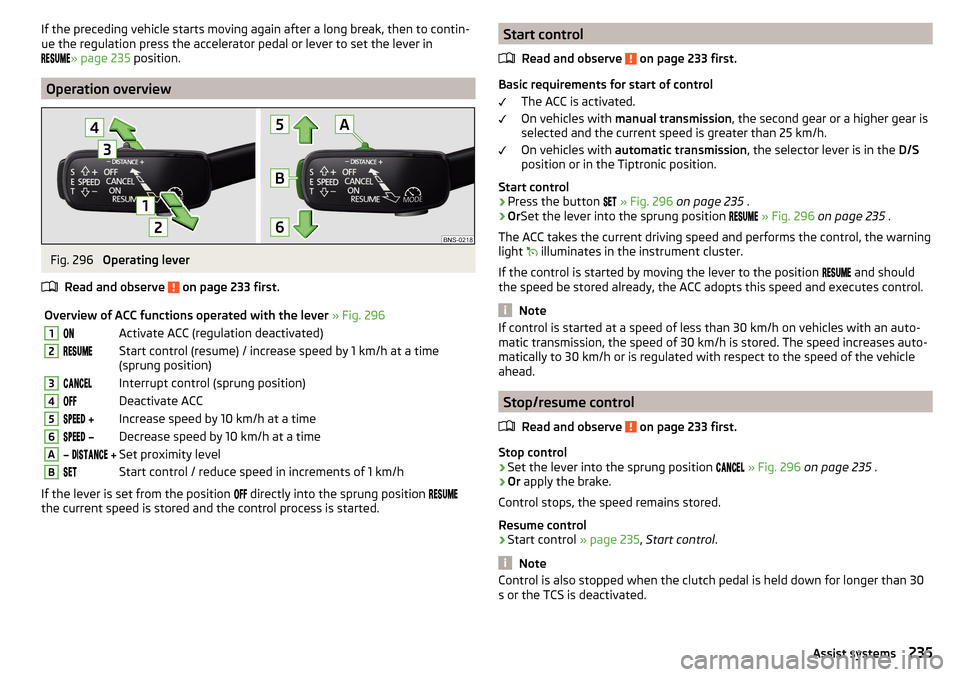
Fig. 296
Operating lever
Read and observe
on page 233 first.
Overview of ACC functions operated with the lever » Fig. 2961Activate ACC (regulation deactivated)2Start control (resume) / increase speed by 1 km/h at a time
(sprung position)3Interrupt control (sprung position)4Deactivate ACC5 Increase speed by 10 km/h at a time6 Decrease speed by 10 km/h at a timeA Set proximity levelBStart control / reduce speed in increments of 1 km/h
If the lever is set from the position
directly into the sprung position
the current speed is stored and the control process is started.
Start control
Read and observe
on page 233 first.
Basic requirements for start of control The ACC is activated.
On vehicles with manual transmission , the second gear or a higher gear is
selected and the current speed is greater than 25 km/h.
On vehicles with automatic transmission , the selector lever is in the D/S
position or in the Tiptronic position.
Start control
›
Press the button
» Fig. 296 on page 235 .
›
OrSet the lever into the sprung position
» Fig. 296 on page 235 .
The ACC takes the current driving speed and performs the control, the warning light illuminates in the instrument cluster.
If the control is started by moving the lever to the position and should
the speed be stored already, the ACC adopts this speed and executes control.
Note
If control is started at a speed of less than 30 km/h on vehicles with an auto-
matic transmission, the speed of 30 km/h is stored. The speed increases auto-
matically to 30 km/h or is regulated with respect to the speed of the vehicle
ahead.
Stop/resume control
Read and observe
on page 233 first.
Stop control
›
Set the lever into the sprung position
» Fig. 296 on page 235 .
›
Or apply the brake.
Control stops, the speed remains stored.
Resume control
›
Start control » page 235, Start control .
Note
Control is also stopped when the clutch pedal is held down for longer than 30
s or the TCS is deactivated.235Assist systems
Page 238 of 336
Set/change the desired speedRead and observe
on page 233 first.
The desired speed can be set or changed using the control lever » Fig. 296 on
page 235 .
Setting/changing the speed by increments of 10 km/h at a time (
) - re-
quirements
The ACC is activated.
Increasing/reducing the speed by increments of 1 km/h at a time (
/
-
requirements
The ACC is activated.
Vehicle control takes place.
Changing the speed by adopting the current speed ( ) - requirements
The ACC is activated.
The vehicle is moving at a speed other than that which is stored.
Note
■
If during control the speed is increased by pressing the accelerator, control is
temporarily stopped. Upon releasing the accelerator, control is automatically
resumed.■
If during control the speed is reduced by applying the brake, control is stop-
ped. Control needs to be restarted in order to resume » page 235.
■
If the vehicle is controlled by a lower speed than the stored speed, then
the current speed is stored by pressing the button again
and the speed is
reduced in increments of 1 km/h.
Set the clearance level
Read and observe
on page 233 first.
The proximity to the vehicle ahead can be set with the lever » Fig. 296 on
page 235 or in Infotainment » page 233, Settings in Infotainment .
Setting by means of the lever
›
Set the switch Adjust in the spring-tensioned position
or
» Fig. 296
on page 235 .
The display of the instrument cluster shows line
2
» Fig. 294 on page 234 ,
which indicates the proximity.
› Using the switch
on the lever, adjust the line 2 to the desired dis-
tance.
Note
■ If the proximity is changed in infotainment, the change will only come into
effect after a subsequent activation of the ACC.■
The higher the speed, the greater the proximity to the vehicle ahead.
■
The adjustment of the distance is stored (depending on the Infotainment
type) in the active user account personalisation » page 49.
Special driving situations
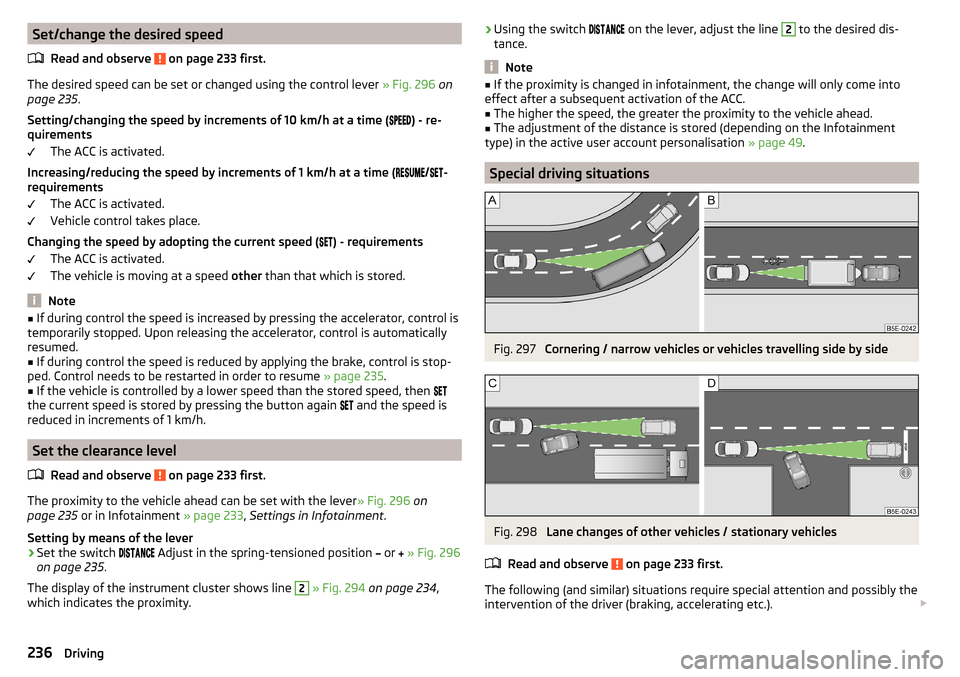
Fig. 297
Cornering / narrow vehicles or vehicles travelling side by side
Fig. 298
Lane changes of other vehicles / stationary vehicles
Read and observe
on page 233 first.
The following (and similar) situations require special attention and possibly the intervention of the driver (braking, accelerating etc.).
236Driving
Page 239 of 336
When cornering
When driving into or driving out of long corners, it could be that a vehicle is
travelling in the adjacent lane and is scanned by the radar » Fig. 297 -
. The
host vehicle is then controlled according to this vehicle.
Narrow vehicles or vehicles travelling side by side
A narrow or offset vehicle driving can only be recognized by the ACC if this is
located in the scanning range of the radar » Fig. 297 -
.
Other vehicles changing lanes
Vehicles that change onto the lane with a small distance » Fig. 298 -
may not
be detected by ACC in good time.
Stationary vehicles
The ACC does not detect stationary objects! When a vehicle detected by the
ACC turns or sheers off and there is a stationary vehicle in front of this vehi-
cle, » Fig. 298 -
the ACC does not respond to the stationary vehicle.
Vehicles with special load or special body parts
Other vehicles with a load or with body parts protruding from the sides, back
or top of the vehicle contour may not be detected by the ACC.
Overtaking and towing
Read and observe
on page 233 first.
When overtaking
When your vehicle is being controlled at a speed that is lower than the set
speed and the turn signal is operated, ACC assesses this situation as meaning
that the driver wishes to overtake. The ACC automatically accelerates the vehi-
cle, thereby reducing the proximity to a vehicle ahead.
If your vehicle changes to the overtaking lane and no vehicle is detected
ahead, ACC accelerates until the set speed is reached and then keeps it con-
stant.
Acceleration can be cancelled at any time by touch on the brake pedal or
pressing the button on the lever
» Fig. 296 on page 235 .
Towing a trailer
When towing, or if another accessory is connected to the trailer socket, ACC
control is set with a lower rate. The manner of driving should therefore be
adapted to this limitation.
Malfunctions
Read and observe
on page 233 first.
If, for some unknown reason, ACC is not available, the warning light
appears
in the display of the instrument cluster and an appropriate message is shown.
Sensor covered / dirty
If the sensor cover or the sensor is dirty or covered, a message appears on the
instrument cluster display stating there is no sensor view. Clean the sensor
cover or remove the obstacles » Fig. 264 on page 212 .
If there is no sensor view in the winter, the snow on the sensor under the cov- er could be the reason. The ACC is functional again after the snow melts away
from the sensor.
ACC not available
If the ACC is currently unavailable, a message concerning the unavailability ap-
pears. Stop the vehicle, switch off the engine and then start it again. If ACC
continues to be unavailable, seek the assistance of a specialist garage.
ACC fault
With an ACC fault, an error message appears. Seek help from a specialist ga-
rage.
Front Assist
Introduction
This chapter contains information on the following subjects:
Settings in Infotainment
238
Operation
238
Distance warning
238
Warning and automatic braking
238
Deactivation/activation
239
Malfunctions
240
The Front Assist (hereinafter referred to as the system) warns you of the dan-
ger of a collision with a vehicle or another obstacle in front of the vehicle, and
tries to avoid a collision or mitigate its consequences by automatically applying
the brakes where necessary.
The area in front of the vehicle is monitored by a radar sensor » page 212.
237Assist systems
Page 318 of 336
Dipstick271
Display125
Cardinal points43
Coolant temperature32
Fuel level33
Gear changes44
In the instrument cluster43
MAXI DOT48
Rear centre console33
Service intervals49
Display in Infotainment Driving data
46
Disposal Acceptance and recycling of used vehicles
258
Distance warning238
Warning light42
Diverting calls136
Door Child safety lock
57
Emergency locking293
Emergency locking of the driver's door292
Open / Close57
Door warning43
Drive Driving through water
211
DriveGreen210
Driving Emissions
305
Fuel consumption305
Maximum speed309
through water211
Driving data Show
46
Driving mode240
Adaptive Chassis Control (DCC)240
Comfort241
Eco240
Individual241
Mode selection and Infotainment display241
Normal241
Settings for individual mode242
Sports241
Driving Mode Selection240
DSR214
DVD149
DVD-Video Set to
135
Dynamic Light Assist71
Dynamic Road Sign Display Additional display
248
Information messages248
Malfunctions248
Operation247
Settings in Infotainment247
Dynamic route switch on / off
197
E
Economical driving
209
Economy mode42
ECO TIP43
Eco tips43
Edit route192
EDS214
Electrical boot lid set the top position of the lid
61
Electric boot lid Force limiter
59
Manual operation59
Open/close60
Electric parking brake203
Electric power windows62, 63
Malfunctions64
Electric tail gate Malfunctions
61
Electric windows Buttons on the driver door
62
Electronic Differential Lock (EDL, XDS)214
Electronic immobilizer199
Elevation180
emergency Jump-starting
288
Starting the engine / stopping the push of a button
201
Emergency Changing a wheel
282
Hazard warning light system70
Jump-starting287
Selector lever release293
Starting the engine / stopping the engine at the push of a button
200
Towing the using the tow hitch290
Towing the vehicle288
Tyre repair285
Unlocking/locking the door292
Unlocking / locking the door293
Emergency call168
Emergency equipment Fire extinguisher
281
First aid kit280
Jack281
Reflective vest280
Vehicle tool kit281
Warning triangle280
Emission control system36
Emissions305
Engine Information messages
39
Running in209
Engine compartment268
Brake fluid273
Coolant271
Engine oil270
Overview269
Vehicle battery273
Windscreen washer fluid270
Engine drag torque control (MSR)213
Engine number303
316Index
Page 326 of 336
External device data transfer132
FM134, 141
Images135
Information regarding the version of the navi- gation data
138
Infotainment131, 139
Infotainment language132, 140
Infotainment screen132, 139
Manage favourites170
Manage memory137
Map137
Media135, 141
Navigation137
Nav. announcements138
Network133
Personalisation49
Pin code136
Radio134, 140
Reset to factory settings133, 198
Restore factory settings140
Route options137
SmartLink137
Software update131
Software updates140
Sound131, 139
Sound system131
Subwoofer131
Surround131
System information131, 134, 140
Tank options138
Telephone136, 141
Text messages136
Time and date132, 139
Top speeds138
TV tuner135
Units132, 140
Update software134
User profile170
Vehicle198
Video DVD135
Voice control133
Volume127
WLAN133
Settings Call136
Setting the Clock
44
Setup131, 139
Show POIs on the map187
Side compartments in the luggage compart- ment
106
SIM card Change PIN code
166
Data connection175
PIN code166
Plug in166
Remove166
Sliding/tilting roof Activate operation
65
Activating operation of the sunblind66
Sunshade65
SmartGate connection using Wi-Fi direct
52
Connection via Wi-Fi51
introductory information51
Password/PIN code change52
Setting52
SmartLink Android Auto
177
Apple CarPlay178
Main menu176
MirrorLink®178
Set to137
SMS172
new172
Operation172
Received173
Snow chains279
Sockets 12-volt socket in the interior
96
12 volt socket in luggage compartment97
230 V97
Software update131
Software Update134
Software updates140
Sound131, 139
Sound system131
Spare wheel278
Removing / stowing283
Speed limitations191
Speed limiter231
Warning light38
Speed regulating system Warning light
38
Speed symbol278
Split screen Manoeuvre
191
Spoiler257
SSID133
Stabilisation system212
Stability Control (ESC)213
START-STOP201
Jump-starting288
Manually disable / enable system202
Operation201
Warning light41
START-STOP system201
Start engine Immobilizer
199
Jump-starting288
Starter button Lock / unlock the steering lock
199
Problems with the engine start201
Starting / stopping the engine200
Switch on/off ignition200
Starting the engine Jump-starting
287
Key200
Starter button200
Start route guidance190
324Index
Page 327 of 336
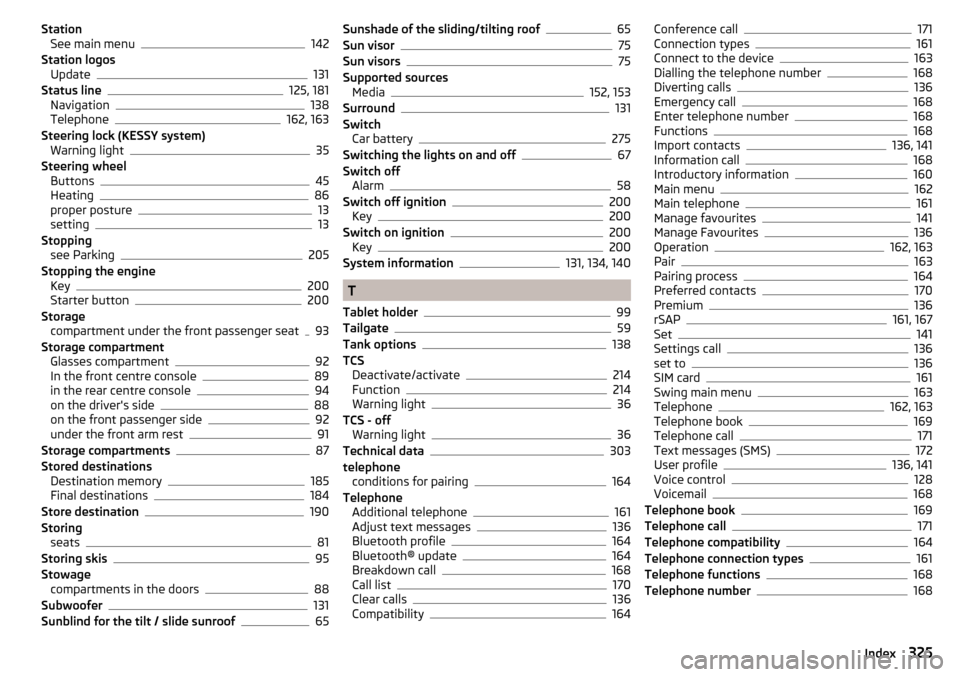
StationSee main menu142
Station logos Update
131
Status line125, 181
Navigation138
Telephone162, 163
Steering lock (KESSY system) Warning light
35
Steering wheel Buttons
45
Heating86
proper posture13
setting13
Stopping see Parking
205
Stopping the engine Key
200
Starter button200
Storage compartment under the front passenger seat
93
Storage compartment Glasses compartment
92
In the front centre console89
in the rear centre console94
on the driver's side88
on the front passenger side92
under the front arm rest91
Storage compartments87
Stored destinations Destination memory
185
Final destinations184
Store destination190
Storing seats
81
Storing skis95
Stowage compartments in the doors
88
Subwoofer131
Sunblind for the tilt / slide sunroof65
Sunshade of the sliding/tilting roof65
Sun visor75
Sun visors75
Supported sources Media
152, 153
Surround131
Switch Car battery
275
Switching the lights on and off67
Switch off Alarm
58
Switch off ignition200
Key200
Switch on ignition200
Key200
System information131, 134, 140
T
Tablet holder
99
Tailgate59
Tank options138
TCS Deactivate/activate
214
Function214
Warning light36
TCS - off Warning light
36
Technical data303
telephone conditions for pairing
164
Telephone Additional telephone
161
Adjust text messages136
Bluetooth profile164
Bluetooth® update164
Breakdown call168
Call list170
Clear calls136
Compatibility164
Conference call171
Connection types161
Connect to the device163
Dialling the telephone number168
Diverting calls136
Emergency call168
Enter telephone number168
Functions168
Import contacts136, 141
Information call168
Introductory information160
Main menu162
Main telephone161
Manage favourites141
Manage Favourites136
Operation162, 163
Pair163
Pairing process164
Preferred contacts170
Premium136
rSAP161, 167
Set141
Settings call136
set to136
SIM card161
Swing main menu163
Telephone162, 163
Telephone book169
Telephone call171
Text messages (SMS)172
User profile136, 141
Voice control128
Voicemail168
Telephone book169
Telephone call171
Telephone compatibility164
Telephone connection types161
Telephone functions168
Telephone number168
325Index