ignition SKODA SUPERB 2016 3.G / (B8/3V) Service Manual
[x] Cancel search | Manufacturer: SKODA, Model Year: 2016, Model line: SUPERB, Model: SKODA SUPERB 2016 3.G / (B8/3V)Pages: 336, PDF Size: 53.89 MB
Page 98 of 336

CAUTIONNever fold and stow the through-loading bag when it is wet - risk of damaging
the through-loading bag.
Electrical sockets
Introduction
This chapter contains information on the following subjects:
12-volt socket in the front centre console
96
12 volt socket in the rear centre console
96
12 volt socket in luggage compartment
97
230-volt socket in the rear centre console
97WARNING■ Do not place anything on the dashboard. These objects might slide or fall
down when driving and may distract you from concentrating on the traffic –
risk of accident!■
Make sure that while driving no objects can enter the driver's footwell -
cause an accident!
■
Safely stow all devices during the journey to prevent them from being
thrown around the interior in the event of a sudden braking manoeuvre or
an accident – risk of death!
■
The devices may warm up during operation – risk of injury or fire!
■
Improper use of the power sockets and the electrical accessories can
cause fires, burns and other serious injuries.
■
The 12-Volt sockets also work if the ignition is switched off. When leaving
the vehicle, never leave persons who are not completely independent, such
as children, unattended in the vehicle.
CAUTION
When using the 12 volt power outlets the following notes are to be observed.■The sockets can only be used for the connection of approved electrical ac-
cessories with a total power consumption of up to 120 watts, otherwise the
electrical system of the vehicle may be damaged.■
Connecting appliances when the engine is not running will drain the battery
of the vehicle!
■
Before switching the ignition on / off or before starting the engine, switch
off the devices which are connected to the sockets - there is a risk of damage
to the equipment due to voltage fluctuations.
12-volt socket in the front centre consoleFig. 108
Cover of the 12 volt power outlet
Read and observe and on page 96 first.
›
To use , open the storage compartment, remove the cover of the socket
» Fig. 108 and plug the electrical appliance plug into the socket.
12 volt socket in the rear centre console
Fig. 109
Open the cover / 12 volt power outlet
96Using the system
Page 101 of 336

Cigarette lighterFig. 114
Cigarette lighter: in the front centre console/in the rear centre
console
Read and observe
on page 98 first.
›
To use , open the respective storage compartment and push in the lighter un-
til it stops » Fig. 114.
›
Wait until the glowing lighter protrudes, remove it immediately and use.
›
Put the lighter back in the socket and close the storage compartment.
WARNING■
The cigarette lighter also works if the ignition is switched off. When leav-
ing the vehicle, never leave people who are not completely independent,
such as children, unattended in the vehicle - there is a risk of burning, fire
or damage to the vehicle interior.■
Be careful when using the cigarette lighter - it can cause burns.
Note
The cigarette lighter socket can also be used as a 12 volt socket.
Tablet holder
Introduction
This chapter contains information on the following subjects:
Attaching the rear headrests
99
Attach to the storage compartment in the rear armrest
100
Handling the holder
100External devices (e.g. tablet, smartphone etc.) measuring min. 122 mm and
max. 195 mm can be secured in the holder.
The maximum permissible load of the compartment is 750 g.
CAUTION
Never exceed the maximum permissible load of the holder - there is a risk of
damage or functional impairment.
Attaching the rear headrests
Fig. 115
Inserting: Adapter / holder
Fig. 116
Removing: Holder / adapter
Read and observe
on page 99 first.
›
To insert , attach the opened adapter to the guide rods of the front headrest
and clip in the direction of arrow
1
» Fig. 115 » .
›
Clip in the holder in the direction of arrow
2
into the adapter.
›
To remove , pull on the securing tab
A
in direction of arrow
3
and take the
holder in direction of arrow
4
out of the adapter » Fig. 116.
99Practical features
Page 103 of 336

Transport of cargo
Luggage compartment
Introduction
This chapter contains information on the following subjects:
Fastening elements
101
Fixing nets
102
Foldable hook
103
Fasten the flooring
103
Floor covering on both sides
103
Net on the luggage compartment cover
103
Luggage compartment cover
104
Roll-up cover
105
Roll-up cover - automatic rolling-up
105
Side storage compartment and trays
106
Cargo element
106
Storage compartments under the floor covering
107
Multi-function pocket
108
Removable light
109
Class N1 vehicles
109
When transporting heavy objects, the driving characteristics change due to the
shift in centre-of-gravity. The speed and style of driving must be adjusted ac-
cordingly.
When transporting cargo the following the instructions must be adhered to
▶ Distribute the load evenly in the luggage compartment and secure it with
suitable lashing straps to the lashing eyes or securing nets so that they can-
not slip.
▶ Place heavy objects as far forward as possible.
▶ Tyre pressure is to match the load.
In the event of an accident, even small and light objects gain so much kinetic
energy that they can cause severe injuries.
The magnitude of the kinetic energy is dependent on the speed at which the
vehicle is travelling and the weight of the object.
Luggage compartment light
The light switches on/off when the boot lid is opened or closed.
If the boot lid is open and the ignition switched off, the light will extinguish
automatically after around 10 minutes.WARNING■ Never exceed the maximum permissible load of the respective fasteners,
nets, hooks etc. Heavy objects were not secured sufficiently – risk of injury!■
Do not exceed the permissible axle loads and permissible gross weight of
the vehicle – risk of accident!
■
An unfixed or improperly fixed load can slip during a sudden manoeuvre
or an accident - danger of injury!
■
Loose cargo could hit a deployed airbag and injure occupants – danger of
death!
■
When transporting loads in the luggage compartment that has been en-
larged by folding the rear seats forward, ensure the safety of the passen-
gers transported on the other rear seats .
CAUTION
■ Never exceed the maximum permissible load of the respective fasteners,
nets, hooks etc. - these could be damaged.■
Make sure that the heating elements of the rear window heater, the ele-
ments of the integrated aerial in the rear window or in the rear side windows
are not damaged by abrasive items.
■
Do not place sharp objects in the nets and storage compartments in the lug-
gage compartment - there is a risk of damage to the net as well as the com-
partments.
■
Put the items in the storage compartments carefully and not load these
punctiform - there is a risk of damage to the compartments.
Fastening elements
Fig. 120
Fasteners: Variant 1 / Variant 2
101Transport of cargo
Page 117 of 336
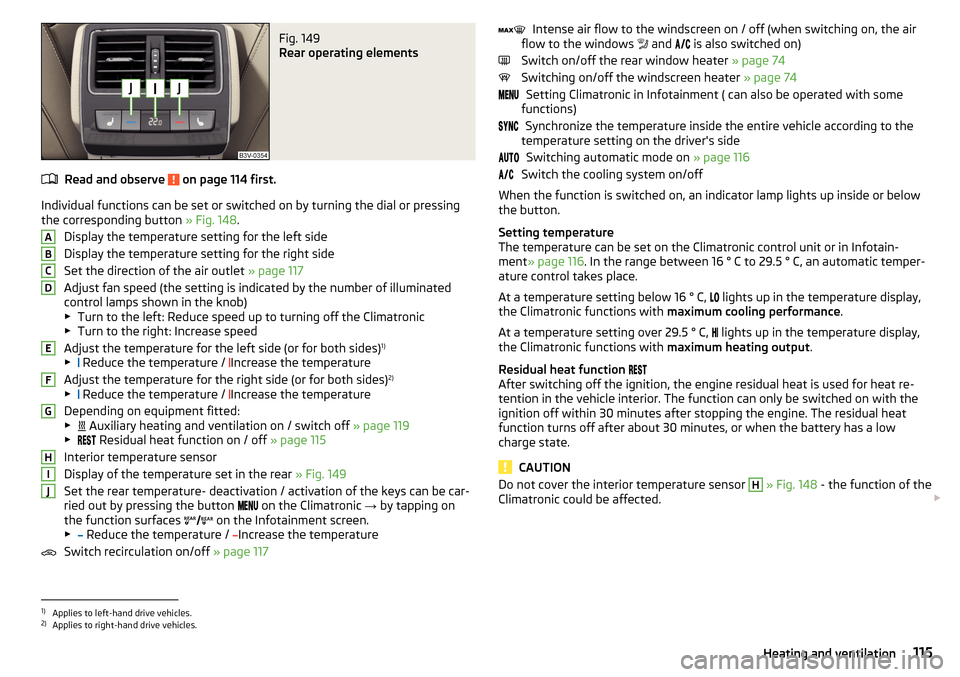
Fig. 149
Rear operating elements
Read and observe on page 114 first.
Individual functions can be set or switched on by turning the dial or pressingthe corresponding button » Fig. 148.
Display the temperature setting for the left side
Display the temperature setting for the right side
Set the direction of the air outlet » page 117
Adjust fan speed (the setting is indicated by the number of illuminated
control lamps shown in the knob)
▶ Turn to the left: Reduce speed up to turning off the Climatronic
▶ Turn to the right: Increase speed
Adjust the temperature for the left side (or for both sides) 1)
▶ Reduce the temperature /
Increase the temperature
Adjust the temperature for the right side (or for both sides) 2)
▶ Reduce the temperature /
Increase the temperature
Depending on equipment fitted:
▶ Auxiliary heating and ventilation on / switch off
» page 119
▶ Residual heat function on / off
» page 115
Interior temperature sensor
Display of the temperature set in the rear » Fig. 149
Set the rear temperature- deactivation / activation of the keys can be car-
ried out by pressing the button on the Climatronic
→ by tapping on
the function surfaces on the Infotainment screen.
▶ Reduce the temperature /
Increase the temperature
Switch recirculation on/off » page 117
ABCDEFGHIJIntense air flow to the windscreen on / off (when switching on, the air
flow to the windows and is also switched on)
Switch on/off the rear window heater » page 74
Switching on/off the windscreen heater » page 74
Setting Climatronic in Infotainment ( can also be operated with some
functions)
Synchronize the temperature inside the entire vehicle according to the
temperature setting on the driver's side
Switching automatic mode on » page 116
Switch the cooling system on/off
When the function is switched on, an indicator lamp lights up inside or below
the button.
Setting temperature
The temperature can be set on the Climatronic control unit or in Infotain-
ment » page 116 . In the range between 16 ° C to 29.5 ° C, an automatic temper-
ature control takes place.
At a temperature setting below 16 ° C, lights up in the temperature display,
the Climatronic functions with maximum cooling performance .
At a temperature setting over 29.5 ° C, lights up in the temperature display,
the Climatronic functions with maximum heating output.
Residual heat function
After switching off the ignition, the engine residual heat is used for heat re-
tention in the vehicle interior. The function can only be switched on with the
ignition off within 30 minutes after stopping the engine. The residual heat
function turns off after about 30 minutes, or when the battery has a low
charge state.
CAUTION
Do not cover the interior temperature sensor H » Fig. 148 - the function of the
Climatronic could be affected. 1)
Applies to left-hand drive vehicles.
2)
Applies to right-hand drive vehicles.
115Heating and ventilation
Page 120 of 336
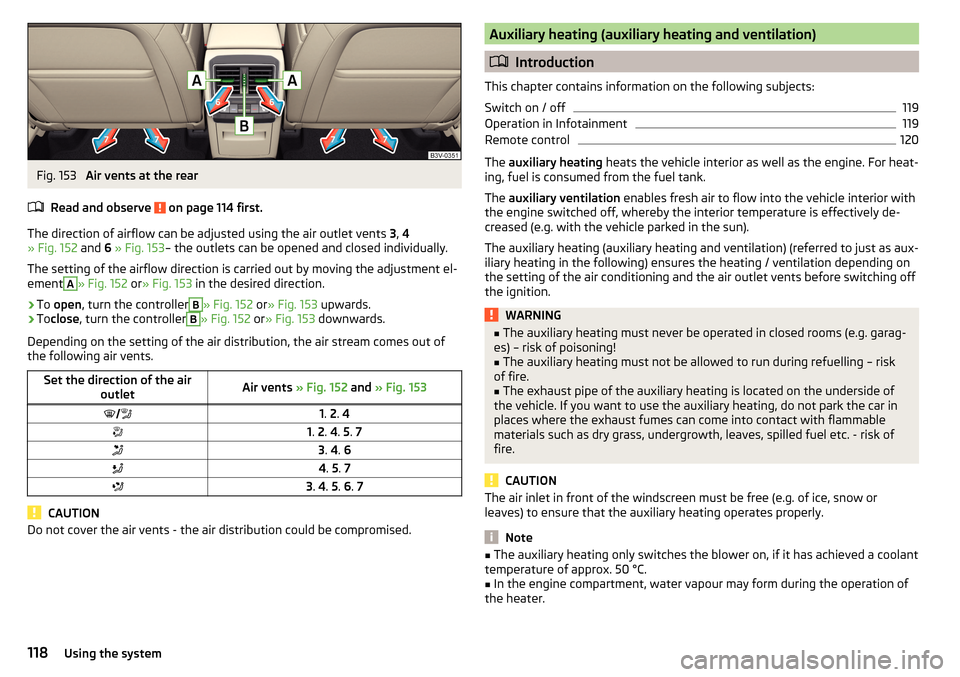
Fig. 153
Air vents at the rear
Read and observe
on page 114 first.
The direction of airflow can be adjusted using the air outlet vents 3, 4
» Fig. 152 and 6 » Fig. 153 – the outlets can be opened and closed individually.
The setting of the airflow direction is carried out by moving the adjustment el-
ement
A
» Fig. 152 or» Fig. 153 in the desired direction.
›
To open , turn the controller
B
» Fig. 152 or» Fig. 153 upwards.
›
Toclose , turn the controller
B
» Fig. 152 or» Fig. 153 downwards.
Depending on the setting of the air distribution, the air stream comes out of
the following air vents.
Set the direction of the air outletAir vents » Fig. 152 and » Fig. 1531. 2 . 41. 2 . 4 . 5 . 73 . 4 . 64 . 5 . 73 . 4 . 5 . 6 . 7
CAUTION
Do not cover the air vents - the air distribution could be compromised.Auxiliary heating (auxiliary heating and ventilation)
Introduction
This chapter contains information on the following subjects:
Switch on / off
119
Operation in Infotainment
119
Remote control
120
The auxiliary heating heats the vehicle interior as well as the engine. For heat-
ing, fuel is consumed from the fuel tank.
The auxiliary ventilation enables fresh air to flow into the vehicle interior with
the engine switched off, whereby the interior temperature is effectively de-
creased (e.g. with the vehicle parked in the sun).
The auxiliary heating (auxiliary heating and ventilation) (referred to just as aux- iliary heating in the following) ensures the heating / ventilation depending on
the setting of the air conditioning and the air outlet vents before switching off
the ignition.
WARNING■ The auxiliary heating must never be operated in closed rooms (e.g. garag-
es) – risk of poisoning!■
The auxiliary heating must not be allowed to run during refuelling – risk
of fire.
■
The exhaust pipe of the auxiliary heating is located on the underside of
the vehicle. If you want to use the auxiliary heating, do not park the car in
places where the exhaust fumes can come into contact with flammable
materials such as dry grass, undergrowth, leaves, spilled fuel etc. - risk of
fire.
CAUTION
The air inlet in front of the windscreen must be free (e.g. of ice, snow or
leaves) to ensure that the auxiliary heating operates properly.
Note
■ The auxiliary heating only switches the blower on, if it has achieved a coolant
temperature of approx. 50 °C.■
In the engine compartment, water vapour may form during the operation of
the heater.
118Using the system
Page 121 of 336
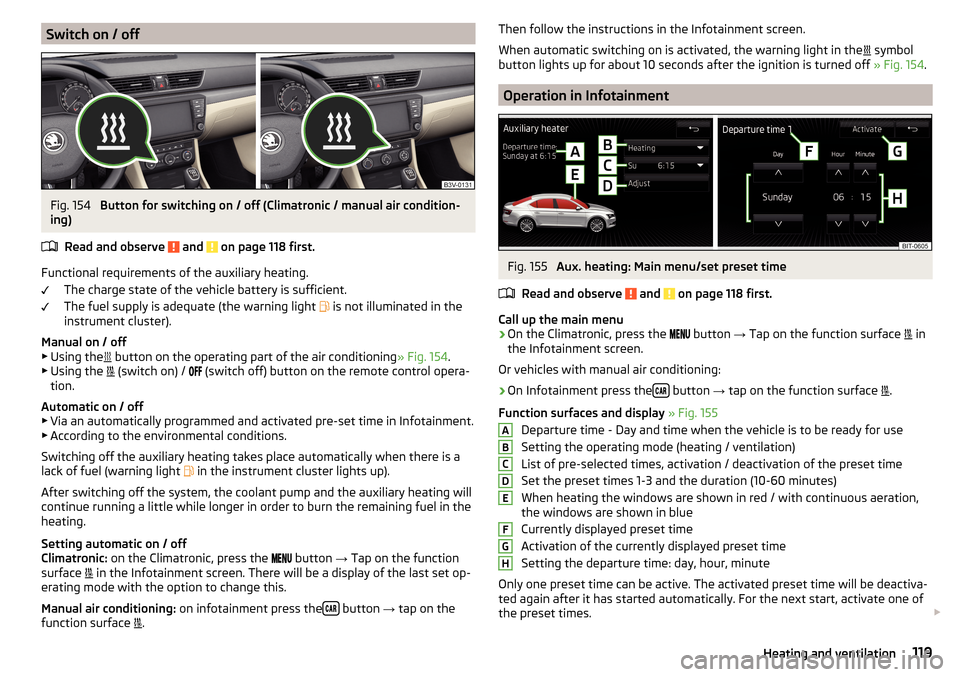
Switch on / offFig. 154
Button for switching on / off (Climatronic / manual air condition-
ing)
Read and observe
and on page 118 first.
Functional requirements of the auxiliary heating. The charge state of the vehicle battery is sufficient.
The fuel supply is adequate (the warning light is not illuminated in the
instrument cluster).
Manual on / off ▶ Using the button on the operating part of the air conditioning
» Fig. 154.
▶ Using the (switch on) /
(switch off) button on the remote control opera-
tion.
Automatic on / off ▶ Via an automatically programmed and activated pre-set time in Infotainment.
▶ According to the environmental conditions.
Switching off the auxiliary heating takes place automatically when there is a
lack of fuel (warning light in the instrument cluster lights up).
After switching off the system, the coolant pump and the auxiliary heating will
continue running a little while longer in order to burn the remaining fuel in the
heating.
Setting automatic on / off
Climatronic: on the Climatronic, press the
button
→ Tap on the function
surface in the Infotainment screen. There will be a display of the last set op-
erating mode with the option to change this.
Manual air conditioning: on infotainment press the
button
→ tap on the
function surface .
Then follow the instructions in the Infotainment screen.
When automatic switching on is activated, the warning light in the
symbol
button lights up for about 10 seconds after the ignition is turned off » Fig. 154.
Operation in Infotainment
Fig. 155
Aux. heating: Main menu/set preset time
Read and observe
and on page 118 first.
Call up the main menu
›
On the Climatronic, press the button
→ Tap on the function surface
in
the Infotainment screen.
Or vehicles with manual air conditioning:
›
On Infotainment press the button
→ tap on the function surface
.
Function surfaces and display » Fig. 155
Departure time - Day and time when the vehicle is to be ready for use
Setting the operating mode (heating / ventilation)
List of pre-selected times, activation / deactivation of the preset time
Set the preset times 1-3 and the duration (10-60 minutes)
When heating the windows are shown in red / with continuous aeration,
the windows are shown in blue
Currently displayed preset time
Activation of the currently displayed preset time
Setting the departure time: day, hour, minute
Only one preset time can be active. The activated preset time will be deactiva-
ted again after it has started automatically. For the next start, activate one of
the preset times.
ABCDEFGH119Heating and ventilation
Page 122 of 336
Note■When selecting the day in the preset time, there is an option between Sun-
day and Monday without the specified day. If this setting is selected, the vehi-
cle will be ready for use at the selected time, regardless of the current day.■
If a different time is set, the activated preset time is automatically deactiva-
ted. The preset time must be reactivated.
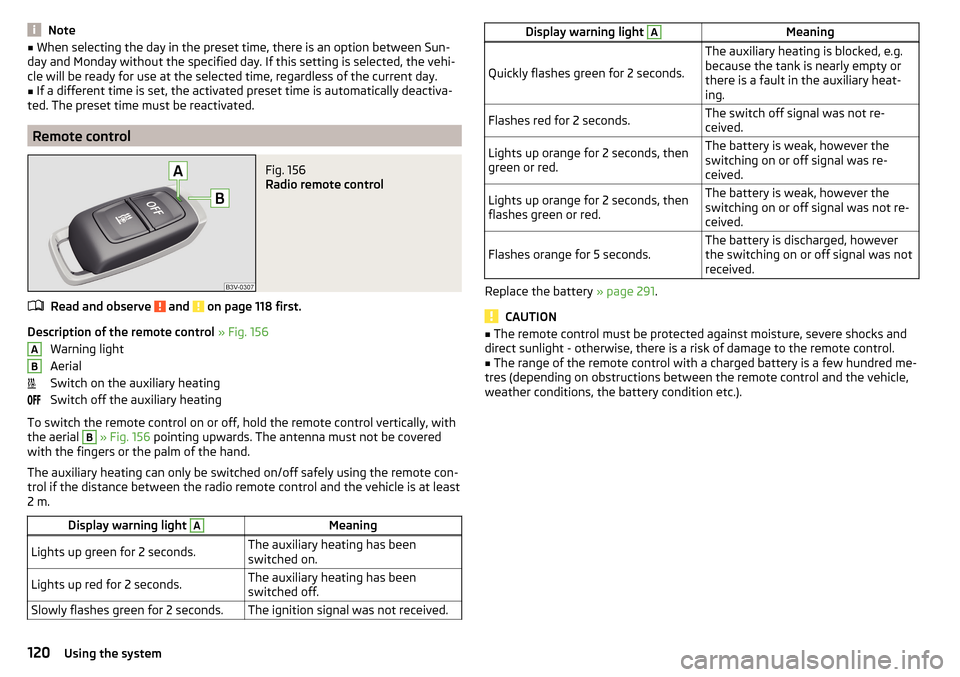
Remote control
Fig. 156
Radio remote control
Read and observe and on page 118 first.
Description of the remote control » Fig. 156
Warning light
Aerial
Switch on the auxiliary heating
Switch off the auxiliary heating
To switch the remote control on or off, hold the remote control vertically, with
the aerial
B
» Fig. 156 pointing upwards. The antenna must not be covered
with the fingers or the palm of the hand.
The auxiliary heating can only be switched on/off safely using the remote con-
trol if the distance between the radio remote control and the vehicle is at least
2 m.
Display warning light AMeaningLights up green for 2 seconds.The auxiliary heating has been
switched on.Lights up red for 2 seconds.The auxiliary heating has been
switched off.Slowly flashes green for 2 seconds.The ignition signal was not received.ABDisplay warning light AMeaning
Quickly flashes green for 2 seconds.
The auxiliary heating is blocked, e.g.
because the tank is nearly empty or
there is a fault in the auxiliary heat-
ing.Flashes red for 2 seconds.The switch off signal was not re-
ceived.Lights up orange for 2 seconds, then
green or red.The battery is weak, however the
switching on or off signal was re-
ceived.Lights up orange for 2 seconds, then
flashes green or red.The battery is weak, however the
switching on or off signal was not re-
ceived.Flashes orange for 5 seconds.The battery is discharged, however
the switching on or off signal was not
received.
Replace the battery » page 291.
CAUTION
■
The remote control must be protected against moisture, severe shocks and
direct sunlight - otherwise, there is a risk of damage to the remote control.■
The range of the remote control with a charged battery is a few hundred me-
tres (depending on obstructions between the remote control and the vehicle,
weather conditions, the battery condition etc.).
120Using the system
Page 128 of 336
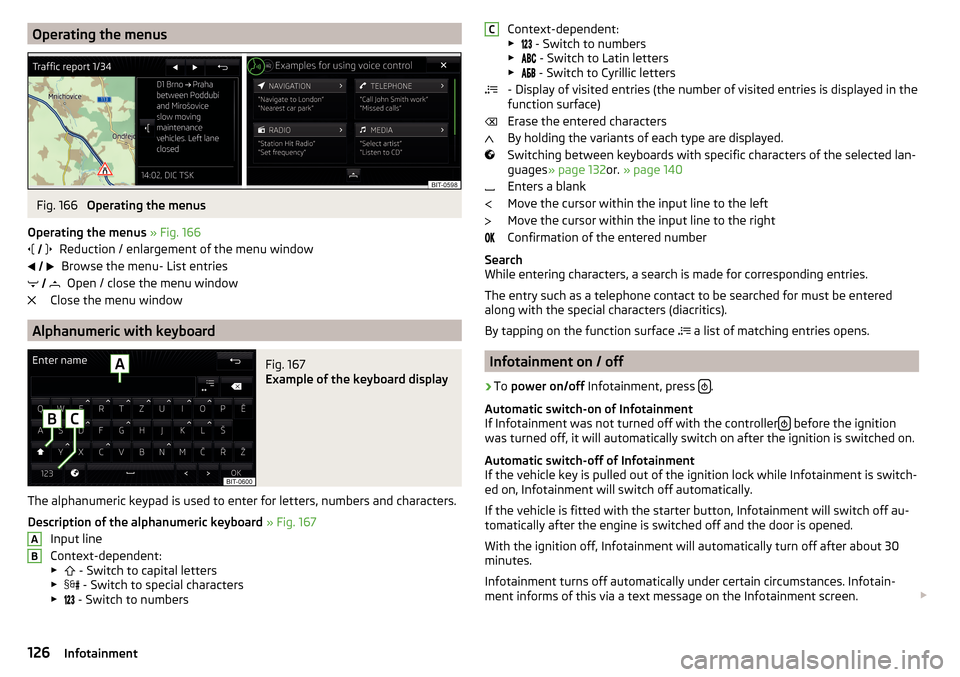
Operating the menusFig. 166
Operating the menus
Operating the menus » Fig. 166
Reduction / enlargement of the menu window Browse the menu- List entries Open / close the menu window
Close the menu window
Alphanumeric with keyboard
Fig. 167
Example of the keyboard display
The alphanumeric keypad is used to enter for letters, numbers and characters.
Description of the alphanumeric keyboard » Fig. 167
Input line
Context-dependent: ▶ - Switch to capital letters
▶ - Switch to special characters
▶ - Switch to numbers
ABContext-dependent:
▶ - Switch to numbers
▶ - Switch to Latin letters
▶
- Switch to Cyrillic letters
- Display of visited entries (the number of visited entries is displayed in the
function surface)
Erase the entered characters
By holding the variants of each type are displayed.
Switching between keyboards with specific characters of the selected lan-
guages » page 132 or. » page 140
Enters a blank
Move the cursor within the input line to the left
Move the cursor within the input line to the right
Confirmation of the entered number
Search
While entering characters, a search is made for corresponding entries.
The entry such as a telephone contact to be searched for must be entered
along with the special characters (diacritics).
By tapping on the function surface a list of matching entries opens.
Infotainment on / off
›
To
power on/off Infotainment, press .
Automatic switch-on of Infotainment
If Infotainment was not turned off with the controller
before the ignition
was turned off, it will automatically switch on after the ignition is switched on.
Automatic switch-off of Infotainment
If the vehicle key is pulled out of the ignition lock while Infotainment is switch-
ed on, Infotainment will switch off automatically.
If the vehicle is fitted with the starter button, Infotainment will switch off au-
tomatically after the engine is switched off and the door is opened.
With the ignition off, Infotainment will automatically turn off after about 30
minutes.
Infotainment turns off automatically under certain circumstances. Infotain-
ment informs of this via a text message on the Infotainment screen.
C126Infotainment
Page 134 of 336
■Touchscreen tone - Switch on/off audible tone when touching the screen
■No navigation sound during call
- Switching on / off the nav. announcements dur-
ing a telephone conversation (does not apply to Infotainment Bolero)
Screen settings
›
Press the button, then tap on the function surface
Tap →
screen
.
■
Screen off (in 10 seconds)
- Enable / disable the automatic power off function
■
Brightness:
- Adjusts the brightness of the screen
■
Touchscreen tone
- Switch on/off audible tone when touching the screen
■
Animation when finger near screen
- Turn the proximity sensors on/off (When the
function is on, e.g. Navigation will be shown in the main menu when moving a
finger towards the bottom bar with the functional surfaces on the screen)
■
Show clock in standby mode
- Time and date displayed on the screen when the
ignition is switched on and Infotainment is switched off
Time and date settings
›
Press the button, then tap on the function surface
→
time and date
.
■
Time source:
- Time source settings: manual / GPS (applies to Infotainment Co-
lumbus, Amundsen)
■
Time:
- time settings
■
Summer (DST)
- Switches the summer time setting on/off (applies to Infotain-
ment Columbus, Amundsen)
■
Automatic summertime
- Turn on / off the automatic switch to daylight saving
time
■
Time zone:
- Choice of time zone
■
Time format:
- Specify the time format
■
Date:
- Date settings
■
Date format:
- Setting the date format
Setting the Infotainment language
›
Press the button, then tap on the function surface
→
Language
.
›
Select the Infotainment language.
In some languages, after selecting the function surface
Female
and
Male
are dis-
played for the choice of voice prompts for Infotainment.
Note■ When a language is selected which does not support voice control, Infotain-
ment will indicate with a message on the screen.■
The messages are generated by Infotainment. Flawless clarity (e.g. road or
city name) cannot always be guaranteed.
Additional keypad language settings
›
Press the button, then tap on the function surface
→
Additional keypadlanguages
.
In this menu, a keyboard language set can be added to allow the entering of
characters other than those in the currently selected language (function sur-
face ).
Unit settings
›
Press the button, then tap on the function surface
→
Units
.
■
Distance:
- Distance units
■
Speed:
- Speed units
■
Temperature:
- Temperature units
■
Volume:
- Volume units
■
Consumption:
- Consumption units
■
Pressure:
- Pressure units for tire pressure
Setting data transfer
An active data transfer allows data transfer between Infotainment and the ex-
ternal device (e.g. MirrorLink ®
application) or the operation of some Infotain-
ment functions using the application of the external device (e.g. ŠKODA Media
Command).
›
Press the button, then tap on the function surface
→
Mobile device datatransfer
.
■
Activate data transfer for ŠKODA apps
- Turning data transfer on and off
■
Use apps to operate::
- Setting Infotainment operation via the external device
applications (applies to Infotainment Columbus) ■
Deactivate
- Deactivate Infotainment operation via an external device
■
Confirm
- Infotainment operation with required confirmation
■
Allow
- Infotainment operation without required confirmation
132Infotainment
Page 141 of 336
■Note: National border crossed - Switching on/off the display for information on na-
tional speed limits when crossing the national border
■Demo mode
- Switch on/off guidance in demo mode
■
Define demo mode starting point
- Specifying the start point of the route guidance
in the demo mode by entering the address or the current vehicle position
Infotainment settings - Swing
Infotainment system settings
Sound settings
›
Press the button.
■
Volume
- Volume settings
■
Max. switch-on volume.
- Sets the maximum volume when Infotainment is
turned on
■
Message
- Adjustment of traffic announcements volume (TP)
■
Speed-dependent volume adjustment
- volume increases as speed increases
■
Entert. Fading
- Lowers the audio volume (e.g. radio volume) with activated
parking aid
■
AUX volume:
- Sets the volume for the device connected through AUX
■
BT audio:
- Volume setting of the device connected via Bluetooth ®
audio pro-
file
■
Balance - Fader
- Sets the balance between left and right, front and rear
■
Bass - Mid - Treble
- Setting the equaliser
■
Confirmation tone
- Switch on/off audible tone when touching the screen
Screen settings
›
Press the button, then tap the function surface
Screen
.
■
Switch off screen (in 10 seconds)
- Enable / disable the automatic power off func-
tion 1)
■
Brightness:
- Adjusts the brightness of the screen
■
Confirmation tone
- Switch on/off audible tone when touching the screen
■
Show clock in standby mode
- Time and date displayed on the screen when the
ignition is switched on and Infotainment is switched off
Time and date settings
›
Press the button, then tap the function surface
Time and date
.
■
Time:
- time settings
■
Time format:
- Specify the time format
■
Summer time
- Switches the summer setting on/off
1)
Infotainment turns the screen off when no touch screen is performed or none of the keys are pressed /
rotated for more than 10 seconds.
139Infotainment settings - Swing