buttons SKODA SUPERB 2016 3.G / (B8/3V) Owner's Manual
[x] Cancel search | Manufacturer: SKODA, Model Year: 2016, Model line: SUPERB, Model: SKODA SUPERB 2016 3.G / (B8/3V)Pages: 336, PDF Size: 53.89 MB
Page 33 of 336
Using the system
Cockpit
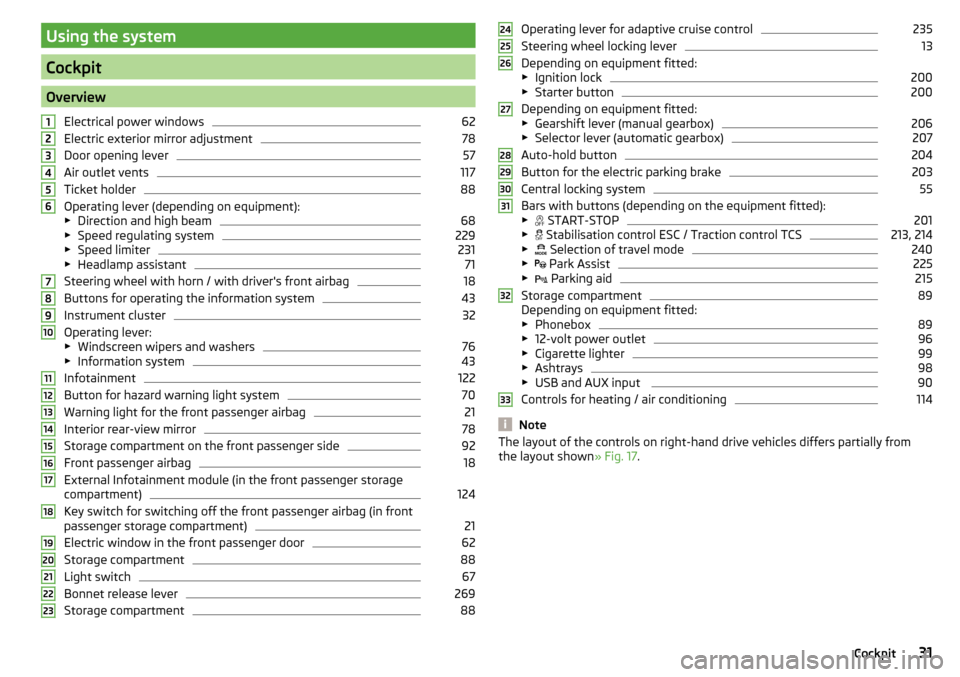
OverviewElectrical power windows
62
Electric exterior mirror adjustment
78
Door opening lever
57
Air outlet vents
117
Ticket holder
88
Operating lever (depending on equipment):
▶ Direction and high beam
68
▶Speed regulating system
229
▶Speed limiter
231
▶Headlamp assistant
71
Steering wheel with horn / with driver's front airbag
18
Buttons for operating the information system
43
Instrument cluster
32
Operating lever:
▶ Windscreen wipers and washers
76
▶Information system
43
Infotainment
122
Button for hazard warning light system
70
Warning light for the front passenger airbag
21
Interior rear-view mirror
78
Storage compartment on the front passenger side
92
Front passenger airbag
18
External Infotainment module (in the front passenger storage
compartment)
124
Key switch for switching off the front passenger airbag (in front
passenger storage compartment)
21
Electric window in the front passenger door
62
Storage compartment
88
Light switch
67
Bonnet release lever
269
Storage compartment
881234567891011121314151617181920212223Operating lever for adaptive cruise control235
Steering wheel locking lever
13
Depending on equipment fitted:
▶ Ignition lock
200
▶Starter button
200
Depending on equipment fitted:
▶ Gearshift lever (manual gearbox)
206
▶Selector lever (automatic gearbox)
207
Auto-hold button
204
Button for the electric parking brake
203
Central locking system
55
Bars with buttons (depending on the equipment fitted):
▶ START-STOP
201
▶
Stabilisation control ESC / Traction control TCS
213, 214
▶
Selection of travel mode
240
▶
Park Assist
225
▶
Parking aid
215
Storage compartment
89
Depending on equipment fitted:
▶ Phonebox
89
▶12-volt power outlet
96
▶Cigarette lighter
99
▶Ashtrays
98
▶USB and AUX input
90
Controls for heating / air conditioning
114
Note
The layout of the controls on right-hand drive vehicles differs partially from
the layout shown » Fig. 17.2425262728293031323331Cockpit
Page 47 of 336
No message/warning messages relating to vehicle status and the num-
ber (if there is only one message, one warning message text is dis-
played)Display information about the status of the START-STOP system Activation / deactivation of notes relating to START-STOP-System
messages in another screen display
Operation of the information system
Operation via the operating lever
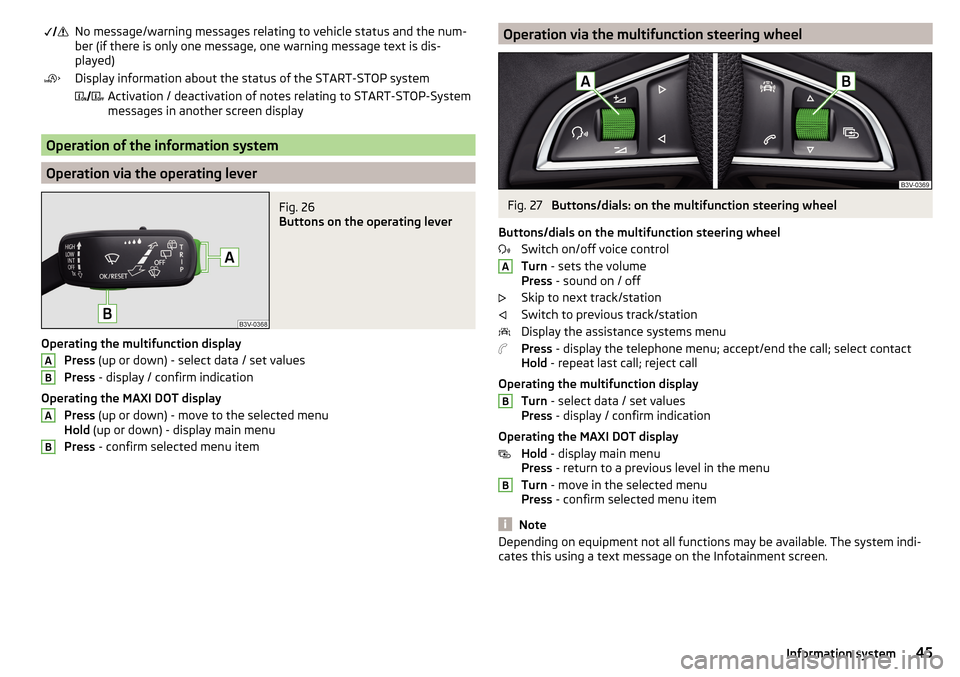
Fig. 26
Buttons on the operating lever
Operating the multifunction display
Press (up or down) - select data / set values
Press - display / confirm indication
Operating the MAXI DOT display Press (up or down) - move to the selected menu
Hold (up or down) - display main menu
Press - confirm selected menu item
ABABOperation via the multifunction steering wheelFig. 27
Buttons/dials: on the multifunction steering wheel
Buttons/dials on the multifunction steering wheel Switch on/off voice control
Turn - sets the volume
Press - sound on / off
Skip to next track/station
Switch to previous track/station
Display the assistance systems menu
Press - display the telephone menu; accept/end the call; select contact
Hold - repeat last call; reject call
Operating the multifunction display Turn - select data / set values
Press - display / confirm indication
Operating the MAXI DOT display Hold - display main menu
Press - return to a previous level in the menu
Turn - move in the selected menu
Press - confirm selected menu item
Note
Depending on equipment not all functions may be available. The system indi-
cates this using a text message on the Infotainment screen.ABB45Information system
Page 50 of 336
▶Average speed.
▶ Driving time.
Note
Disconnecting the vehicle battery will delete all memory data.
MAXI DOT display
Introduction
This chapter contains information on the following subjects:
Menu item
Navigation48
Menu item
Audio48
Menu item
Telephone48
Menu item
Assist systems48
The MAXI DOT display is a user interface which, depending on the equipment
configuration, provides information about the Infotainment, the multifunction
display, the assistance systems etc.
The menus with details can be operated and displayed using the buttons on
the operating lever or the multifunction steering wheel » page 45.
Main menu items (depending on vehicle equipment) ■
Driving data
» page 46
■
Assist systems
» page 48
■
Navigation
» page 48
■
Audio
» page 48
■
Telephone
» page 48 ;
■
Vehicle
» page 44
Note
■
If warning messages are displayed, these messages must first be confirmed
to access the main menu.■
The display language can also be set in Infotainment » page 132, Setting the
Infotainment language and» page 140 , Setting the Infotainment language .
Menu item
Navigation
The following information is displayed in the
Navigation
menu item.
▶
Driving recommendations
▶ Compass
▶ Last destinations
Menu item
Audio
The following information is displayed in the
Audio
menu item.
Radio
▶ Currently playing station (name/frequency).
▶ The selected frequency range (e.g. FM) optionally with the number of the sta-
tion button (e.g. FM3), if the station is stored in the memory list.
▶ List of available stations (if more than 5 stations can be received).
▶ TP traffic announcements.
Media
▶ Name of the track being played, if necessary, further information regarding
title (e.g. artist, album name), if this information is stored as a so called ID3
tag on the audio source.
Menu item
Telephone
The call list with the following symbols is displayed in the
Telephone
menu item.
Incoming call
Outgoing call
Missed call
Symbols in the display Charge status of the telephone battery 1)
Signal strength 1)
A telephone is connected to the unit
Missed calls (if there are several missed calls, the number of calls is shown
next to the symbol)
Switch-off microphone
Menu item
Assist systems
The following systems are activated/deactivated in the
Assist systems
menu
item.
1)
This function is only supported by some mobile telephone.
48Using the system
Page 54 of 336
›Enter the password (vehicle identification number using uppercase let-
ters » page 52 ).
With SmartGate, a maximum of four external devices can be connected simul-
taneously using Wi-Fi. In these external devices, up to four ŠKODA applications
can be started simultaneously.
Disconnection
The connection can be switched off in one of the following ways.›
Switch off the ignition for longer than 5 seconds (for vehicles with a starter
button, switch off the engine and open the driver's door).
›
End the connection in the SmartGate application.
›
Switch off Wi-Fi in the connected external device.
Automatic connection
If the communication device has already had a connection with SmartGate,
then the connection is automatically restored under the following conditions.
The ignition is switched on.
Wi-Fi is switched on in the external device that is to be connected to.
The external device that is to be connected to stores the password re-
quired for the connection check.
Connection to SmartGate using Wi-Fi direct
This type of connection is intended for external devices running the Android
operating system.
Establishing a connection
›
Switch on the ignition.
›
In the external device that is to be connected to, start the SmartGate appli- cation.
›
In the application, change the connection type to Wi-Fi direct.
›
Then follow the instructions in the manual, which is included in the
SmartGate application.
The password for the connection to SmartGate _... 1)
includes the last six digits
of the vehicle identification number » page 52.
With SmartGate, a maximum of two external devices can be connected simul-
taneously using Wi-Fi direct, with as many launched ŠKODA applications as re-
quired.
If you want to connect to SmartGate in a different vehicle, you must make a
new connection in the SmartGate application.
Disconnection
The connection can be switched off in one of the following ways.›
Switch off the ignition for longer than 5 seconds (for vehicles with a starter
button, switch off the engine and open the driver's door).
›
End the connection in the SmartGate application.
›
Switch off Wi-Fi in the connected external device.
Automatic connection
If the external device once had a connection with SmartGate, then the connec-
tion is automatically restored after the ignition is started.
SmartGate web interface
SmartGate parameters can be set in the SmartGate web interface.
The following address must be entered in the web browser of the external de-
vice that is connected with SmartGate.
HTTP://192.168.123.1
The setting changes are only effective after tapping the buttons “Save” →
“Reboot”.
Password/PIN code
The password for the Wi-Fi connection preset by the factory is the complete
vehicle identification number (entered in upper case); the PIN code for the Wi-
Fi direct connection is the last 6 digits of the vehicle identification number.
After changing the password/PIN, the connection to SmartGate must be re-es-
tablished on the external device to be connected using the new password or
new PIN code.
Changing the password for the Wi-Fi connection
›
Open the SmartGate web interface » page 52.
›
In the menu item “WPA / WPA2 key:”enter the new password (8 to 63 alpha-
numeric characters and special characters, small and capital letters) .
›
Confirm the password change by tapping on the “Save” button.
1)
The last 6 characters of the vehicle identification number of your vehicle are displayed at position
....
52Using the system
Page 59 of 336
Open / close doorFig. 37
Door handle/door opening lever
Read and observe
and on page 54 first.
›
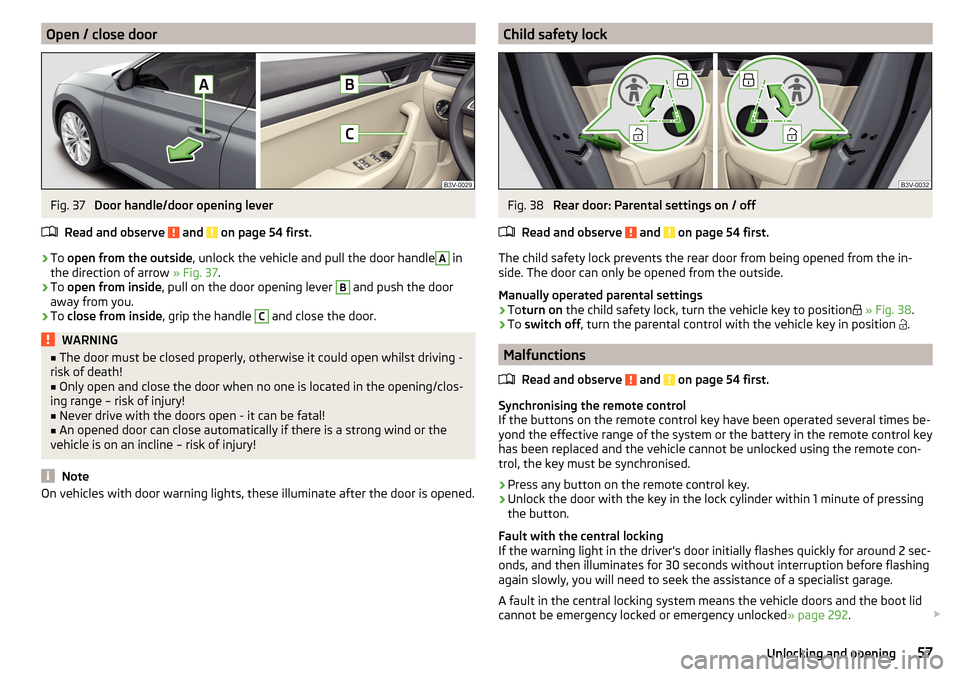
To open from the outside , unlock the vehicle and pull the door handle
A
in
the direction of arrow » Fig. 37.
›
To open from inside , pull on the door opening lever
B
and push the door
away from you.
›
To close from inside , grip the handle
C
and close the door.
WARNING■
The door must be closed properly, otherwise it could open whilst driving -
risk of death!■
Only open and close the door when no one is located in the opening/clos-
ing range – risk of injury!
■
Never drive with the doors open - it can be fatal!
■
An opened door can close automatically if there is a strong wind or the
vehicle is on an incline – risk of injury!
Note
On vehicles with door warning lights, these illuminate after the door is opened.Child safety lockFig. 38
Rear door: Parental settings on / off
Read and observe
and on page 54 first.
The child safety lock prevents the rear door from being opened from the in-
side. The door can only be opened from the outside.
Manually operated parental settings
›
To turn on the child safety lock, turn the vehicle key to position
» Fig. 38 .
›
To switch off , turn the parental control with the vehicle key in position
.
Malfunctions
Read and observe
and on page 54 first.
Synchronising the remote control
If the buttons on the remote control key have been operated several times be-
yond the effective range of the system or the battery in the remote control key
has been replaced and the vehicle cannot be unlocked using the remote con-
trol, the key must be synchronised.
›
Press any button on the remote control key.
›
Unlock the door with the key in the lock cylinder within 1 minute of pressing the button.
Fault with the central locking
If the warning light in the driver's door initially flashes quickly for around 2 sec-
onds, and then illuminates for 30 seconds without interruption before flashing
again slowly, you will need to seek the assistance of a specialist garage.
A fault in the central locking system means the vehicle doors and the boot lid
cannot be emergency locked or emergency unlocked » page 292.
57Unlocking and opening
Page 64 of 336
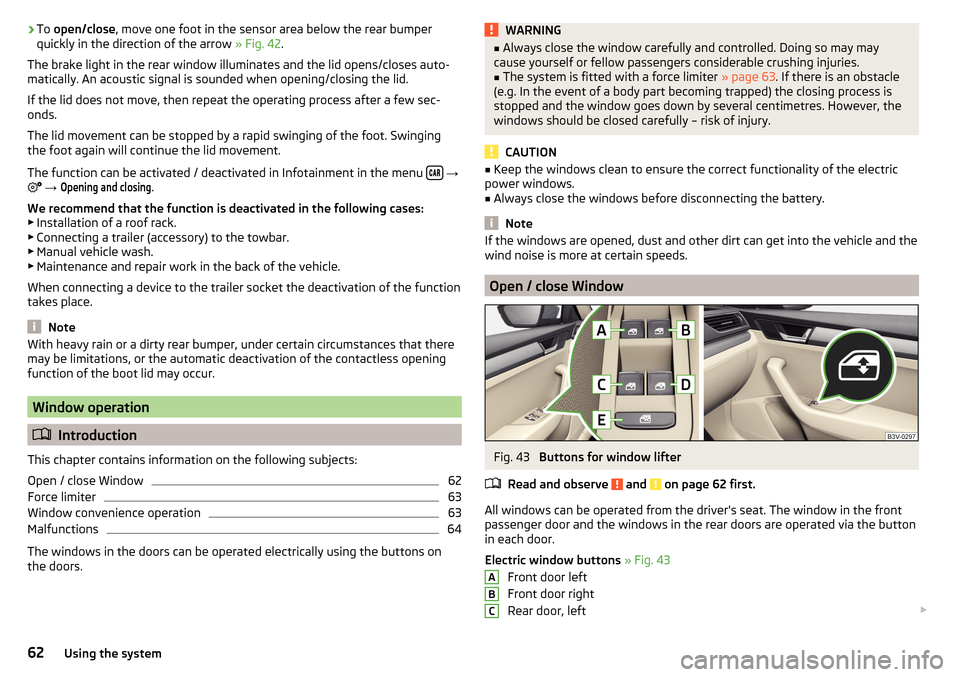
›To
open/close , move one foot in the sensor area below the rear bumper
quickly in the direction of the arrow » Fig. 42.
The brake light in the rear window illuminates and the lid opens/closes auto-
matically. An acoustic signal is sounded when opening/closing the lid.
If the lid does not move, then repeat the operating process after a few sec-
onds.
The lid movement can be stopped by a rapid swinging of the foot. Swinging
the foot again will continue the lid movement.
The function can be activated / deactivated in Infotainment in the menu
→
→
Opening and closing
.
We recommend that the function is deactivated in the following cases:
▶ Installation of a roof rack.
▶ Connecting a trailer (accessory) to the towbar.
▶ Manual vehicle wash.
▶ Maintenance and repair work in the back of the vehicle.
When connecting a device to the trailer socket the deactivation of the function
takes place.
Note
With heavy rain or a dirty rear bumper, under certain circumstances that there
may be limitations, or the automatic deactivation of the contactless opening
function of the boot lid may occur.
Window operation
Introduction
This chapter contains information on the following subjects:
Open / close Window
62
Force limiter
63
Window convenience operation
63
Malfunctions
64
The windows in the doors can be operated electrically using the buttons on
the doors.
WARNING■ Always close the window carefully and controlled. Doing so may may
cause yourself or fellow passengers considerable crushing injuries.■
The system is fitted with a force limiter » page 63. If there is an obstacle
(e.g. In the event of a body part becoming trapped) the closing process is
stopped and the window goes down by several centimetres. However, the
windows should be closed carefully – risk of injury.
CAUTION
■ Keep the windows clean to ensure the correct functionality of the electric
power windows.■
Always close the windows before disconnecting the battery.
Note
If the windows are opened, dust and other dirt can get into the vehicle and the
wind noise is more at certain speeds.
Open / close Window
Fig. 43
Buttons for window lifter
Read and observe
and on page 62 first.
All windows can be operated from the driver's seat. The window in the front
passenger door and the windows in the rear doors are operated via the button
in each door.
Electric window buttons » Fig. 43
Front door left
Front door right
Rear door, left
ABC62Using the system
Page 65 of 336

Rear door, right
Deactivate/activate the buttons in the rear doors (the deactivation may be
advantageous if, for example, children are transported on the rear seats)
Open/close window›
To open , lightly press the appropriate button down and hold it until the win-
dow has moved into the desired position.
›
or: press the button to the stop, the window automatically opens fully. Re-
newed pressing of the button causes the window to stop.
›
To close , pull gently on the top edge of the corresponding button and hold
until the window has moved into the desired position.
›
or: pull the button briefly to the stop, the window automatically closes fully.
Renewed pulling of the button causes the window to stop immediately.
Disable / enable buttons in the rear doors
›
To deactivate/activate the buttons in the rear doors, press the
E
button. If
the buttons in the rear doors are deactivated, the warning light illumi-
nates in the
E
button.
Note
■ After switching off the ignition, the windows can still open and close for
about 10 minutes.■
After the driver or front passenger door is opened, the operation of the win-
dow is only possible with the button
A
» Fig. 43 , in which case this is pressed
or pulled for approx. 2 seconds.
Force limiter
Read and observe
and on page 62 first.
The electrical power windows are fitted with a force limiter.
If there is an obstacle, the closing process is stopped and the window goes
down by several centimetres.
If the obstacle prevents the window from being closed during the next 10 sec-
onds, the closing process is interrupted once again and the window goes down
by several centimetres.
If you attempt to close the window again within 10 seconds of the window be-
ing moved down for the second time, even though the obstacle was not yet
been removed, the closing process is only stopped. During this time it is not
possible to automatically close the window. The force limiter is still switched
on.
DEThe force limiter is only not operational if you attempt to close the window
again within the next 10 seconds – the window will now close with full force!
If you wait longer than 10 seconds, the force limiter is switched on again.
Window convenience operation
Read and observe
and on page 62 first.
The convenience operation for the window offers the option to open/close all
the windows at once (or only the window in the driver's door). The functions of
the comfort operation can be individually adjusted in infotainment in the
→
→
Opening and closing
menu.
Opening
›
Press and hold the button on the key.
›
Or
Switch off the ignition, open the driver's door and hold the key
A
until it
stops in the open position » Fig. 43 on page 62 .
Closing
›
Press and hold the button on the key.
›
Or
Switch off the ignition, open the driver's door and hold the key
A
until it
stops in the closed position » Fig. 43 on page 62 .
›
In the KESSY system, hold your finger on the sensor on the outside of the
door handle of the front door » Fig. 35 on page 55 .
The convenience operation will only function correctly if all the windows auto-
matically open/close properly.
Convenience opening or closing the window using the key in the driver's door
locking cylinder is only possible within 45 seconds of locking the vehicle.
The movement of the window is stopped immediately when the respective
button is released.
Note
The settings for the window convenience operation are stored (depending on
the Infotainment type) in the active user account personalisation » page 49.63Unlocking and opening
Page 67 of 336
If there is an obstacle, the closing process is stopped and the glass pane re-
tracts by several centimetres.WARNINGIf the sliding/tilting roof is closed by holding down the switch 7 / 8,
» Fig. 44 on page 64 and the closing process is hindered by an obstacle,
then when attempting to close for a third time, the force limiter is rendered inoperable (if the period of 5 s is not reached between the individual at-
tempts to close). The sliding/tilting roof closes with full force - it may cause
injury.
Activate operation of the sliding/tilting roof
Fig. 45
Operation of the sliding/tilting
roof
Read and observe and on page 64 first.
If the operation of the sliding/tilting roof is deactivated (e.g. after disconnect-
ing and connecting the battery), then operation will have to be activated.
›
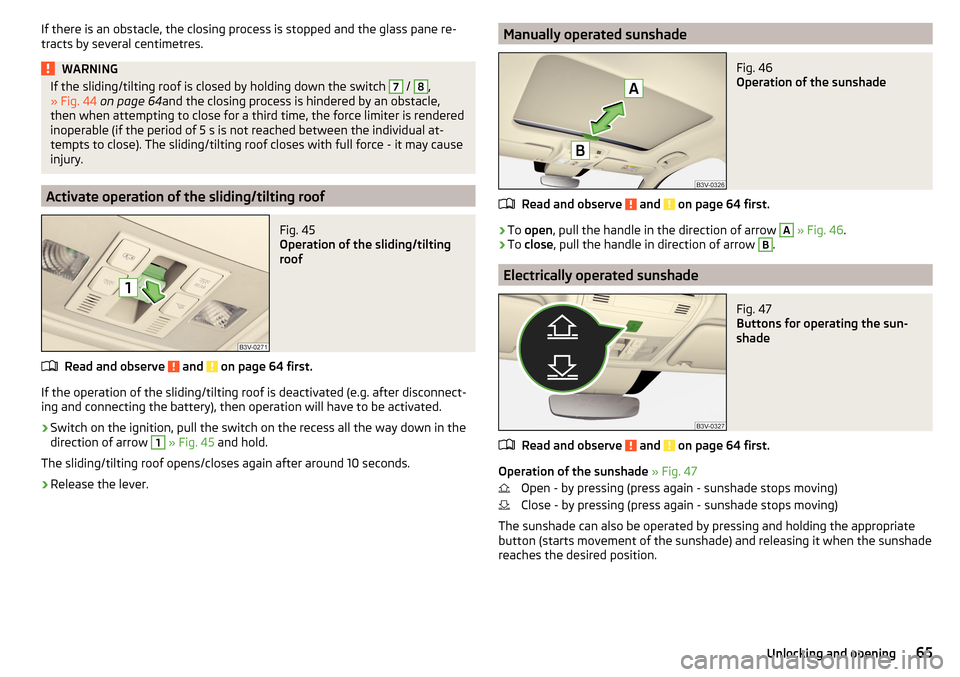
Switch on the ignition, pull the switch on the recess all the way down in the
direction of arrow
1
» Fig. 45 and hold.
The sliding/tilting roof opens/closes again after around 10 seconds.
›
Release the lever.
Manually operated sunshadeFig. 46
Operation of the sunshade
Read and observe and on page 64 first.
›
To open , pull the handle in the direction of arrow
A
» Fig. 46 .
›
To
close , pull the handle in direction of arrow
B
.
Electrically operated sunshade
Fig. 47
Buttons for operating the sun-
shade
Read and observe and on page 64 first.
Operation of the sunshade » Fig. 47
Open - by pressing (press again - sunshade stops moving)
Close - by pressing (press again - sunshade stops moving)
The sunshade can also be operated by pressing and holding the appropriate
button (starts movement of the sunshade) and releasing it when the sunshade
reaches the desired position.
65Unlocking and opening
Page 76 of 336

The ambient lighting can be adjusted in the Infotainment menu
→ →Ambient lighting
.
Infotainment Columbus, Amundsen, Bolero: Description of function surfaces
» Fig. 58
Enable / disable the background lighting
Activating of the brightness setting for all areas at the same time
Activating of the brightness setting for the dashboard area
Activating the brightness controls for the door area
Activating of the brightness setting for the footwell area only in white
Choice of colour options / brightness adjustment
Function surfaces for selecting lighting colour / brightness adjustment
To display B
.
C
.
D
and
E
tap on the function surface .
Note
The adjustment of the ambient lighting is stored (depending on the Infotain-
ment type) in the active user account personalisation » page 49.
Visibility
Introduction
This chapter contains information on the following subjects:
Windscreen and rear window heater
74
Sun visors
75
Sunshade
75
Sunshade in the rear doors
75WARNINGNo objects should be attached to the sun visors, which could limit the view
or endanger the vehicle occupants during sudden braking or should the ve-
hicle collide.ABCDEFGWindscreen and rear window heaterFig. 59
Buttons for the front and rear window heater: Climatronic / man-
ual air conditioning
Read and observe
on page 74 first.
The heating for quick defrosting and ventilation of the front /and rear window.
The heating only works when the engine is running.
Buttons for the heating (depending on vehicle equipment) » Fig. 59
Switch on/off the rear window heating
Switching the windscreen heater on/off
When the heating is switched on, a light illuminates inside or below the but-
ton.
The heating automatically switches off after ten minutes.
If the engine is switched off when the heating is on and turned back on again
within 10 minutes, the heating is continued.
Note
■ If the on-board voltage decreases, the heating switches off automatically
» page 273 , Automatic consumer shutdown - discharge protection of the vehi-
cle battery .■
If the lighting inside or below the button flashes, the heater will not work be-
cause of the low charge of the battery.
■
If the Climatronic recognises that the windshield could fog up, the windshield
heating is automatically switched on. This function can be activated / deactiva-
ted on the Climatronic control panel menu
→
.
74Using the system
Page 83 of 336
Note■If the inclination angle of the seat backrest relative to the seat surface is
greater than approx. 110°, then it is not possible for safety reasons to save this
setting in the memory of the electrically adjustable seats or the remote control
key.■
On vehicles with personalisation, the driver's seat setting is stored in the ac-
tive user account personalisation » page 49.
Convenience operation of the front passenger seat
Fig. 70
Operating elements on the front
passenger's seat
Read and observe on page 80 first.
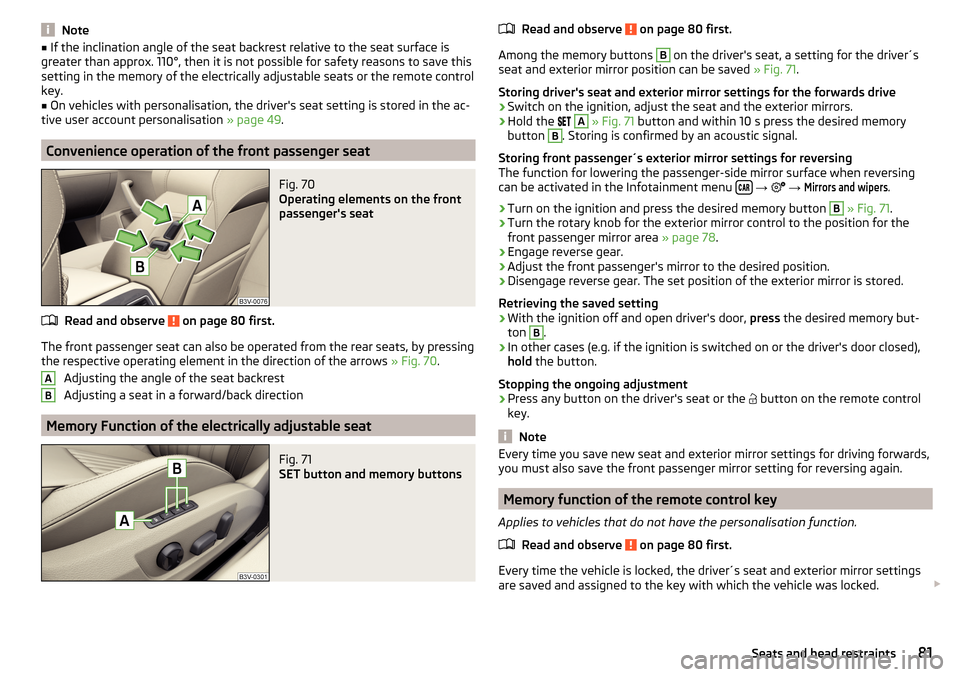
The front passenger seat can also be operated from the rear seats, by pressing
the respective operating element in the direction of the arrows » Fig. 70.
Adjusting the angle of the seat backrest
Adjusting a seat in a forward/back direction
Memory Function of the electrically adjustable seat
Fig. 71
SET button and memory buttons
ABRead and observe on page 80 first.
Among the memory buttons
B
on the driver's seat, a setting for the driver´s
seat and exterior mirror position can be saved » Fig. 71.
Storing driver's seat and exterior mirror settings for the forwards drive
›
Switch on the ignition, adjust the seat and the exterior mirrors.
›
Hold the
A
» Fig. 71 button and within 10 s press the desired memory
button
B
. Storing is confirmed by an acoustic signal.
Storing front passenger´s exterior mirror settings for reversing
The function for lowering the passenger-side mirror surface when reversing can be activated in the Infotainment menu
→
→
Mirrors and wipers
.
›
Turn on the ignition and press the desired memory button
B
» Fig. 71 .
›
Turn the rotary knob for the exterior mirror control to the position for the
front passenger mirror area » page 78.
›
Engage reverse gear.
›
Adjust the front passenger's mirror to the desired position.
›
Disengage reverse gear. The set position of the exterior mirror is stored.
Retrieving the saved setting
›
With the ignition off and open driver's door, press the desired memory but-
ton
B
.
›
In other cases (e.g. if the ignition is switched on or the driver's door closed),
hold the button.
Stopping the ongoing adjustment
›
Press any button on the driver's seat or the button on the remote control
key.
Note
Every time you save new seat and exterior mirror settings for driving forwards,
you must also save the front passenger mirror setting for reversing again.
Memory function of the remote control key
Applies to vehicles that do not have the personalisation function.
Read and observe
on page 80 first.
Every time the vehicle is locked, the driver´s seat and exterior mirror settingsare saved and assigned to the key with which the vehicle was locked.
81Seats and head restraints