dashboard SKODA SUPERB 2016 3.G / (B8/3V) Owner's Manual
[x] Cancel search | Manufacturer: SKODA, Model Year: 2016, Model line: SUPERB, Model: SKODA SUPERB 2016 3.G / (B8/3V)Pages: 336, PDF Size: 53.89 MB
Page 15 of 336
WARNING■The front seats and all head restraints must be adjusted to match the
body size at all times and the seat belt must always be fastened properly to
provide the most effective levels of protection to the passengers.■
Each occupant must correctly fasten the seat belt belonging to the seat.
Children must be fastened » page 22, Transporting children safely with a
suitable restraint system.
■
The seat backrests must not be tilted too far back when driving, as this
will impair the function of the seat belts and of the airbag system – risk of
injury!
WARNINGBy sitting incorrectly, the occupant is risking life-threatening injuries.
Driver’s correct seating position
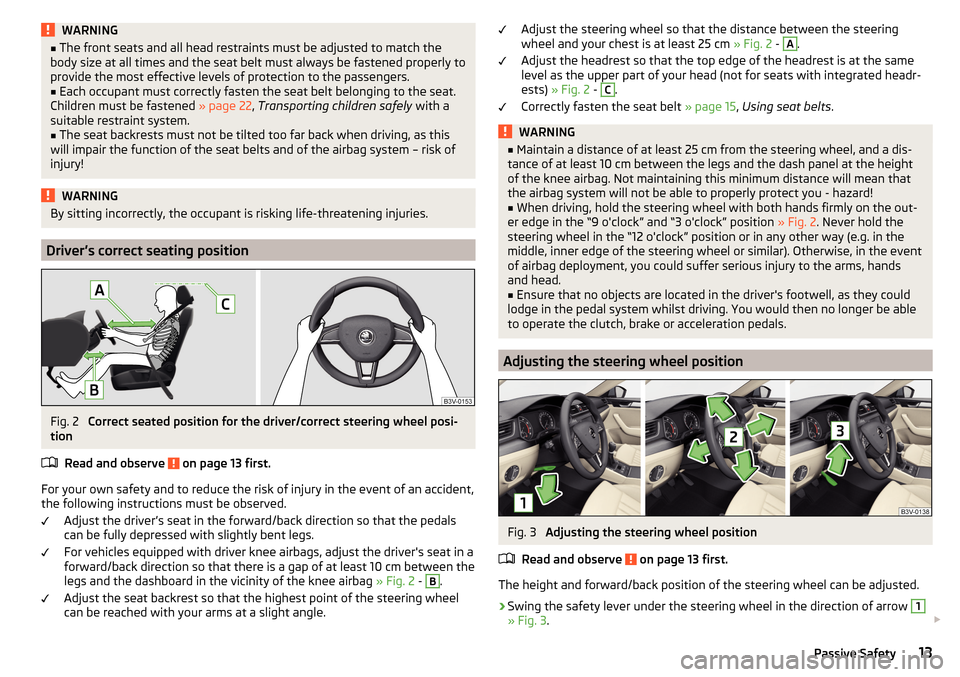
Fig. 2
Correct seated position for the driver/correct steering wheel posi-
tion
Read and observe
on page 13 first.
For your own safety and to reduce the risk of injury in the event of an accident,
the following instructions must be observed.
Adjust the driver’s seat in the forward/back direction so that the pedals
can be fully depressed with slightly bent legs.
For vehicles equipped with driver knee airbags, adjust the driver's seat in a
forward/back direction so that there is a gap of at least 10 cm between the
legs and the dashboard in the vicinity of the knee airbag » Fig. 2 -
B
.
Adjust the seat backrest so that the highest point of the steering wheel
can be reached with your arms at a slight angle.
Adjust the steering wheel so that the distance between the steering
wheel and your chest is at least 25 cm » Fig. 2 - A.
Adjust the headrest so that the top edge of the headrest is at the same
level as the upper part of your head (not for seats with integrated headr-
ests) » Fig. 2 - C
.
Correctly fasten the seat belt » page 15, Using seat belts .
WARNING■
Maintain a distance of at least 25 cm from the steering wheel, and a dis-
tance of at least 10 cm between the legs and the dash panel at the height
of the knee airbag. Not maintaining this minimum distance will mean that
the airbag system will not be able to properly protect you - hazard!■
When driving, hold the steering wheel with both hands firmly on the out-
er edge in the “9 o'clock” and “3 o'clock” position » Fig. 2. Never hold the
steering wheel in the “12 o'clock” position or in any other way (e.g. in the
middle, inner edge of the steering wheel or similar). Otherwise, in the event
of airbag deployment, you could suffer serious injury to the arms, hands
and head.
■
Ensure that no objects are located in the driver's footwell, as they could
lodge in the pedal system whilst driving. You would then no longer be able
to operate the clutch, brake or acceleration pedals.
Adjusting the steering wheel position
Fig. 3
Adjusting the steering wheel position
Read and observe
on page 13 first.
The height and forward/back position of the steering wheel can be adjusted.
›
Swing the safety lever under the steering wheel in the direction of arrow
1
» Fig. 3 .
13Passive Safety
Page 16 of 336
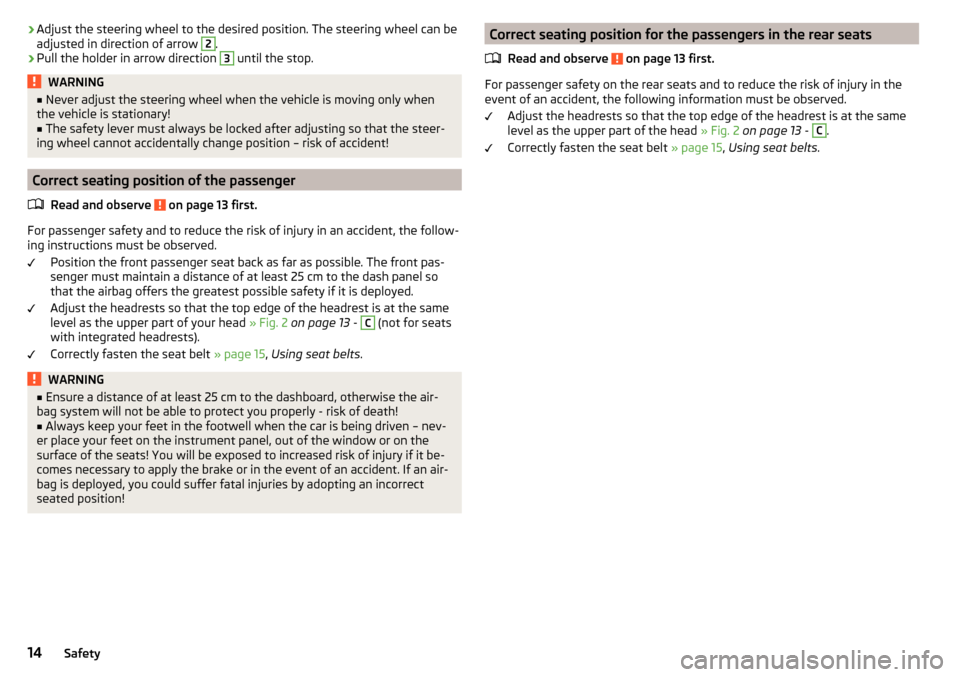
›Adjust the steering wheel to the desired position. The steering wheel can be
adjusted in direction of arrow 2.›
Pull the holder in arrow direction
3
until the stop.
WARNING■ Never adjust the steering wheel when the vehicle is moving only when
the vehicle is stationary!■
The safety lever must always be locked after adjusting so that the steer-
ing wheel cannot accidentally change position – risk of accident!
Correct seating position of the passenger
Read and observe
on page 13 first.
For passenger safety and to reduce the risk of injury in an accident, the follow-
ing instructions must be observed.
Position the front passenger seat back as far as possible. The front pas-
senger must maintain a distance of at least 25 cm to the dash panel so
that the airbag offers the greatest possible safety if it is deployed.
Adjust the headrests so that the top edge of the headrest is at the same
level as the upper part of your head » Fig. 2 on page 13 -
C
(not for seats
with integrated headrests).
Correctly fasten the seat belt » page 15, Using seat belts .
WARNING■
Ensure a distance of at least 25 cm to the dashboard, otherwise the air-
bag system will not be able to protect you properly - risk of death!■
Always keep your feet in the footwell when the car is being driven – nev-
er place your feet on the instrument panel, out of the window or on the
surface of the seats! You will be exposed to increased risk of injury if it be-
comes necessary to apply the brake or in the event of an accident. If an air-
bag is deployed, you could suffer fatal injuries by adopting an incorrect
seated position!
Correct seating position for the passengers in the rear seats
Read and observe
on page 13 first.
For passenger safety on the rear seats and to reduce the risk of injury in the
event of an accident, the following information must be observed.
Adjust the headrests so that the top edge of the headrest is at the same
level as the upper part of the head » Fig. 2 on page 13 -
C
.
Correctly fasten the seat belt » page 15, Using seat belts .
14Safety
Page 20 of 336
Airbag system
Description of the airbag system
Introduction
This chapter contains information on the following subjects:
System description
18
Airbag deployment
19
Safety instructions
19
As a supplement to the seat belts, the airbag system provides additional pas-
senger protection in the event of severe frontal and side collisions.
The best possible protective effect of the airbag can only be achieved if the
seat belts are applied properly. The airbag is not a substitute for the seat
belts .
The functional status of the airbag system is indicated by the warning light
in the instrument cluster » page 37.
System description
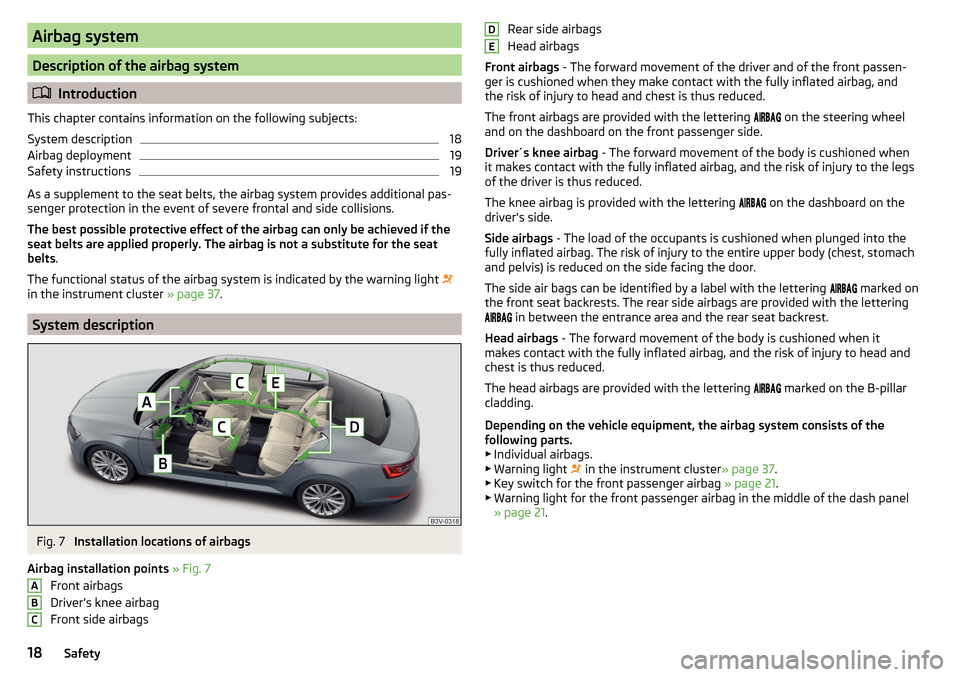
Fig. 7
Installation locations of airbags
Airbag installation points » Fig. 7
Front airbags
Driver’s knee airbag
Front side airbags
ABCRear side airbags
Head airbags
Front airbags - The forward movement of the driver and of the front passen-
ger is cushioned when they make contact with the fully inflated airbag, and
the risk of injury to head and chest is thus reduced.
The front airbags are provided with the lettering
on the steering wheel
and on the dashboard on the front passenger side.
Driver´s knee airbag - The forward movement of the body is cushioned when
it makes contact with the fully inflated airbag, and the risk of injury to the legs
of the driver is thus reduced.
The knee airbag is provided with the lettering on the dashboard on the
driver's side.
Side airbags - The load of the occupants is cushioned when plunged into the
fully inflated airbag. The risk of injury to the entire upper body (chest, stomach
and pelvis) is reduced on the side facing the door.
The side air bags can be identified by a label with the lettering marked on
the front seat backrests. The rear side airbags are provided with the lettering
in between the entrance area and the rear seat backrest.
Head airbags - The forward movement of the body is cushioned when it
makes contact with the fully inflated airbag, and the risk of injury to head and
chest is thus reduced.
The head airbags are provided with the lettering marked on the B-pillar
cladding.
Depending on the vehicle equipment, the airbag system consists of the
following parts. ▶ Individual airbags.
▶ Warning light in the instrument cluster
» page 37.
▶ Key switch for the front passenger airbag » page 21.
▶ Warning light for the front passenger airbag in the middle of the dash panel
» page 21 .DE18Safety
Page 21 of 336
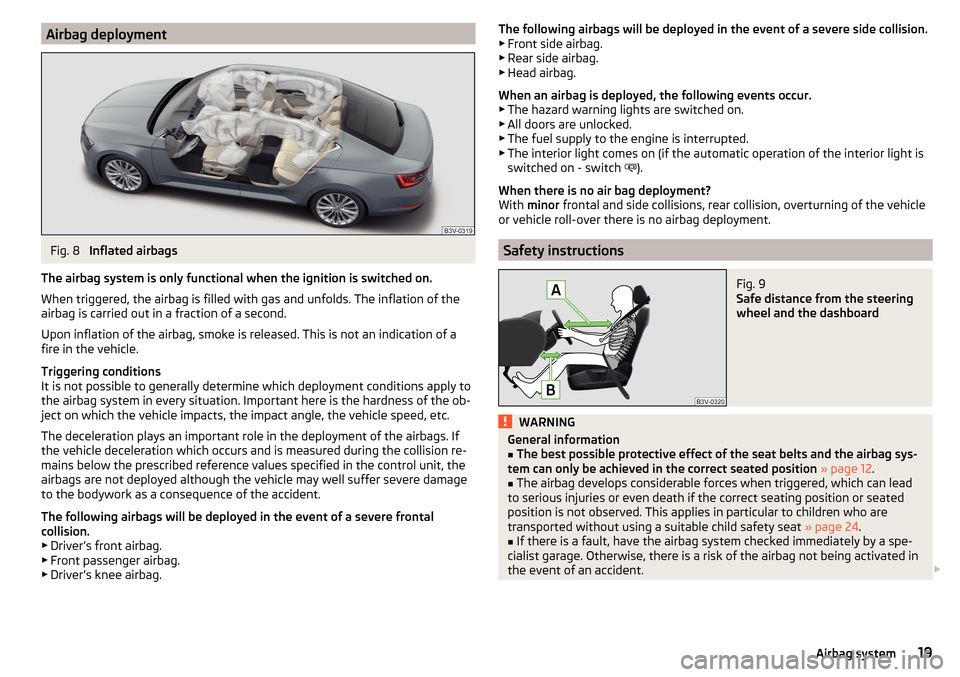
Airbag deploymentFig. 8
Inflated airbags
The airbag system is only functional when the ignition is switched on.
When triggered, the airbag is filled with gas and unfolds. The inflation of the
airbag is carried out in a fraction of a second.
Upon inflation of the airbag, smoke is released. This is not an indication of a fire in the vehicle.
Triggering conditions
It is not possible to generally determine which deployment conditions apply to
the airbag system in every situation. Important here is the hardness of the ob-
ject on which the vehicle impacts, the impact angle, the vehicle speed, etc.
The deceleration plays an important role in the deployment of the airbags. If
the vehicle deceleration which occurs and is measured during the collision re-
mains below the prescribed reference values specified in the control unit, the
airbags are not deployed although the vehicle may well suffer severe damage
to the bodywork as a consequence of the accident.
The following airbags will be deployed in the event of a severe frontal
collision.
▶ Driver’s front airbag.
▶ Front passenger airbag.
▶ Driver’s knee airbag.
The following airbags will be deployed in the event of a severe side collision.
▶ Front side airbag.
▶ Rear side airbag.
▶ Head airbag.
When an airbag is deployed, the following events occur. ▶ The hazard warning lights are switched on.
▶ All doors are unlocked.
▶ The fuel supply to the engine is interrupted.
▶ The interior light comes on (if the automatic operation of the interior light is
switched on - switch
).
When there is no air bag deployment?
With minor frontal and side collisions, rear collision, overturning of the vehicle
or vehicle roll-over there is no airbag deployment.
Safety instructions
Fig. 9
Safe distance from the steering
wheel and the dashboard
WARNINGGeneral information■The best possible protective effect of the seat belts and the airbag sys-
tem can only be achieved in the correct seated position » page 12 .■
The airbag develops considerable forces when triggered, which can lead
to serious injuries or even death if the correct seating position or seated
position is not observed. This applies in particular to children who are
transported without using a suitable child safety seat » page 24.
■
If there is a fault, have the airbag system checked immediately by a spe-
cialist garage. Otherwise, there is a risk of the airbag not being activated in
the event of an accident.
19Airbag system
Page 22 of 336
WARNING (Continued)■The airbag system must be replaced if it has been deployed.■In the area of the front airbag and the knee airbag, the surface of the
steering wheel and the dashboard should be cleaned using only a dry cloth
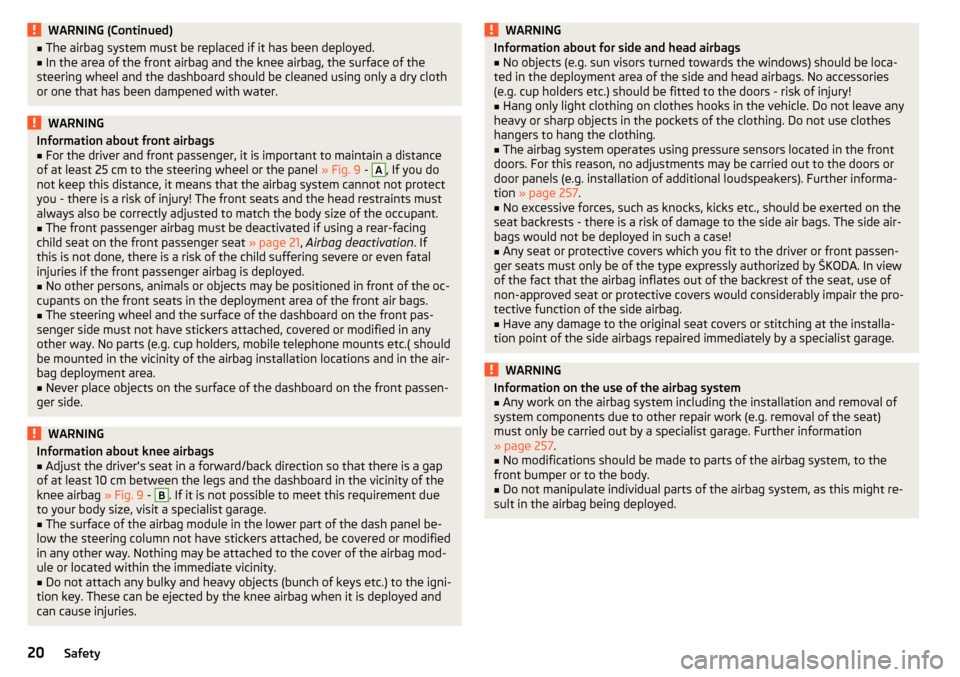
or one that has been dampened with water.WARNINGInformation about front airbags■For the driver and front passenger, it is important to maintain a distance
of at least 25 cm to the steering wheel or the panel » Fig. 9 - A
, If you do
not keep this distance, it means that the airbag system cannot not protect
you - there is a risk of injury! The front seats and the head restraints must
always also be correctly adjusted to match the body size of the occupant.
■
The front passenger airbag must be deactivated if using a rear-facing
child seat on the front passenger seat » page 21, Airbag deactivation . If
this is not done, there is a risk of the child suffering severe or even fatal
injuries if the front passenger airbag is deployed.
■
No other persons, animals or objects may be positioned in front of the oc-
cupants on the front seats in the deployment area of the front air bags.
■
The steering wheel and the surface of the dashboard on the front pas-
senger side must not have stickers attached, covered or modified in any
other way. No parts (e.g. cup holders, mobile telephone mounts etc.( should
be mounted in the vicinity of the airbag installation locations and in the air-
bag deployment area.
■
Never place objects on the surface of the dashboard on the front passen-
ger side.
WARNINGInformation about knee airbags■Adjust the driver's seat in a forward/back direction so that there is a gap
of at least 10 cm between the legs and the dashboard in the vicinity of the
knee airbag » Fig. 9 - B
. If it is not possible to meet this requirement due
to your body size, visit a specialist garage.
■
The surface of the airbag module in the lower part of the dash panel be-
low the steering column not have stickers attached, be covered or modified
in any other way. Nothing may be attached to the cover of the airbag mod-
ule or located within the immediate vicinity.
■
Do not attach any bulky and heavy objects (bunch of keys etc.) to the igni-
tion key. These can be ejected by the knee airbag when it is deployed and
can cause injuries.
WARNINGInformation about for side and head airbags■No objects (e.g. sun visors turned towards the windows) should be loca-
ted in the deployment area of the side and head airbags. No accessories
(e.g. cup holders etc.) should be fitted to the doors - risk of injury!■
Hang only light clothing on clothes hooks in the vehicle. Do not leave any
heavy or sharp objects in the pockets of the clothing. Do not use clothes
hangers to hang the clothing.
■
The airbag system operates using pressure sensors located in the front
doors. For this reason, no adjustments may be carried out to the doors or
door panels (e.g. installation of additional loudspeakers). Further informa-
tion » page 257 .
■
No excessive forces, such as knocks, kicks etc., should be exerted on the
seat backrests - there is a risk of damage to the side air bags. The side air-
bags would not be deployed in such a case!
■
Any seat or protective covers which you fit to the driver or front passen-
ger seats must only be of the type expressly authorized by ŠKODA. In view
of the fact that the airbag inflates out of the backrest of the seat, use of
non-approved seat or protective covers would considerably impair the pro-
tective function of the side airbag.
■
Have any damage to the original seat covers or stitching at the installa-
tion point of the side airbags repaired immediately by a specialist garage.
WARNINGInformation on the use of the airbag system■Any work on the airbag system including the installation and removal of
system components due to other repair work (e.g. removal of the seat)
must only be carried out by a specialist garage. Further information
» page 257 .■
No modifications should be made to parts of the airbag system, to the
front bumper or to the body.
■
Do not manipulate individual parts of the airbag system, as this might re-
sult in the airbag being deployed.
20Safety
Page 76 of 336

The ambient lighting can be adjusted in the Infotainment menu
→ →Ambient lighting
.
Infotainment Columbus, Amundsen, Bolero: Description of function surfaces
» Fig. 58
Enable / disable the background lighting
Activating of the brightness setting for all areas at the same time
Activating of the brightness setting for the dashboard area
Activating the brightness controls for the door area
Activating of the brightness setting for the footwell area only in white
Choice of colour options / brightness adjustment
Function surfaces for selecting lighting colour / brightness adjustment
To display B
.
C
.
D
and
E
tap on the function surface .
Note
The adjustment of the ambient lighting is stored (depending on the Infotain-
ment type) in the active user account personalisation » page 49.
Visibility
Introduction
This chapter contains information on the following subjects:
Windscreen and rear window heater
74
Sun visors
75
Sunshade
75
Sunshade in the rear doors
75WARNINGNo objects should be attached to the sun visors, which could limit the view
or endanger the vehicle occupants during sudden braking or should the ve-
hicle collide.ABCDEFGWindscreen and rear window heaterFig. 59
Buttons for the front and rear window heater: Climatronic / man-
ual air conditioning
Read and observe
on page 74 first.
The heating for quick defrosting and ventilation of the front /and rear window.
The heating only works when the engine is running.
Buttons for the heating (depending on vehicle equipment) » Fig. 59
Switch on/off the rear window heating
Switching the windscreen heater on/off
When the heating is switched on, a light illuminates inside or below the but-
ton.
The heating automatically switches off after ten minutes.
If the engine is switched off when the heating is on and turned back on again
within 10 minutes, the heating is continued.
Note
■ If the on-board voltage decreases, the heating switches off automatically
» page 273 , Automatic consumer shutdown - discharge protection of the vehi-
cle battery .■
If the lighting inside or below the button flashes, the heater will not work be-
cause of the low charge of the battery.
■
If the Climatronic recognises that the windshield could fog up, the windshield
heating is automatically switched on. This function can be activated / deactiva-
ted on the Climatronic control panel menu
→
.
74Using the system
Page 89 of 336

Heated steering wheel, along with the driver's seat heating›To activate / deactivate the heated steering wheel with the driver's seat
heating, press the button
on the Climatronic, then tap on the function
surface
→
Link seats and steering wheel heating
in the Infotainment screen.
›
To switch on / off the heated steering wheel, press the button for the driver
seat heating.
Setting the heat output of the steering wheel heater
›
Press the button
on the Climatronic, then tap the function surface
→
intensity
on the Infotainment screen.
›
Select one of the three heating levels (this remains stored even after switch-
ing off the engine).
The selected heat output of the heated steering wheel is shown on the Info- tainment screen
B
» Fig. 84 ,
Note
■
The heated steering wheel only works when the engine is running.■If the on-board voltage decreases, the heated steering wheel switches off
automatically.Practical features
Interior equipment
Introduction
This chapter contains information on the following subjects:
Parking ticket holder
88
Storage compartment on the driver's side
88
stowage compartments in the doors
88
Storage compartment in the front centre console
89
Phonebox
89
USB and AUX inputs
90
Cup holders
90
Waste container
91
Storage compartment under the front arm rest
91
Glasses compartment
92
Storage compartment on the front passenger side
92
Storage compartment under the front passenger seat
93
Storage compartments for umbrella
93
Clothes hook
93
Storage pockets on the backs of the front seats
94
Storage pockets at the inner sides of the front seats
94
Storage compartment in the rear centre console
94
Storage compartment in the rear armrest
94
Long cargo channel
95
Removable through-loading bag
95WARNING■ Do not place anything on the dashboard. These objects might slide or fall
down when driving and may distract you from concentrating on the traffic –
risk of accident!■
Make sure that while driving no objects can enter the driver's footwell -
cause an accident!
■
Do not carry any objects on the front passenger seat except objects de-
signed for this purpose (e.g. child seats) – risk of accident!
87Practical features
Page 98 of 336

CAUTIONNever fold and stow the through-loading bag when it is wet - risk of damaging
the through-loading bag.
Electrical sockets
Introduction
This chapter contains information on the following subjects:
12-volt socket in the front centre console
96
12 volt socket in the rear centre console
96
12 volt socket in luggage compartment
97
230-volt socket in the rear centre console
97WARNING■ Do not place anything on the dashboard. These objects might slide or fall
down when driving and may distract you from concentrating on the traffic –
risk of accident!■
Make sure that while driving no objects can enter the driver's footwell -
cause an accident!
■
Safely stow all devices during the journey to prevent them from being
thrown around the interior in the event of a sudden braking manoeuvre or
an accident – risk of death!
■
The devices may warm up during operation – risk of injury or fire!
■
Improper use of the power sockets and the electrical accessories can
cause fires, burns and other serious injuries.
■
The 12-Volt sockets also work if the ignition is switched off. When leaving
the vehicle, never leave persons who are not completely independent, such
as children, unattended in the vehicle.
CAUTION
When using the 12 volt power outlets the following notes are to be observed.■The sockets can only be used for the connection of approved electrical ac-
cessories with a total power consumption of up to 120 watts, otherwise the
electrical system of the vehicle may be damaged.■
Connecting appliances when the engine is not running will drain the battery
of the vehicle!
■
Before switching the ignition on / off or before starting the engine, switch
off the devices which are connected to the sockets - there is a risk of damage
to the equipment due to voltage fluctuations.
12-volt socket in the front centre consoleFig. 108
Cover of the 12 volt power outlet
Read and observe and on page 96 first.
›
To use , open the storage compartment, remove the cover of the socket
» Fig. 108 and plug the electrical appliance plug into the socket.
12 volt socket in the rear centre console
Fig. 109
Open the cover / 12 volt power outlet
96Using the system
Page 266 of 336
■Ensure that no part of the leather is soaked through during cleaning and
that no water gets into the seams.
■ Do not clean the roof panelling with a brush – risk of damage to the surface
of the panelling.
■ Do not use solvents, floor wax, shoe cream, stain remover or similar agents
on Alcantara ®
seat upholstery.
■ Some clothing fabrics (e.g. dark denim) do not have sufficient colour fast-
ness - this may leave evident marks on upholstery. This is not a defect in the
fabric.
■ Sharp objects on garments (e.g. zips, rivets, sharp- edged belts) can dam-
age the upholstery fabrics in the vehicle. Such damage cannot be subse-
quently recognised as a justified complaint.■
Plastic parts ■ Do not attach scents or air fresheners to the dashboard – there is a risk of
damage to the dashboard.
■
Windows
■ Do not attach any stickers to the filaments or glass antenna - there is risk
of damage.
■
Covers of electrically heated seats
■ Do not clean with water or other liquids - there is a risk of damage to the
heating system.
■ Do not dry by switching on the heating.
■
Seat belts
■ Allow to dry before rolling up the seat belts.
Note
During vehicle use, the leather and Alcantara ®
parts may show minor changes
(e.g. folds, discolouration).Inspecting and replenishing
Fuel
Introduction
Fig. 314
Stickers with prescribed fuel
This chapter contains information on the following subjects:
Petrol and diesel refuelling
265
Unleaded petrol
265
Diesel fuel
266
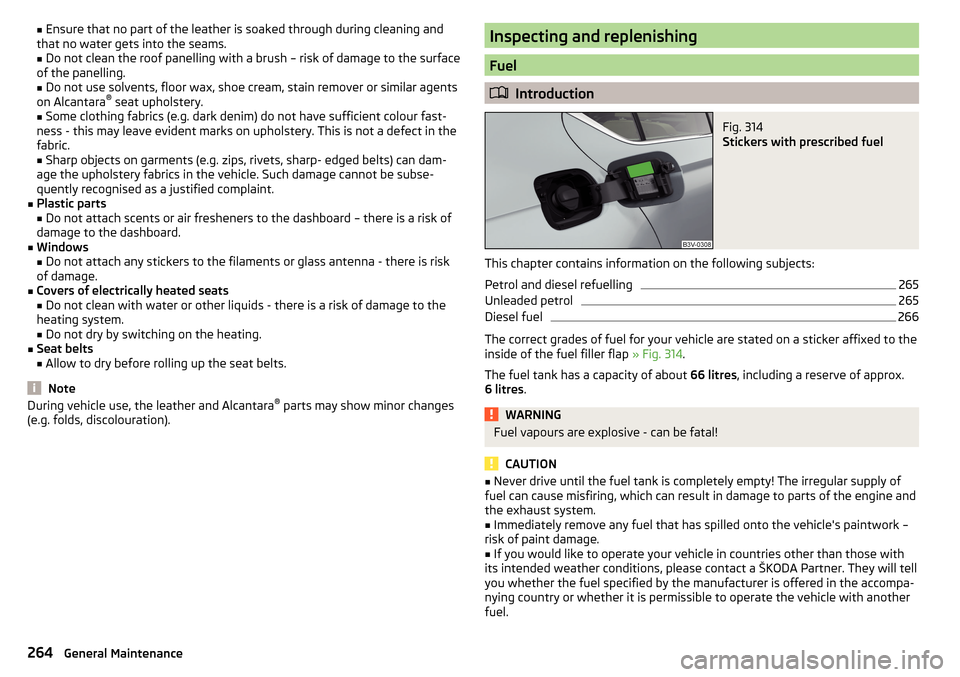
The correct grades of fuel for your vehicle are stated on a sticker affixed to the
inside of the fuel filler flap » Fig. 314.
The fuel tank has a capacity of about 66 litres, including a reserve of approx.
6 litres .
WARNINGFuel vapours are explosive - can be fatal!
CAUTION
■
Never drive until the fuel tank is completely empty! The irregular supply of
fuel can cause misfiring, which can result in damage to parts of the engine and
the exhaust system.■
Immediately remove any fuel that has spilled onto the vehicle's paintwork –
risk of paint damage.
■
If you would like to operate your vehicle in countries other than those with
its intended weather conditions, please contact a ŠKODA Partner. They will tell
you whether the fuel specified by the manufacturer is offered in the accompa-
nying country or whether it is permissible to operate the vehicle with another
fuel.
264General Maintenance
Page 271 of 336
CAUTIONRefill only operating fluids of the correct specification - danger of damaging
the vehicle!
Note
■ Fluids with the proper specifications can be purchased from the ŠKODA Origi-
nal Accessories or from the ŠKODA Genuine Parts ranges.■
We recommend you have the battery replaced by a specialist garage.
Open the bonnet and close
Fig. 318
Opening the bonnet
Read and observe
and on page 268 first.
Open flap
›
Make sure that the windscreen wiper arms are not folded away from the
windscreen - there is a risk of damage to the bonnet.
›
Open the driver's door and pull the unlocking lever below the dashboard in
the direction of arrow
1
» Fig. 318 .
›
Press the release lever in the direction of the arrow
2
and the bonnet is un-
locked.
›
Hold the bonnet and lift up until it is held open by the pressurised gas spring.
Close the bonnet lid
›
Pull the bonnet lid down far enough to overcome the force of the pressur-
ised gas spring.
›
From around 20 cm, lightly push the bonnet lid closed until it securely engag-
es.
If the bonnet lid is not properly closed, the display of the instrument cluster
will show this.
WARNING■ Never drive if the bonnet is open - could cause an accident!■Make sure that when closing the engine compartment lid, no body parts
are crushed - there is danger of injury!
Engine compartment overview
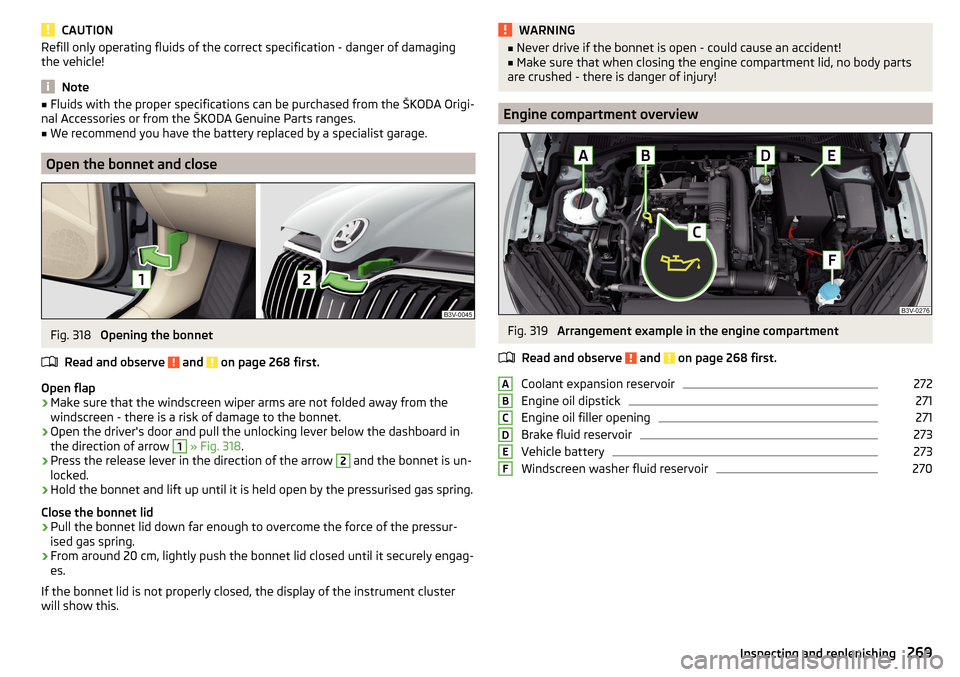
Fig. 319
Arrangement example in the engine compartment
Read and observe
and on page 268 first.
Coolant expansion reservoir
272
Engine oil dipstick
271
Engine oil filler opening
271
Brake fluid reservoir
273
Vehicle battery
273
Windscreen washer fluid reservoir
270ABCDEF269Inspecting and replenishing