run flat SKODA SUPERB 2016 3.G / (B8/3V) Owner's Manual
[x] Cancel search | Manufacturer: SKODA, Model Year: 2016, Model line: SUPERB, Model: SKODA SUPERB 2016 3.G / (B8/3V)Pages: 336, PDF Size: 53.89 MB
Page 211 of 336

When approaching maximum speed (launch control function)1)
The launch control function is available in mode S or Tiptronic.›
Disable the TCS » page 212, Braking and stabilisation systems .
›
START STOP deactivate » page 202, Manually disable / enable system .
›
Fully depress and hold the brake pedal with your left foot.
›
Fully depress the accelerator pedal with your right foot.
›
Release the brake pedal - the vehicle is running at maximum acceleration.
Driving in neutral (“coasting”)
When releasing the accelerator pedal, the vehicle moves without the braking
effect of the engine.
Operating conditions
▶ The selector lever is in the D/S position.
▶ Driving mode Eco or Individual (Drive - Eco) is selected » page 240, Select the
driving mode (Driving Mode Selection) .
▶ The vehicle is travelling at more than 20 km/h.
▶ No trailer or other accessory is connected to the trailer socket.
The gear is selected again automatically, when you depress the accelerator or
brake pedal or pull the left rocker switch
-
towards the steering wheel
» page 208 , Manual shifting of gears (Tiptronic) .
WARNINGRapid acceleration, particularly on slippery roads, can lead to loss of control
of the vehicle – risk of accident!
Running in the engine and economical driving
Introduction
This chapter contains information on the following subjects:
Running in the engine
209
Tips for economical driving
209
DriveGreen function
210
Radiator shutters
210Running in the engine
During the first 1,500 km, the driving manner determines the quality of the
running in process on a new engine.
During the first 1,000 km , the engine should not be charged with more than
3/4 of the maximum permitted engine revs and without the trailer.
In the area of 1,000 to 1,500 kilometres , the engine load can be increased up
to the maximum permitted engine speed.
Tips for economical driving
The fuel consumption depends on the driving style, road condition, weather
conditions and the like.
For an economical driving style, the following instructions must be observed. ▶ Avoid unnecessary acceleration and braking.
▶ Observe the recommended gear » page 44.
▶ Avoid full throttle and high speeds.
▶ Reduce idling.
▶ Avoid short distances.
▶ Ensure the correct tyre inflation pressure is maintained » page 277.
▶ Avoid unnecessary ballast.
▶ Remove the roof rack when it is not needed.
▶ Only switch on electrical consumers (e.g. seat heating) for as long as they are
needed. In the Infotainment menu
→
→
conv. Consumers,
, up to three
consumers who currently have the largest share of fuel consumption, can be
displayed.
▶ Before switching on, ventilate the cooling system briefly and do not use the
cooling system with open windows.
▶ Do not leave windows open at high speed.
1)
This function is only valid for some engines.
209Starting-off and Driving
Page 289 of 336

›For vehicles with
manual transmission , set the lever in the neutral position.›On vehicles with automatic transmission , place the selector lever in the P
position.›
Start the engine.
›
Plug the connector
6
into 12 volt socket » page 96.
›
Switch on the air compressor with the ON and OFF switch
9
.
›
Once a tyre inflation pressure of 2.0-2.5 bar is reached, turn off the air com-
pressor. Maximum run time of 6 minutes » .
›
If you cannot reach an air pressure of 2.0 - 2.5 bar, unscrew the tyre inflation
hose
7
from the tyre valve.
›
Drive the vehicle approx. 10 metres forwards or backwards to allow the seal-
ing agent to “distribute” in the tyre.
›
Firmly screw the tyre inflation hose
7
back onto the tyre valve and repeat
the inflation process.
›
Stick the corresponding sticker
1
on the dashboard in the driver's field of
view.
Once a tyre inflation pressure of 2.0 – 2.5 bar is achieved, continue the journey
at a maximum speed of 80 km/h (50 mph).
WARNING■ If the tire does not inflate at least. 2.0 bar, the damage is too great. The
sealing agent cannot be used to seal the tyre. Stop driving! Seek help
from a specialist garage.■
The tyre inflation hose and air compressor may get hot as the tyre is be-
ing inflated – risk of burning.
CAUTION
Switch off the air compressor after running 6 minutes at the most – risk of
overheating! Allow the air compressor to cool a few minutes before switching
it on again.
Information for driving with repaired tyres
Read and observe
on page 285 first.
The inflation pressure of the repaired tyre must be checked after driving for 10
minutes.
If the tyre inflation pressure is 1.3 bar or less
›
The tyre cannot be properly sealed with the breakdown kit.
Do not drive
the vehicle! Seek help from a specialist garage.
If the tyre inflation pressure is 1.3 bar or more›Set the tyre pressure back to the correct value » page 277.›
Continue driving carefully to the nearest specialist garage at a maximum
speed of 80 km/h (50 mph).
WARNINGA tyre filled with sealant has the same driving characteristics as a standard
tyre. The following guidelines must be observed.■
Do not drive faster than 80 km/h (50 mph).
■
Avoid accelerating at full throttle, sharp braking and fast cornering.
Jump-starting
Introduction
This chapter contains information on the following subjects:
Start using the battery from another vehicle
288WARNING■ The following instructions must be followed at all times when working on
the engine compartment » page 268.■
When handling the vehicle battery, the following warnings must be ob-
served » page 273 .
■
A discharged vehicle battery may already freeze at temperatures just be-
low 0 °C. If the battery is frozen, do not carry out a jump start with the bat-
tery of another vehicle – risk of explosion!
■
Never jump-start vehicle batteries with an acid level that is too low – risk
of explosion and caustic burns!
287Emergency equipment and self-help
Page 295 of 336

›On vehicles with the
KESSY system, hold the emergency key with the handle
facing downwards » Fig. 349 - into the lock cylinder and unlock / lock the
vehicle.›
Pull on the door handle and hold.
›
Replace the cover.
CAUTION
Make sure you do not damage the paint when performing an emergency lock-
ing/unlocking.
Locking the door without locking cylinders
Fig. 350
Emergency locking: Left/right rear door
›
Open the corresponding back door remove the trim
A
» Fig. 350 .
›
Insert the key into the slot and turn in the direction of the arrow (sprung po-
sition).
›
Replace the cover
A
.
After closing, the door is locked.
Unlock the boot lidFig. 351
Unlock flap: Variant 1 / Variant 2
The boot lid can be unlocked manually from inside.
›
Insert a screwdriver or similar tool into the recess or the opening in the
trim » Fig. 351 as far as the stop.
›
Unlock the lid by moving it in the direction of the arrow.
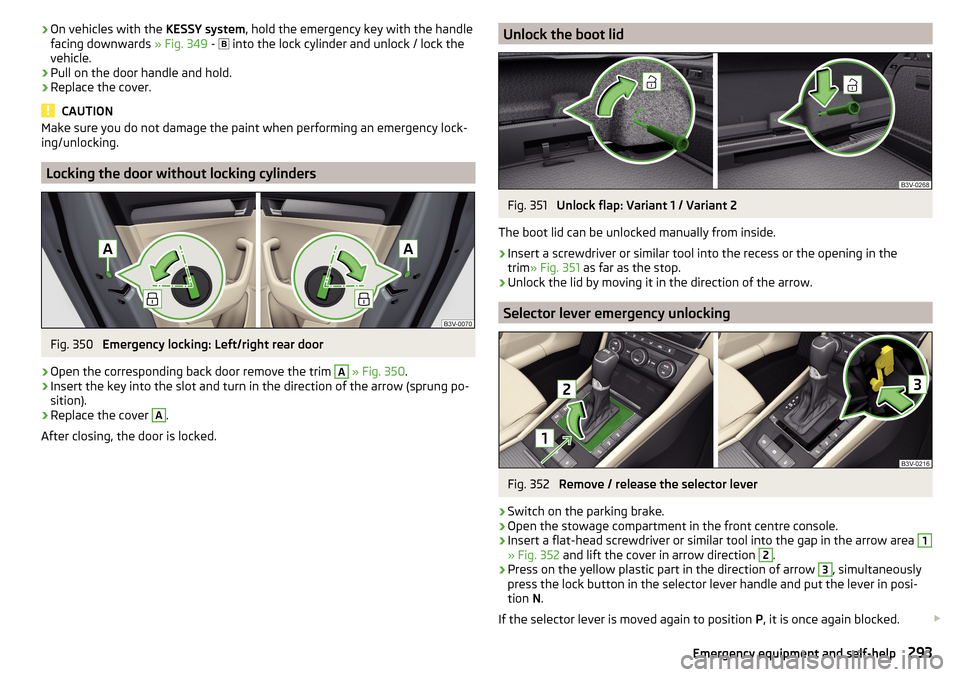
Selector lever emergency unlocking
Fig. 352
Remove / release the selector lever
›
Switch on the parking brake.
›
Open the stowage compartment in the front centre console.
›
Insert a flat-head screwdriver or similar tool into the gap in the arrow area
1
» Fig. 352 and lift the cover in arrow direction
2
.
›
Press on the yellow plastic part in the direction of arrow
3
, simultaneously
press the lock button in the selector lever handle and put the lever in posi-
tion N.
If the selector lever is moved again to position P, it is once again blocked.
293Emergency equipment and self-help