check engine SKODA YETI 2010 1.G / 5L Technical Change
[x] Cancel search | Manufacturer: SKODA, Model Year: 2010, Model line: YETI, Model: SKODA YETI 2010 1.G / 5LPages: 18, PDF Size: 0.88 MB
Page 3 of 18

“START - STOP”*
2
Description
Openings for attachment of DVD player holder.
Audio input
Input, power supply for DVD player
Only a DVD pre-installation comes factory-fitted . It is located in the seat backrests of
the front seats.
The DVD player holder and DVD player can be purchased from the range of the Škoda
original accessories. Please also refer to the operating instructions of the DVD player
holder and DVD player.
WARNING
•
If the rear seats are occu pied, the DVD player holder must not be set up
alone (without DVD player) - risk of injury!
•
Do not use the DVD player holder when the rear seat backrests or the rear
seat are folded forwarded or have been removed completely. Note
Please pay attention to the information in the fitting instructions for the DVD player
holder/DVD player.“START - STOP”*
The “START-STOP” system helps you to save fuel while at the same time reducing
harmful exhaust emissions and CO
2 emissions.
The function is automatically activated ea ch time the ignition is switched on.
In the start-stop mode, the engine automatica lly switches to the vehicle's idle phase,
e.g. when stopped at traffic lights.
Information regarding the current state of the “START-STOP” system is indicated in the
display of the instrument cluster.
Automatic engine shut down (stop phase)– Stop the vehicle (where necessary, apply the handbrake).
– Take the vehicle out of gear.
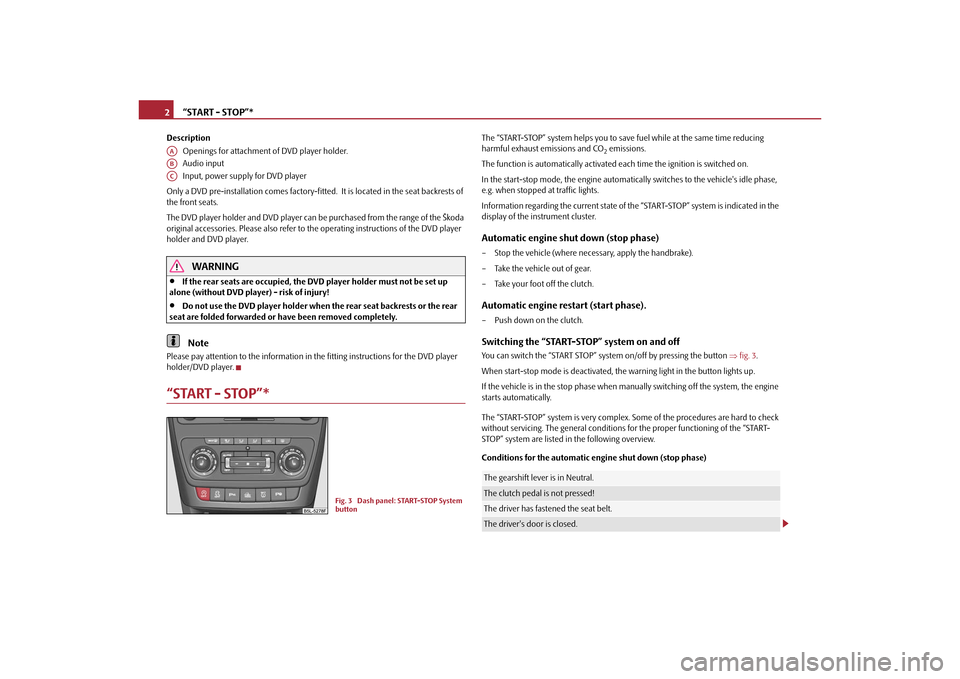
– Take your foot off the clutch.Automatic engine restart (start phase).– Push down on the clutch.Switching the “START-STOP” system on and offYou can switch the “START STOP” syst em on/off by pressing the button fig. 3 .
When start-stop mode is deactivated, th e warning light in the button lights up.
If the vehicle is in the stop phase when manually switching off the system, the engine
starts automatically.
The “START-STOP” system is very complex. Some of the procedures are hard to check
without servicing. The general conditions for the proper functioning of the “START-
STOP” system are listed in the following overview.
Conditions for the automatic en gine shut down (stop phase)
AAABAC
Fig. 3 Dash panel: START-STOP System
button
The gearshift lever is in Neutral.The clutch pedal is not pressed!The driver has fastened the seat belt.The driver's door is closed.
s35k.9.book Page 2 Thursday, September 16, 2010 10:24 AM
Page 9 of 18

Tyre repair kit*
8 Tyre inflator bottle with sealing agent
Replacement valve core
The valve remover has a slot at its lower end which fits into the valve core. This is
the only way in which you can remove and re-i nstall the valve core from the tyre valve.
The same also applies to the replacement valve core .
Preparing to use the tyre repair kitBefore using the tyre repair kit, carry out the following preparatory work:
– Park the vehicle as far away as possible from the traffic flow. Park on as flat and firm a surface as possible.
–Have all the occupants get out. While changing a wheel, the occupants of the
vehicle should not stand on the road (instead of behind a crash barrier).
– Switch off the engine and engage 1st gear or if your vehicle is fitted with an auto-
matic gearbox, position the selector lever into position P .
– Apply the handbrake firmly.
– Check whether you can carry out the repairs with the tyre repair kit page 6,
“General information”.
– If a trailer is coupled, uncouple it.
– Remove the tyre repair kit from the luggage compartment.
– Stick the sticker page 7, fig. 7 on the dash panel in view of the driver.
– Do not remove the foreign body, e.g. screw or nail, from the tyre.
– Unscrew the valve cap.
– Use the valve remover to remove the va lve core and place it down on a clean
surface.Seal and inflate tyresSealing tyres– Forcefully shake the tyre inflator bottle page 7, fig. 7 several times. – Firmly screw inflation hose onto the tyre inflator bottle in a clockwise direction
. The film on the cap is pierced automatically.
– Remove the plug from the inflation hose and plug the open end fully into the tyre valve.
– Hold the bottle with the floor facing upwards and fill the whole sealing agent in the tyre inflator bottle into the tyres.
– Remove the empty tyre inflator bottle from the valve.
– Screw the valve core back into the tyre valve using the valve remover .
Pumping up the tyres– Screw the tyre inflation hose page 7, fig. 7 of the air compressor firmly onto
the tyre valve.
– Check whether the air re lease valve is closed.
– Start the engine and run it in idle.
– Plug the cable connector into the 12 Vo lt socket in the vehicle, see Owner's
manual.
– Switch on the air compressor with the ON and OFF switch .
– Allow the air compressor to run until reac hing a pressure of 2.0 - 2.5 bars for a
maximum of 8 minutes !
– Switch off the air compressor with the ON and OFF switch.
– If you cannot reach an air pressure of 2.0 – 2.5 bar, unscrew the tyre inflation hose from the tyre valve.
– Drive the vehicle 10 metres forwards or backwards to allow the sealing agent to
distribute in the tyre.
– Screw the tyre inflation hose of the air compressor firmly back onto the tyre
valve and repeat the inflation procedure.
– If you cannot reach the required tyre inflation pressure here either, this means the tyre has sustained too much damage. You cannot seal with tyre with the break-
down kit .
– Switch off the air compressor with the ON and OFF switch.
– Remove the tyre inflation hose from the tyre valve.
A10A11
A1
A11
A2
A1
A10
A3
A10
A3
A10
A1
A5
A7
A9
A8
A5
A5
A5
s35k.9.book Page 8 Thursday, September 16, 2010 10:24 AM
Page 10 of 18

Tow-starting and towing vehicle9
If you reached a tyre inflation pressure of 2.0 – 2.5 bar, resume driving at a maximum
speed of 80 km/h (50 mph).
Check the tyre inflation pressure after driving 10 minutes page 9, “Check after
driving for 10 minutes”.
WARNING
•
During inflation, the tyre inflation hose and air compressor may get hot-
risk of injury!
•
Do not place hot tyre inflation hoses or hot air compressors on flammable
materials - risk of fire!
•
If you cannot inflate the tyre to at least 2.0 bar, this means the damage
sustained was too serious. The sealing agent cannot be used to seal the tyre. Do
not drive the vehicle. Get professional assistance.Caution
Switch off the air compressor after running 8 minutes at the latest - danger of over-
heating! Allow the air compressor to cool a few moments before switching it on
again.Check after driving for 10 minutesCheck the tyre inflation pressu re after driving 10 minutes.If the tyre inflation pressure is 1.3 bar or less:–Do not drive the vehicle! You cannot properly seal wi th tyre with the breakdown
kit.
– Obtain professional assistance.If the tyre inflation pressure is 1.3 bar or more:– Adjust the tyre inflation pressure to the corr ect value (see inside of fuel filler cap).
– Continue driving carefully to the nearest specialist garage at a maximum speed of 80 km/h (50 mph).
Tow-starting and towing vehicleGeneral
Caution
Do not push or two the vehicle to start the engine - likely engine damage! In vehicles
with catalytic converters, fuel may get into the catalytic converter where it may ignite.
This results in the catalytic converter overheating and being destroyed. To help start
the engine, you can use a battery from another vehicle, see Owner's manual.Electric fusesFuse assignment in engine compartmentFuse assignment in the dash panelNo.
Power consumer
Amperes
F11
Control unit for auxiliary heating
30
No.
Power consumer
Amperes
36
DVD
5
s35k.9.book Page 9 Thursday, September 16, 2010 10:24 AM