start stop button SKODA YETI 2012 1.G / 5L User Guide
[x] Cancel search | Manufacturer: SKODA, Model Year: 2012, Model line: YETI, Model: SKODA YETI 2012 1.G / 5LPages: 225, PDF Size: 5.47 MB
Page 112 of 225

If the selector lever position
N is accidentally selected while driving, it is first nec-
essary to release pressure on the accelerator pedal and wait for the idling speed
of the engine to be reached before the selector lever can be engaged in the drive
position. ÐStarting-off and driving
First read and observe the introductory information and safety warn-
ings on page 109.
Starting off
›
Firmly depress and hold the brake pedal.
› Press the Shiftlock button (button in the selector lever handle), move the selec-
tor lever into the desired position » page 110 and then release the Shiftlock
button.
› Release the brake pedal and accelerate.
Stop
› The selector lever position
N does not have to be selected when stopping for a
short time, such as at a cross roads. It is sufficient to hold the vehicle stationary
using the foot brake. The engine can, however, be allowed just to idle.
Parking
› Depress the brake pedal.
› Firmly apply the handbrake.
› Press and Shiftlock button in the selector lever, move the selector lever to
P
and then release the Shiftlock button. Ð
ä Selector lever positions
Fig. 107
Selector lever/information display: Selector lever positions
First read and observe the introductory information and safety warn-
ings on page 109.
The current selector lever position is indicated in the information display of the
instrument cluster
1
» Fig. 107.
P
- Parklock
The driven wheels are locked mechanically in this position.
The Parklock must only be engaged when the vehicle is stationary.
If you wish to move the selector lever into/out of this position, the Shiftlock but-
ton in the selector lever handle and the brake pedal must be actuated at the
same time.
If the battery is used, the selector lever cannot be moved out of the position P. R
- Reverse gear
Reverse gear must only be engaged when the vehicle is stationary and the en-
gine is idling.
The brake pedal must be depressed and at the same time the Shiftlock must be
pressed, if you wish to obtain the selector lever positions R, P or N.
When the ignition is switched on and the selector lever is in position R, the re-
verse lights will come on. N
- Neutral
The transmission is in Neutral in this position. £
ä
110 Using the system
Page 125 of 225

›
Use the device that is to be connected to search for available Bluetooth ®
devi-
ces.
› Select the hands-free system (as standard “SKODA_BT”) from the list of found
devices.
› Enter the password on the device being connected and follow any instructions
given on this device or in the information display.
› Enter the desired Internet address in the Internet browser. The operating sys-
tem requests the entry of the telephone number for the internet access (de-
pending on the operator, usually
“*99#”). ÐVoice control
Dialogue
The period of time during which the system is ready to receive voice commands
and to carry them out is called a dialogue. The system gives audible feedback and
guides you if necessary through the relevant functions.
Optimum understanding of the voice commands depends on several factors.
› Speak with a normal tone of voice without intonation and excessive pauses.
› Avoid a bad pronunciation.
› Close the doors, windows and sliding roof, to reduce or stop disturbing exterior
noise.
› It is recommended to speak louder at higher speeds, so that the tone of your
voice is louder than the increased surrounding noise.
› During the dialogue, limit additional noise in the vehicle, e.g. passengers talking
at the same time.
› Do not speak, if the system makes an announcement.
The microphone for voice control is inserted in the moulded headliner and direc-
ted to the driver and front passenger. Therefore the driver and the front passen-
ger can operate the equipment.
Entering a phone number
The telephone number can be entered as a continuous series of individually spo-
ken digits (the whole number at once) or in the form of digital blocks (separated
by short pauses). After each order of digits (separation through brief voice pause)
all of the digits detected up to now are repeated by the system. The digits 0 - 9
, symbols +, , # are permitted. The system detects no continuous
digit combinations such as twenty-three, but only individually spoken digits (two,
three).
Activating voice control - GSM
II
› by briefly pressing the button 1
» Fig. 110 on page 115 on the multifunction
steering wheel,
› by briefly pressing the button
on the adapter
1)
» Fig. 112 on page 118
.
Deactivating voice control - GSM II
If the system is currently playing a message, the message that is currently being
played will have to be stopped:
› by briefly pressing the button
on the adapter
1)
» Fig. 112 on page 118;
› by briefly pressing the button 1
on the multifunction steering wheel.
If the system expects a voice command, you can end the dialogue yourself:
› with the
CANCEL voice command;
› by pressing the button
on the adapter
1)
» Fig. 112 on page 118;
› by briefly pressing the button 1
on the multifunction steering wheel.
Activating voice control - GSM
III
The dialogue can be started at any time by pressing the button 1
» Fig. 110 on
page 115 on the multifunction steering wheel 1)
.
Deactivating voice control - GSM
III
If the system is currently playing a message, the message that is currently being
played must be terminated by pressing the button 1
» Fig. 110
on page
115 on the
multi-function steering wheel.
If the system expects a voice command, you can end the dialogue yourself:
› with the
CANCEL voice command;
› by briefly pressing the button 1
» Fig. 110 on page 115 on the multifunction
steering wheel. Note
■ The dialogue of an incoming call is immediately interrupted.
■ The voice control is only possible in vehicles fitted with a multifunction steering
wheel with telephone control or a phone mount and adapter.
■ On vehicles which are factory-fitted with the Columbus navigation system, it is
only possible to operate the voice control for the telephone via this device » op-
erating instructions for the Columbus navigation system .Ð1)
Not valid for vehicles with the Columbus navigation system.
123
Communication
Page 188 of 225

Tyre control display
Fig. 153
Button for setting the tyre infla-
tion pressure control value
First read and observe the introductory information and safety warn-
ings on page 181.
The tyre control display compares the speed and thus the rolling circumference of
the individual wheels with the help of the ABS sensors. If the rolling circumfer-
ence of a wheel is changed, the indicator light
in the instrument clus-
ter » page 24, Tyre control display and an audible signal sounds.
The rolling circumference of the tyre can change if: › the tyre inflation pressure is too low;
› the structure of the tyre is damaged;
› the vehicle is loaded on one side;
› the wheels of an axle are loaded heavily (e.g. when towing a trailer or when
driving uphill or downhill);
› snow chains are mounted;
› the temporary spare wheel is mounted;
› one wheel per axle was changed.
Basic setting of the system
After changing the tyre inflation pressure, after changing one or several wheels,
the position of a wheel on the vehicle (e.g. exchanging the wheels between the
axles) or when the indicator light lights up while driving, a basic setting of the
system must be carried out as follows:
› Inflate all of the tyres to the specified inflation pressure
» page 182, Service life
of tyres.
› Switch on the ignition.
ä
›
Press and hold the button
» Fig. 153 for longer than 2
seconds. While
pressing the button, the indicator light illuminates. At the same time the sys-
tem memory is erased and the new calibration is started, which is confirmed
with an audible signal and then the indicator light goes out.
› If the indicator light
does not go out after the basic setting, this indicates a
system fault. Seek help from a ŠKODA specialist garage.
The indicator light is lit
If the tyre inflation pressure of at least one wheel is insufficiently inflated in com-
parison to the stored basic value, the indicator light » lights up.
The indicator light flashes
If the indicator light flashes, there is a system fault. Seek help from a
ŠKODA spe-
cialist garage to correct the fault. WARNING
■ When the indicator light illuminates, immediately reduce the speed and
avoid sudden steering and brake manoeuvres. Stop the vehicle as soon as
possible and inspect the tyres and their inflation pressure.
■ Under certain circumstances (e.g. sporty style of driving, wintry or unpaved
roads) the indicator light can be delayed or does not light up at all.
■ The tyre control display does not absolve the driver of the responsibility to
ensure the correct tyre inflation pressure. For this reason, the tyre inflation
pressure must be checked regularly. Note
■ The tyre control display does therefore not replace the regular tyre inflation
pressure control, as the system cannot detect an even loss of pressure. ■ The tyre control display cannot provide a warning in the event of very rapid tyre
inflation pressure loss, e.g. in the case of sudden tyre damage. In this case care-
fully bring the vehicle to a standstill without sudden steering movements or
sharp braking.
■ To ensure a proper functioning of the tyre control display, it is necessary to re-
peat the basic setting every 10 000 km or once a year. Ð
186 General Maintenance
Page 204 of 225

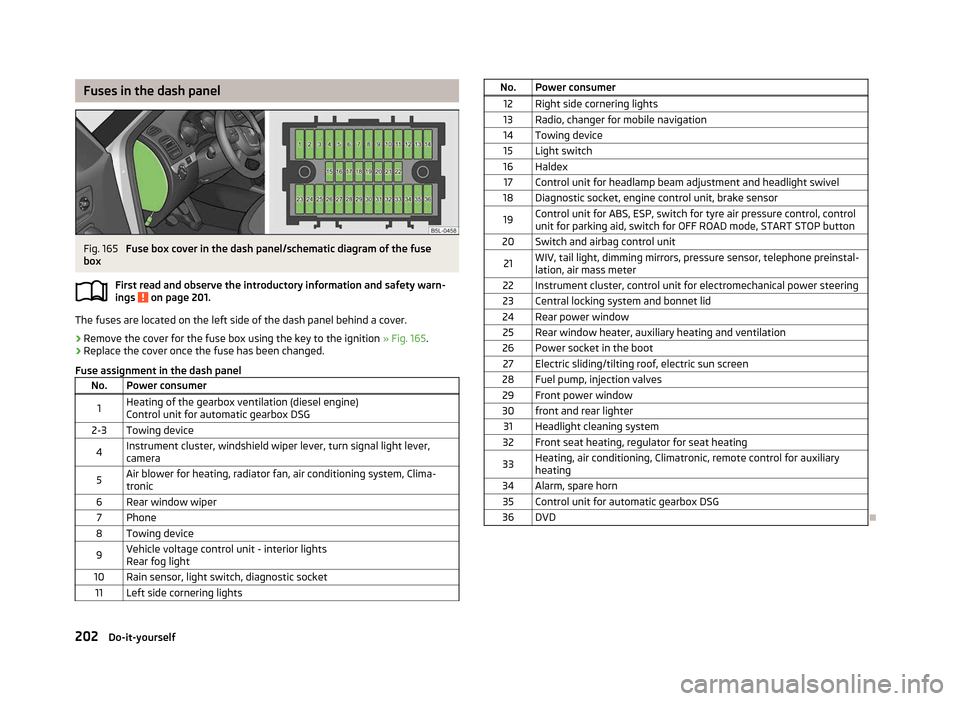
Fuses in the dash panel
Fig. 165
Fuse box cover in the dash panel/schematic diagram of the fuse
box
First read and observe the introductory information and safety warn-
ings on page 201.
The fuses are located on the left side of the dash panel behind a cover.
›
Remove the cover for the fuse box using the key to the ignition
» Fig. 165.
› Replace the cover once the fuse has been changed.
Fuse assignment in the dash panel No. Power consumer
1 Heating of the gearbox ventilation (diesel engine)
Control unit for automatic gearbox DSG
2-3 Towing device
4 Instrument cluster, windshield wiper lever, turn signal light lever,
camera
5 Air blower for heating, radiator fan, air conditioning system, Clima-
tronic
6 Rear window wiper 7 Phone
8 Towing device
9 Vehicle voltage control unit - interior lights
Rear fog light
10 Rain sensor, light switch, diagnostic socket 11 Left side cornering lights ä
No. Power consumer
12 Right side cornering lights
13 Radio, changer for mobile navigation
14 Towing device 15 Light switch
16 Haldex 17 Control unit for headlamp beam adjustment and headlight swivel
18 Diagnostic socket, engine control unit, brake sensor
19 Control unit for ABS, ESP, switch for tyre air pressure control, control
unit for parking aid, switch for
OFF ROAD mode, START STOP button
20 Switch and airbag control unit
21 WIV, tail light, dimming mirrors, pressure sensor, telephone preinstal-
lation, air mass meter
22 Instrument cluster, control unit for electromechanical power steering
23 Central locking system and bonnet lid
24 Rear power window 25 Rear window heater, auxiliary heating and ventilation
26 Power socket in the boot 27 Electric sliding/tilting roof, electric sun screen
28 Fuel pump, injection valves 29 Front power window
30 front and rear lighter 31 Headlight cleaning system
32 Front seat heating, regulator for seat heating
33 Heating, air conditioning, Climatronic, remote control for auxiliary
heating
34 Alarm, spare horn 35 Control unit for automatic gearbox DSG
36 DVD Ð
202 Do-it-yourself
Page 217 of 225

Index
A
Ability to climb see Slope angle 153
ABS Function 97
Warning light 22
Accessories 189
Active driver-steering recommendation (DSR) 96
Adjusting Exterior mirror 53
Adjusting seats 129
Adjustment Seat 56
Aerial 161
see Radio reception 163
Airbag 137
Deployment 137
Front airbag 138
Head airbag 141
Knee airbag 139
Side airbag 140
Airbag system 137
Air conditioning system Air outlet vents 81
Climatronic 86
Manual air conditioning system 83
Alarm 31
Anti-theft alarm system 31
Antilock brake system 97
Armrest 75
Ashtray 70
Assistance systems OFF ROAD 98
Assist systems ABS 22, 97
Cruise control systems (CCS) 104EDL 98
ESC 22, 96
Park assist 101
Parking aid 100
START/STOP 106
TCS 22, 97
Auto Check Control 17
Automatic driving lamp control 40
Automatic gearbox 109
Dynamic shift programme 112
Emergency programme 112
Information for driving 109
Kickdown 112
Manual shifting of gears 111
Parking 110
Selector lever-emergency unlocking 113
Selector lever lock 111
Selector lever positions 110
Starting off 110
Stopping 110
Tiptronic 111
Automatic load deactivation 180
Auxiliary heating (auxiliary heating and ventila- tion) 88
Avoiding damage to your vehicle 150
B
Before setting off 128
Belts 132
Belt tensioners 135
Bonnet Closing 171
Opening 171
Boot Class
N1 vehicles 63
Cover 65
Emergency unlocking 34
Fastening elements 64
Fixing nets 65
Folding hooks 64Light 47
see Boot lid 33
Unlocking the boot lid 34
Variable loading floor 66
Boot lid 33
Automatic locking 33
Warning light 21
Brake assist 96
Brake booster 96
Brake fluid Checking 175
Brakes Brake assist systems 94
Handbrake 96
Indicator light 19
Running in 146
Braking Brake fluid 175
Breakdown kit 194
Bulbs Replacing 204
Button in the driver's door Electric power windows 34
C
Car computer see Multifunction display 12
Car jack 190
Carrier 68
Catalytic converter 146
CD changer 126
Central locking button 29
Central locking system 27
lock 29
unlock 28
Changes 189
Changing Engine oil 173
Wheel 191
215
Index
Page 218 of 225

Charging a vehicle battery 179
Checking Battery electrolyte level 178
Brake fluid 175
Coolant level 174
Engine oil 172
Oil level 172
Windscreen washer fluid 176
Children and safety 143
Child safety Side airbag 144
Child safety lock 27
Child seat Classification 144
ISOFIX 145
on the front passenger seat 143
Suitability 144
TOP TETHER 145
Chrome parts refer to Taking care of your vehicle 162
Cigarette lighter 71
Cleaning 160
Artificial leather 165
Headlight lenses 163
Material coverings 165
Materials 165
Natural leather 165
Plastic parts 162
Wheels 164
Clock 11
Clothes hooks 78
Cockpit 12-volt power socket 71
Ashtray 70
Cigarette lighter 71
General view 7
Light 46
Storage compartments 72
Compartments 72
Computer see Multifunction display 12Coolant
Checking 174
Replenishing 174
Coolant temperature gauge display 9
Correct seated position 129
Counter for distance driven 10
Cruise control system (CCS) 104
Cup holder front 69
rear 70
D
Daytime running lights 40
De-icing the windscreen and rear window 47
Deactivating an airbag 141
Deactivating an airbag 141
Delayed locking of the boot lid see Boot lid 33
Diesel refer to Fuel 169
Diesel fuel Operation in winter 169
Diesel particulate filter 23
Digital clock 11
Dipstick 172
Display Service interval 10
Distance driven 10
Door Child safety lock 27
Indicator light for an open door 20
Doors Emergency locking 32
Driving Abroad 150
Driving through water on the street 151
Emissions 208Fuel consumption 208
Maximum speed 211
Driving off-road after driving off-road 156
Before driving 153
Changing gear when driving off-road 154
Explanation of technical terms 152
Ground clearance 152
Hillside angle 155
OFF ROAD mode 98
Overhang angle 152
Stuck vehicle 155
DVD-preinstallation 127
E
Economical and environmentally friendly driving 147
EDL Operating principle 98
Electrical power windows Button in the driver's door 34
Electric power windows Central locking system 36
Electronic differential lock (EDL) 98
Electronic immobiliser 93
Emergency Automatic gearbox 112
Changing a wheel 191
Hazard warning light system 44
Jump-starting 197
locking of the doors 32
panormaic sliding roof 38
Selector lever-unlocking 113
Towing the vehicle 198
Tyre repair 194
Unlocking the boot lid 34
Emissions 208
Engine Running in 146
Starting and stopping the engine 92
216 Index