display SKODA YETI 2012 1.G / 5L Repair Manual
[x] Cancel search | Manufacturer: SKODA, Model Year: 2012, Model line: YETI, Model: SKODA YETI 2012 1.G / 5LPages: 225, PDF Size: 5.47 MB
Page 175 of 225
Changing engine oil
First read and observe the introductory information and safety warn-
ings on page 169.
The engine oil must be changed at the intervals stated in the Service schedule or
according to the service interval indicator
» page 10, Service Interval Display.CAUTION
Additives must not be added to the engine oil - risk of causing considerable dam-
age to parts of the engine! Damage, which results from such product, are exclu-
ded from the warranty. Note
If your skin has come into contact with oil, it must be washed thoroughly. ÐCoolant
First read and observe the introductory information and safety warn-
ings on page 169.
The cooling system is filled with a coolant in the factory.
The coolant consists of water with a concentration of coolant additive of 40 %.
This mixture provides antifreeze protection down to -25
°C and also protects the
cooling and heating system from corrosion. It also prevents the formation of scale
and significantly increases the boiling point of the coolant.
The concentration of coolant must therefore not be reduced by adding water dur-
ing the summer months or in countries with a warm climate. The concentration of
coolant additive in the coolant must be at least 40 %. 40 %.
If a higher concentration of antifreeze is required for climatic reasons, the amount
of coolant additive can only be increased up to 60 % (antifreeze protection down
to approx. -40 °C). The antifreeze protection tails off above that concentration.
Vehicles exported to countries with a cold climate are already factory-filled with a
coolant which offers antifreeze protection down to about -35 °C. In these coun-
tries the concentration of coolant additive should be at least 50 %.
When refilling, we only recommend you use the same antifreeze written on the
antifreeze expansion tank » Fig. 143 on page 174.
ä
ä
Coolant capacity
Petrol engines Capacities (in litres)
1.2 ltr./77 kW TSI 7.7
1.4 ltr./90 kW TSI 7.7
1.8 ltr./112 kW TSI 8.6
1.8 ltr./118 kW TSI 8.6 Diesel engines
Capacities (in litres)
1.6 ltr./77 kW TDI CR 8.4
2.0 ltr./81 kW TDI CR 8.4
2.0 ltr./103 kW TDI CR 8.4
2.0 ltr./125 kW TDI CR 8.4 CAUTION
■ Other coolant additives that do not comply with the correct specifications can
above all significantly reduce the anticorrosion effect.
■ Any faults resulting from corrosion may cause a loss of coolant and can conse-
quently result in major engine damage! Note
On vehicles that are fitted with an auxiliary heater (auxiliary heating and ventila-
tion), the coolant capacity is approx. 1 l larger. Ð
173
Inspecting and replenishing
Page 181 of 225
Charging a vehicle battery
First read and observe the introductory information and safety warn-
ings on page 176.
A properly charged vehicle battery is essential for reliably starting the engine.
› Switch off the ignition and all of the electrical components.
› Only for “quick-charging”: Disconnect both battery cables (first of all “negative”,
then “positive”).
› Attach the terminal clamps of the charger to the battery terminals (red =
“posi-
tive
”, black = “negative”).
› Only now plug the mains cable of the charger into the power socket and switch
on the device.
› When charging is completed: Switch off the charger and remove the mains ca-
ble from the power socket.
› Only then disconnect the charger's terminal clamps.
› Reconnect the cables to the battery, if necessary (first of all
“positive”, then
“negative
”).
It is not normally necessary to disconnect the cables of the battery if you re-
charge the vehicle battery using low amperages (as for example from a mini-
charger). Refer to the instructions of the charger manufacturer.
A charging current of 0.1 multiple of the total vehicle battery capacity (or lower)
must be used until full charging is achieved.
It is, however, necessary to disconnect both cables before charging the battery
with high amperages, so-called “ quick-charging”.
“Quick-charging” the vehicle battery is dangerous and requires a special charger
and specialist knowledge. We therefore recommend having the quick charging of
vehicle batteries undertaken by a ŠKODA specialist garage.
The vent plugs of the vehicle battery should not be opened for charging. CAUTION
On vehicles with the START/STOP system, the pole terminal of the charger must
not be connected directly to the negative terminal of the vehicle battery, but only
to the engine earth » page 198, Jump-starting in vehicles with the
START-STOP
system . Ð
ä Disconnecting and reconnecting the vehicle battery
First read and observe the introductory information and safety warn-
ings on page 176.
On disconnecting and reconnecting the vehicle battery the following functions
are initially deactivated or are no longer able to operate fault-free.
Operation Operating measure
Electrical power window (operational faults) » page 36
Panoramic sliding roof (operational faults) » page 38
Enter the radio/navigation system code num-
ber » User manual of the radio
or »
user manual of the navigation
system
Setting the clock » page 11
Data in the multifunction display are deleted. » page 12 Note
We recommend having the vehicle checked by a ŠKODA Service Partner to ensure
the full functionality of all electrical systems. Ð Replacing the vehicle battery
First read and observe the introductory information and safety warn-
ings on page 176.
When replacing a battery, the new vehicle battery must have the same capacity,
voltage, amperage and be the same size. Suitable types of vehicle batteries can
be purchased from a
ŠKODA Service Partner.
We recommend that the battery is replaced by a ŠKODA Service Partner, where
the new vehicle battery will be installed properly and the original battery will be
disposed of in accordance with national regulations. Ð
ä
ä
179
Inspecting and replenishing
Page 183 of 225
Wheels and Tyres
Tyres
ä
Introduction
This chapter contains information on the following subjects:
Service life of tyres 182
Handling wheels and tyres 183
New wheels and tyres 183
Unidirectional tyres 184
Spare wheel 184
Full wheel trim 185
Wheel bolts 185
Wheel trim caps 185
Tyre control display 186
Wheel bolts 187
Winter tyres 187
Snow chains 187
WARNING
■ During the first 500 km, new tyres do not offer optimum grip and appropri-
ate care should therefore be taken when driving - risk of accident!
■ Never drive with damaged tyres - risk of accident!
■ Only use those tyres or wheel rims which have been approved by ŠKODA for
your model of vehicle. Failure to observe this instruction will adversely affect
the road safety of your vehicle - risk of accident!
■ The maximum permissible speed for your tyres must not be exceeded under
any circumstances - risk of an accident resulting from tyre damage and loss of
control of the vehicle.
■ If the inflation pressure is too low, the tyre must perform a higher rolling re-
sistance. At higher speeds the tyre will warm up as a result of this. This can
result in tread separation and a tyre blowout. WARNING (Continued)
■ Do not, where possible, replace individual tyres but at least replace them on
both wheels of a given axle at the same time. Always fit the tyres with the
deeper tread depth to the front wheels.
■ Never use tyres if you do not know anything about the condition and age.
■ You must have your tyres replaced with new ones at the latest when the
wear indicators have been worn down.
■ Worn tyres do not provide the necessary adhesion to the road surface at
high speeds on wet roads. One could experience
“aquaplaning” (uncontrolled
movements of the vehicle - “swimming” on a wet road surface).
■ Immediately replace damaged wheel rims or tyres.
■ Do not use summer or winter tyres that are older than 6 years or 4 years re-
spectively.
■ The wheel bolts must be clean and must turn easily. However, they must
never be treated with grease or oil.
■ If the wheel bolts are tightened to a too low tightening torque, the rim can
come loose when the car is moving - risk of accident! A tightening torque
which is too high can damage the bolts and threads and this can result in per-
manent deformation of the contact surfaces on the rim.
■ In case of incorrect treatment of the wheel bolts, the wheel can loosen
when the car is moving - risk of accident!
■ Observe the national legal regulations relating to the use of tyres and snow
chains. CAUTION
■ If a spare wheel is used that is not identical to the fitted tyres, the following
must be observed » page 184, Spare wheel.
■ The prescribed tightening torque of the wheel bolts for steel and light alloy
wheels is 120 Nm.
■ Protect the tyres from contact with oil, grease and fuel.
■ Replace any lost valve caps immediately. For the sake of the environment
Tyres which are insufficiently inflated increase your fuel consumption. £
181
Wheels and Tyres
Page 186 of 225

Unidirectional tyres
First read and observe the introductory information and safety warn-
ings on page 181.
The direction of rotation of the tyres is marked by arrows on the wall of the tyre
.
The so specified running direction must absolutely be complied with. Only then
are the tyres able to provide the optimal properties in terms of grip, low noise,
wear-and-tear and aquaplaning.
If, in the event of a puncture, it is necessary to fit a spare wheel with a tyre with-
out a dedicated running direction or the opposite running direction, drive carefully
as the optimum characteristics of the tyre are no longer applicable in this situa-
tion. ÐSpare wheel
Fig. 150
Boot: Spare wheel
First read and observe the introductory information and safety warn-
ings on page 181.
The spare wheel is located in a well under the floor covering in the boot and is
fixed in place with a special bolt
» Fig. 150.
Before removing the spare wheel, the box containing the vehicle tool kit must be
removed.
It is important to check the inflation pressure in the spare wheel (preferably every
time the tyre air pressure is checked - see sticker on the fuel filler flap »
page 182)
to ensure it is always ready to use.
ä
ä
If the dimensions or design of the spare wheel differ from the tyres fitted to the
vehicle (e.g. winter tyres or low-profile tyres), it must only be used briefly in the
event of a puncture and if an appropriately cautious style of driving is adop-
ted » .
Replace it with a wheel having the appropriate mode and dimensions as soon as
possible
Temporary spare wheel
A warning label is displayed on the wheel rim of the spare wheel to indicate that
your vehicle is equipped with a temporary spare wheel.
Please observe the following when driving with a temporary spare wheel.
› The warning label must not be covered after installing the wheel.
› Do not drive faster than 80
km/h with the temporary spare wheel and pay par-
ticular attention while driving. Avoid accelerating at full throttle, sharp braking
and fast cornering.
› The inflation pressure for this spare wheel is identical to the maximum inflation
pressure of the standard tyres.
› Only use this temporary spare wheel to reach the nearest ŠKODA specialist ga-
rage as it is not intended for continuous use. WARNING
■ Never use the temporary spare wheel if it is damaged.
■ If the dimensions or design of the temporary spare wheel differ from the fit-
ted tyres, never drive faster than 80
km/h (or 50 mph). Avoid accelerating at
full throttle, sharp braking and fast cornering. CAUTION
Observe the instructions on the sticker on the temporary spare wheel. Note
The tyre pressure should be at the highest pressure specified for your vehicle at
all times. Ð
184 General Maintenance
Page 188 of 225

Tyre control display
Fig. 153
Button for setting the tyre infla-
tion pressure control value
First read and observe the introductory information and safety warn-
ings on page 181.
The tyre control display compares the speed and thus the rolling circumference of
the individual wheels with the help of the ABS sensors. If the rolling circumfer-
ence of a wheel is changed, the indicator light
in the instrument clus-
ter » page 24, Tyre control display and an audible signal sounds.
The rolling circumference of the tyre can change if: › the tyre inflation pressure is too low;
› the structure of the tyre is damaged;
› the vehicle is loaded on one side;
› the wheels of an axle are loaded heavily (e.g. when towing a trailer or when
driving uphill or downhill);
› snow chains are mounted;
› the temporary spare wheel is mounted;
› one wheel per axle was changed.
Basic setting of the system
After changing the tyre inflation pressure, after changing one or several wheels,
the position of a wheel on the vehicle (e.g. exchanging the wheels between the
axles) or when the indicator light lights up while driving, a basic setting of the
system must be carried out as follows:
› Inflate all of the tyres to the specified inflation pressure
» page 182, Service life
of tyres.
› Switch on the ignition.
ä
›
Press and hold the button
» Fig. 153 for longer than 2
seconds. While
pressing the button, the indicator light illuminates. At the same time the sys-
tem memory is erased and the new calibration is started, which is confirmed
with an audible signal and then the indicator light goes out.
› If the indicator light
does not go out after the basic setting, this indicates a
system fault. Seek help from a ŠKODA specialist garage.
The indicator light is lit
If the tyre inflation pressure of at least one wheel is insufficiently inflated in com-
parison to the stored basic value, the indicator light » lights up.
The indicator light flashes
If the indicator light flashes, there is a system fault. Seek help from a
ŠKODA spe-
cialist garage to correct the fault. WARNING
■ When the indicator light illuminates, immediately reduce the speed and
avoid sudden steering and brake manoeuvres. Stop the vehicle as soon as
possible and inspect the tyres and their inflation pressure.
■ Under certain circumstances (e.g. sporty style of driving, wintry or unpaved
roads) the indicator light can be delayed or does not light up at all.
■ The tyre control display does not absolve the driver of the responsibility to
ensure the correct tyre inflation pressure. For this reason, the tyre inflation
pressure must be checked regularly. Note
■ The tyre control display does therefore not replace the regular tyre inflation
pressure control, as the system cannot detect an even loss of pressure. ■ The tyre control display cannot provide a warning in the event of very rapid tyre
inflation pressure loss, e.g. in the case of sudden tyre damage. In this case care-
fully bring the vehicle to a standstill without sudden steering movements or
sharp braking.
■ To ensure a proper functioning of the tyre control display, it is necessary to re-
peat the basic setting every 10 000 km or once a year. Ð
186 General Maintenance
Page 205 of 225
Fuses in the engine compartment
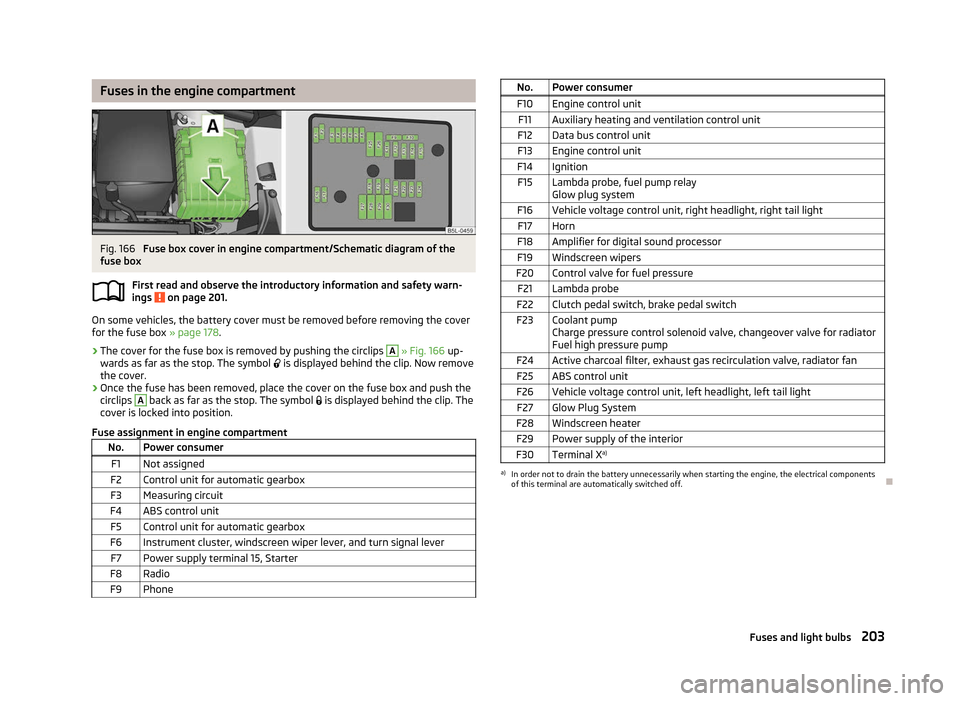
Fig. 166
Fuse box cover in engine compartment/Schematic diagram of the
fuse box
First read and observe the introductory information and safety warn-
ings on page 201.
On some vehicles, the battery cover must be removed before removing the cover
for the fuse box
» page 178.
› The cover for the fuse box is removed by pushing the circlips A
» Fig. 166
up-
wards as far as the stop. The symbol is displayed behind the clip. Now remove
the cover.
› Once the fuse has been removed, place the cover on the fuse box and push the
circlips A
back as far as the stop. The symbol
is displayed behind the clip. The
cover is locked into position.
Fuse assignment in engine compartment No. Power consumer
F1 Not assigned
F2 Control unit for automatic gearbox
F3 Measuring circuit
F4 ABS control unit F5 Control unit for automatic gearbox
F6 Instrument cluster, windscreen wiper lever, and turn signal lever F7 Power supply terminal 15, Starter
F8 Radio F9 Phone ä
No. Power consumer
F10 Engine control unit F11 Auxiliary heating and ventilation control unit
F12 Data bus control unit
F13 Engine control unit
F14 Ignition F15 Lambda probe, fuel pump relay Glow plug system
F16 Vehicle voltage control unit, right headlight, right tail light F17 Horn
F18 Amplifier for digital sound processor F19 Windscreen wipers
F20 Control valve for fuel pressure F21 Lambda probe
F22 Clutch pedal switch, brake pedal switch
F23 Coolant pump Charge pressure control solenoid valve, changeover valve for radiator
Fuel high pressure pump
F24 Active charcoal filter, exhaust gas recirculation valve, radiator fan F25 ABS control unit
F26 Vehicle voltage control unit, left headlight, left tail light F27 Glow Plug System
F28 Windscreen heater F29 Power supply of the interior
F30 Terminal X a) a)
In order not to drain the battery unnecessarily when starting the engine, the electrical components
of this terminal are automatically switched off. Ð
203
Fuses and light bulbs
Page 217 of 225
Index
A
Ability to climb see Slope angle 153
ABS Function 97
Warning light 22
Accessories 189
Active driver-steering recommendation (DSR) 96
Adjusting Exterior mirror 53
Adjusting seats 129
Adjustment Seat 56
Aerial 161
see Radio reception 163
Airbag 137
Deployment 137
Front airbag 138
Head airbag 141
Knee airbag 139
Side airbag 140
Airbag system 137
Air conditioning system Air outlet vents 81
Climatronic 86
Manual air conditioning system 83
Alarm 31
Anti-theft alarm system 31
Antilock brake system 97
Armrest 75
Ashtray 70
Assistance systems OFF ROAD 98
Assist systems ABS 22, 97
Cruise control systems (CCS) 104EDL 98
ESC 22, 96
Park assist 101
Parking aid 100
START/STOP 106
TCS 22, 97
Auto Check Control 17
Automatic driving lamp control 40
Automatic gearbox 109
Dynamic shift programme 112
Emergency programme 112
Information for driving 109
Kickdown 112
Manual shifting of gears 111
Parking 110
Selector lever-emergency unlocking 113
Selector lever lock 111
Selector lever positions 110
Starting off 110
Stopping 110
Tiptronic 111
Automatic load deactivation 180
Auxiliary heating (auxiliary heating and ventila- tion) 88
Avoiding damage to your vehicle 150
B
Before setting off 128
Belts 132
Belt tensioners 135
Bonnet Closing 171
Opening 171
Boot Class
N1 vehicles 63
Cover 65
Emergency unlocking 34
Fastening elements 64
Fixing nets 65
Folding hooks 64Light 47
see Boot lid 33
Unlocking the boot lid 34
Variable loading floor 66
Boot lid 33
Automatic locking 33
Warning light 21
Brake assist 96
Brake booster 96
Brake fluid Checking 175
Brakes Brake assist systems 94
Handbrake 96
Indicator light 19
Running in 146
Braking Brake fluid 175
Breakdown kit 194
Bulbs Replacing 204
Button in the driver's door Electric power windows 34
C
Car computer see Multifunction display 12
Car jack 190
Carrier 68
Catalytic converter 146
CD changer 126
Central locking button 29
Central locking system 27
lock 29
unlock 28
Changes 189
Changing Engine oil 173
Wheel 191
215
Index
Page 218 of 225
Charging a vehicle battery 179
Checking Battery electrolyte level 178
Brake fluid 175
Coolant level 174
Engine oil 172
Oil level 172
Windscreen washer fluid 176
Children and safety 143
Child safety Side airbag 144
Child safety lock 27
Child seat Classification 144
ISOFIX 145
on the front passenger seat 143
Suitability 144
TOP TETHER 145
Chrome parts refer to Taking care of your vehicle 162
Cigarette lighter 71
Cleaning 160
Artificial leather 165
Headlight lenses 163
Material coverings 165
Materials 165
Natural leather 165
Plastic parts 162
Wheels 164
Clock 11
Clothes hooks 78
Cockpit 12-volt power socket 71
Ashtray 70
Cigarette lighter 71
General view 7
Light 46
Storage compartments 72
Compartments 72
Computer see Multifunction display 12Coolant
Checking 174
Replenishing 174
Coolant temperature gauge display 9
Correct seated position 129
Counter for distance driven 10
Cruise control system (CCS) 104
Cup holder front 69
rear 70
D
Daytime running lights 40
De-icing the windscreen and rear window 47
Deactivating an airbag 141
Deactivating an airbag 141
Delayed locking of the boot lid see Boot lid 33
Diesel refer to Fuel 169
Diesel fuel Operation in winter 169
Diesel particulate filter 23
Digital clock 11
Dipstick 172
Display Service interval 10
Distance driven 10
Door Child safety lock 27
Indicator light for an open door 20
Doors Emergency locking 32
Driving Abroad 150
Driving through water on the street 151
Emissions 208Fuel consumption 208
Maximum speed 211
Driving off-road after driving off-road 156
Before driving 153
Changing gear when driving off-road 154
Explanation of technical terms 152
Ground clearance 152
Hillside angle 155
OFF ROAD mode 98
Overhang angle 152
Stuck vehicle 155
DVD-preinstallation 127
E
Economical and environmentally friendly driving 147
EDL Operating principle 98
Electrical power windows Button in the driver's door 34
Electric power windows Central locking system 36
Electronic differential lock (EDL) 98
Electronic immobiliser 93
Emergency Automatic gearbox 112
Changing a wheel 191
Hazard warning light system 44
Jump-starting 197
locking of the doors 32
panormaic sliding roof 38
Selector lever-unlocking 113
Towing the vehicle 198
Tyre repair 194
Unlocking the boot lid 34
Emissions 208
Engine Running in 146
Starting and stopping the engine 92
216 Index
Page 219 of 225
Engine compartment
Brake fluid 175
Coolant 173
Overview 171
Vehicle battery 176
Engine oil Capacity 210
Changing 173
Checking 172
Replenishing 172
Specification 210
Engine revolutions counter 9
Environment 147
Environmental compatibility 149
Environmentally friendly driving 147
ESC Function 96
Indicator light 22
F
Fire extinguisher 190
First-aid kit 190
Folding table 76
Footmats 100
Front airbag 138
Front seats 55
Fuel 167
Diesel 169
Fuel gauge 9
gauge 9
refer to Fuel 167
Refuelling 167
Unleaded petrol 168
Fuel consumption 147
Fuses Assignment 201
Replacing 201 G
Gear Recommended gear 11
General view Cockpit 7
Glow plug system Warning light 23
GSM 116, 119
H
Handbrake 96
Head airbag 141
Headlight cleaning system Headlight cleaning system 51
Headlights Driving abroad 150
Head restraint 59
Heating 82
Defrosting windows 82
Exterior mirror 53
Recirculated air mode 83
Seats 58
Windscreen and rear window 47
Horn 7
I
Ignition 94
Ignition lock 94
Immobiliser 93
Indicator lights 18
Information display see MAXI DOT 15
Instrument Cluster 8
See Instrument Cluster 8
Instrument lighting 43
Interior monitor 32
Internet connection 122ISOFIX 145
J
Jacking points Raise vehicle 193
Jump-starting 197
K
Knee airbag 139
L
Lever Main beam 45
Turn signal 45
Levers Windscreen wipers 49
Light Automatic driving lamp control 40
Cockpit 46
COMING HOME/LEAVING HOME function 41
Daytime running lights 40
Fog lights 42
Fog lights with the function CORNER 42
Hazard warning light system 44
Headlight beam adjustment 44
Headlight flasher 45
Low beam 40
Main beam 45
Parking light 40, 41
Rear fog light 43
Replacing bulbs 204
Tourist light 42
Turn signal 45
Lights Cornering lights 41
Indicator lights 18
switching lights on and off 40
Loads 208
217
Index
Page 220 of 225
Lock
Central locking system 29
Locking Emergency locking 32
Remote control 30
Locking and unlocking from the inside 29
M
MAXI DOT 15
Main menu 15
Settings 16
Maximum speed 211
Mirror Additional interior mirror 53
Automatic dimming interior mirror 52
Exterior mirror 53
Manual dimming interior mirror 52
Vanity 48
Mobile phone 114, 116, 119
Connecting to the hands-free system 117, 120
Multifunction display Functions 12
Memory 12
Operation 13
Multimedia 125
AUX-IN 126
MDI 126
N
Net partition 66
O
Off-road driving 151
Style of driving 154
OFF ROAD 98
Oil refer to Engine oil 172Onboard computer
see Multifunction display 12
Opening and closing the panoramic sliding roof 36
Opening and closing the sun screen 36
Operation in winter De-icing windows 163
Diesel fuel 169
Vehicle battery 178
Outside temperature 13
Overhang angle 153
Overview Engine compartment 171
Indicator lights 18
P
Paint see Paint damage 162
Paint damage 162
Panoramic sliding roof 36
Parking Park assist 101
Parking aid 100
Parking ticket holder 79
Passive Safety 128
Pedals 100
Periodic wiping 49
Petrol refer to Fuel 168
Polishing the paintwork refer to Taking care of your vehicle 162
Power steering 93
Power windows Button in the front passenger door 35
Button in the rear doors 35
Operational faults 36
Preservation refer to Taking care of your vehicle 162 R
Radiator fan 175
Radio reception Aerial 163
Functional fault 163
Raise vehicle 193
Rear mirror Automatic dimming interior mirror 52
Exterior mirror 53
Manual dimming interior mirror 52
Rear window - heating 47
Recirculated air mode Climatronic 87
Manual air conditioning system 85
Recommended gear 11
Refuelling 167
Fuel 167
Regulation Headlight beam 44
Remote control 30
Synchronisation process 31
Remote control key Replacing the battery 26
Replacement of parts 189
Replacing Bulbs 204
Fuses 201
Vehicle battery 179
Windscreen wiper blade 51
Replenishing Coolant 174
Engine oil 172
Windscreen washer fluid 176
Roof rack system Roof load 69
Running in Brake pads 146
Engine 146
218 Index