catalytic converter SKODA YETI 2012 1.G / 5L Owner's Manual
[x] Cancel search | Manufacturer: SKODA, Model Year: 2012, Model line: YETI, Model: SKODA YETI 2012 1.G / 5LPages: 225, PDF Size: 5.47 MB
Page 5 of 225
Table of Contents
Abbreviations
Using the system
Cockpit 7
Overview 6
Instruments and Indicator Lights 8
Instrument Cluster 8
Multifunction display (onboard computer) 12
MAXI DOT (information display) 15
Indicator lights 18
Unlocking and locking 26
Vehicle key 26
Child safety lock 27
Central locking system 27
Remote control 30
Anti-theft alarm system 31
Boot lid 33
Electric power windows 34
Panoramic sliding roof 36
Lights and visibility 39
Lights 39
Interior light 46
Visibility 47
Windscreen wipers and washers 48
Rear window 52
Seats and Stowage 55
Front seats 55
Head restraints 59
Rear seats 60
Boot 62
Variable loading floor in the boot 66Variable loading floor with spare wheel 68
Roof rack system 68
Cup holder 69
Ashtray 70
Cigarette lighter, 12-volt power socket 71
Storage compartments 72
Through-loading bag 78
Clothes hooks 78
Parking ticket holder 79
Heating and air conditioning system 80
Heating and air conditioning system 80
Air outlet vents 81
Heating 82
Air conditioning system (manual air conditioning
system) 83
Climatronic (automatic air conditioning
system) 86
Auxiliary heating (auxiliary heating and
ventilation) 88
Starting-off and Driving 92
Starting and stopping the engine 92
Brakes and brake assist systems 94
OFF ROAD mode 98
Shifting (manual gearbox) 100
Pedals 100
Parking aid 100
Park assist 101
Cruise control system (CCS) 104
START/STOP 106
Fatigue detection system (break
recommendation) 107
Automatic gearbox 109
Automatic gearbox 109
Communication 114
Mobile phones and two-way radio systems 114
Operating the phone on the multifunction
steering wheel 115Symbols in the information display 116
Phone Phonebook 116
Universal telephone preinstallation GSM II 116
Universal telephone preinstallation GSM IIl 119
Voice control 123
Multimedia 125
Safety
Passive Safety 128
General information 128
Correct seated position 129
Seat belts 132
Seat belts 132
Airbag system 137
Description of the airbag system 137
Front airbags 138
Driver’s knee airbag 139
Side airbags 140
Head airbags 141
Deactivating airbags 141
Transporting children safely 143
Child seat 143
Driving Tips
Driving and the Environment 146
The first 1 500 km 146
Catalytic converter 146
Economical and environmentally friendly
driving 147
Environmental compatibility 149
Driving abroad 150
Avoiding damage to your vehicle 150
3
Table of Contents
Page 12 of 225

CAUTION
Never drive until the fuel tank is completely empty! An irregular supply of fuel can
lead to irregular engine running. Unburnt fuel may get into the exhaust system
and damage the catalytic converter. Note
After filling up, it can occur that during dynamic driving (e.g. numerous curves,
braking, driving downhill and climbing a steep hill) the fuel gauge indicates ap-
prox. a fraction less. When stopping or during less dynamic driving, the fuel gauge
displays the correct fuel level again. This is not a fault. ÐCounter for distance driven
First read and observe the introductory information and safety warn-
ings on page 8.
The distance which you have driven with your vehicle is shown in kilometres (km).
In some countries the measuring unit (mph) is used.
Daily trip counter (trip)
The daily trip counter indicates the distance which you have driven since it was
last reset - in steps of 100 metres or 1/10 of a mile.
To reset the display of the daily trip counter, press button
7
» Fig. 2 on page 8
for longer.
Odometer
The odometer indicates the total distance in kilometres or miles which the vehicle
has been driven.
Fault display
If there is a fault in the instrument cluster Error will appear continuously in the
display. Ensure the fault is rectified as soon as possible by
ŠKODA a specialist ga-
rage. Note
For vehicles fitted with the information display, if the display of the second speed
is activated in mph or km/h, this driving speed is indicated instead of the counter
for the total distance driven. Ð
ä Service Interval Display
Fig. 3
Service Interval Display: Note
First read and observe the introductory information and safety warn-
ings on page 8.
The display can vary depending on the equipment.
Service Interval Display
Before the next service interval a key symbol
and the remaining kilometres are
indicated for 10 seconds after switching on the ignition » Fig. 3. At the same time,
the remaining days until the next service interval are displayed.
The following is displayed in the information display: Service in ... km or ... days.
The kilometre indicator or the days indicator reduces in steps of 100
km or, where
applicable, days until the service due date is reached.
As soon as the due date for the service is reached, a flashing key symbol and
the text Service appears in the display for 20 seconds after the ignition has been
switched on.
The following is displayed in the information display:
Service now!
Displaying the distance and days until the next service interval
You can use the button 3
to display the remaining distance and days until the
next service interval » Fig. 2 on page 8
.
A key symbol and the remaining distance appear for 10 seconds in the display.
At the same time, the remaining days until the next service interval are displayed.
On vehicles which are equipped with the information display, you can call up this
display in the menu Settings » page 16. £
ä
10 Using the system
Page 94 of 225
Starting-off and Driving
Starting and stopping the engine
ä
Introduction
This chapter contains information on the following subjects:
Adjusting the steering wheel position 93
Electromechanical power steering 93
Electronic immobiliser 93
Ignition lock 94
Starting engine 94
Switching the engine off 94
WARNING
■ Never adjust the steering wheel when the vehicle is moving only when the
vehicle is stationary!
■ Maintain a distance of 25 cm 1
to the steering wheel
» Fig. 94 on page 93
- . Not maintaining this minimum distance will mean that the airbag system
will not be able to properly protect you - hazard!
■ The lever for adjusting the steering wheel must be locked whilst driving so
that the position of the steering wheel cannot accidently change during the
journey - risk of accident!
■ If the steering wheel is adjusted further towards the head, the protection
provided by the driver airbag in the event of an accident is reduced. Check
that the steering wheel is aligned to the chest. ■ When driving, hold the steering wheel with both hands firmly on the outer
edge in the 9 o'clock and 3 o'clock position. Never hold the steering wheel in
the 12 o'clock position or in any other way (e.g. in the middle or inner edge of
the steering wheel). In such cases, you could injure the arms, hands and head
when the driver airbag is deployed.
■ When driving, the ignition key must always be in the position 2
» Fig. 95 on
page 94 (ignition switched on) without the engine running. This position is
indicated by the indicator lights coming on. If this is not the case, it could re-
sult in unexpected locking of the steering wheel - risk of accident! WARNING (Continued)
■ Only pull the ignition key from the ignition lock when the vehicle has come
to a complete stop (by applying the handbrake). Otherwise the steering wheel
could block - risk of accident!
■ When leaving the vehicle, the ignition must always be removed. This is par-
ticularly important if children are left in the vehicle. Otherwise the children
could, for example, start the engine - risk of accident or injury!
■ Never leave the engine running in unventilated or closed rooms. The ex-
haust gases of the engine contain besides the odorless and colourless carbon
monoxide a poisonous gas - hazard! Carbon monoxide can cause unconscious-
ness and death. ■ Never leave the vehicle unattended with the engine running.
■ Never switch off the engine before the vehicle is stationary - risk of acci-
dent! CAUTION
■ The starter may only be operated (ignition key position 3
» Fig. 95 on
page 94), if the engine is not running. The starter or engine can be damaged if
the starter is activated when the engine is running.
■ Let go of the ignition key as soon as the engine starts otherwise the starter
could be damaged.
■ Avoid high engine revolutions, full throttle and high engine loads as long as the
engine has not yet reached its operating temperature - risk of damaging the en-
gine! ■ Do not tow start the engine - danger of damaging the engine! On vehicles with
a catalytic converter, unburnt fuel may get into the catalytic converter where it
may ignite. This in turn may damage the catalytic converter. The battery from an-
other vehicle can be used as a jump-start aid » page 197, Jump-starting.
■ Do not switch the engine off immediately at the end of your journey after the
engine has been operated over a prolonged period at high loads but leave it to
run at an idling speed for about 1
minute. This prevents any possible accumulation
of heat when the engine is switched off. For the sake of the environment
Do not warm up the engine while the vehicle is stationary. If possible, start your
journey as soon as the engine has started. Through this the engine reaches its
operating temperature more rapidly and the pollutant emissions are lower. £
92 Using the system
Page 148 of 225
Driving Tips
Driving and the Environment
The first 1 500 km
New engine
The engine has to be run in during the first 1 500 kilometres.
Up to 1 000 kilometres › Do not drive faster than 3/4 of the maximum speed of the gear in use, i.e. 3/4 of
the maximum permissible engine speed.
› No full throttle.
› Avoid high engine speeds.
› Do not tow a trailer.
From 1 000 up to 1
500 kilometres
› Gradually
increase the power output of the engine up to the full speed of the
gear engaged, i.e. up to the maximum permissible engine speed.
During the first operating hours the engine has higher internal friction than later
until all of the moving parts have harmonized. The driving style which you adopt
during the first approx.1
500 kilometres plays a decisive part in the success of
running in your car.
Never drive at unnecessarily high engine speeds even after the running-in period
is complete. The maximum permissible engine speed is marked by the start of the
red scale area of the revolutions counter. On vehicles fitted with a manual gear-
box, at the very latest shift up into the next gear when the red area is reached.
During acceleration (depressing the accelerator) exceptionally high engine
speeds are automatically reduced, yet the engine is not protected against too
high engine speeds which are caused by incorrectly shifting down the gears re-
sulting in a sudden increase of the engine speeds above the permitted maximum
revolutions which can lead to engine damage.
For a vehicle fitted with a manual gearbox the converse situation also applies: Do
not drive at an engine speed that is too low. Shift down a gear when the engine
is no longer running smoothly. Observe the recommended gear » page 11, Recom-
mended gear . CAUTION
All the speed and engine revolution figures apply only when the engine is at its
normal operating temperature. Never rev up a cold engine when the vehicle is
stationary or when driving in individual gears. For the sake of the environment
Not driving at unnecessarily high engine revolutions and shifting to a higher gear
as early as possible are ways to minimise fuel consumption and operating noise
levels and protects the environment. Ð New tyres
New tyres have to be “
run in” since they do not offer optimal grip at first. Drive
especially carefully for the first 500 km or so. Ð New brake pads
New brake pads initially do not provide full braking efficiency. The brake pads
must initially be “run in
”. Drive especially carefully for the first 200 km or so. Ð Catalytic converter
Proper operation of the emission control system (catalytic converter) is of major
significance for driving your vehicle in an environmentally conscious way.
The following guidelines must be observed: › Vehicles fitted with a petrol engine must always be refueled with unleaded pet-
rol » page 168 , Unleaded petrol ;
› Do not pour too much oil into the engine
» page 172, Checking the engine oil
level ;
› Do not switch off the ignition while driving.
If you drive your vehicle in a country in which unleaded petrol is not available, you
must have the catalytic converter replaced later when driving the vehicle into a
country in which use of a catalytic converter is mandatory. £
146 Driving Tips
Page 149 of 225

WARNING
■ In view of the high temperatures which can be produced in the catalytic con-
verter, the vehicle should be parked in such a way that the catalytic converter
cannot come into contact with easily flammable materials under the vehicle -
risk of fire!
■ Never use additional underbody protection or anti-corrosion agents for ex-
haust pipes, catalytic converters or heat shields - risk of fire! CAUTION
■ Never drive until the fuel tank is completely empty! The irregular supply of fuel
can cause misfiring, which can result in considerable damage to parts of the en-
gine and exhaust system. ■ Just filling the tank with leaded petrol once will damage the exhaust system! ÐEconomical and environmentally friendly driving
Introductory information
Your fuel consumption, any pollution of the environmental and the wear-and-tear
to the engine, brakes and tyres, depend essentially on three factors:
› your personal style of driving;
› the conditions under which your vehicle is operated;
› technical aspects.
The fuel economy by can be improved by 10
-15 % by always looking ahead and
driving in an economical way.
Fuel consumption is also be influenced by external factors which are beyond the
driver's control. Consumption increases during the winter or under difficult condi-
tions, on poor roads, etc.
Fuel consumption can vary considerably from the manufacturer's data, as a result
of outside temperatures, the weather and driving style.
The technical requirements for low fuel usage and economic efficiency of the ve-
hicle have already been built into the vehicle at the works. ŠKODA places a partic-
ular emphasis on minimising negative effects on the environment. It is necessary
to take note of the guidelines given in this chapter in order to make best use of
these characteristics and to maintain their effectiveness. The optimal engine speed should be obtained when accelerating, in order to
avoid a high fuel consumption and resonance of the vehicle.
Ð Looking ahead when driving
A vehicle's highest fuel consumption occurs when accelerating, therefore unnec-
essary accelerating and braking should be avoided. If looking ahead when driving,
less braking and consequently less accelerating are required. If possible, let your
vehicle coast to a stop, or use the engine brake, if you can see that the next set
of traffic lights is on red, for example. Ð Shifting to save energy
Fig. 131
Principle sketch: Fuel consump-
tion in litres/100 km depending
on the selected gear
Shifting up early saves on fuel.
Manual gearbox › Drive no more than about one length of your vehicle in first gear.
› Shift up into the next gear at approx. 2
000 revolutions.
An effective way of achieving good fuel economy is to shift up early. Observe the
recommended gear » page 11, Recommended gear .
A suitably selected gear can have an effect on fuel consumption » Fig. 131.
Automatic gearbox › Slowly
apply the accelerator pedal. However, do not depress it to the kickdown
position.
› If the accelerator pedal is only depressed slowly on a vehicle fitted with an au-
tomatic gearbox, an economic driving programme is automatically selected.
£
147
Driving and the Environment
Page 151 of 225
Avoid short distances
Fig. 133
Principle sketch: Fuel consump-
tion in l/100 km at different tem-
peratures
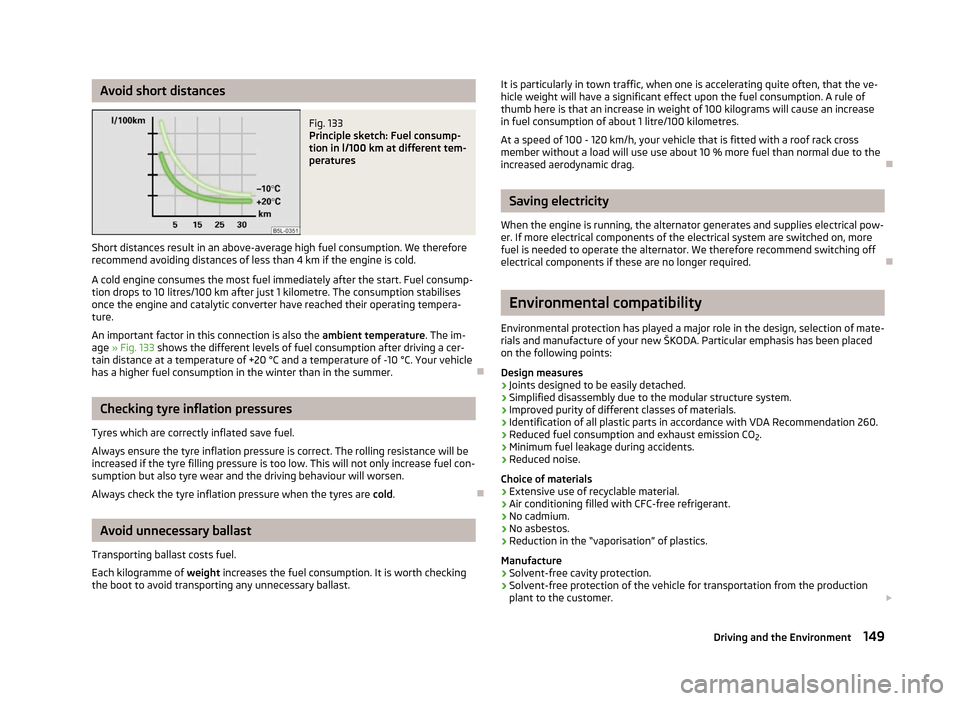
Short distances result in an above-average high fuel consumption. We therefore
recommend avoiding distances of less than 4 km if the engine is cold.
A cold engine consumes the most fuel immediately after the start. Fuel consump-
tion drops to 10 litres/100 km after just 1 kilometre. The consumption stabilises
once the engine and catalytic converter have reached their operating tempera-
ture.
An important factor in this connection is also the ambient temperature. The im-
age » Fig. 133 shows the different levels of fuel consumption after driving a cer-
tain distance at a temperature of +20 °C and a temperature of -10 °C. Your vehicle
has a higher fuel consumption in the winter than in the summer. ÐChecking tyre inflation pressures
Tyres which are correctly inflated save fuel.
Always ensure the tyre inflation pressure is correct. The rolling resistance will be
increased if the tyre filling pressure is too low. This will not only increase fuel con-
sumption but also tyre wear and the driving behaviour will worsen.
Always check the tyre inflation pressure when the tyres are cold. ÐAvoid unnecessary ballast
Transporting ballast costs fuel.
Each kilogramme of weight increases the fuel consumption. It is worth checking
the boot to avoid transporting any unnecessary ballast. It is particularly in town traffic, when one is accelerating quite often, that the ve-
hicle weight will have a significant effect upon the fuel consumption. A rule of
thumb here is that an increase in weight of 100 kilograms will cause an increase
in fuel consumption of about 1 litre/100 kilometres.
At a speed of 100 - 120 km/h, your vehicle that is fitted with a roof rack cross
member without a load will use use about 10 % more fuel than normal due to the
increased aerodynamic drag.
Ð Saving electricity
When the engine is running, the alternator generates and supplies electrical pow-
er. If more electrical components of the electrical system are switched on, more
fuel is needed to operate the alternator. We therefore recommend switching off
electrical components if these are no longer required. Ð Environmental compatibility
Environmental protection has played a major role in the design, selection of mate-
rials and manufacture of your new
ŠKODA. Particular emphasis has been placed
on the following points:
Design measures
› Joints designed to be easily detached.
› Simplified disassembly due to the modular structure system.
› Improved purity of different classes of materials.
› Identification of all plastic parts in accordance with VDA Recommendation 260.
› Reduced fuel consumption and exhaust emission CO
2.
› Minimum fuel leakage during accidents.
› Reduced noise.
Choice of materials › Extensive use of recyclable material.
› Air conditioning filled with CFC-free refrigerant.
› No cadmium.
› No asbestos.
› Reduction in the “vaporisation” of plastics.
Manufacture › Solvent-free cavity protection.
› Solvent-free protection of the vehicle for transportation from the production
plant to the customer. £
149
Driving and the Environment
Page 166 of 225

Wheels
First read and observe the introductory information and safety warn-
ings on page 160.
Wheel rims
Also thoroughly wash the wheel rims when washing the vehicle on a regular ba-
sis. Regularly remove salt and brake abrasion from the wheel rims otherwise the
material will be affected. Damage to the paint layer on the wheel rims must be
touched up immediately.
Light alloy wheels
After washing thoroughly and treat the wheel rims with a protective product for
light alloy wheels. Products which cause abrasion must not be used to treat the
wheel rims. WARNING
Water, ice and grit in the brake system can affect the braking efficiency - risk
of accident! CAUTION
Severe layers of dirt on the wheels can also result in wheel imbalance. This may
show itself in the form of a wheel vibration which is transmitted to the steering
wheel which, in certain circumstances, can cause premature wear of the steering.
This means it is necessary to remove the dirt. Note
We recommend that any repairs to damaged paintwork are carried out by a
ŠKODA Service Partner. ÐUnderbody protection
First read and observe the introductory information and safety warn-
ings on page 160.
The underside of your vehicle is protected for life against chemical and mechani-
cal influences.ä
ä As damage to the
protective layer when driving cannot be ruled out completely,
we recommend that you inspect the protective layer on the underside of your ve-
hicle and on the chassis at specific intervals - preferably at the beginning and end
of the winter.
ŠKODA Service Partners have suitable spray products and the necessary equip-
ment available, and are familiar with the instructions for use. We therefore rec-
ommend that touch-up work or additional corrosion protection measures are car-
ried out by a ŠKODA Service Partner. WARNING
Never use additional underbody protection or anti-corrosion agents for ex-
haust pipes, catalytic converters, diesel particle filters or heat shields. When
the engine reaches its operating temperature, these substances might ignite -
risk of fire! Ð Protection of hollow spaces
First read and observe the introductory information and safety warn-
ings on page 160.
All the cavities of your vehicle which are at risk from corrosion are protected for
life by a layer of protective wax applied in the factory.
This wax protection does not require to be inspected or re-treated. If any small
amount of wax flow out of the cavities at high temperatures, these must be re-
moved with a plastic scraper and the stains cleaned using a petroleum cleaner. WARNING
Safety regulations should be observed when using petroleum cleaner to re-
move wax - risk of fire! Ð
ä
164 General Maintenance
Page 200 of 225
›
Attach the other end 4
to a solid metal part which is connected firmly to the
engine block, or to the engine block itself.
Starting engine
› Start the engine on the vehicle providing the power and allow it to idle.
› Now start the engine of the vehicle with the discharged battery.
› If the engine does not start, terminate the attempt to start the engine after
10 seconds and wait for about 30 seconds before repeating the process.
› Disconnect the cables in exactly the
reverse order to the one described above. ÐJump-starting in vehicles with the START-STOP system
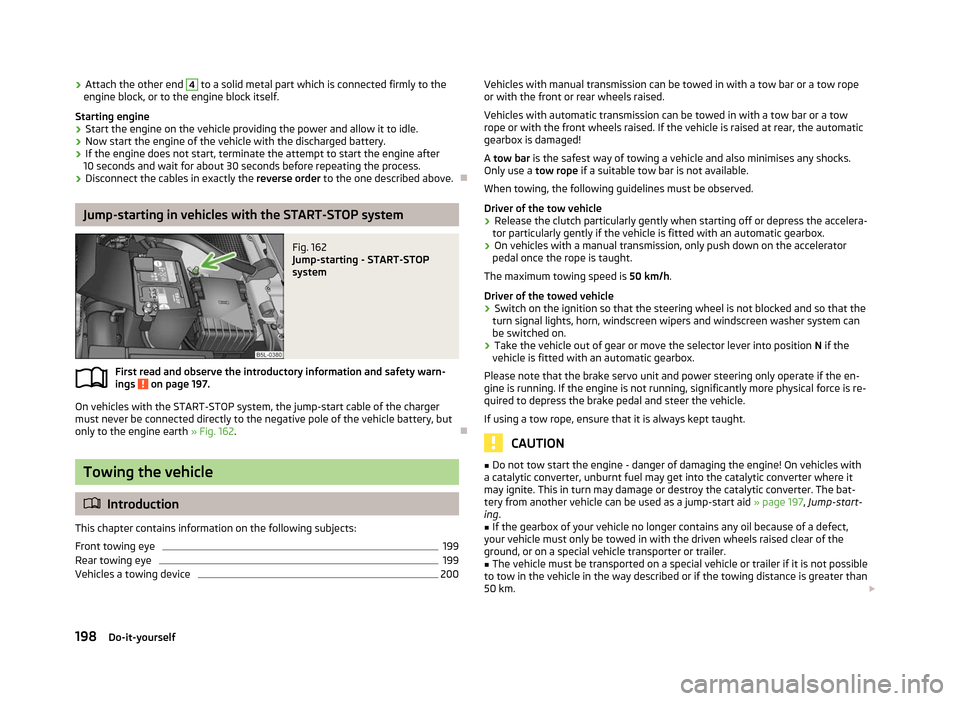
Fig. 162
Jump-starting - START-STOP
system
First read and observe the introductory information and safety warn-
ings on page 197.
On vehicles with the START-STOP system, the jump-start cable of the charger
must never be connected directly to the negative pole of the vehicle battery, but
only to the engine earth » Fig. 162. ÐTowing the vehicle
ä
Introduction
This chapter contains information on the following subjects:
Front towing eye 199
Rear towing eye 199
Vehicles a towing device 200
ä Vehicles with manual transmission can be towed in with a tow bar or a tow rope
or with the front or rear wheels raised.
Vehicles with automatic transmission can be towed in with a tow bar or a tow
rope or with the front wheels raised. If the vehicle is raised at rear, the automatic
gearbox is damaged!
A tow bar is the safest way of towing a vehicle and also minimises any shocks.
Only use a tow rope if a suitable tow bar is not available.
When towing, the following guidelines must be observed.
Driver of the tow vehicle › Release the clutch particularly gently when starting off or depress the accelera-
tor particularly gently if the vehicle is fitted with an automatic gearbox.
› On vehicles with a manual transmission, only push down on the accelerator
pedal once the rope is taught.
The maximum towing speed is 50 km/h.
Driver of the towed vehicle
› Switch on the ignition so that the steering wheel is not blocked and so that the
turn signal lights, horn, windscreen wipers and windscreen washer system can
be switched on.
› Take the vehicle out of gear or move the selector lever into position
N if the
vehicle is fitted with an automatic gearbox.
Please note that the brake servo unit and power steering only operate if the en-
gine is running. If the engine is not running, significantly more physical force is re-
quired to depress the brake pedal and steer the vehicle.
If using a tow rope, ensure that it is always kept taught. CAUTION
■ Do not tow start the engine - danger of damaging the engine! On vehicles with
a catalytic converter, unburnt fuel may get into the catalytic converter where it
may ignite. This in turn may damage or destroy the catalytic converter. The bat-
tery from another vehicle can be used as a jump-start aid » page 197, Jump-start-
ing .
■ If the gearbox of your vehicle no longer contains any oil because of a defect,
your vehicle must only be towed in with the driven wheels raised clear of the
ground, or on a special vehicle transporter or trailer.
■ The vehicle must be transported on a special vehicle or trailer if it is not possible
to tow in the vehicle in the way described or if the towing distance is greater than
50 km. £
198 Do-it-yourself
Page 217 of 225
Index
A
Ability to climb see Slope angle 153
ABS Function 97
Warning light 22
Accessories 189
Active driver-steering recommendation (DSR) 96
Adjusting Exterior mirror 53
Adjusting seats 129
Adjustment Seat 56
Aerial 161
see Radio reception 163
Airbag 137
Deployment 137
Front airbag 138
Head airbag 141
Knee airbag 139
Side airbag 140
Airbag system 137
Air conditioning system Air outlet vents 81
Climatronic 86
Manual air conditioning system 83
Alarm 31
Anti-theft alarm system 31
Antilock brake system 97
Armrest 75
Ashtray 70
Assistance systems OFF ROAD 98
Assist systems ABS 22, 97
Cruise control systems (CCS) 104EDL 98
ESC 22, 96
Park assist 101
Parking aid 100
START/STOP 106
TCS 22, 97
Auto Check Control 17
Automatic driving lamp control 40
Automatic gearbox 109
Dynamic shift programme 112
Emergency programme 112
Information for driving 109
Kickdown 112
Manual shifting of gears 111
Parking 110
Selector lever-emergency unlocking 113
Selector lever lock 111
Selector lever positions 110
Starting off 110
Stopping 110
Tiptronic 111
Automatic load deactivation 180
Auxiliary heating (auxiliary heating and ventila- tion) 88
Avoiding damage to your vehicle 150
B
Before setting off 128
Belts 132
Belt tensioners 135
Bonnet Closing 171
Opening 171
Boot Class
N1 vehicles 63
Cover 65
Emergency unlocking 34
Fastening elements 64
Fixing nets 65
Folding hooks 64Light 47
see Boot lid 33
Unlocking the boot lid 34
Variable loading floor 66
Boot lid 33
Automatic locking 33
Warning light 21
Brake assist 96
Brake booster 96
Brake fluid Checking 175
Brakes Brake assist systems 94
Handbrake 96
Indicator light 19
Running in 146
Braking Brake fluid 175
Breakdown kit 194
Bulbs Replacing 204
Button in the driver's door Electric power windows 34
C
Car computer see Multifunction display 12
Car jack 190
Carrier 68
Catalytic converter 146
CD changer 126
Central locking button 29
Central locking system 27
lock 29
unlock 28
Changes 189
Changing Engine oil 173
Wheel 191
215
Index