child lock SKODA YETI 2013 1.G / 5L User Guide
[x] Cancel search | Manufacturer: SKODA, Model Year: 2013, Model line: YETI, Model: SKODA YETI 2013 1.G / 5LPages: 266, PDF Size: 26.71 MB
Page 169 of 266
It is also important that rear passengers fasten their seat belts, as they could oth-
erwise be thrown through the vehicle in an uncontrolled manner in the event of
an accident.
A rear seat passenger who has not fastened the seat belt is a danger not only to
himself but also for those seated at the front » Fig. 137 - .
Fastening and unfastening seat belts
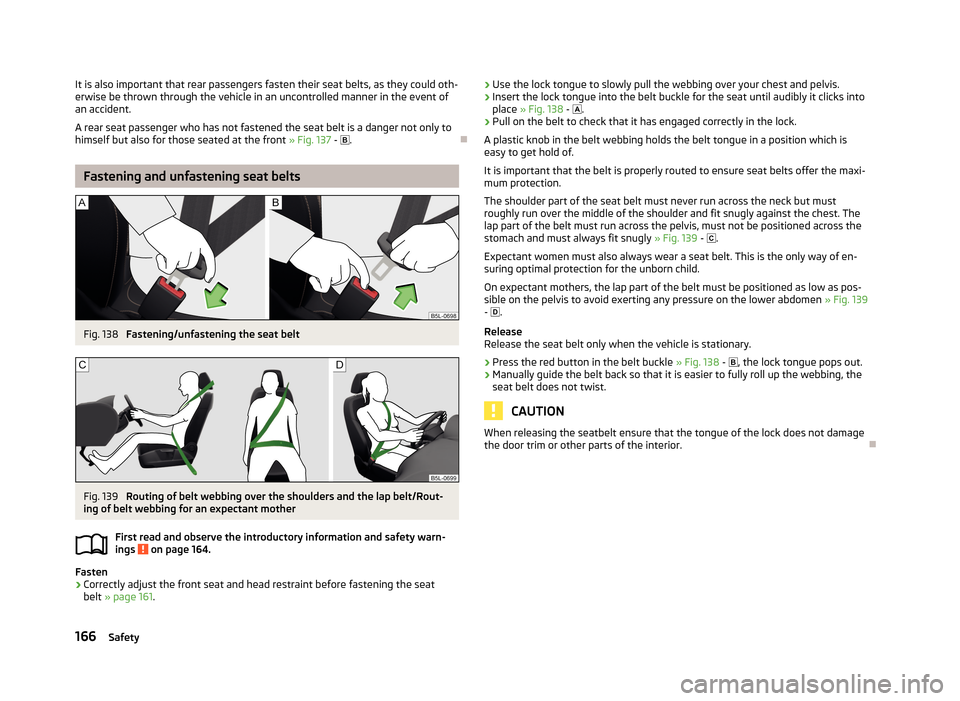
Fig. 138
Fastening/unfastening the seat belt
Fig. 139
Routing of belt webbing over the shoulders and the lap belt/Rout-
ing of belt webbing for an expectant mother
First read and observe the introductory information and safety warn-
ings
on page 164.
Fasten
›
Correctly adjust the front seat and head restraint before fastening the seat belt » page 161 .
›Use the lock tongue to slowly pull the webbing over your chest and pelvis.›Insert the lock tongue into the belt buckle for the seat until audibly it clicks into
place » Fig. 138 - .›
Pull on the belt to check that it has engaged correctly in the lock.
A plastic knob in the belt webbing holds the belt tongue in a position which is
easy to get hold of.
It is important that the belt is properly routed to ensure seat belts offer the maxi- mum protection.
The shoulder part of the seat belt must never run across the neck but must
roughly run over the middle of the shoulder and fit snugly against the chest. The
lap part of the belt must run across the pelvis, must not be positioned across the
stomach and must always fit snugly » Fig. 139 -
.
Expectant women must also always wear a seat belt. This is the only way of en-
suring optimal protection for the unborn child.
On expectant mothers, the lap part of the belt must be positioned as low as pos-
sible on the pelvis to avoid exerting any pressure on the lower abdomen » Fig. 139
-
.
Release
Release the seat belt only when the vehicle is stationary.
›
Press the red button in the belt buckle » Fig. 138 -
, the lock tongue pops out.
›
Manually guide the belt back so that it is easier to fully roll up the webbing, the
seat belt does not twist.
CAUTION
When releasing the seatbelt ensure that the tongue of the lock does not damage
the door trim or other parts of the interior.
166Safety
Page 183 of 266
Fastening systems
Introduction
This chapter contains information on the following subjects:
eyes belonging to the lISOFIX system
180
Use of child seats with the ISOFIX system
180
Locking eyes of the TOP TETHER system
181
eyes belonging to the lISOFIX system
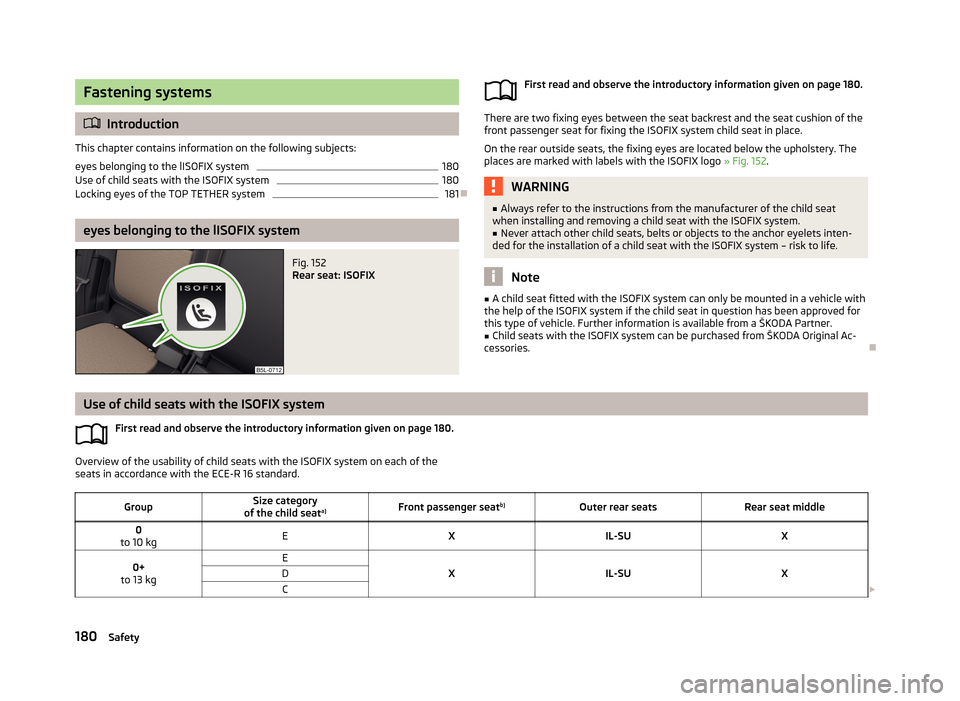
Fig. 152
Rear seat: ISOFIX
First read and observe the introductory information given on page 180.
There are two fixing eyes between the seat backrest and the seat cushion of the front passenger seat for fixing the ISOFIX system child seat in place.
On the rear outside seats, the fixing eyes are located below the upholstery. The
places are marked with labels with the ISOFIX logo » Fig. 152.
WARNING■
Always refer to the instructions from the manufacturer of the child seat
when installing and removing a child seat with the ISOFIX system.■
Never attach other child seats, belts or objects to the anchor eyelets inten-
ded for the installation of a child seat with the ISOFIX system – risk to life.
Note
■ A child seat fitted with the ISOFIX system can only be mounted in a vehicle with
the help of the ISOFIX system if the child seat in question has been approved for this type of vehicle. Further information is available from a ŠKODA Partner.■
Child seats with the ISOFIX system can be purchased from ŠKODA Original Ac-
cessories.
Use of child seats with the ISOFIX system
First read and observe the introductory information given on page 180.
Overview of the usability of child seats with the ISOFIX system on each of the
seats in accordance with the ECE-R 16 standard.
GroupSize category
of the child seat a)Front passenger seat b)Outer rear seatsRear seat middle0
to 10 kgEXIL-SUX0+
to 13 kgE
XIL-SUX
DC 180Safety
Page 184 of 266
GroupSize category
of the child seat a)Front passenger seat b)Outer rear seatsRear seat middle
1
9-18 kg
D
XIL-SU IUFX
CBB1Aa)
The size category is shown on the label attached to the child seat.
b)
If the front passenger seat is fitted with the ISOFIX system attachment points, it is suited for the installation of an ISOFIX child seat with the “Semi-Universal” approval.
The seat is suited for installation of an ISOFIX child seat with “Semi-
Universal” approval. The “Semi-Universal” category means that the child
seat with the ISOFIX system is approved for your vehicle. Observe the list of vehicles that comes with the child seat.
The seat is suitable for the installation of an ISOFIX child seat with
“Universal” approval and attachment with the TOP TETHER belt.
The seat is not fitted with fixing eyes for the ISOFIX system.
Locking eyes of the TOP TETHER system
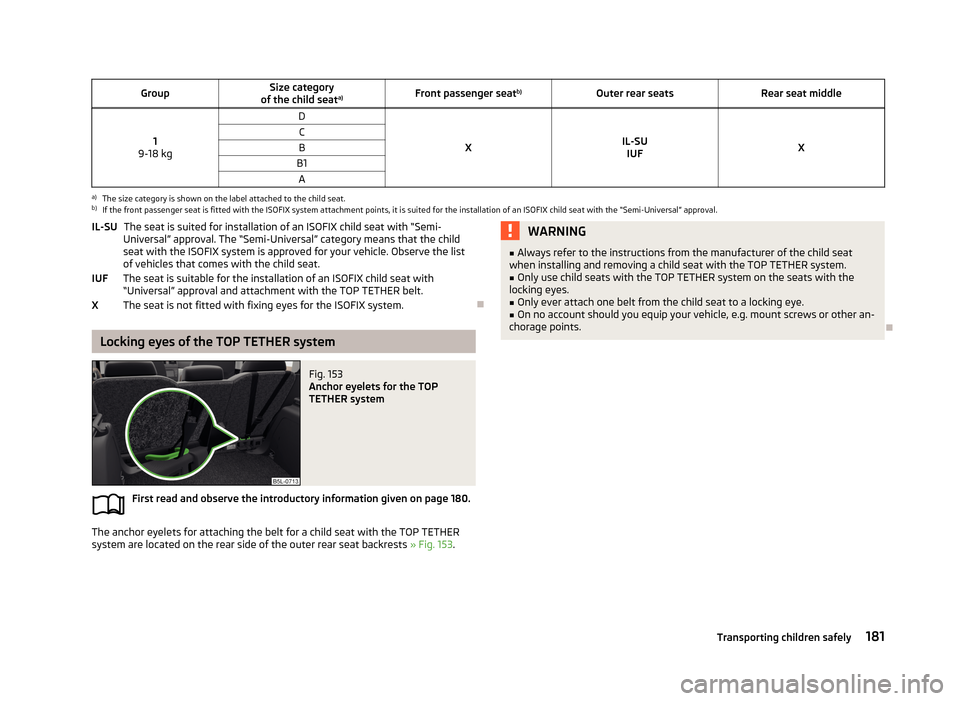
Fig. 153
Anchor eyelets for the TOP
TETHER system
First read and observe the introductory information given on page 180.
The anchor eyelets for attaching the belt for a child seat with the TOP TETHER
system are located on the rear side of the outer rear seat backrests » Fig. 153.
IL-SU
IUFXWARNING■
Always refer to the instructions from the manufacturer of the child seat
when installing and removing a child seat with the TOP TETHER system.■
Only use child seats with the TOP TETHER system on the seats with the
locking eyes.
■
Only ever attach one belt from the child seat to a locking eye.
■
On no account should you equip your vehicle, e.g. mount screws or other an-
chorage points.
181Transporting children safely
Page 192 of 266
Taking care of your vehicle exterior
Introduction
This chapter contains information on the following subjects:
Taking care of your vehicle's paintwork
189
Plastic parts
190
Rubber seals
190
Chrome parts
190
Decorative films
190
Windows and exterior mirrors
191
Headlight lenses
191
Camera lens
191
Door lock cylinders
191
Cavity protection
192
Wheels
192
Underbody protection
192
Regular and proper care help to retain the efficiency and value of your vehicle. It
may also be one of the requirements for the acceptance of warranty claims relat- ing to corrosion damage and paint defects on the bodywork.
We recommend using vehicle care products from ŠKODA Original Accessories.These are available from ŠKODA Partners. The usage instructions on the package
must be observed.
WARNING■ Vehicle care products may be harmful to your health if not used according to
the instructions.■
Always store vehicle care products safely, in particular out of the reach of
children – risk of poisoning!
■
Protect your hands and arms from sharp-edged metal parts when cleaning
the underfloor, the inside of the wheel housings or the wheel trims – risk of
cuts!
CAUTION■ Do not use any insect sponges, rough kitchen sponges or similar cleaning prod-
ucts – risk of damaging the paintwork surface.■
Cleaner that contain solvents can damage the material being cleaned.
For the sake of the environment
Used vehicle care product cans represent hazardous waste that is harmful to the
environment. These must be disposed of in accordance with national legal regula- tions.
Note
Due to the special tools and knowledge required, and to avoid any potential prob-
lems with the cleaning and care of your vehicle's exterior, we recommend that
the cleaning and care of your vehicle be carried out by a ŠKODA Service Partner.
Taking care of your vehicle's paintwork
First read and observe the introductory information and safety warn-ings
on page 189.
Minor paint damage such as scratches, scuffs or stone chips should be treated im-
mediately if possible, using touch-up pens or sprays .
Preserving the vehicle paintwork
A thorough wax treatment provides the vehicle's paintwork with highly effective
protection against harmful environmental influences.
The vehicle must be treated with a high-quality hard wax polish at the latest,when no more drops form on the clean paintwork.
A new layer of a high-quality hard wax polish can be applied to the clean body- work after it has dried thoroughly.
Even if you use a wax preserver regularly we still recommend that you treat the paintwork of the vehicle at least twice a year with hard wax.
Polishing
Polishing is necessary if the vehicle's paintwork has become unattractive and if it
is no longer possible to achieve a gloss with wax preservatives.
If the polish does not contain any preserving elements, the paint must be treated with a preservative afterwards.
189Vehicle care
Page 196 of 266
WARNING■Vehicle care products may be harmful to your health if not used according to
the instructions.■
Always store vehicle care products safely, in particular out of the reach of
children – risk of poisoning!
CAUTION
■ Be sure to check clothing for colourfastness to avoid any damage or visible
stains on the material (leather), panels and textiles.■
Remove fresh stains such as those from ball-point pens, ink, lipstick, shoe pol-
ish, etc., from the material (leather), panels and textiles as quickly as possible.
■
Air fresheners and scents can be hazardous to heath when the temperature in-
side the vehicle is high.
■
Do not attach scents or air fresheners to the dash panel – there is a risk of dam-
age to the dash panel.
■
Do not stick any stickers on the inside of the rear windows, the rear side win-
dows and in the vicinity of the heating elements on the windscreen or near the
window aerial. These may get damaged.
■
Do not clean the roof panelling with a brush – there is a risk of damage to the
surface of the panelling.
■
Cleaner that contain solvents can damage the material being cleaned.
■
Apply only a small amount of the cleaning and care product.
For the sake of the environment
Used vehicle care product cans represent hazardous waste that is harmful to the
environment. These must be disposed of in accordance with national legal regula- tions.
Note
Due to the special tools and knowledge required, and to avoid any potential prob-
lems with the cleaning and care of the interior of your vehicle, we recommend
that cleaning and care of the interior of your vehicle be carried out by a ŠKODA service partner.
Natural leather
First read and observe the introductory information and safety warn-
ings
on page 192.
Leather is a natural material with specific properties, and requires regular clean-
ing and maintenance.
The leather should be cleaned on a regular basis depending on the amount of
wear-and-tear.
Dust and dirt in the pores and folds act as abrasive materials. This leads to severe corrosion and the premature brittleness of the leather surface.
We recommend that you remove dust regularly and at short intervals using a
cloth or vacuum cleaner.
Clean soiled leather surfaces with a water-dampened cotton or woollen cloth and
then dry with a clean, dry cloth »
.
Clean severely soiled areas with a cloth soaked in a mild soap solution (2 table-
spoons of neutral soap to 1 litre of water).
To remove stains , use a cleaning agent specially designed for this purpose.
Treat the leather regularly and at suitable intervals using a suitable leather care
product.
CAUTION
■ Ensure that no part of the leather is soaked through during cleaning and that
no water gets into the seams. Otherwise, the leather could become brittle or
cracked.■
Avoid leaving the vehicle for lengthy periods in bright sunlight to avoid the
leather from bleaching. If the vehicle is parked in the open for lengthy periods, protect the leather from direct sunlight by covering it.
■
Sharp-edged objects on items of clothing such as zip fasteners, rivets, sharp-
edged belts, jewellery and pendants may leave permanent scratches or signs of
rubbing on the surface. Such damage cannot be subsequently recognised as a
justified complaint.
■
The use of a mechanical steering wheel lock may damage the leather surface of
the steering wheel.
193Vehicle care
Page 203 of 266
WARNING■Read and observe the information and warning instructions on the fluid con-
tainers.■
Keep fluids in their original containers and keep securely out of the reach of
children!
■
If you intend to work underneath the vehicle, you must secure the vehicle
from rolling away and support it with suitable supporting blocks; the car jack
is not sufficient – risk of injury!
■
Never cover the engine with additional insulation material (e.g. with a cover)
– risk of fire!
■
The bonnet must always be properly closed when driving. Therefore, the
lock must always be checked after closing the bonnet in order to ensure that
it has engaged properly.
■
If you notice that the lock is not properly engaged while driving, stop the ve-
hicle immediately and close the bonnet – risk of accident!
CAUTION
Always top up using the correct specification of fluids. This may result in major
operating problems and also vehicle damage!
For the sake of the environment
In view of the requirements for the environmentally friendly disposal of fluids and the special tools and knowledge required for such work, we recommend that flu-
ids be changed by a specialist garage.
Note
■ Please consult a specialist garage for any questions relating to fluids.■Fluids with the proper specifications can be purchased from the ŠKODA Original
Accessories or from the ŠKODA Genuine Parts ranges.
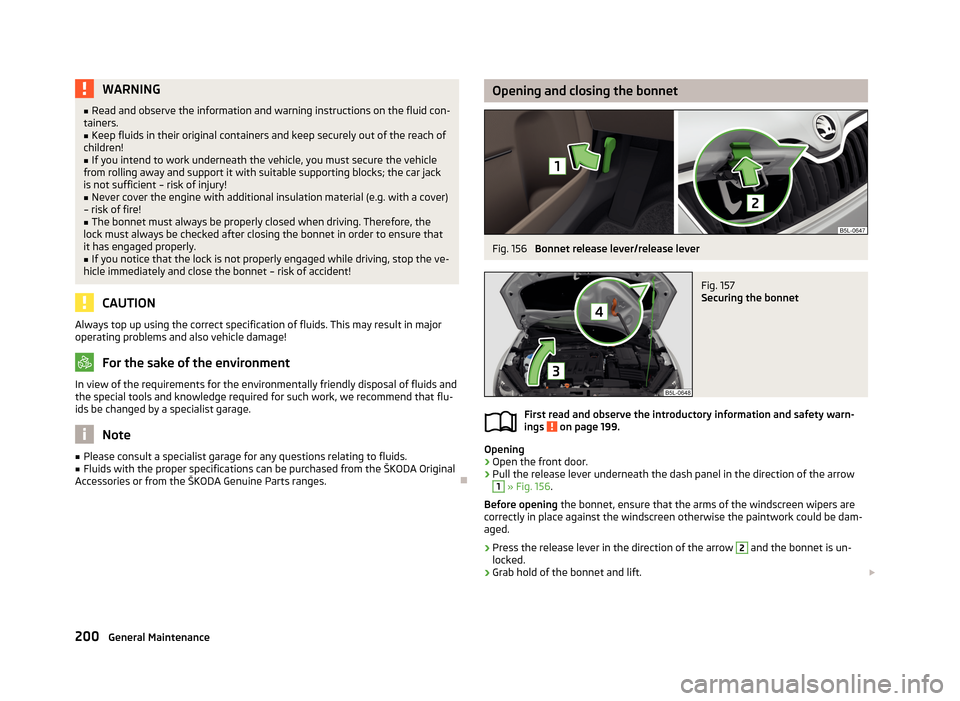
Opening and closing the bonnetFig. 156
Bonnet release lever/release lever
Fig. 157
Securing the bonnet
First read and observe the introductory information and safety warn-
ings on page 199.
Opening
›
Open the front door.
›
Pull the release lever underneath the dash panel in the direction of the arrow
1
» Fig. 156 .
Before opening the bonnet, ensure that the arms of the windscreen wipers are
correctly in place against the windscreen otherwise the paintwork could be dam- aged.
›
Press the release lever in the direction of the arrow
2
and the bonnet is un-
locked.
›
Grab hold of the bonnet and lift.
200General Maintenance
Page 255 of 266
Brake booster125
Brake fluid206
Changing207
Checking206
information messages15
Brakes Brake assist systems
136
Brake booster125
Brake fluid206
Handbrake125
Running in130
Braking Information on braking
124
Breakdown kit225
Break recommendation See Fatigue detection
151
bulb failurel warning light
19
bulbs warning light
19
Bulbs Changing
238
In the rear light242
Button in the driver's door Electric power windows
41
C
Car computer See multifunction display
25
Car park ticket holder71
Carrier90
Cavity protection192
CD changer115
Central locking32
Central locking button36
changing bulb for low beam and high beam
240
ChangingBrake fluid207
Bulbs238
Bulbs in the rear light242
Engine oil204
Wheels221
Changing a wheel Follow-up tasks
222
Preparation222
Removing and refitting a wheel222
Charging a vehicle battery209
Check Fit ball head properly
155
Checking Battery electrolyte level
209
Brake fluid206
Coolant205
Engine oil203
Oil level203
Windscreen washer fluid201
Children and safety177
Child safety Side airbag
179
Child safety lock37
Child safety seat Use of child safety seats
179
Child seat Classification
179
ISOFIX180
on the front passenger seat178
TOP TETHER181
Use of ISOFIX child seats180
Chrome parts refer to Taking care of your vehicle
190
Cigarette lighter74
Cleaning182
Alcantara194
Artificial leather194
cloths194
Covers of electrically heated seats194
Headlight lenses191
Natural leather193
Plastic parts190
Wheels192
Climatronic Operarting elements
95
Recirculation93
Clothes hook79
Cockpit 12-volt power outlet
75
Ashtray74
Cigarette lighter74
General view9
Lighting53
Practical equipment70
Storage compartments70
Comfort control window
43
COMING HOME51
Compartment for glasses77
Compartments70
Computer See multifunction display
25
Convenience operation sliding / tilting roof
46
convenience turn signal49
coolant warning light
16
warning reports16
Coolant204
Checking205
Replenishing206
Temperature gauge11
CORNER See Fog lights with CORNER function
51
Correct seated position161
Driver162
Front passenger162
Rear seats162
Correct seating position Instructions
162
252Index
Page 256 of 266
Counter for distance driven13
Cruise control system Activating/deactivating
148
Changing the stored speed148
Storing and maintaining speed148
Switching off temporarily148
Warning light22
Cruise Control System147
Cupholders73
D
DAY LIGHT see Daylight running lights
48
Daylight running lights48
De-icing the windscreen and rear window55
Deactivating an airbag175
Decorative films190
Delayed locking of the boot lid see Boot lid
41
Diesel refer to Fuel
198
diesel - particulate filter
20
Diesel fuel Operation in winter
198
Diesel particulate filter warning light
20
Digital Clock Time
13
Dipstick203
Disconnecting and reconnecting vehicle battery
210
Display12
Compass points25
Coolant temperature11
Correct gear changes24
Fuel supply12
Service intervals30
Display of the second speed13
Distance driven13
Door Child safety lock
37
Closing37
Emergency locking233
Emergency locking the driver's door232
Opening37
warning light door open16
Door open warning light
16
Driver Steering Recommendation (DSR)137
Driving Abroad
135
Emissions244
Fording water on roads134
Fuel consumption244
Maximum speed247
on unpaved roads135
driving away from paved roads135
Driving economically Economical gear changing
131
Driving with a trailer157
DSR137
DVD-preinstallation116
E
Economical driving
130
Ballast132
Driving at full throttle131
Idling131
Looking ahead130
Regular maintenance132
Saving energy133
Short distances132
Tyre inflation pressure132
EDL Operation
137
Electrical power windows43
Button in the driver's door41, 42
Button in the rear doors43
Operational faults44
Electronic Differential Lock (EDL)137
Electronic immobiliser119
Electronic Stability Control (ESC)136
emergency replace battery in the remote control
231
Emergency Activation of the sliding/tilting roof
234
Changing a wheel221
Hazard warning light system52
Jump-starting226, 227
Locking the door without a locking cylinder233
Locking the driver's door232
Selector lever-unlocking233
Sliding/tilting roof234
Start engine - KESSY123
Switching off the ignition –KESSY123
Towing the using the tow hitch230
Towing the vehicle228
Tyre repair224
Unlocking the driver's door232
Unlocking the tailgate233
emergency equipment reflective vest
219
Emergency equipment First aid kit
219
Jack220
Vehicle tool kit220
Warning triangle219
Emissions244
Engine Running in
129
Engine compartment199
Brake fluid206
Coolant205
Overview201
Vehicle battery207
engine oil information messages
17
warning light17
253Index
Page 260 of 266
Practical features70
Compartment for glasses77
Folding table in the middle seat backrest80
Folding table on front seat backrest80
Storage compartment in the front central con- sole
72
Storage compartments in the doors72
Storage net in the front centre console77
Waste container76
Practical Features Storage compartment on the dashboard
71
R
Radiator fan
201
Radio reception See windows
191
Radio remote control Auxiliary heating
99
Raise vehicle223
Rear-view mirror Exterior mirrors
59
Fold in passenger mirror60
Rear-view mirrors Synchronous adjustment of the rear-view mirrors 59
Rear fog light
51
Warning light19
Rear head restraints in the centre
67
Rear interior light54
Rear mirror58
Interior mirror59
rear seats in the longitudinal direction
68
Rear seats67
Setting the tilt of the seat backrests68
Rear window - heater55
Recirculation93
Refuelling196
Fuel196
Remote control Locking34
Replacing the battery231
Synchronisation process34
Unlocking34
Remote control key Replacing the battery
231
Removable light Removing light
87
replace batteries of the lights232
Removable ski bag81
Removing the variable loading floor
88
Repairs and technical alterations184
Replace the battery in the auxiliary heating (auxiliary
heating) in the remote control
231
replace - batteries of the lights232
Replacing bulb for fog lights
241
Bulb for the licence plate light242
Bulb in rear light243
Fuses236
Fuses in the dash panel236
Fuses in the engine compartment237
Vehicle battery210
windscreen wiper blades235
Replacing windscreen wiper blades234
Replenishing Coolant
206
Engine oil204
Windscreen washer fluid201
reversing assistant orientation lines and monitored area
142
Revolutions counter11
Roof rack system90
Roof load90
Running-in the first 1500 km
129
Running inBrake pads130
Engine129
Tyres129
S
SAFE See Safe securing system
35
SAFELOCK See Safe securing system
35
Safe securing system35
Safety160
Child safety177
Child safety seats177
Correct seated position161
Head restraints66
ISOFIX180
TOP TETHER181
Safety belts rear middle seat
167
Saving electrical energy130
Seals Taking care of your vehicle
190
Seat belt warning light
15
Seat belts164
Belt tensioners168
Cleaning195
fastening and unfastening166
Height adjustment167
Seatbelts Inertia reels
167
Seat belts The physical principle of a head-on collision
165
Seat functions64
Seats Electric adjustment
62
Folding front passenger seat66
Front armrest65
Head restraints66
257Index
Page 262 of 266
Temporary spare wheel216
the rear seats fold down seat backrest and fold seat fully for- ward
68
Tiptronic127
Tools220
TOP TETHER181
Towing228
Towing a trailer152
Towing device Description
152
Drawbar load152
Use and care156
Towing eye front
229
Rear229
Towing protection40
Traction Control System (TCS)137
Trailer152, 156
13-pin power socket157
driving with a trailer157
loading156
Safety eye157
Trailer stabilisation158
Transport Luggage compartment
81
Roof rack system90
Transporting children safely177
TSA158
Turn signal49
Turn signal system Warning light
21
Two-way radio systems100
Type plate244
Tyre inflation pressure Warning light
21
Tyre load-bearing capacity see Wheels
214
Tyre pressure monitor Setting
215
Tyre repairCheck pressure226
Preparations225
Sealing and inflating the tyre226
Tyres212
Inflation pressure213
New214
See Wheels214
Sizes213
Tyre wear indicator213
U
Underbody protection
192
Unleaded petrol135
Unlocking Individual settings
36
KESSY35
Key33
Remote control34
Vehicle key33
Unlocking and locking32
Useful equipment 12-volt power outlet
75
Ashtray74
Car park ticket holder71
Cigarette lighter74
Clothes hook79
Cupholders73
Removable ski bag81
Storage compartment under the front armrest76
Using the information system23
Using the selector lever127
Using the variable loading floor with a spare wheel
90
V
Variable loading floor
88
Removing and fitting carrier rails89
Variable loading floor with spare wheel Removable storage box87
Vehicle battery Automatic load deactivation
210
charging209
Checking the battery electrolyte level209
Cover208
Operation in winter209
Replacing210
Safety instructions207
Vehicle care182
Alcantara194
Artificial leather194
Cloths194
Vehicle Condition See Auto Check Control
13
Vehicle data sticker244
Vehicle dimensions245
Vehicle key Locking
33
Unlocking33
Vehicle tool kit220
vest holder for reflective vest
219
Visibility55
Visors see Sun visors
55
W
Warning at excessive speeds
28
Warning lights14
warning messages Diesel particulate filter
20
Warning symbols see Warning lights
14
Warning triangle219
Warranty5
259Index