key SKODA YETI 2013 1.G / 5L Owner's Guide
[x] Cancel search | Manufacturer: SKODA, Model Year: 2013, Model line: YETI, Model: SKODA YETI 2013 1.G / 5LPages: 266, PDF Size: 26.71 MB
Page 78 of 266
Removing the ashtray from the low centre console›Place the ashtray insert into the console and press it in.
Opening the ashtray on the high centre console›
Press on the top part of the ashtray cover in area
C
» Fig. 63 .
Removing the ashtray from the high centre console
›
Carefully push the ashtray cover downwards as far as the stop.
›
Grasp the ashtray insert in the area of the arrows » Fig. 63 and remove.
Inserting the ashtray into the high centre console
›
Place the ashtray insert in the mount and press it in.
WARNINGNever place flammable objects in the ashtray – risk of fire!
CAUTION
■ When removing the ash tray, do not hold it on the cover on the front – risk of
breakage.■
The ashtray in the rear part of the central console must be closed (otherwise it
could get damaged) before folding forward the rear middle seat.
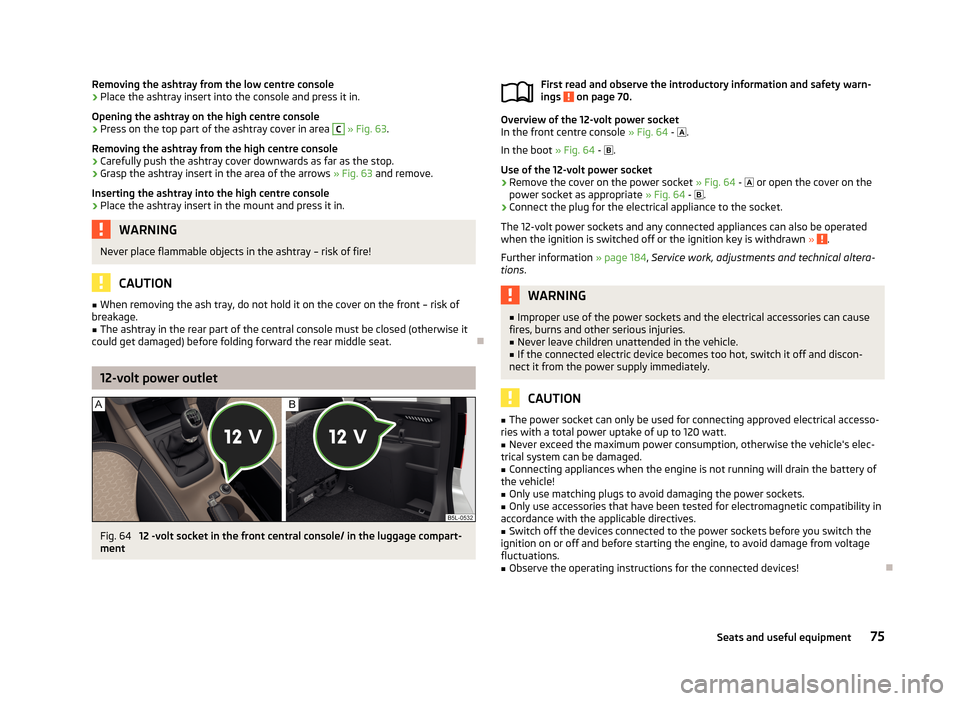
12-volt power outlet
Fig. 64
12 -volt socket in the front central console/ in the luggage compart-
ment
First read and observe the introductory information and safety warn- ings on page 70.
Overview of the 12-volt power socket
In the front centre console » Fig. 64 - .
In the boot » Fig. 64 - .
Use of the 12-volt power socket
›
Remove the cover on the power socket » Fig. 64 - or open the cover on the
power socket as appropriate » Fig. 64 - .
›
Connect the plug for the electrical appliance to the socket.
The 12-volt power sockets and any connected appliances can also be operated when the ignition is switched off or the ignition key is withdrawn »
.
Further information » page 184, Service work, adjustments and technical altera-
tions .
WARNING■
Improper use of the power sockets and the electrical accessories can cause
fires, burns and other serious injuries.■
Never leave children unattended in the vehicle.
■
If the connected electric device becomes too hot, switch it off and discon-
nect it from the power supply immediately.
CAUTION
■ The power socket can only be used for connecting approved electrical accesso-
ries with a total power uptake of up to 120 watt.■
Never exceed the maximum power consumption, otherwise the vehicle's elec-
trical system can be damaged.
■
Connecting appliances when the engine is not running will drain the battery of
the vehicle!
■
Only use matching plugs to avoid damaging the power sockets.
■
Only use accessories that have been tested for electromagnetic compatibility in
accordance with the applicable directives.
■
Switch off the devices connected to the power sockets before you switch the
ignition on or off and before starting the engine, to avoid damage from voltage
fluctuations.
■
Observe the operating instructions for the connected devices!
75Seats and useful equipment
Page 92 of 266
Securing the loading floor in the raised positionFig. 88
Secured loading floor in the
raised position
First read and observe the introductory information and safety warn-
ings on page 88.
›
Fold up the hooks on the fastening strip in direction of arrow
1
» Fig. 80 on
page 84.
›
Fold up the variable loading floor behind the rear back backrests.
›
Fold down the hooks in direction of arrow
3
» Fig. 80 on page 84 as far as the
stop.
›
Support the variable loading floor on the hooks folded downwards » Fig. 88.
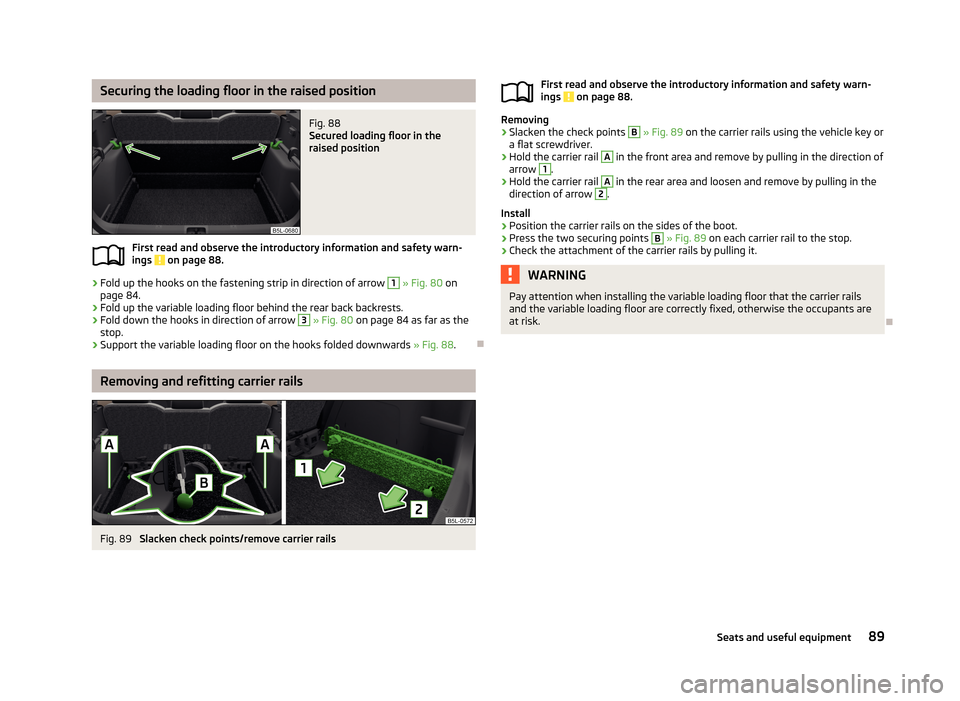
Removing and refitting carrier rails
Fig. 89
Slacken check points/remove carrier rails
First read and observe the introductory information and safety warn-
ings on page 88.
Removing
›
Slacken the check points
B
» Fig. 89 on the carrier rails using the vehicle key or
a flat screwdriver.
›
Hold the carrier rail
A
in the front area and remove by pulling in the direction of
arrow
1
.
›
Hold the carrier rail
A
in the rear area and loosen and remove by pulling in the
direction of arrow
2
.
Install
›
Position the carrier rails on the sides of the boot.
›
Press the two securing points
B
» Fig. 89 on each carrier rail to the stop.
›
Check the attachment of the carrier rails by pulling it.
WARNINGPay attention when installing the variable loading floor that the carrier rails
and the variable loading floor are correctly fixed, otherwise the occupants are
at risk.
89Seats and useful equipment
Page 96 of 266
Note■Do not cover the air outlet vents with any objects, of any kind.■The air outlet vents 6 » Fig. 92 are only fitted on vehicles with the higher centre
console.
Recirculation
First read and observe the introductory information and safety warn-ings
on page 91.
Recirculated air mode prevents polluted air outside the vehicle from getting into
the vehicle, e.g. when driving through a tunnel or in a traffic jam.
In recirculated air mode air is sucked out of the interior of the vehicle and thenfed back into the interior.
Heating and air conditioning (manual air conditioning)
To turn the recirculation mode on or off, press the Symbol key
.
The air recirculation mode is automatically turned off by turning the air distribu-
tion control
C
to position
» Fig. 93 on page 94 or » Fig. 94 on page 94 .
Recirculated air mode can be switched on again from this position by repeatedly
pressing the symbol button
.
Climatronic (automatic air conditioning)
To turn the recirculation mode on, press the Symbol key
repeatedly until the
indicator light is lit on the left side of the button.
To activate the automatic recirculation mode, press the Symbol key
repeat-
edly until the indicator light is lit on the right side of the button.
Climatronic has an air quality sensor for the detection of the pollutant concentra-
tion in the sucked-in air.
If a considerable increase in concentration of pollutants is recognised by the air
quality sensor, recirculated air mode will temporarily be switched on.
If the concentration of pollutants decreases to the normal level, the air distribu-tion control is automatically switched off so that fresh air can be guided into the
vehicle interior.
If the air quality sensor does not automatically switch on the recirculated air
mode in the event of an unpleasant odour, you can switch it on yourself by press-
ing the button . The indicator light lights up in the button on the left side.
To
turn off the air recirculation or to deactivate the automatic air recirculations ,
press the button of press the symbol button repeatedly until the warning
lights in the button go out.WARNINGNever leave recirculated air mode switched on over a longer period of time, as
“stale air” can cause driver and passenger fatigue, reduce attention levels and
also cause the windows to mist up. The risk of having an accident increases.
Switch off recirculated air mode as soon as the windows start to mist up.
CAUTION
We recommend not smoking in the vehicle when the recirculating air operation is switched on. The smoke sucked from inside the vehicle is deposited on the evap-orator of the air conditioner. This produces a permanent odour when the air con-
ditioning system is operating which can only be eliminated through considerable effort and expense (replacement of compressor).
Note
The automatic air distribution control operates only if the outside temperature is
higher than approx. 2 °C.
93Heating and air-conditioning
Page 107 of 266
›Confirm the PIN 1)
.›If the hands-free system announces (as standard SKODA_BT) on the display of
the mobile phone, enter the PIN 1 )
within 30 seconds and wait, until the connec-
tion is established 2)
.›
To finish pairing in the MAXI DOT display, confirm the creation of the new user
profile.
If there is no free space available to create a new user profile, delete an existing
user profile.
During the connecting procedure, no other mobile phone may be connected with the hands-free system.
Up to four mobile phones can be paired with the hands-free system, whereby on- ly one mobile phone can communicate with the hands-free system.
The visibility of the hands-free system is automatically switched off 3 minutes af-
ter the ignition is switched on and is also deactivated when the mobile phone has
connected to the hands-free system.
Restoring the visibility of the hands-free system
If you have not managed to connect your mobile phone with the hands-free sys- tem within 3 minutes of switching on the ignition, the visibility of the hands-free system can be reestablished for 3 minutes in the following ways.
› By turning the ignition off and on.
› By turning voice control off and on.
› In the MAXI DOT display under menu item
Bluetooth - Visibility .
Creating a connection with an already paired mobile phone
After switching on the ignition, the connection is automatically established for
the already paired mobile phone 2)
. Check on your mobile phone if the automatic
connection has been established.
Disconnecting the connection
› By withdrawing the ignition key.
› By disconnecting the hands-free system in the mobile phone.
› By disconnecting from the user in the MAXI DOT display under the menu item
Bluetooth - User .
Solving connection problems
If the hands-free system reports No paired phone found, check the operating
status of the mobile phone.
› Is the mobile phone switched on?
› Is the PIN code entered?
› Is Bluetooth ®
active?
› Is the visibility of the mobile phone active?
› Has the mobile phone already been paired with the hands-free system?
Telephone operation in the MAXI DOT display
First read and observe the introductory information given on page 103.
The following menu items can be selected from the Phone menu.
■ Phone book
■ Dial number 3)
■ Call register
■ Voice mailbox
■ Bluetooth 3)
■ Settings 4)
■ Back
Phone book
The Phone book menu item lists the contacts downloaded from the telephone
memory and the mobile phone SIM card.
1)
Depending on the Bluetooth®
version on the mobile phone, an automatically generated 6-digit PIN
(SSP) is either displayed, or the PIN 1234 has to be entered manually.
2)
Some mobile phones have a menu, in which the authorisation for establishing a Bluetooth ®
connec-
tion is completed by inputting a code. If the authorisation input is required, it must always be per-
formed when re-establishing the Bluetooth connection.
3)
On vehicles fitted with the Amundsen+ navigation system, this function can be accessed via the navi-
gation system menu; refer to the » operating instructions for the Amundsen+ navigation system .
4)
This function is not available in vehicles fitted with the Amundsen+ navigation system.
104Using the system
Page 109 of 266
NoteThe following guidelines must be observed » page 100, Mobile phones and two-
way radio systems .
Connecting the phone to the hands-free system
First read and observe the introductory information given on page 105.
To connect a mobile phone with the hands-free system, it is necessary to inter-
connect the telephone and hands-free system. Detailed information on this is
provided in the operating instructions for your mobile phone. The following steps must be carried out for the connection.
Connecting the telephone with the hands-free system via the rSAP profile
›
Activate Bluetooth ®
and the visibility of your mobile phone on your telephone.
For certain mobile phones it is necessary to switch on first the rSAP function.
›
Switch on the ignition.
›
Select the Phone - New user menu in the MAXI DOT display and wait until the
hands-free system has completed the search.
›
Select the phone you wish to connect from the list of units found.
›
Confirm the PIN 1)
.
›
If your SIM card is blocked by a PIN code, enter the PIN code for the SIM card in
your phone. The telephone connects to the hands-free system (during the first
connection you can only enter the PIN code in the MAXI DOT display when the
vehicle is stationary, as this is the only situation when you can choose whether
the PIN code should be stored).
›
To save a new user, follow the instructions in the Maxi DOT display.
›
Reconfirm the rSAP command on your mobile phone to download the tele-
phone book and the identification data from the SIM card into the hands-free
system.
Connecting the telephone with the hands-free system via the HPP profile
›
Activate Bluetooth ®
and the visibility of your mobile phone on your telephone.
›
Switch on the ignition.
› Select the
Phone - New user menu in the MAXI DOT display and wait until the
hands-free system has completed the search.›
Select the phone you wish to connect from the list of units found.
›
Confirm the PIN 1)
.
›
Follow the instructions on the MAXI DOT display and the mobile phone to store
a new user or to download the telephone book and identification data from the
SIM card into the hands-free system.
The telephone primarily connects via the rSAP profile.
If the PIN code was stored, the telephone is automatically detected and connec-
ted with the hands-free system the next time the ignition is switched on. Check
your mobile phone to see whether this automatic connection has been establish-
ed.
Disconnecting the connection
› By removing the key from the ignition lock (the connection is disconnected dur-
ing a telephone call).
› By disconnecting the hands-free system in the mobile phone.
› Select the user by disconnecting the user in the Maxi DOT display in the
Blue-
tooth - User menu option - Disconnect.
On vehicles which are fitted with a radio or navigation system at the factory, it is
possible to terminate the telephone call after removing the key from the ignition
lock by pressing the button on the touchscreen of the radio 2)
or navigation sys-
tem; refer to the » Operating instructions for the radio or navigation system .
Note
■
In the memory of the hands-free system, up to three users can be stored,
whereby the hands-free system can only communicate actively with one user. If a connection is established with a fourth mobile phone, one of the users must be
deleted.■
When connecting to the hands-free system, follow the instructions on your mo-
bile phone.
1)
Depending on the Bluetooth ®
version on the mobile phone, an automatically generated 6-digit PIN
(SSP) will either be displayed, or a 16-digit code displayed in the MAXI DOTdisplay will need to be en-
tered into your mobile phone and confirmed within 30 seconds by following the instructions on your
mobile phone display.
2)
Does not apply for Radio Swing.
106Using the system
Page 121 of 266
Power steeringFirst read and observe the introductory information and safety warn-ings
on page 117.
The power steering enables you to steer the vehicle with less physical force.
The power steering only works when the engine is running. It is still possible to fully steer the vehicle if the power steering fails or if the en-gine is not running (e.g. vehicle being towed in). However, greater physical effort is required to turn the steering wheel.
Starting and stopping the engine using the key
Introduction
This chapter contains information on the following subjects:
Electronic immobiliser
119
Ignition switch
119
Starting the engine
119
Stopping the engine
120
Starting and stopping the engine on vehicles with the KESSY system » page 120.
The engine can only be started with an appropriate original key.
The engine running noises may louder at first be louder for a short time after
starting the cold engine. This is quite normal and is not an operating problem.
WARNING■ When driving without the engine running, the ignition key must always be in
the position 2 » Fig. 105 on page 119 (ignition switched on). This position is
indicated by the illumination of certain indicator lights in the instrument clus-
ter. ■ If the key is not in position 2
, this could lead to unexpected the steering
locking - risk of accident!
■
Only pull the ignition key from the ignition lock when the vehicle has come
to a complete stop (by applying the handbrake). Otherwise, the steering could
be blocked – risk of accident!
■
When leaving the vehicle, the ignition must always be removed. This is par-
ticularly important if children are left in the vehicle. Children could otherwise
start the engine for example – risk of accident or injury!
■
Never leave the vehicle unattended with the engine running.
■
Never switch off the engine before the vehicle is stationary – risk of acci-
dent!
WARNING■ Never leave the engine running in unventilated or closed rooms. The ex-
haust gases from the engine contain substances such as odourless and col-
ourless carbon monoxide (a poisonous gas) – risk to life! ■ Carbon monoxide can cause unconsciousness and death.
CAUTION
■The starter must only be operated when the engine is not running and the vehi-
cle is at a standstill. The starter or engine may be damaged if the starter is activa- ted when the engine is running 3
» Fig. 105 on page 119.
■
Do not tow start the engine – there is a risk of damaging the engine and the
catalytic converter. The battery from another vehicle can be used as a jump-start
aid » page 226 , Jump-starting .
CAUTION
■
Avoid high engine revolutions, full throttle and high engine loads before the en-
gine has reached its operating temperature – risk of damaging the engine!■
Do not switch the engine off immediately at the end of your journey after the
engine has been operated over a prolonged period at high loads but leave it to
run at an idling speed for about 1 minute. This prevents any possible accumulation
of heat when the engine is switched off.
118Driving
Page 122 of 266
For the sake of the environmentDo not warm up the engine while the vehicle is stationary. If possible, start your
journey as soon as the engine has started. Through this the engine reaches its operating temperature more rapidly and the pollutant emissions are lower.
Note
After switching off the ignition, the radiator fan may intermittently continue to
operate for approx. 10 minutes.
Electronic immobiliser
First read and observe the introductory information and safety warn-
ings
on page 118.
An electronic chip is integrated in the head of the key. The immobiliser is deacti-
vated with the aid of this chip when the key is inserted in the ignition lock.
The electronic immobiliser is automatically activated when the ignition key is
withdrawn from the lock.
The engine will not start if a non-authorized ignition key is used.
The following message is shown in the information cluster display.
Immobilizer active.
IMMOBILIZER
Ignition switch
Fig. 105
Positions of the vehicle key in the ignition lockFirst read and observe the introductory information and safety warn-
ings on page 118.
Petrol engines » Fig. 105
Ignition switched off, engine off, the steering can be locked
Ignition switched on
Starting engine
Diesel engines » Fig. 105
Fuel supply interrupted, ignition switched off, engine switched off, the steer-
ing can be locked.
Heating glow plugs on, ignition switched on
Starting engine
To lock the steering , with the ignition key withdrawn, turn the steering wheel
until the steering locking pin engages audibly.
If the steering is locked and it is impossible or difficult to turn the key into posi-
tion
2
» Fig. 105 , move the steering wheel back and forth to unlock the steering.
Note
We recommend locking the steering wheel whenever leaving the vehicle. This
acts as a deterrent against the attempted theft of your car.
Starting the engine
First read and observe the introductory information and safety warn-
ings
on page 118.
Vehicles with a diesel engine are equipped with a glow plug system. The glow
plug warning light
illuminates after the ignition has been switched on. Start
the engine after the warning light
has gone out.
You should not switch on any major electrical components during the heating pe- riod otherwise the vehicle battery will be drained unnecessarily.
Procedure for starting the engine
›
Firmly apply the handbrake.
›
Move the gearshift lever into neutral or move the selector lever into position P
or N.
›
Switch on the ignition
2
» Fig. 105 on page 119.
123123119Starting-off and Driving
Page 123 of 266
›Depress and hold the clutch pedal (vehicles with a manual gearbox) or brake
pedal (vehicles with an automatic gearbox) until the engine starts.›
Turn the key into position
3
to the stop and release immediately after the en-
gine has been started – do not apply the accelerator.
After letting go, the vehicle key will return to position
2
.
If the engine does not start within 10 seconds, turn the key to position
1
. Repeat
the start-up process after approx. half a minute.
›
Release the handbrake.
Vehicles with manual transmission
The engine will not start if the clutch pedal is not depressed.
The following message is shown in the information cluster display.
Depress clutch to start!
CLUTCH
Vehicles with automatic transmission 1)
The engine will not start if the brake pedal is not depressed.
The warning light
lights up in the instrument cluster and the following mes-
sage appears in the display.
Depress brake to start!
BRAKE
CAUTION
■ If the engine does not start up after a second attempt, one of the following
fuses may be defective. ■Petrol engine - fuse for the fuel pump.
■ Diesel engine - fuse for the glow plug control unit or fuel pump.■
Check the fuse and replace if necessary » page 236, or seek assistance from a
specialist garage.
Stopping the engine
First read and observe the introductory information and safety warn-ings
on page 118.
Switch off the engine by turning the ignition key into position
1
» Fig. 105 on
page 119.
For vehicles with automatic transmission, the ignition key can only be removed if
the selector lever is in position P .
Starting and stopping the engine - KESSY
Introduction
This chapter contains information on the following subjects:
Steering lock / unlock
121
Switching on the ignition
122
Starting the engine
122
Switching off the ignition
123
Switching off the engine
123
Emergency start-up of the engine
123
Emergency ignition shutoff system
123
The KESSY system (Keyless Entry Exit System, hereinafter referred to only as sys- tem) allows the switching on or switching off of the ignition and starting or stop-ping of the engine without the active use of the key.
A key must be in the vehicle to unlock the steering, switch on the ignition and
start the vehicle. When travelling the key must be in the vehicle.
The engine running noises may louder at first be louder for a short time afterstarting the cold engine. This is quite normal and is not an operating problem.
1)
Applies to vehicles with START-STOP system.
120Driving
Page 124 of 266
WARNING■Never leave the key in the vehicle when you exit the vehicle. This is particu-
larly important if children are left in the vehicle. Otherwise the children could,
for example, start the engine – risk of accident or injury!■
Never leave the vehicle unattended with the engine running.
■
Never switch off the engine before the vehicle is stationary – risk of acci-
dent!
WARNING■ Never leave the engine running in unventilated or closed rooms. The ex-
haust gases from the engine contain substances such as odourless and col-
ourless carbon monoxide (a poisonous gas) – risk to life! ■ Carbon monoxide can cause unconsciousness and death.
CAUTION
■The system can recognize the valid key, even if it has been forgotten, for exam-
ple, in the front of the vehicle roof D » Fig. 14 on page 35 - There is danger of
loss or damage to the key! It is therefore not always necessary to know where
the key is.■
The starter must only be operated when the engine is not running and the vehi-
cle is at a standstill. The starter or engine may be damaged if the starter is activa- ted when the engine is running.
■
Do not tow start the engine – there is a risk of damaging the engine and the
catalytic converter. The battery from another vehicle can be used as a jump-start
aid » page 226 , Jump-starting .
CAUTION
■
Avoid high engine revolutions, full throttle and high engine loads before the en-
gine has reached its operating temperature – risk of damaging the engine!■
Do not switch the engine off immediately at the end of your journey after the
engine has been operated over a prolonged period at high loads but leave it to
run at an idling speed for about 1 minute. This prevents any possible accumulation
of heat when the engine is switched off.
For the sake of the environmentDo not warm up the engine while the vehicle is stationary. If possible, start your
journey as soon as the engine has started. Through this the engine reaches its operating temperature more rapidly and the pollutant emissions are lower.
Note
■ The system is protected against inadvertently switching off the engine while
driving, this means that the engine can only be switched off in an emergen- cy » page 123 .■
After switching off the ignition, the radiator fan may intermittently continue to
operate for approx. 10 minutes.
■
Under certain circumstances (e.g. after switching off the ignition and opening
the driver's door), the steering is enabled only when the ignition is switched on or the engine is started.
Steering lock / unlock
Fig. 106
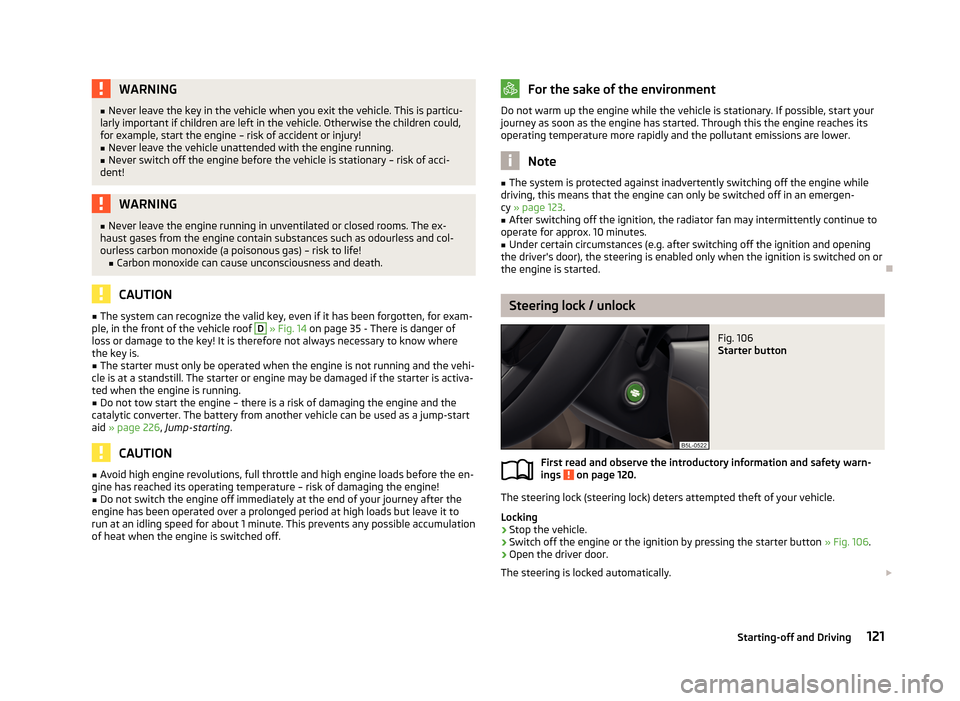
Starter button
First read and observe the introductory information and safety warn-
ings on page 120.
The steering lock (steering lock) deters attempted theft of your vehicle.
Locking
›
Stop the vehicle.
›
Switch off the engine or the ignition by pressing the starter button » Fig. 106.
›
Open the driver door.
The steering is locked automatically.
121Starting-off and Driving
Page 126 of 266
CAUTION■If the engine does not start up after a second attempt, one of the following
fuses may be defective. ■Petrol engine - fuse for the fuel pump.
■ Diesel engine - fuse for the glow plug control unit or fuel pump.■
Check the fuse and replace if necessary » page 236, or seek assistance from a
specialist garage.
Switching off the ignition
First read and observe the introductory information and safety warn-ings
on page 120.
›
Press the starter button » Fig. 106 on page 121 briefly.
The ignition is switched off.
The ignition can be switched off up to a speed of 2 km/h.
On vehicles fitted with a manual gearbox, the clutch pedal must not be de-
pressed after switching off the ignition, otherwise the system would try to start.
For automatic transmission vehicles, the brake pedal must not be depressed,
otherwise the system will try to start.
If the driver's door is opened while the ignition is on, an audible signal sounds and
the following message appears in the instrument cluster display.
Ignition on!
IGNITION SWITCHED ON
When leaving the vehicle always switch off the ignition.
Switching off the engine
First read and observe the introductory information and safety warn-ings
on page 120.
›
Stop the vehicle.
›
Press the starter button » Fig. 106 on page 121.
The engine and the ignition are switched off simultaneously.
Emergency start-up of the engineFig. 107
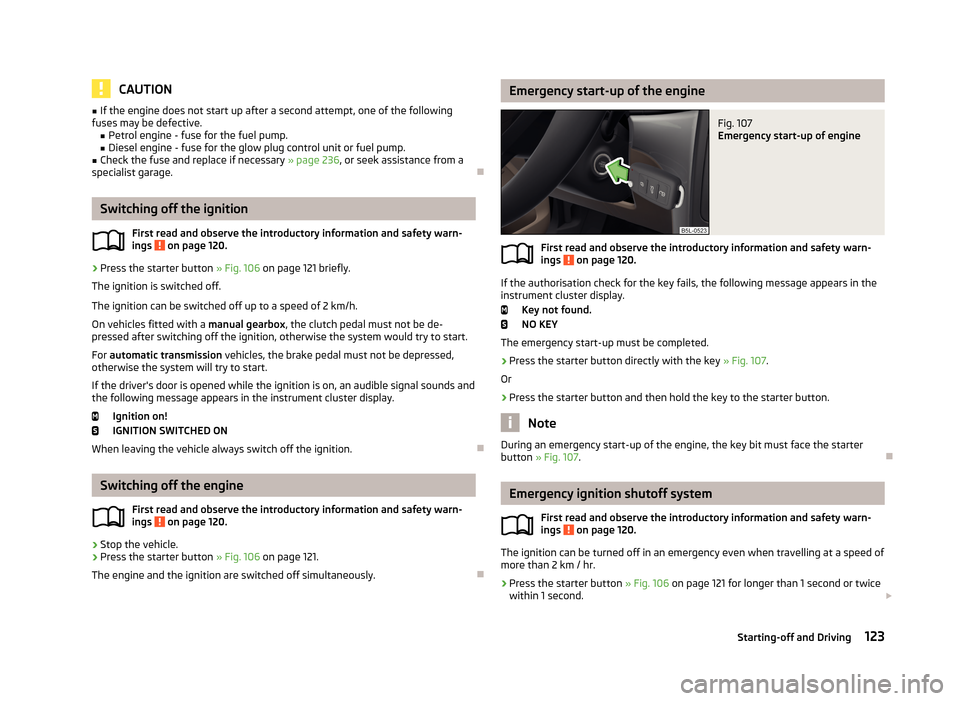
Emergency start-up of engine
First read and observe the introductory information and safety warn- ings on page 120.
If the authorisation check for the key fails, the following message appears in the
instrument cluster display.
Key not found.
NO KEY
The emergency start-up must be completed.
› Press the starter button directly with the key
» Fig. 107.
Or
› Press the starter button and then hold the key to the starter button.
Note
During an emergency start-up of the engine, the key bit must face the starter
button » Fig. 107 .
Emergency ignition shutoff system
First read and observe the introductory information and safety warn-
ings
on page 120.
The ignition can be turned off in an emergency even when travelling at a speed of
more than 2 km / hr.
›
Press the starter button » Fig. 106 on page 121 for longer than 1 second or twice
within 1 second.
123Starting-off and Driving