ESP SKODA YETI 2013 1.G / 5L Workshop Manual
[x] Cancel search | Manufacturer: SKODA, Model Year: 2013, Model line: YETI, Model: SKODA YETI 2013 1.G / 5LPages: 266, PDF Size: 26.71 MB
Page 240 of 266
›Insert a new fuse.›Replace the bracket at the original position.›
Re-insert the cover of the fuse box .
Fuse assignment in the dash panel
No.Power consumer1Heating of the gearbox ventilation (diesel engine)
Control unit for automatic gearbox DSG2-3Tow hitch4Instrument cluster, windshield wiper lever, turn signal light lever,
camera5Air blower for heating, radiator fan, air conditioning system, Clima-
tronic6Rear window wiper7Phone8Tow hitch9Vehicle voltage control unit - interior lights
Rear fog light10Rain sensor, light switch, diagnosis connector, removable light11Left side cornering lights12Right side cornering lights13Radio, DVD14Central control unit, engine control unit15Light switch16Haldex17KESSY controller, steering wheel locking18Diagnostic socket, engine control unit, brake sensor, Haldex19Control unit for ABS, ESP, switch for tyre air pressure control, control
unit for parking aid, switch for OFF ROAD mode, START STOP button20Switch and airbag control unit21WIV, tail lamp, dimming mirror, pressure sensor, telephone prepara- tion, air mass sensor, control unit for headlight range control and
headlight tilt22Instrument cluster controller for electro-mechanical power steering, control unit for data bus23Central locking system and bonnet lidNo.Power consumer24Rear power window25Rear window heater, auxiliary heating and ventilation26Power socket in the boot27Electric sliding/tilting roof, electric sun screen28Fuel pump, injection valves29Front power window30front and rear lighter31Headlight cleaning system32Front seat heating, regulator for seat heating33Heating, air conditioning, Climatronic, remote control for auxiliary
heating34Alarm, spare horn35Control unit for automatic gearbox DSG36Tow hitch
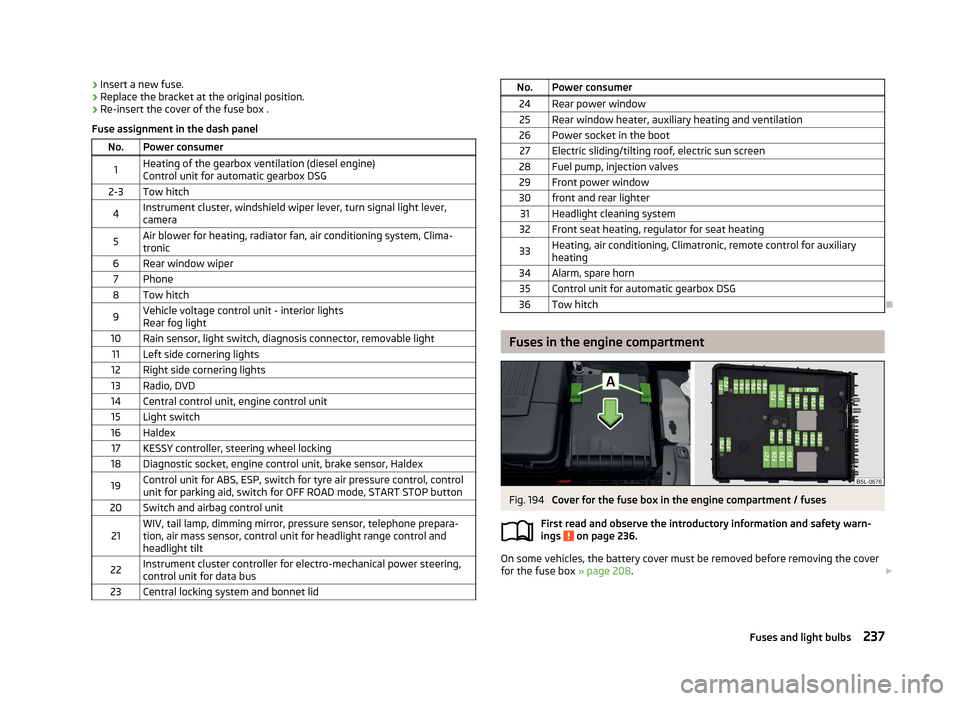
Fuses in the engine compartment
Fig. 194
Cover for the fuse box in the engine compartment / fuses
First read and observe the introductory information and safety warn-
ings
on page 236.
On some vehicles, the battery cover must be removed before removing the cover
for the fuse box » page 208.
237Fuses and light bulbs
Page 242 of 266
Remove the protective grille for fog lights - sensor plug for parkingassistance241
Replacing the bulb for the fog lights
241
Replacing the bulb for the licence plate light
242
Rear light
242
Replacing bulbs in rear light
243
Some manual skills are required to change a bulb. For this reason, we recommend
having bulbs replaced by a specialist garage or seeking other expert help in the
event of any uncertainties.
› Switch off the ignition and all of the lights before replacing a bulb.
› Faulty bulbs must only be replaced with the same type of bulbs. The designa-
tion is located on the light socket or the glass bulb.
› A stowage compartment for replacement bulbs is located in a box under the
floor covering in the luggage compartment.
WARNING■ Always read and observe the warnings before completing any work in the
engine compartment » page 199.■
Accidents can be caused if the road in front of the vehicle is not sufficiently
illuminated and the vehicle cannot or can only be seen with difficulty by other
road users.
■
Bulbs H7 and H4 are pressurised and may burst when changed - there is a
risk of injury. We therefore recommended wearing gloves and safety glasses
when changing a bulb.
■
Gas discharge bulbs (xenon bulbs) operate with a high voltage, professional
knowledge is required – risk of death!
■
Switch off the respective vehicle light when changing the bulb.
CAUTION
Do not take hold of the glass bulb with naked fingers (even the smallest amount of dirt reduces the working life of the light bulb). Use a clean cloth, napkin, or sim-
ilar.Note■ This Owner's Manual only describes the replacement of bulbs where it is possi-
ble to replace the bulbs on your own without any complications arising. Other bulbs must be replaced by a specialist garage.■
We recommend that a box of replacement bulbs always be carried in the vehi-
cle. Replacement bulbs can be purchased from ŠKODAOriginal Accessories.
■
We recommend having the headlight settings checked by a specialist garage af-
ter replacing a bulb in the main beam, low beam or fog lights.
■
In case of failure of a xenon gas discharge lamp or an LED diode, visit a special-
ist garage.
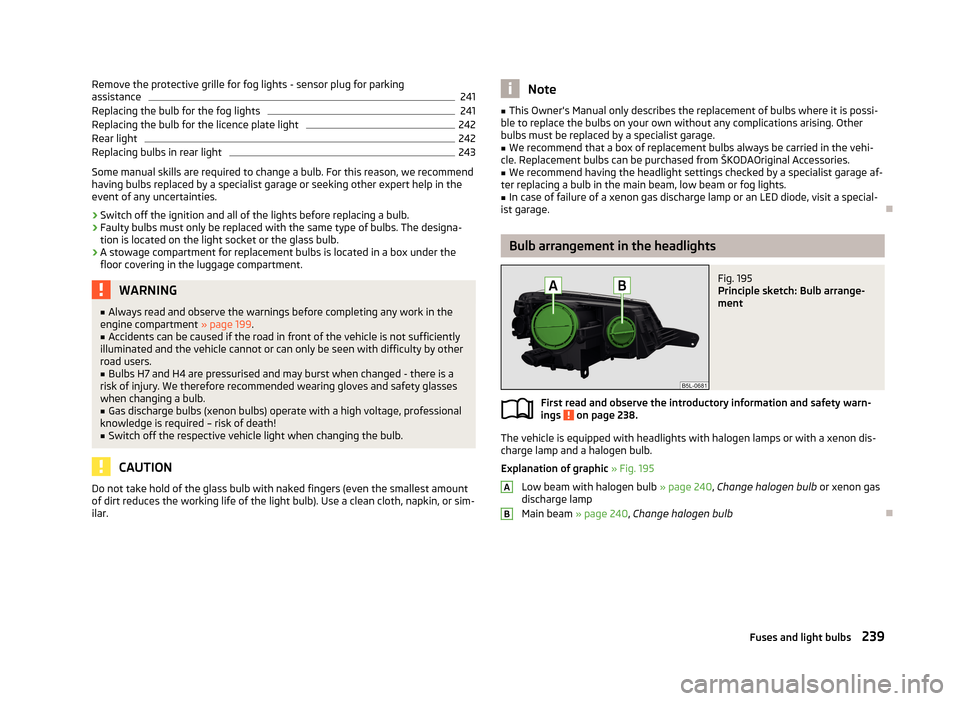
Bulb arrangement in the headlights
Fig. 195
Principle sketch: Bulb arrange-
ment
First read and observe the introductory information and safety warn-
ings on page 238.
The vehicle is equipped with headlights with halogen lamps or with a xenon dis-
charge lamp and a halogen bulb.
Explanation of graphic » Fig. 195
Low beam with halogen bulb » page 240, Change halogen bulb or xenon gas
discharge lamp
Main beam » page 240, Change halogen bulb
AB239Fuses and light bulbs
Page 243 of 266
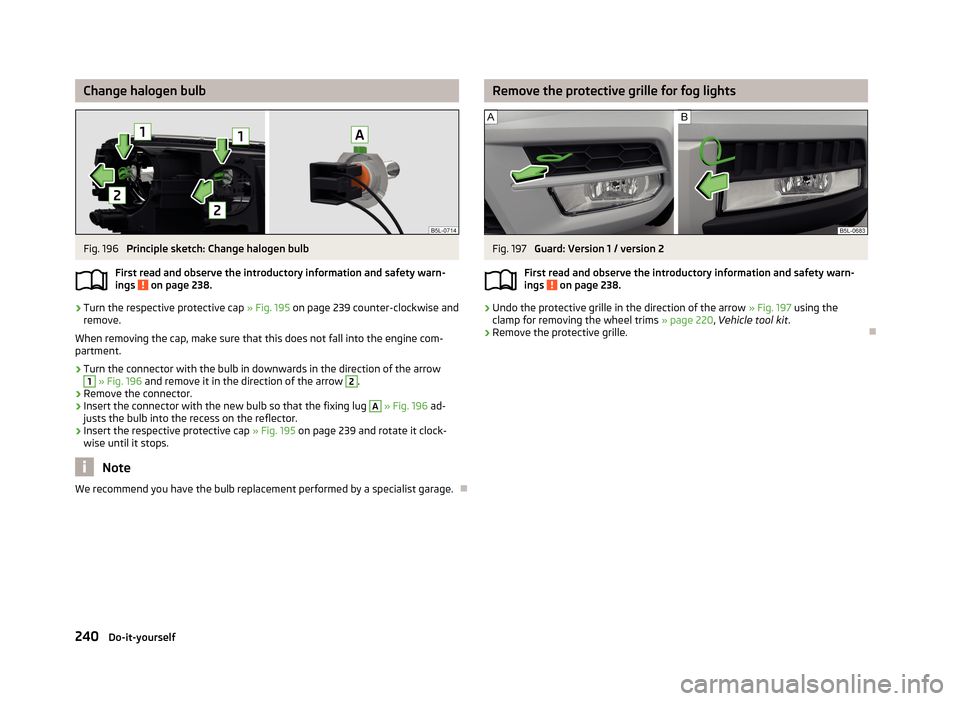
Change halogen bulbFig. 196
Principle sketch: Change halogen bulb
First read and observe the introductory information and safety warn-
ings
on page 238.
›
Turn the respective protective cap » Fig. 195 on page 239 counter-clockwise and
remove.
When removing the cap, make sure that this does not fall into the engine com-
partment.
›
Turn the connector with the bulb in downwards in the direction of the arrow
1
» Fig. 196 and remove it in the direction of the arrow
2
.
›
Remove the connector.
›
Insert the connector with the new bulb so that the fixing lug
A
» Fig. 196 ad-
justs the bulb into the recess on the reflector.
›
Insert the respective protective cap » Fig. 195 on page 239 and rotate it clock-
wise until it stops.
Note
We recommend you have the bulb replacement performed by a specialist garage.
Remove the protective grille for fog lightsFig. 197
Guard: Version 1 / version 2
First read and observe the introductory information and safety warn- ings
on page 238.
›
Undo the protective grille in the direction of the arrow » Fig. 197 using the
clamp for removing the wheel trims » page 220, Vehicle tool kit .
›
Remove the protective grille.
240Do-it-yourself
Page 246 of 266
›Carefully press the light into the body so that the bolts 1
» Fig. 204 on
page 243 or » Fig. 205 on page 243 on the light engage into the mounts on the
body.›
Screw the light with the screws » Fig. 202into place.
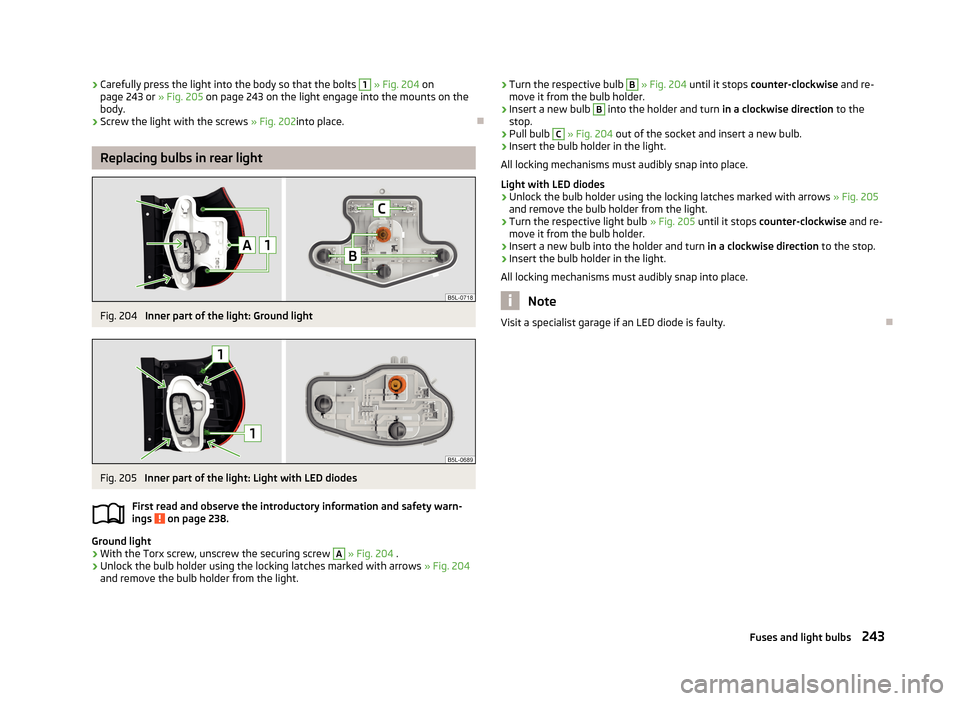
Replacing bulbs in rear light
Fig. 204
Inner part of the light: Ground light
Fig. 205
Inner part of the light: Light with LED diodes
First read and observe the introductory information and safety warn- ings
on page 238.
Ground light
›
With the Torx screw, unscrew the securing screw
A
» Fig. 204 .
›
Unlock the bulb holder using the locking latches marked with arrows » Fig. 204
and remove the bulb holder from the light.
› Turn the respective bulb B
» Fig. 204 until it stops counter-clockwise and re-
move it from the bulb holder.›
Insert a new bulb
B
into the holder and turn in a clockwise direction to the
stop.
›
Pull bulb
C
» Fig. 204 out of the socket and insert a new bulb.
›
Insert the bulb holder in the light.
All locking mechanisms must audibly snap into place.
Light with LED diodes
›
Unlock the bulb holder using the locking latches marked with arrows » Fig. 205
and remove the bulb holder from the light.
›
Turn the respective light bulb » Fig. 205 until it stops counter-clockwise and re-
move it from the bulb holder.
›
Insert a new bulb into the holder and turn in a clockwise direction to the stop.
›
Insert the bulb holder in the light.
All locking mechanisms must audibly snap into place.
Note
Visit a specialist garage if an LED diode is faulty.
243Fuses and light bulbs
Page 248 of 266
The operating weight also contains the weight of the driver (75 kg), the weight of
the operating fluids, the tool kit, and a fuel tank filled to 90 % capacity.
It is possible to calculate the approximate loading capacity from the difference
between the permissible total weight and the operating weight »
.
The payload consists of the following components. › The weight of the rider.
› The weight of all luggage and other loads.
› The weight of the roof, including the roof rack system.
› The weight of the equipment that are excluded from the operating weight.
› The trailer nose weight with trailer (max. 80 kg and 85 kg 1)
).
Fuel consumption and CO 2 emissions according to ECE regulations and EU
directives
The measurement of the intra-urban cycle begins with a cold start of the engine.
Afterwards urban driving is simulated.
In the extra-urban driving cycle, the vehicle is accelerated and decelerated in all
gears, corresponding to daily routine driving conditions. The driving speed varies
between 0 and 120 km/h.
The calculation of the combined fuel consumption considers a weighting of about 37 % for the intra-urban cycle and 63 % for the extra-urban cycle.
WARNINGDo not exceed the specified maximum permissible weights – risk of accident
and damage!
Note
■ If required, you can find out the precise weight of your vehicle at a specialist ga-
rage.■
The fuel consumption and emission values have been determined in accordance
with rules and under conditions set out by legal or technical requirements for de-
termining operational and technical data for motor vehicles.
■
Depending on the range of equipment, style of driving, traffic situation, weather
influences and vehicle condition, consumption values may deviate from the indi-
cated values.
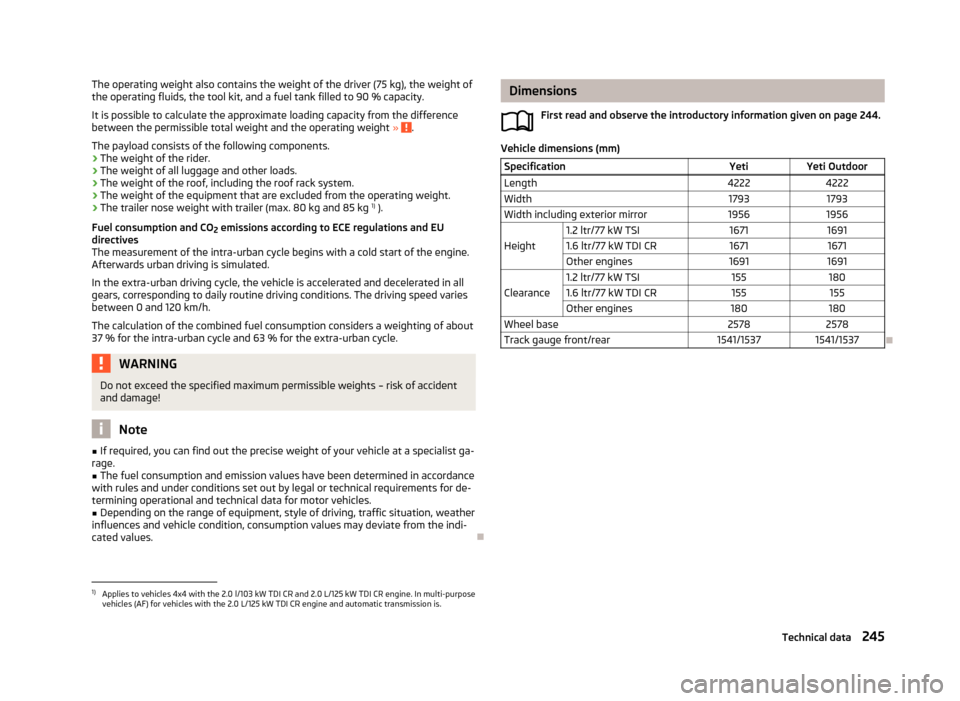
Dimensions
First read and observe the introductory information given on page 244.
Vehicle dimensions (mm)
SpecificationYetiYeti OutdoorLength42224222Width17931793Width including exterior mirror19561956
Height
1.2 ltr/77 kW TSI167116911.6 ltr/77 kW TDI CR16711671Other engines16911691
Clearance
1.2 ltr/77 kW TSI1551801.6 ltr/77 kW TDI CR155155Other engines180180Wheel base25782578Track gauge front/rear1541/15371541/1537
1)
Applies to vehicles 4x4 with the 2.0 l/103 kW TDI CR and 2.0 L/125 kW TDI CR engine. In multi-purpose
vehicles (AF) for vehicles with the 2.0 L/125 kW TDI CR engine and automatic transmission is.
245Technical data