ESP SKODA YETI 2013 1.G / 5L Owner's Guide
[x] Cancel search | Manufacturer: SKODA, Model Year: 2013, Model line: YETI, Model: SKODA YETI 2013 1.G / 5LPages: 266, PDF Size: 26.71 MB
Page 98 of 266
NoteThe warning light in the button lights after activation, even if not all of the
conditions for the function of the cooling system have been met. By lighting up of the indicator light in the button, the operational readiness of the cooling system
is signalled.
Climatronic (automatic air conditioning)
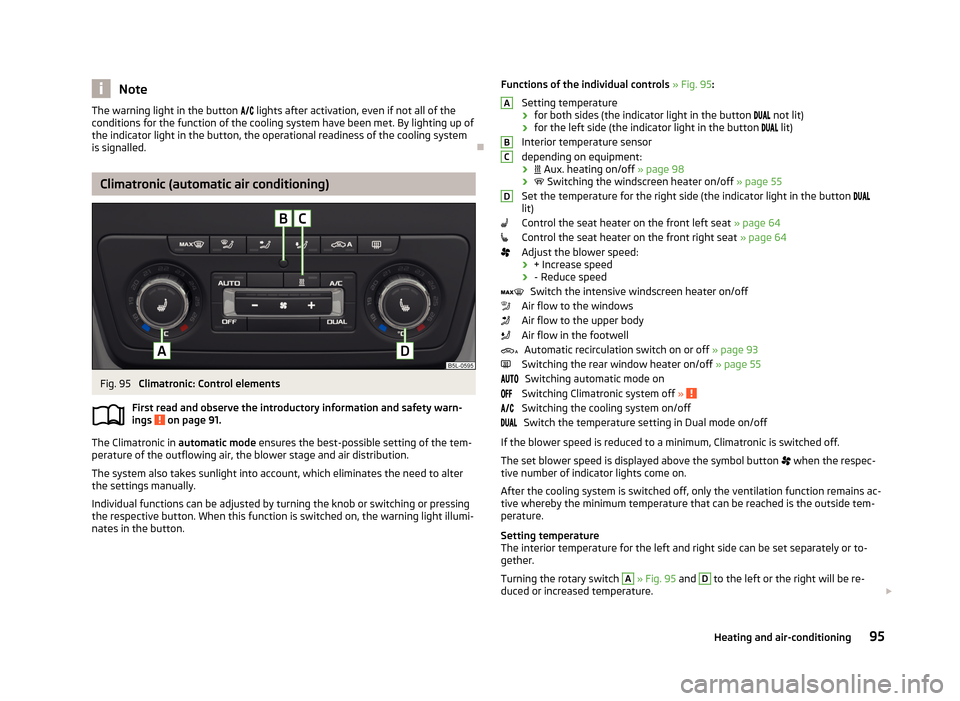
Fig. 95
Climatronic: Control elements
First read and observe the introductory information and safety warn- ings
on page 91.
The Climatronic in automatic mode ensures the best-possible setting of the tem-
perature of the outflowing air, the blower stage and air distribution.
The system also takes sunlight into account, which eliminates the need to alterthe settings manually.
Individual functions can be adjusted by turning the knob or switching or pressing the respective button. When this function is switched on, the warning light illumi-
nates in the button.
Functions of the individual controls » Fig. 95 :
Setting temperature
› for both sides (the indicator light in the button
not lit)
› for the left side (the indicator light in the button
lit)
Interior temperature sensor
depending on equipment:
›
Aux. heating on/off » page 98
›
Switching the windscreen heater on/off » page 55
Set the temperature for the right side (the indicator light in the button
lit)
Control the seat heater on the front left seat » page 64
Control the seat heater on the front right seat » page 64
Adjust the blower speed:
› + Increase speed
› - Reduce speed
Switch the intensive windscreen heater on/off
Air flow to the windows
Air flow to the upper body
Air flow in the footwell
Automatic recirculation switch on or off » page 93
Switching the rear window heater on/off » page 55
Switching automatic mode on
Switching Climatronic system off »
Switching the cooling system on/off
Switch the temperature setting in Dual mode on/off
If the blower speed is reduced to a minimum, Climatronic is switched off. The set blower speed is displayed above the symbol button
when the respec-
tive number of indicator lights come on.
After the cooling system is switched off, only the ventilation function remains ac-tive whereby the minimum temperature that can be reached is the outside tem-
perature.
Setting temperature
The interior temperature for the left and right side can be set separately or to-
gether.
Turning the rotary switch
A
» Fig. 95 and
D
to the left or the right will be re-
duced or increased temperature.
ABCD95Heating and air-conditioning
Page 116 of 266
If the system does not recognise the command, it repeats the first part of thehelp thus enabling a new entry to be completed. After the 2nd error the systemrepeats the second part of the aid. After the 3rd failed attempt, the answer “ Can-
celled. ” is given and the dialogue is ended.
Storing voice recording for a contact
If automatic name recognition does not work reliably for some contacts, you can
choose to save your own voice tag for the contact in the Phone book - Voice tag -
Record menu item.
Your own voice tag can also be saved using the voice control in the FURTHER OP-
TIONS menu.
Multimedia
Introduction
This chapter contains information on the following subjects:
Music playback via Bluetooth ®
113
Operating the radio and navigation system on the multifunction steering
wheel
113
AUX- and MDIinputs
115CD change115DVD-preinstallation116
Music playback via Bluetooth ®
First read and observe the introductory information given on page 113.
The universal telephone preinstallation makes it possible to play back music via
Bluetooth ®
from devices such as MP3 players, mobile phones or notebooks.
To ensure that music can be played via Bluetooth ®
, you must first pair the device
with the hands-free system in the Phone - Bluetooth - Media player menu.
The music playback process is performed on the connected device.
The universal telephone preinstallation GSM II ensures that the music played back
via the hands-free system can be controlled with the remote control » page 112,
Voice commands - GSM II .
Note
The device being connected must support the Bluetooth ®
A2DP profile; refer to
the operating instructions for the relevant device being connected.
Operating the radio and navigation system on the multifunction steering wheel
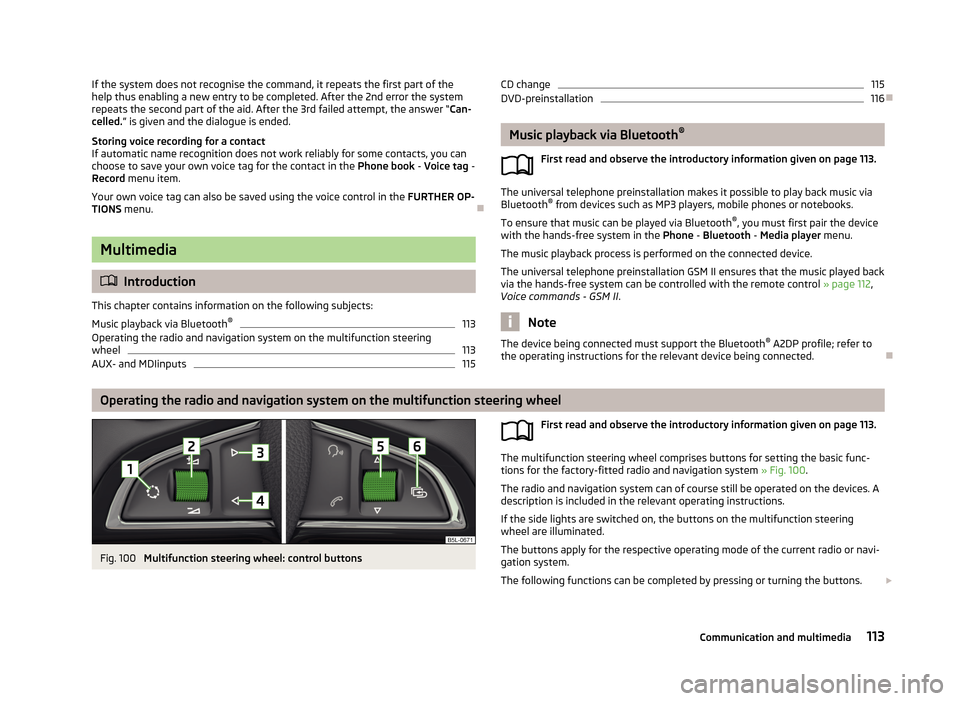
Fig. 100
Multifunction steering wheel: control buttons
First read and observe the introductory information given on page 113.
The multifunction steering wheel comprises buttons for setting the basic func-
tions for the factory-fitted radio and navigation system » Fig. 100.
The radio and navigation system can of course still be operated on the devices. A
description is included in the relevant operating instructions.
If the side lights are switched on, the buttons on the multifunction steeringwheel are illuminated.
The buttons apply for the respective operating mode of the current radio or navi- gation system.
The following functions can be completed by pressing or turning the buttons.
113Communication and multimedia
Page 118 of 266
AUX- and MDIinputsFirst read and observe the introductory information given on page 113.
The AUX and MDI inputs are used to connect external audio sources (e.g. iPod ormp3 player) and to play back music from these devices via the factory-fitted radio
or navigation system.
The AUX input for external audio sources is located below the armrest of the
front seats and is marked with the 1)
symbol.
The MDI input is above the storage compartment in the front center console and
has the identifier
» page 72 characterized.
For a description of use, refer to the operating instructions for the relevant radio or navigation system.
CD change
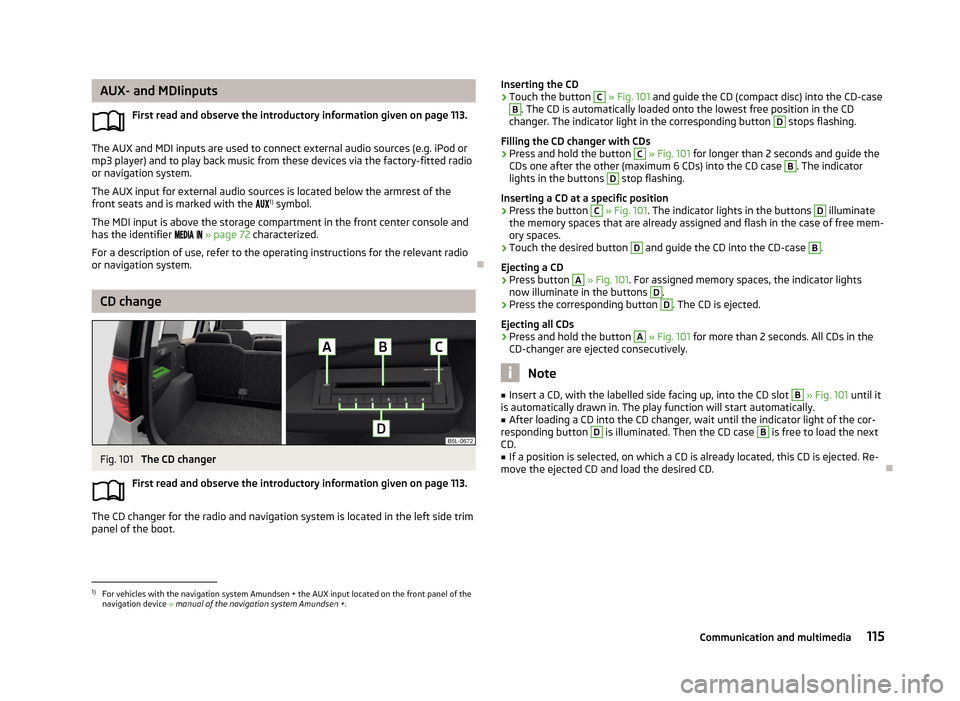
Fig. 101
The CD changer
First read and observe the introductory information given on page 113.
The CD changer for the radio and navigation system is located in the left side trim panel of the boot.
Inserting the CD›Touch the button C » Fig. 101 and guide the CD (compact disc) into the CD-caseB
. The CD is automatically loaded onto the lowest free position in the CD
changer. The indicator light in the corresponding button
D
stops flashing.
Filling the CD changer with CDs
›
Press and hold the button
C
» Fig. 101 for longer than 2 seconds and guide the
CDs one after the other (maximum 6 CDs) into the CD case
B
. The indicator
lights in the buttons
D
stop flashing.
Inserting a CD at a specific position
›
Press the button
C
» Fig. 101 . The indicator lights in the buttons
D
illuminate
the memory spaces that are already assigned and flash in the case of free mem-
ory spaces.
›
Touch the desired button
D
and guide the CD into the CD-case
B
.
Ejecting a CD
›
Press button
A
» Fig. 101 . For assigned memory spaces, the indicator lights
now illuminate in the buttons
D
.
›
Press the corresponding button
D
. The CD is ejected.
Ejecting all CDs
›
Press and hold the button
A
» Fig. 101 for more than 2 seconds. All CDs in the
CD-changer are ejected consecutively.
Note
■ Insert a CD, with the labelled side facing up, into the CD slot B » Fig. 101 until it
is automatically drawn in. The play function will start automatically.■
After loading a CD into the CD changer, wait until the indicator light of the cor-
responding button
D
is illuminated. Then the CD case
B
is free to load the next
CD.
■
If a position is selected, on which a CD is already located, this CD is ejected. Re-
move the ejected CD and load the desired CD.
1)
For vehicles with the navigation system Amundsen + the AUX input located on the front panel of the
navigation device » manual of the navigation system Amundsen + .
115Communication and multimedia
Page 129 of 266
WARNINGNever engage reverse gear when driving – risk of accident!
CAUTION
If not in the process of changing gear, do not leave your hand on the gearshiftlever while driving. The pressure from the hand can cause the gearshift mecha-nism to wear excessively.
Pedals
First read and observe the introductory information given on page 125.
The operation of the pedals must not be hindered under any circumstances!
In the driver's footwell, only a footmat, which is attached to the two correspond-
ing attachment points, may be used.
Only use factory-supplied footmats or footmats from the range of ŠKODA Original
Accessories, which are fitted to two attachment points.
WARNINGNo objects may be placed in the driver's footwell – risk due to obstruction or
limitation of pedal operation.
Automatic transmission
Introduction
This chapter contains information on the following subjects:
Modes and use of selector lever
127
Manual shifting of gears (Tiptronic)
127
Starting-off and driving
128
Malfunction
128WARNING■ Do not depress the accelerator if changing the forward driving mode – risk
of accident!■
Never move the selector lever to mode R or P when driving – risk of an acci-
dent!
■
When the vehicle is stationery and the engine is running, you need to hold
the vehicle with the brake pedal in mode D, S or R. Even when the engine is
idling, the power transmission is never completely interrupted – the vehicle
creeps.
CAUTION
■ If you moved the selector lever to mode N while driving, you need to release the
accelerator pedal and wait until the engine has reached its idling speed, before
you can move the selector lever to a forward driving mode again.■
At temperatures below -10 °C the engine can only be started in the selector lev-
er position P.
■
When trying to stop on a slope, never try to hold the vehicle using the accelera-
tor pedal – this may lead to gear damage.
Note
After the ignition is switched off, the ignition key can only be withdrawn if the se-
lector lever is in the position P.
126Driving
Page 132 of 266
Defective selector lever lock
If the selector lever lock is defective or its power supply is interrupted (e.g. dis-
charged vehicle battery, blown fuse), the selector lever can no longer be moved
out of position P in the normal manner, and the vehicle can no longer be moved.
The selector lever must be unlocked specially » page 233.
Note
If the gearbox has switched to the emergency programme, visit a specialist ga-
rage.
Running in
Introduction
This chapter contains information on the following subjects:
New engine
129
New tyres
129
New brake pads
130
New engine
First read and observe the introductory information given on page 129.
The engine has to be run in during the first 1 500 kilometres.Up to 1 000 kilometres
›
Do not drive faster than 3/4 of the maximum speed of the gear in use, i.e. 3/4 of
the maximum permissible engine speed.
›
No full throttle.
›
Avoid high engine speeds.
›
Do not tow a trailer.
From 1 000 up to 1 500 kilometres
Gradually increase the power output of the engine up to the full speed of the
gear engaged, i.e. up to the maximum permissible engine speed.
The red scale of the rev counter indicates the range in which the system beginsto limit the engine speed.
During the first operating hours the engine has higher internal friction than later
until all of the moving parts have harmonized. The driving style which you adopt
during the first approx.1 500 kilometres plays a decisive part in the success of
running in your car.
Never drive at unnecessarily high engine speeds, even after the running-in period is complete.
On vehicles fitted with a manual gearbox, at the very latest shift up into the next
gear when the red area is reached. Observe the recommended gear » page 24,
Gear recommendation . Very high engine speeds when accelerating (accelerator)
are automatically restricted »
.
With vehicles with a manual gearbox, do not drive at unnecessarily low engine
speeds. Shift down a gear when the engine is no longer running smoothly. Ob-
serve the recommended gear » page 24, Gear recommendation .
CAUTION
■
The engine is not protected from excessive engine revs caused by shifting
down at the wrong time. This can result in the sudden increase in revs beyond
the permissible maximum rpm and thus cause engine damage.■
Never rev up a cold engine when the vehicle is stationary or when driving in in-
dividual gears.
For the sake of the environment
Do not drive at unnecessarily high engine speeds. Shifting up sooner helps save
on fuel, reduces engine noises and protects the environment.
New tyres
First read and observe the introductory information given on page 129.
New tyres must firstly be “run in”, as they do not offer optimal grip at first. There-fore, drive especially carefully for the first 500 km or so.
129Starting-off and Driving
Page 133 of 266
New brake padsFirst read and observe the introductory information given on page 129.
New brake pads do not initially provide optimal braking performance. They first
need to be “run in”. Therefore, drive especially carefully for the first 200 km or so.
Economical driving and environmental sustainability
Introduction
This chapter contains information on the following subjects:
Looking ahead
130
Economical gear changing
131
Avoiding full throttle
131
Reducing idling
131
Avoiding short distances
132
Checking tyre inflation pressure
132
Avoiding unnecessary ballast
132
Regular maintenance
132
Saving electrical energy
133
Environmental compatibility
133
The technical requirements for low fuel usage and economic efficiency of the ve-
hicle have already been built into the vehicle at the works. ŠKODA places a partic-
ular emphasis on minimising negative effects on the environment.
It is necessary to take note of the guidelines given in this chapter in order tomake best use of these characteristics and to maintain their effectiveness.
Fuel consumption, environmental pollution and the wear to the engine, brakes
and tyres depend essentially on the following three factors:
› your personal driving style
› operating conditions
› technical requirements
The fuel economy by can be improved by 10 -15 % by always looking ahead and
driving in an economical way.
Fuel consumption is also be influenced by external factors which are beyond the
driver's control. Consumption increases during the winter or under difficult condi-
tions, on poor roads, etc.
Fuel consumption can vary considerably from the manufacturer's data, as a result
of outside temperatures, the weather and driving style.
The optimal engine speed should be obtained when accelerating, in order to
avoid a high fuel consumption and resonance of the vehicle.
CAUTION
All the speed and engine revolution figures apply only when the engine is at its
normal operating temperature.
Looking ahead
First read and observe the introductory information and safety warn-
ings
on page 130.
A vehicle's highest fuel consumption occurs when accelerating, therefore unnec-
essary accelerating and braking should be avoided. If looking ahead when driving, less braking and consequently less accelerating are required.
If possible, let your vehicle coast to a stop, or use the engine brake, if you can see that the next set of traffic lights is on red, for example.
130Driving
Page 138 of 266
At a higher speed, a water wave can form in front of the vehicle which can causewater to penetrate into the air induction system of the engine or into other partsof the vehicle.›
Never stop in the water, do not reverse and do not switch the engine off.
›
Deactivate the START-STOP system before driving through water » page 149.
Off-road driving
First read and observe the introductory information and safety warn-
ings
on page 134.
Only drive on such roads and in such terrain, which match the vehicle parame-
ters » page 244 , Technical data as well as your driving skills.
The driver is always responsible for deciding whether the vehicle can handle trav-
elling in the given terrain.
When travelling off paved roads, we recommend activating the OFF ROAD
mode » page 138 .
Driving abroad
Introduction
This chapter contains information on the following subjects:
Unleaded petrol
135
Headlights
135
In certain countries, it may be possible that the ŠKODA service partner network is
limited or has not been established. This is the reason why procuring certain
spare parts may be somewhat complicated and specialist garages may only be
able to make limited repairs.
Unleaded petrol
First read and observe the introductory information given on page 135.
A vehicle fitted with a petrol engine must always be refuelled with unleaded pet-rol » page 197 . Information regarding the locations of filling stations that offer
unleaded petrol is, for example, provided by the automobile associations.
Headlights
First read and observe the introductory information given on page 135.
The low beam of your headlights is set asymmetrically. It illuminates the side of
the road on which the vehicle is being driven to a greater extent.
When driving in countries in which the traffic drives on the other side of the road
than in your home country, the asymmetrical low beam may dazzle oncoming
drivers. In order to avoid this, the headlights must be adjusted at a specialist ga-
rage.
Headlights with Xenon lights can be adjusted in the menu of the MAXI DOT dis-
play » page 28 .
Note
You can find out more information on adjusting the headlights at a specialist ga-
rage.
135Starting-off and Driving
Page 141 of 266
The HBA is activated by very quick operation of the brake pedal. In order to ach-
ieve the shortest possible braking distance, the brake pedal must be applied firm-
ly until the vehicle has come to a standstill.
The HBA function is automatically deactivated when the brake pedal is released.
The ABS is activated faster and more effectively with the intervention of the HBA.
Hill Hold Control (HHC)
First read and observe the introductory information and safety warn-ings
on page 136.
When driving on slopes, HHC allows you to move your foot from the brake pedalto the accelerator pedal without having to use the handbrake.
The system holds the brake pressure produced by the activation of the brakepedal for approx. 2 seconds after the brake pedal is released.
The brake pressure drops gradually the more you operate the accelerator pedal. If the vehicle does not start off within 2 seconds, it starts to roll back.
The HHC is active from a 5% slope if the driver's door is closed. HHC is only ever
active on slopes when in forward or reverse start off. When driving downhill, it is
inactive.
OFF ROAD-mode
Introduction
This chapter contains information on the following subjects:
Operation
138
Activation / deactivation
140
The OFF ROAD mode supports the driver when driving away from paved roads.
But even with OFF ROAD mode activated, your vehicle is never a true SUV.
WARNING■ A lack of fuel can cause irregular engine running or cause the engine to shut
down. This would lead the OFF ROAD mode to lose its effectiveness - risk of accident!■
Adjust the speed and driving style to the current visibility, weather, road and
traffic conditions.
■
The increased safety offered by the OFF ROAD mode must not tempt you to
take greater risks than otherwise - risk of an accident!
CAUTION
■ The OFF ROAD mode is not designed for the use on common roads.■All four wheels must be fitted with the same tyres approved by the manufactur-
er to ensure theOFF ROAD mode operates correctly.
Operation
First read and observe the introductory information and safety warn-
ings
on page 138.
The OFF ROAD mode is ready to intervene at speeds below 30 km / hr. The readi-
ness of the system is the warning light
displayed in the instrument cluster.
The following functions are integrated in the OFF ROAD mode.
› Downhill Drive Support.
› Start-Off Assist.
› ABS OFF ROAD.
› TCS OFF ROAD.
› EDL OFF ROAD.
Downhill Drive Support
The hill descent assistant, with its automatic braking action on all wheels, en-
sures a constant speed on a steep slope when driving forwards and reversing.
The speed maintained corresponds to the speed of the vehicle at the time the As- sistant was first engaged.
During an intervention of the Assistants, the warning light
flashes in the in-
strument cluster.
By pressing the accelerator or brake pedal, the speed can be increased or re- duced. This is true even if the shift lever is in the neutral position and the selector
lever in the N position.
138Driving
Page 143 of 266
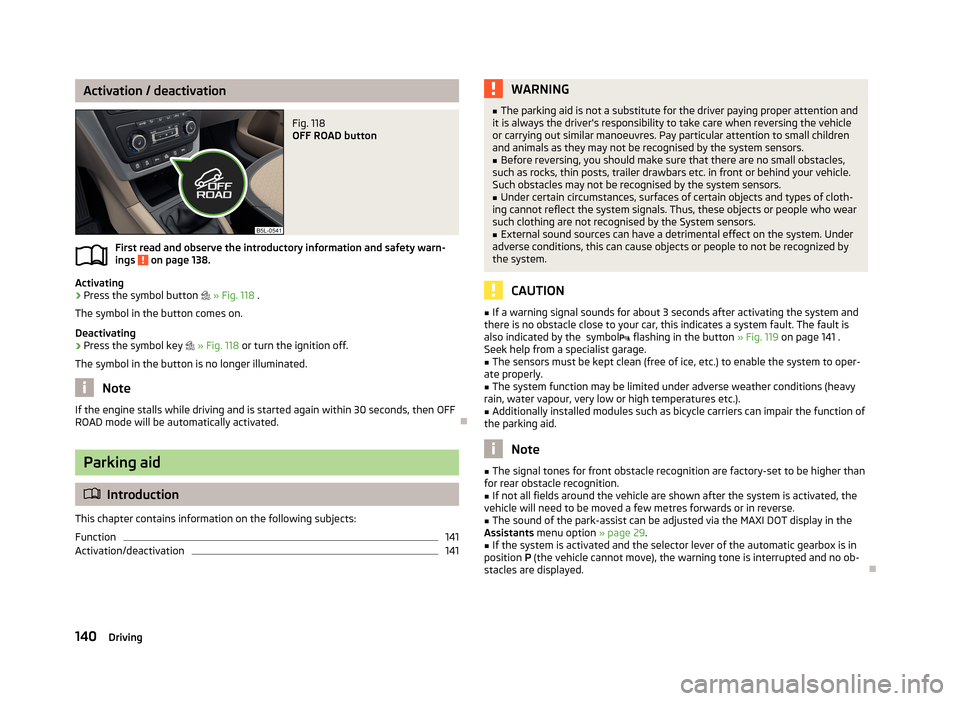
Activation / deactivationFig. 118
OFF ROAD button
First read and observe the introductory information and safety warn-ings on page 138.
Activating
›
Press the symbol button
» Fig. 118 .
The symbol in the button comes on.
Deactivating
›
Press the symbol key
» Fig. 118 or turn the ignition off.
The symbol in the button is no longer illuminated.
Note
If the engine stalls while driving and is started again within 30 seconds, then OFF
ROAD mode will be automatically activated.
Parking aid
Introduction
This chapter contains information on the following subjects:
Function
141
Activation/deactivation
141WARNING■ The parking aid is not a substitute for the driver paying proper attention and
it is always the driver's responsibility to take care when reversing the vehicle
or carrying out similar manoeuvres. Pay particular attention to small children
and animals as they may not be recognised by the system sensors.■
Before reversing, you should make sure that there are no small obstacles,
such as rocks, thin posts, trailer drawbars etc. in front or behind your vehicle.
Such obstacles may not be recognised by the system sensors.
■
Under certain circumstances, surfaces of certain objects and types of cloth-
ing cannot reflect the system signals. Thus, these objects or people who wear such clothing are not recognised by the System sensors.
■
External sound sources can have a detrimental effect on the system. Under
adverse conditions, this can cause objects or people to not be recognized by
the system.
CAUTION
■ If a warning signal sounds for about 3 seconds after activating the system and
there is no obstacle close to your car, this indicates a system fault. The fault is
also indicated by the symbol flashing in the button » Fig. 119 on page 141 .
Seek help from a specialist garage.■
The sensors must be kept clean (free of ice, etc.) to enable the system to oper-
ate properly.
■
The system function may be limited under adverse weather conditions (heavy
rain, water vapour, very low or high temperatures etc.).
■
Additionally installed modules such as bicycle carriers can impair the function of
the parking aid.
Note
■ The signal tones for front obstacle recognition are factory-set to be higher than
for rear obstacle recognition.■
If not all fields around the vehicle are shown after the system is activated, the
vehicle will need to be moved a few metres forwards or in reverse.
■
The sound of the park-assist can be adjusted via the MAXI DOT display in the
Assistants menu option » page 29.
■
If the system is activated and the selector lever of the automatic gearbox is in
position P (the vehicle cannot move), the warning tone is interrupted and no ob-
stacles are displayed.
140Driving
Page 145 of 266
This chapter contains information on the following subjects:
Orientation lines and monitored area142
Switching on/off
143
Optical Parking Assistant (hereinafter only as a system) supports the driver when
parking and manoeuvring.
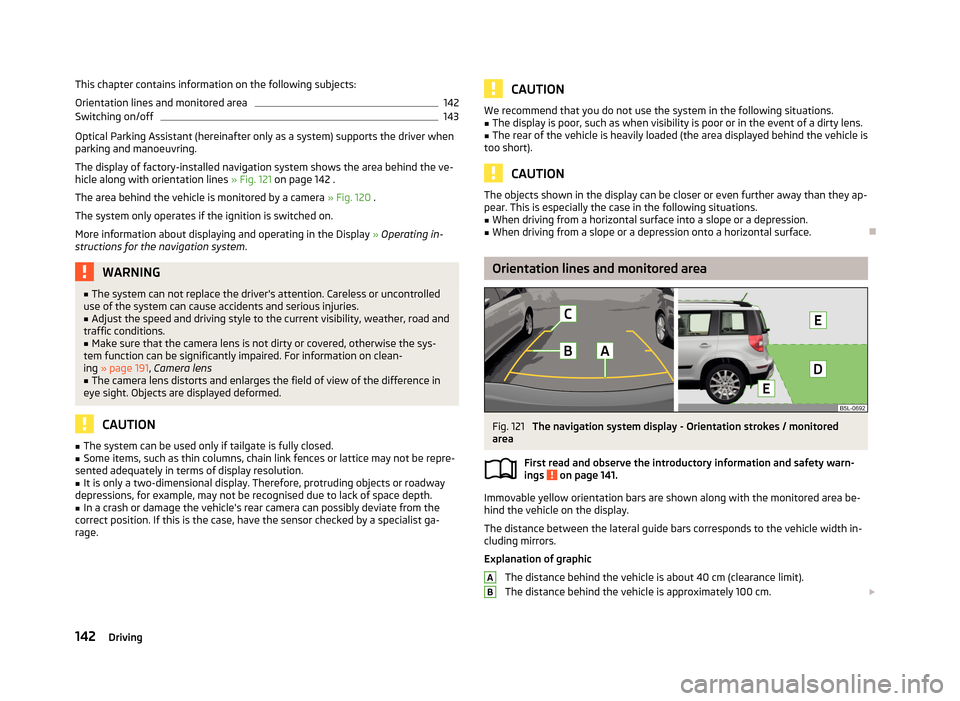
The display of factory-installed navigation system shows the area behind the ve- hicle along with orientation lines » Fig. 121 on page 142 .
The area behind the vehicle is monitored by a camera » Fig. 120 .
The system only operates if the ignition is switched on. More information about displaying and operating in the Display » Operating in-
structions for the navigation system .
WARNING■
The system can not replace the driver's attention. Careless or uncontrolled
use of the system can cause accidents and serious injuries.■
Adjust the speed and driving style to the current visibility, weather, road and
traffic conditions.
■
Make sure that the camera lens is not dirty or covered, otherwise the sys-
tem function can be significantly impaired. For information on clean-
ing » page 191 , Camera lens
■
The camera lens distorts and enlarges the field of view of the difference in
eye sight. Objects are displayed deformed.
CAUTION
■ The system can be used only if tailgate is fully closed.■Some items, such as thin columns, chain link fences or lattice may not be repre-
sented adequately in terms of display resolution.■
It is only a two-dimensional display. Therefore, protruding objects or roadway
depressions, for example, may not be recognised due to lack of space depth.
■
In a crash or damage the vehicle's rear camera can possibly deviate from the
correct position. If this is the case, have the sensor checked by a specialist ga-
rage.
CAUTIONWe recommend that you do not use the system in the following situations.■The display is poor, such as when visibility is poor or in the event of a dirty lens.■
The rear of the vehicle is heavily loaded (the area displayed behind the vehicle is
too short).
CAUTION
The objects shown in the display can be closer or even further away than they ap-
pear. This is especially the case in the following situations.■
When driving from a horizontal surface into a slope or a depression.
■
When driving from a slope or a depression onto a horizontal surface.
Orientation lines and monitored area
Fig. 121
The navigation system display - Orientation strokes / monitored
area
First read and observe the introductory information and safety warn-
ings
on page 141.
Immovable yellow orientation bars are shown along with the monitored area be-
hind the vehicle on the display.
The distance between the lateral guide bars corresponds to the vehicle width in-
cluding mirrors.
Explanation of graphic The distance behind the vehicle is about 40 cm (clearance limit).The distance behind the vehicle is approximately 100 cm.
AB142Driving