Aux in SKODA YETI 2013 1.G / 5L Owner's Manual
[x] Cancel search | Manufacturer: SKODA, Model Year: 2013, Model line: YETI, Model: SKODA YETI 2013 1.G / 5LPages: 266, PDF Size: 26.71 MB
Page 6 of 266
Table of Contents
Materials defect liability and ŠKODA warranty for
new cars5
Mobility warranty and ŠKODA extended
warranty
6
Abbreviations
Using the system
Cockpit
9
Overview
8
Instruments and Indicator Lights
10
Instrument cluster
10
Warning lights
14
Information system
23
Driver information system
23
Multifunction display (MFD)
25
MAXI DOT display
28
Service interval display
30
Unlocking and opening
32
Unlocking and locking
32
KESSY
38
Anti-theft alarm system
39
Luggage compartment lid
40
Electric power windows
41
Panorama sliding/tilting roof
44
Lights and visibility
47
Lights
47
Interior lights
53
Visibility
55
Windscreen wipers and washers
56
Rear mirror
58Seats and useful equipment61Front seats61
Front seat functions
64
Head restraints
66
Rear seats
67
Practical equipment
70
Luggage compartment
81
Variable loading floor in the luggage
compartment (Estate)
88
Roof rack system
90
Heating and air-conditioning
91
Heating, ventilation, cooling
91
Auxiliary heating (auxiliary heating and ventilation)
97
Communication and multimedia
100
General information
100
Universal telephone preinstallation GSM II
103
Universal telephone preinstallation GSM IIl
105
Wi-Fi
109
Voice control
110
Multimedia
113
Driving
Starting-off and Driving
117
Steering
117
Starting and stopping the engine using the
key
118
Starting and stopping the engine - KESSY
120
Brakes
124
Manual gear changing and pedals
125
Automatic transmission
126
Running in
129
Economical driving and environmental
sustainability
130
Water crossing and drive outside paved roads
134
Driving abroad
135Assist systems136Brake assist systems136
OFF ROAD-mode
138
Parking aid
140
Optical Parking Assist (Rear view camera)
141
Park assist
143
Cruise Control System
147
START-STOP
149
Fatigue detection (break recommendation)
151
Towing a trailer
152
Towing device
152
Trailer
156
Safety
Passive Safety
160
General information
160
Correct seated position
161
Seat belts
164
Using seat belts
164
Inertia reels and belt tensioners
167
Airbag system
169
Description of the airbag system
169
Airbag overview
170
Deactivating airbags
175
Transporting children safely
177
Child seat
177
Fastening systems
180
General Maintenance
Vehicle care
182
Service intervals
182
Service work, adjustments and technical alterations
184
Washing your car
1873Table of Contents
Page 32 of 266
Main menu points
The following information can be selected (depending on the equipment installed in the vehicle).
■ MFD (Multifunction display) » page 25
■ Audio » Operating instructions for the radio
■ Navigation » Operating instructions for the navigation system
■ Phone » page 100 ;
■ Aux. heating » page 97
■ Assistants » page 151
■ Vehicle status » page 13
■ Settings » page 29
The Audio and Navigation menu items are only displayed when the factory-fitted
radio or navigation system is switched on.
The Aux. heating menu item is only displayed if the vehicle is equipped with fac-
tory-fitted auxiliary heating.
The menu item Assistants is only displayed if the vehicle is fitted with fatigue de-
tection.
Note
■ If warning messages are displayed, these messages must be verified to access
the main menu » page 23, Using the information system .■
If the display is not activated at that moment, the menu always shifts to one of
the higher levels after approx. 10 seconds.
■
Using the factory-fitted radio or navigation system » Radio operating instruc-
tions or» navigation system operating instructions .
Settings
First read and observe the introductory information and safety warn-
ings
on page 28.
You can change certain settings by means of the MAXI DOT display. The current
menu item is shown in the top of the display under a line.
The following information can be selected (depending on the equipment installed in the vehicle).
Language
You can set the language for the display texts here.
MFD data
Activate or deactivate certain displays of the multifunction display here.
Convenience
The following functions can be activated, deactivated or adjusted here:
Rain closing
Switch on/off the function for automatically closing the window and panoramic tilt/slide sunroof in a locked ve-
hicle when it starts raining a)
. If the function is set and it
is not raining, the windows including the panoramic tilt/
slide sunroof will close automatically after approx.
12 hours.ATA confirmSwitch on/off the audible signal indicating activation of the anti-theft alarm system. Further informa-
tion » page 39 , Anti-theft alarm system .Central lockingSwitch on/off the central locking and automatic locking
function. Further information » page 36, Individual
settings .Window op.Only convenience mode for the driver window or for all
of the windows can be adjusted here. Further informa-tion » page 43 , Window convenience operation .
Mirror down
Switch on/off the function for mirror lowering on the
front passenger side when engaging the reverse gear b)
.
Further information » page 60, Fold in passenger's
mirror .
Mirror adjust.
Switch on/off the function for left and right exterior
mirror setting simultaneously. Further informa-
tion » page 59 , Synchronous adjustment of both mirr-
rors .Factory settingRestore the Convenience factory setting.a)
This function is only available on vehicles with a rain sensor.
b)
This function is only available on vehicles with an electrically adjustable driver seat.
Lights & Vision
The following functions can be activated, deactivated or adjusted here:
29Information system
Page 58 of 266
Visibility
Introduction
This chapter contains information on the following subjects:
Windscreen and rear window heater
55
Sun visors
55
Windscreen and rear window heater
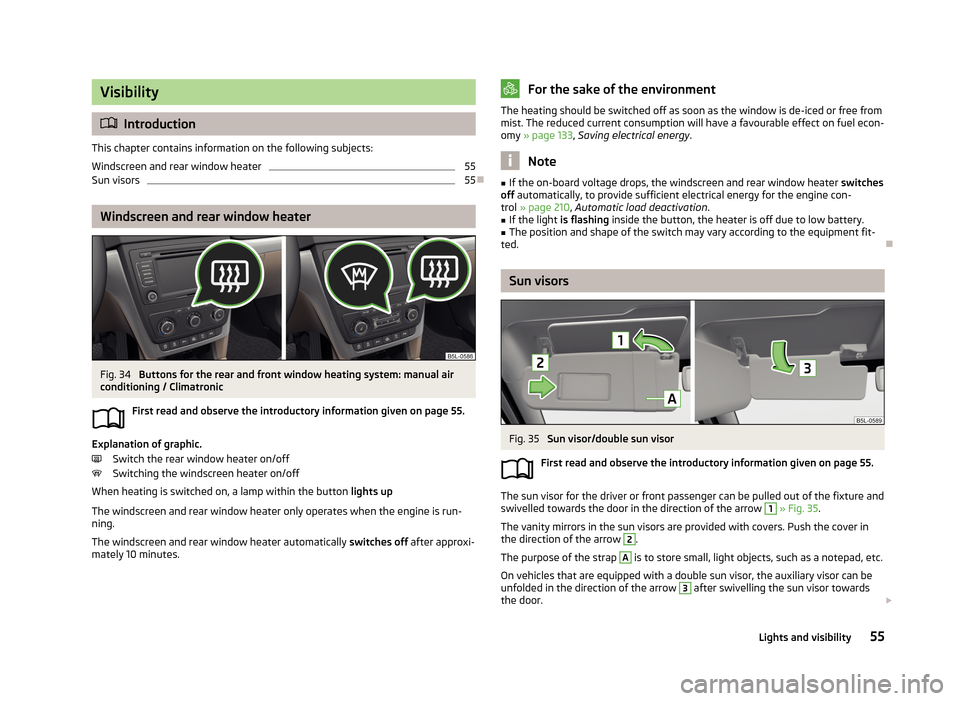
Fig. 34
Buttons for the rear and front window heating system: manual air
conditioning / Climatronic
First read and observe the introductory information given on page 55.
Explanation of graphic.Switch the rear window heater on/off
Switching the windscreen heater on/off
When heating is switched on, a lamp within the button lights up
The windscreen and rear window heater only operates when the engine is run-
ning.
The windscreen and rear window heater automatically switches off after approxi-
mately 10 minutes.
For the sake of the environmentThe heating should be switched off as soon as the window is de-iced or free from
mist. The reduced current consumption will have a favourable effect on fuel econ-
omy » page 133 , Saving electrical energy .
Note
■
If the on-board voltage drops, the windscreen and rear window heater switches
off automatically, to provide sufficient electrical energy for the engine con-
trol » page 210 , Automatic load deactivation .■
If the light is flashing inside the button, the heater is off due to low battery.
■
The position and shape of the switch may vary according to the equipment fit-
ted.
Sun visors
Fig. 35
Sun visor/double sun visor
First read and observe the introductory information given on page 55.
The sun visor for the driver or front passenger can be pulled out of the fixture and
swivelled towards the door in the direction of the arrow
1
» Fig. 35 .
The vanity mirrors in the sun visors are provided with covers. Push the cover in
the direction of the arrow
2
.
The purpose of the strap
A
is to store small, light objects, such as a notepad, etc.
On vehicles that are equipped with a double sun visor, the auxiliary visor can be
unfolded in the direction of the arrow
3
after swivelling the sun visor towards
the door.
55Lights and visibility
Page 97 of 266
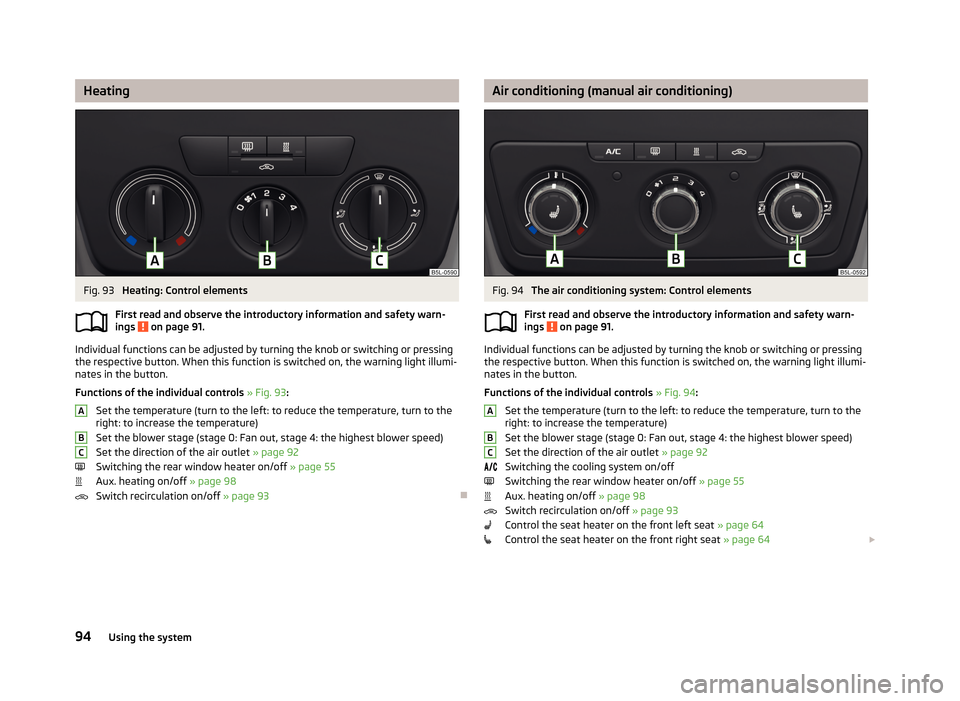
HeatingFig. 93
Heating: Control elements
First read and observe the introductory information and safety warn- ings
on page 91.
Individual functions can be adjusted by turning the knob or switching or pressingthe respective button. When this function is switched on, the warning light illumi-
nates in the button.
Functions of the individual controls » Fig. 93 :
Set the temperature (turn to the left: to reduce the temperature, turn to the
right: to increase the temperature)
Set the blower stage (stage 0: Fan out, stage 4: the highest blower speed) Set the direction of the air outlet » page 92
Switching the rear window heater on/off » page 55
Aux. heating on/off » page 98
Switch recirculation on/off » page 93
ABCAir conditioning (manual air conditioning)Fig. 94
The air conditioning system: Control elements
First read and observe the introductory information and safety warn- ings
on page 91.
Individual functions can be adjusted by turning the knob or switching or pressing the respective button. When this function is switched on, the warning light illumi-
nates in the button.
Functions of the individual controls » Fig. 94 :
Set the temperature (turn to the left: to reduce the temperature, turn to the
right: to increase the temperature)
Set the blower stage (stage 0: Fan out, stage 4: the highest blower speed) Set the direction of the air outlet » page 92
Switching the cooling system on/off Switching the rear window heater on/off » page 55
Aux. heating on/off » page 98
Switch recirculation on/off » page 93
Control the seat heater on the front left seat » page 64
Control the seat heater on the front right seat » page 64
ABC94Using the system
Page 98 of 266
NoteThe warning light in the button lights after activation, even if not all of the
conditions for the function of the cooling system have been met. By lighting up of the indicator light in the button, the operational readiness of the cooling system
is signalled.
Climatronic (automatic air conditioning)
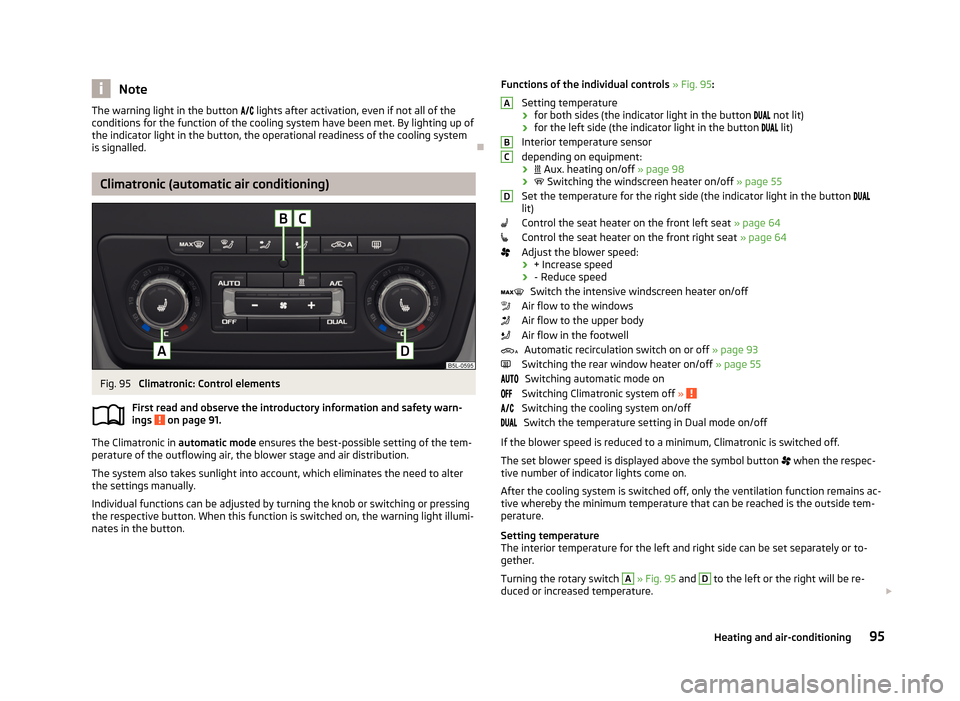
Fig. 95
Climatronic: Control elements
First read and observe the introductory information and safety warn- ings
on page 91.
The Climatronic in automatic mode ensures the best-possible setting of the tem-
perature of the outflowing air, the blower stage and air distribution.
The system also takes sunlight into account, which eliminates the need to alterthe settings manually.
Individual functions can be adjusted by turning the knob or switching or pressing the respective button. When this function is switched on, the warning light illumi-
nates in the button.
Functions of the individual controls » Fig. 95 :
Setting temperature
› for both sides (the indicator light in the button
not lit)
› for the left side (the indicator light in the button
lit)
Interior temperature sensor
depending on equipment:
›
Aux. heating on/off » page 98
›
Switching the windscreen heater on/off » page 55
Set the temperature for the right side (the indicator light in the button
lit)
Control the seat heater on the front left seat » page 64
Control the seat heater on the front right seat » page 64
Adjust the blower speed:
› + Increase speed
› - Reduce speed
Switch the intensive windscreen heater on/off
Air flow to the windows
Air flow to the upper body
Air flow in the footwell
Automatic recirculation switch on or off » page 93
Switching the rear window heater on/off » page 55
Switching automatic mode on
Switching Climatronic system off »
Switching the cooling system on/off
Switch the temperature setting in Dual mode on/off
If the blower speed is reduced to a minimum, Climatronic is switched off. The set blower speed is displayed above the symbol button
when the respec-
tive number of indicator lights come on.
After the cooling system is switched off, only the ventilation function remains ac-tive whereby the minimum temperature that can be reached is the outside tem-
perature.
Setting temperature
The interior temperature for the left and right side can be set separately or to-
gether.
Turning the rotary switch
A
» Fig. 95 and
D
to the left or the right will be re-
duced or increased temperature.
ABCD95Heating and air-conditioning
Page 100 of 266
Operational problemsFirst read and observe the introductory information and safety warn-
ings
on page 91.
If the cooling system does not operate at outside temperatures higher than +5 °C,
there is a problem in the system. The reasons for this may be.
› One of the fuses has blown. Check the fuse and replace if necessa-
ry » page 236 .
› The cooling system has switched off automatically for a short time because the
coolant temperature of the engine is too hot » page 11.
If you are not able to resolve the operational problem yourself, or if the cooler output has reduced, switch off the cooling system and seek assistance from a
specialist garage.
Auxiliary heating (auxiliary heating and ventilation)
Introduction
This chapter contains information on the following subjects:
Switching on and off directly
98
System settings
98
Radio remote control
99
Conditions for the functioning of auxiliary heating (Aux. heating and ventilation),
hereinafter referred to only as auxiliary heating (Aux. heating).
The charge state of the vehicle battery is sufficient.
The fuel supply is adequate (the warning icon
is not lit in the display of the
instrument cluster).
Auxiliary ventilation
The auxiliary ventilation enables fresh air to flow into the vehicle interior by
switching off the engine, whereby the interior temperature is effectively de-
creased (e.g. with the vehicle parked in the sun).
Auxiliary heating (auxiliary heating)
The auxiliary heating (auxiliary heating) can be used when stationary, when the engine is switched off to preheat the vehicle and also while driving (e.g. during
the heating phase of the engine).
The auxiliary heater (parking heater) functions in connection with the air-condi-
tioning system or Climatronic.
The auxiliary heating (auxiliary heating) also warms up the engine.
The auxiliary heating (parking heating) warms up the coolant by combusting fuel
from the vehicle tank.
The coolant warms up the air, which (if the blower speed is not set to zero) flows into the passenger compartment.WARNING■ The auxiliary heater (independent vehicle heater) must never be operated in
closed rooms (e.g. garages) – risk of poisoning!■
The auxiliary heating (parking heating) must not be allowed to run during re-
fuelling – risk of fire.
■
The exhaust pipe of the auxiliary heating is located underneath the vehicle.
Therefore, if you wish to operate the auxiliary heating (auxiliary heating), do
not park the vehicle in such a way that the exhaust gases can come into con-
tact with highly flammable materials (e.g. dry grass) or easily inflammable sub-
stances (e.g. spilt fuel) – risk of fire.
CAUTION
■ The running auxiliary heating (auxiliary heating) consumes fuel from the vehicle
tank and automatically controls the filling level. If only a low quantity of fuel is
present in the fuel tank, the auxiliary heater switches itself off.■
The exhaust pipe of the auxiliary heating, which is located on the underside of
the vehicle, must not be clogged and the exhaust flow must not be blocked.
■
If the auxiliary heating is running, the vehicle battery discharges. If the auxiliary
heating and ventilation has been operated several times over a longer period, the
vehicle must be driven a few kilometres in order to recharge the vehicle battery.
Note
■ The auxiliary heating only switches the blower on, if it has achieved a coolant
temperature of approx. 50 °C.■
At low outside temperatures, this can result in a formation of water vapour in
the area of the engine compartment. This is quite normal and is not an operating problem.
97Heating and air-conditioning
Page 101 of 266
■The air inlet in front of the windscreen must be free (e.g. of ice, snow or leaves)
to ensure that the auxiliary heating (aux. heating) operates properly.■
So that warm air can flow into the vehicle interior after switching on the auxili-
ary heating, you must maintain the comfort temperature normally selected by you, leave the fan switched on and leave the air outlet vents in an open position.It is recommended putting the air flow in the position or .
Switching on and off directly
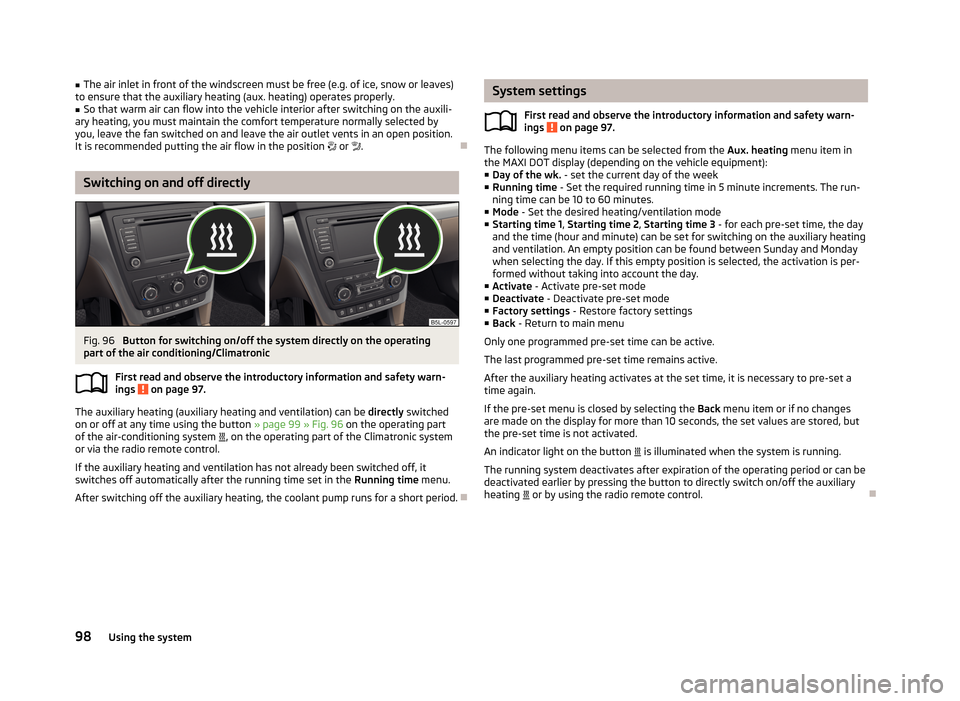
Fig. 96
Button for switching on/off the system directly on the operating
part of the air conditioning/Climatronic
First read and observe the introductory information and safety warn-
ings
on page 97.
The auxiliary heating (auxiliary heating and ventilation) can be directly switched
on or off at any time using the button » page 99 » Fig. 96 on the operating part
of the air-conditioning system
, on the operating part of the Climatronic system
or via the radio remote control.
If the auxiliary heating and ventilation has not already been switched off, it switches off automatically after the running time set in the Running time menu.
After switching off the auxiliary heating, the coolant pump runs for a short period.
System settings
First read and observe the introductory information and safety warn-
ings
on page 97.
The following menu items can be selected from the Aux. heating menu item in
the MAXI DOT display (depending on the vehicle equipment): ■ Day of the wk. - set the current day of the week
■ Running time - Set the required running time in 5 minute increments. The run-
ning time can be 10 to 60 minutes.
■ Mode - Set the desired heating/ventilation mode
■ Starting time 1 , Starting time 2 , Starting time 3 - for each pre-set time, the day
and the time (hour and minute) can be set for switching on the auxiliary heating
and ventilation. An empty position can be found between Sunday and Monday when selecting the day. If this empty position is selected, the activation is per-formed without taking into account the day.
■ Activate - Activate pre-set mode
■ Deactivate - Deactivate pre-set mode
■ Factory settings - Restore factory settings
■ Back - Return to main menu
Only one programmed pre-set time can be active.
The last programmed pre-set time remains active. After the auxiliary heating activates at the set time, it is necessary to pre-set a
time again.
If the pre-set menu is closed by selecting the Back menu item or if no changes
are made on the display for more than 10 seconds, the set values are stored, but
the pre-set time is not activated.
An indicator light on the button
is illuminated when the system is running.
The running system deactivates after expiration of the operating period or can be
deactivated earlier by pressing the button to directly switch on/off the auxiliary
heating
or by using the radio remote control.
98Using the system
Page 102 of 266
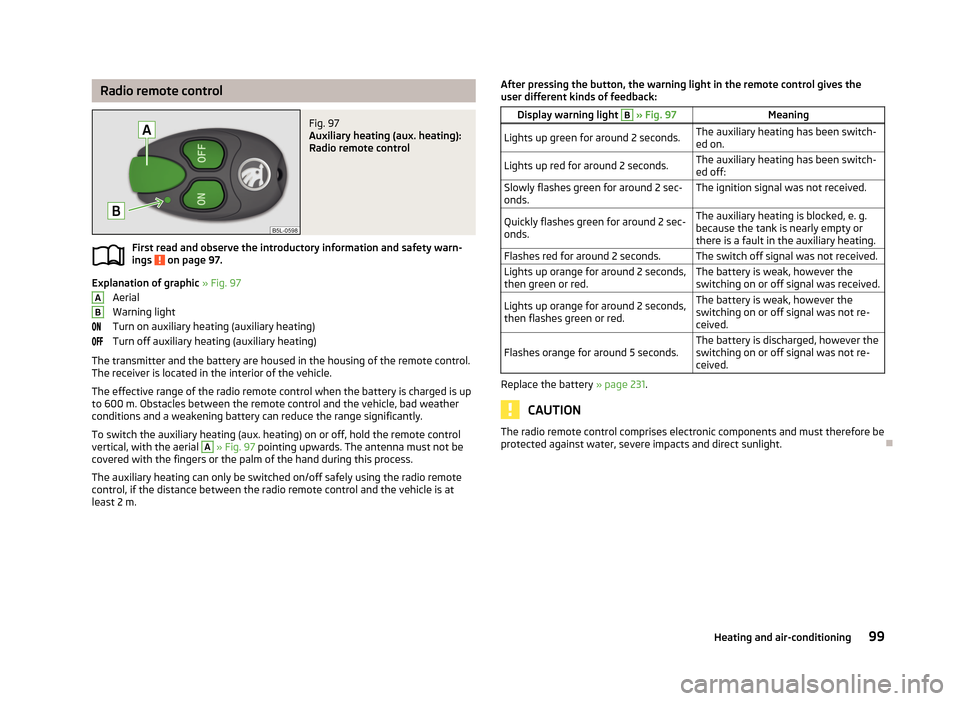
Radio remote controlFig. 97
Auxiliary heating (aux. heating):
Radio remote control
First read and observe the introductory information and safety warn-
ings on page 97.
Explanation of graphic » Fig. 97
Aerial
Warning light
Turn on auxiliary heating (auxiliary heating)
Turn off auxiliary heating (auxiliary heating)
The transmitter and the battery are housed in the housing of the remote control. The receiver is located in the interior of the vehicle.
The effective range of the radio remote control when the battery is charged is up
to 600 m. Obstacles between the remote control and the vehicle, bad weather
conditions and a weakening battery can reduce the range significantly.
To switch the auxiliary heating (aux. heating) on or off, hold the remote control
vertical, with the aerial
A
» Fig. 97 pointing upwards. The antenna must not be
covered with the fingers or the palm of the hand during this process.
The auxiliary heating can only be switched on/off safely using the radio remotecontrol, if the distance between the radio remote control and the vehicle is at
least 2 m.
ABAfter pressing the button, the warning light in the remote control gives the
user different kinds of feedback:Display warning light B » Fig. 97MeaningLights up green for around 2 seconds.The auxiliary heating has been switch-
ed on.Lights up red for around 2 seconds.The auxiliary heating has been switch-
ed off:Slowly flashes green for around 2 sec- onds.The ignition signal was not received.Quickly flashes green for around 2 sec-
onds.The auxiliary heating is blocked, e. g.
because the tank is nearly empty or
there is a fault in the auxiliary heating.Flashes red for around 2 seconds.The switch off signal was not received.Lights up orange for around 2 seconds,
then green or red.The battery is weak, however the
switching on or off signal was received.Lights up orange for around 2 seconds,
then flashes green or red.The battery is weak, however the
switching on or off signal was not re-
ceived.Flashes orange for around 5 seconds.The battery is discharged, however the
switching on or off signal was not re-
ceived.
Replace the battery » page 231.
CAUTION
The radio remote control comprises electronic components and must therefore be
protected against water, severe impacts and direct sunlight.
99Heating and air-conditioning
Page 116 of 266
If the system does not recognise the command, it repeats the first part of thehelp thus enabling a new entry to be completed. After the 2nd error the systemrepeats the second part of the aid. After the 3rd failed attempt, the answer “ Can-
celled. ” is given and the dialogue is ended.
Storing voice recording for a contact
If automatic name recognition does not work reliably for some contacts, you can
choose to save your own voice tag for the contact in the Phone book - Voice tag -
Record menu item.
Your own voice tag can also be saved using the voice control in the FURTHER OP-
TIONS menu.
Multimedia
Introduction
This chapter contains information on the following subjects:
Music playback via Bluetooth ®
113
Operating the radio and navigation system on the multifunction steering
wheel
113
AUX- and MDIinputs
115CD change115DVD-preinstallation116
Music playback via Bluetooth ®
First read and observe the introductory information given on page 113.
The universal telephone preinstallation makes it possible to play back music via
Bluetooth ®
from devices such as MP3 players, mobile phones or notebooks.
To ensure that music can be played via Bluetooth ®
, you must first pair the device
with the hands-free system in the Phone - Bluetooth - Media player menu.
The music playback process is performed on the connected device.
The universal telephone preinstallation GSM II ensures that the music played back
via the hands-free system can be controlled with the remote control » page 112,
Voice commands - GSM II .
Note
The device being connected must support the Bluetooth ®
A2DP profile; refer to
the operating instructions for the relevant device being connected.
Operating the radio and navigation system on the multifunction steering wheel
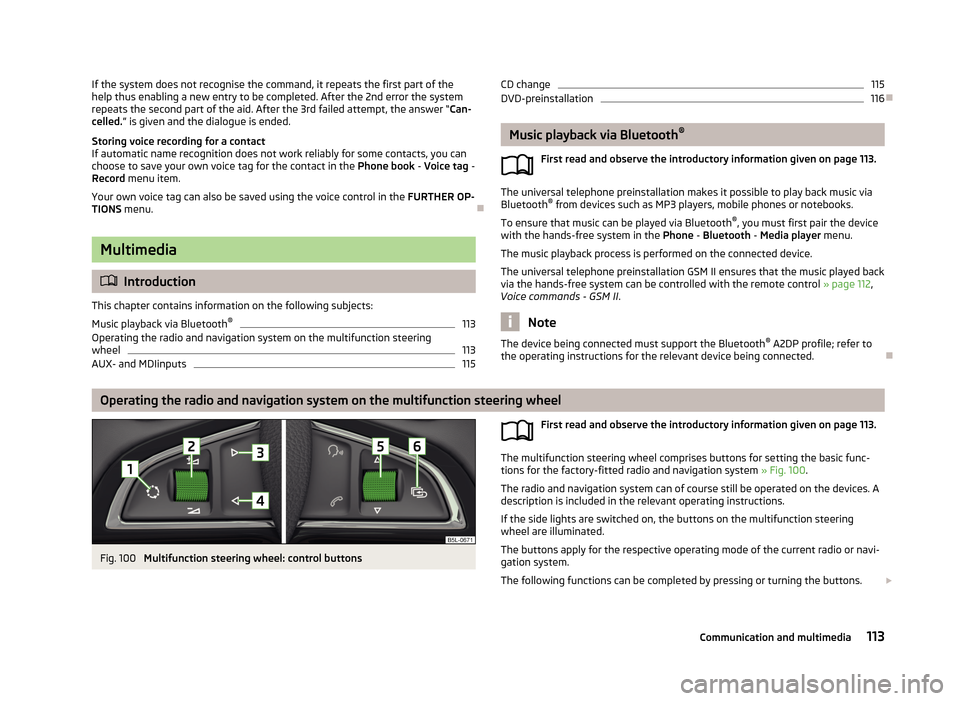
Fig. 100
Multifunction steering wheel: control buttons
First read and observe the introductory information given on page 113.
The multifunction steering wheel comprises buttons for setting the basic func-
tions for the factory-fitted radio and navigation system » Fig. 100.
The radio and navigation system can of course still be operated on the devices. A
description is included in the relevant operating instructions.
If the side lights are switched on, the buttons on the multifunction steeringwheel are illuminated.
The buttons apply for the respective operating mode of the current radio or navi- gation system.
The following functions can be completed by pressing or turning the buttons.
113Communication and multimedia
Page 118 of 266
AUX- and MDIinputsFirst read and observe the introductory information given on page 113.
The AUX and MDI inputs are used to connect external audio sources (e.g. iPod ormp3 player) and to play back music from these devices via the factory-fitted radio
or navigation system.
The AUX input for external audio sources is located below the armrest of the
front seats and is marked with the 1)
symbol.
The MDI input is above the storage compartment in the front center console and
has the identifier
» page 72 characterized.
For a description of use, refer to the operating instructions for the relevant radio or navigation system.
CD change
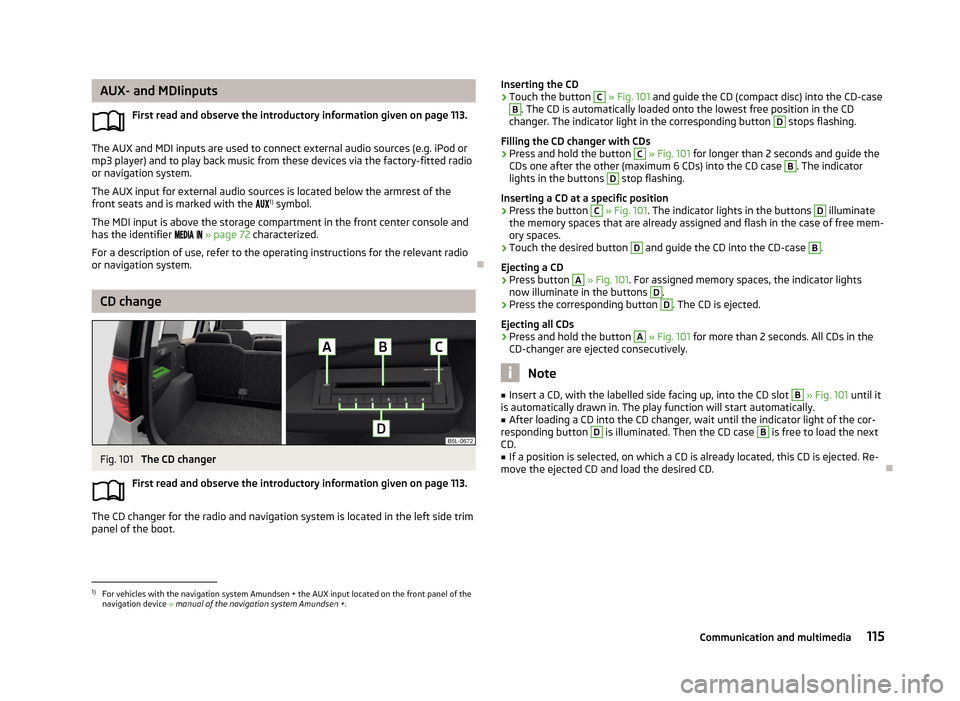
Fig. 101
The CD changer
First read and observe the introductory information given on page 113.
The CD changer for the radio and navigation system is located in the left side trim panel of the boot.
Inserting the CD›Touch the button C » Fig. 101 and guide the CD (compact disc) into the CD-caseB
. The CD is automatically loaded onto the lowest free position in the CD
changer. The indicator light in the corresponding button
D
stops flashing.
Filling the CD changer with CDs
›
Press and hold the button
C
» Fig. 101 for longer than 2 seconds and guide the
CDs one after the other (maximum 6 CDs) into the CD case
B
. The indicator
lights in the buttons
D
stop flashing.
Inserting a CD at a specific position
›
Press the button
C
» Fig. 101 . The indicator lights in the buttons
D
illuminate
the memory spaces that are already assigned and flash in the case of free mem-
ory spaces.
›
Touch the desired button
D
and guide the CD into the CD-case
B
.
Ejecting a CD
›
Press button
A
» Fig. 101 . For assigned memory spaces, the indicator lights
now illuminate in the buttons
D
.
›
Press the corresponding button
D
. The CD is ejected.
Ejecting all CDs
›
Press and hold the button
A
» Fig. 101 for more than 2 seconds. All CDs in the
CD-changer are ejected consecutively.
Note
■ Insert a CD, with the labelled side facing up, into the CD slot B » Fig. 101 until it
is automatically drawn in. The play function will start automatically.■
After loading a CD into the CD changer, wait until the indicator light of the cor-
responding button
D
is illuminated. Then the CD case
B
is free to load the next
CD.
■
If a position is selected, on which a CD is already located, this CD is ejected. Re-
move the ejected CD and load the desired CD.
1)
For vehicles with the navigation system Amundsen + the AUX input located on the front panel of the
navigation device » manual of the navigation system Amundsen + .
115Communication and multimedia