deactivate airbag SKODA YETI 2013 1.G / 5L Owner's Manual
[x] Cancel search | Manufacturer: SKODA, Model Year: 2013, Model line: YETI, Model: SKODA YETI 2013 1.G / 5LPages: 266, PDF Size: 26.71 MB
Page 12 of 266
Using the system
Cockpit
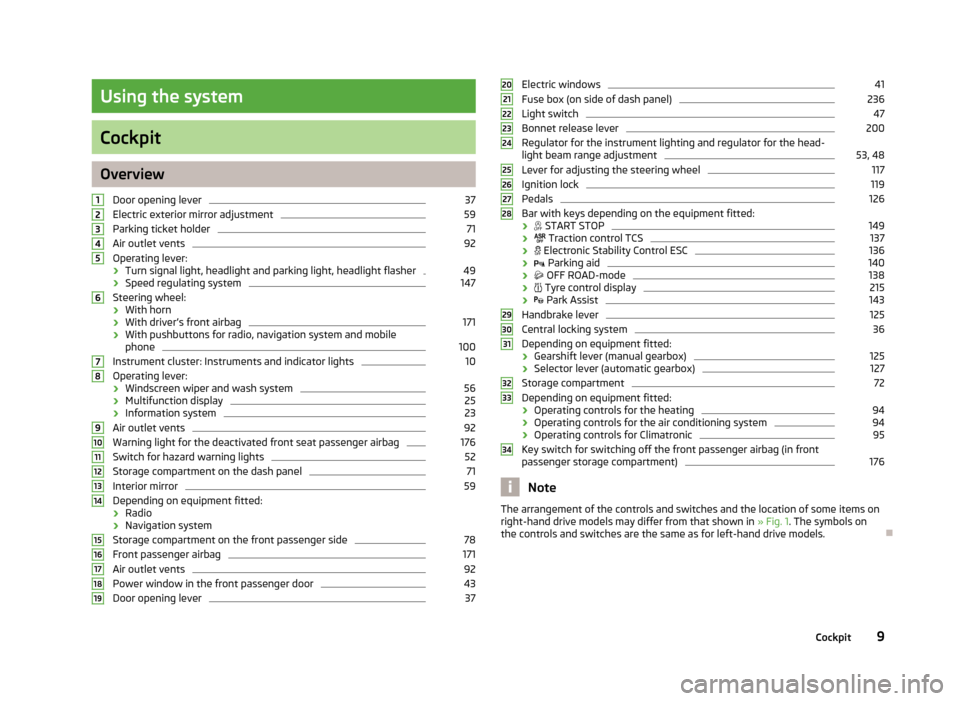
OverviewDoor opening lever
37
Electric exterior mirror adjustment
59
Parking ticket holder
71
Air outlet vents
92
Operating lever:
› Turn signal light, headlight and parking light, headlight flasher
49
›Speed regulating system
147
Steering wheel:
› With horn
› With driver’s front airbag
171
›With pushbuttons for radio, navigation system and mobile
phone
100
Instrument cluster: Instruments and indicator lights
10
Operating lever:
› Windscreen wiper and wash system
56
›Multifunction display
25
›Information system
23
Air outlet vents
92
Warning light for the deactivated front seat passenger airbag
176
Switch for hazard warning lights
52
Storage compartment on the dash panel
71
Interior mirror
59
Depending on equipment fitted:
› Radio
› Navigation system
Storage compartment on the front passenger side
78
Front passenger airbag
171
Air outlet vents
92
Power window in the front passenger door
43
Door opening lever
3712345678910111213141516171819Electric windows41Fuse box (on side of dash panel)236
Light switch
47
Bonnet release lever
200
Regulator for the instrument lighting and regulator for the head- light beam range adjustment
53, 48
Lever for adjusting the steering wheel
117
Ignition lock
119
Pedals
126
Bar with keys depending on the equipment fitted:
›
START STOP
149
›
Traction control TCS
137
›
Electronic Stability Control ESC
136
›
Parking aid
140
›
OFF ROAD-mode
138
›
Tyre control display
215
›
Park Assist
143
Handbrake lever
125
Central locking system
36
Depending on equipment fitted:
› Gearshift lever (manual gearbox)
125
›
Selector lever (automatic gearbox)
127
Storage compartment
72
Depending on equipment fitted:
› Operating controls for the heating
94
›Operating controls for the air conditioning system
94
›
Operating controls for Climatronic
95
Key switch for switching off the front passenger airbag (in front
passenger storage compartment)
176
Note
The arrangement of the controls and switches and the location of some items on
right-hand drive models may differ from that shown in » Fig. 1. The symbols on
the controls and switches are the same as for left-hand drive models.2021222324252627282930313233349Cockpit
Page 24 of 266
Airbag systemFirst read and observe the introductory information and safety warn-ings
on page 14.
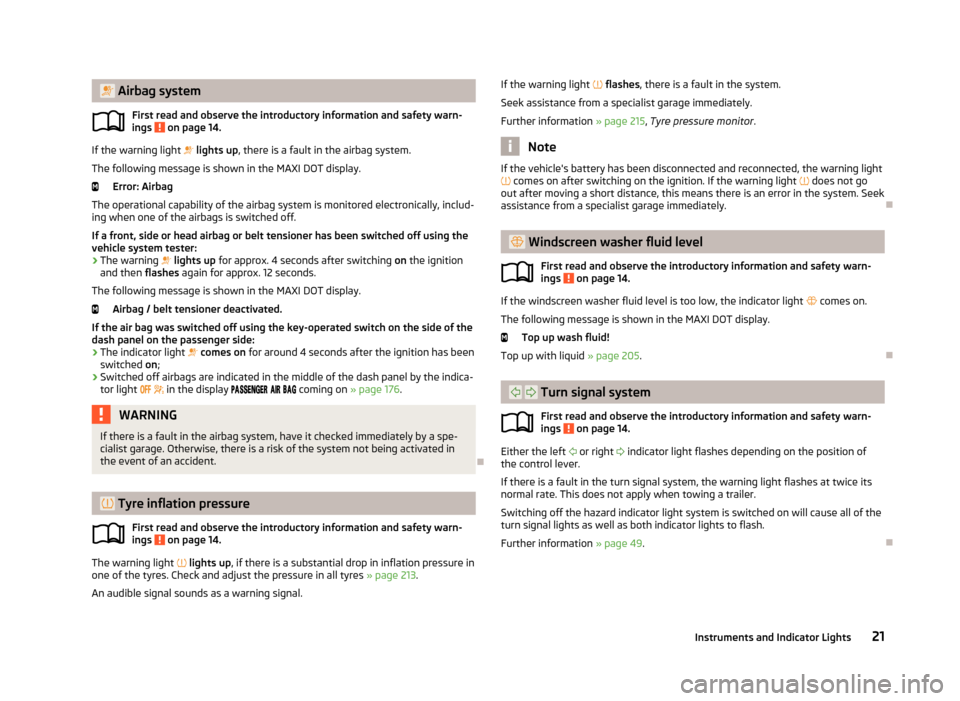
If the warning light lights up , there is a fault in the airbag system.
The following message is shown in the MAXI DOT display. Error: Airbag
The operational capability of the airbag system is monitored electronically, includ-
ing when one of the airbags is switched off.
If a front, side or head airbag or belt tensioner has been switched off using thevehicle system tester:
› The warning
lights up for approx. 4 seconds after switching on the ignition
and then flashes again for approx. 12 seconds.
The following message is shown in the MAXI DOT display. Airbag / belt tensioner deactivated.
If the air bag was switched off using the key-operated switch on the side of the
dash panel on the passenger side:
› The indicator light
comes on for around 4 seconds after the ignition has been
switched on;
› Switched off airbags are indicated in the middle of the dash panel by the indica-
tor light
in the display
coming on » page 176.
WARNINGIf there is a fault in the airbag system, have it checked immediately by a spe-
cialist garage. Otherwise, there is a risk of the system not being activated in
the event of an accident.
Tyre inflation pressure
First read and observe the introductory information and safety warn-
ings
on page 14.
The warning light
lights up , if there is a substantial drop in inflation pressure in
one of the tyres. Check and adjust the pressure in all tyres » page 213.
An audible signal sounds as a warning signal.
If the warning light flashes , there is a fault in the system.
Seek assistance from a specialist garage immediately.
Further information » page 215, Tyre pressure monitor .
Note
If the vehicle's battery has been disconnected and reconnected, the warning light
comes on after switching on the ignition. If the warning light does not go
out after moving a short distance, this means there is an error in the system. Seek
assistance from a specialist garage immediately.
Windscreen washer fluid level
First read and observe the introductory information and safety warn-ings
on page 14.
If the windscreen washer fluid level is too low, the indicator light
comes on.
The following message is shown in the MAXI DOT display. Top up wash fluid!
Top up with liquid » page 205.
Turn signal system
First read and observe the introductory information and safety warn-ings
on page 14.
Either the left
or right
indicator light flashes depending on the position of
the control lever.
If there is a fault in the turn signal system, the warning light flashes at twice its
normal rate. This does not apply when towing a trailer.
Switching off the hazard indicator light system is switched on will cause all of the
turn signal lights as well as both indicator lights to flash.
Further information » page 49.
21Instruments and Indicator Lights
Page 35 of 266
Unlocking and opening
Unlocking and locking
Introduction
This chapter contains information on the following subjects:
Vehicle key
33
Unlocking/locking with the key
33
Unlocking/locking with the remote control
34
Synchronising the remote control
34
Unlocking/locking – KESSY
35
Safe securing system
35
Individual settings
36
Locking/unlocking the vehicle from the inside
36
Child safety lock
37
Opening/closing a door
37
Your car is equipped with a central locking system.
The central locking system allows you to lock and unlock all doors, the fuel filler
flap 1)
and tailgate 2)
at the same time.
The safe securing system » page 35 is integrated in the central locking system.
Once the car is locked from the outside, the door locks 3)
are automatically blocked
by the safe securing system »
.
The following is true after unlocking 2)
.
› The doors, the boot lid and the fuel filler flap 1)
are unlocked.
› The interior light operated via the door contact illuminates.
› The safe securing system is switched off 3)
.
› The indicator light in the driver door stops flashing.
› The anti-theft alarm system is deactivated.
The following is true after locking 2)
.
› The doors, the boot lid and the fuel filler flap 1)
are locked.
› The interior light operated via the door contact goes out.
› The safe securing system is switched on 3)
.
› The indicator light in the driver door begins flashing.
› The anti-theft alarm system is activated.
Displaying an error
If the warning light in the driver's door initially flashes quickly for around 2 sec-
onds, and then lights up for 30 seconds without interruption before flashing
again slowly, you will need to seek the assistance of a specialist garage.WARNINGIf the car is locked and the safe securing system activated, no people must re-
main in the car as it will then not be possible to either unlock a door or open a
window from the inside. The locked doors make it more difficult for rescuers
to get into the vehicle in an emergency – risk to life!
Note
■ In the event of an accident in which the airbags are deployed, the locked doors
are automatically unlocked in order to enable rescuers to gain access to the vehi- cle.■
Only the driver's door can be unlocked or locked using the key if the central
locking system fails » page 33. The other doors and the boot lid can be emer-
gency locked or unlocked. ■ Emergency locking of the door » page 232.
■ Emergency unlocking of the boot lid » page 233.
1)
Applies to vehicles with a lockable fuel filler cap.
2)
Depending on the individual setting » page 36.
3)
This function only applies to certain countries.
32Using the system
Page 55 of 266
The daytime running lights are switched on automatically if the following condi-tions are met:
The light switch is in the position » Fig. 27 on page 49.
The visibility in the vehicle environment is reduced. The ignition is switched off.
The parking aid is activated.
The function switches on the following light, depending on the equipment fit- ted.
› Parking lights
› Low beam
› Entry lighting in the exterior mirrors
› Licence plate light
The light is controlled on the basis of information that is collected from the holder
mounted in the rear-view mirror sensor » page 49 .
COMING HOME
The light turns on automatically when you open the driver's door on (within 60
seconds of turning off the ignition).
The light turns off 10 seconds after closing all the doors and the boot lid or after
the pre-set time has expired.
If a door or the boot lid remains open, the light goes out after 60 seconds.
LEAVING HOME
The light turns on automatically after the vehicle is unlocked with the remote
control.
The light turns off after 10 seconds or after a pre-set time or after the vehicle is
locked.
If no door is opened, the vehicle is locked automatically after 30 seconds.
Activate/deactivate the function
The functions and settings of the illumination time can be activated/deactivated via the MAXI DOT display in the menu items Coming Home or Leaving
Home » page 29 .
CAUTION
■
Do not attach any stickers or similar objects in front of the light sensor on the
windscreen to avoid impairing the function or its reliability.■
If this function is activated constantly, the battery will be heavily discharged
particularly in short-haul traffic.
Hazard warning light systemFig. 29
Button for hazard warning light
system
First read and observe the introductory information and safety warn-
ings on page 47.
Switching on/off
›
Press the button
» Fig. 29 .
All the turn signal lights on the vehicle flash at the same time when the hazard
warning light system is switched on. The warning light for the turn signals and
the warning light in the button also flash at the same time. The hazard warning
light system can also be operated if the ignition is switched off.
If one of the airbags is deployed, the hazard warning light system will switch on
automatically.
If the turn signal light is switched on when the hazard warning light and the igni- tion are both switched on, then only the turn signal light on the corresponding
vehicle side will flash.
WARNINGSwitch on the hazard warning light system if, for example, the following oc-
curs.■
You encounter a traffic congestion.
■
The vehicle has broken down.
52Using the system
Page 165 of 266
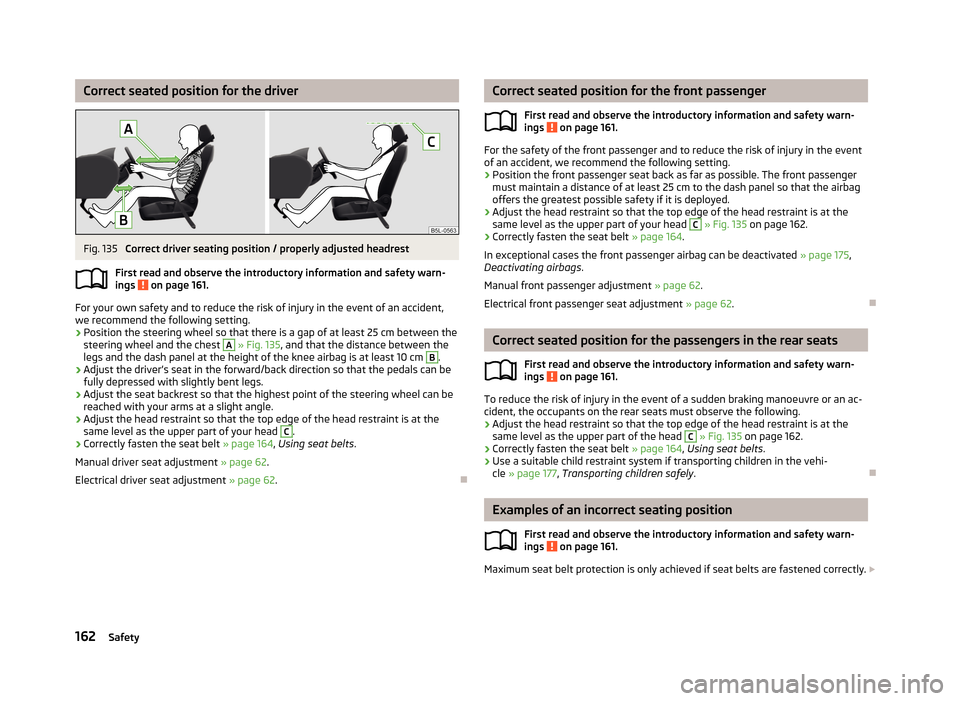
Correct seated position for the driverFig. 135
Correct driver seating position / properly adjusted headrest
First read and observe the introductory information and safety warn-
ings
on page 161.
For your own safety and to reduce the risk of injury in the event of an accident,
we recommend the following setting.
› Position the steering wheel so that there is a gap of at least 25 cm between the
steering wheel and the chest
A
» Fig. 135 , and that the distance between the
legs and the dash panel at the height of the knee airbag is at least 10 cm
B
.
› Adjust the driver’s seat in the forward/back direction so that the pedals can be
fully depressed with slightly bent legs.
› Adjust the seat backrest so that the highest point of the steering wheel can be
reached with your arms at a slight angle.
› Adjust the head restraint so that the top edge of the head restraint is at the
same level as the upper part of your head
C
.
› Correctly fasten the seat belt
» page 164, Using seat belts .
Manual driver seat adjustment » page 62.
Electrical driver seat adjustment » page 62.
Correct seated position for the front passenger
First read and observe the introductory information and safety warn-ings
on page 161.
For the safety of the front passenger and to reduce the risk of injury in the event
of an accident, we recommend the following setting.
› Position the front passenger seat back as far as possible. The front passenger
must maintain a distance of at least 25 cm to the dash panel so that the airbag
offers the greatest possible safety if it is deployed.
› Adjust the head restraint so that the top edge of the head restraint is at the
same level as the upper part of your head
C
» Fig. 135 on page 162.
› Correctly fasten the seat belt
» page 164.
In exceptional cases the front passenger airbag can be deactivated » page 175,
Deactivating airbags .
Manual front passenger adjustment » page 62.
Electrical front passenger seat adjustment » page 62.
Correct seated position for the passengers in the rear seats
First read and observe the introductory information and safety warn-
ings
on page 161.
To reduce the risk of injury in the event of a sudden braking manoeuvre or an ac-
cident, the occupants on the rear seats must observe the following.
› Adjust the head restraint so that the top edge of the head restraint is at the
same level as the upper part of the head
C
» Fig. 135 on page 162.
› Correctly fasten the seat belt
» page 164, Using seat belts .
› Use a suitable child restraint system if transporting children in the vehi-
cle » page 177 , Transporting children safely .
Examples of an incorrect seating position
First read and observe the introductory information and safety warn-ings
on page 161.
Maximum seat belt protection is only achieved if seat belts are fastened correctly.
162Safety
Page 174 of 266
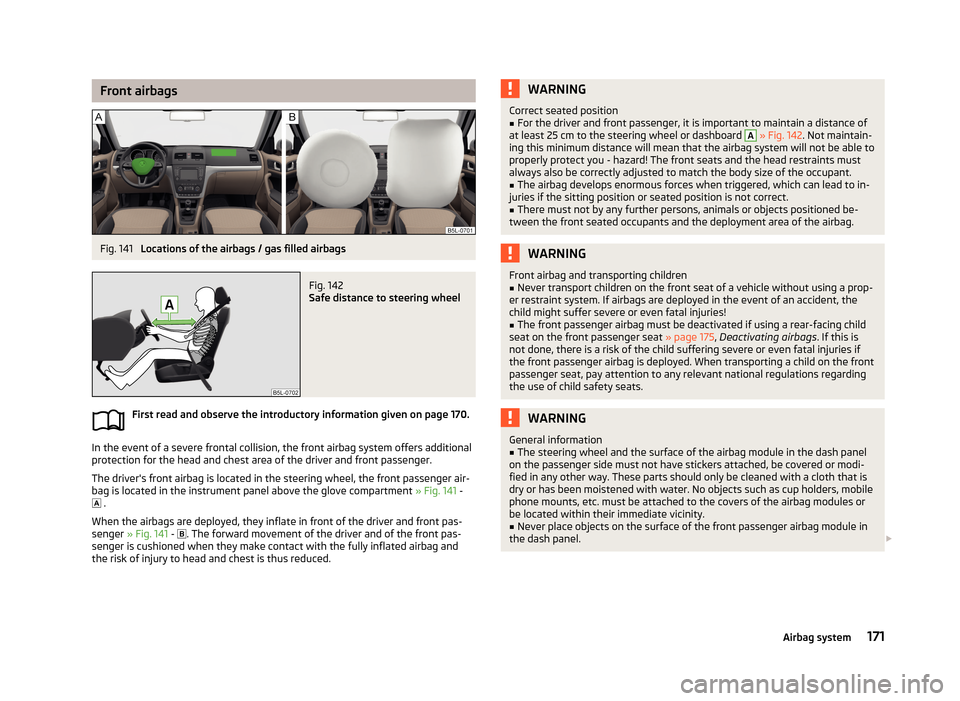
Front airbagsFig. 141
Locations of the airbags / gas filled airbags
Fig. 142
Safe distance to steering wheel
First read and observe the introductory information given on page 170.
In the event of a severe frontal collision, the front airbag system offers additional
protection for the head and chest area of the driver and front passenger.
The driver's front airbag is located in the steering wheel, the front passenger air-
bag is located in the instrument panel above the glove compartment » Fig. 141 -
.
When the airbags are deployed, they inflate in front of the driver and front pas-
senger » Fig. 141 -
. The forward movement of the driver and of the front pas-
senger is cushioned when they make contact with the fully inflated airbag and
the risk of injury to head and chest is thus reduced.
WARNINGCorrect seated position■For the driver and front passenger, it is important to maintain a distance of
at least 25 cm to the steering wheel or dashboard A
» Fig. 142 . Not maintain-
ing this minimum distance will mean that the airbag system will not be able to
properly protect you - hazard! The front seats and the head restraints must
always also be correctly adjusted to match the body size of the occupant.
■
The airbag develops enormous forces when triggered, which can lead to in-
juries if the sitting position or seated position is not correct.
■
There must not by any further persons, animals or objects positioned be-
tween the front seated occupants and the deployment area of the airbag.
WARNINGFront airbag and transporting children■Never transport children on the front seat of a vehicle without using a prop-
er restraint system. If airbags are deployed in the event of an accident, the
child might suffer severe or even fatal injuries!■
The front passenger airbag must be deactivated if using a rear-facing child
seat on the front passenger seat » page 175, Deactivating airbags . If this is
not done, there is a risk of the child suffering severe or even fatal injuries if
the front passenger airbag is deployed. When transporting a child on the front
passenger seat, pay attention to any relevant national regulations regarding
the use of child safety seats.
WARNINGGeneral information■The steering wheel and the surface of the airbag module in the dash panel
on the passenger side must not have stickers attached, be covered or modi-
fied in any other way. These parts should only be cleaned with a cloth that is
dry or has been moistened with water. No objects such as cup holders, mobile
phone mounts, etc. must be attached to the covers of the airbag modules or
be located within their immediate vicinity.■
Never place objects on the surface of the front passenger airbag module in
the dash panel.
171Airbag system
Page 178 of 266
WARNINGThe airbag control unit operates using pressure sensors located in the front
doors. For this reason, no adjustments may be carried out to the doors or door
panels (e.g. installation of additional loudspeakers). Resulting damage can have a negative impact on the function of the airbag system. Any work on thefront doors and door panels must be carried out by a specialist garage. The
following instructions must be observed.■
Never drive with inner door panels removed.
■
Never drive if parts of the inner door panel have been removed and the re-
sulting openings have not been properly sealed.
■
Never drive if the loudspeakers in the doors have been removed, unless the
loudspeaker openings have been properly sealed.
■
Always make sure that the openings are covered or filled if additional loud-
speakers or other equipment parts have been installed in the inner door pan-
els.
■
Always have work carried out by a ŠKODA service partner or a professional
specialist garage.
Note
In vehicles with head airbags, the word AIRBAG can be seen on the B and C col-
umn cladding.
Deactivating airbags
Introduction
This chapter contains information on the following subjects:
Deactivating airbags
175
Deactivating the front passenger airbag
176
Deactivating airbags
First read and observe the introductory information given on page 175.
Deactivating an airbag should be considered in cases such as the ones below.› If using a rear-facing child seat on the front passenger seat (due to different le-
gal regulations, the airbag must be deactivated if using a forwards-facing child
seat in some countries) » page 177, Transporting children safely .
› If it is not possible to maintain a distance of at least 25 cm between the middle
of the steering wheel and chest, despite the driver's seat being correctly adjus-
ted.
› If special attachments are required in the area of the steering wheel because of
a physical disability.
› If different seats have been fitted (e.g. orthopaedic seats without side airbags).
The front passenger airbag can be switched off with the key-operated
switch » page 176 , Deactivating the front passenger airbag .
We recommend that you ask a ŠKODA service partner to deactivate any other air-
bags.
Monitoring the airbag system
The operational capability of the airbag system is monitored electronically, includ-
ing when one of the airbags is switched off.
Airbag deactivated using diagnostic equipment
› The
warning light lights up for approximately 4 seconds after the ignition is
switched on and then flashes again for approximately 12 seconds.
Front passenger airbag deactivated using the key switch in the storage com-
partment
› The
warning light lights up for approximately 4 seconds after the ignition is
switched on.
› The
warning light
3
» Fig. 148 on page 176 lights up after the ignition is
switched on.
Note
■ The national regulations for switching off airbags must be observed.■A ŠKODA service partner will be able to inform you which, if any, of your vehi-
cle's airbags can or must be deactivated.
175Airbag system
Page 179 of 266
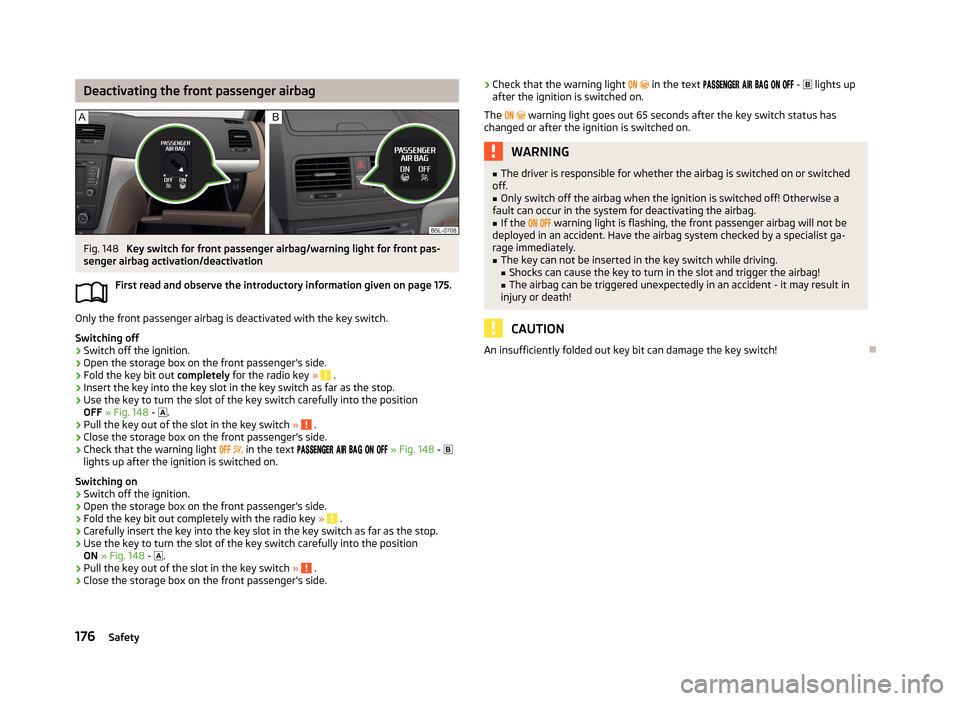
Deactivating the front passenger airbagFig. 148
Key switch for front passenger airbag/warning light for front pas-
senger airbag activation/deactivation
First read and observe the introductory information given on page 175.
Only the front passenger airbag is deactivated with the key switch.
Switching off
›
Switch off the ignition.
›
Open the storage box on the front passenger's side.
›
Fold the key bit out completely for the radio key » .
›
Insert the key into the key slot in the key switch as far as the stop.
›
Use the key to turn the slot of the key switch carefully into the position
OFF » Fig. 148 -
.
›
Pull the key out of the slot in the key switch » .
›
Close the storage box on the front passenger's side.
›
Check that the warning light
in the text
» Fig. 148 -
lights up after the ignition is switched on.
Switching on
›
Switch off the ignition.
›
Open the storage box on the front passenger's side.
›
Fold the key bit out completely with the radio key » .
›
Carefully insert the key into the key slot in the key switch as far as the stop.
›
Use the key to turn the slot of the key switch carefully into the position
ON » Fig. 148 -
.
›
Pull the key out of the slot in the key switch » .
›
Close the storage box on the front passenger's side.
›Check that the warning light
in the text - lights up
after the ignition is switched on.
The warning light goes out 65 seconds after the key switch status has
changed or after the ignition is switched on.WARNING■ The driver is responsible for whether the airbag is switched on or switched
off.■
Only switch off the airbag when the ignition is switched off! Otherwise a
fault can occur in the system for deactivating the airbag.
■
If the warning light is flashing, the front passenger airbag will not be
deployed in an accident. Have the airbag system checked by a specialist ga- rage immediately.
■
The key can not be inserted in the key switch while driving. ■ Shocks can cause the key to turn in the slot and trigger the airbag!
■ The airbag can be triggered unexpectedly in an accident - it may result in
injury or death!
CAUTION
An insufficiently folded out key bit can damage the key switch!
176Safety
Page 180 of 266
Transporting children safely
Child seat
Introduction
This chapter contains information on the following subjects:
Use of a child seat on the front passenger seat
178
Child safety and side airbag
179
Classification of child seats
179
Use of child seats fastened with a seat belt
179
Children are generally safer on the rear seats than on the front passenger seat.
In contrast to adults, the muscles and bone structure of children are not yet fully developed. Thus children are exposed to increased risk of injury.
Children should be transported in accordance with the relevant statutory provi-sions.
Child seats complying with the ECE-R 44 standard must be used. ECE-R stands
for: Economic Commission for Europe - Regulation.
Child seats that comply with the ECE-R 44 standard are identified with a test
mark that cannot be removed: a large E within a circle with the test number be-
low.
WARNING■ The national legal requirements must be observed when using child seats.■One should never carry children, and also not babies! - on one's lap.■
Never leave children unattended in the vehicle. Certain outside climatic con-
ditions can cause life-threatening temperatures in the vehicle.
■
The child must be secured in the vehicle during the entire journey! Other-
wise, the child would be thrown through the vehicle in the event of an acci-
dent, causing fatal injuries to both the child and other occupants.
WARNING (Continued)■ Children are exposed to an increased risk of injury in the event of an acci-
dent if they lean forward or adopt an incorrect seated position when the vehi-
cle is moving. This particularly applies to children who are transported on the
front passenger seat as they can suffer severe, or even fatal injuries if the air-
bag system is deployed!■
Pay particular attention to the information provided by the manufacturer of
the child safety seat regarding the correct routing of the belt. Seat belts which are not correctly adjusted can themselves cause injuries even in minor
accidents.
■
Safety belts must be checked to ensure that they are running properly. One
should also ensure that the belt is not damaged by sharp-edged fittings.
■
The front passenger airbag must be deactivated if using a rear-facing child
seat on the front passenger seat. Further information » page 178, Use of a
child seat on the front passenger seat .
CAUTION
■
When installing a child seat in which the child faces forward, adjust the head re-
straints so that they are as high as possible.■
If the head restraints still prevent the child seat from being installed, even in
the highest position, you will need to remove them » page 67. After removing the
child seat, re-install the head restraints.
Note
We recommend that you use child seats from ŠKODA Original Accessories. These child seats were developed and also tested for use in ŠKODA vehicles. They meet
the ECE-R 44 standard.
177Transporting children safely
Page 181 of 266
Use of a child seat on the front passenger seat
Never use a backwards-facing child restraint system on a seat that is protected by an active airbag installed in front of it. This could cause the child severe injury
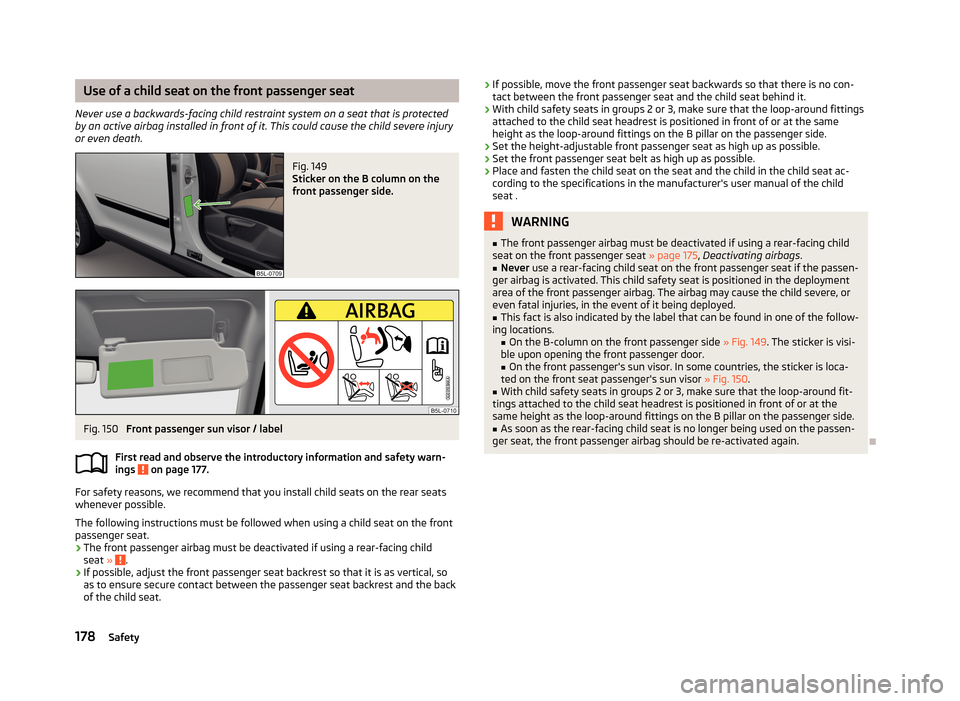
or even death.Fig. 149
Sticker on the B column on the
front passenger side.
Fig. 150
Front passenger sun visor / label
First read and observe the introductory information and safety warn-
ings
on page 177.
For safety reasons, we recommend that you install child seats on the rear seats
whenever possible.
The following instructions must be followed when using a child seat on the front passenger seat.
› The front passenger airbag must be deactivated if using a rear-facing child
seat »
.
› If possible, adjust the front passenger seat backrest so that it is as vertical, so
as to ensure secure contact between the passenger seat backrest and the back of the child seat.
› If possible, move the front passenger seat backwards so that there is no con-
tact between the front passenger seat and the child seat behind it.
› With child safety seats in groups 2 or 3, make sure that the loop-around fittings
attached to the child seat headrest is positioned in front of or at the same
height as the loop-around fittings on the B pillar on the passenger side.
› Set the height-adjustable front passenger seat as high up as possible.
› Set the front passenger seat belt as high up as possible.
› Place and fasten the child seat on the seat and the child in the child seat ac-
cording to the specifications in the manufacturer's user manual of the child seat .WARNING■ The front passenger airbag must be deactivated if using a rear-facing child
seat on the front passenger seat » page 175, Deactivating airbags .■
Never use a rear-facing child seat on the front passenger seat if the passen-
ger airbag is activated. This child safety seat is positioned in the deployment
area of the front passenger airbag. The airbag may cause the child severe, or
even fatal injuries, in the event of it being deployed.
■
This fact is also indicated by the label that can be found in one of the follow-
ing locations. ■On the B-column on the front passenger side » Fig. 149. The sticker is visi-
ble upon opening the front passenger door.
■ On the front passenger's sun visor. In some countries, the sticker is loca-
ted on the front seat passenger's sun visor » Fig. 150.
■
With child safety seats in groups 2 or 3, make sure that the loop-around fit-
tings attached to the child seat headrest is positioned in front of or at the
same height as the loop-around fittings on the B pillar on the passenger side.
■
As soon as the rear-facing child seat is no longer being used on the passen-
ger seat, the front passenger airbag should be re-activated again.
178Safety