change wheel SKODA YETI 2013 1.G / 5L Owner's Manual
[x] Cancel search | Manufacturer: SKODA, Model Year: 2013, Model line: YETI, Model: SKODA YETI 2013 1.G / 5LPages: 266, PDF Size: 26.71 MB
Page 33 of 266

Coming HomeSwitch on/off and adjust the light duration of the Com-
ing Home function. Further information » page 51,
COMING HOME / LEAVING HOME .Leaving HomeSwitch on/off and adjust the light duration of the Com-
ing Home function. Further information » page 51,
COMING HOME / LEAVING HOME .Dayl. dri. lightEnable / disable the daytime running lights. Further in-
formation » page 48, Daylight running lights (DAY
LIGHT) .Rear wiperSwitch on/off the function for automatic rear window
wiping. Further information » page 57, Automatic rear
window wiping .Lane ch. flashSwitch on/off the convenience flashing function. Fur-
ther information » page 49, “Convenience turn sig-
nal” .Travel modeSwitch on/off the travel model function. Further infor-
mation » page 50 , Tourist lights (Travel mode) .Factory settingRestore the factory setting for the lighting.
Time
The time, time format (12 or 24 hour indicator) and the changeover between sum-
mer/winter time can be set here.
Winter tyres
Here, the speed and the switching on and off of the acoustic signals when ex-
ceeding this speed can be adjusted. This function is, for example, used for winter
tyres where the maximum permissible speed is lower than the maximum speed ofthe vehicle » page 212, Tyres and wheel rims .
As soon as the parking procedure is completed, an audible signal sounds and the
following message appears in the information display.
Winter tyres: max. speed … km/h.
Units
The units for the temperature, consumption and distance driven can be set here.
Assistants
The tones of the audible signals for the parking aid can be adjusted here.
Further information » page 140, Parking aid .
Alt. speed dis.
Here, the display of the second speed in mph 1)
can be activated.
Further information » page 13, Display of the second speed .
Service
The days and kilometres remaining until the next service can be displayed here.
Further information » page 30, Service interval display .
Factory setting
The factory setting of the functions of the MAXI DOT display can be restored here.
Service interval display
Introduction
This chapter contains information on the following subjects:
Prompt in the segment display
31
Prompt in the MAXI DOT display
31
Before the next service interval is reached, a message concerning the kilometres
and days remaining until the next service is due is shown for about 10 seconds
after the ignition is switched on.
This information can also be displayed manually with the ignition at all times.
The kilometre indicator or the days indicator reduces in steps of 100 km or, where
applicable, days until the service due date is reached.
Note
■ Information is retained in the Service Interval Display even after the vehicle bat-
tery is disconnected.■
If the instrument cluster is exchanged after a repair, the correct values must be
entered in the counter for the Service Interval Display. This work is carried out by a specialist garage.
■
In some national versions the displays appear in the Imperial system of meas-
urement.
■
For more information on the service intervals, see » page 182, Service intervals .
1)
For models with the speedometer in mph, the second speed is displayed in km/h.
30Using the system
Page 93 of 266
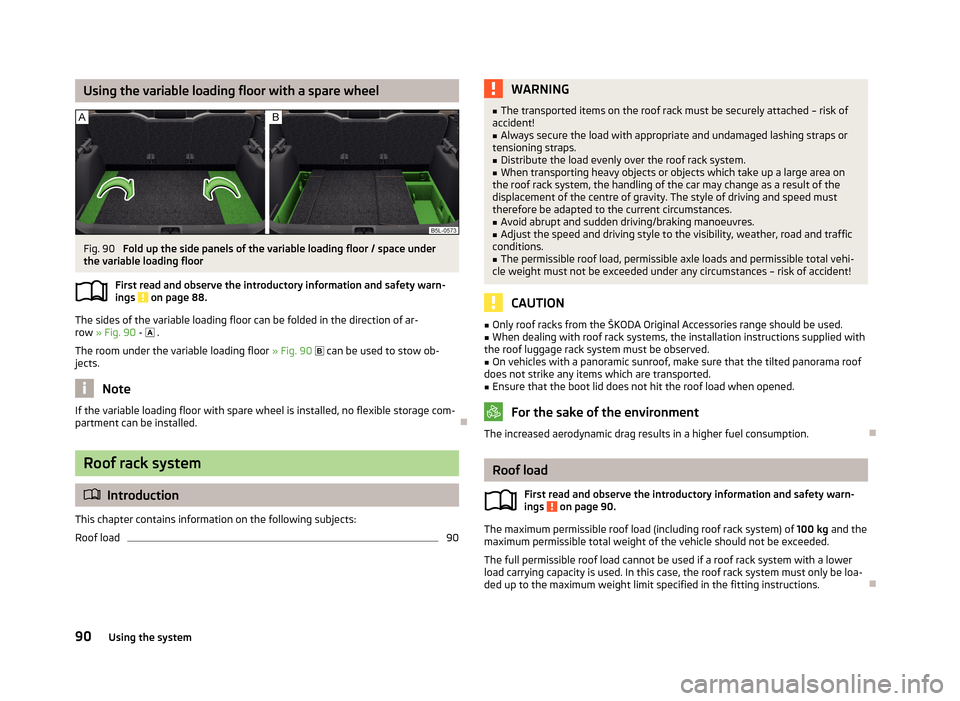
Using the variable loading floor with a spare wheelFig. 90
Fold up the side panels of the variable loading floor / space under
the variable loading floor
First read and observe the introductory information and safety warn-ings
on page 88.
The sides of the variable loading floor can be folded in the direction of ar-row » Fig. 90 -
.
The room under the variable loading floor » Fig. 90
can be used to stow ob-
jects.
Note
If the variable loading floor with spare wheel is installed, no flexible storage com-
partment can be installed.
Roof rack system
Introduction
This chapter contains information on the following subjects:
Roof load
90WARNING■ The transported items on the roof rack must be securely attached – risk of
accident!■
Always secure the load with appropriate and undamaged lashing straps or
tensioning straps.
■
Distribute the load evenly over the roof rack system.
■
When transporting heavy objects or objects which take up a large area on
the roof rack system, the handling of the car may change as a result of the displacement of the centre of gravity. The style of driving and speed musttherefore be adapted to the current circumstances.
■
Avoid abrupt and sudden driving/braking manoeuvres.
■
Adjust the speed and driving style to the visibility, weather, road and traffic
conditions.
■
The permissible roof load, permissible axle loads and permissible total vehi-
cle weight must not be exceeded under any circumstances – risk of accident!
CAUTION
■ Only roof racks from the ŠKODA Original Accessories range should be used.■When dealing with roof rack systems, the installation instructions supplied with
the roof luggage rack system must be observed.■
On vehicles with a panoramic sunroof, make sure that the tilted panorama roof
does not strike any items which are transported.
■
Ensure that the boot lid does not hit the roof load when opened.
For the sake of the environment
The increased aerodynamic drag results in a higher fuel consumption.
Roof load
First read and observe the introductory information and safety warn-
ings
on page 90.
The maximum permissible roof load (including roof rack system) of 100 kg and the
maximum permissible total weight of the vehicle should not be exceeded.
The full permissible roof load cannot be used if a roof rack system with a lower
load carrying capacity is used. In this case, the roof rack system must only be loa-
ded up to the maximum weight limit specified in the fitting instructions.
90Using the system
Page 108 of 266
Dial number
Any telephone number can be entered in the Dial number menu item. The re-
quired digits must be selected one after the other using the adjustment wheel,
and then confirmed by pressing the adjustment wheel. You can select digits 0-9,
symbols , , # and the Cancel, Call and Delete functions.
Call register
The following menu items can be selected in the Call register menu item.
■ Missed calls - List of missed calls
■ Dialled numbers - List of dialled numbers
■ Received calls - list of received calls
Voice mailbox
In the Voice mailbox menu item, you can set the number of the voice mailbox 1)
and then dial the number.
Bluetooth
The following menu items can be selected from the Bluetooth menu item.
■ User - Overview of the stored telephones
■ New user - Search for new mobile phones that are in the reception range
■ Visibility - Switches on the visibility of the hands-free system for other devices
■ Media player - Playback via Bluetooth ®
■ Active device - Connected device
■ Paired devices - List of paired devices
■ Search - Device search
■ Phone name - option to change the name of the phone (default SKODA_BT)
Settings
The following menu items can be selected from the Settings menu item.
■ Phone book - Phonebook
■ Update 1)
- Update the phone book
■ List - Arrange the entries in the phone book
■ Surname - Arrange according to surname
■ Surname - Sorted by contact name
■ Ring tone - Ring tone setting
Back
Return in the Start menu of the telephone.
Universal telephone preinstallation GSM IIl
Introduction
This chapter contains information on the following subjects:
Connecting the phone to the hands-free system
106
Telephone operation in the MAXI DOT display
107
Internet connection via Bluetooth ®
108
The universal telephone preparation GSM III includes the following functions:
› Phone Phonebook
» page 103.
› Convenience operation via the multifunction steering wheel
» page 101.
› Telephone operation in the MAXI DOT display
» page 107.
› Voice control of the telephone
» page 110.
› Music playback from the telephone or other multimedia units
» page 113.
› Internet connection
» page 108.
› Display of SMS messages
» page 107.
All communication between a telephone and the hands-free system of your vehi- cle can only be established with the help of the following profiles of Bluetooth ®
technology.
rSAP - Remote SIM access profile
After connecting the telephone with the hands-free system via the rSAP profile,
the telephone deregisters from the GSM network, and communication with the
network is only enabled by the hands-free system via the vehicle's external aerial. In the telephone only the interface for Bluetooth ®
remains active. In this case,
you can only use the mobile phone to disconnect from the hands-free system, de-
activate the Bluetooth ®
connection or dial the emergency number 112 (only valid
in some countries).
HFP - Hands Free Profile
After connecting the telephone with the hands-free system via the HFP profile,
the telephone continues to use its GMS module and the internal antenna to com-
municate with the GSM network.
1)
On vehicles fitted with the Amundsen+ navigation system, this function can be accessed via the navi-
gation system menu; refer to the » operating instructions for the Amundsen+ navigation system .
105Communication and multimedia
Page 116 of 266
If the system does not recognise the command, it repeats the first part of thehelp thus enabling a new entry to be completed. After the 2nd error the systemrepeats the second part of the aid. After the 3rd failed attempt, the answer “ Can-
celled. ” is given and the dialogue is ended.
Storing voice recording for a contact
If automatic name recognition does not work reliably for some contacts, you can
choose to save your own voice tag for the contact in the Phone book - Voice tag -
Record menu item.
Your own voice tag can also be saved using the voice control in the FURTHER OP-
TIONS menu.
Multimedia
Introduction
This chapter contains information on the following subjects:
Music playback via Bluetooth ®
113
Operating the radio and navigation system on the multifunction steering
wheel
113
AUX- and MDIinputs
115CD change115DVD-preinstallation116
Music playback via Bluetooth ®
First read and observe the introductory information given on page 113.
The universal telephone preinstallation makes it possible to play back music via
Bluetooth ®
from devices such as MP3 players, mobile phones or notebooks.
To ensure that music can be played via Bluetooth ®
, you must first pair the device
with the hands-free system in the Phone - Bluetooth - Media player menu.
The music playback process is performed on the connected device.
The universal telephone preinstallation GSM II ensures that the music played back
via the hands-free system can be controlled with the remote control » page 112,
Voice commands - GSM II .
Note
The device being connected must support the Bluetooth ®
A2DP profile; refer to
the operating instructions for the relevant device being connected.
Operating the radio and navigation system on the multifunction steering wheel
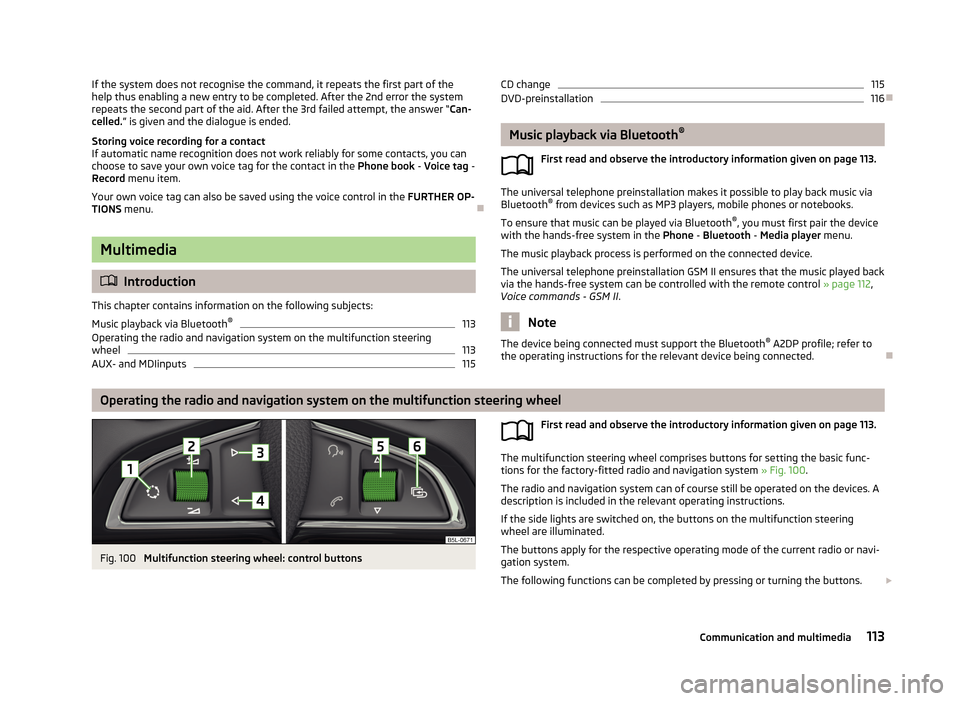
Fig. 100
Multifunction steering wheel: control buttons
First read and observe the introductory information given on page 113.
The multifunction steering wheel comprises buttons for setting the basic func-
tions for the factory-fitted radio and navigation system » Fig. 100.
The radio and navigation system can of course still be operated on the devices. A
description is included in the relevant operating instructions.
If the side lights are switched on, the buttons on the multifunction steeringwheel are illuminated.
The buttons apply for the respective operating mode of the current radio or navi- gation system.
The following functions can be completed by pressing or turning the buttons.
113Communication and multimedia
Page 120 of 266
Driving
Starting-off and Driving
Steering
Introduction
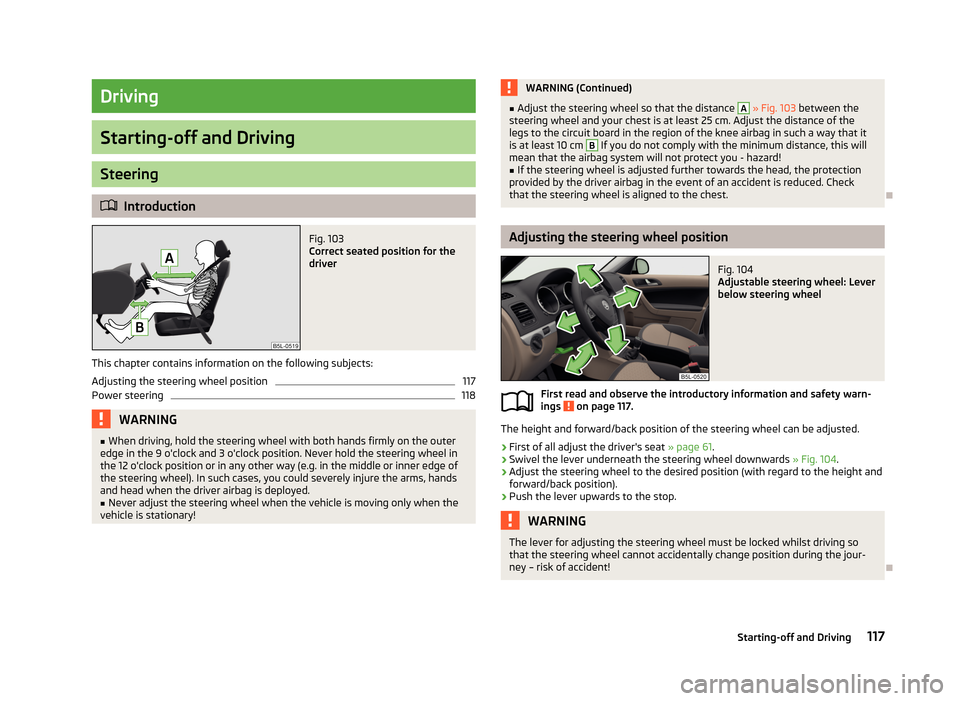
Fig. 103
Correct seated position for the
driver
This chapter contains information on the following subjects:
Adjusting the steering wheel position
117
Power steering
118WARNING■ When driving, hold the steering wheel with both hands firmly on the outer
edge in the 9 o'clock and 3 o'clock position. Never hold the steering wheel in
the 12 o'clock position or in any other way (e.g. in the middle or inner edge of
the steering wheel). In such cases, you could severely injure the arms, hands
and head when the driver airbag is deployed.■
Never adjust the steering wheel when the vehicle is moving only when the
vehicle is stationary!
WARNING (Continued)■ Adjust the steering wheel so that the distance A » Fig. 103 between the
steering wheel and your chest is at least 25 cm. Adjust the distance of the
legs to the circuit board in the region of the knee airbag in such a way that it
is at least 10 cm B
If you do not comply with the minimum distance, this will
mean that the airbag system will not protect you - hazard!
■
If the steering wheel is adjusted further towards the head, the protection
provided by the driver airbag in the event of an accident is reduced. Check that the steering wheel is aligned to the chest.
Adjusting the steering wheel position
Fig. 104
Adjustable steering wheel: Lever
below steering wheel
First read and observe the introductory information and safety warn-
ings on page 117.
The height and forward/back position of the steering wheel can be adjusted.
›
First of all adjust the driver's seat » page 61.
›
Swivel the lever underneath the steering wheel downwards » Fig. 104.
›
Adjust the steering wheel to the desired position (with regard to the height and
forward/back position).
›
Push the lever upwards to the stop.
WARNINGThe lever for adjusting the steering wheel must be locked whilst driving so
that the steering wheel cannot accidentally change position during the jour-
ney – risk of accident!
117Starting-off and Driving
Page 130 of 266
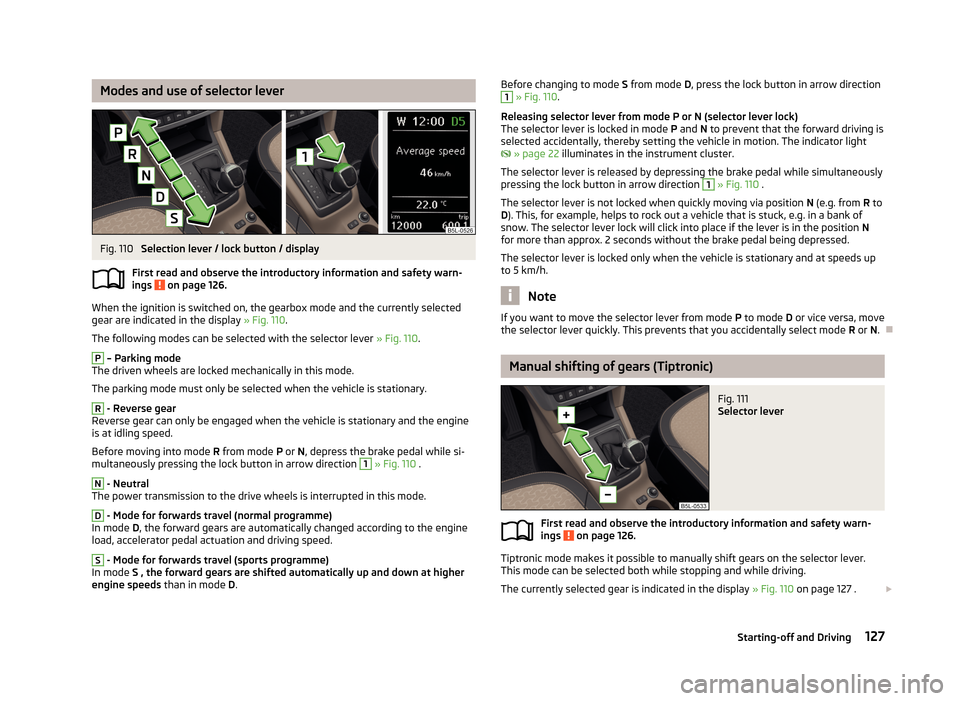
Modes and use of selector leverFig. 110
Selection lever / lock button / display
First read and observe the introductory information and safety warn- ings
on page 126.
When the ignition is switched on, the gearbox mode and the currently selected
gear are indicated in the display » Fig. 110.
The following modes can be selected with the selector lever » Fig. 110.
P
– Parking mode
The driven wheels are locked mechanically in this mode.
The parking mode must only be selected when the vehicle is stationary.
R
- Reverse gear
Reverse gear can only be engaged when the vehicle is stationary and the engine
is at idling speed.
Before moving into mode R from mode P or N, depress the brake pedal while si-
multaneously pressing the lock button in arrow direction
1
» Fig. 110 .
N
- Neutral
The power transmission to the drive wheels is interrupted in this mode.
D
- Mode for forwards travel (normal programme)
In mode D, the forward gears are automatically changed according to the engine
load, accelerator pedal actuation and driving speed.
S
- Mode for forwards travel (sports programme)
In mode S , the forward gears are shifted automatically up and down at higher
engine speeds than in mode D.
Before changing to mode S from mode D, press the lock button in arrow direction1 » Fig. 110 .
Releasing selector lever from mode P or N (selector lever lock)
The selector lever is locked in mode P and N to prevent that the forward driving is
selected accidentally, thereby setting the vehicle in motion. The indicator light
» page 22 illuminates in the instrument cluster.
The selector lever is released by depressing the brake pedal while simultaneously
pressing the lock button in arrow direction 1
» Fig. 110 .
The selector lever is not locked when quickly moving via position N (e.g. from R to
D ). This, for example, helps to rock out a vehicle that is stuck, e.g. in a bank of
snow. The selector lever lock will click into place if the lever is in the position N
for more than approx. 2 seconds without the brake pedal being depressed.
The selector lever is locked only when the vehicle is stationary and at speeds up
to 5 km/h.
Note
If you want to move the selector lever from mode P to mode D or vice versa, move
the selector lever quickly. This prevents that you accidentally select mode R or N.
Manual shifting of gears (Tiptronic)
Fig. 111
Selector lever
First read and observe the introductory information and safety warn-
ings on page 126.
Tiptronic mode makes it possible to manually shift gears on the selector lever.
This mode can be selected both while stopping and while driving.
The currently selected gear is indicated in the display » Fig. 110 on page 127 .
127Starting-off and Driving
Page 139 of 266

Assist systems
Brake assist systems
Introduction
This chapter contains information on the following subjects:
Electronic Stability Control (ESC)
136
Antilock brake system (ABS)
137
Traction Control System (TCS)
137
Electronic Differential Lock (EDL)
137
Driver Steering Recommendation (DSR)
137
Hydraulic Brake Assist (HBA)
137
Hill Hold Control (HHC)
138WARNING■ A lack of fuel can cause irregular engine running or cause the engine to shut
down. The brake assist systems would then fail to function – risk of accident!■
Adjust the speed and driving style to the current visibility, weather, road and
traffic conditions. The increased safety provided by the brake assist systems
must not tempt you to take safety risks – risk of accident!
■
In the event of an ABS fault, visit a specialist garage immediately. Adjust
your style of driving according to the damage to the ABS, as you will not know
the exact extent of the damage or the extent to which this is limiting the
braking efficiency.
CAUTION
■ All four wheels must be fitted with the same tyres approved by the manufactur-
er to ensure the brake assist systems operate correctly.■
Changes to the vehicle (e.g. to the engine, brakes, chassis) can influence the
functionality of the brake assist systems » page 184, Service work, adjustments
and technical alterations .
■
If a fault occurs in the ABS system, the ESC, ASR and EDL will also not work. An
ABS fault is indicated by the warning light » page 19 .
Electronic Stability Control (ESC)Fig. 116
ESC system: TCS button
First read and observe the introductory information and safety warn-
ings on page 136.
The ESC system helps improve control of the vehicle in situations where it is be-
ing operated at its dynamic limits, such as a sudden change to the direction of
travel. The risk of skidding is reduced and your car thus offers greater driving sta-
bility depending on the conditions of the road surface.
The ESC system is automatically activated each time the ignition is switched on.The direction which the driver wishes to take is determined based on the steering angle and the speed of the vehicle and is constantly compared with the actual
behaviour of the vehicle. In the event of deviations, such as the car beginning to
skid, the ESC system will automatically brake the appropriate wheel.
During an intervention of the system, the indicator light
flashes in the instru-
ment cluster.
The following systems are integrated into the Electronic Stability Control (ESC).
› Antilock Brake System (ABS)
» page 137.
› Traction control (TCS)
» page 137.
› Electronic Differential Lock (EDL)
» page 137.
› Driver Steering Recommendation (DSR)
» page 137.
› Hydraulic Brake Assist (HBA)
» page 137.
› Hill Hold Control (HHC)
» page 138.
› Trailer stabilisation (TSA)
» page 158.
The ESC system cannot be deactivated. The
» Fig. 116 symbol button can only
be used to deactivate the ASR.
The warning light lights up in the instrument cluster when the TCR is deactiva-
ted.
136Driving
Page 148 of 266
If the driver changes the parking mode while searching for a parking space, the
symbol button must be pressed again.
Note
If the symbol (km / h) is shown in the display , the vehicle speed should be
reduced below 40 km / hr (parallel parking) or below 20 km / hr (Transverse park- ing) .
Parking
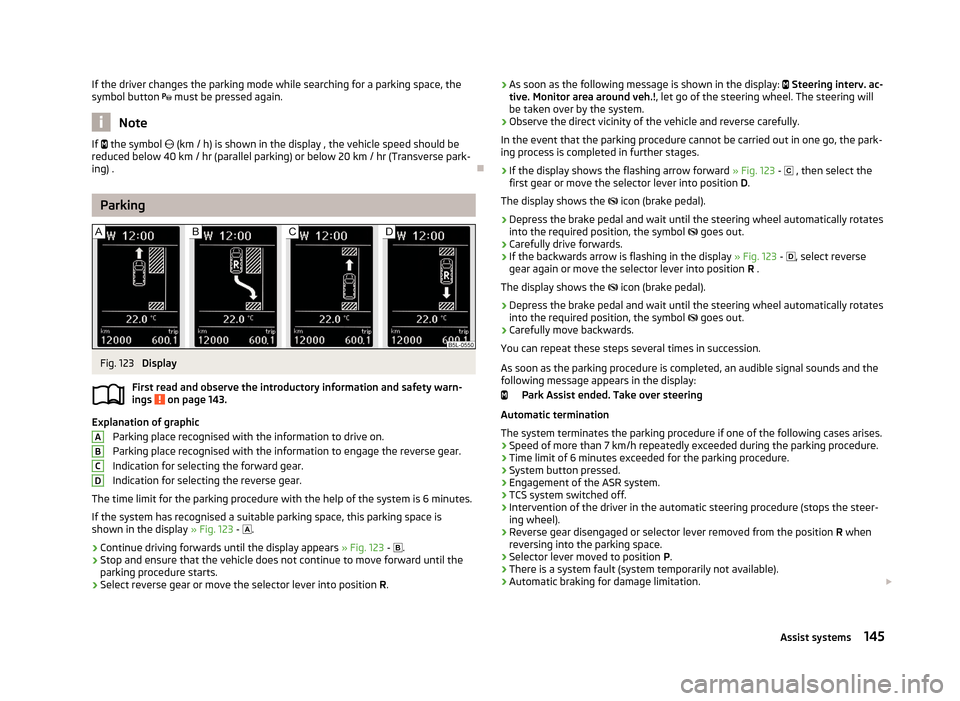
Fig. 123
Display
First read and observe the introductory information and safety warn- ings
on page 143.
Explanation of graphic
Parking place recognised with the information to drive on.
Parking place recognised with the information to engage the reverse gear.
Indication for selecting the forward gear.
Indication for selecting the reverse gear.
The time limit for the parking procedure with the help of the system is 6 minutes. If the system has recognised a suitable parking space, this parking space is
shown in the display » Fig. 123 -
.
›
Continue driving forwards until the display appears » Fig. 123 -
.
›
Stop and ensure that the vehicle does not continue to move forward until the
parking procedure starts.
›
Select reverse gear or move the selector lever into position R.
ABCD› As soon as the following message is shown in the display:
Steering interv. ac-
tive. Monitor area around veh.! , let go of the steering wheel. The steering will
be taken over by the system.›
Observe the direct vicinity of the vehicle and reverse carefully.
In the event that the parking procedure cannot be carried out in one go, the park- ing process is completed in further stages.
›
If the display shows the flashing arrow forward » Fig. 123 - , then select the
first gear or move the selector lever into position D.
The display shows the icon (brake pedal).
›
Depress the brake pedal and wait until the steering wheel automatically rotates
into the required position, the symbol goes out.
›
Carefully drive forwards.
›
If the backwards arrow is flashing in the display » Fig. 123 -
, select reverse
gear again or move the selector lever into position R .
The display shows the
icon (brake pedal).
›
Depress the brake pedal and wait until the steering wheel automatically rotates
into the required position, the symbol
goes out.
›
Carefully move backwards.
You can repeat these steps several times in succession.
As soon as the parking procedure is completed, an audible signal sounds and the
following message appears in the display:
Park Assist ended. Take over steering
Automatic termination
The system terminates the parking procedure if one of the following cases arises.
› Speed of more than 7 km/h repeatedly exceeded during the parking procedure.
› Time limit of 6 minutes exceeded for the parking procedure.
› System button pressed.
› Engagement of the ASR system.
› TCS system switched off.
› Intervention of the driver in the automatic steering procedure (stops the steer-
ing wheel).
› Reverse gear disengaged or selector lever removed from the position
R when
reversing into the parking space.
› Selector lever moved to position
P.
› There is a system fault (system temporarily not available).
› Automatic braking for damage limitation.
145Assist systems
Page 164 of 266
What influences driving safety?First read and observe the introductory information and safety warn-
ings
on page 160.
The driver is fully responsible for himself and his occupants. If your driving safety is effected, you place yourself and the oncoming traffic at risk.
The following guidelines must therefore be observed. › Do not become distracted from concentrating on the traffic situation, e.g. by
your passengers or mobile phone calls.
› Never drive when your driving ability is impaired, e.g. due to medication, alcohol
or drugs.
› Keep to the traffic regulations and the permissible speed limit.
› Always adjust the driving speed to the road, traffic and weather conditions.
› Take regular breaks on long journeys – at least every two hours.
Correct seated position
Introduction
This chapter contains information on the following subjects:
Correct seated position for the driver
162
Correct seated position for the front passenger
162
Correct seated position for the passengers in the rear seats
162
Examples of an incorrect seating position
162WARNINGGeneral information■The front seats and head restraints must be adjusted to match the body
size at all times and the seat belt must always be fastened properly to provide the most effective levels of protection to the passengers.■
If the occupant adopts an incorrect seated position, he is exposed to life-
threatening injuries, in case he is hit by a deployed airbag.
■
If the occupants on the rear seats are not sitting upright, the risk of injury is
increased due to incorrect routing of the seat belt.
■
The seat backrests must not be tilted too far back when driving, as this will
impair the function of the seat belts and of the airbag system – risk of injury!
WARNINGInformation for the driver■Always assume the correct seated position before setting off and do not
change this position while driving. Also advise your passengers to adopt the
correct seated position and not to change this position while the car is mov-
ing.■
Maintain a distance of at least 25 cm from the steering wheel, and a dis-
tance of at least 10 cm between the legs and the dash panel at the height of
the knee airbag. Not maintaining this minimum distance will mean that the airbag system will not be able to properly protect you - hazard!
■
When driving, hold the steering wheel with both hands firmly on the outer
edge in the 9 o'clock and 3 o'clock position. Never hold the steering wheel in
the 12 o'clock position or in any other way (e.g. in the middle or inner edge of the steering wheel). In such cases, you could severely injure the arms, hands
and head when the driver airbag is deployed.
■
Ensure that there are no objects in the driver's footwell, as these may get
caught in the pedal apparatus when driving or braking. You would then no
longer be able to operate the clutch, brake or acceleration pedals.
WARNINGInformation for the front passenger■Maintain a distance of at least 25 cm to the dash panel. Not maintaining this
minimum distance will mean that the airbag system will not be able to proper-
ly protect you – hazard!■
Always keep your feet in the footwell when the car is being driven – never
place your feet on the instrument panel, out of the window or on the surfaces of the seats. You will be exposed to increased risk of injury if it becomes nec-
essary to apply the brake or in the event of an accident. If an airbag is de-
ployed, you may suffer fatal injuries when adopting an incorrect seated posi- tion!
161Passive Safety
Page 168 of 266
WARNINGInformation on the proper use of safety belts■Never use one seat belt to secure two persons (including children). The
seatbelt must not be placed over a child who is sitting on the lap of another
passenger.■
The lock tongue should only be inserted into the lock which is the correct
one for your seat. Wrong use of the safety belt will reduce its capacity to pro-
tect and the risk of injury increases.
■
The slot of the belt tongue must not be blocked, otherwise the belt tongue
will not lock in place properly.
■
Many layers of clothing and loose clothing (e. g. a winter coat over a jacket)
do not allow you to be correctly seated and impairs proper operation of the
seat belts.
■
It is prohibited to use clamps or other objects to adjust seat belts (e. g. for
shortening the belts for smaller persons).
■
The seat belts for the rear seats can only fulfil their function reliably when
the seat backrests are correctly locked into position » page 68.
WARNINGInformation on the care and maintenance of safety belts■The belt webbing must always be kept clean. Soiled belt webbing may im-
pair proper operation of the inertia reel » page 195, Seat belts .■
The seat belts must not be removed or changed in any way. Do not attempt
to repair the seat belts yourself.
■
Check the condition of all the seat belts on a regular basis. If any damage to
the seat belts, seat belt connections, inertia reel or the lock is detected, the
relevant seat belt must be replaced by a specialist garage.
■
Damaged seat belts which have been subjected to stress in an accident and
were therefore stretched, must be replaced – this is best done by a specialist
garage. The anchorage points of the belts must also be inspected. The an-
chorage points for the belts should also be checked.
Note
The national legal requirements must be observed when using seat belts.
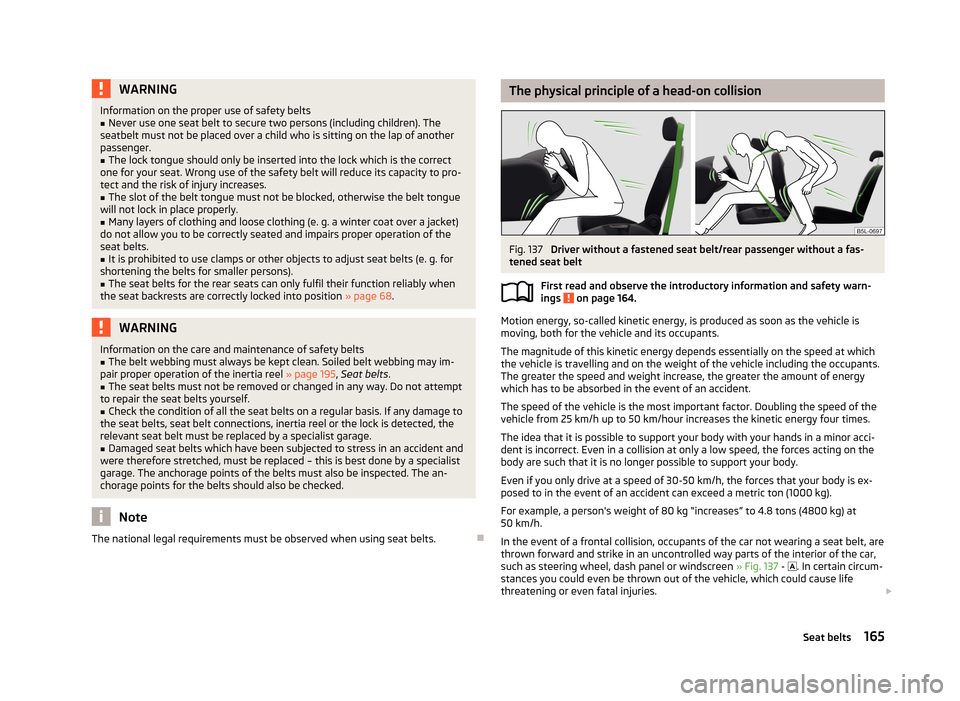
The physical principle of a head-on collisionFig. 137
Driver without a fastened seat belt/rear passenger without a fas-
tened seat belt
First read and observe the introductory information and safety warn-ings
on page 164.
Motion energy, so-called kinetic energy, is produced as soon as the vehicle is
moving, both for the vehicle and its occupants.
The magnitude of this kinetic energy depends essentially on the speed at which
the vehicle is travelling and on the weight of the vehicle including the occupants. The greater the speed and weight increase, the greater the amount of energy
which has to be absorbed in the event of an accident.
The speed of the vehicle is the most important factor. Doubling the speed of the
vehicle from 25 km/h up to 50 km/hour increases the kinetic energy four times.
The idea that it is possible to support your body with your hands in a minor acci- dent is incorrect. Even in a collision at only a low speed, the forces acting on the
body are such that it is no longer possible to support your body.
Even if you only drive at a speed of 30-50 km/h, the forces that your body is ex-
posed to in the event of an accident can exceed a metric ton (1000 kg).
For example, a person's weight of 80 kg “increases” to 4.8 tons (4800 kg) at
50 km/h.
In the event of a frontal collision, occupants of the car not wearing a seat belt, are thrown forward and strike in an uncontrolled way parts of the interior of the car,
such as steering wheel, dash panel or windscreen » Fig. 137 -
. In certain circum-
stances you could even be thrown out of the vehicle, which could cause life threatening or even fatal injuries.
165Seat belts