headrest SKODA YETI 2013 1.G / 5L Owner's Manual
[x] Cancel search | Manufacturer: SKODA, Model Year: 2013, Model line: YETI, Model: SKODA YETI 2013 1.G / 5LPages: 266, PDF Size: 26.71 MB
Page 69 of 266
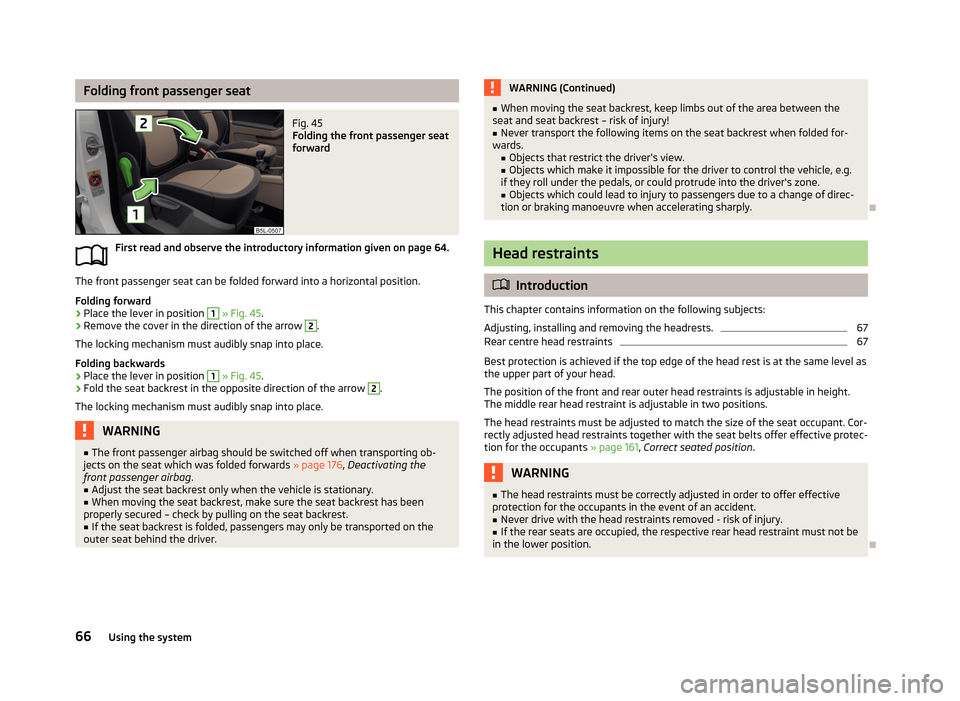
Folding front passenger seatFig. 45
Folding the front passenger seat
forward
First read and observe the introductory information given on page 64.
The front passenger seat can be folded forward into a horizontal position.
Folding forward
›
Place the lever in position
1
» Fig. 45 .
›
Remove the cover in the direction of the arrow
2
.
The locking mechanism must audibly snap into place.
Folding backwards
›
Place the lever in position
1
» Fig. 45 .
›
Fold the seat backrest in the opposite direction of the arrow
2
.
The locking mechanism must audibly snap into place.
WARNING■ The front passenger airbag should be switched off when transporting ob-
jects on the seat which was folded forwards » page 176, Deactivating the
front passenger airbag .■
Adjust the seat backrest only when the vehicle is stationary.
■
When moving the seat backrest, make sure the seat backrest has been
properly secured – check by pulling on the seat backrest.
■
If the seat backrest is folded, passengers may only be transported on the
outer seat behind the driver.
WARNING (Continued)■ When moving the seat backrest, keep limbs out of the area between the
seat and seat backrest – risk of injury!■
Never transport the following items on the seat backrest when folded for-
wards. ■Objects that restrict the driver's view.
■ Objects which make it impossible for the driver to control the vehicle, e.g.
if they roll under the pedals, or could protrude into the driver's zone.
■ Objects which could lead to injury to passengers due to a change of direc-
tion or braking manoeuvre when accelerating sharply.
Head restraints
Introduction
This chapter contains information on the following subjects:
Adjusting, installing and removing the headrests.
67
Rear centre head restraints
67
Best protection is achieved if the top edge of the head rest is at the same level as the upper part of your head.
The position of the front and rear outer head restraints is adjustable in height. The middle rear head restraint is adjustable in two positions.
The head restraints must be adjusted to match the size of the seat occupant. Cor-rectly adjusted head restraints together with the seat belts offer effective protec-
tion for the occupants » page 161, Correct seated position .
WARNING■
The head restraints must be correctly adjusted in order to offer effective
protection for the occupants in the event of an accident.■
Never drive with the head restraints removed - risk of injury.
■
If the rear seats are occupied, the respective rear head restraint must not be
in the lower position.
66Using the system
Page 70 of 266
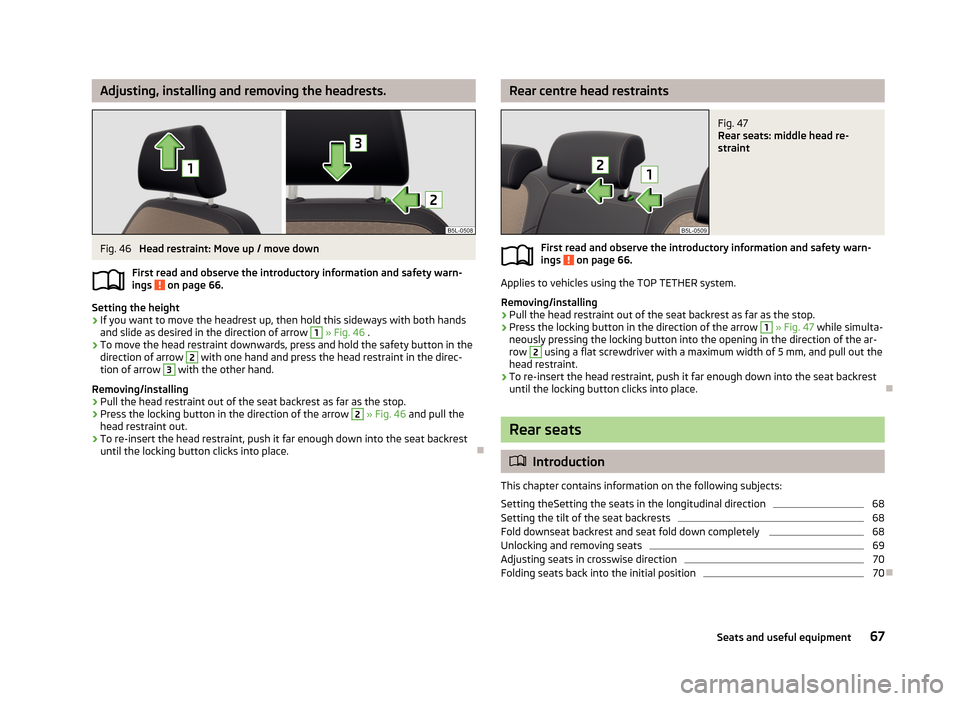
Adjusting, installing and removing the headrests.Fig. 46
Head restraint: Move up / move down
First read and observe the introductory information and safety warn-
ings
on page 66.
Setting the height
›
If you want to move the headrest up, then hold this sideways with both hands
and slide as desired in the direction of arrow
1
» Fig. 46 .
›
To move the head restraint downwards, press and hold the safety button in the
direction of arrow
2
with one hand and press the head restraint in the direc-
tion of arrow
3
with the other hand.
Removing/installing
›
Pull the head restraint out of the seat backrest as far as the stop.
›
Press the locking button in the direction of the arrow
2
» Fig. 46 and pull the
head restraint out.
›
To re-insert the head restraint, push it far enough down into the seat backrest until the locking button clicks into place.
Rear centre head restraintsFig. 47
Rear seats: middle head re-
straint
First read and observe the introductory information and safety warn-
ings on page 66.
Applies to vehicles using the TOP TETHER system.
Removing/installing
›
Pull the head restraint out of the seat backrest as far as the stop.
›
Press the locking button in the direction of the arrow
1
» Fig. 47 while simulta-
neously pressing the locking button into the opening in the direction of the ar- row
2
using a flat screwdriver with a maximum width of 5 mm, and pull out the
head restraint.
›
To re-insert the head restraint, push it far enough down into the seat backrest until the locking button clicks into place.
Rear seats
Introduction
This chapter contains information on the following subjects:
Setting theSetting the seats in the longitudinal direction
68
Setting the tilt of the seat backrests
68
Fold downseat backrest and seat fold down completely
68
Unlocking and removing seats
69
Adjusting seats in crosswise direction
70
Folding seats back into the initial position
70
67Seats and useful equipment
Page 165 of 266
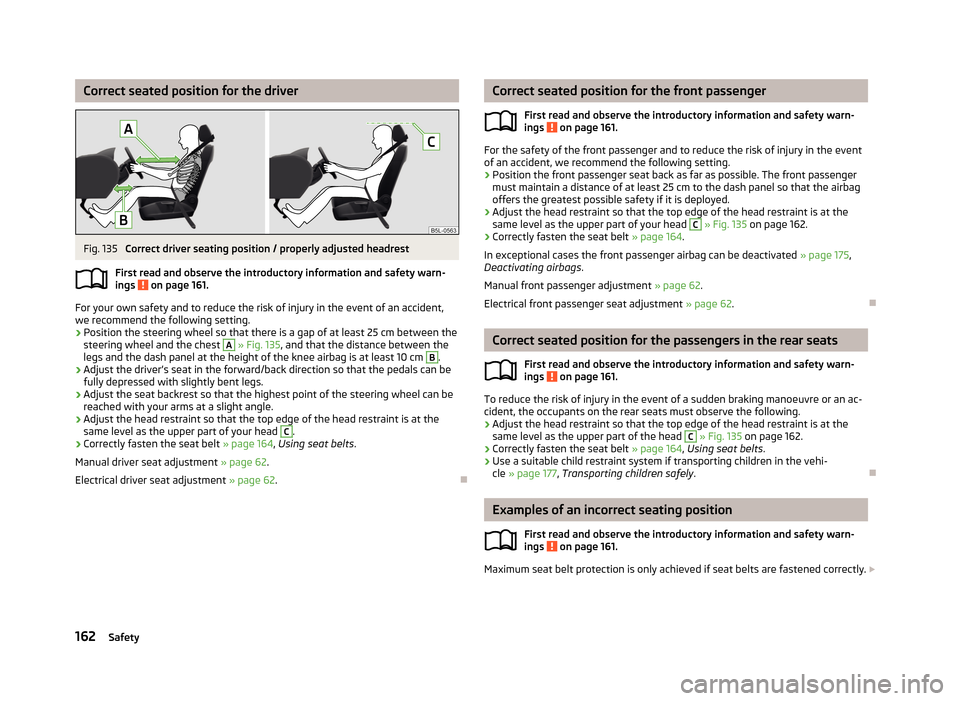
Correct seated position for the driverFig. 135
Correct driver seating position / properly adjusted headrest
First read and observe the introductory information and safety warn-
ings
on page 161.
For your own safety and to reduce the risk of injury in the event of an accident,
we recommend the following setting.
› Position the steering wheel so that there is a gap of at least 25 cm between the
steering wheel and the chest
A
» Fig. 135 , and that the distance between the
legs and the dash panel at the height of the knee airbag is at least 10 cm
B
.
› Adjust the driver’s seat in the forward/back direction so that the pedals can be
fully depressed with slightly bent legs.
› Adjust the seat backrest so that the highest point of the steering wheel can be
reached with your arms at a slight angle.
› Adjust the head restraint so that the top edge of the head restraint is at the
same level as the upper part of your head
C
.
› Correctly fasten the seat belt
» page 164, Using seat belts .
Manual driver seat adjustment » page 62.
Electrical driver seat adjustment » page 62.
Correct seated position for the front passenger
First read and observe the introductory information and safety warn-ings
on page 161.
For the safety of the front passenger and to reduce the risk of injury in the event
of an accident, we recommend the following setting.
› Position the front passenger seat back as far as possible. The front passenger
must maintain a distance of at least 25 cm to the dash panel so that the airbag
offers the greatest possible safety if it is deployed.
› Adjust the head restraint so that the top edge of the head restraint is at the
same level as the upper part of your head
C
» Fig. 135 on page 162.
› Correctly fasten the seat belt
» page 164.
In exceptional cases the front passenger airbag can be deactivated » page 175,
Deactivating airbags .
Manual front passenger adjustment » page 62.
Electrical front passenger seat adjustment » page 62.
Correct seated position for the passengers in the rear seats
First read and observe the introductory information and safety warn-
ings
on page 161.
To reduce the risk of injury in the event of a sudden braking manoeuvre or an ac-
cident, the occupants on the rear seats must observe the following.
› Adjust the head restraint so that the top edge of the head restraint is at the
same level as the upper part of the head
C
» Fig. 135 on page 162.
› Correctly fasten the seat belt
» page 164, Using seat belts .
› Use a suitable child restraint system if transporting children in the vehi-
cle » page 177 , Transporting children safely .
Examples of an incorrect seating position
First read and observe the introductory information and safety warn-ings
on page 161.
Maximum seat belt protection is only achieved if seat belts are fastened correctly.
162Safety
Page 181 of 266
Use of a child seat on the front passenger seat
Never use a backwards-facing child restraint system on a seat that is protected by an active airbag installed in front of it. This could cause the child severe injury
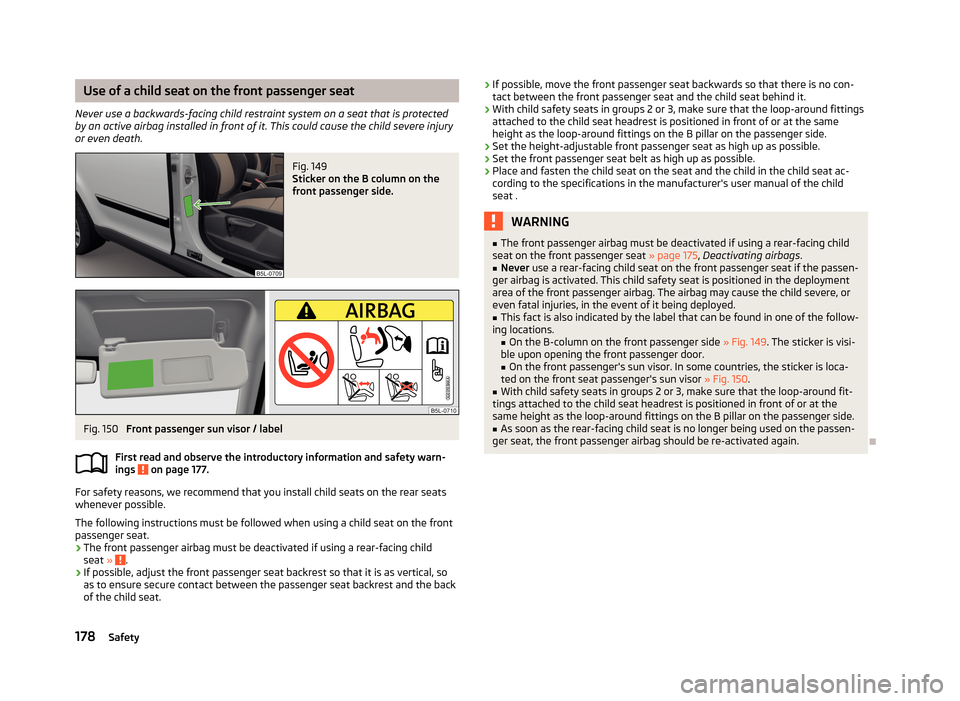
or even death.Fig. 149
Sticker on the B column on the
front passenger side.
Fig. 150
Front passenger sun visor / label
First read and observe the introductory information and safety warn-
ings
on page 177.
For safety reasons, we recommend that you install child seats on the rear seats
whenever possible.
The following instructions must be followed when using a child seat on the front passenger seat.
› The front passenger airbag must be deactivated if using a rear-facing child
seat »
.
› If possible, adjust the front passenger seat backrest so that it is as vertical, so
as to ensure secure contact between the passenger seat backrest and the back of the child seat.
› If possible, move the front passenger seat backwards so that there is no con-
tact between the front passenger seat and the child seat behind it.
› With child safety seats in groups 2 or 3, make sure that the loop-around fittings
attached to the child seat headrest is positioned in front of or at the same
height as the loop-around fittings on the B pillar on the passenger side.
› Set the height-adjustable front passenger seat as high up as possible.
› Set the front passenger seat belt as high up as possible.
› Place and fasten the child seat on the seat and the child in the child seat ac-
cording to the specifications in the manufacturer's user manual of the child seat .WARNING■ The front passenger airbag must be deactivated if using a rear-facing child
seat on the front passenger seat » page 175, Deactivating airbags .■
Never use a rear-facing child seat on the front passenger seat if the passen-
ger airbag is activated. This child safety seat is positioned in the deployment
area of the front passenger airbag. The airbag may cause the child severe, or
even fatal injuries, in the event of it being deployed.
■
This fact is also indicated by the label that can be found in one of the follow-
ing locations. ■On the B-column on the front passenger side » Fig. 149. The sticker is visi-
ble upon opening the front passenger door.
■ On the front passenger's sun visor. In some countries, the sticker is loca-
ted on the front seat passenger's sun visor » Fig. 150.
■
With child safety seats in groups 2 or 3, make sure that the loop-around fit-
tings attached to the child seat headrest is positioned in front of or at the
same height as the loop-around fittings on the B pillar on the passenger side.
■
As soon as the rear-facing child seat is no longer being used on the passen-
ger seat, the front passenger airbag should be re-activated again.
178Safety
Page 254 of 266
Index
A
Abroad Driving abroad
135
Unleaded petrol135
ABS Operation
137
Warning light19
Accessories184
Adaptive headlights (AFS)50
Adjusting Belt height
167
Exterior mirrors59
Head restraints66
Interior mirror59
Seats62
Steering wheel117
Adjusting the headrests
67
Adjusting the seats161
Adjustment Headlight beam
47
Aerial188
See windows191
AFS50
Airbag169
Deactivating175
Deactivating the front passenger airbag176
Deployment169
Front airbag171
Head airbag174
Indicator light21
Knee airbag172
Modifications and damage to the airbag system 186
Side airbag
173
Airbag system169
Air conditioning Climatronic95
manual air conditioning94
Recirculation93
Air conditioning system Air outlets
92
Air outlets92
Alarm Switching off
39
Triggering39
Anti-theft alarm system Activating/deactivating
39
Trailer159
Antilock brake system (ABS)137
Armrest Front
65
Artificial leather194
Ashtray74
ASR warning light
18
Assistence systems OFF ROAD-mode
138
Assist systems136
ABS19, 137
ASR18
Cruise Control System147
DSR137
EDL137
ESC18, 136
HBA137
HHC138
Park assist143
Parking aid140
START-STOP149
TCS137
Auto Check Control13
Automatic driving lamp control49
Automatic gearbox Manual shifting of gears
127
Selector lever-emergency unlocking233
Starting-off and driving128
Tiptronic127
Automatic load deactivation210
Automatic transmission126
Kickdown128
Malfunction128
Selector lever lock127
Using the selector lever127
Auxiliary heating and ventilation System settings
98
auxiliary heating and ventilations Switching on and off directly
98
Auxiliary heating (auxiliary heating and ventila- tion)
97
Radio remote control99
B
Ball head Check fitting
155
Ball rod installing
154
Ready position153
removing155
Bar with sliding hook84
Battery In the remote control key
231
Belts164
Belt tensioners168
Bonnet Closing
200
Opening200
Boot Class N1 vehicles
88
see Boot lid41
Boot lid41
Automatic locking41
Warning light17
Brake information messages
15
warning light15
251Index