heating SKODA YETI 2013 1.G / 5L Owner's Manual
[x] Cancel search | Manufacturer: SKODA, Model Year: 2013, Model line: YETI, Model: SKODA YETI 2013 1.G / 5LPages: 266, PDF Size: 26.71 MB
Page 6 of 266
Table of Contents
Materials defect liability and ŠKODA warranty for
new cars5
Mobility warranty and ŠKODA extended
warranty
6
Abbreviations
Using the system
Cockpit
9
Overview
8
Instruments and Indicator Lights
10
Instrument cluster
10
Warning lights
14
Information system
23
Driver information system
23
Multifunction display (MFD)
25
MAXI DOT display
28
Service interval display
30
Unlocking and opening
32
Unlocking and locking
32
KESSY
38
Anti-theft alarm system
39
Luggage compartment lid
40
Electric power windows
41
Panorama sliding/tilting roof
44
Lights and visibility
47
Lights
47
Interior lights
53
Visibility
55
Windscreen wipers and washers
56
Rear mirror
58Seats and useful equipment61Front seats61
Front seat functions
64
Head restraints
66
Rear seats
67
Practical equipment
70
Luggage compartment
81
Variable loading floor in the luggage
compartment (Estate)
88
Roof rack system
90
Heating and air-conditioning
91
Heating, ventilation, cooling
91
Auxiliary heating (auxiliary heating and ventilation)
97
Communication and multimedia
100
General information
100
Universal telephone preinstallation GSM II
103
Universal telephone preinstallation GSM IIl
105
Wi-Fi
109
Voice control
110
Multimedia
113
Driving
Starting-off and Driving
117
Steering
117
Starting and stopping the engine using the
key
118
Starting and stopping the engine - KESSY
120
Brakes
124
Manual gear changing and pedals
125
Automatic transmission
126
Running in
129
Economical driving and environmental
sustainability
130
Water crossing and drive outside paved roads
134
Driving abroad
135Assist systems136Brake assist systems136
OFF ROAD-mode
138
Parking aid
140
Optical Parking Assist (Rear view camera)
141
Park assist
143
Cruise Control System
147
START-STOP
149
Fatigue detection (break recommendation)
151
Towing a trailer
152
Towing device
152
Trailer
156
Safety
Passive Safety
160
General information
160
Correct seated position
161
Seat belts
164
Using seat belts
164
Inertia reels and belt tensioners
167
Airbag system
169
Description of the airbag system
169
Airbag overview
170
Deactivating airbags
175
Transporting children safely
177
Child seat
177
Fastening systems
180
General Maintenance
Vehicle care
182
Service intervals
182
Service work, adjustments and technical alterations
184
Washing your car
1873Table of Contents
Page 12 of 266
Using the system
Cockpit
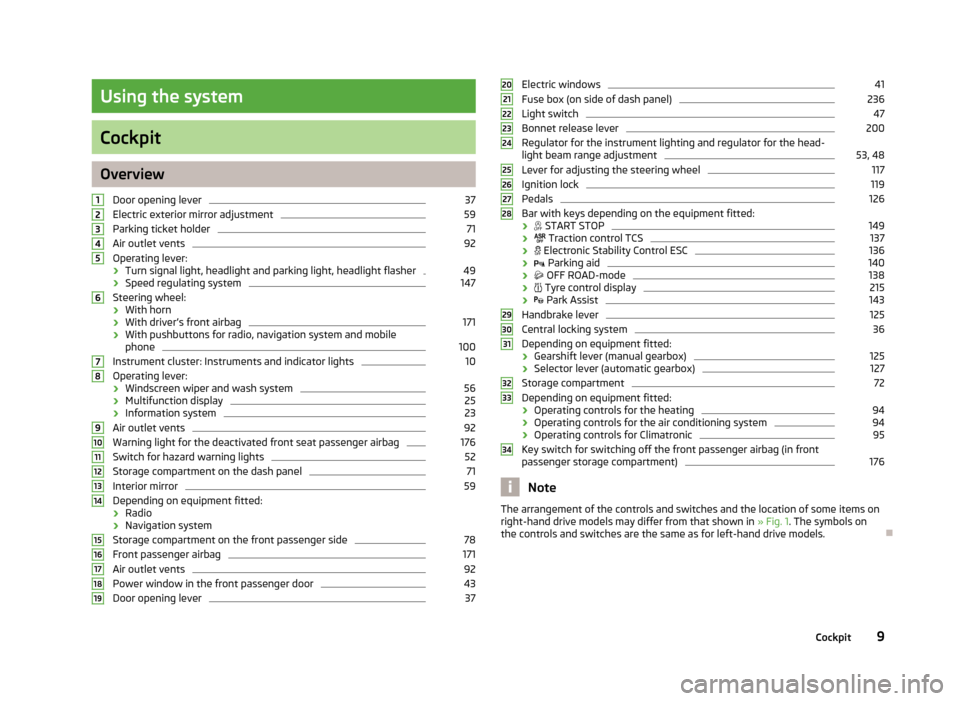
OverviewDoor opening lever
37
Electric exterior mirror adjustment
59
Parking ticket holder
71
Air outlet vents
92
Operating lever:
› Turn signal light, headlight and parking light, headlight flasher
49
›Speed regulating system
147
Steering wheel:
› With horn
› With driver’s front airbag
171
›With pushbuttons for radio, navigation system and mobile
phone
100
Instrument cluster: Instruments and indicator lights
10
Operating lever:
› Windscreen wiper and wash system
56
›Multifunction display
25
›Information system
23
Air outlet vents
92
Warning light for the deactivated front seat passenger airbag
176
Switch for hazard warning lights
52
Storage compartment on the dash panel
71
Interior mirror
59
Depending on equipment fitted:
› Radio
› Navigation system
Storage compartment on the front passenger side
78
Front passenger airbag
171
Air outlet vents
92
Power window in the front passenger door
43
Door opening lever
3712345678910111213141516171819Electric windows41Fuse box (on side of dash panel)236
Light switch
47
Bonnet release lever
200
Regulator for the instrument lighting and regulator for the head- light beam range adjustment
53, 48
Lever for adjusting the steering wheel
117
Ignition lock
119
Pedals
126
Bar with keys depending on the equipment fitted:
›
START STOP
149
›
Traction control TCS
137
›
Electronic Stability Control ESC
136
›
Parking aid
140
›
OFF ROAD-mode
138
›
Tyre control display
215
›
Park Assist
143
Handbrake lever
125
Central locking system
36
Depending on equipment fitted:
› Gearshift lever (manual gearbox)
125
›
Selector lever (automatic gearbox)
127
Storage compartment
72
Depending on equipment fitted:
› Operating controls for the heating
94
›Operating controls for the air conditioning system
94
›
Operating controls for Climatronic
95
Key switch for switching off the front passenger airbag (in front
passenger storage compartment)
176
Note
The arrangement of the controls and switches and the location of some items on
right-hand drive models may differ from that shown in » Fig. 1. The symbols on
the controls and switches are the same as for left-hand drive models.2021222324252627282930313233349Cockpit
Page 32 of 266
Main menu points
The following information can be selected (depending on the equipment installed in the vehicle).
■ MFD (Multifunction display) » page 25
■ Audio » Operating instructions for the radio
■ Navigation » Operating instructions for the navigation system
■ Phone » page 100 ;
■ Aux. heating » page 97
■ Assistants » page 151
■ Vehicle status » page 13
■ Settings » page 29
The Audio and Navigation menu items are only displayed when the factory-fitted
radio or navigation system is switched on.
The Aux. heating menu item is only displayed if the vehicle is equipped with fac-
tory-fitted auxiliary heating.
The menu item Assistants is only displayed if the vehicle is fitted with fatigue de-
tection.
Note
■ If warning messages are displayed, these messages must be verified to access
the main menu » page 23, Using the information system .■
If the display is not activated at that moment, the menu always shifts to one of
the higher levels after approx. 10 seconds.
■
Using the factory-fitted radio or navigation system » Radio operating instruc-
tions or» navigation system operating instructions .
Settings
First read and observe the introductory information and safety warn-
ings
on page 28.
You can change certain settings by means of the MAXI DOT display. The current
menu item is shown in the top of the display under a line.
The following information can be selected (depending on the equipment installed in the vehicle).
Language
You can set the language for the display texts here.
MFD data
Activate or deactivate certain displays of the multifunction display here.
Convenience
The following functions can be activated, deactivated or adjusted here:
Rain closing
Switch on/off the function for automatically closing the window and panoramic tilt/slide sunroof in a locked ve-
hicle when it starts raining a)
. If the function is set and it
is not raining, the windows including the panoramic tilt/
slide sunroof will close automatically after approx.
12 hours.ATA confirmSwitch on/off the audible signal indicating activation of the anti-theft alarm system. Further informa-
tion » page 39 , Anti-theft alarm system .Central lockingSwitch on/off the central locking and automatic locking
function. Further information » page 36, Individual
settings .Window op.Only convenience mode for the driver window or for all
of the windows can be adjusted here. Further informa-tion » page 43 , Window convenience operation .
Mirror down
Switch on/off the function for mirror lowering on the
front passenger side when engaging the reverse gear b)
.
Further information » page 60, Fold in passenger's
mirror .
Mirror adjust.
Switch on/off the function for left and right exterior
mirror setting simultaneously. Further informa-
tion » page 59 , Synchronous adjustment of both mirr-
rors .Factory settingRestore the Convenience factory setting.a)
This function is only available on vehicles with a rain sensor.
b)
This function is only available on vehicles with an electrically adjustable driver seat.
Lights & Vision
The following functions can be activated, deactivated or adjusted here:
29Information system
Page 45 of 266
When driving always use the existing heating, air conditioning and ventilation
system for ventilating the interior of the vehicle. If the windows are opened, dust
as well as other dirt can get into the vehicle and in addition the wind noise is
more at certain speeds.WARNING■ Ensure that no persons are still left in the vehicle when locking the vehicle.
In an emergency, the windows will no longer be able to be opened from the
inside.■
The system is fitted with a force limiter » page 43. If there is an obstacle,
the closing process is stopped and the window goes down by several centi-
metres. However, the windows should be closed carefully – risk of injury.
■
It is recommended to deactivate the electrically operated power windows in
the rear doors (safety pushbutton)
S
» Fig. 21 on page 42 when children are
being transported on the rear seats.
CAUTION
■ Keep the windows clean to ensure the correct functionality of the electric win-
dows.■
In the event that the windows are frozen, first of all eliminate the
ice » page 191 , Windows and exterior mirrors and only then operate the electrical
power windows. Otherwise, the window sealing and the electrical power window mechanism could be damaged.
■
In the winter, ice accumulating on the surface of the window may cause there
to be more resistance when closing the window. The window will stop and move back several centimetres.
■
It is necessary to deactivate the force limiter to close the window » page 43.
■
Make sure that the windows are closed whenever you leave the locked vehicle.
For the sake of the environment
At high speeds, you should keep the windows closed to prevent unnecessarily
high fuel consumption.
Note
The window lift system is equipped with protection against overheating. Repea-
ted opening and closing of the window can cause this mechanism to overheat. If
this happens, it will not be possible to operate the window for a short time. You
will be able to operate the window again as soon as the overheating protection
has cooled down.
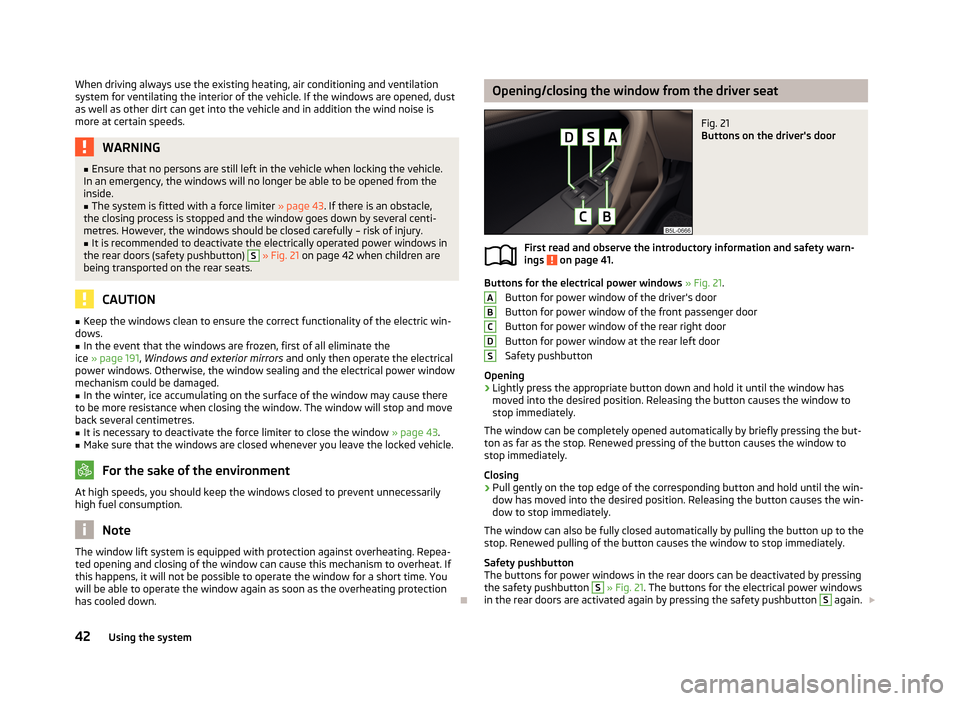
Opening/closing the window from the driver seatFig. 21
Buttons on the driver's door
First read and observe the introductory information and safety warn-
ings on page 41.
Buttons for the electrical power windows » Fig. 21 .
Button for power window of the driver's door
Button for power window of the front passenger door
Button for power window of the rear right door
Button for power window at the rear left door
Safety pushbutton
Opening
›
Lightly press the appropriate button down and hold it until the window has moved into the desired position. Releasing the button causes the window to
stop immediately.
The window can be completely opened automatically by briefly pressing the but- ton as far as the stop. Renewed pressing of the button causes the window to stop immediately.
Closing
›
Pull gently on the top edge of the corresponding button and hold until the win-
dow has moved into the desired position. Releasing the button causes the win-
dow to stop immediately.
The window can also be fully closed automatically by pulling the button up to the
stop. Renewed pulling of the button causes the window to stop immediately.
Safety pushbutton
The buttons for power windows in the rear doors can be deactivated by pressing
the safety pushbutton
S
» Fig. 21 . The buttons for the electrical power windows
in the rear doors are activated again by pressing the safety pushbutton
S
again.
ABCDS42Using the system
Page 58 of 266
Visibility
Introduction
This chapter contains information on the following subjects:
Windscreen and rear window heater
55
Sun visors
55
Windscreen and rear window heater
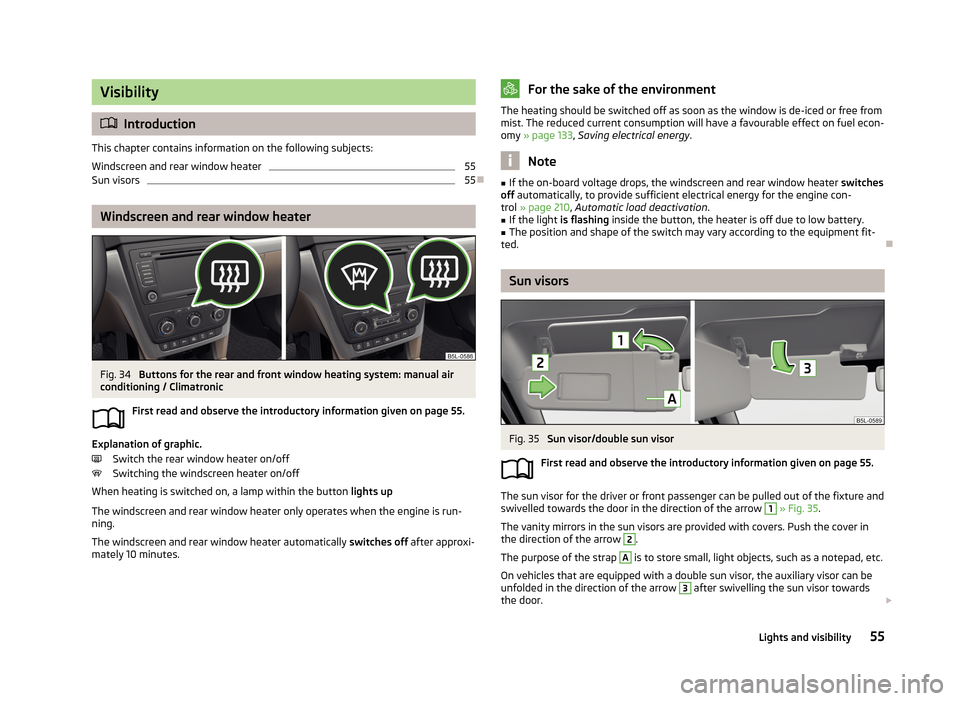
Fig. 34
Buttons for the rear and front window heating system: manual air
conditioning / Climatronic
First read and observe the introductory information given on page 55.
Explanation of graphic.Switch the rear window heater on/off
Switching the windscreen heater on/off
When heating is switched on, a lamp within the button lights up
The windscreen and rear window heater only operates when the engine is run-
ning.
The windscreen and rear window heater automatically switches off after approxi-
mately 10 minutes.
For the sake of the environmentThe heating should be switched off as soon as the window is de-iced or free from
mist. The reduced current consumption will have a favourable effect on fuel econ-
omy » page 133 , Saving electrical energy .
Note
■
If the on-board voltage drops, the windscreen and rear window heater switches
off automatically, to provide sufficient electrical energy for the engine con-
trol » page 210 , Automatic load deactivation .■
If the light is flashing inside the button, the heater is off due to low battery.
■
The position and shape of the switch may vary according to the equipment fit-
ted.
Sun visors
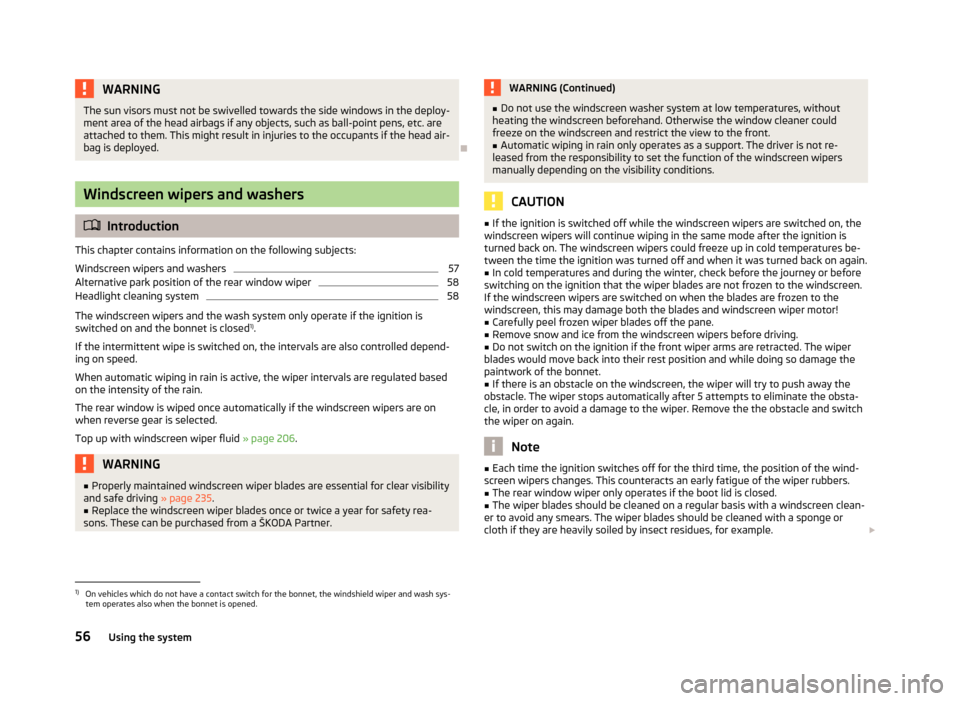
Fig. 35
Sun visor/double sun visor
First read and observe the introductory information given on page 55.
The sun visor for the driver or front passenger can be pulled out of the fixture and
swivelled towards the door in the direction of the arrow
1
» Fig. 35 .
The vanity mirrors in the sun visors are provided with covers. Push the cover in
the direction of the arrow
2
.
The purpose of the strap
A
is to store small, light objects, such as a notepad, etc.
On vehicles that are equipped with a double sun visor, the auxiliary visor can be
unfolded in the direction of the arrow
3
after swivelling the sun visor towards
the door.
55Lights and visibility
Page 59 of 266
WARNINGThe sun visors must not be swivelled towards the side windows in the deploy-
ment area of the head airbags if any objects, such as ball-point pens, etc. are attached to them. This might result in injuries to the occupants if the head air-
bag is deployed.
Windscreen wipers and washers
Introduction
This chapter contains information on the following subjects:
Windscreen wipers and washers
57
Alternative park position of the rear window wiper
58
Headlight cleaning system
58
The windscreen wipers and the wash system only operate if the ignition is
switched on and the bonnet is closed 1)
.
If the intermittent wipe is switched on, the intervals are also controlled depend-
ing on speed.
When automatic wiping in rain is active, the wiper intervals are regulated based
on the intensity of the rain.
The rear window is wiped once automatically if the windscreen wipers are on
when reverse gear is selected.
Top up with windscreen wiper fluid » page 206.
WARNING■
Properly maintained windscreen wiper blades are essential for clear visibility
and safe driving » page 235.■
Replace the windscreen wiper blades once or twice a year for safety rea-
sons. These can be purchased from a ŠKODA Partner.
WARNING (Continued)■ Do not use the windscreen washer system at low temperatures, without
heating the windscreen beforehand. Otherwise the window cleaner could
freeze on the windscreen and restrict the view to the front.■
Automatic wiping in rain only operates as a support. The driver is not re-
leased from the responsibility to set the function of the windscreen wipers
manually depending on the visibility conditions.
CAUTION
■ If the ignition is switched off while the windscreen wipers are switched on, the
windscreen wipers will continue wiping in the same mode after the ignition is
turned back on. The windscreen wipers could freeze up in cold temperatures be-
tween the time the ignition was turned off and when it was turned back on again.■
In cold temperatures and during the winter, check before the journey or before
switching on the ignition that the wiper blades are not frozen to the windscreen.
If the windscreen wipers are switched on when the blades are frozen to the windscreen, this may damage both the blades and windscreen wiper motor!
■
Carefully peel frozen wiper blades off the pane.
■
Remove snow and ice from the windscreen wipers before driving.
■
Do not switch on the ignition if the front wiper arms are retracted. The wiper
blades would move back into their rest position and while doing so damage the
paintwork of the bonnet.
■
If there is an obstacle on the windscreen, the wiper will try to push away the
obstacle. The wiper stops automatically after 5 attempts to eliminate the obsta- cle, in order to avoid a damage to the wiper. Remove the the obstacle and switch
the wiper on again.
Note
■ Each time the ignition switches off for the third time, the position of the wind-
screen wipers changes. This counteracts an early fatigue of the wiper rubbers.■
The rear window wiper only operates if the boot lid is closed.
■
The wiper blades should be cleaned on a regular basis with a windscreen clean-
er to avoid any smears. The wiper blades should be cleaned with a sponge or
cloth if they are heavily soiled by insect residues, for example.
1)
On vehicles which do not have a contact switch for the bonnet, the windshield wiper and wash sys-
tem operates also when the bonnet is opened.
56Using the system
Page 63 of 266
Folding-in both of the exterior mirrors using the remote control keyThe entire mirror can be folded by pressing the symbol button on the remote
control key for 2 seconds. All windows must be closed.
The exterior mirror is folded back into the driving position when the ignition isswitched on.
Automatic dimming mirror
The exterior mirrors are dimmed together with the automatic dimming interior
mirror » page 59 .
Fold in passenger's mirror
On vehicles fitted with the memory function for the driver's seat » page 63, the
mirror tilts down slightly when the reverse gear is engaged and the rotary knob is
in the position
or in position
on vehicles with right-hand drive » Fig. 38 . This
provides an aid in seeing the kerb of the pavement when parking the car.
The mirror returns into its initial position after the rotary knob is moved out of po-
sition
(or position
on vehicles with right-hand drive) and put into another posi-
tion or if the speed is more than 15 km/h.
This mode can be enabled or disabled via the Maxi DOT display in the Travel
mode » page 29 menu option.
Memory function for mirrors
On vehicles fitted with a memory function for the driver seat, the relevant setting for the exterior mirrors can also be stored automatically when the seat position is
stored » page 63 .WARNINGDo not touch the exterior mirror surfaces, if the exterior mirror heating is
switched on - hazard of burning.
CAUTION
Never mechanically fold in or fold back the exterior mirrors with the fold-in func-
tion by hand as this will damage the electric drive.
Note
■
The mirror heater only operates when the engine is running and up to an out-
side temperature of +35 ℃.■
If the power setting function fails at any time, the exterior mirrors can be set by
hand by pressing on the edge of the mirror surface.
60Using the system
Page 67 of 266
When automatic storage is activated, the current positions of the driver's seat
and the external mirrors are saved in the memory of the remote control key each
time the vehicle is locked. When the vehicle is next unlocked using the same key,
the driver's seat and the external mirrors assume the positions stored in the
memory of this key 1)
.
Saving front passenger mirror settings when reversing›
Unlock the vehicle with the remote control key.
›
Switch on the ignition.
›
Adjust the rotary knob for the mirrors to the position
or in right-hand drive to
the position » page 59 .
›
Engage reverse gear.
›
Adjust the front passenger's mirror to the desired position » page 59.
›
Disengage reverse gear.
The adjusted position of the exterior mirror is stored in the remote control key
memory.
Enable automatic storage
›
Unlock the vehicle with the remote control key.
›
Press and hold any memory button
B
» Fig. 42 on page 63. After the seat has
assumed the position stored under this button, at the same time press the but-
ton
on the remote control key within 10 seconds.
The successful activation of the automatic storage function for each key is con-
firmed by an acoustic signal.
The seat and external mirror positions which are already saved in the memory
button are not saved in the memory of the key.
The seat can be adjusted to the required position if necessary » page 62.
After locking the vehicle, the current positions of the driver's seat and the exter-
nal mirrors are saved in the memory of the remote control key.
Disable the function of automatic storage
›
Unlock the vehicle with the remote control key.
›
Press and hold the SET button
A
» Fig. 42 on page 63. At the same time, press
the button on the remote control key within 10 seconds.
The successful deactivation of the automatic storage function for each key is con-
firmed by an acoustic signal.
Stopping the ongoing adjustment›Press any button on the driver's seat.
or›
Press the button on the remote control key.
Front seat functions
Introduction
This chapter contains information on the following subjects:
Front seat heating
64
Front armrest
65
Folding front passenger seat
66
Front seat heating
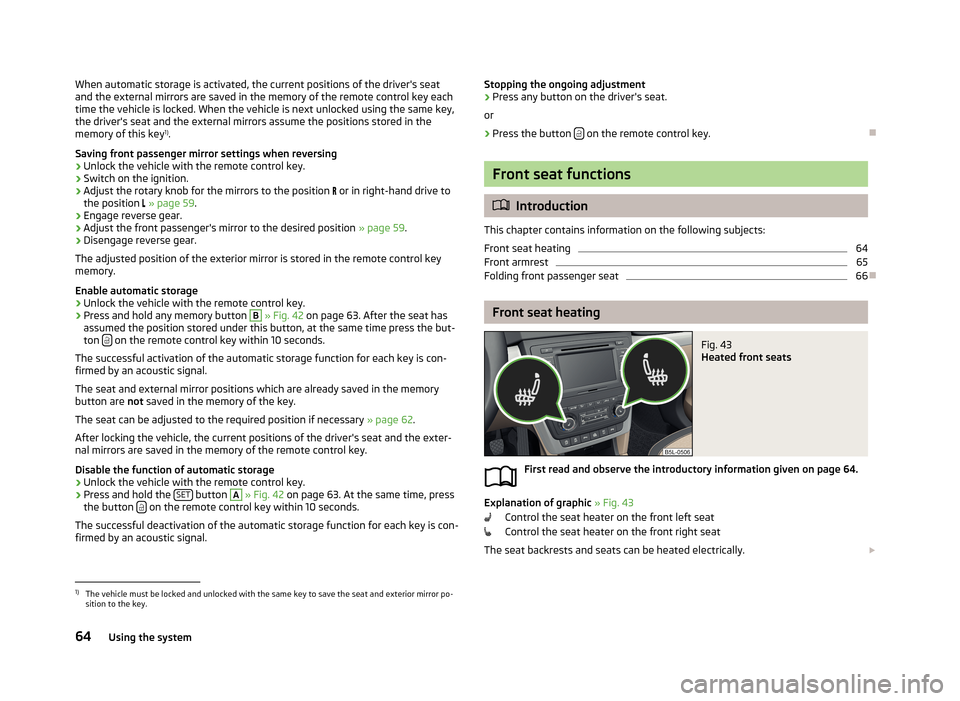
Fig. 43
Heated front seats
First read and observe the introductory information given on page 64.
Explanation of graphic » Fig. 43
Control the seat heater on the front left seat
Control the seat heater on the front right seat
The seat backrests and seats can be heated electrically.
1)
The vehicle must be locked and unlocked with the same key to save the seat and exterior mirror po-
sition to the key.
64Using the system
Page 68 of 266
The seat heating can only be switched on when the engine is running.›
Press the surfaces of the controller in the area of the symbol or » Fig. 43 .
Pressing once switches the seat heating on at its maximum level - Level 3.
With repeated pressing of the switch, the intensity of the heating is down-regula-
ted up to the switch-off.
The intensity of the heating is indicated by the number of illuminated indicator
lights in the switch.WARNINGIf, as an occupant, you have a subdued pain and/or temperature sensitivity,
e.g. through medication, paralysis or because of chronic illness (e.g. diabetes),
we recommend not to use the seat heating. This can lead to burns on the
back, the posterior and the legs which are difficult to heal. If the seat heating
is used, we recommend to make regular breaks in your journey when driving
long distances, so that the body can recuperate from the stress of the jour-
ney. Please consult your doctor, who can evaluate your specific condition.
CAUTION
■ Do not kneel on the seats or otherwise apply concentrated pressure to them.■Do not turn on the seat heater if seats are not occupied.■
Do not switch on the seat heating if the seats have objects attached to or
placed on them, for example a child seat, a bag, etc. A fault of the heating ele-
ments in the seat heating can occur.
■
If additional seat covers or protective covers are attached to the seats, do not
turn on the seat heater - there is a risk of damaging the seat covers and seat
heating.
■
Do not clean the seats using moisture » page 194.
Note
If the on-board voltage drops, the seat heating is switched off automatically, in
order to provide sufficient electrical energy for the engine control » page 210,
Automatic load deactivation .
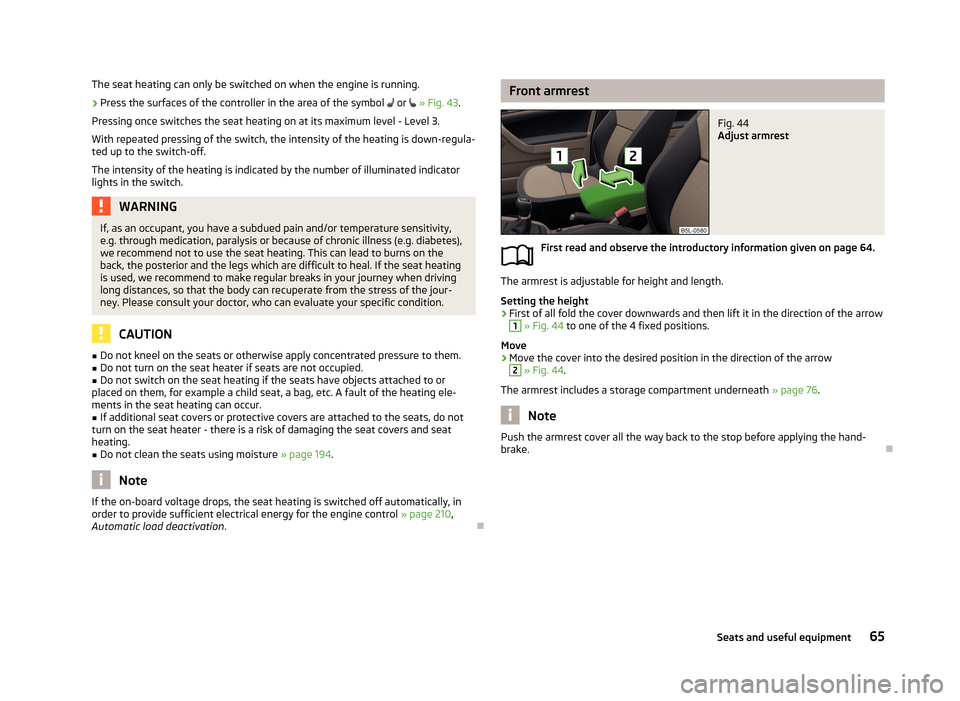
Front armrestFig. 44
Adjust armrest
First read and observe the introductory information given on page 64.
The armrest is adjustable for height and length.
Setting the height
›
First of all fold the cover downwards and then lift it in the direction of the arrow
1
» Fig. 44 to one of the 4 fixed positions.
Move
›
Move the cover into the desired position in the direction of the arrow
2
» Fig. 44 .
The armrest includes a storage compartment underneath » page 76.
Note
Push the armrest cover all the way back to the stop before applying the hand-
brake.
65Seats and useful equipment
Page 85 of 266
›Place heavy objects as far forward as possible.›Attach the items of luggage to the lashing eyes or using the nets
» page 82.
In the event of an accident, even small and light objects gain so much kinetic en-
ergy that they can cause severe injuries.
The magnitude of the kinetic energy is dependent on the speed at which the ve-
hicle is travelling and the weight of the object.
Example: In the event of a frontal collision at a speed of 50 km/h, an object with a
weight of 4.5 kg produces an energy, which corresponds to 20 times its own
weight. This means that it results in a weight of approx. 90 kg “ ”.WARNING■ Store the objects in the boot and attach them to the lashing eyes.■Loose objects can be thrown forward during a sudden manoeuvre or in case
of an accident and can injure the occupants or other road users.■
Loose objects could hit a deployed airbag and injure occupants – danger of
death!
■
Please note that transporting heavy objects alters the handling properties
of the vehicle due to the displacement of the centre of gravity – risk of acci-
dent! The speed and style of driving must be adjusted accordingly.
■
If the items of luggage or objects are attached to the lashing eyes with un-
suitable or damaged lashing straps, injuries can occur in the event of braking manoeuvres or accidents. To prevent items of luggage from moving around,
always use suitable lashing straps which must be firmly attached to the lash-
ing eyes.
■
The transported items must be stowed in such a way that no objects are
able to slip forward on sudden driving or braking manoeuvres – risk of injury!
■
When transporting objects in the luggage compartment that has been en-
larged by folding the rear seats forward, ensure the safety of the passengers transported on the other rear seats » page 162, Correct seated position for
the passengers in the rear seats .
■
If the rear seat next to the folded forward seat is occupied, ensure maxi-
mum safety, e.g. by placing the goods to be transported in such a way that the
seat is prevented from folding back in case of a rear collision.
■
Do not drive with the luggage compartment lid fully opened or slightly ajar
otherwise exhaust gases may get into the interior of the vehicle – risk of poi-
soning!
■
Do not exceed the permissible axle loads and permissible gross weight of
the vehicle – risk of accident!
■
Do not transport people in the boot!
CAUTIONPlease ensure that the heating elements for the rear window heater are not dam-
aged as a result of abrasive objects.
Note
Tyre pressure must be adjusted to the load » page 213, Service life of tyres .
Fastening elements
Fig. 77
Fasteners: Version 1/version 2
First read and observe the introductory information and safety warn- ings
on page 81.
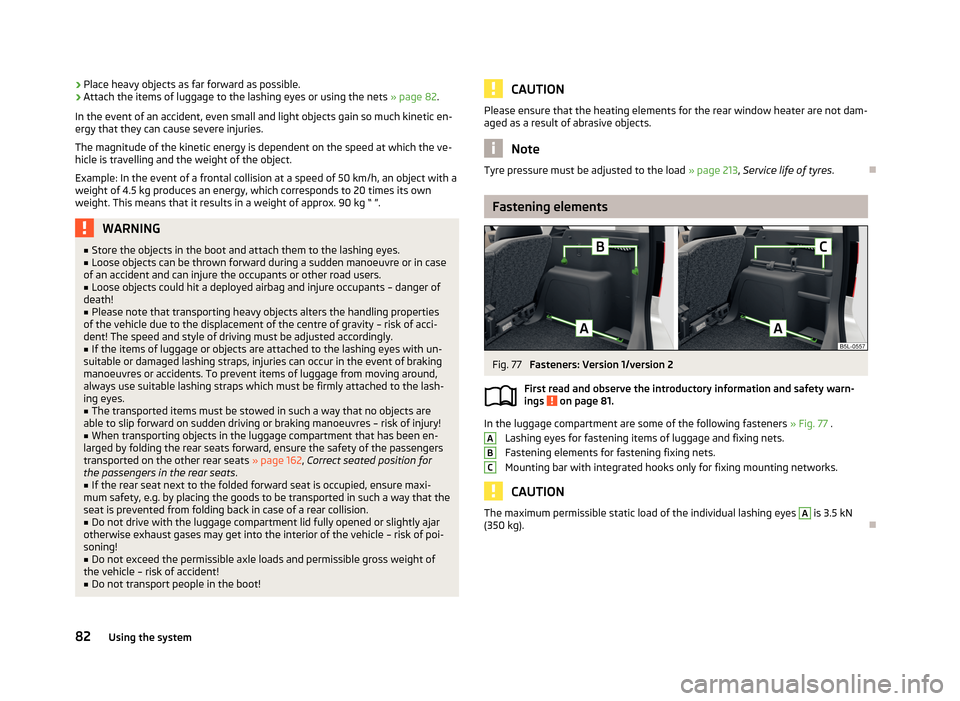
In the luggage compartment are some of the following fasteners » Fig. 77 .
Lashing eyes for fastening items of luggage and fixing nets.
Fastening elements for fastening fixing nets.
Mounting bar with integrated hooks only for fixing mounting networks.
CAUTION
The maximum permissible static load of the individual lashing eyes A is 3.5 kN
(350 kg).
ABC82Using the system