navigation system SKODA YETI 2014 1.G / 5L Amundsen Infotainment Navigation System Manual
[x] Cancel search | Manufacturer: SKODA, Model Year: 2014, Model line: YETI, Model: SKODA YETI 2014 1.G / 5LPages: 88, PDF Size: 8.18 MB
Page 5 of 88
Table of Contents
Operating Instructions3
Notes
4
Declaration of conformity
5
Abbreviations
Familiarization with the unit
Introductory information
7
Important notes
7
Equipment overview
7
Unit operation
10
Operation on the device screen
10
Operation via the buttons / wheels on the multifunction steering wheel / operating
lever
11
Voice control
15
Device Settings
19
Menu Sound
19
Menu Setup
20
Radio
23
Operation
23
Settings
27
Media
29
Operation
29
Audio sources
31
Pictures
36
Image viewer
36
Communication
38
Telephone
38
Pair
42
Connection
45
Dial telephone number
47Telephone functions50Text messages (SMS)51
MirrorLink ™
54
Navigation
Description of the navigation system
57
Preface to navigation
57
Settings
61
route guidance
63
Enter new destination
63
Destination entry by means of saved
destinations
66
POI
67
POI categories
69
Route guidance
70
Traffic Information (TMC)
72
My tour
73
Destination management
74
Index
2Table of Contents
Page 11 of 88
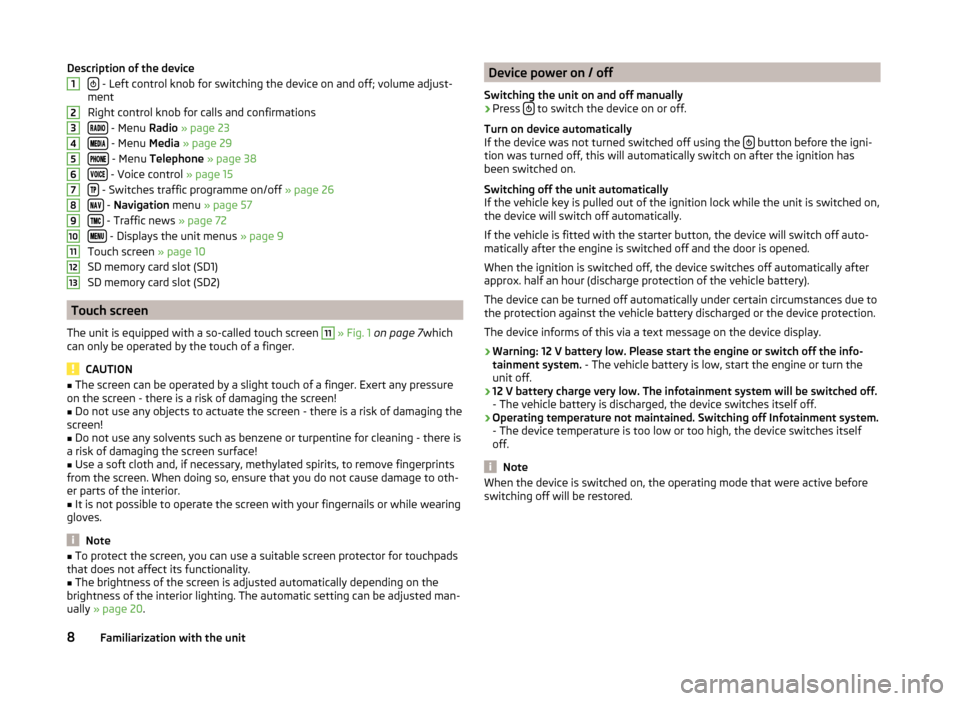
Description of the device
- Left control knob for switching the device on and off; volume adjust-
ment
Right control knob for calls and confirmations
- Menu Radio » page 23
- Menu Media » page 29
- Menu Telephone » page 38
- Voice control » page 15
- Switches traffic programme on/off » page 26
- Navigation menu » page 57
- Traffic news » page 72
- Displays the unit menus » page 9
Touch screen » page 10
SD memory card slot (SD1)
SD memory card slot (SD2)
Touch screen
The unit is equipped with a so-called touch screen
11
» Fig. 1 on page 7 which
can only be operated by the touch of a finger.
CAUTION
■ The screen can be operated by a slight touch of a finger. Exert any pressure
on the screen - there is a risk of damaging the screen!■
Do not use any objects to actuate the screen - there is a risk of damaging the
screen!
■
Do not use any solvents such as benzene or turpentine for cleaning - there is
a risk of damaging the screen surface!
■
Use a soft cloth and, if necessary, methylated spirits, to remove fingerprints
from the screen. When doing so, ensure that you do not cause damage to oth-
er parts of the interior.
■
It is not possible to operate the screen with your fingernails or while wearing
gloves.
Note
■ To protect the screen, you can use a suitable screen protector for touchpads
that does not affect its functionality.■
The brightness of the screen is adjusted automatically depending on the
brightness of the interior lighting. The automatic setting can be adjusted man-
ually » page 20 .
12345678910111213Device power on / off
Switching the unit on and off manually›
Press to switch the device on or off.
Turn on device automatically
If the device was not turned switched off using the
button before the igni-
tion was turned off, this will automatically switch on after the ignition has
been switched on.
Switching off the unit automatically
If the vehicle key is pulled out of the ignition lock while the unit is switched on,
the device will switch off automatically.
If the vehicle is fitted with the starter button, the device will switch off auto-
matically after the engine is switched off and the door is opened.
When the ignition is switched off, the device switches off automatically after
approx. half an hour (discharge protection of the vehicle battery).
The device can be turned off automatically under certain circumstances due to
the protection against the vehicle battery discharged or the device protection.
The device informs of this via a text message on the device display.
› Warning: 12 V battery low. Please start the engine or switch off the info-
tainment system. - The vehicle battery is low, start the engine or turn the
unit off.
› 12 V battery charge very low. The infotainment system will be switched off.
- The vehicle battery is discharged, the device switches itself off.
› Operating temperature not maintained. Switching off Infotainment system.
- The device temperature is too low or too high, the device switches itself
off.
Note
When the device is switched on, the operating mode that were active before
switching off will be restored.8Familiarization with the unit
Page 14 of 88
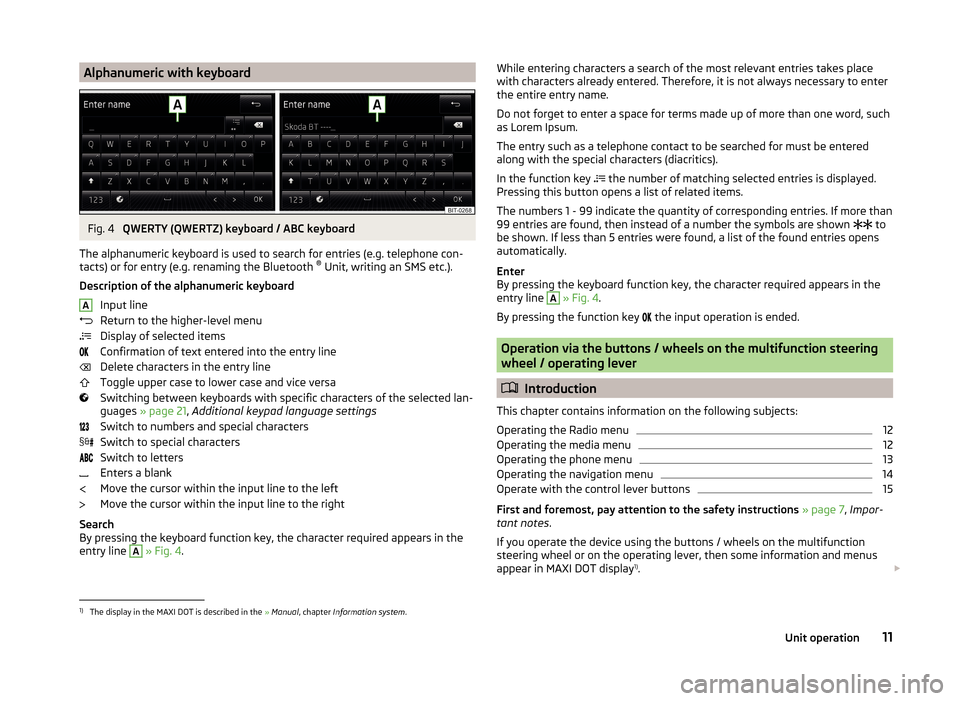
Alphanumeric with keyboardFig. 4
QWERTY (QWERTZ) keyboard / ABC keyboard
The alphanumeric keyboard is used to search for entries (e.g. telephone con-
tacts) or for entry (e.g. renaming the Bluetooth ®
Unit, writing an SMS etc.).
Description of the alphanumeric keyboard Input line
Return to the higher-level menu
Display of selected items
Confirmation of text entered into the entry line
Delete characters in the entry line
Toggle upper case to lower case and vice versa
Switching between keyboards with specific characters of the selected lan-
guages » page 21 , Additional keypad language settings
Switch to numbers and special characters
Switch to special characters
Switch to letters
Enters a blank
Move the cursor within the input line to the left
Move the cursor within the input line to the right
Search
By pressing the keyboard function key, the character required appears in the
entry line
A
» Fig. 4 .
AWhile entering characters a search of the most relevant entries takes place
with characters already entered. Therefore, it is not always necessary to enter
the entire entry name.
Do not forget to enter a space for terms made up of more than one word, such
as Lorem Ipsum.
The entry such as a telephone contact to be searched for must be entered
along with the special characters (diacritics).
In the function key
the number of matching selected entries is displayed.
Pressing this button opens a list of related items.
The numbers 1 - 99 indicate the quantity of corresponding entries. If more than 99 entries are found, then instead of a number the symbols are shown to
be shown. If less than 5 entries were found, a list of the found entries opens
automatically.
Enter
By pressing the keyboard function key, the character required appears in the
entry line A
» Fig. 4 .
By pressing the function key the input operation is ended.
Operation via the buttons / wheels on the multifunction steering
wheel / operating lever
Introduction
This chapter contains information on the following subjects:
Operating the Radio menu
12
Operating the media menu
12
Operating the phone menu
13
Operating the navigation menu
14
Operate with the control lever buttons
15
First and foremost, pay attention to the safety instructions » page 7 , Impor-
tant notes .
If you operate the device using the buttons / wheels on the multifunction
steering wheel or on the operating lever, then some information and menus
appear in MAXI DOT display 1)
.
1)
The display in the MAXI DOT is described in the
» Manual , chapter Information system .
11Unit operation
Page 18 of 88
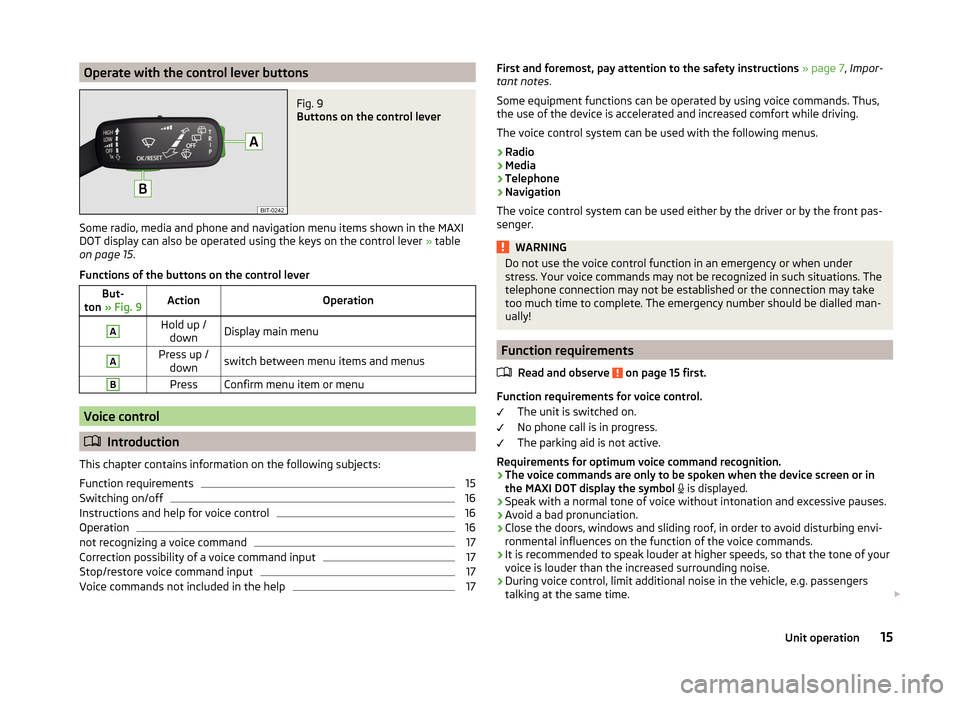
Operate with the control lever buttonsFig. 9
Buttons on the control lever
Some radio, media and phone and navigation menu items shown in the MAXI
DOT display can also be operated using the keys on the control lever » table
on page 15 .
Functions of the buttons on the control lever
But-
ton » Fig. 9ActionOperationAHold up /
downDisplay main menuAPress up / downswitch between menu items and menusBPressConfirm menu item or menu
Voice control
Introduction
This chapter contains information on the following subjects:
Function requirements
15
Switching on/off
16
Instructions and help for voice control
16
Operation
16
not recognizing a voice command
17
Correction possibility of a voice command input
17
Stop/restore voice command input
17
Voice commands not included in the help
17First and foremost, pay attention to the safety instructions » page 7 , Impor-
tant notes .
Some equipment functions can be operated by using voice commands. Thus,
the use of the device is accelerated and increased comfort while driving.
The voice control system can be used with the following menus.
› Radio
› Media
› Telephone
› Navigation
The voice control system can be used either by the driver or by the front pas-
senger.WARNINGDo not use the voice control function in an emergency or when under
stress. Your voice commands may not be recognized in such situations. The
telephone connection may not be established or the connection may take
too much time to complete. The emergency number should be dialled man-
ually!
Function requirements
Read and observe
on page 15 first.
Function requirements for voice control. The unit is switched on.
No phone call is in progress.
The parking aid is not active.
Requirements for optimum voice command recognition.
› The voice commands are only to be spoken when the device screen or in
the MAXI DOT display the symbol
is displayed.
› Speak with a normal tone of voice without intonation and excessive pauses.
› Avoid a bad pronunciation.
› Close the doors, windows and sliding roof, in order to avoid disturbing envi-
ronmental influences on the function of the voice commands.
› It is recommended to speak louder at higher speeds, so that the tone of your
voice is louder than the increased surrounding noise.
› During voice control, limit additional noise in the vehicle, e.g. passengers
talking at the same time.
15Unit operation
Page 19 of 88
CAUTION■For some languages, there is no voice control available. This device indicates
this fact through a text message that is displayed after setting the device lan-
guage screen » page 20.■
For some countries it is required to spell the city or street name in the menu
Navigation . The device indicates this through a text message on the screen.
Note
■
During voice control, no navigation announcements and traffic announce-
ments are played.■
Some voice commands must be spelled out when pronouncing depending on
the selected language of communication, such as the Source Selection “ SD”
card .
Switching on/off
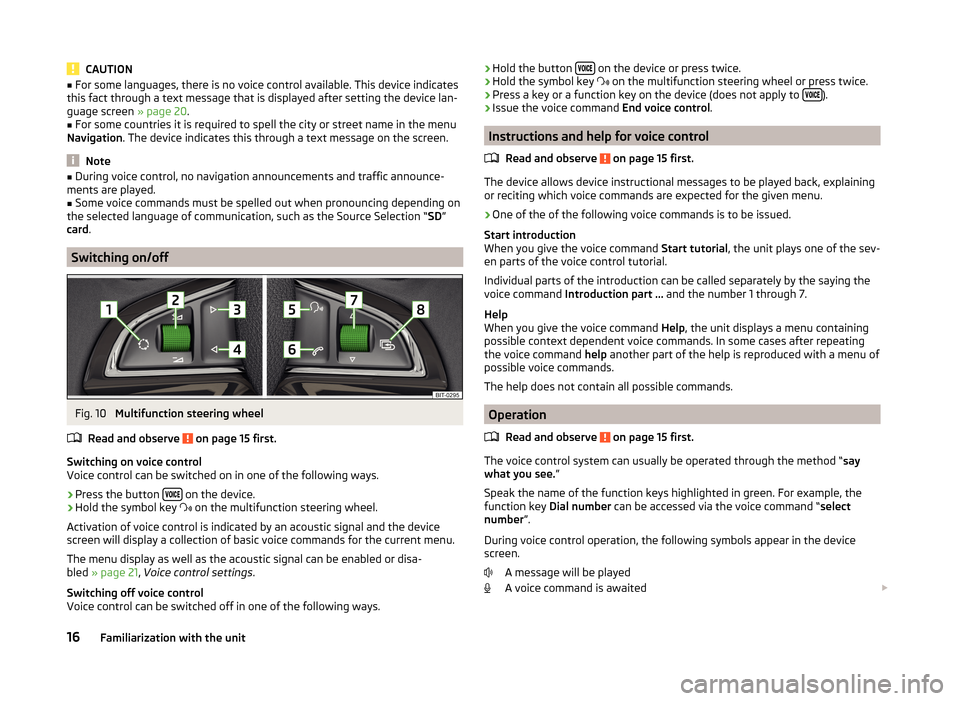
Fig. 10
Multifunction steering wheel
Read and observe
on page 15 first.
Switching on voice control
Voice control can be switched on in one of the following ways.
›
Press the button on the device.
›
Hold the symbol key
on the multifunction steering wheel.
Activation of voice control is indicated by an acoustic signal and the device
screen will display a collection of basic voice commands for the current menu.
The menu display as well as the acoustic signal can be enabled or disa-
bled » page 21 , Voice control settings .
Switching off voice control
Voice control can be switched off in one of the following ways.
› Hold the button
on the device or press twice.›Hold the symbol key
on the multifunction steering wheel or press twice.›
Press a key or a function key on the device (does not apply to ).
›
Issue the voice command
End voice control.
Instructions and help for voice control
Read and observe
on page 15 first.
The device allows device instructional messages to be played back, explainingor reciting which voice commands are expected for the given menu.
›
One of the of the following voice commands is to be issued.
Start introduction
When you give the voice command Start tutorial, the unit plays one of the sev-
en parts of the voice control tutorial.
Individual parts of the introduction can be called separately by the saying the
voice command Introduction part ... and the number 1 through 7.
Help
When you give the voice command Help, the unit displays a menu containing
possible context dependent voice commands. In some cases after repeating
the voice command help another part of the help is reproduced with a menu of
possible voice commands.
The help does not contain all possible commands.
Operation
Read and observe
on page 15 first.
The voice control system can usually be operated through the method “ say
what you see. ”
Speak the name of the function keys highlighted in green. For example, the
function key Dial number can be accessed via the voice command “ select
number ”.
During voice control operation, the following symbols appear in the device
screen.
A message will be played
A voice command is awaited
16Familiarization with the unit
Page 22 of 88
Device Settings
Menu Sound
Introduction
This chapter contains information on the following subjects:
Sound settings
19
First and foremost, pay attention to the safety instructions » page 7 , Impor-
tant notes .
This chapter covers the sound setting of the device and the volume setting of
the connected equipment.
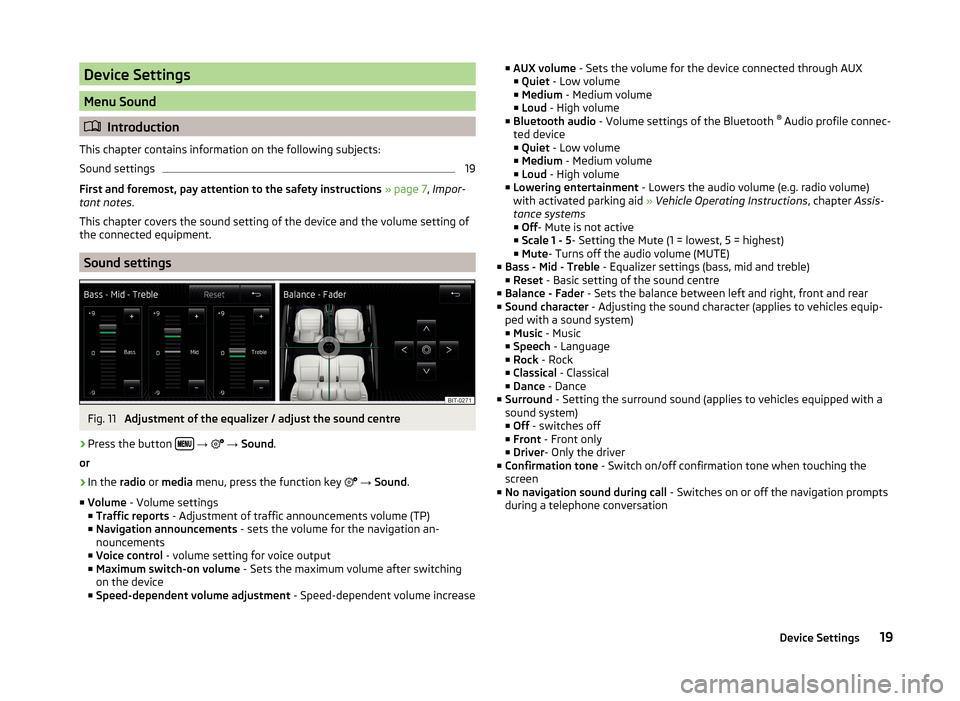
Sound settings
Fig. 11
Adjustment of the equalizer / adjust the sound centre
›
Press the button
→
→ Sound .
or
›
In the radio or media menu, press the function key
→ Sound .
■ Volume - Volume settings
■ Traffic reports - Adjustment of traffic announcements volume (TP)
■ Navigation announcements - sets the volume for the navigation an-
nouncements
■ Voice control - volume setting for voice output
■ Maximum switch-on volume - Sets the maximum volume after switching
on the device
■ Speed-dependent volume adjustment - Speed-dependent volume increase
■
AUX volume - Sets the volume for the device connected through AUX
■ Quiet - Low volume
■ Medium - Medium volume
■ Loud - High volume
■ Bluetooth audio - Volume settings of the Bluetooth ®
Audio profile connec-
ted device ■ Quiet - Low volume
■ Medium - Medium volume
■ Loud - High volume
■ Lowering entertainment - Lowers the audio volume (e.g. radio volume)
with activated parking aid » Vehicle Operating Instructions , chapter Assis-
tance systems ■ Off - Mute is not active
■ Scale 1 - 5 - Setting the Mute (1 = lowest, 5 = highest)
■ Mute - Turns off the audio volume (MUTE)
■ Bass - Mid - Treble - Equalizer settings (bass, mid and treble)
■ Reset - Basic setting of the sound centre
■ Balance - Fader - Sets the balance between left and right, front and rear
■ Sound character - Adjusting the sound character (applies to vehicles equip-
ped with a sound system)
■ Music - Music
■ Speech - Language
■ Rock - Rock
■ Classical - Classical
■ Dance - Dance
■ Surround - Setting the surround sound (applies to vehicles equipped with a
sound system)
■ Off - switches off
■ Front - Front only
■ Driver - Only the driver
■ Confirmation tone - Switch on/off confirmation tone when touching the
screen
■ No navigation sound during call - Switches on or off the navigation prompts
during a telephone conversation19Device Settings
Page 24 of 88
Keyboard settings›
Press the button
→
→ Keypad: .
You can choose between two types of keyboard character arrange-
ment » page 11 , Alphanumeric with keyboard .
■ ABC - Keyboard characters in alphabetical order
■ QWERTZ - Keyboard characters in QWERTZ or QWERTY system
Additional keypad language settings
›
Press the button
→
→ More keypad languages .
In this menu, the keyboard character arrangement for the chosen language
can be selected, and with this the option for fast entry of the characters used
in the selected language.
It is then possible to swap between the languages in the input screen showing
a keyboard by pressing the function keys
» page 11 .
Voice control settings
›
Press the button
→
→ Voice control .
■ Dialogue style: - Setting the message style
■ Long - The device plays unabridged audible messages
■ Short - The device shortens some audible messages or substitutes them
with an acoustic signal
■ Display available commands - Switch on/off the menus containing basic
voice commands when voice control is activated
■ Voice control session start tone - Switch on/off the audible signal that is
output when voice control is activated
■ Voice control session end tone - Switch on/off the audible signal that is out-
put when voice control ends
■ Input tone in voice dialogue - Switch on/off the audible signal for voice con-
trol input
Note
For some languages, there is no voice control available. In this regard, an ap-
propriate warning message appears on the device screen.Data transmission of mobile devices›
Press the button
→
→ Mobile device data transfer .
The activated function enables transmission of vehicle data for applications in
connected devices (e.g. MirrorLink ™
Applications).
■ Activate data transfer for apps - Turning the data transfer on and off
■ Use apps to operate - Select the mode for operation using applications con-
nected to the device
■ Deactivate - The operation is prohibited
■ Confirm - An acknowledgment from the device is required
■ Allow - The operation is always allowed
Safe removal of the audio source
›
Press the button
→
→ Remove safely .
■ SD card 1 - Safe removal of the SD storage card 1
■ SD card 2 - Safe removal of the SD storage card 2
■ USB - Safe removal of the USB source
Restore factory settings
›
Press the button
→
→ Factory settings .
■ Reset all settings and data - menu to restore all settings
■ Restore factory settings - Reset all factory settings
■ Reset individual settings/data - menu for the recovery of individual settings
■ Sound - Reset default settings for sound
■ Radio - Reset default settings for radio
■ Telephone - Reset default settings for phone
■ Media - Reset default settings for media
■ Voice control - Restore the voice control
■ Navigation - Restore default settings for navigation
■ System - Reset the system default settings
■ MirrorLink ™
- Reset settings on the MirrorLink ™
- function
Bluetooth ®
settings
›
Press the button
→
→ Bluetooth .
21Device Settings
Page 25 of 88
■Bluetooth - Switch on/off Bluetooth ®
function
■ Visibility: - Switch on/off the visibility of the Bluetooth ®
device for other de-
vices
■ Visible - Visibility is always on
■ Hidden - Visibility is off
■ Name: - Open the input screen with keyboard - Change the device name
■ Paired devices - Display the list of paired Bluetooth ®
devices; connect or de-
lete a paired device; delete the list of paired devices ■ Delete all - Delete all paired Bluetooth ®
devices
■ - Delete the paired Bluetooth ®
device
■ Find devices - Searches for available external devices with enabled Blue-
tooth ®
functions and activated visibility
■ Bluetooth audio (A2DP/AVRCP) - Switch on/off the connection option for
Bluetooth ®
profiles A2DP or AVRCP 1)
System Information
›
Press the button
→
→ System Information .
■ Device part number: ... - Part number of the unit
■ Hardware: ... - Version of the hardware used
■ Software: ... - Version of the software used
■ Navigation database: ... - Version of the navigation data
■ Media Codec: ... - Media codec version
■ Update software - the function key for the software update
The information about available software updates can be found on the ŠKODA
Internet pages www.infotainment.skoda-auto.com .
1)
A2DP or AVRCP are Bluetooth®
profiles that support multimedia functions.
22Familiarization with the unit
Page 60 of 88
Navigation
Description of the navigation system
Preface to navigation
Introduction
This chapter contains information on the following subjects:
Navigation data
57
Main menu
58
Map display
58
Map Orientation
59
Map scale
59
Options for map display
60
Split screen
60
First and foremost, pay attention to the safety instructions » page 7 , Impor-
tant notes .
The unit uses the GPS (Global Positioning System) satellite system for route
guidance. The satellite signal allows you to determine your current vehicle po-
sition.
Outside the range of the GPS satellite signal (e.g. in dense vegetation, in tun-
nels, parking garages, etc.), the unit navigates only with restrictions using on-
vehicle sensors.
The route guidance is as follows.
› With graphical driving recommendations in the device screen and MAXI DOT
display.
› With navigation announcements.
WARNING■
Information about traffic lights, stop and right of way signs, parking and
stopping restrictions as well as lane constrictions and speed restrictions is
not taken into account for route guidance by the unit.■
The navigation announcements provided may vary from the actual situa-
tions, e.g. due out-of-date navigation data.
■
The volume should be adjusted to ensure that acoustic signals from out-
side, e.g. sirens from vehicles which have the right of way, such as police,
ambulance and fire brigade vehicles, can be heard at all time.
CAUTIONIn some countries, some unit features can no longer be selected when the ve-
hicle is running faster than a certain speed. This is not a malfunction, but com-
plies with the national legal regulations.
Navigation data
Read and observe
and on page 57 first.
Navigation data source
You received the SD memory card with navigation data together with the unit.
For correct functioning of the device, the card must be inserted into slots
12
or
13
» Fig. 1 on page 7 during the entire route guidance.
Insert the memory card » page 33, SD memory card .
Data update
The navigation data is subject to constant changes (such as new streets,
changes of street names and house numbers) and are no longer valid after
some time. Therefore the route guidance may be inaccurate of incorrect. We
recommend that you update the navigation data on a regular basis.
For more information on updating the data, please visit the ŠKODA website
www.infotainment.skoda-auto.com or contact a ŠKODA Partner.
The version of the navigation data for maps can be found in the navigation
settings
→
→ Version information .
Card has been damaged or lost
If the SD memory card with the navigation data has been damaged or lost, a
new card can be obtained from ŠKODA original accessories. The navigation da-
ta can be loaded only on the original card.
57Description of the navigation system
Page 62 of 88
If no scale change occurs then above the scale function key the symbol with
mediated elevation 1)
appears.
Map Orientation
Read and observe
and on page 57 first.
The 2D map can be oriented to the north or in relation to the direction of trav-
el.
The 3D map is always aligned with respect to the direction of travel.
A change of map orientation is only possible when the map is centred on the
vehicle position (the function key or
is not displayed).
›
Press the function key
- one of the following types of 2D map orientations
is displayed.
Map orientation towards the north
› The map is oriented towards north and the Arrow
A
» Fig. 32
on
page 58 shows the direction of travel.
If the scale of the 2D Map or 3D Map is greater than 10 km (5 miles), then the
map is automatically displayed as 2D and aligned in the direction of north.
Map orientation with respect to the direction
› The map rotates and the direction of travel arrow
A
» Fig. 32
on
page 58 points to the top of the screen.
Map scale
Read and observe
and on page 57 first.
It is possible to change the map scale manually or to turn on the automatic
change of scale.
Symbols of the scale function keys
The map type can be changed by pressing a function key depending on the
context in
G
» Fig. 32 on page 58 .
manual scale is active automatic scale is active
Turn on / off the automatic scale
fast map
manual scale
The manual scale is turned on when the function key G
and the symbol
» Fig. 32 on page 58 is displayed.
Map scale can be change in the following ways.
› Turning the right control
2
» Fig. 1
on page 7 .
› Touching the device screen with two fingers and pulling them apart or clos-
ing them together.
The map is moved by touching the device screen with one finger and moving it
in the desired direction. If the automatic scale is on then it changes to manual
scale. The symbol in the function key changes to .
Turn on the automatic scale
The automatic scale can be turned on by pressing the function key
→
.
The function key is highlighted in green and the function of the automatic
scale is turned on. The symbol in the function key changes to .
The automatic scale will only be active as long as the map is centred on the
vehicle position (the function key or
is not displayed).
If the automatic scale is active, the map scale will change automatically de-
pending on the route travelled (motorway - smaller map scale / town larger
map scale).
Turning off the automatic scale
The automatic scale can be turned off by pressing the function key
→
or by manually changing the map scale. The symbol in the function key
changes to .
Fast map
› Press the function key
or
→
.
The map scale is reduced for a few seconds and then restored.
1)
Display of elevation requires the reception of signals from at least five satellites. Route guidance must
not be running in demo mode.
59Description of the navigation system