stop start SKODA YETI 2014 1.G / 5L Amundsen Infotainment Navigation System Manual
[x] Cancel search | Manufacturer: SKODA, Model Year: 2014, Model line: YETI, Model: SKODA YETI 2014 1.G / 5LPages: 88, PDF Size: 8.18 MB
Page 68 of 88
After entering the destination check whether the entered destination is cor-
rect, for example by pressing the function key J» Fig. 36 and viewing on the
map. Some place names can be found in several locations.
If the address is entered correctly, destination details are dis-
played » page 75 .
More options for calling the menu
› Press in the menu
Navigation function key
→ New dest./stopover → Op-
tions
→ Street address .
› Press in the menu
Navigation function key
→ Other POIs → Options
→
Street address .
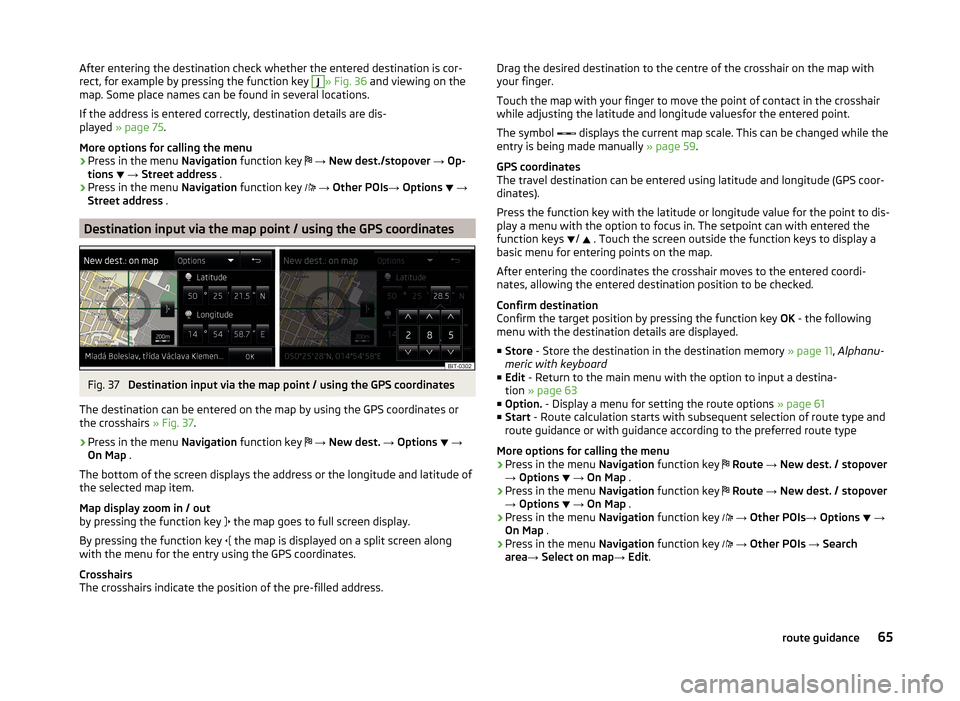
Destination input via the map point / using the GPS coordinates
Fig. 37
Destination input via the map point / using the GPS coordinates
The destination can be entered on the map by using the GPS coordinates or
the crosshairs » Fig. 37.
›
Press in the menu Navigation function key
→ New dest. → Options
→
On Map .
The bottom of the screen displays the address or the longitude and latitude of
the selected map item.
Map display zoom in / out
by pressing the function key the map goes to full screen display.
By pressing the function key the map is displayed on a split screen along
with the menu for the entry using the GPS coordinates.
Crosshairs
The crosshairs indicate the position of the pre-filled address.
Drag the desired destination to the centre of the crosshair on the map with
your finger.
Touch the map with your finger to move the point of contact in the crosshair
while adjusting the latitude and longitude valuesfor the entered point.
The symbol
displays the current map scale. This can be changed while the
entry is being made manually » page 59.
GPS coordinates
The travel destination can be entered using latitude and longitude (GPS coor- dinates).
Press the function key with the latitude or longitude value for the point to dis-
play a menu with the option to focus in. The setpoint can with entered the
function keys /
. Touch the screen outside the function keys to display a
basic menu for entering points on the map.
After entering the coordinates the crosshair moves to the entered coordi-nates, allowing the entered destination position to be checked.
Confirm destination
Confirm the target position by pressing the function key OK - the following
menu with the destination details are displayed.
■ Store - Store the destination in the destination memory » page 11, Alphanu-
meric with keyboard
■ Edit - Return to the main menu with the option to input a destina-
tion » page 63
■ Option. - Display a menu for setting the route options » page 61
■ Start - Route calculation starts with subsequent selection of route type and
route guidance or with guidance according to the preferred route type
More options for calling the menu › Press in the menu
Navigation function key
Route → New dest. / stopover
→ Options
→ On Map .
› Press in the menu
Navigation function key
Route → New dest. / stopover
→ Options
→ On Map .
› Press in the menu
Navigation function key
→ Other POIs → Options
→
On Map .
› Press in the menu
Navigation function key
→ Other POIs → Search
area → Select on map → Edit .65route guidance
Page 69 of 88
Destination entry by means of saved destinations
Introduction
This chapter contains information on the following subjects:
List of saved destinations (My destinations)
66
Flagged destination (current vehicle position)
66
Home address
67
Custom destination (vCard)
67
Image with GPS coordinates
67
First and foremost, pay attention to the safety instructions » page 7 , Impor-
tant notes .
This chapter discusses the entry options and using the destinations saved in
the device memory.
List of saved destinations (My destinations)
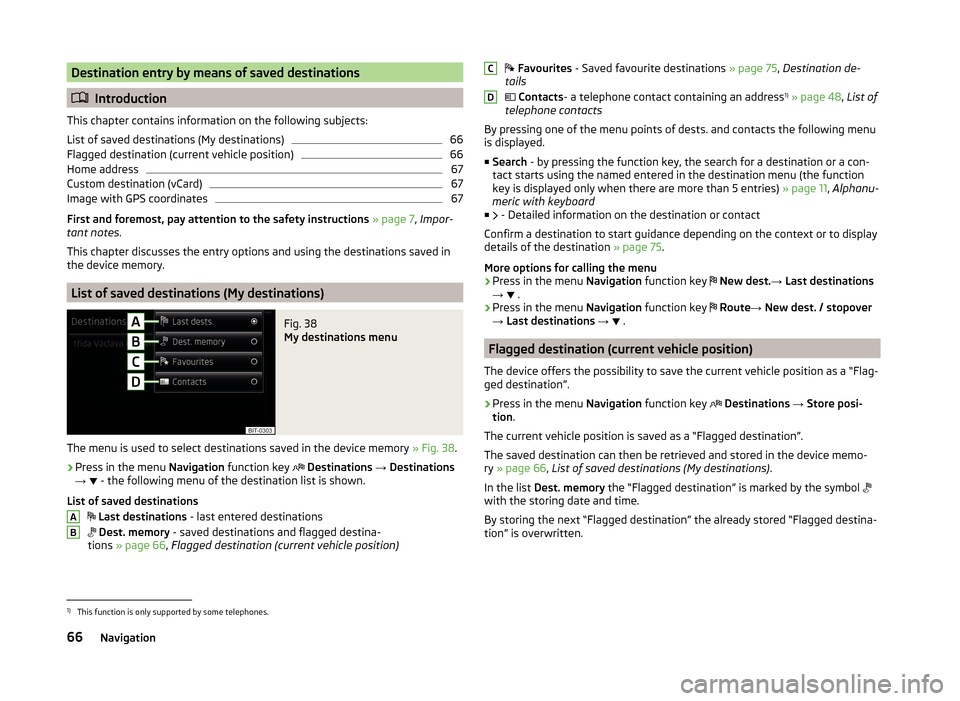
Fig. 38
My destinations menu
The menu is used to select destinations saved in the device memory » Fig. 38.
›
Press in the menu Navigation function key
Destinations → Destinations
→ - the following menu of the destination list is shown.
List of saved destinations
Last destinations - last entered destinations
Dest. memory - saved destinations and flagged destina-
tions » page 66 , Flagged destination (current vehicle position)
AB Favourites - Saved favourite destinations » page 75, Destination de-
tails
Contacts - a telephone contact containing an address 1)
» page 48 , List of
telephone contacts
By pressing one of the menu points of dests. and contacts the following menu is displayed.
■ Search - by pressing the function key, the search for a destination or a con-
tact starts using the named entered in the destination menu (the function
key is displayed only when there are more than 5 entries) » page 11, Alphanu-
meric with keyboard
■ - Detailed information on the destination or contact
Confirm a destination to start guidance depending on the context or to display
details of the destination » page 75.
More options for calling the menu
› Press in the menu
Navigation function key
New dest. → Last destinations
→ .
› Press in the menu
Navigation function key
Route → New dest. / stopover
→ Last destinations →
.
Flagged destination (current vehicle position)
The device offers the possibility to save the current vehicle position as a “Flag-
ged destination”.
›
Press in the menu Navigation function key
Destinations → Store posi-
tion .
The current vehicle position is saved as a “Flagged destination”.
The saved destination can then be retrieved and stored in the device memo-
ry » page 66 , List of saved destinations (My destinations) .
In the list Dest. memory the “Flagged destination” is marked by the symbol
with the storing date and time.
By storing the next “Flagged destination” the already stored “Flagged destina-
tion” is overwritten.
CD1)
This function is only supported by some telephones.
66Navigation
Page 74 of 88
The route is recalculated each time if you ignore driving recommendations or
change the route. This process takes only a few seconds. Nav. announcements
can only then be re-transmitted.
If Demo mode is switched on » page 62, a prompt appears asking whether you
want the guidance to start in demo mode or normal mode.
Demo mode provides a travel simulation to the entered destination. The func-
tion offers the chance to travel the calculated route “virtually” on the device
screen.
If an alternative route option is set » page 61, then after the route calculation
the following function keys for the choice of route type will be displayed.
- economic route
- fast route
- short route
In the function keys information about the route length and the estimated
travel time are displayed.
It is possible to select a pre-calculated route before the calculation of the re-
maining routes is completed.
Selecting the route type will start route guidance.
If the option for alternative routes is disabled, the route is calculated and route
guidance is started according to the preferred route » page 61.
The unit tries to allow for continued guidance even if the navigation data is in-
complete or there is no data at all for the given area (e.g., one-way streets,
road types, etc.).
Abort route guidance
If the ignition is switched off and on again, then the route guidance is contin-
ued depending on the stop time in one of the following ways.
› Within 15 min - route guidance is continued taking into account the calcula-
ted route.
› From 15 min to 120 min - the device screen displays
Continue route guid-
ance? (after confirming the guidance is continued, taking into account the
calculated route).
› After 120 min - the route guidance is cancelled.
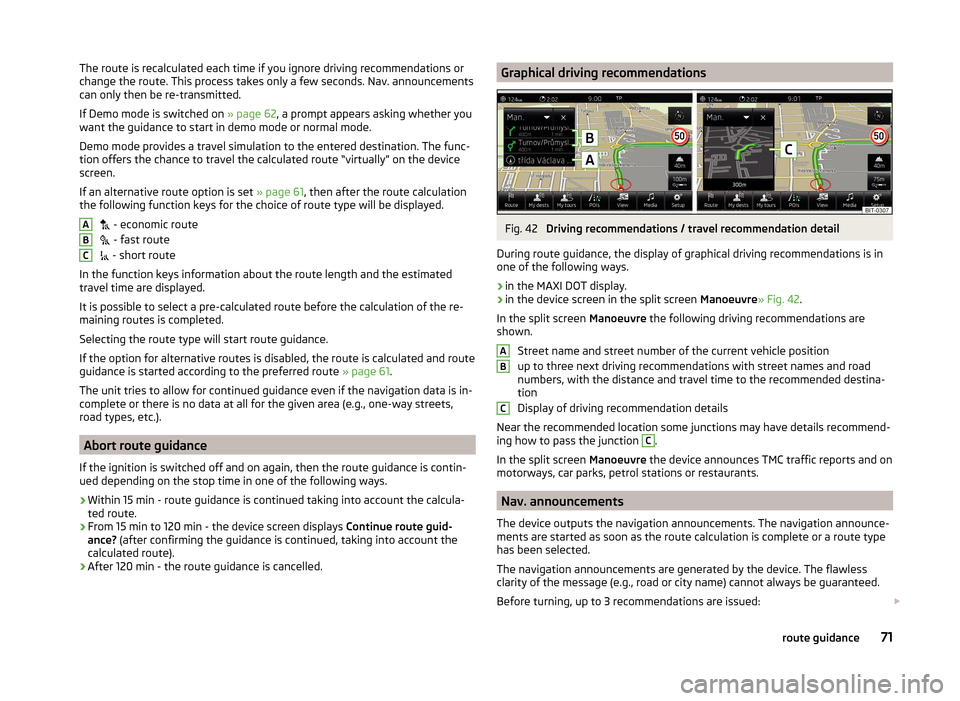
ABCGraphical driving recommendationsFig. 42
Driving recommendations / travel recommendation detail
During route guidance, the display of graphical driving recommendations is in one of the following ways.
› in the MAXI DOT display.
› in the device screen in the split screen
Manoeuvre» Fig. 42.
In the split screen Manoeuvre the following driving recommendations are
shown.
Street name and street number of the current vehicle position
up to three next driving recommendations with street names and road
numbers, with the distance and travel time to the recommended destina-
tion
Display of driving recommendation details
Near the recommended location some junctions may have details recommend- ing how to pass the junction
C
.
In the split screen Manoeuvre the device announces TMC traffic reports and on
motorways, car parks, petrol stations or restaurants.
Nav. announcements
The device outputs the navigation announcements. The navigation announce-
ments are started as soon as the route calculation is complete or a route type
has been selected.
The navigation announcements are generated by the device. The flawless
clarity of the message (e.g., road or city name) cannot always be guaranteed.
Before turning, up to 3 recommendations are issued:
ABC71route guidance
Page 77 of 88
A route can contain a maximum of twenty stopovers.
The individual destinations can be mutually replaced by touching the function
key for one destination
and moving it to another position. It is not possible
to replace already reached destinations with each other.
When you press the name of the destination or stopover, the system displays the following menu where you can edit the destination.
Delete the destination or the stopover
the route guidance is continued from this destination (previous stopovers
are skipped)
Open the destination details » page 75
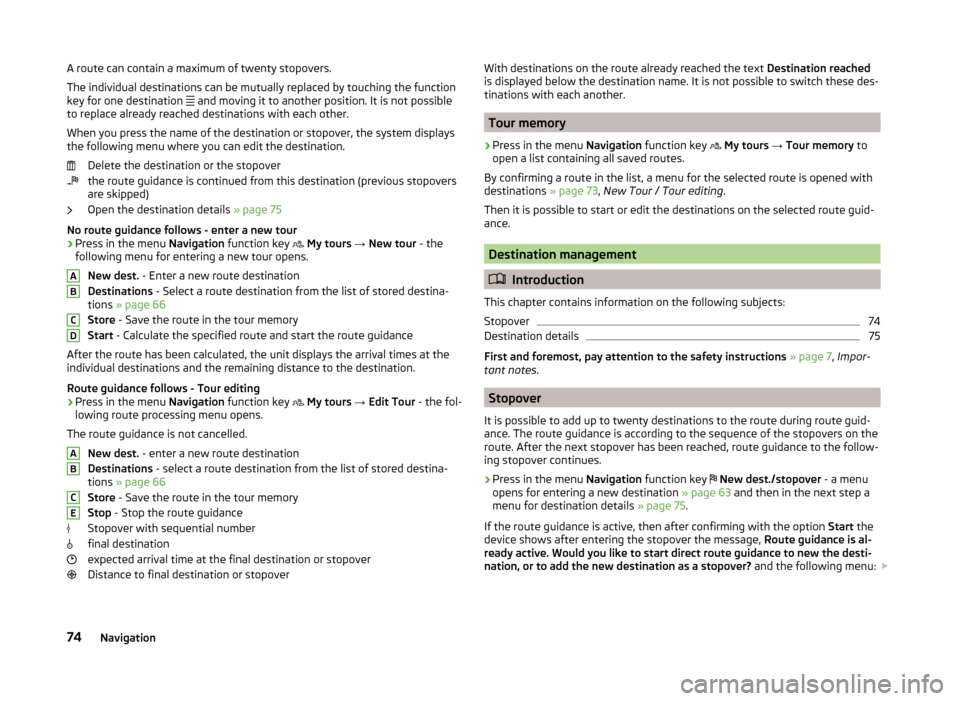
No route guidance follows - enter a new tour
› Press in the menu
Navigation function key
My tours → New tour - the
following menu for entering a new tour opens.
New dest. - Enter a new route destination
Destinations - Select a route destination from the list of stored destina-
tions » page 66
Store - Save the route in the tour memory
Start - Calculate the specified route and start the route guidance
After the route has been calculated, the unit displays the arrival times at the
individual destinations and the remaining distance to the destination.
Route guidance follows - Tour editing
› Press in the menu
Navigation function key
My tours → Edit Tour - the fol-
lowing route processing menu opens.
The route guidance is not cancelled. New dest. - enter a new route destination
Destinations - select a route destination from the list of stored destina-
tions » page 66
Store - Save the route in the tour memory
Stop - Stop the route guidance
Stopover with sequential number
final destination
expected arrival time at the final destination or stopover
Distance to final destination or stopoverABCDABCEWith destinations on the route already reached the text Destination reached
is displayed below the destination name. It is not possible to switch these des-
tinations with each another.
Tour memory
›
Press in the menu Navigation function key
My tours → Tour memory to
open a list containing all saved routes.
By confirming a route in the list, a menu for the selected route is opened with destinations » page 73, New Tour / Tour editing .
Then it is possible to start or edit the destinations on the selected route guid- ance.
Destination management
Introduction
This chapter contains information on the following subjects:
Stopover
74
Destination details
75
First and foremost, pay attention to the safety instructions » page 7 , Impor-
tant notes .
Stopover
It is possible to add up to twenty destinations to the route during route guid-
ance. The route guidance is according to the sequence of the stopovers on the
route. After the next stopover has been reached, route guidance to the follow-
ing stopover continues.
›
Press in the menu Navigation function key
New dest./stopover - a menu
opens for entering a new destination » page 63 and then in the next step a
menu for destination details » page 75.
If the route guidance is active, then after confirming with the option Start the
device shows after entering the stopover the message, Route guidance is al-
ready active. Would you like to start direct route guidance to new the desti-
nation, or to add the new destination as a stopover? and the following menu:
74Navigation
Page 78 of 88
■Cancel - the stopover destination input and the destination guidance to the
original destination is continued
■ Stopover - the destination entered is added to the route and guidance to
this destination is initially provided » Fig. 43 on page 73
■ Start - the destination entered is added as the final destination and the orig-
inal final destination is replaced by this new destination
After reaching the maximum number of destinations one of the destinations is
to be deleted in order to enter the next destination.
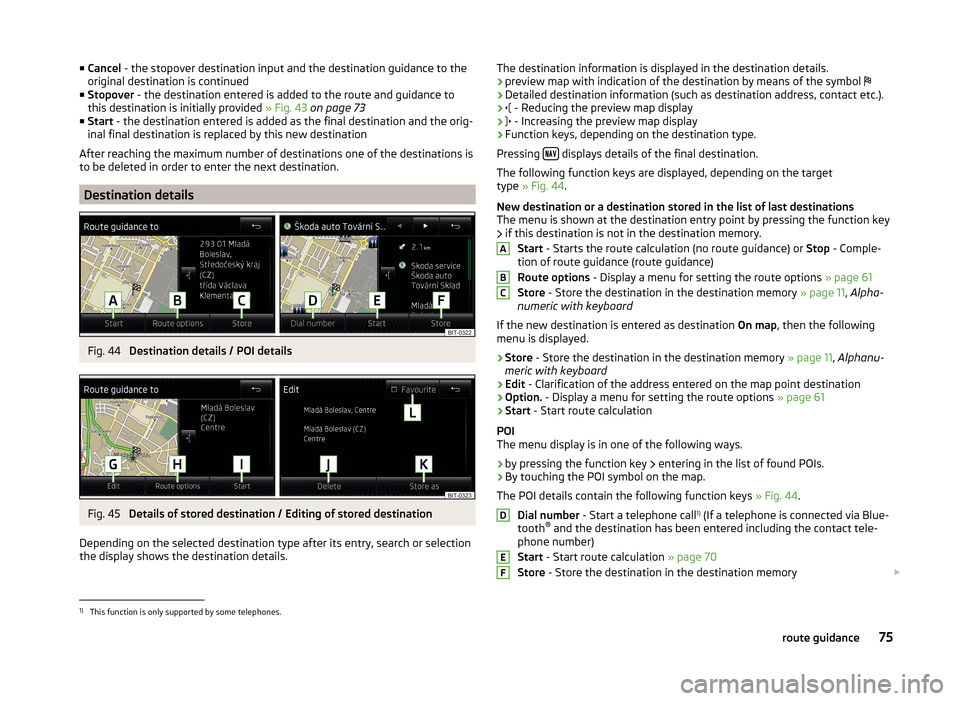
Destination details
Fig. 44
Destination details / POI details
Fig. 45
Details of stored destination / Editing of stored destination
Depending on the selected destination type after its entry, search or selection the display shows the destination details.
The destination information is displayed in the destination details.
› preview map with indication of the destination by means of the symbol
› Detailed destination information (such as destination address, contact etc.).
›
- Reducing the preview map display
›
- Increasing the preview map display
› Function keys, depending on the destination type.
Pressing
displays details of the final destination.
The following function keys are displayed, depending on the target type » Fig. 44 .
New destination or a destination stored in the list of last destinations
The menu is shown at the destination entry point by pressing the function key
if this destination is not in the destination memory.
Start - Starts the route calculation (no route guidance) or Stop - Comple-
tion of route guidance (route guidance)
Route options - Display a menu for setting the route options » page 61
Store - Store the destination in the destination memory » page 11, Alpha-
numeric with keyboard
If the new destination is entered as destination On map, then the following
menu is displayed.
› Store
- Store the destination in the destination memory » page 11, Alphanu-
meric with keyboard
› Edit
- Clarification of the address entered on the map point destination
› Option.
- Display a menu for setting the route options » page 61
› Start
- Start route calculation
POI
The menu display is in one of the following ways.
› by pressing the function key
entering in the list of found POIs.
› By touching the POI symbol on the map.
The POI details contain the following function keys » Fig. 44.
Dial number - Start a telephone call 1)
(If a telephone is connected via Blue-
tooth ®
and the destination has been entered including the contact tele-
phone number)
Start - Start route calculation » page 70
Store - Store the destination in the destination memory
ABCDEF1)
This function is only supported by some telephones.
75route guidance