ESP SKODA YETI 2014 1.G / 5L Amundsen Infotainment Navigation System Manual
[x] Cancel search | Manufacturer: SKODA, Model Year: 2014, Model line: YETI, Model: SKODA YETI 2014 1.G / 5LPages: 88, PDF Size: 8.18 MB
Page 6 of 88
Operating Instructions
This Owner's Manual describes all possible device functions without identify-
ing them as special equipment, model variants or market-dependent equip-
ment. Consequently, the device on this vehicle does not need to contain all of
the functions described in this Owner's Manual.
The Pictures in these Operating Instructions are for illustrative purposes only.
The illustrations can differ in minor details from your vehicle; they are only in-
tended to provide general information.
ŠKODA AUTO a.s. pursues a policy of constant product and model develop-
ment. Changes in terms of supply scope are possible at any time with regard to
design, equipment and technology. The information listed in these Operating
Instructions corresponds to the information available at the time of going to
press.
It is therefore not possible for legal claims to be made based on the technical
data, illustrations and information contained in these Operating Instructions.3Operating Instructions
Page 10 of 88
Familiarization with the unit
Introductory information
Important notes
Introduction
This chapter contains information on the following subjects:
Component protection
7WARNING■ Concentrate fully at all times on your driving! As the driver, you are fully
responsible for the operation of your vehicle.■
Only use the device in such a way that you are in full control of your vehi-
cle in every traffic situation – there is the risk of accidents!
■
Adjust the volume to ensure that acoustic signals from outside the vehi-
cle, e.g. sirens from emerging vehicles instructing you to give way to, such
as the police, ambulance and fire brigade, can be heard at all times.
■
High volumes can cause hearing damage!
Component protection
Read and observe
on page 7 first.
Some electronic control units are factory-equipped with component protec-tion.
Component protection serves as a protection mechanism for the following:
› for the impairment of factory- or garage-fitted control units after installation
in another vehicle (for example, after a theft).
› for the impairment of components operated outside of the vehicle.
› for the possibility of a legitimate installation or change of control units for re-
pairs at a ŠKODA specialist garage 1)
.
When component protection is enabled, the following message appears on the
unit display Component theft protection: The infotainment system is not fully
available at present. Please switch on the ignition.
If the component protection does not activate by switching on the ignition,
please contact a ŠKODA specialist garage.
Equipment overview
Introduction
This chapter contains information on the following subjects:
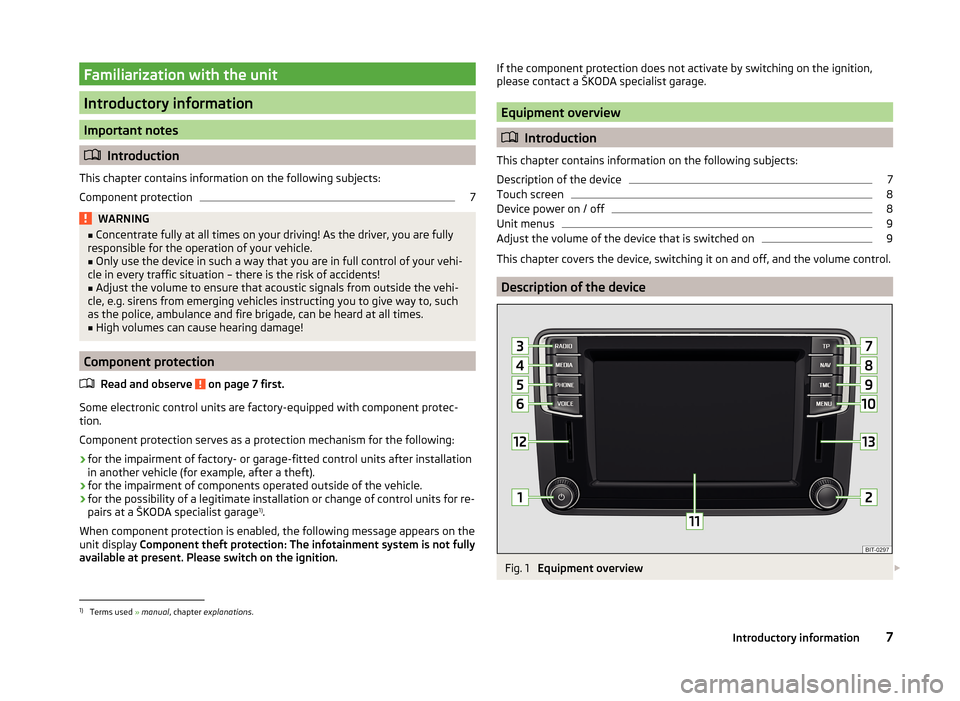
Description of the device
7
Touch screen
8
Device power on / off
8
Unit menus
9
Adjust the volume of the device that is switched on
9
This chapter covers the device, switching it on and off, and the volume control.
Description of the device
Fig. 1
Equipment overview
1)
Terms used
» manual , chapter explanations .
7Introductory information
Page 14 of 88
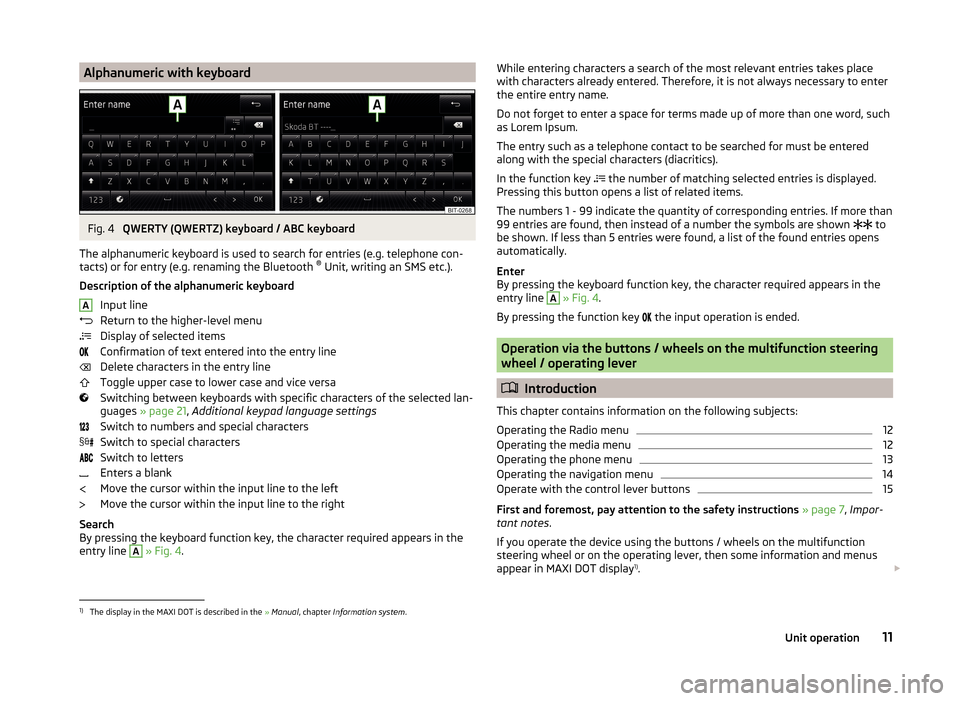
Alphanumeric with keyboardFig. 4
QWERTY (QWERTZ) keyboard / ABC keyboard
The alphanumeric keyboard is used to search for entries (e.g. telephone con-
tacts) or for entry (e.g. renaming the Bluetooth ®
Unit, writing an SMS etc.).
Description of the alphanumeric keyboard Input line
Return to the higher-level menu
Display of selected items
Confirmation of text entered into the entry line
Delete characters in the entry line
Toggle upper case to lower case and vice versa
Switching between keyboards with specific characters of the selected lan-
guages » page 21 , Additional keypad language settings
Switch to numbers and special characters
Switch to special characters
Switch to letters
Enters a blank
Move the cursor within the input line to the left
Move the cursor within the input line to the right
Search
By pressing the keyboard function key, the character required appears in the
entry line
A
» Fig. 4 .
AWhile entering characters a search of the most relevant entries takes place
with characters already entered. Therefore, it is not always necessary to enter
the entire entry name.
Do not forget to enter a space for terms made up of more than one word, such
as Lorem Ipsum.
The entry such as a telephone contact to be searched for must be entered
along with the special characters (diacritics).
In the function key
the number of matching selected entries is displayed.
Pressing this button opens a list of related items.
The numbers 1 - 99 indicate the quantity of corresponding entries. If more than 99 entries are found, then instead of a number the symbols are shown to
be shown. If less than 5 entries were found, a list of the found entries opens
automatically.
Enter
By pressing the keyboard function key, the character required appears in the
entry line A
» Fig. 4 .
By pressing the function key the input operation is ended.
Operation via the buttons / wheels on the multifunction steering
wheel / operating lever
Introduction
This chapter contains information on the following subjects:
Operating the Radio menu
12
Operating the media menu
12
Operating the phone menu
13
Operating the navigation menu
14
Operate with the control lever buttons
15
First and foremost, pay attention to the safety instructions » page 7 , Impor-
tant notes .
If you operate the device using the buttons / wheels on the multifunction
steering wheel or on the operating lever, then some information and menus
appear in MAXI DOT display 1)
.
1)
The display in the MAXI DOT is described in the
» Manual , chapter Information system .
11Unit operation
Page 32 of 88
Media
Operation
Introduction
This chapter contains information on the following subjects:
Main menu
29
Playback
29
Folder / track list - Browser
30
Multimedia database
31
Settings
31
First and foremost, pay attention to the safety instructions » page 7 , Impor-
tant notes .
The device allows you to play audio files from different media and connected
devices (hereinafter referred to only as “audio sources)” » page 31.
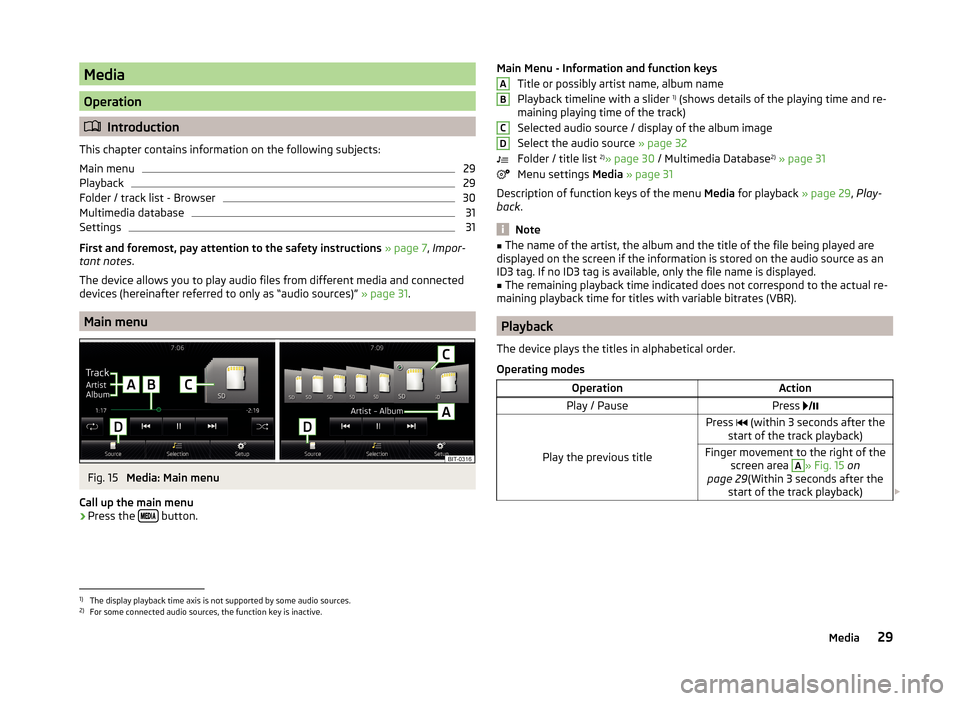
Main menu
Fig. 15
Media: Main menu
Call up the main menu
›
Press the button.
Main Menu - Information and function keys
Title or possibly artist name, album name
Playback timeline with a slider 1)
(shows details of the playing time and re-
maining playing time of the track)
Selected audio source / display of the album image
Select the audio source » page 32
Folder / title list 2)
» page 30 / Multimedia Database 2)
» page 31
Menu settings Media » page 31
Description of function keys of the menu Media for playback » page 29, Play-
back .
Note
■
The name of the artist, the album and the title of the file being played are
displayed on the screen if the information is stored on the audio source as an
ID3 tag. If no ID3 tag is available, only the file name is displayed.■
The remaining playback time indicated does not correspond to the actual re-
maining playback time for titles with variable bitrates (VBR).
Playback
The device plays the titles in alphabetical order.
Operating modes
OperationActionPlay / PausePress
Play the previous title
Press (within 3 seconds after the
start of the track playback)Finger movement to the right of the screen area A
» Fig. 15 on
page 29 (Within 3 seconds after the
start of the track playback)
ABCD1)
The display playback time axis is not supported by some audio sources.
2)
For some connected audio sources, the function key is inactive.
29Media
Page 35 of 88
First and foremost, pay attention to the safety instructions » page 7 , Impor-
tant notes .
The device allows you to play audio files in various formats and to connect dif-
ferent source types » page 35.
For an audio source with a memory split into several areas, only the memory
areas of the supported formats can be read » tab. Supported audio sources on
page 35 .WARNING■
Never place audio sources close to the airbags. They could be thrown into
the passenger compartment when the airbags are deployed, injuring the
occupants.■
Never place audio sources on the dash panel, in your hand or on your
knees. They could be thrown into the passenger compartment during sud-
den driving manoeuvres, thereby injuring the occupants.
■
Always route the connection cable of the audio source such that is does
not restrict you when driving.
CAUTION
Do not store any important data on the connected external sources. ŠKODA
assumes no responsibility for lost or damaged files or connected audio sour-
ces.
Note
See the owner's manual of the specific manufacturer for operating the exter-
nal audio source.Select audio sourceFig. 18
Select audio source
Read and observe
and on page 32 first.
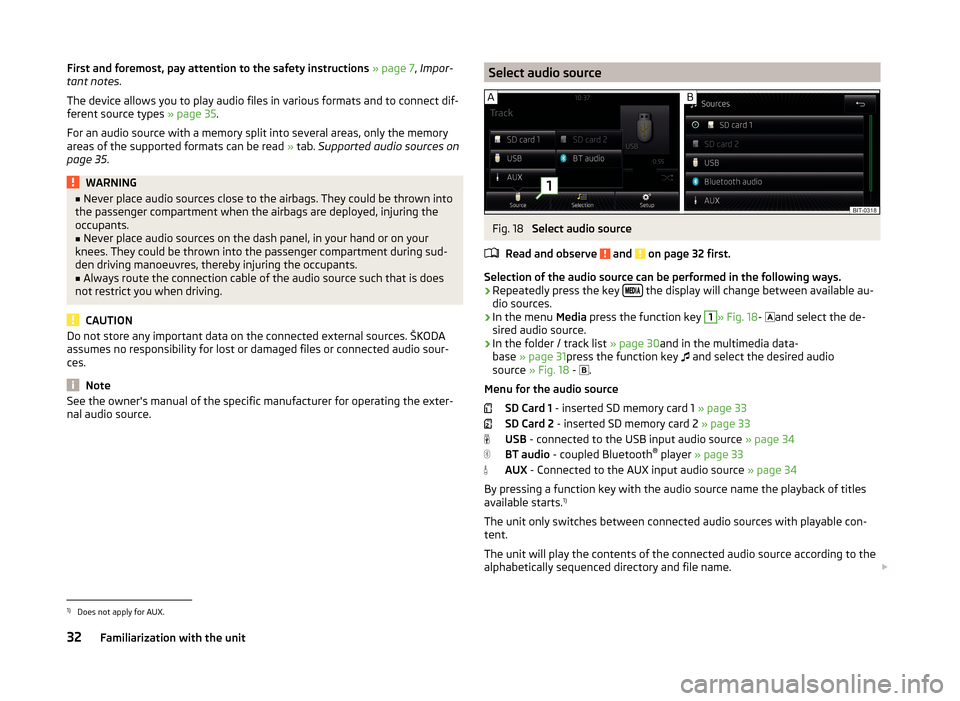
Selection of the audio source can be performed in the following ways.
› Repeatedly press the key
the display will change between available au-
dio sources.
› In the menu
Media press the function key
1
» Fig. 18 -
and select the de-
sired audio source.
› In the folder / track list
» page 30and in the multimedia data-
base » page 31 press the function key
and select the desired audio
source » Fig. 18 -
.
Menu for the audio source SD Card 1 - inserted SD memory card 1 » page 33
SD Card 2 - inserted SD memory card 2 » page 33
USB - connected to the USB input audio source » page 34
BT audio - coupled Bluetooth ®
player » page 33
AUX - Connected to the AUX input audio source » page 34
By pressing a function key with the audio source name the playback of titles
available starts. 1)
The unit only switches between connected audio sources with playable con-
tent.
The unit will play the contents of the connected audio source according to the
alphabetically sequenced directory and file name.
1)
Does not apply for AUX.
32Familiarization with the unit
Page 37 of 88
USB inputFig. 20
USB and AUX inputs
Read and observe and on page 32 first.
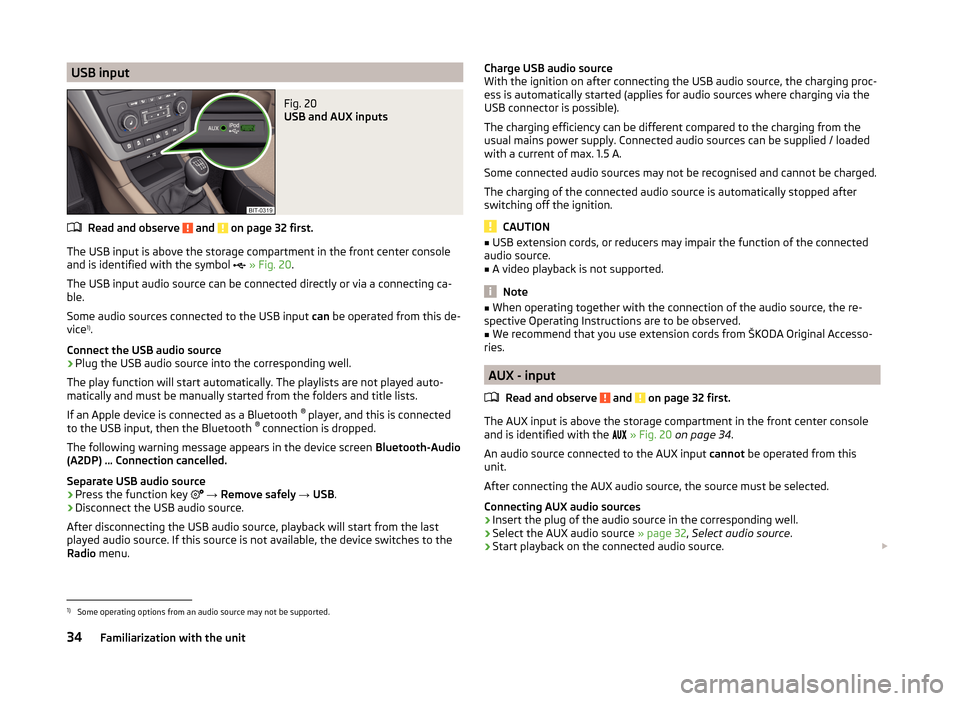
The USB input is above the storage compartment in the front center console
and is identified with the symbol
» Fig. 20 .
The USB input audio source can be connected directly or via a connecting ca-
ble.
Some audio sources connected to the USB input can be operated from this de-
vice 1)
.
Connect the USB audio source
›
Plug the USB audio source into the corresponding well.
The play function will start automatically. The playlists are not played auto-
matically and must be manually started from the folders and title lists.
If an Apple device is connected as a Bluetooth ®
player, and this is connected
to the USB input, then the Bluetooth ®
connection is dropped.
The following warning message appears in the device screen Bluetooth-Audio
(A2DP) … Connection cancelled.
Separate USB audio source
›
Press the function key
→ Remove safely → USB .
›
Disconnect the USB audio source.
After disconnecting the USB audio source, playback will start from the last
played audio source. If this source is not available, the device switches to the
Radio menu.
Charge USB audio source
With the ignition on after connecting the USB audio source, the charging proc-
ess is automatically started (applies for audio sources where charging via the
USB connector is possible).
The charging efficiency can be different compared to the charging from the
usual mains power supply. Connected audio sources can be supplied / loaded
with a current of max. 1.5 A.
Some connected audio sources may not be recognised and cannot be charged.
The charging of the connected audio source is automatically stopped after
switching off the ignition.
CAUTION
■ USB extension cords, or reducers may impair the function of the connected
audio source.■
A video playback is not supported.
Note
■ When operating together with the connection of the audio source, the re-
spective Operating Instructions are to be observed.■
We recommend that you use extension cords from ŠKODA Original Accesso-
ries.
AUX - input
Read and observe
and on page 32 first.
The AUX input is above the storage compartment in the front center console
and is identified with the
» Fig. 20 on page 34 .
An audio source connected to the AUX input cannot be operated from this
unit.
After connecting the AUX audio source, the source must be selected.
Connecting AUX audio sources
›
Insert the plug of the audio source in the corresponding well.
›
Select the AUX audio source » page 32, Select audio source .
›
Start playback on the connected audio source.
1)
Some operating options from an audio source may not be supported.
34Familiarization with the unit
Page 38 of 88
Disconnect AUX audio source›Disconnect the connector of the audio source.
After disconnecting the AUX audio source is no automatic change to another
audio source takes place.
CAUTION
■ The AUX input must only be used for audio devices!■If an external audio source is connected to the AUX input, which is equipped
with an adapter for external power supply, the sound will be impaired. This de-
pends on the quality of the adapter which is used.
Note
■ The standard 3.5 mm stereo jack plug is used for the AUX input. If the exter-
nal devices do not have this jack plug, you must use an adapter.■
The AUX input can be activated / deactivated » page 31, Settings .
■
The volume can be adjusted by setting the input sensitivity of the connected
AUX audio source » page 19, Sound settings .
■
We recommend that you use extension cords from ŠKODA Original Accesso-
ries.
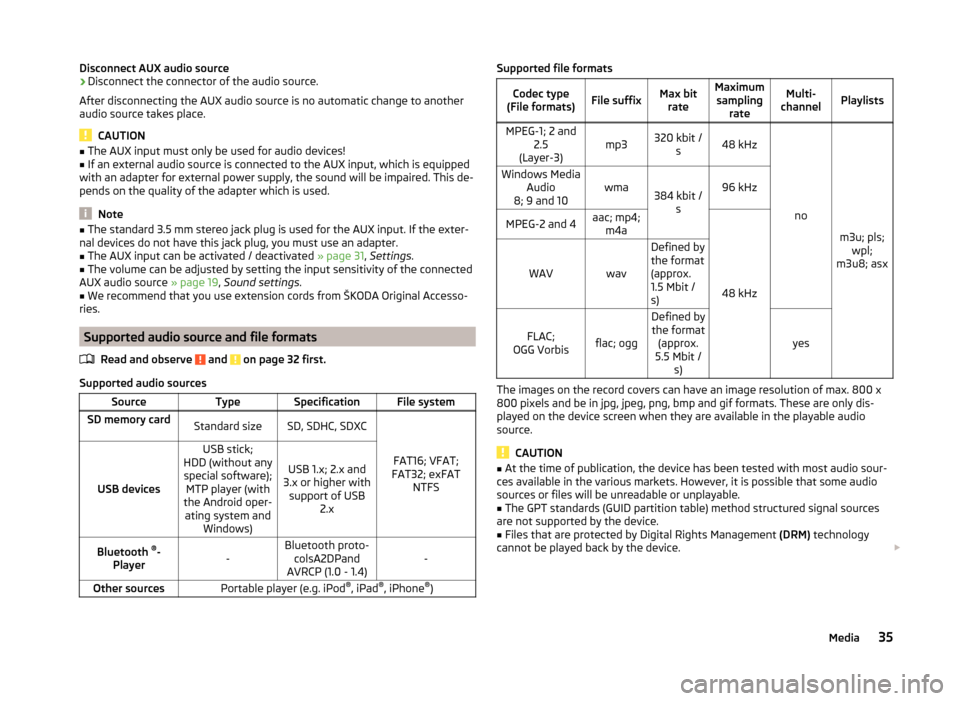
Supported audio source and file formats
Read and observe
and on page 32 first.
Supported audio sources
SourceTypeSpecificationFile systemSD memory cardStandard sizeSD, SDHC, SDXC
FAT16; VFAT;
FAT32; exFAT NTFSUSB devices
USB stick;
HDD (without any special software); MTP player (with
the Android oper- ating system and Windows)
USB 1.x; 2.x and
3.x or higher with support of USB 2.xBluetooth ®
-
Player-Bluetooth proto- colsA2DPand
AVRCP (1.0 - 1.4)-Other sourcesPortable player (e.g. iPod ®
, iPad ®
, iPhone ®
)Supported file formatsCodec type
(File formats)File suffixMax bit rateMaximumsampling rateMulti-
channelPlaylistsMPEG-1; 2 and 2.5
(Layer-3)mp3320 kbit / s48 kHz
no
m3u; pls;wpl;
m3u8; asx
Windows Media Audio
8; 9 and 10wma384 kbit / s96 kHzMPEG-2 and 4aac; mp4;m4a
48 kHz
WAVwav
Defined by
the format
(approx.
1.5 Mbit /
s)
FLAC;
OGG Vorbisflac; ogg
Defined by the format (approx.
5.5 Mbit / s)
yes
The images on the record covers can have an image resolution of max. 800 x
800 pixels and be in jpg, jpeg, png, bmp and gif formats. These are only dis-
played on the device screen when they are available in the playable audio
source.
CAUTION
■ At the time of publication, the device has been tested with most audio sour-
ces available in the various markets. However, it is possible that some audio
sources or files will be unreadable or unplayable.■
The GPT standards (GUID partition table) method structured signal sources
are not supported by the device.
■
Files that are protected by Digital Rights Management (DRM) technology
cannot be played back by the device.
35Media
Page 51 of 88
›Press the function key
, connection starts.
› Press the function key
- connection starts with the area code.
Search for a contact in the list The input screen » Fig. 24 also functions as an alphanumeric keypad that you
can use to search for contacts in the phonebook.
For example, if you enter 32, the unit will display contacts with the letter se-
quence DA, FA, EB, etc.
On the right side next to the numerical keyboard a list of contacts found from
the directory appears according to the lettered specified. By pressing the cor-
responding function key for the respective contact, dialling is started or the
contact details are displayed if the telephone contact has several telephone
numbers.
Enter prefix
Entering the prefix into the input line can be done in one of two ways.
› Enter the characters or numbers of the prefix (e.g.
or enter 00 or similar).
› Enter the telephone number and press the function key
(the connection
with the prefix starts).
The prefix may, for example be used for international calls, telephone calls via
a virtual telephone service provider or distinguishing between business and
private calls and similar.
If the contact number contains a prefix, pressing the function key causes a
further prefix to be added before the number and the connection starts. The
telephone number contains at this time two prefixes and a telephone call is
not initiated.
Dialling breakdown and info numbers
› Press the function key
Breakdn. call , breakdown number is dialled.
A breakdown service will then be called when your vehicle breaks down.
› Press the function key
Info. call the Info number is dialled.
An information service can be called when information regarding the products and services of the ŠKODA brand are required.
The breakdown and info numbers are free of charge. Charges are only made for a telephone call in accordance with the fare conditions of your telephone
service provider.
If no Breakdown or Info. call can be made, then a ŠKODA service partner
should be consulted.The breakdown and info numbers are set country-specific at the factory. If you
want to change the preset numbers, then consult a ŠKODA service partner.
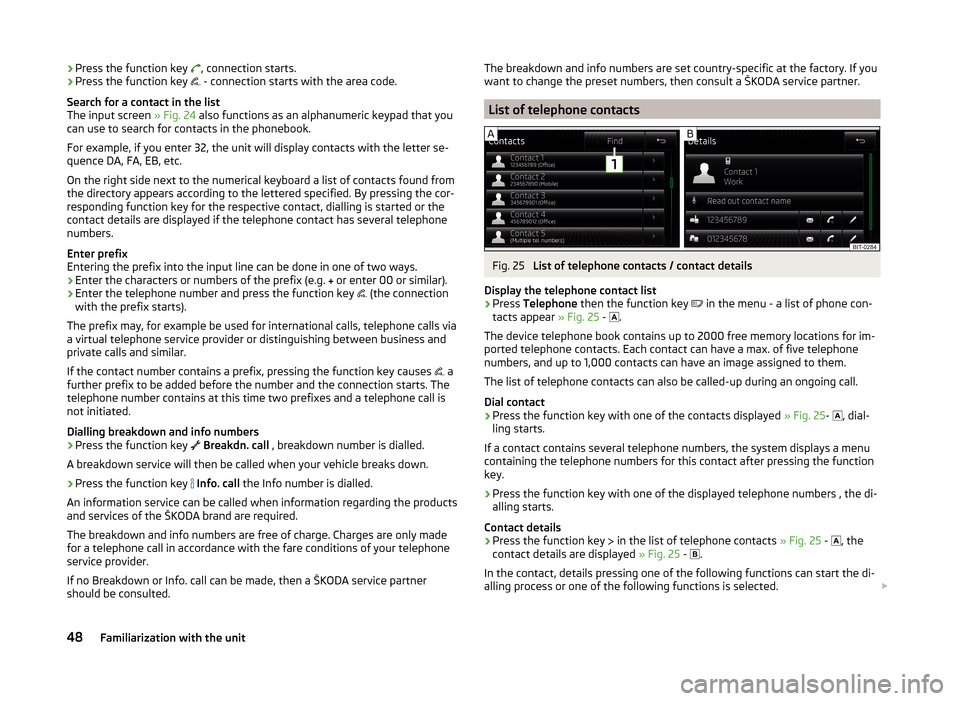
List of telephone contacts
Fig. 25
List of telephone contacts / contact details
Display the telephone contact list
›
Press Telephone then the function key
in the menu - a list of phone con-
tacts appear » Fig. 25 -
.
The device telephone book contains up to 2000 free memory locations for im-
ported telephone contacts. Each contact can have a max. of five telephone
numbers, and up to 1,000 contacts can have an image assigned to them.
The list of telephone contacts can also be called-up during an ongoing call.
Dial contact
›
Press the function key with one of the contacts displayed » Fig. 25-
, dial-
ling starts.
If a contact contains several telephone numbers, the system displays a menu
containing the telephone numbers for this contact after pressing the function
key.
›
Press the function key with one of the displayed telephone numbers , the di-
alling starts.
Contact details
›
Press the function key in the list of telephone contacts
» Fig. 25 -
, the
contact details are displayed » Fig. 25 -
.
In the contact, details pressing one of the following functions can start the di- alling process or one of the following functions is selected.
48Familiarization with the unit
Page 57 of 88
MirrorLink ™
Introduction
This chapter contains information on the following subjects:
Connection conditions
54
Start function
54
Operation
55
Settings
55
Function problems
55
First and foremost, pay attention to the safety instructions » page 7 , Impor-
tant notes .
MirrorLink ™
provides a function for the operation of some installed applica-
tions in the communication facility (e.g. telephone, hereinafter referred to only
as facility) by using the device.
Using this function is only for specially designed and certified applications. For
reasons of safety, the operation of some applications while driving is limited or
not possible (function keys of the applications are inactive).
WARNING■ No objects such as mobile telephone mounts, etc. must be attached to
the covers of the airbag modules or be located within their immediate vicin-
ity.■
Never leave communication facility in the deployment area of an airbag,
on a seat, on the dash panel or in another area, from which it can be
thrown during a sudden braking manoeuvre, an accident or a collision -
there is a risk of injury. There are storage compartments with lids and if
necessary there is the multimedia storage compartments to hold this » Ve-
hicle owner's manual , chapter Transport and practical equipment .
CAUTION
■
MirrorLink ™
Applications that use a mobile data connection, are dependent
on the quality of the signal supplied by your telephone service provider. ŠKODA
accepts no responsibility for the transmitted data volume.■
An intensive use of the function MirrorLink ™
and the work associated with
applications (e.g., GPS, mobile data, fully-backlit display and the like.) can lead
to battery discharge of the connected facility.
Connection conditions
Read and observe
and on page 54 first.
The connection between the facility and the device using the function
MirrorLink ™
is operational under the following conditions.
The ignition is switched on.
The facility supports the function MirrorLink ™
and contains applications
that support this feature.
The display of the equipment is unlocked.
The facility is connected to the USB input » Fig. 20 on page 34 .
Note
Before connecting the MirrorLink - Functions, unlock the device screen. While
using the function the display may automatically darken or the screen com-
pletely turns off.
Start function
Read and observe
and on page 54 first.
›
Press the button
→
™
→ Selection .
A list of the facilities connected to the USB input is displayed.
›
Select one of the MirrorLink ™
function supporting facilities.
If the facility is separated from the USB cable and the ignition is not off, it au- tomatically reconnects when a new connection to the device is made.
Note
■ If the facility is connected by means of the function MirrorLink ™
, it cannot be
used as a USB audio source Media menu.■
The list of available facilities and applications, which support the MirrorLink ™
function, can be seed in the ŠKODA Internet pages www.infotainment.skoda-
auto.com .
54Familiarization with the unit
Page 58 of 88
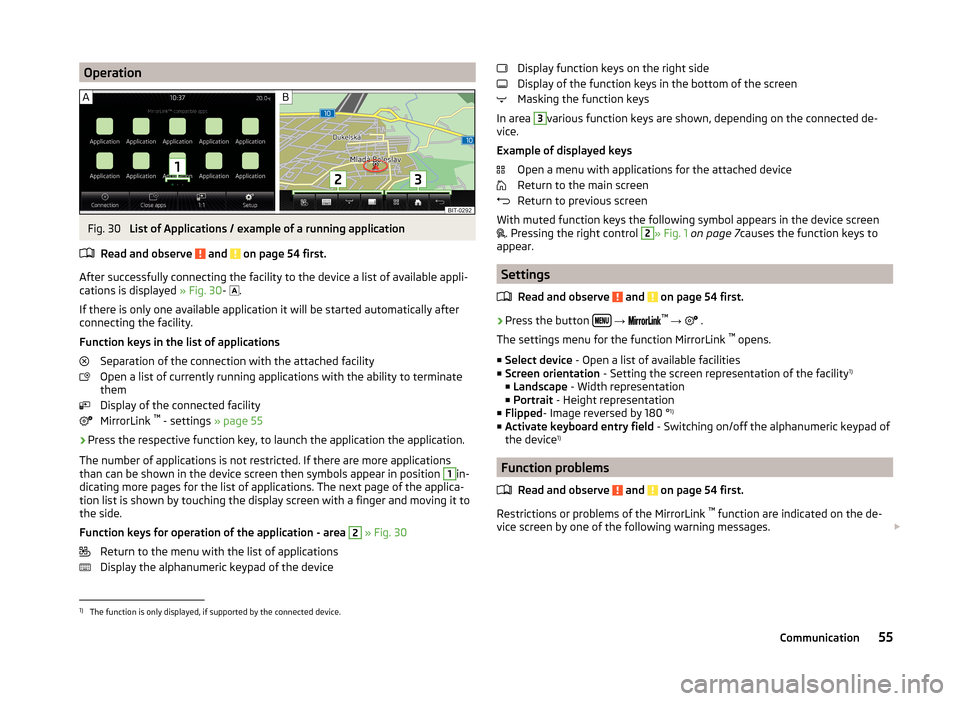
OperationFig. 30
List of Applications / example of a running application
Read and observe
and on page 54 first.
After successfully connecting the facility to the device a list of available appli-
cations is displayed » Fig. 30-
.
If there is only one available application it will be started automatically after
connecting the facility.
Function keys in the list of applications Separation of the connection with the attached facility
Open a list of currently running applications with the ability to terminate
them
Display of the connected facility
MirrorLink ™
- settings » page 55
›
Press the respective function key, to launch the application the application.
The number of applications is not restricted. If there are more applications
than can be shown in the device screen then symbols appear in position
1
in-
dicating more pages for the list of applications. The next page of the applica-
tion list is shown by touching the display screen with a finger and moving it to
the side.
Function keys for operation of the application - area
2
» Fig. 30
Return to the menu with the list of applications
Display the alphanumeric keypad of the device
Display function keys on the right side
Display of the function keys in the bottom of the screen
Masking the function keys
In area 3
various function keys are shown, depending on the connected de-
vice.
Example of displayed keys Open a menu with applications for the attached device
Return to the main screen
Return to previous screen
With muted function keys the following symbol appears in the device screen
. Pressing the right control
2
» Fig. 1
on page 7 causes the function keys to
appear.
Settings
Read and observe
and on page 54 first.
›
Press the button
→
™
→ .
The settings menu for the function MirrorLink ™
opens.
■ Select device - Open a list of available facilities
■ Screen orientation - Setting the screen representation of the facility 1)
■ Landscape - Width representation
■ Portrait - Height representation
■ Flipped - Image reversed by 180 ° 1)
■ Activate keyboard entry field - Switching on/off the alphanumeric keypad of
the device 1)
Function problems
Read and observe
and on page 54 first.
Restrictions or problems of the MirrorLink ™
function are indicated on the de-
vice screen by one of the following warning messages.
1)
The function is only displayed, if supported by the connected device.
55Communication