light SKODA YETI 2014 1.G / 5L Amundsen Infotainment Navigation System Manual
[x] Cancel search | Manufacturer: SKODA, Model Year: 2014, Model line: YETI, Model: SKODA YETI 2014 1.G / 5LPages: 88, PDF Size: 8.18 MB
Page 11 of 88
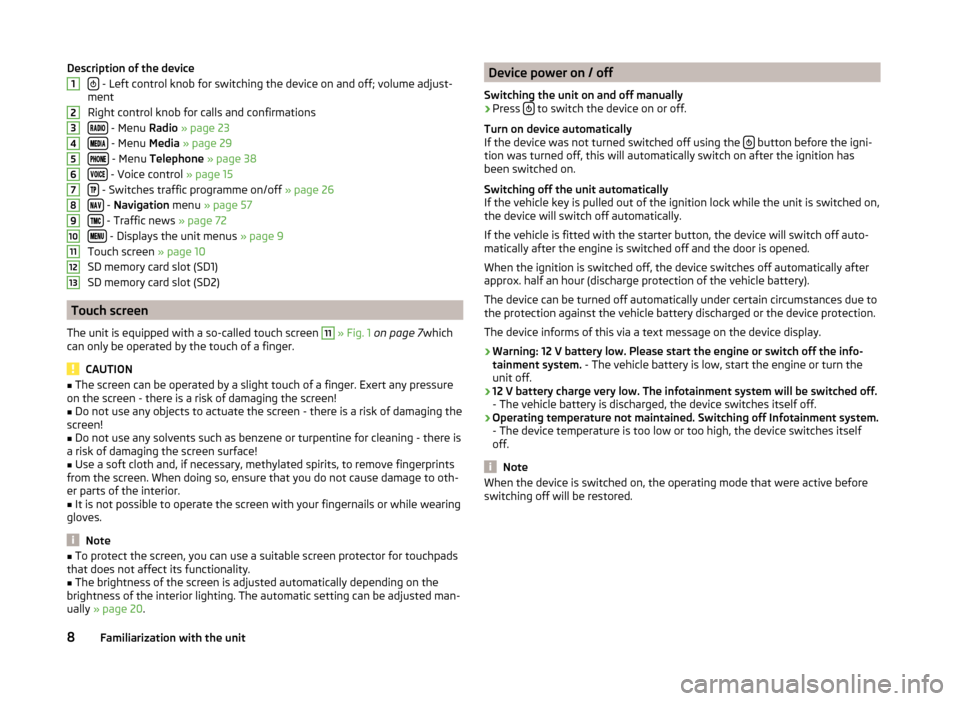
Description of the device
- Left control knob for switching the device on and off; volume adjust-
ment
Right control knob for calls and confirmations
- Menu Radio » page 23
- Menu Media » page 29
- Menu Telephone » page 38
- Voice control » page 15
- Switches traffic programme on/off » page 26
- Navigation menu » page 57
- Traffic news » page 72
- Displays the unit menus » page 9
Touch screen » page 10
SD memory card slot (SD1)
SD memory card slot (SD2)
Touch screen
The unit is equipped with a so-called touch screen
11
» Fig. 1 on page 7 which
can only be operated by the touch of a finger.
CAUTION
■ The screen can be operated by a slight touch of a finger. Exert any pressure
on the screen - there is a risk of damaging the screen!■
Do not use any objects to actuate the screen - there is a risk of damaging the
screen!
■
Do not use any solvents such as benzene or turpentine for cleaning - there is
a risk of damaging the screen surface!
■
Use a soft cloth and, if necessary, methylated spirits, to remove fingerprints
from the screen. When doing so, ensure that you do not cause damage to oth-
er parts of the interior.
■
It is not possible to operate the screen with your fingernails or while wearing
gloves.
Note
■ To protect the screen, you can use a suitable screen protector for touchpads
that does not affect its functionality.■
The brightness of the screen is adjusted automatically depending on the
brightness of the interior lighting. The automatic setting can be adjusted man-
ually » page 20 .
12345678910111213Device power on / off
Switching the unit on and off manually›
Press to switch the device on or off.
Turn on device automatically
If the device was not turned switched off using the
button before the igni-
tion was turned off, this will automatically switch on after the ignition has
been switched on.
Switching off the unit automatically
If the vehicle key is pulled out of the ignition lock while the unit is switched on,
the device will switch off automatically.
If the vehicle is fitted with the starter button, the device will switch off auto-
matically after the engine is switched off and the door is opened.
When the ignition is switched off, the device switches off automatically after
approx. half an hour (discharge protection of the vehicle battery).
The device can be turned off automatically under certain circumstances due to
the protection against the vehicle battery discharged or the device protection.
The device informs of this via a text message on the device display.
› Warning: 12 V battery low. Please start the engine or switch off the info-
tainment system. - The vehicle battery is low, start the engine or turn the
unit off.
› 12 V battery charge very low. The infotainment system will be switched off.
- The vehicle battery is discharged, the device switches itself off.
› Operating temperature not maintained. Switching off Infotainment system.
- The device temperature is too low or too high, the device switches itself
off.
Note
When the device is switched on, the operating mode that were active before
switching off will be restored.8Familiarization with the unit
Page 19 of 88
CAUTION■For some languages, there is no voice control available. This device indicates
this fact through a text message that is displayed after setting the device lan-
guage screen » page 20.■
For some countries it is required to spell the city or street name in the menu
Navigation . The device indicates this through a text message on the screen.
Note
■
During voice control, no navigation announcements and traffic announce-
ments are played.■
Some voice commands must be spelled out when pronouncing depending on
the selected language of communication, such as the Source Selection “ SD”
card .
Switching on/off
Fig. 10
Multifunction steering wheel
Read and observe
on page 15 first.
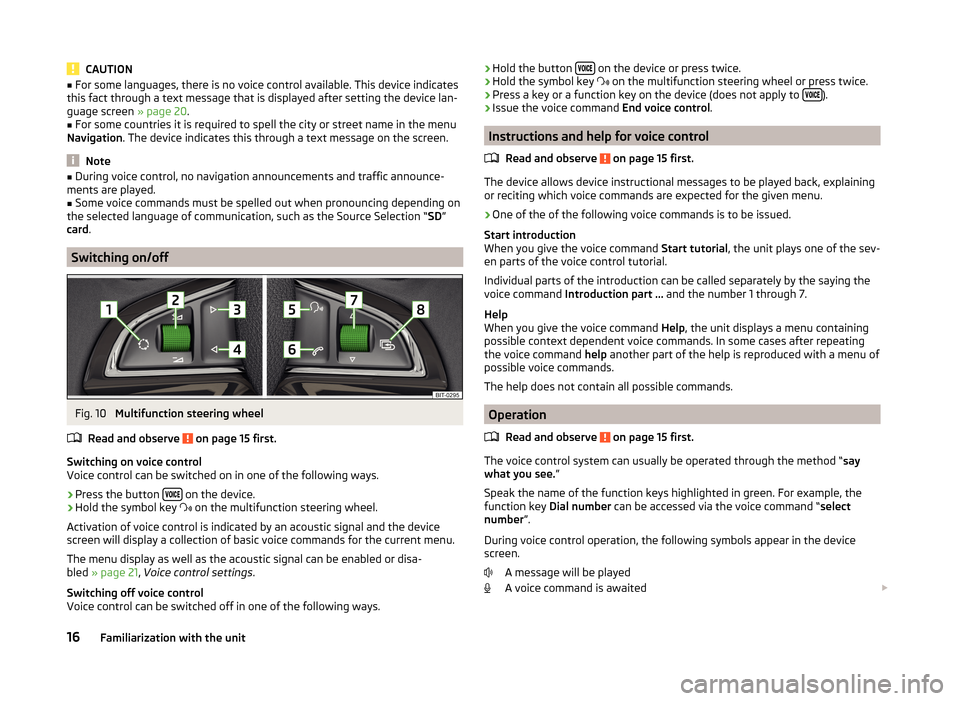
Switching on voice control
Voice control can be switched on in one of the following ways.
›
Press the button on the device.
›
Hold the symbol key
on the multifunction steering wheel.
Activation of voice control is indicated by an acoustic signal and the device
screen will display a collection of basic voice commands for the current menu.
The menu display as well as the acoustic signal can be enabled or disa-
bled » page 21 , Voice control settings .
Switching off voice control
Voice control can be switched off in one of the following ways.
› Hold the button
on the device or press twice.›Hold the symbol key
on the multifunction steering wheel or press twice.›
Press a key or a function key on the device (does not apply to ).
›
Issue the voice command
End voice control.
Instructions and help for voice control
Read and observe
on page 15 first.
The device allows device instructional messages to be played back, explainingor reciting which voice commands are expected for the given menu.
›
One of the of the following voice commands is to be issued.
Start introduction
When you give the voice command Start tutorial, the unit plays one of the sev-
en parts of the voice control tutorial.
Individual parts of the introduction can be called separately by the saying the
voice command Introduction part ... and the number 1 through 7.
Help
When you give the voice command Help, the unit displays a menu containing
possible context dependent voice commands. In some cases after repeating
the voice command help another part of the help is reproduced with a menu of
possible voice commands.
The help does not contain all possible commands.
Operation
Read and observe
on page 15 first.
The voice control system can usually be operated through the method “ say
what you see. ”
Speak the name of the function keys highlighted in green. For example, the
function key Dial number can be accessed via the voice command “ select
number ”.
During voice control operation, the following symbols appear in the device
screen.
A message will be played
A voice command is awaited
16Familiarization with the unit
Page 60 of 88
Navigation
Description of the navigation system
Preface to navigation
Introduction
This chapter contains information on the following subjects:
Navigation data
57
Main menu
58
Map display
58
Map Orientation
59
Map scale
59
Options for map display
60
Split screen
60
First and foremost, pay attention to the safety instructions » page 7 , Impor-
tant notes .
The unit uses the GPS (Global Positioning System) satellite system for route
guidance. The satellite signal allows you to determine your current vehicle po-
sition.
Outside the range of the GPS satellite signal (e.g. in dense vegetation, in tun-
nels, parking garages, etc.), the unit navigates only with restrictions using on-
vehicle sensors.
The route guidance is as follows.
› With graphical driving recommendations in the device screen and MAXI DOT
display.
› With navigation announcements.
WARNING■
Information about traffic lights, stop and right of way signs, parking and
stopping restrictions as well as lane constrictions and speed restrictions is
not taken into account for route guidance by the unit.■
The navigation announcements provided may vary from the actual situa-
tions, e.g. due out-of-date navigation data.
■
The volume should be adjusted to ensure that acoustic signals from out-
side, e.g. sirens from vehicles which have the right of way, such as police,
ambulance and fire brigade vehicles, can be heard at all time.
CAUTIONIn some countries, some unit features can no longer be selected when the ve-
hicle is running faster than a certain speed. This is not a malfunction, but com-
plies with the national legal regulations.
Navigation data
Read and observe
and on page 57 first.
Navigation data source
You received the SD memory card with navigation data together with the unit.
For correct functioning of the device, the card must be inserted into slots
12
or
13
» Fig. 1 on page 7 during the entire route guidance.
Insert the memory card » page 33, SD memory card .
Data update
The navigation data is subject to constant changes (such as new streets,
changes of street names and house numbers) and are no longer valid after
some time. Therefore the route guidance may be inaccurate of incorrect. We
recommend that you update the navigation data on a regular basis.
For more information on updating the data, please visit the ŠKODA website
www.infotainment.skoda-auto.com or contact a ŠKODA Partner.
The version of the navigation data for maps can be found in the navigation
settings
→
→ Version information .
Card has been damaged or lost
If the SD memory card with the navigation data has been damaged or lost, a
new card can be obtained from ŠKODA original accessories. The navigation da-
ta can be loaded only on the original card.
57Description of the navigation system
Page 62 of 88
If no scale change occurs then above the scale function key the symbol with
mediated elevation 1)
appears.
Map Orientation
Read and observe
and on page 57 first.
The 2D map can be oriented to the north or in relation to the direction of trav-
el.
The 3D map is always aligned with respect to the direction of travel.
A change of map orientation is only possible when the map is centred on the
vehicle position (the function key or
is not displayed).
›
Press the function key
- one of the following types of 2D map orientations
is displayed.
Map orientation towards the north
› The map is oriented towards north and the Arrow
A
» Fig. 32
on
page 58 shows the direction of travel.
If the scale of the 2D Map or 3D Map is greater than 10 km (5 miles), then the
map is automatically displayed as 2D and aligned in the direction of north.
Map orientation with respect to the direction
› The map rotates and the direction of travel arrow
A
» Fig. 32
on
page 58 points to the top of the screen.
Map scale
Read and observe
and on page 57 first.
It is possible to change the map scale manually or to turn on the automatic
change of scale.
Symbols of the scale function keys
The map type can be changed by pressing a function key depending on the
context in
G
» Fig. 32 on page 58 .
manual scale is active automatic scale is active
Turn on / off the automatic scale
fast map
manual scale
The manual scale is turned on when the function key G
and the symbol
» Fig. 32 on page 58 is displayed.
Map scale can be change in the following ways.
› Turning the right control
2
» Fig. 1
on page 7 .
› Touching the device screen with two fingers and pulling them apart or clos-
ing them together.
The map is moved by touching the device screen with one finger and moving it
in the desired direction. If the automatic scale is on then it changes to manual
scale. The symbol in the function key changes to .
Turn on the automatic scale
The automatic scale can be turned on by pressing the function key
→
.
The function key is highlighted in green and the function of the automatic
scale is turned on. The symbol in the function key changes to .
The automatic scale will only be active as long as the map is centred on the
vehicle position (the function key or
is not displayed).
If the automatic scale is active, the map scale will change automatically de-
pending on the route travelled (motorway - smaller map scale / town larger
map scale).
Turning off the automatic scale
The automatic scale can be turned off by pressing the function key
→
or by manually changing the map scale. The symbol in the function key
changes to .
Fast map
› Press the function key
or
→
.
The map scale is reduced for a few seconds and then restored.
1)
Display of elevation requires the reception of signals from at least five satellites. Route guidance must
not be running in demo mode.
59Description of the navigation system
Page 63 of 88
Options for map displayFig. 33
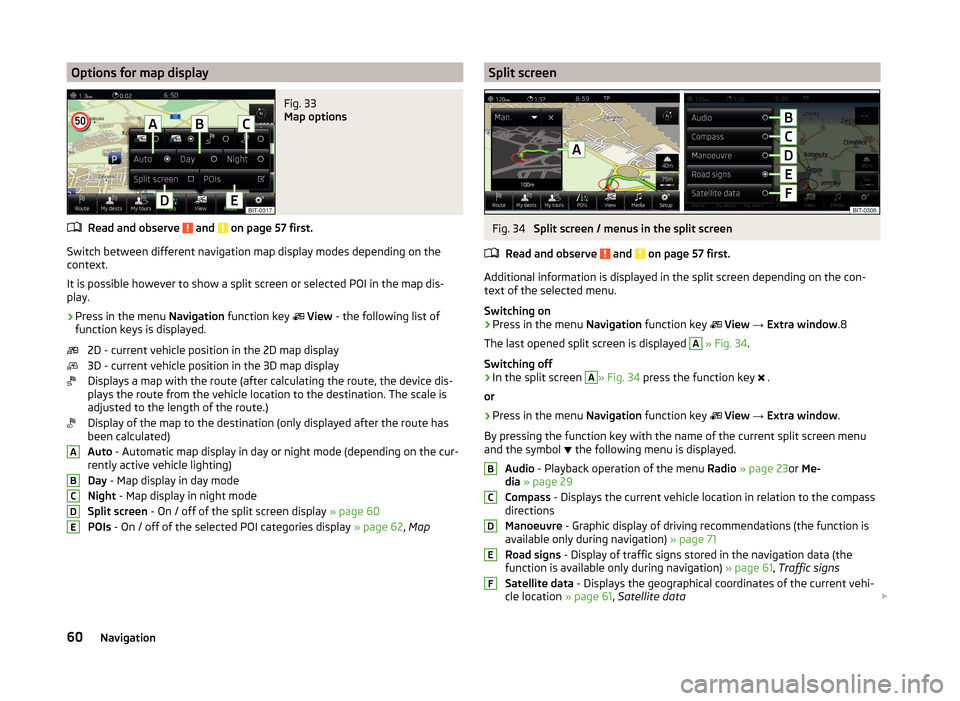
Map options
Read and observe and on page 57 first.
Switch between different navigation map display modes depending on the
context.
It is possible however to show a split screen or selected POI in the map dis-
play.
›
Press in the menu Navigation function key
View - the following list of
function keys is displayed.
2D - current vehicle position in the 2D map display
3D - current vehicle position in the 3D map display
Displays a map with the route (after calculating the route, the device dis-
plays the route from the vehicle location to the destination. The scale is
adjusted to the length of the route.)
Display of the map to the destination (only displayed after the route has
been calculated)
Auto - Automatic map display in day or night mode (depending on the cur-
rently active vehicle lighting)
Day - Map display in day mode
Night - Map display in night mode
Split screen - On / off of the split screen display » page 60
POIs - On / off of the selected POI categories display » page 62, Map
ABCDESplit screenFig. 34
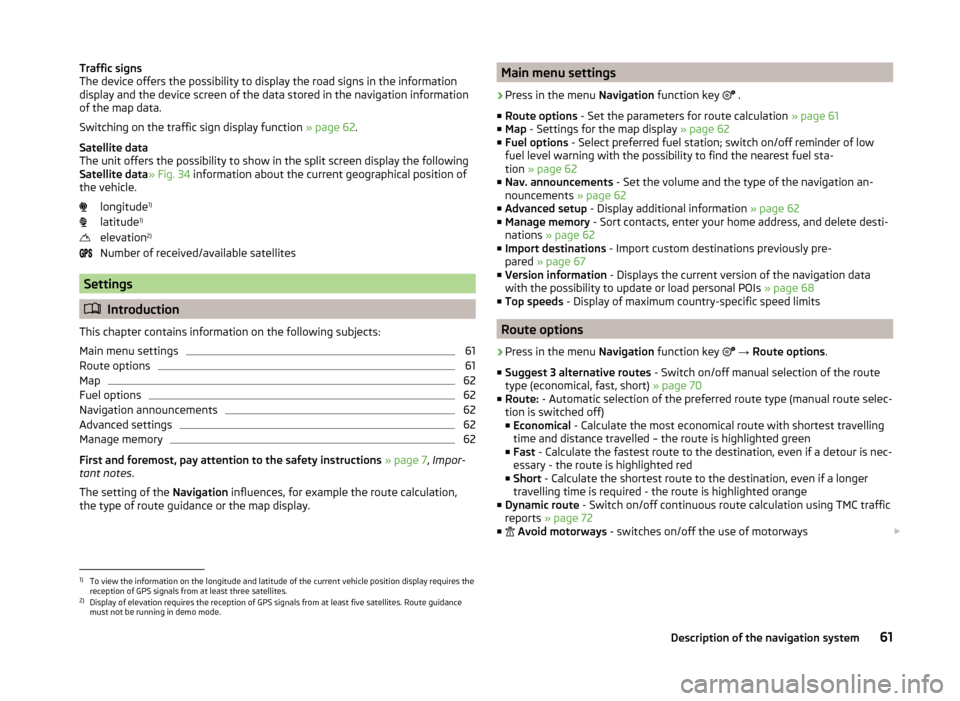
Split screen / menus in the split screen
Read and observe
and on page 57 first.
Additional information is displayed in the split screen depending on the con- text of the selected menu.
Switching on
›
Press in the menu Navigation function key
View → Extra window .8
The last opened split screen is displayed
A
» Fig. 34 .
Switching off
›
In the split screen
A
» Fig. 34 press the function key
.
or
›
Press in the menu Navigation function key
View → Extra window .
By pressing the function key with the name of the current split screen menu
and the symbol the following menu is displayed.
Audio - Playback operation of the menu Radio » page 23 or Me-
dia » page 29
Compass - Displays the current vehicle location in relation to the compass
directions
Manoeuvre - Graphic display of driving recommendations (the function is
available only during navigation) » page 71
Road signs - Display of traffic signs stored in the navigation data (the
function is available only during navigation) » page 61, Traffic signs
Satellite data - Displays the geographical coordinates of the current vehi-
cle location » page 61, Satellite data
BCDEF60Navigation
Page 64 of 88
Traffic signs
The device offers the possibility to display the road signs in the information
display and the device screen of the data stored in the navigation information
of the map data.
Switching on the traffic sign display function » page 62.
Satellite data
The unit offers the possibility to show in the split screen display the following
Satellite data » Fig. 34 information about the current geographical position of
the vehicle.
longitude 1)
latitude 1)
elevation 2)
Number of received/available satellites
Settings
Introduction
This chapter contains information on the following subjects:
Main menu settings
61
Route options
61
Map
62
Fuel options
62
Navigation announcements
62
Advanced settings
62
Manage memory
62
First and foremost, pay attention to the safety instructions » page 7 , Impor-
tant notes .
The setting of the Navigation influences, for example the route calculation,
the type of route guidance or the map display.
Main menu settings›
Press in the menu Navigation function key
.
■ Route options - Set the parameters for route calculation » page 61
■ Map - Settings for the map display » page 62
■ Fuel options - Select preferred fuel station; switch on/off reminder of low
fuel level warning with the possibility to find the nearest fuel sta-
tion » page 62
■ Nav. announcements - Set the volume and the type of the navigation an-
nouncements » page 62
■ Advanced setup - Display additional information » page 62
■ Manage memory - Sort contacts, enter your home address, and delete desti-
nations » page 62
■ Import destinations - Import custom destinations previously pre-
pared » page 67
■ Version information - Displays the current version of the navigation data
with the possibility to update or load personal POIs » page 68
■ Top speeds - Display of maximum country-specific speed limits
Route options
›
Press in the menu Navigation function key
→ Route options .
■ Suggest 3 alternative routes - Switch on/off manual selection of the route
type (economical, fast, short) » page 70
■ Route: - Automatic selection of the preferred route type (manual route selec-
tion is switched off)
■ Economical - Calculate the most economical route with shortest travelling
time and distance travelled – the route is highlighted green
■ Fast - Calculate the fastest route to the destination, even if a detour is nec-
essary - the route is highlighted red
■ Short - Calculate the shortest route to the destination, even if a longer
travelling time is required - the route is highlighted orange
■ Dynamic route - Switch on/off continuous route calculation using TMC traffic
reports » page 72
■
Avoid motorways - switches on/off the use of motorways
1)
To view the information on the longitude and latitude of the current vehicle position display requires the
reception of GPS signals from at least three satellites.
2)
Display of elevation requires the reception of GPS signals from at least five satellites. Route guidance
must not be running in demo mode.
61Description of the navigation system