display SMART FORTWO COUPE 2012 Owner's Manual
[x] Cancel search | Manufacturer: SMART, Model Year: 2012, Model line: FORTWO COUPE, Model: SMART FORTWO COUPE 2012Pages: 228, PDF Size: 12.76 MB
Page 98 of 228
RESET menu appears in the multifunction
display.
X To reset: Press button : (Y page 90)on
the instrument cluster until the RESET
menu is reset to 0.Messages menu
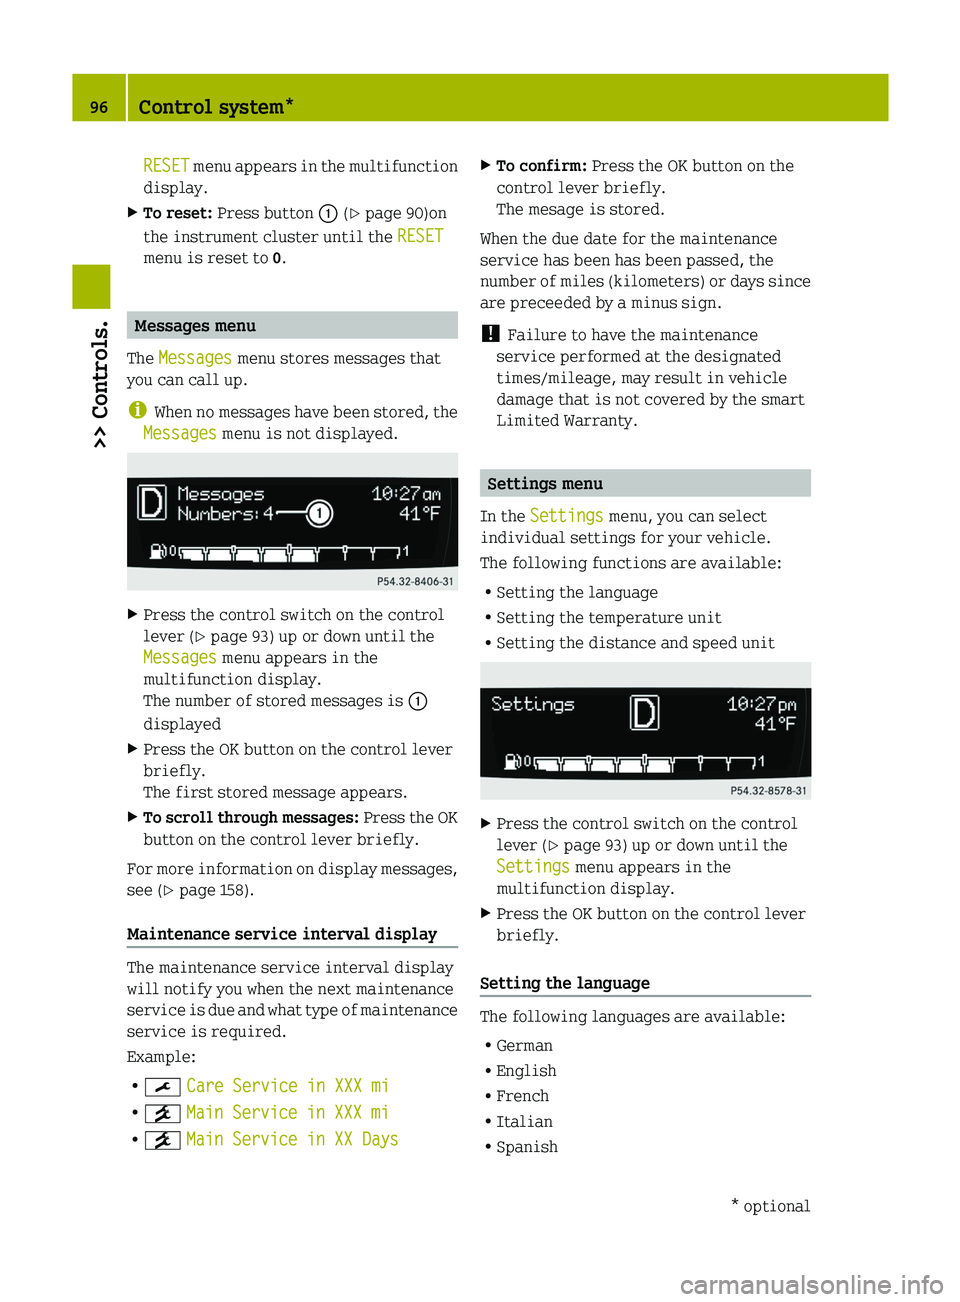
The Messages menu stores messages that
you can call up.
i When
no messages have been stored, the
Messages menu is not displayed. X
Press the control switch on the control
lever (Y page 93) up or down until the
Messages menu appears in the
multifunction display.
The number of stored messages is :
displayed
X Press the OK button on the control lever
briefly.
The first stored message appears.
X To scroll through messages:
Press the OK
button on the control lever briefly.
For more information on display messages,
see (Y page 158).
Maintenance service interval display The maintenance service interval display
will notify you when the next maintenance
service
is due and what type of maintenance
service is required.
Example:
R ¯ Care Service in XXX mi
R ° Main Service in XXX mi
R ° Main Service in XX Days X
To confirm: Press the OK button on the
control lever briefly.
The mesage is stored.
When the due date for the maintenance
service has been has been passed, the
number
of miles (kilometers) or days since
are preceeded by a minus sign.
! Failure to have the maintenance
service performed at the designated
times/mileage, may result in vehicle
damage that is not covered by the smart
Limited Warranty. Settings menu
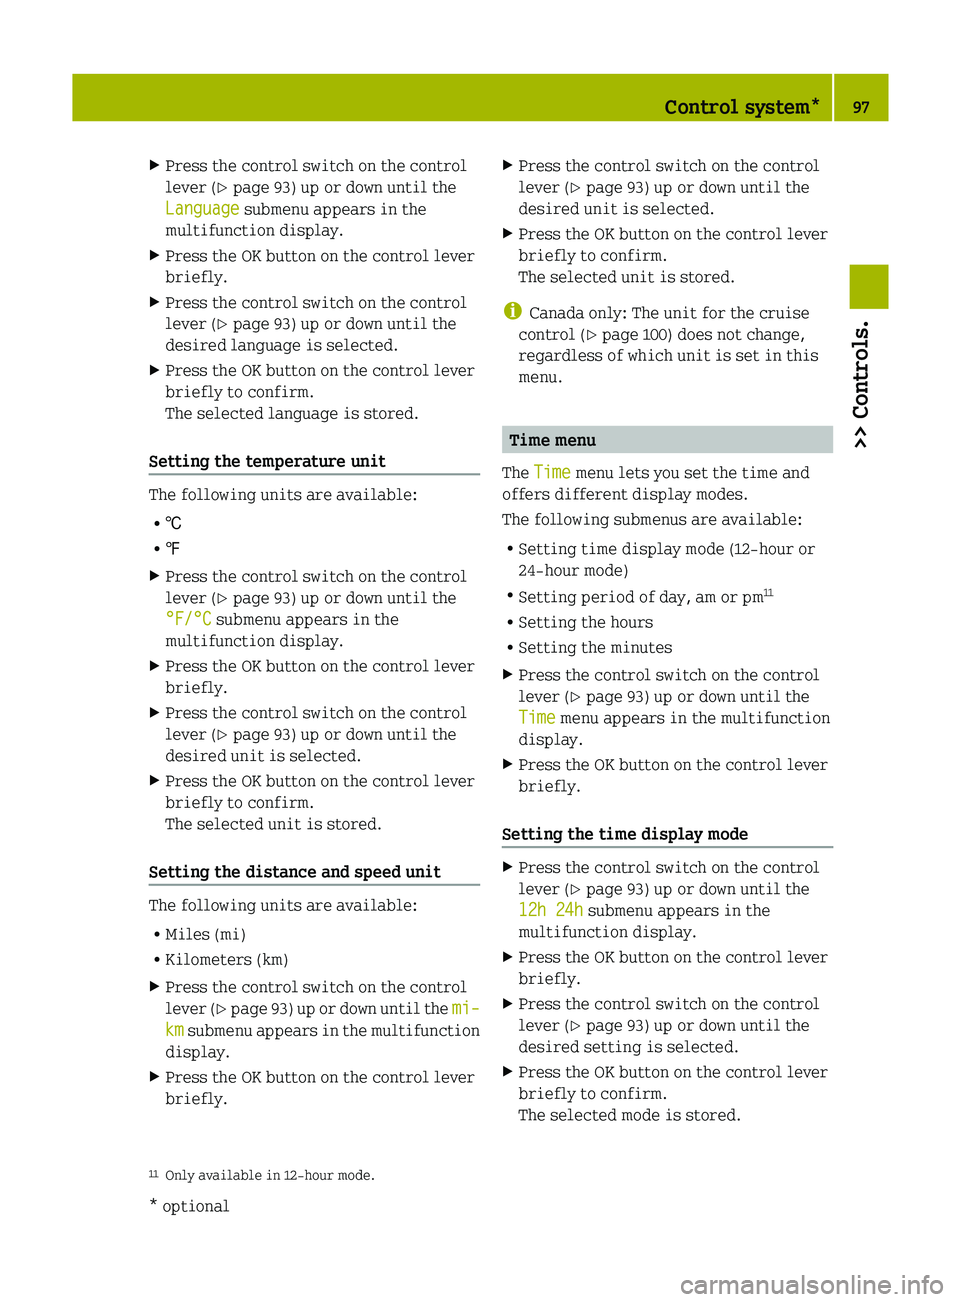
In the Settings menu, you can select
individual settings for your vehicle.
The following functions are available:
R Setting the language
R Setting the temperature unit
R Setting the distance and speed unit X
Press the control switch on the control
lever (Y page 93) up or down until the
Settings menu appears in the
multifunction display.
X Press the OK button on the control lever
briefly.
Setting the language The following languages are available:
R
German
R English
R French
R Italian
R Spanish 96
Control system*
>> Controls.
* optional
Page 99 of 228
X
Press the control switch on the control
lever (Y page 93) up or down until the
Language submenu appears in the
multifunction display.
X Press the OK button on the control lever
briefly.
X Press the control switch on the control
lever (Y page 93) up or down until the
desired language is selected.
X Press the OK button on the control lever
briefly to confirm.
The selected language is stored.
Setting the temperature unit The following units are available:
R
†
R ‡
X Press the control switch on the control
lever (Y page 93) up or down until the
°F/°C submenu appears in the
multifunction display.
X Press the OK button on the control lever
briefly.
X Press the control switch on the control
lever (Y page 93) up or down until the
desired unit is selected.
X Press the OK button on the control lever
briefly to confirm.
The selected unit is stored.
Setting the distance and speed unit The following units are available:
R
Miles (mi)
R Kilometers (km)
X Press the control switch on the control
lever (Y
page 93) up or down until the mi–
km submenu appears in the multifunction
display.
X Press the OK button on the control lever
briefly. X
Press the control switch on the control
lever (Y page 93) up or down until the
desired unit is selected.
X Press the OK button on the control lever
briefly to confirm.
The selected unit is stored.
i Canada only: The unit for the cruise
control (Y page 100) does not change,
regardless of which unit is set in this
menu. Time menu
The Time menu lets you set the time and
offers different display modes.
The following submenus are available:
R Setting time display mode (12-hour or
24-hour mode)
R Setting period of day, am or pm 11
R Setting the hours
R Setting the minutes
X Press the control switch on the control
lever (Y page 93) up or down until the
Time menu appears in the multifunction
display.
X Press the OK button on the control lever
briefly.
Setting the time display mode X
Press the control switch on the control
lever (Y page 93) up or down until the
12h 24h submenu appears in the
multifunction display.
X Press the OK button on the control lever
briefly.
X Press the control switch on the control
lever (Y page 93) up or down until the
desired setting is selected.
X Press the OK button on the control lever
briefly to confirm.
The selected mode is stored.
11 Only available in 12-hour mode. Control system*
97
>> Controls.
* optional Z
Page 100 of 228
Setting the period of day
X
Press the control switch on the control
lever (Y page 93) up or down until the
am pm submenu appears in the
multifunction display.
X Press the OK button on the control lever
briefly.
X Press the control switch on the control
lever (Y page 93) up or down until the
desired setting is selected.
X Press the OK button on the control lever
briefly to confirm.
The selected mode is stored.
Setting the hours X
Press the control switch on the control
lever (Y page 93) up or down until the
Hour submenu appears in the
multifunction display.
X Press the OK button on the control lever
briefly.
X Press the control switch on the control
lever (Y page 93) up or down until the
desired setting is selected.
X Press the OK button on the control lever
briefly to confirm.
The selected hours are stored.
Setting the minutes X
Press the control switch on the control
lever (Y page 93) up or down until the
Minute submenu appears in the
multifunction display.
X Press the OK button on the control lever
briefly.
X Press the control switch on the control
lever (Y page 93) up or down until the
desired setting is selected.
X Press the OK button on the control lever
briefly to confirm.
The selected minutes are stored. Audio system*
G
WARNING
In order to avoid distraction which could
lead to an accident, the driver should enter
system settings with the vehicle at a
standstill and operate the system only when
road and traffic conditions permit. Always
pay full attention to traffic conditions
first before operating system controls
while driving.
Bear in mind that at a speed of just 30 mph
(approximately 50 km/h), your vehicle is
covering a distance of 44 feet
(approximately 14 m) every second. G
WARNING
Always select a volume that allows you to
still
hear ambient sound in your immediate
vicinity (e.g. horns, emergency rescue
vehicles, police vehicles, etc.). You could
otherwise cause an accident. G
WARNING
If you wish to have an audio system other
than an original smart audio system fitted
in your vehicle, please always have the
necessary work performed at an authorized
smart center.
This is particularly important if your
vehicle is fitted with a radio
preinstallation. Improper connection can
result in the failure of important vehicle
functions, thereby endangering the
operating safety of your vehicle and thus
your own safety and that of other people.
The following pages contain a brief
description
of the audio systems available
for the coupé and cabriolet.
The devices are described with their full
complement of equipment. The description
for your individual equipment
specification applies.
Please refer to the separate operating
instructions for detailed functions. 98
Audio system*
>> Controls.
* optional
Page 101 of 228
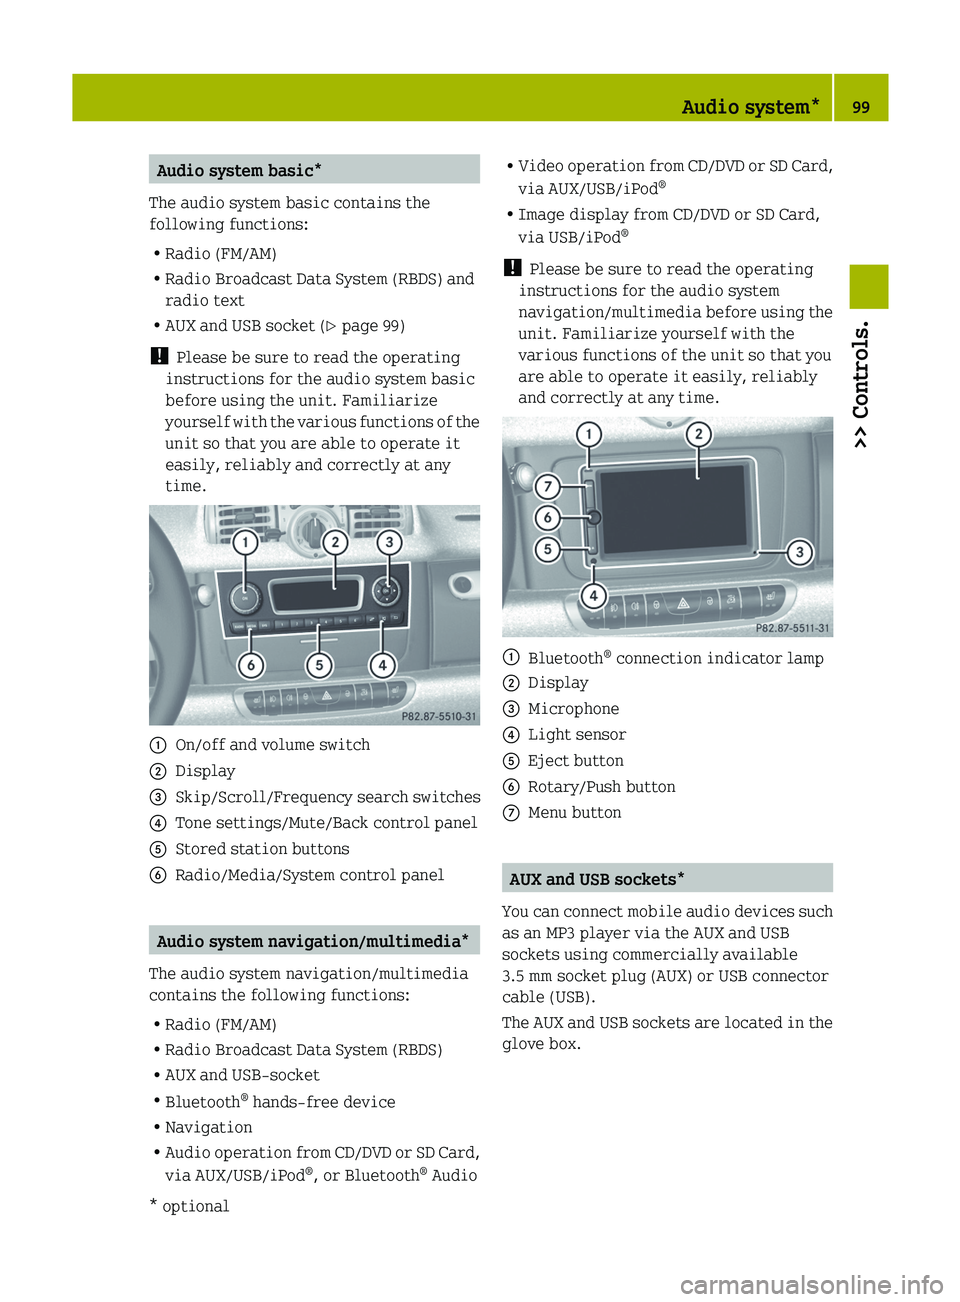
Audio system basic*
The audio system basic contains the
following functions:
R Radio (FM/AM)
R Radio Broadcast Data System (RBDS) and
radio text
R AUX and USB socket ( Y page 99)
! Please be sure to read the operating
instructions for the audio system basic
before using the unit. Familiarize
yourself
with the various functions of the
unit so that you are able to operate it
easily, reliably and correctly at any
time. :
On/off and volume switch
; Display
= Skip/Scroll/Frequency search switches
? Tone settings/Mute/Back control panel
A Stored station buttons
B Radio/Media/System control panel Audio system navigation/multimedia*
The audio system navigation/multimedia
contains the following functions:
R Radio (FM/AM)
R Radio Broadcast Data System (RBDS)
R AUX and USB-socket
R Bluetooth ®
hands-free device
R Navigation
R Audio
operation from CD/DVD or SD Card,
via AUX/USB/iPod ®
, or Bluetooth ®
Audio R
Video
operation from CD/DVD or SD Card,
via AUX/USB/iPod ®
R Image display from CD/DVD or SD Card,
via USB/iPod ®
! Please be sure to read the operating
instructions for the audio system
navigation/multimedia before using the
unit. Familiarize yourself with the
various functions of the unit so that you
are able to operate it easily, reliably
and correctly at any time. :
Bluetooth ®
connection indicator lamp
; Display
= Microphone
? Light sensor
A Eject button
B Rotary/Push button
C Menu button AUX and USB sockets*
You
can connect mobile audio devices such
as an MP3 player via the AUX and USB
sockets using commercially available
3.5 mm socket plug (AUX) or USB connector
cable (USB).
The AUX and USB sockets are located in the
glove box. Audio system*
99
>> Controls.
* optional Z
Page 102 of 228
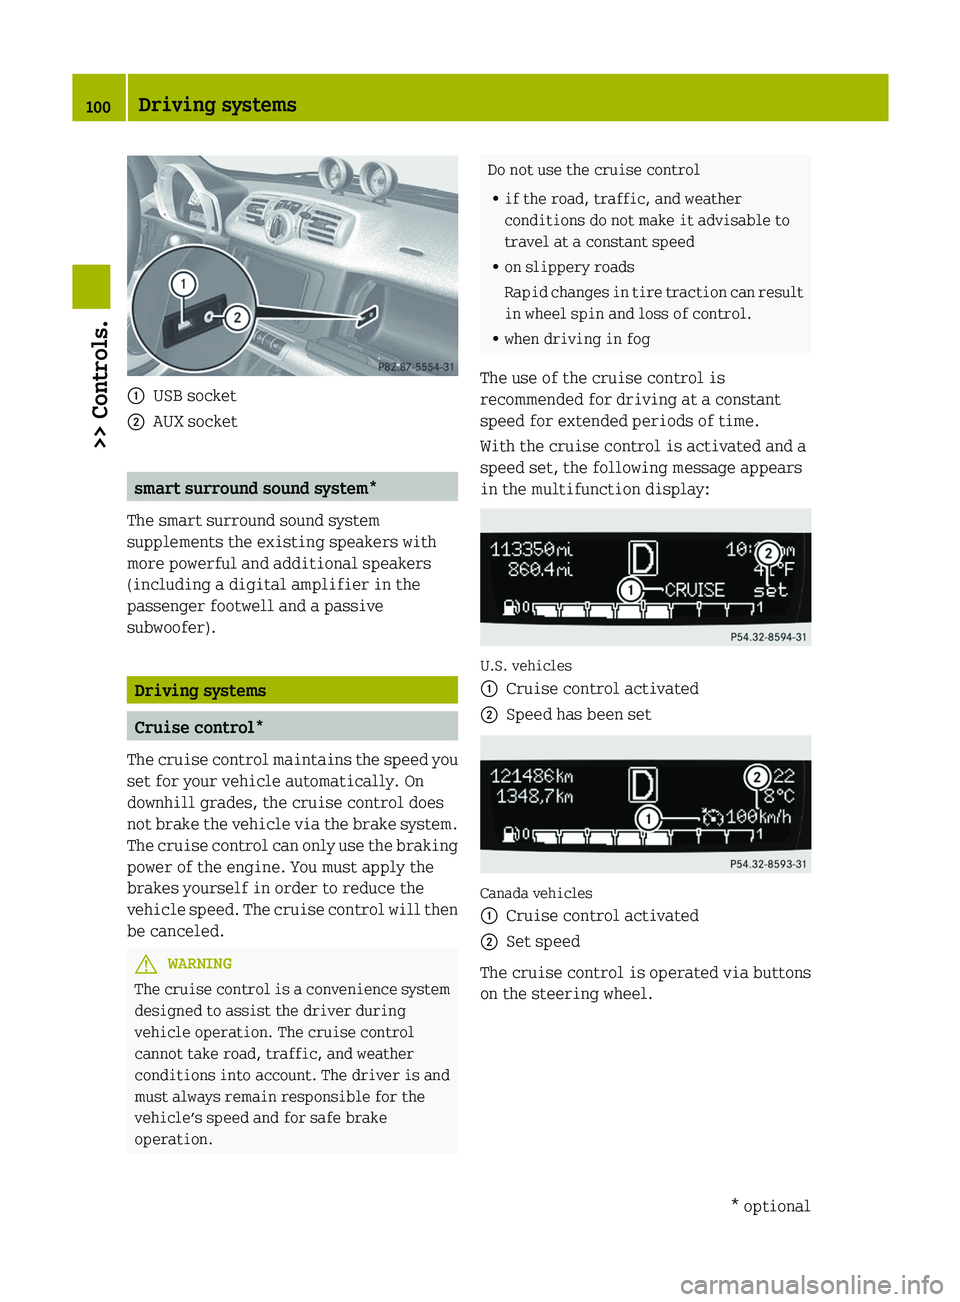
:
USB socket
; AUX socket smart surround sound system*
The smart surround sound system
supplements the existing speakers with
more powerful and additional speakers
(including a digital amplifier in the
passenger footwell and a passive
subwoofer). Driving systems
Cruise control*
The cruise control maintains the speed you
set for your vehicle automatically. On
downhill grades, the cruise control does
not brake the vehicle via the brake system.
The cruise control can only use the braking
power of the engine. You must apply the
brakes yourself in order to reduce the
vehicle speed. The cruise control will then
be canceled. G
WARNING
The cruise control is a convenience system
designed to assist the driver during
vehicle operation. The cruise control
cannot take road, traffic, and weather
conditions into account. The driver is and
must always remain responsible for the
vehicle’s speed and for safe brake
operation. Do not use the cruise control
R
if the road, traffic, and weather
conditions do not make it advisable to
travel at a constant speed
R on slippery roads
Rapid
changes in tire traction can result
in wheel spin and loss of control.
R when driving in fog
The use of the cruise control is
recommended for driving at a constant
speed for extended periods of time.
With the cruise control is activated and a
speed set, the following message appears
in the multifunction display: U.S. vehicles
:
Cruise control activated
; Speed has been set Canada vehicles
:
Cruise control activated
; Set speed
The cruise control is operated via buttons
on the steering wheel. 100
Driving systems
>> Controls.
* optional
Page 103 of 228
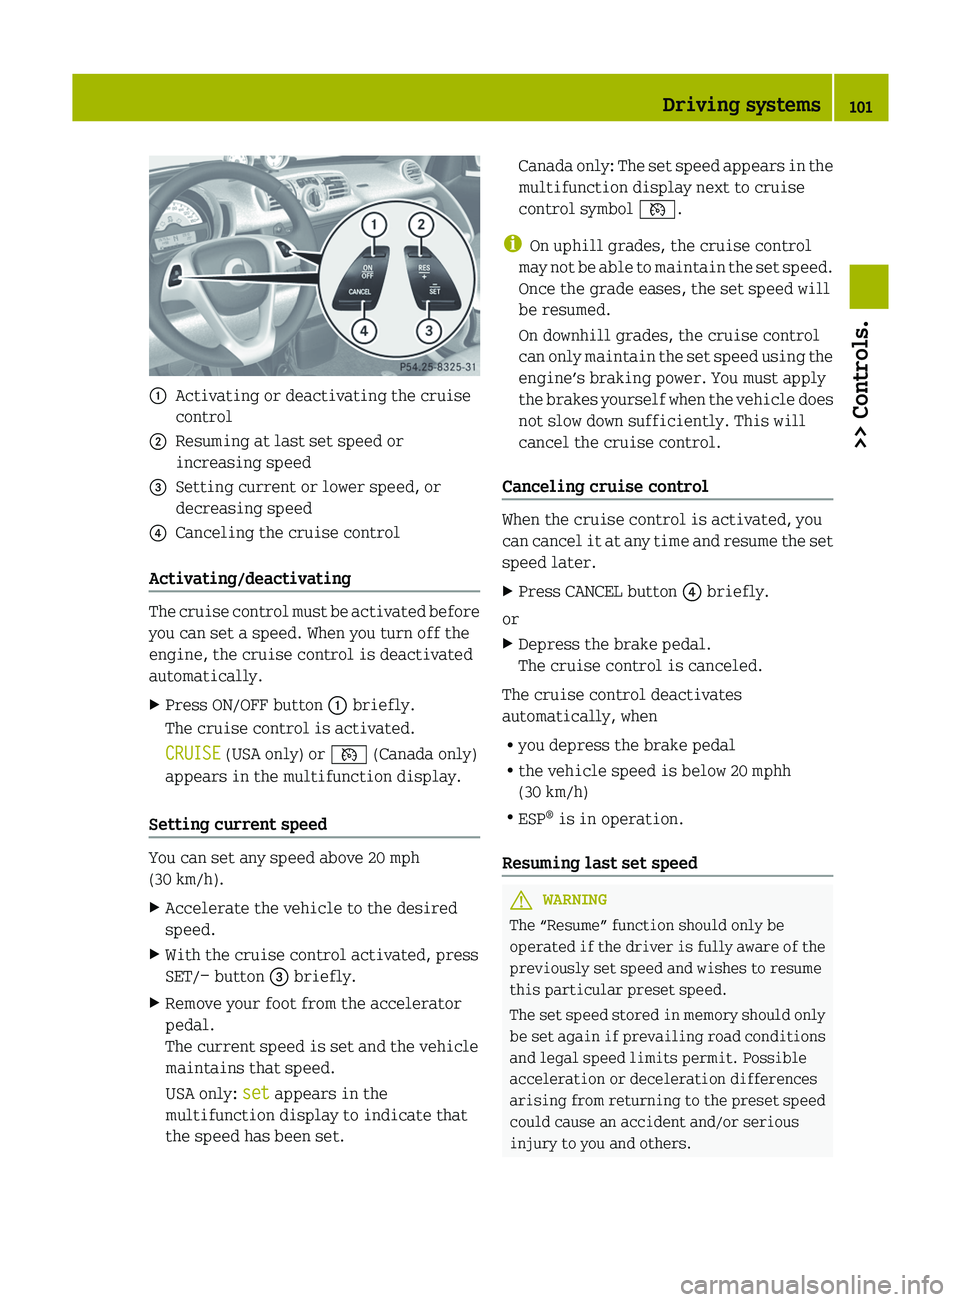
:
Activating or deactivating the cruise
control
; Resuming at last set speed or
increasing speed
= Setting current or lower speed, or
decreasing speed
? Canceling the cruise control
Activating/deactivating The cruise control must be activated before
you can set a speed. When you turn off the
engine, the cruise control is deactivated
automatically.
X
Press ON/OFF button : briefly.
The cruise control is activated.
CRUISE (USA only) or V (Canada only)
appears in the multifunction display.
Setting current speed You can set any speed above 20 mph
(30 km/h).
X
Accelerate the vehicle to the desired
speed.
X With the cruise control activated, press
SET/− button = briefly.
X Remove your foot from the accelerator
pedal.
The current speed is set and the vehicle
maintains that speed.
USA only: set appears in the
multifunction display to indicate that
the speed has been set. Canada only: The set speed appears in the
multifunction display next to cruise
control symbol V.
i On uphill grades, the cruise control
may
not be able to maintain the set speed.
Once the grade eases, the set speed will
be resumed.
On downhill grades, the cruise control
can only maintain the set speed using the
engine’s braking power. You must apply
the brakes yourself when the vehicle does
not slow down sufficiently. This will
cancel the cruise control.
Canceling cruise control When the cruise control is activated, you
can
cancel it at any time and resume the set
speed later.
X Press CANCEL button ? briefly.
or
X Depress the brake pedal.
The cruise control is canceled.
The cruise control deactivates
automatically, when
R you depress the brake pedal
R the vehicle speed is below 20 mphh
(30 km/h)
R ESP ®
is in operation.
Resuming last set speed G
WARNING
The “Resume” function should only be
operated
if the driver is fully aware of the
previously set speed and wishes to resume
this particular preset speed.
The set speed stored in memory should only
be set again if prevailing road conditions
and legal speed limits permit. Possible
acceleration or deceleration differences
arising from returning to the preset speed
could cause an accident and/or serious
injury to you and others. Driving systems
101
>> Controls. Z
Page 150 of 228
(Y page 217), for example when purchasing
new tires.
For
information on how to identify the tire
speed rating on a tire’s sidewall, see “Tire
size designation, load and speed rating”
(Y page 136).
If you are uncertain about the correct
reading of the information given on a
tire’s sidewall, any authorized smart
center will be glad to assist you.
i For information on speed ratings for
winter tires, see “All-season and winter
tires” ( Y page 137). Winter driving instructions
The
most important rule for slippery or icy
roads is to drive sensibly and to avoid
abrupt acceleration, braking and steering
maneuvers.
When the vehicle is in danger of skidding,
move gear selector lever to neutral
position N. Try to keep the vehicle under
control by corrective steering action.
For information on driving with snow
chains*, see “Snow chains*” (Y page 142). G
WARNING
On slippery road surfaces, never downshift
in order to obtain braking action. This
could result in drive wheel slip and
reduced
vehicle control. Your vehicle’s ABS
will not prevent this type of loss of control.
Road salts and chemicals can adversely
affect braking efficiency. Increased pedal
force may become necessary to produce the
normal braking effect.
Depressing the brake pedal periodically
when traveling at length on salt-strewn
roads can bring road-salt-impaired
braking efficiency back to normal.
If the vehicle is parked after being driven
on salt-treated roads, the braking
efficiency should be tested as soon as
possible after driving is resumed. G
WARNING
Make sure not to endanger any other road
users when carrying out these braking
maneuvers. G
WARNING
If the vehicle becomes stuck in snow, make
sure
snow is kept clear of the exhaust pipe
and from around the vehicle with the engine
running. Otherwise, deadly carbon
monoxide (CO) gases may enter vehicle
interior resulting in unconsciousness and
death.
To assure sufficient fresh air ventilation,
open a window slightly on the side of the
vehicle not facing the wind. G
WARNING
The outside temperature display is not
designed
to serve as an ice-warning device
and is therefore unsuitable for that
purpose. Indicated temperatures just
above the freezing point do not guarantee
that the road surface is free of ice.
For more information, see “Winter driving”
(Y page 142). Standing water
! Do not drive through flooded areas or
water of unknown depth. Before driving
through water, determine its depth.
Never accelerate before driving into
water. The bow wave could force water
into the engine and auxiliary
equipment, thus damaging them.
If you must drive through standing water,
drive
slowly to prevent water from entering
R the front compartment
R the engine compartment
R the passenger compartment
Water in these areas could cause damage to
electrical components or wiring of the
engine or transmission, or could result in 148
Driving instructions
>> Operation.
* optional
Page 159 of 228
>> Practical hints.Where will I find ...
.......................... 158
Display messages ............................. 158
What to do if ... ............................... 162
Unlocking/locking manually ...............176
Replacing transmitter battery ............177
Replacing bulbs ...............................
178
Replacing wiper blades ..................... 184
Flat tire ........................................ 186
Wheel change .................................. 194
Battery .......................................... 196
Jump starting .................................. 199
Towing .......................................... 202
Fuses ............................................ 205
Page 160 of 228
Where will I find ...
Tire repair kit
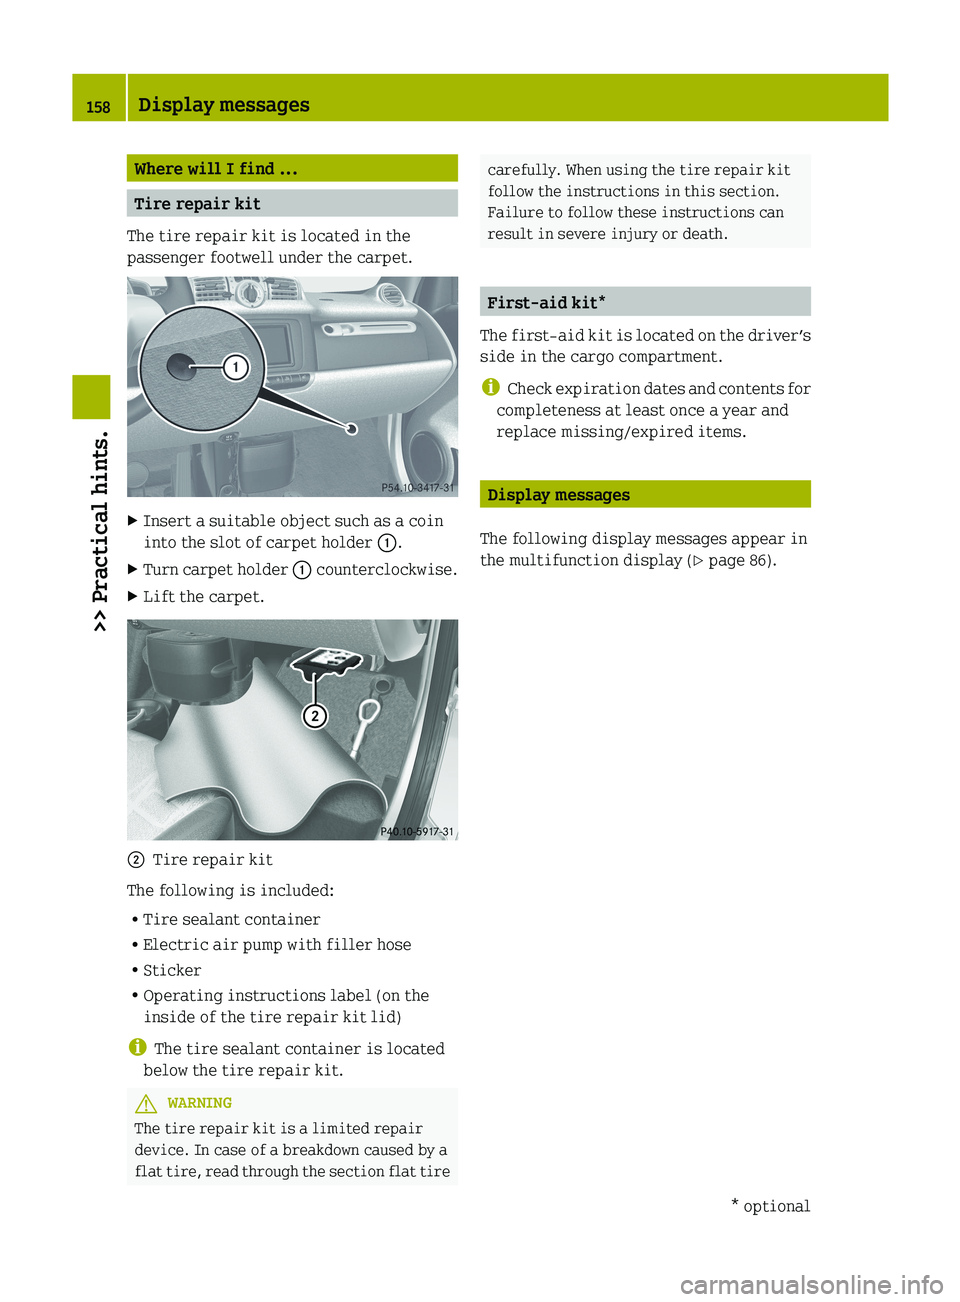
The tire repair kit is located in the
passenger footwell under the carpet. X
Insert a suitable object such as a coin
into the slot of carpet holder :.
X Turn carpet holder : counterclockwise.
X Lift the carpet. ;
Tire repair kit
The following is included:
R Tire sealant container
R Electric air pump with filler hose
R Sticker
R Operating instructions label (on the
inside of the tire repair kit lid)
i The tire sealant container is located
below the tire repair kit. G
WARNING
The tire repair kit is a limited repair
device. In case of a breakdown caused by a
flat
tire, read through the section flat tire carefully. When using the tire repair kit
follow the instructions in this section.
Failure to follow these instructions can
result in severe injury or death.
First-aid kit*
The
first-aid kit is located on the driver’s
side in the cargo compartment.
i Check expiration dates and contents for
completeness at least once a year and
replace missing/expired items. Display messages
The following display messages appear in
the multifunction display ( Y page 86).158
Display messages
>> Practical hints.
* optional
Page 161 of 228
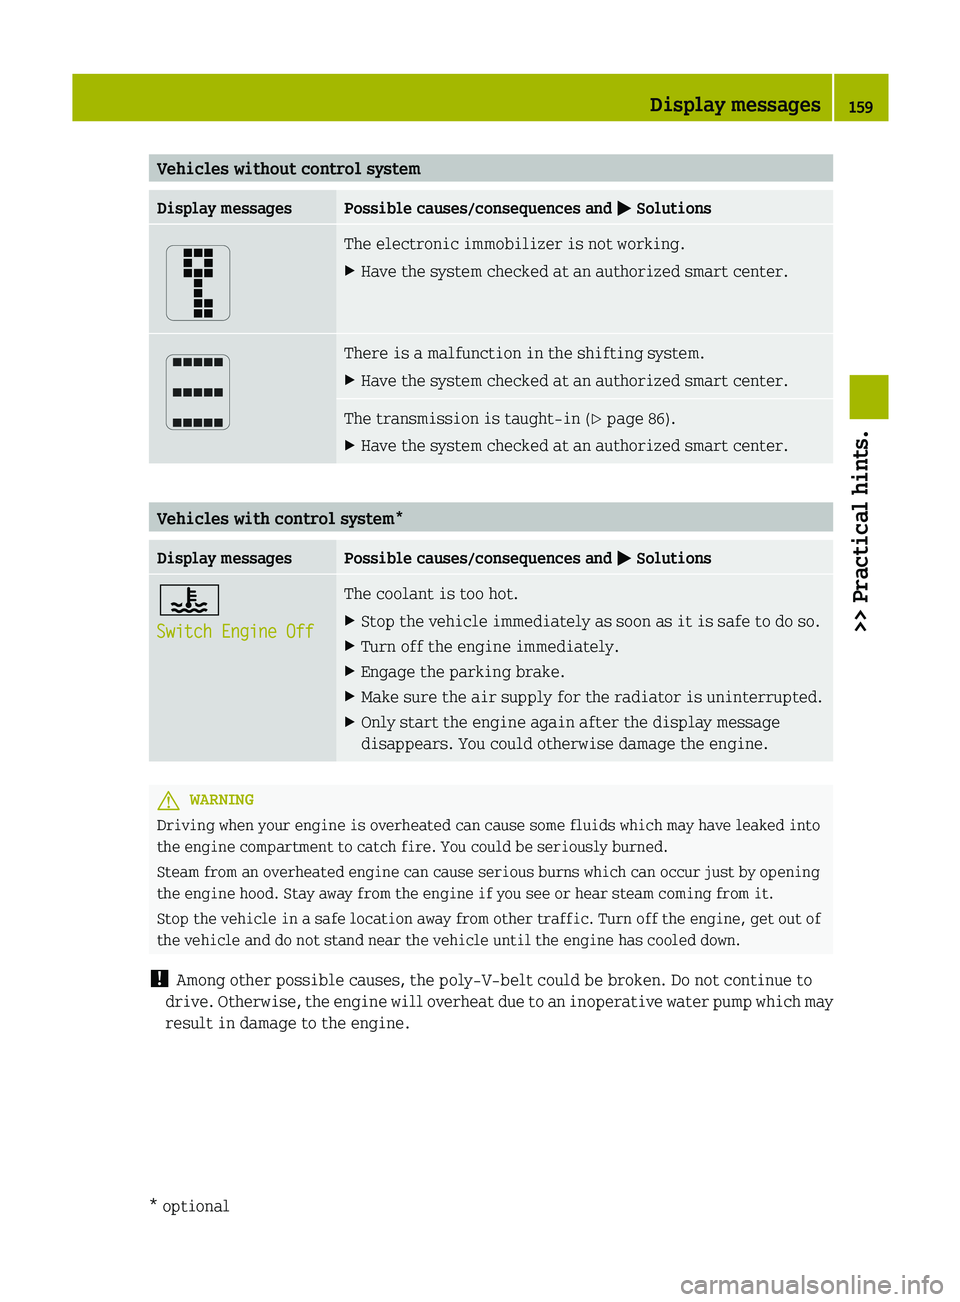
Vehicles without control system
Display messages Possible causes/consequences and
M Solutions The electronic immobilizer is not working.
X
Have the system checked at an authorized smart center. There is a malfunction in the shifting system.
X
Have the system checked at an authorized smart center. The transmission is taught-in (
Y page 86).
X Have the system checked at an authorized smart center. Vehicles with control system*
Display messages Possible causes/consequences and
M Solutions?
Switch Engine Off The coolant is too hot.
X
Stop the vehicle immediately as soon as it is safe to do so.
X Turn off the engine immediately.
X Engage the parking brake.
X Make sure the air supply for the radiator is uninterrupted.
X Only start the engine again after the display message
disappears. You could otherwise damage the engine. G
WARNING
Driving when your engine is overheated can cause some fluids which may have leaked into
the engine compartment to catch fire. You could be seriously burned.
Steam from an overheated engine can cause serious burns which can occur just by opening
the engine hood. Stay away from the engine if you see or hear steam coming from it.
Stop the vehicle in a safe location away from other traffic. Turn off the engine, get out of
the vehicle and do not stand near the vehicle until the engine has cooled down.
! Among other possible causes, the poly-V-belt could be broken. Do not continue to
drive.
Otherwise, the engine will overheat due to an inoperative water pump which may
result in damage to the engine. Display messages
159
>> Practical hints.
* optional Z