change time SSANGYONG KORANDO 1997 Service User Guide
[x] Cancel search | Manufacturer: SSANGYONG, Model Year: 1997, Model line: KORANDO, Model: SSANGYONG KORANDO 1997Pages: 2053, PDF Size: 88.33 MB
Page 458 of 2053
1F2 -- 40 M161 ENGINE CONTROLS
D AEW OO M Y_2000
FUEL SYSTEM
The function of the fuel metering system is to deliver the correct amount of fuel to the engine under all operating condi-
tions. The fuel is delivered to the engine by the individual fuel injectors mounted into the intake manifold near each
cylinder.
The main fuel control sensors are the Mass Air Flow (MAF) sensor and the oxygen (O2) sensors.
The MAF sensor monitors the mass flow of the air being drawn into the engine. An electrically heated element is
mounted in the intake air stream, where it is cooled by the flow of incoming air. Engine Control Module (ECM) modu-
lates the flow of heating current to maintain the temperature differential between the heated film and the intake air at a
constant level. The amount of heating current required to maintain the temperature thus provides an index for the
mass air flow. This concept automatically compensates for variations in air density, as this is one of the factors that
determines the amount of warmth that the surrounding air absorbs from the heated element. MAF sensor is located
between the air filter and the throttle valve.
Under high fuel demands, the MAF sensor reads a high mass flow condition, such as wide open throttle. The ECM
uses this information to enrich the mixture, thus increasing the fuel injector on-- time, to provide the correct amount of
fuel. When decelerating, the mass flow decreases. This mass flow change is sensed by the MAF sensor and read by
the ECM, which then decreases the fuel injector on-- time due to the low fuel demand conditions.
The O2 sensors are located in the exhaust pipe before catalytic converter. The O2 sensors indicate to the ECM the
amount of oxygen in the exhaust gas, and the ECM changes the air/fuel ratio to the engine by controlling the fuel
injectors. The best air/fuel ratio to minimize exhaust emissions is 14.7 to 1, which allows the catalytic converter to
operate most efficiently. Because of the constant measuring and adjusting of the air/fuel ratio, the fuel injection system
is called a “closed loop” system.
The ECM uses voltage inputs from several sensors to determine how much fuel to provide to the engine. The fuel is
delivered under one of several conditions, called ‘‘modes”.
Starting Mode
When the ignition is turned ON, the ECM turns the fuel pump relay on for 1 second. The fuel pump then builds fuel
pressure. The ECM also checks the Engine Coolant Temperature (ECT) sensor and the Throttle Position (TP) sensor
and determines the proper air/fuel ratio for starting the engine. This ranges from 1.5 to 1 at -- 36°C(--33°F) coolant
temperature to 14.7 to 1 at 94°C (201°F) coolant temperature. The ECM controls the amount of fuel delivered in the
starting mode by changing how long the fuel injector is turned on and off. This is done by ‘‘pulsing” the fuel injectors for
very short times.
Run Mode
The run mode has two conditions called ‘‘open loop” and ‘‘closed loop”.
Open Loop
When the engine is first started and it is above 690 rpm, thesystem goes into “open loop” operation. In “open loop”, the
ECM ignores the signal from the HO2S and calculates the air/fuel ratio based on inputs from the ECT sensor and the
MAF sensor. The ECM stays in “open loop” until the following conditions are met:
DThe O2 has a varying voltage output, showing that it is hot enough to operate properly.
DThe ECT sensor is above a specified temperature (22.5°C).
DA specific amount of time has elapsed after starting the engine.
Closed Loop
The specific values for the above conditions vary with different engines and are stored in the Electronically Erasable
Programmable Read -- Only Memory (EEPROM). When these conditions are met, thesystem goes into “closed loop”
operation. In “closed loop”, the ECM calculates the air/fuel ratio (fuel injector on-- time) based on the signals from the
O2 sensors. This allows the air/fuel ratio to stay very close to 14.7 to 1.
Acceleration Mode
The ECM responds to rapid changes in throttle position and airflow and provides extra fuel.
Deceleration Mode
The ECM responds to changes in throttle position and airflow and reduces the amount of fuel. When deceleration is
very fast, the ECM can cut off fuel completely for short periods of time.
Page 472 of 2053

1F2 -- 54 M161 ENGINE CONTROLS
D AEW OO M Y_2000
FUEL PRESSURE REGULATOR
YA A 1 F0 F0
Function of the Fuel Pressure Regulator
The fuel pressure regulator maintains the fuel pressure
in the fuel line with the pressure of 3.2 bars to 3.8 bars
according to the intake manifold pressure. This operat-
ing pressure cannot be changed, and the fuel injection
volume will be only determined by the injection time.
Over supplied fuel returns to the fuel tank through the
return line.
There is no negative pressure applied to the spring
chamber (9) during the full load, and it is separated from
the fuel chamber (8) by the diaphragm (5).
When the fuel pressure goes up, the diaphragm forces
the compression spring (6) in the direction of compres-
sion . At this moment, the valve (3) sticks to the dia-
phragm by the fuel pressure, and the fuel return line (2)
opens. The fuel over supplied returns to the fuel tank
through the return line.
YAA1F490
2. Fuel return line
3. Valve
5. Diaphragm
6. Compression Spring
8. Fuel Chamber
9. Spring Chamber
A. Valves Closed
B. Valves Opened
Page 478 of 2053

1F2 -- 60 M161 ENGINE CONTROLS
D AEW OO M Y_2000
HOT FILM AIR MASS (HFM) SENSOR
YAA1F570
The Hot Film Air Mass (HFM) sensor with recognition of flow direction related to pulsating flow is designed for record-
ing load on Engine Control Module (ECM) by measuring the output voltage proportional to the reference voltage of the
ECM.
Mass Air Flow Sensor
Mass Air Flow (MAF) is a thermal flow meter whose sensor element with its temperature sensors and heating area is
exposed to the MAF to be measured. A heating area located in the center of a thin membrane is controlled to an over --
temperature by a heating resistor and a temperature sensor of this membrane. And the value of over -- temperature
depends on the temperature of the in-- flowing air.
Two temperature sensors on upstream and downstream of the heating area show the same temperature without in-
coming flow. With incoming flow, upstream part is cooled down but downstream temperature retains its temperature
more or less due to the air heated up in the heating area. This temperature difference in quantity and direction depends
on the direction of the incoming flow.
ECM modulates the flow of heating current to maintain the temperature differential between the heated film and the
intake air at a constant level. The amount of heating current required to maintain the temperature thus provides an
index for the MAF. This concept automatically compensates for variations in air density, as this is one of the factors that
determines the amount of warmth that the surrounding air absorbs from the heated element. MAF sensor is located
between the air filter and the throttle valve.
Under high fuel demands, the MAF sensor reads a high mass flow condition, such as Wide Open Throttle (WOT). The
ECM uses this information to enrich the mixture, thus increasing the fuel injector on-- time, to provide the correct
amount of fuel. When decelerating, the mass flow decreases. This mass flow change is sensed by the MAF sensor
and read by the ECM, which then decreases the fuel injector on-- time due to the low fuel demand conditions.
To facilitate the installation of the HFM in the intake passage, lubricating agents may be used. However, when lubri-
cants are used care must be taken to ensure that they do not enter the flow passage and cannot be sucked in with the
air flow.
Page 956 of 2053
SSANGYONG MY2002
4D-6 FRONT BRAKES
KAA4D080
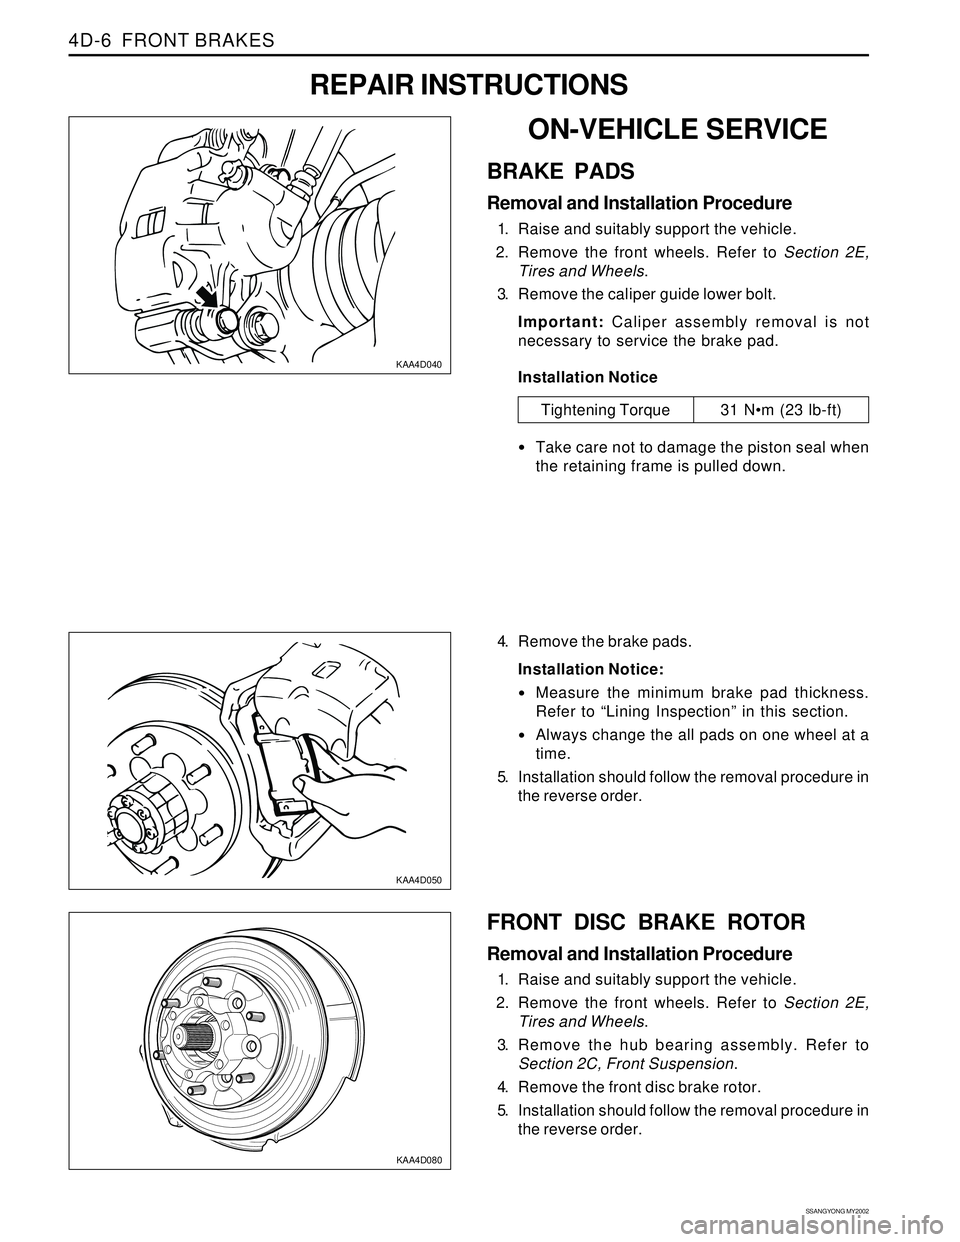
FRONT DISC BRAKE ROTOR
Removal and Installation Procedure
1. Raise and suitably support the vehicle.
2. Remove the front wheels. Refer to Section 2E,
Tires and Wheels.
3. Remove the hub bearing assembly. Refer to
Section 2C, Front Suspension.
4. Remove the front disc brake rotor.
5. Installation should follow the removal procedure in
the reverse order.
KAA4D040
REPAIR INSTRUCTIONS
ON-VEHICLE SERVICE
BRAKE PADS
Removal and Installation Procedure
1. Raise and suitably support the vehicle.
2. Remove the front wheels. Refer to Section 2E,
Tires and Wheels.
3. Remove the caliper guide lower bolt.
Important: Caliper assembly removal is not
necessary to service the brake pad.
Installation Notice
Take care not to damage the piston seal when
the retaining frame is pulled down.
Tightening Torque 31 Nm (23 lb-ft)
KAA4D050
4. Remove the brake pads.
Installation Notice:
Measure the minimum brake pad thickness.
Refer to “Lining Inspection” in this section.
Always change the all pads on one wheel at a
time.
5. Installation should follow the removal procedure in
the reverse order.
Page 1019 of 2053
SSANGYONG MY2002
4F-36 ABS AND TCS
SELF-DIAGNOSTICS
Important: The electronic brake control module (EBCM)
turns the valve relay off when a diagnostic trouble code
(DTC) is set. The scan tool will indicate that the valve
relay is off when it is used to monitor the data list. This
is normal and should not be considered a mal-function.
The EBCM performs system self-diagnostics and can
detect and often isolate system malfunctions. When it
detects a malfunction, the EBCM sets a DTC that repre
sents the malfunction, turns on the ABS and/or the
TCS indicators in most instances, and may disable the
ABS and/or the TCS functions, as necessary, for the
duration of the ignition cycle.
Once each ignition cycle, the EBCM performs an auto-
matic test when the vehicle reaches 2.75 km/h (1.7
mph). In the course of this test, the system cycles
each valve solenoid and the pump motor, along with
the necessary relays, to check component operation.
If the EBCM detects any malfunctions, it will set a
DTC as described above.
DISPLAYING DTCs
Tools Required
Scan Tool
DTCs can be read through the use of the scan tool.
CLEARING DTCs
Tools Required
Scan Tool
The diagnostic trouble codes (DTCs) in the electronic
brake control module (EBCM) memory are erased in
one of two ways:
Use the scan tool “Clear DTCs” selection.
After 249 DTC-free ignition cycles.
These two methods are detailed below. Be sure to verify
the proper system operation and, the absence of DTCs
when the clearing procedure is completed.The EBCM will not permit DTC clearing until all DTCs
have been displayed. Also, DTCs cannot be cleared
by disconnecting the EBCM, disconnecting the battery
cables, or turning the ignition switch to LOCK.
Scan Tool Method
The scan tool can clear ABS/TCS system DTCs using
the mass storage cartridge.
1. Install the scan tool and the mass storage
cartridge.
2. Select “Fault Memory”.
3. Select “Clear Fault Memory”.
Clearing the fault memory cannot reset a valve relay
which was shut down when the fault was recognized.
Changes are possible only after the fault has been elimi-
nated and the next ignition cycle has begun.
Ignition Cycle Default
A DTC is erased from memory after 249 ignition cycles
without any reappearance of that malfunction.
INTERMITTENTS AND POOR
CONNECTIONS
As with most electronic systems, intermittent malfunc
tions may be difficult to diagnose accurately. The follow-
ing is a method to try to isolate an intermittent
malfunction, especially in wheel speed circuitry.
If an ABS malfunction occurs, the ABS indicator will
illuminate during the ignition cycle in which the
malfunction was detected. If it is an intermittent problem
which seems to have corrected itself (ABS indicator
OFF), a history DTC will be stored. Also stored will be
the history data of the DTC at the time the malfunction
occurred. Use the scan tool modular diagnostic system
to read ABS history data.
Most intermittents are caused by faulty electrical con
nections or wiring, although a sticking relay or solenoid
can occasionally be at fault.
Page 1097 of 2053

AUTOMATIC TRANSMISSION 5A-3
SSANGYONG MY2002
N - Neutral allows the engine to be started and oper-
ated while driving the vehicle. The inhibitor switch
allows the engine to be started. There is no power
transferred through the transmission in Neutral. But
the final drive is not locked by the parking pawl, so
thewheels are free to rotate.
D - Overdrive range is used for all normal driving
conditions. 4th gear (overdrive gear) reduces the
fuel consumption and the engine noise. Engine
braking is applied with reduced throttle.
First to second (1 → 2), first to third (1 → 3), second
to third (2 → 3), second to fourth (2 → 4), third to
fourth (3 → 4), fourth to third (4 → 3), fourth to
second (4 → 2), third to second (3 → 2), third to
first (3 → 1) and second to first (2 → 1) shifts are
all available as a function of vehicle speed, throttle
position and the time change rate of the throttle
position.
Downshifts are available for safe passing by
depress-ing the accelerator. Lockup clutch may be
enabled in 3rd and 4th gears depending on vehicle
type.
3 - Manual 3 provides three gear ratios (first through
third) and prevents the transmission from operating
in 4th gear. 3rd gear is used when driving on long
hill roads or in heavy city traffic. Downshifts are
available by depressing the accelerator.
2 - Manual 2 provides two gear ratios (first and
second). It is used to provide more power when
climbing hills or engine braking when driving down
a steep hill or starting off on slippery roads.
1 - Manual 1 is used to provide the maximum engine
braking when driving down the severe gradients.When NORMAL mode is selected upshifts will occur
to maximize fuel economy. When POWER mode is se-
lected, upshifts will occur to give maximum
performance and the POWER mode indicator light is
switched ON.
When WINTER mode is selected, starting in second
gear is facilitated, the WINTER mode indicator light is
switched ON and the POWER mode indicator light is
switched OFF.
Indicator Light
The indicator light is located on the instrument panel.
Auto shift indicator light comes ON when the ignition
switch ON and shows the gear shift control lever
position.
POWER mode indicator light comes ON when the
POWER mode is selected and when the kickdown
switch is depressed.
WINTER mode indicator light comes ON when the
WINTER mode is selected.
CONTROL SYSTEMS
BTRA M74 4WD automatic transmission consists of
two control systems. One is the electronic control
system that monitors vehicle parameters and adjusts
the transmission performance. Another is the hydraulic
control system that implements the commands of the
electronic control system commands.
ELECTRONIC CONTROL SYSTEM
The electronic control system comprises of sensors, a
TCM and seven solenoids. The TCM reads the inputs
and activates the outputs according to values stored
in Read Only Memory (ROM).
The TCM controls the hydraulic control system. This
control is via the hydraulic valve body, which contains
seven electromagnetic solenoids. Six of the seven
solenoids are used to control the line pressure, operate
the shift valves and the torque converter lock-up clutch,
and to turn ON and OFF the two regulator valves that
control the shift feel.
The seventh solenoid is the proportional or Variable
Pressure Solenoid (VPS) which works with the two regu-
lator valves to control shift feel.
Transmission Control Module (TCM)
The TCM is an in-vehicle micro-processor based trans-
mission management system. It is mounted under the
driver’s side front seat in the vehicle cabin.
The TCM contains:
Processing logic circuits which include a central mi-
croprocessor controller and a back-up memory
system.
Input circuits.
Driving Mode Selector
The driving mode selector consists of a driving mode
selector switch and indicator light. The driving mode
selector is located on the center console and allows
the driver to select the driving mode.
The driving modes available to be selected vary with
vehicle types. Typically the driver should have the
option to select among NORMAL, POWER and
WINTER modes.
KAA5A020
Page 1098 of 2053
5A-4 AUTOMATIC TRANSMISSION
SSANGYONG MY2002
Output circuits which control external devices such
as the Variable Pressure Solenoid (VPS) driver, On/
Off solenoid drivers, a diagnostics output and the
driving mode indicator light.
Processing Logic
Shift schedule and calibration information is stored in
an Erasable Programmable Read Only Memory (EPROM).
Throttle input calibration constants and the diagnostics
information are stored in Electrically Erasable Program-
mable Read Only Memory (EEPROM) that retains the
memory even when power to the TCM is disconnected.
TCM continuously monitors the input values and uses
these, via the shift schedule, to determine the required
gear state. At the same time it monitors, via the solenoid
outputs, the current gear state, whenever the input
conditions change such that the required gear state is
different to the current gear state, the TCM initiates a
gear shift to bring the two states back into line.
Once the TCM has determined the type of gearshift
required the TCM accesses the shift logic, estimates
the engine torque output, adjusts the variable pressure
solenoid ramp pressure then executes the shift.The TCM continuously monitors every input and output
circuit for short or open circuits and operating range.
When a failure or abnormal operation is detected the
TCM records the condition code in the diagnostics
memory and implements a Limp Home Mode (LHM).
The actual limp home mode used depends upon the
failure detected with the object to maintain maximum
drive-ability without damaging the transmission. In
general input failures are handled by providing a default
value. Output failures, which are capable of damaging
the transmission, result in full limp mode giving only
third or fourth gear and reverse. For further details of
limp modes and memory retention refer to the
Diagnostic Trouble Code Diagnosis Section.
The TCM is designed to operate at ambient
temperatures between - 40 and 85 °C (- 40 and 185 °F).
It is also protected against electrical noise and voltage
spikes, however all the usual precautions should be
observed, for example when arc welding or jump
starting.
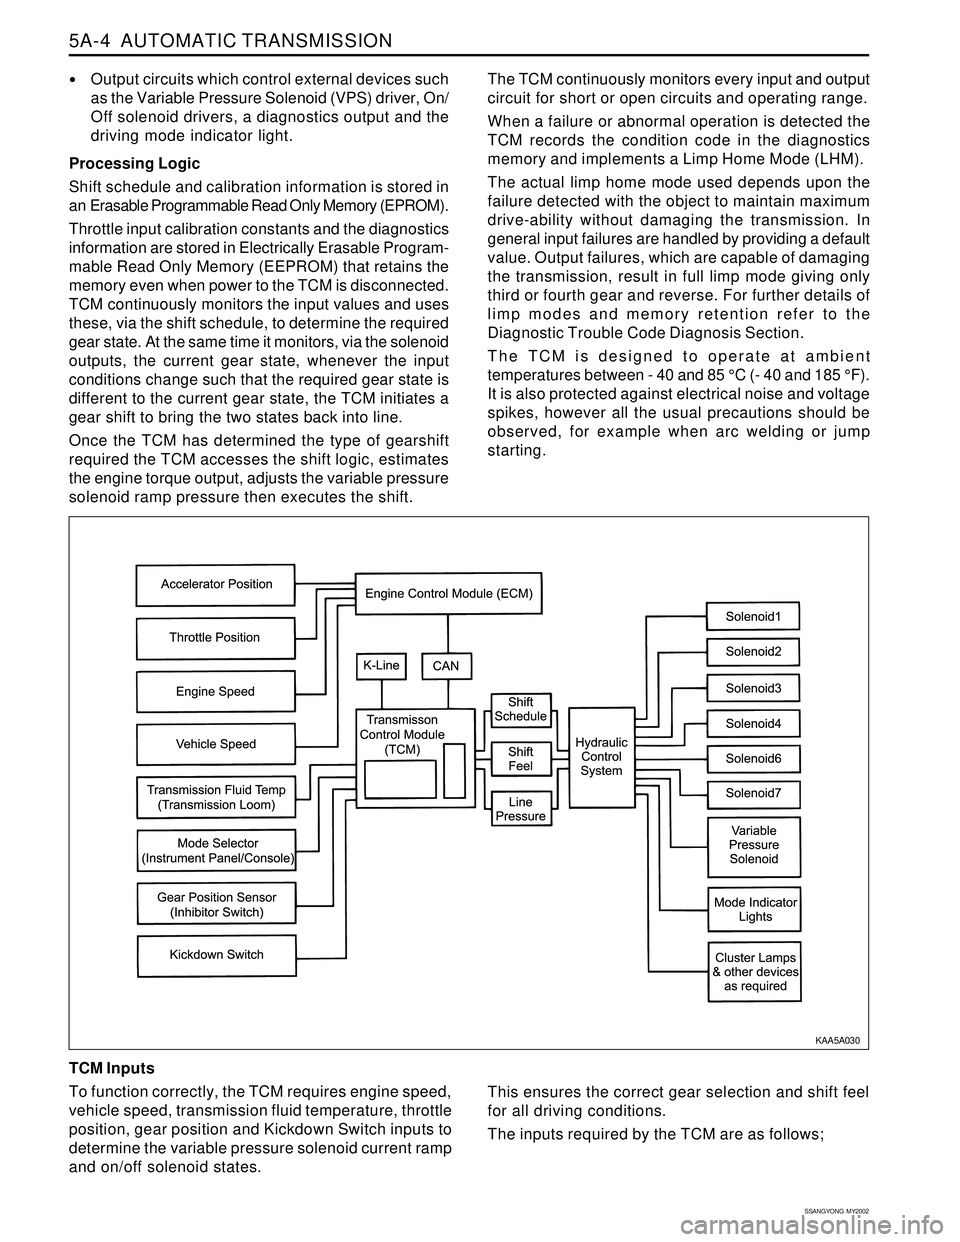
TCM Inputs
To function correctly, the TCM requires engine speed,
vehicle speed, transmission fluid temperature, throttle
position, gear position and Kickdown Switch inputs to
determine the variable pressure solenoid current ramp
and on/off solenoid states.
KAA5A030
This ensures the correct gear selection and shift feel
for all driving conditions.
The inputs required by the TCM are as follows;
Page 1106 of 2053
5A-12 AUTOMATIC TRANSMISSION
SSANGYONG MY2002
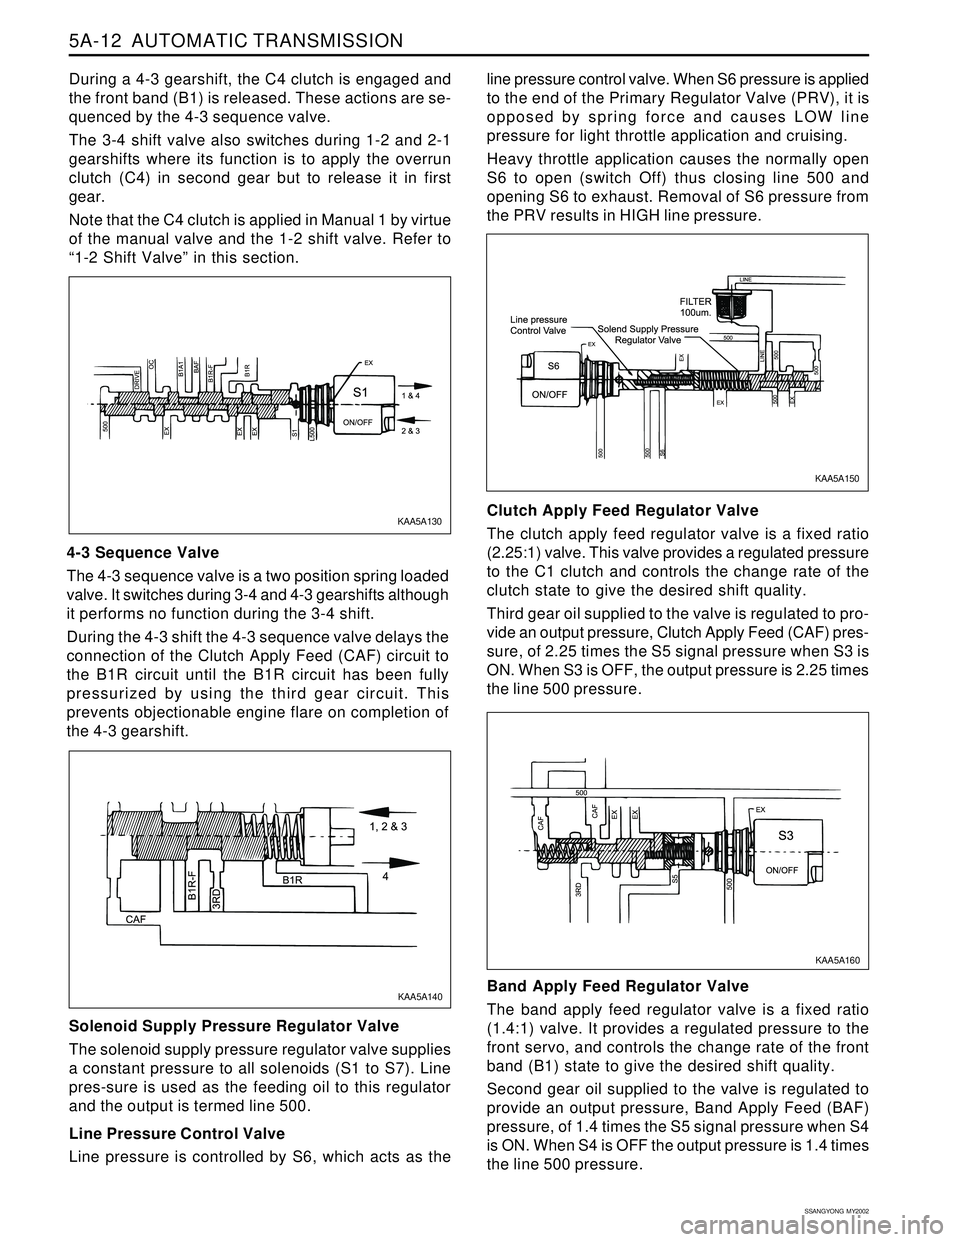
During a 4-3 gearshift, the C4 clutch is engaged and
the front band (B1) is released. These actions are se-
quenced by the 4-3 sequence valve.
The 3-4 shift valve also switches during 1-2 and 2-1
gearshifts where its function is to apply the overrun
clutch (C4) in second gear but to release it in first
gear.
Note that the C4 clutch is applied in Manual 1 by virtue
of the manual valve and the 1-2 shift valve. Refer to
“1-2 Shift Valve” in this section.
4-3 Sequence Valve
The 4-3 sequence valve is a two position spring loaded
valve. It switches during 3-4 and 4-3 gearshifts although
it performs no function during the 3-4 shift.
During the 4-3 shift the 4-3 sequence valve delays the
connection of the Clutch Apply Feed (CAF) circuit to
the B1R circuit until the B1R circuit has been fully
pressurized by using the third gear circuit. This
prevents objectionable engine flare on completion of
the 4-3 gearshift.
Solenoid Supply Pressure Regulator Valve
The solenoid supply pressure regulator valve supplies
a constant pressure to all solenoids (S1 to S7). Line
pres-sure is used as the feeding oil to this regulator
and the output is termed line 500.
Line Pressure Control Valve
Line pressure is controlled by S6, which acts as theline pressure control valve. When S6 pressure is applied
to the end of the Primary Regulator Valve (PRV), it is
opposed by spring force and causes LOW line
pressure for light throttle application and cruising.
Heavy throttle application causes the normally open
S6 to open (switch Off) thus closing line 500 and
opening S6 to exhaust. Removal of S6 pressure from
the PRV results in HIGH line pressure.
Clutch Apply Feed Regulator Valve
The clutch apply feed regulator valve is a fixed ratio
(2.25:1) valve. This valve provides a regulated pressure
to the C1 clutch and controls the change rate of the
clutch state to give the desired shift quality.
Third gear oil supplied to the valve is regulated to pro-
vide an output pressure, Clutch Apply Feed (CAF) pres-
sure, of 2.25 times the S5 signal pressure when S3 is
ON. When S3 is OFF, the output pressure is 2.25 times
the line 500 pressure.
Band Apply Feed Regulator Valve
The band apply feed regulator valve is a fixed ratio
(1.4:1) valve. It provides a regulated pressure to the
front servo, and controls the change rate of the front
band (B1) state to give the desired shift quality.
Second gear oil supplied to the valve is regulated to
provide an output pressure, Band Apply Feed (BAF)
pressure, of 1.4 times the S5 signal pressure when S4
is ON. When S4 is OFF the output pressure is 1.4 times
the line 500 pressure.
KAA5A160 KAA5A130
KAA5A150
KAA5A140
Page 1151 of 2053

5A-56 AUTOMATIC TRANSMISSION
SSANGYONG MY2002
Circuit Description
The Transmission Range (TR) sensor is incorporated
in the inhibitor switch mounted on the side of the
transmis sion case. The TR sensor Indicates to the
TCM which gear position has been selected by way of
a varying resistance.
The TR sensor signal has discrete values indicating
the positions selected by the gear shift control lever
(PRND321). The Transmission Control Module (TCM)
receives that signal with a voltage varying from 0 V to
5 V. DTC P0707 sets when the TR sensor signal is
faulty, causing the gear lever position signal to be less
than 0.87 V.
Conditions for Setting the DTC
TR sensor signal is less than 0.87 V.
The above condition must be continuously present
for 100 milliseconds.
Action Taken When the DTC Sets
The Malfunction Indicator Lamp (MIL) will illuminate
on the second consecutive driving cycle with the
DTC present.
The EOBD system will record operating conditions
at the time the diagnostic fails. This information will
be stored in the Failure Records buffer.
Transmission range is assumed to be in the Drive
position.
The transmission is limited to 2nd and R gears only.
Namely 1st, 3rd and 4th gears are inhibited.
Torque Converter Clutch (TCC) is disabled.
DIAGNOSTIC TROUBLE CODE (DTC) P0707
TRANSMISSION RANGE SENSOR CIRCUIT LOW INPUT
Conditions for Clearing the DTC
The DTC will clear when the malfunction has not
occurred for 3 seconds.
A history DTC will clear after 40 TCM power-up
cycles with a warm transmission (>50 °C) and
without a fault.
History DTCs can be cleared by using a scan tool.
Diagnostic Aids
The voltage measured by the TCM across the TR
sensor input terminals has been below on
acceptable level for a significant length of time.
This would typically be caused by a short to ground
in the wiring to, or within, the inhibitor switch which
has caused the signal at the TCM to read about 0
V.
Inspect the wiring for poor electrical connections
at the TCM and at the TR sensor connector. Look
for possible bent, deformed or damaged terminals.
Also, check for chafed wires that could short to bare
metal or other wiring.
In searching for a possible intermittent short or open
condition, move or massage the wiring harness
while observing the test equipment for a change.
Test Description
The number(s) below refer to the step number(s) on
the Diagnostic Table.
3. This step simulates a DTC P0708 condition. If the
scan tool displays the specified value, the TR
sensor signal circuit and the TCM are OK.
KAA5A5LA
Page 1153 of 2053

5A-58 AUTOMATIC TRANSMISSION
SSANGYONG MY2002
Circuit Description
The Transmission Range (TR) sensor is incorporated
in the inhibitor switch mounted on the side of the
transmission case. The TR sensor Indicates to the
TCM which gear position has been selected by way of
a varying resistance.
The TR sensor signal has discrete values indicating
the positions selected by the gear shift control lever
(PRND321). The Transmission Control Module (TCM)
receives that signal with a voltage varying from 0 V to
5 V.
The transmission range sensor is faulty, causing the
gear lever position signal to be greater than 4.12 V.
Conditions for Setting the DTC
TR sensor signal is greater than 4.12 V.
The above condition must be continuously present
for 100 milliseconds.
Action Taken When the DTC Sets
The Malfunction Indicator Lamp (MIL) will illuminate
on the second consecutive driving cycle with the
DTC present.
The EOBD system will record operating conditions
at the time the diagnostic fails. This information
will be stored in the Failure Records buffer.
Transmission range (gear lever) is assumed to be
in the Drive position.
The transmission is limited to 2nd and R gears only.
Namely 1st, 3rd and 4th gears are inhibited.
Torque Converter Clutch (TCC) is disabled.
Manually initiated downshifts will not be available.
DIAGNOSTIC TROUBLE CODE (DTC) P0708
TRANSMISSION RANGE SENSOR CIRCUIT HIGH INPUT
Conditions for Clearing the DTC
The DTC will clear when the malfunction has not
occurred for 3 seconds.
A history DTC will clear after 40 TCM power-up
cycles with a warm transmission (>50°C) and
without a fault.
History DTCs can be cleared by using a scan tool.
Diagnostic Aids
The voltage measured by the TCM across the shift
lever input terminals has been above an acceptable
level for a significant length of time.
This would typically be caused by a loose
connection or an open or short to B+ in the wiring
to, or within, the inhibitor switch which has caused
the signal at the TCM to read 5 V.
If the DTC sets when an accessory is operated,
check for a poor connection or excessive current
draw.
Inspect the wiring for poor electrical connections
at the TCM and at the TR sensor connector. Look
for possible bent, backed out, deformed or damaged
terminals. Check for weak terminal tension as well.
Also, check for chafed wires that could short to
other wiring. Inspect for broken wires inside the
insulation.
In searching for a possible intermittent short or open
condition, move or massage the wiring harness
while observing test equipment for a change.
KAA5A5LA