service SSANGYONG KORANDO 1997 Service User Guide
[x] Cancel search | Manufacturer: SSANGYONG, Model Year: 1997, Model line: KORANDO, Model: SSANGYONG KORANDO 1997Pages: 2053, PDF Size: 88.33 MB
Page 32 of 2053
1A1 -- 12 GENERAL ENGINE INFORMATION
D AEW OO M Y_2000
GENERAL INFORMATION
CLEANLINESS AND CARE
An automobile engine is a combination of many ma-
chined, honed, polished and lapped surfaces with toler-
ances that are measured in the ten-thousandths of an
inch. When any internal engine parts are serviced, care
and cleanliness are important. A liberal coating of enigne
oil should be applied to friction areas during assembly, to
protect and lubricate the surfaces on initial operation.
Proper cleaning and protection of machined surfaces and
friction areas is part of the repair procedure. This is con-
sidered standard shop practice even if not specifically
stated.
Whenever valve train components are removed for ser-
vice, they should be kept in order. They should be
installed in the same locations, and with the same mating
surfaces, as when they were removed.
Battery cables should be disconnected before any major
work is performed on the engine. Failure to disconnectcables may result in damage to wire harness or other
electrical parts.
ON-ENGINE SERVICE
Caution: Disconnect the negative battery cable be -
fore removing or installing any electrical unit, or
when a tool or equipment could easily come in con-
tact with exposed electrical terminals. Disconnect -
ing this cable will help prevent personal injury and
damage to the vehicle. The ignition must also be in
LOCK unless otherwise noted.
Notice:Any time the air cleaner is removed, the intake
opening should be covered. Thiswill protect against ac-
cidental entrance of foreign material, which could follow
the intake passage into the cylinder and cause exten-
sive damage when the engine is started.
Page 33 of 2053
D AEW OO M Y_2000
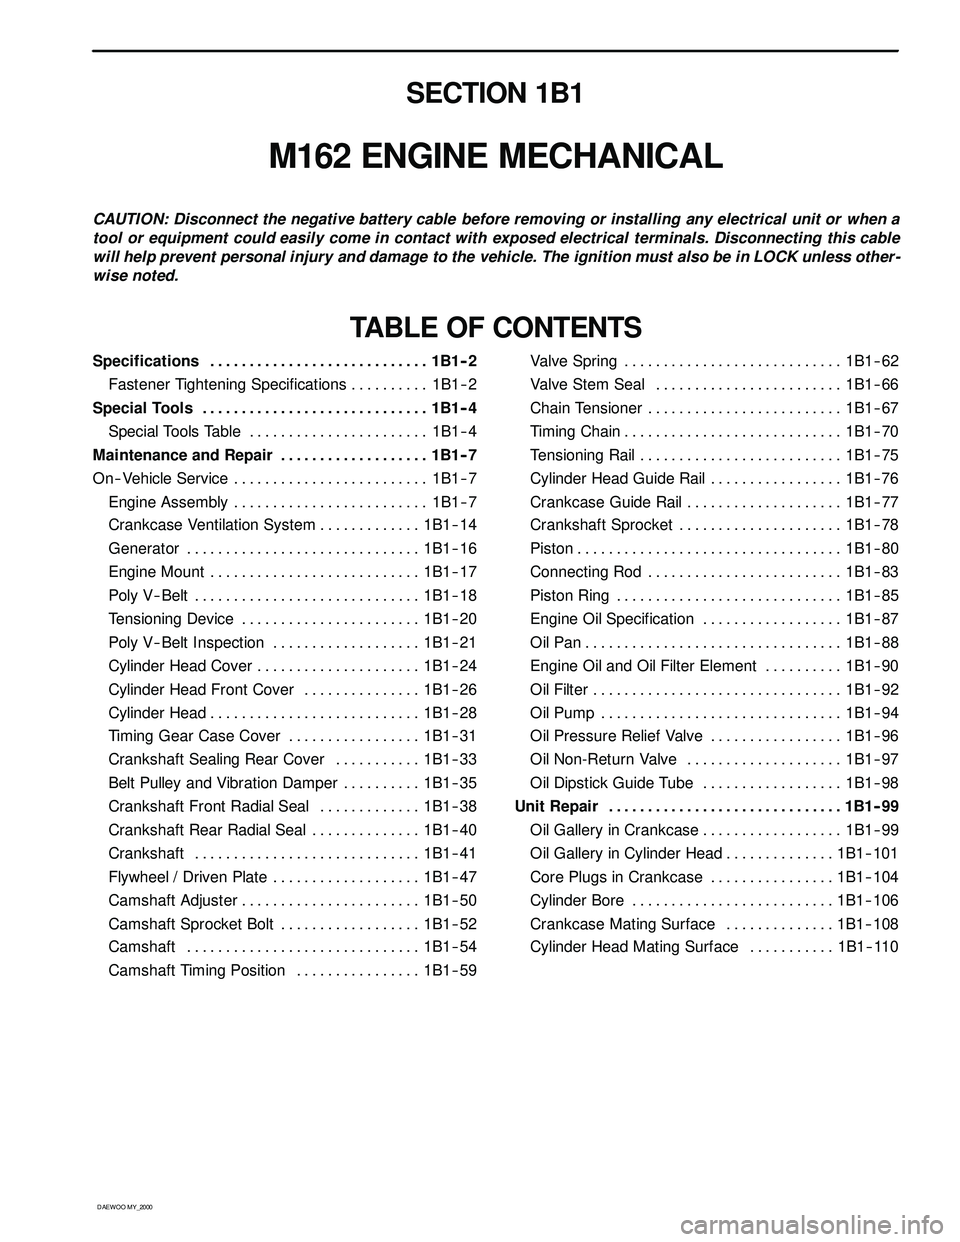
SECTION 1B1
M162 ENGINE MECHANICAL
CAUTION: Disconnect the negative battery cable before removing or installing any electrical unit or when a
tool or equipment could easily come in contact with exposed electrical terminals. Disconnecting this cable
will help prevent personal injury and damage to the vehicle. The ignition must also be in LOCK unless other -
wise noted.
TABLE OF CONTENTS
Specifications 1B1 -- 2............................
Fastener Tightening Specifications 1B1 -- 2..........
Special Tools 1B1 -- 4.............................
Special Tools Table 1B1-- 4.......................
Maintenance and Repair 1B1 -- 7...................
On-- Vehicle Service 1B1-- 7.........................
Engine Assembly 1B1-- 7.........................
Crankcase Ventilation System 1B1-- 14.............
Generator 1B1-- 16..............................
Engine Mount 1B1-- 17...........................
Poly V-- Belt 1B1 -- 18.............................
Tensioning Device 1B1-- 20.......................
Poly V-- Belt Inspection 1B1-- 21...................
Cylinder Head Cover 1B1-- 24.....................
Cylinder Head Front Cover 1B1 -- 26...............
Cylinder Head 1B1-- 28...........................
Timing Gear Case Cover 1B1-- 31.................
Crankshaft Sealing Rear Cover 1B1-- 33...........
Belt Pulley and Vibration Damper 1B1-- 35..........
Crankshaft Front Radial Seal 1B1-- 38.............
Crankshaft Rear Radial Seal 1B1-- 40..............
Crankshaft 1B1-- 41.............................
Flywheel / Driven Plate 1B1 -- 47...................
Camshaft Adjuster 1B1-- 50.......................
Camshaft Sprocket Bolt 1B1-- 52..................
Camshaft 1B1-- 54..............................
Camshaft Timing Position 1B1 -- 59................Valve Spring 1B1 -- 62............................
Valve Stem Seal 1B1-- 66........................
Chain Tensioner 1B1-- 67.........................
Timing Chain 1B1-- 70............................
Tensioning Rail 1B1-- 75..........................
Cylinder Head Guide Rail 1B1-- 76.................
Crankcase Guide Rail 1B1-- 77....................
Crankshaft Sprocket 1B1-- 78.....................
Piston 1B1-- 80..................................
Connecting Rod 1B1-- 83.........................
Piston Ring 1B1 -- 85.............................
Engine Oil Specification 1B1-- 87..................
Oil Pan 1B1-- 88.................................
Engine Oil and Oil Filter Element 1B1-- 90..........
Oil Filter 1B1-- 92................................
Oil Pump 1B1-- 94...............................
Oil Pressure Relief Valve 1B1-- 96.................
Oil Non-Return Valve 1B1-- 97....................
Oil Dipstick Guide Tube 1B1-- 98..................
Unit Repair 1B1 -- 99..............................
Oil Gallery in Crankcase 1B1 -- 99..................
Oil Gallery in Cylinder Head 1B1-- 101..............
Core Plugs in Crankcase 1B1-- 104................
Cylinder Bore 1B1-- 106..........................
Crankcase Mating Surface 1B1-- 108..............
Cylinder Head Mating Surface 1B1-- 110...........
Page 39 of 2053
M162 ENGINE MECHANICAL 1B1 -- 7
D AEW OO M Y_2000
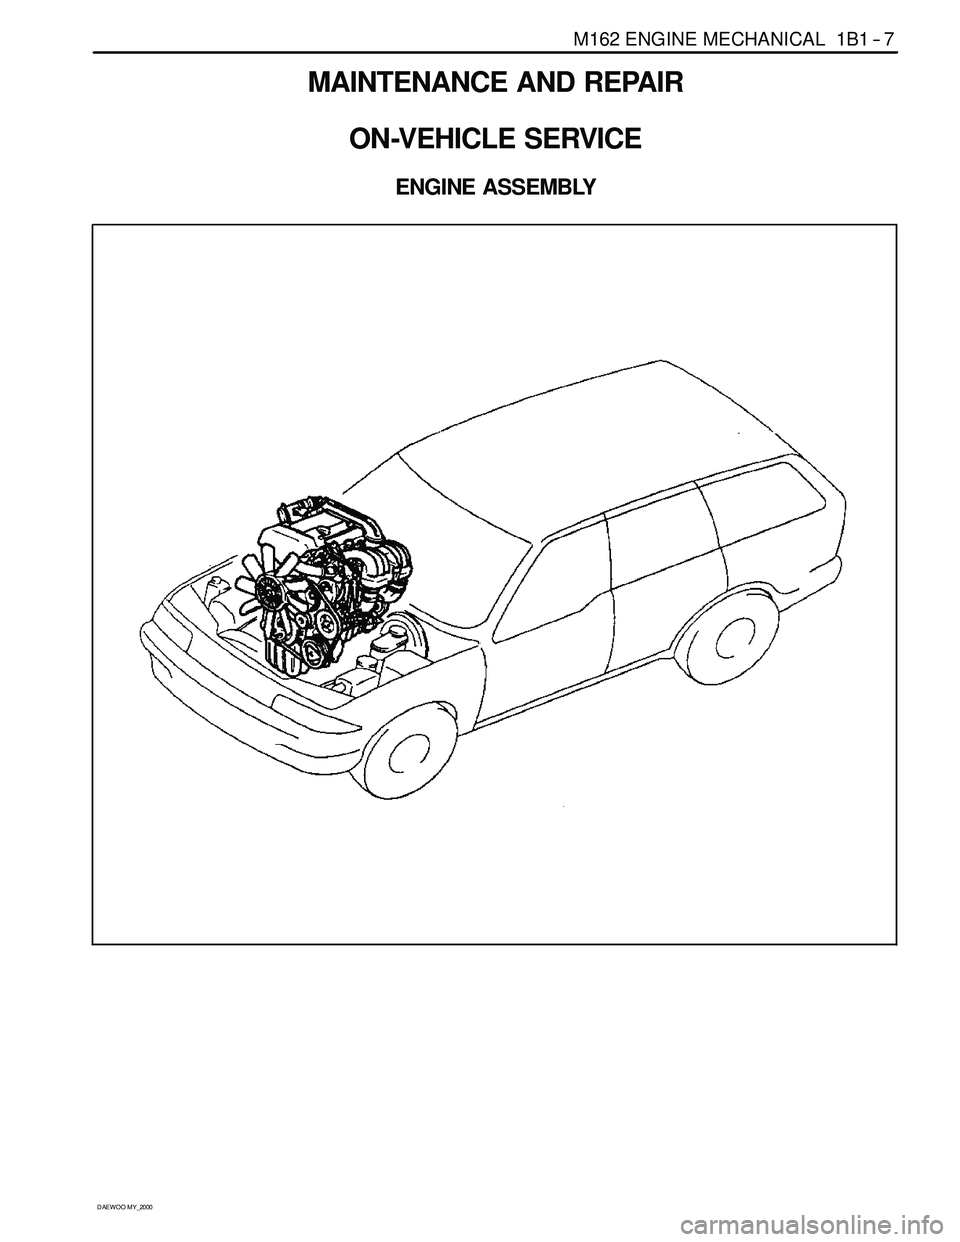
MAINTENANCE AND REPAIR
ON-VEHICLE SERVICE
ENGINE ASSEMBLY
Page 68 of 2053

1B1 -- 36 M162 ENGINE MECHANICAL
D AEW OO M Y_2000
Components
1 Center Bolt (M18 x 50)
2 Center Bolt Washer
3 Vibration Damper and Pulley Assembly
4Key
5 Crankshaft Front Seal
6 Timing Gear Case Cover7 Crankshaft Sprocket (Camshaft Driven)
8 Crankshaft Sprocket (Oil pump Driven)
9 Crankshaft
10 Oil Pan
11 Oil Pan Gasket
12 Oil Pan Mounting Bolt (M6 x 22)
ServiceDataStandard
Permissble Deviation of The Vibration DamperRadial Runout0.6 mmp
Axial Runout0.6 mm
Page 75 of 2053
M162 ENGINE MECHANICAL 1B1 -- 43
D AEW OO M Y_2000
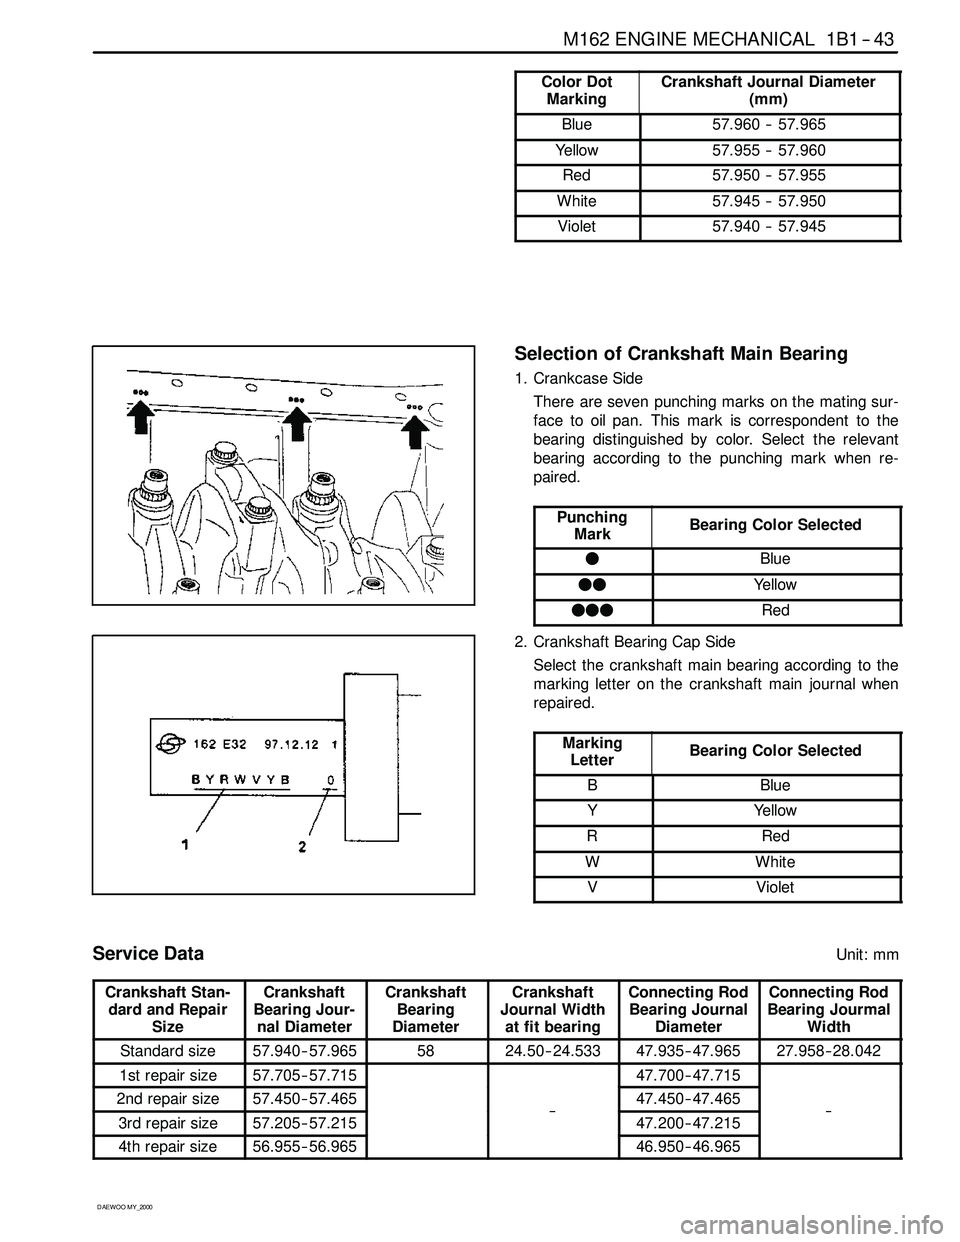
Color Dot
MarkingCrankshaft Journal Diameter
(mm)
Blue57.960 -- 57.965
Yellow57.955 -- 57.960
Red57.950 -- 57.955
White57.945 -- 57.950
Violet57.940 -- 57.945
Selection of Crankshaft Main Bearing
1. Crankcase Side
There are seven punching marks on the mating sur-
face to oil pan. This mark is correspondent to the
bearing distinguished by color. Select the relevant
bearing according to the punching mark when re-
paired.
Punching
Mark
Bearing Color Selected
FBlue
FFYellow
FFFRed
2. Crankshaft Bearing Cap Side
Select the crankshaft main bearing according to the
marking letter on the crankshaft main journal when
repaired.
Marking
Letter
Bearing Color Selected
BBlue
YYellow
RRed
WWhite
VViolet
Service DataUnit: mm
Crankshaft Stan-
dard and Repair
SizeCrankshaft
Bearing Jour-
nal DiameterCrankshaft
Bearing
DiameterCrankshaft
Journal Width
at fit bearingConnecting Rod
Bearing Journal
DiameterConnecting Rod
Bearing Jourmal
Width
Standard size57.940-- 57.9655824.50-- 24.53347.935-- 47.96527.958-- 28.042
1st repair size57.705-- 57.71547.700-- 47.715
2nd repair size57.450-- 57.46547.450-- 47.465
3rd repair size57.205-- 57.215--47.200-- 47.215--
4th repair size56.955-- 56.96546.950-- 46.965
Page 78 of 2053
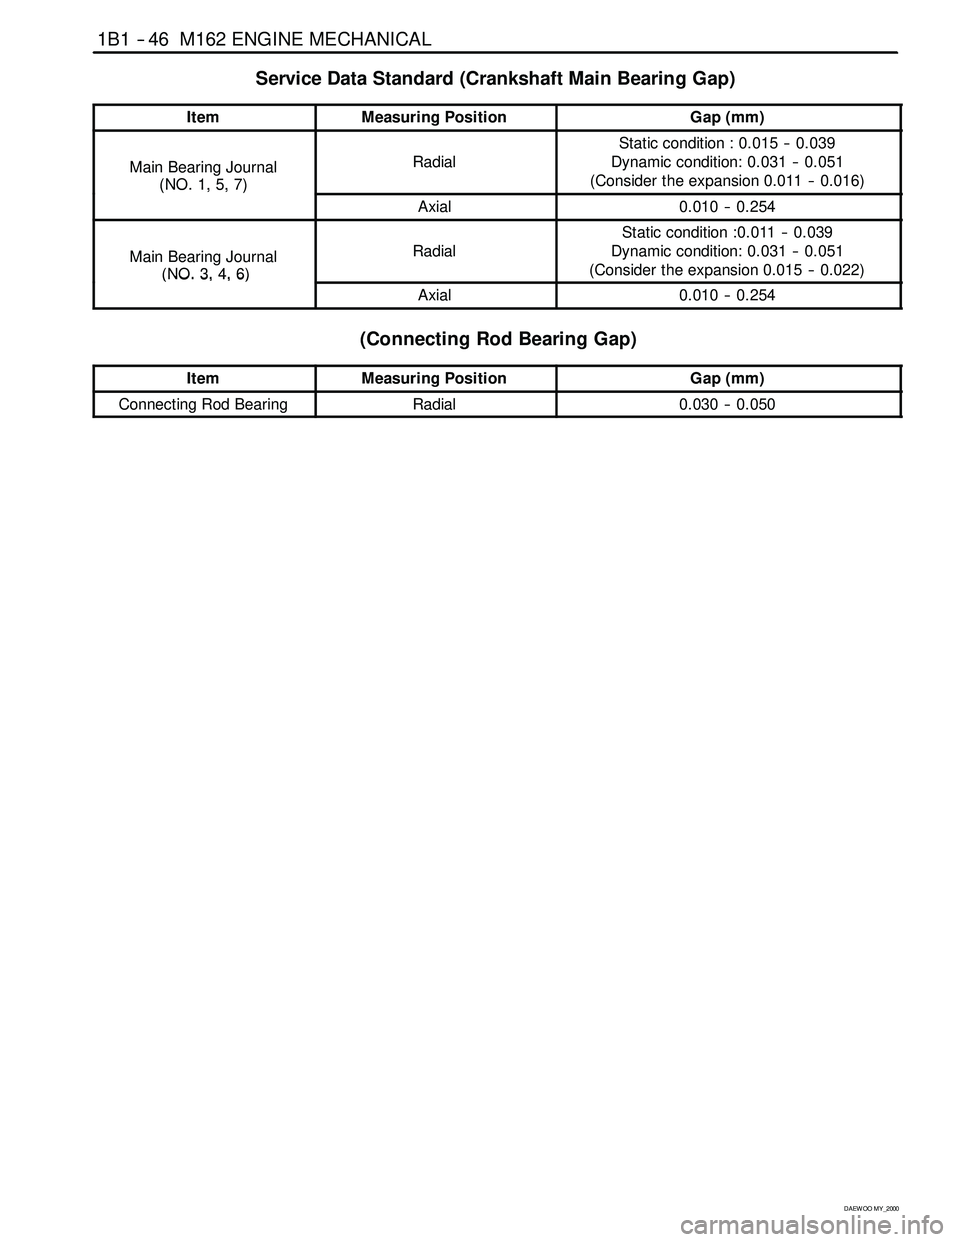
1B1 -- 46 M162 ENGINE MECHANICAL
D AEW OO M Y_2000
Service Data Standard (Crankshaft Main Bearing Gap)
ItemMeasuring PositionGap (mm)
Main Bearing Journal
(NO.1,5,7)
Radial
Static condition : 0.015 -- 0.039
Dynamic condition: 0.031 -- 0.051
(Consider the expansion 0.011 -- 0.016)
(NO.1,5,7)
Axial0.010 -- 0.254
Main Bearing Journal
(NO. 3,4,6)
Radial
Static condition :0.011 -- 0.039
Dynamic condition: 0.031 -- 0.051
(Consider the expansion 0.015 -- 0.022)
(NO.3,4,6)
Axial0.010 -- 0.254
(Connecting Rod Bearing Gap)
ItemMeasuring PositionGap (mm)
Connecting Rod BearingRadial0.030 -- 0.050
Page 79 of 2053
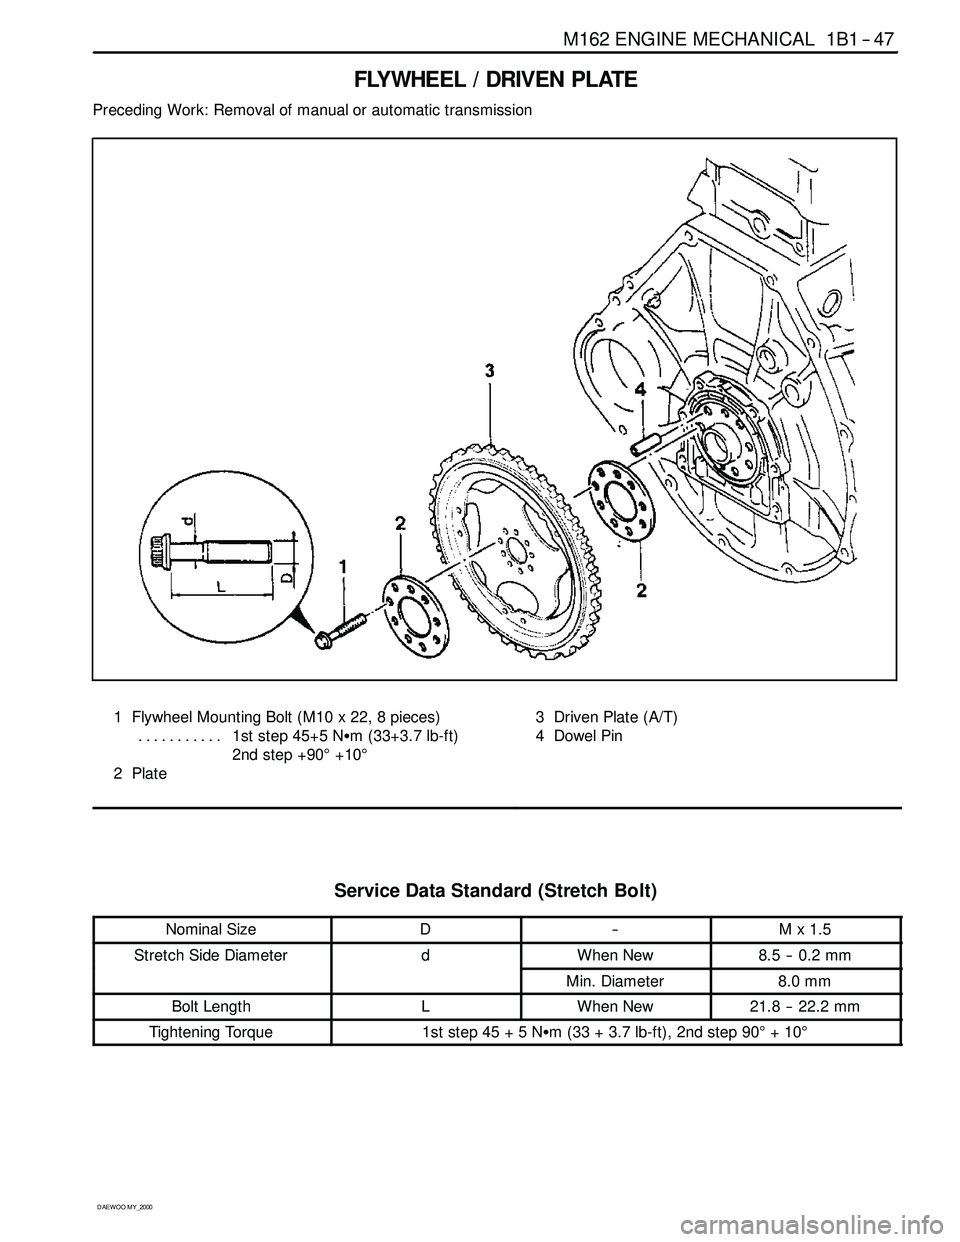
M162 ENGINE MECHANICAL 1B1 -- 47
D AEW OO M Y_2000
FLYWHEEL / DRIVEN PLATE
Preceding Work: Removal of manual or automatic transmission
1 Flywheel Mounting Bolt (M10 x 22, 8 pieces)
1st step 45+5 NSm (33+3.7 lb-ft) ...........
2nd step +90°+10°
2Plate3 Driven Plate (A/T)
4 Dowel Pin
Service Data Standard (Stretch Bolt)
Nominal SizeD--Mx1.5
Stretch Side DiameterdWhen New8.5 -- 0.2 mm
Min. Diameter8.0 mm
Bolt LengthLWhen New21.8 -- 22.2 mm
Tightening Torque1ststep45+5NSm (33 + 3.7 lb-ft), 2nd step 90°+10°
Page 109 of 2053
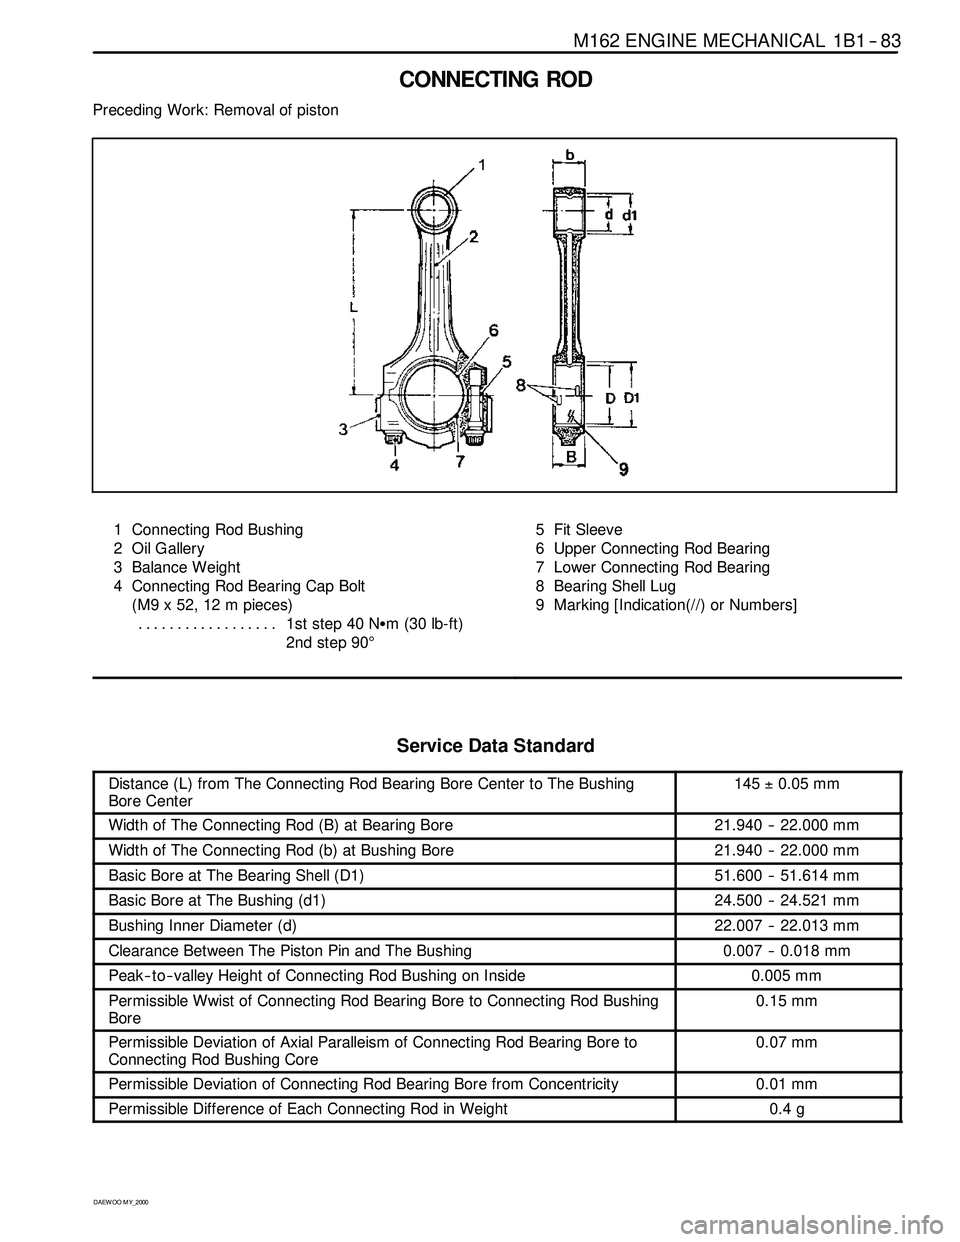
M162 ENGINE MECHANICAL 1B1 -- 83
D AEW OO M Y_2000
CONNECTING ROD
Preceding Work: Removal of piston
1 Connecting Rod Bushing
2 Oil Gallery
3 Balance Weight
4 Connecting Rod Bearing Cap Bolt
(M9 x 52, 12 m pieces)
1ststep40NSm (30 lb-ft) ..................
2nd step 90°5 Fit Sleeve
6 Upper Connecting Rod Bearing
7 Lower Connecting Rod Bearing
8 Bearing Shell Lug
9 Marking [Indication(//) or Numbers]
ServiceDataStandard
Distance (L) from The Connecting Rod Bearing Bore Center to The Bushing
Bore Center145±0.05 mm
Width of The Connecting Rod (B) at Bearing Bore21.940 -- 22.000 mm
Width of The Connecting Rod (b) at Bushing Bore21.940 -- 22.000 mm
Basic Bore at The Bearing Shell (D1)51.600 -- 51.614 mm
Basic Bore at The Bushing (d1)24.500 -- 24.521 mm
Bushing Inner Diameter (d)22.007 -- 22.013 mm
Clearance Between The Piston Pin and The Bushing0.007 -- 0.018 mm
Peak -- to-- valley Height of Connecting Rod Bushing on Inside0.005 mm
Permissible Wwist of Connecting Rod Bearing Bore to Connecting Rod Bushing
Bore0.15 mm
Permissible Deviation of Axial Paralleism of Connecting Rod Bearing Bore to
Connecting Rod Bushing Core0.07 mm
Permissible Deviation of Connecting Rod Bearing Bore from Concentricity0.01 mm
Permissible Difference of Each Connecting Rod in Weight0.4 g
Page 133 of 2053
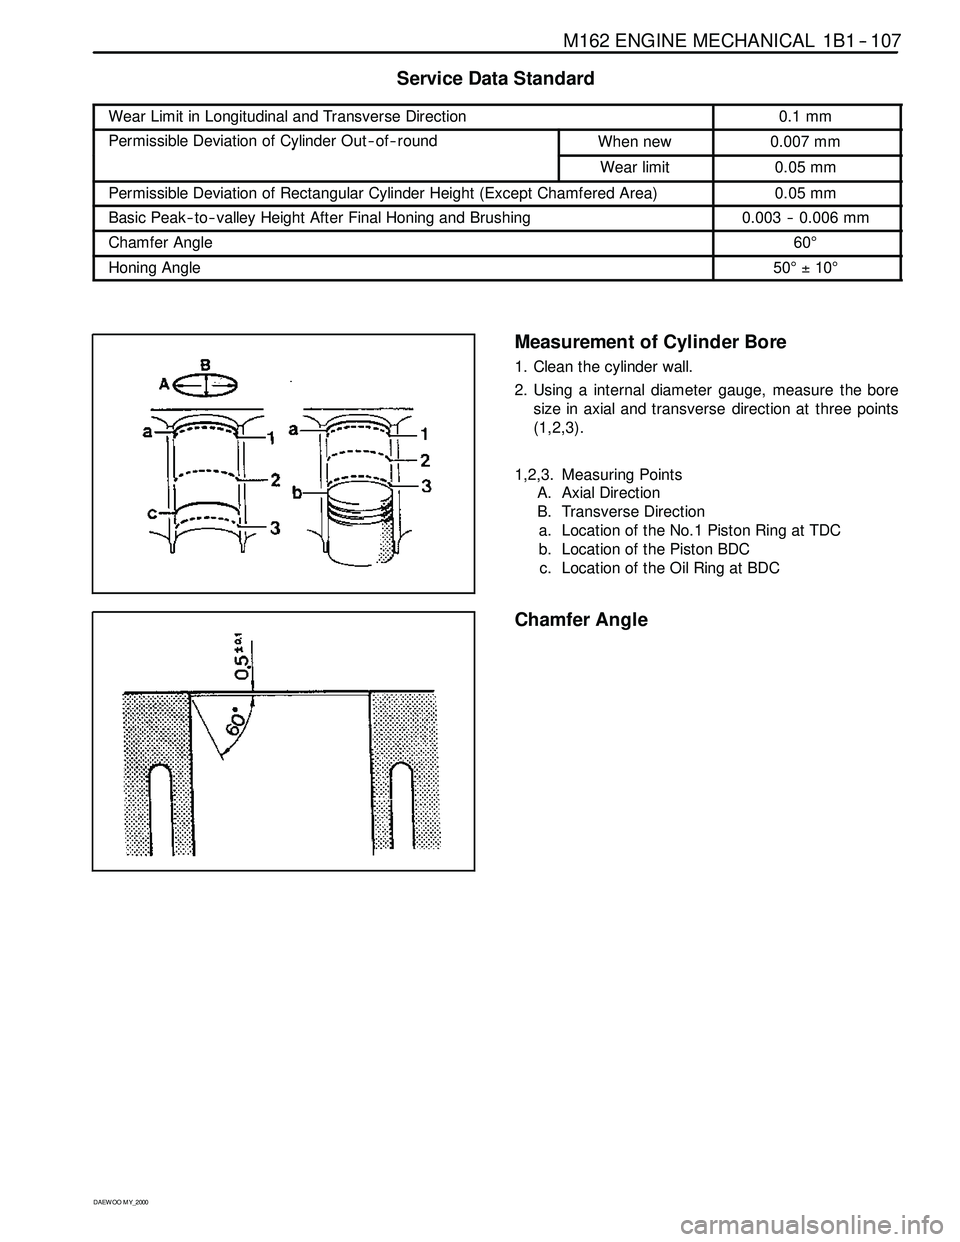
M162 ENGINE MECHANICAL 1B1 -- 107
D AEW OO M Y_2000
ServiceDataStandard
Wear Limit in Longitudinal and Transverse Direction0.1 mm
Permissible Deviation of Cylinder Out -- of -- roundWhen new0.007 mmy
Wear limit0.05 mm
Permissible Deviation of Rectangular Cylinder Height (Except Chamfered Area)0.05 mm
Basic Peak -- to-- valley Height After Final Honing and Brushing0.003 -- 0.006 mm
Chamfer Angle60°
Honing Angle50°±10°
Measurement of Cylinder Bore
1. Clean the cylinder wall.
2. Using a internal diameter gauge, measure the bore
size in axial and transverse direction at three points
(1,2,3).
1,2,3. Measuring Points
A. Axial Direction
B. Transverse Direction
a. Location of the No.1 Piston Ring at TDC
b. Location of the Piston BDC
c. Location of the Oil Ring at BDC
Chamfer Angle
Page 134 of 2053
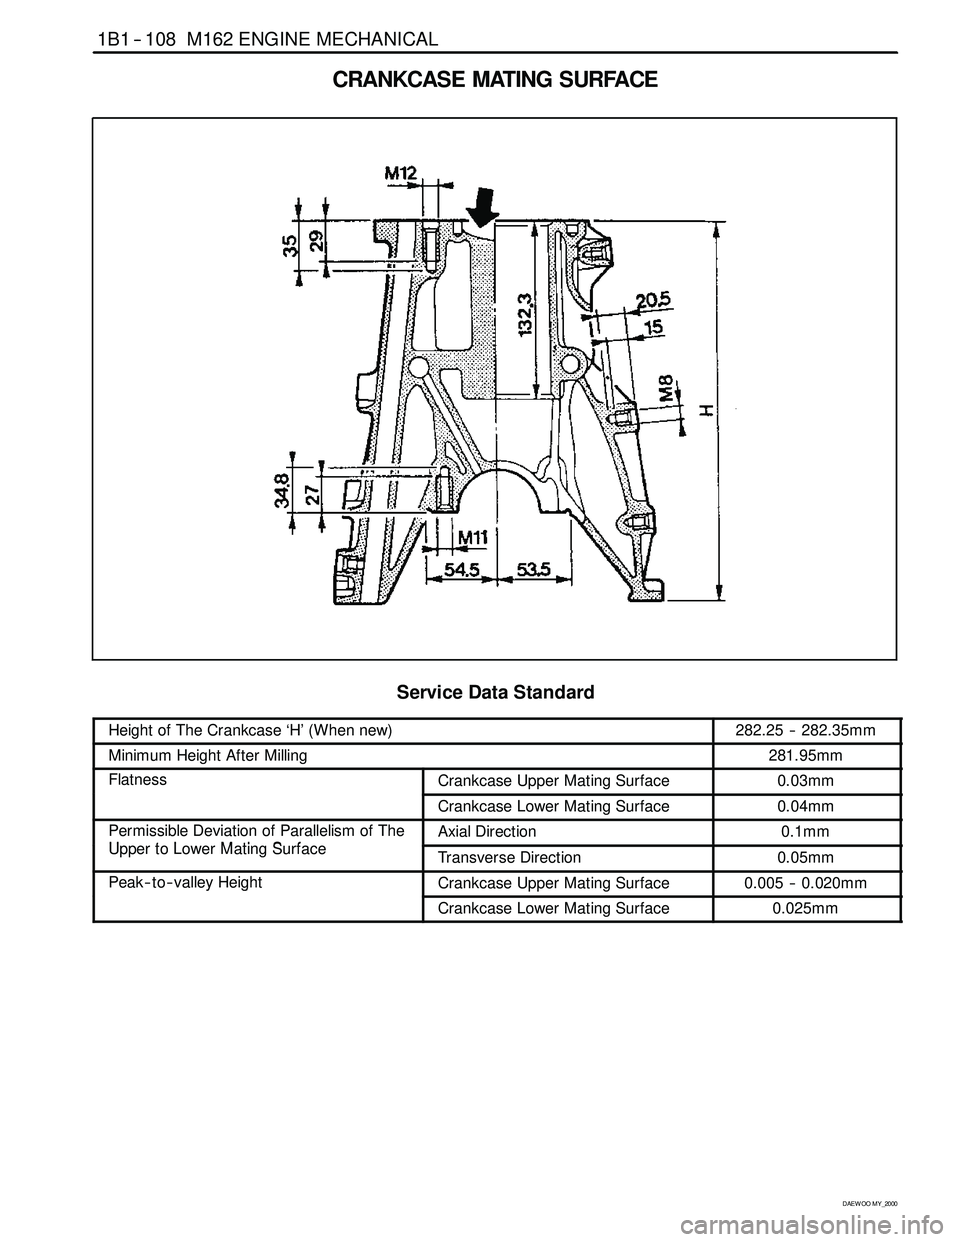
1B1 -- 108 M162 ENGINE MECHANICAL
D AEW OO M Y_2000
CRANKCASE MATING SURFACE
ServiceDataStandard
Height of The Crankcase ‘H’ (When new)282.25 -- 282.35mm
Minimum Height After Milling281.95mm
FlatnessCrankcase Upper Mating Surface0.03mm
Crankcase Lower Mating Surface0.04mm
Permissible Deviation of Parallelism of The
UtLMtiSf
Axial Direction0.1mm
Upper to Lower Mating SurfaceTransverse Direction0.05mm
Peak -- to-- valley HeightCrankcase Upper Mating Surface0.005 -- 0.020mmyg
Crankcase Lower Mating Surface0.025mm