engine SSANGYONG KORANDO 1997 Service Repair Manual
[x] Cancel search | Manufacturer: SSANGYONG, Model Year: 1997, Model line: KORANDO, Model: SSANGYONG KORANDO 1997Pages: 2053, PDF Size: 88.33 MB
Page 320 of 2053

M161 ENGINE MECHANICAL 1B2 -- 27
D AEW OO M Y_2000
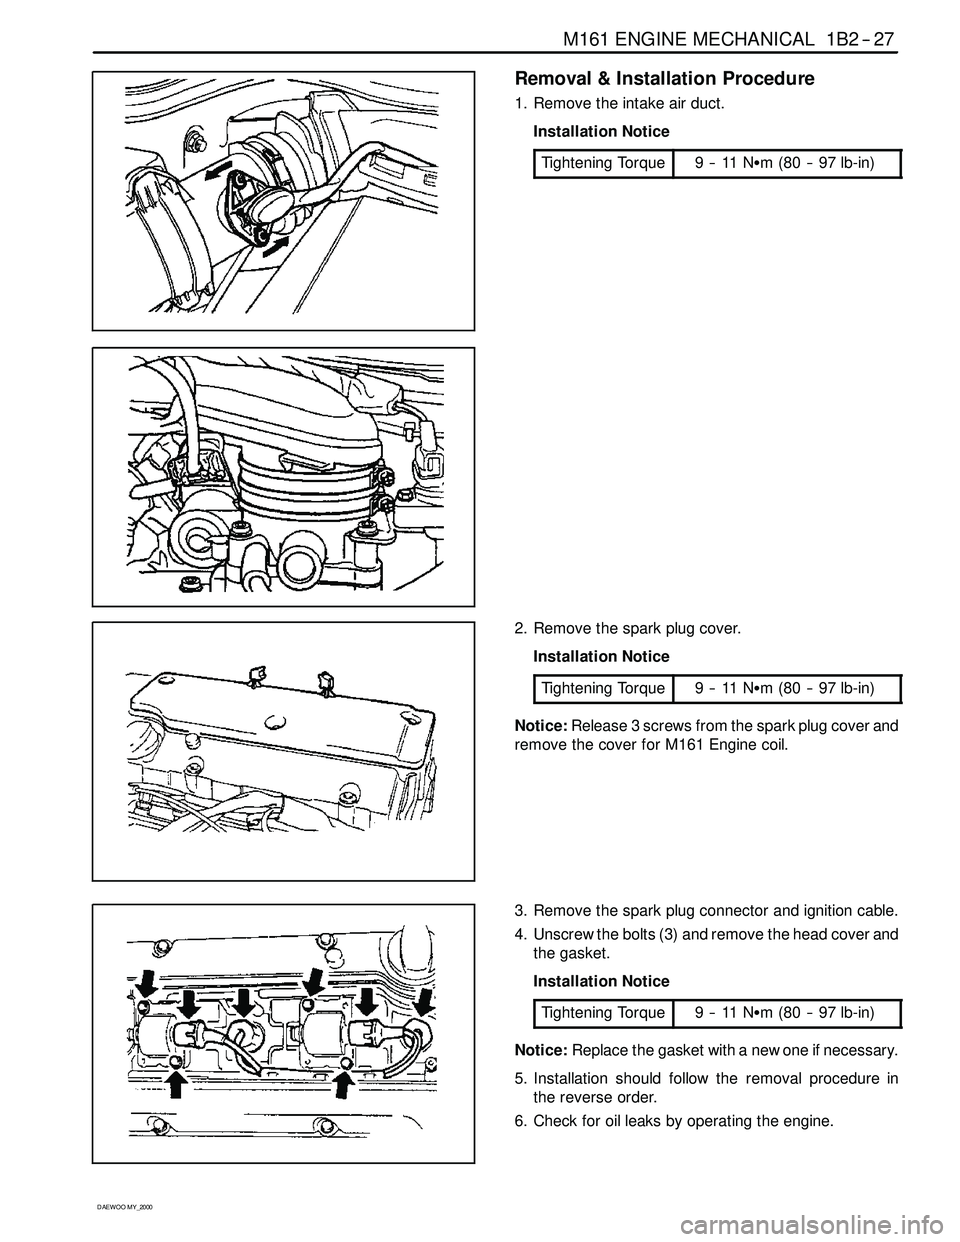
Removal & Installation Procedure
1. Remove the intake air duct.
Installation Notice
Tightening Torque
9--11NSm (80 -- 97 lb-in)
2. Remove the spark plug cover.
Installation Notice
Tightening Torque
9--11NSm (80 -- 97 lb-in)
Notice:Release 3 screws from the spark plug cover and
remove the cover for M161 Engine coil.
3. Remove the spark plug connector and ignition cable.
4. Unscrew the bolts (3) and remove the head cover and
the gasket.
Installation Notice
Tightening Torque
9--11NSm (80 -- 97 lb-in)
Notice:Replace the gasket with a new one if necessary.
5. Installation should follow the removal procedure in
the reverse order.
6. Check for oil leaks by operating the engine.
Page 321 of 2053

1B2 -- 28 M161 ENGINE MECHANICAL
D AEW OO M Y_2000
CYLINDER HEAD FRONT COVER
Preceding Work: Removal of cylinder head cover
Removal of thermostat housing assembly
Removal of engine hanger bracket
1 Bolt (M6 X 16, 3 pieces)
9--11 NSm (80-- 97 lb-in) .....................
2 Camshaft Adjuster
3 Bolt (M8 X 35, 2 pieces)
22.5-- 27.5 NSm (16.6-- 20.3 lb-ft) .............
4 Bolt (M6 X 22, 6 pieces)
9--11 NSm (80-- 97 lb-in) .....................5 Front Cover (E23 : M161.973)
6 Front Cover (E20 : M161.943)
7 Sleeve
8 O -- ring Replace............................
9 Thermostat Housing
Page 322 of 2053

M161 ENGINE MECHANICAL 1B2 -- 29
D AEW OO M Y_2000
Removal & Installation Procedure
1. Disconnect the camshaft adjuster connector and re-
move the camshaft adjuster (E23 engine only).
Installation Notice
Tightening Torque
9--11NSm (80 -- 97 lb-in)
2. Remove the cylinder head front cover.
Installation Notice
Tightening
Torque (3)
22.5 -- 27.5 NSm
(16.6 -- 20.3 lb-ft)
Tightening
Torque (4)9--11NSm
(80 -- 97 lb-in)
Apply the sealant at the mating surface of the cylinder
head and the front cover.
3. Remove the O -- ring.
Installation Notice
Replace the O -- ring with new one and apply the seal-
ant.
4. Installation should follow the removal procedure in
the reverse order.
Page 323 of 2053

1B2 -- 30 M161 ENGINE MECHANICAL
D AEW OO M Y_2000
CYLINDER HEAD
Preceding Work: Removal of cylinder head cover
Removal of cylinder head front cover
Removal of intake manifold
Removal of cylinder head lower line (intake manifold side)
1 Cylinder Head Bolt (M12 X 100, 10 pieces)
1ststep55NSm (41 lb-ft) ...................
2nd step 90°rotation added
3rdstep90°rotation added
3 Bolt (M8 X 35, 4 pieces)
22.5-- 27.5 NSm (16.6-- 20.3 lb-ft) .............4 Camshaft Bearing cap
5 Cylinder Head
6 Gasket Replace...........................
7 Dowel Sleeve Note........................
Page 324 of 2053

M161 ENGINE MECHANICAL 1B2 -- 31
D AEW OO M Y_2000
Tools Required
617589001000 AllenWrenchSocket
116 589 20 33 00 Sliding Hammer
116 589 01 34 00 Threaded Pin
111 589 03 15 00 Holding Pin
Removal & Installation Procedure
1. Rotate the crankshaft so that the piston of number 1
cylinder is at ATDC 20.
2. Put the holding pin 111 589 03 15 00 into the cam-
shaft bearing cap (number 1, 6).
3. Put the alignment marks (arrows) on the timing chain
and camshaft sprocket.
4. Remove the chain tensioner.
Installation Notice
Tightening Torque
72 -- 88 NSm (53 -- 65 lb-ft)
5. Remove the exhaust camshaft sprocket.
Installation Notice
Ti
ghteningTo rque
1st step: 18 -- 22 NSm
(13 -- 16 lb-ft)
TighteningTorque
2nd step: 60°±5°
Notice:The flange bolt is designed to be used only
once, so always replace with new one.
Page 325 of 2053

1B2 -- 32 M161 ENGINE MECHANICAL
D AEW OO M Y_2000
6. Remove the intake camshaft sprocket (E20 engine).
7. Remove the camshaft adjuster (E23, M161.970 en-
gine).
Installation Notice (Flange Bolt)
Ti
ghteningTo rque
1st step: 18 -- 22 NSm
(13 -- 16 lb-ft)
TighteningTorque
2nd step: 60°±5°
Notice:The flange bolt is designed to be used only
once, so always replace with new one.
1 Flange Shaft
2FlangeBolt
3 Compression Spring
4 Adjust Piston
5 Camshaft Sprocket
6 Seal Cover
7Nut
8. Remove the guide rail pin using the sliding hammer
116 589 20 33 00 (02) and the threaded pin 116 589
01 34 00 (03).
Notice:Apply the sealant on guide rail pin when installa-
tion.
9. Unscrew the bolts (A).
Installation Notice
Tightening Torque
22.5 -- 27.5 NSm
(16.6 -- 20.3 lb-ft)
Bolt (A) : (M8 X 35, 4 pieces)
Page 326 of 2053

M161 ENGINE MECHANICAL 1B2 -- 33
D AEW OO M Y_2000
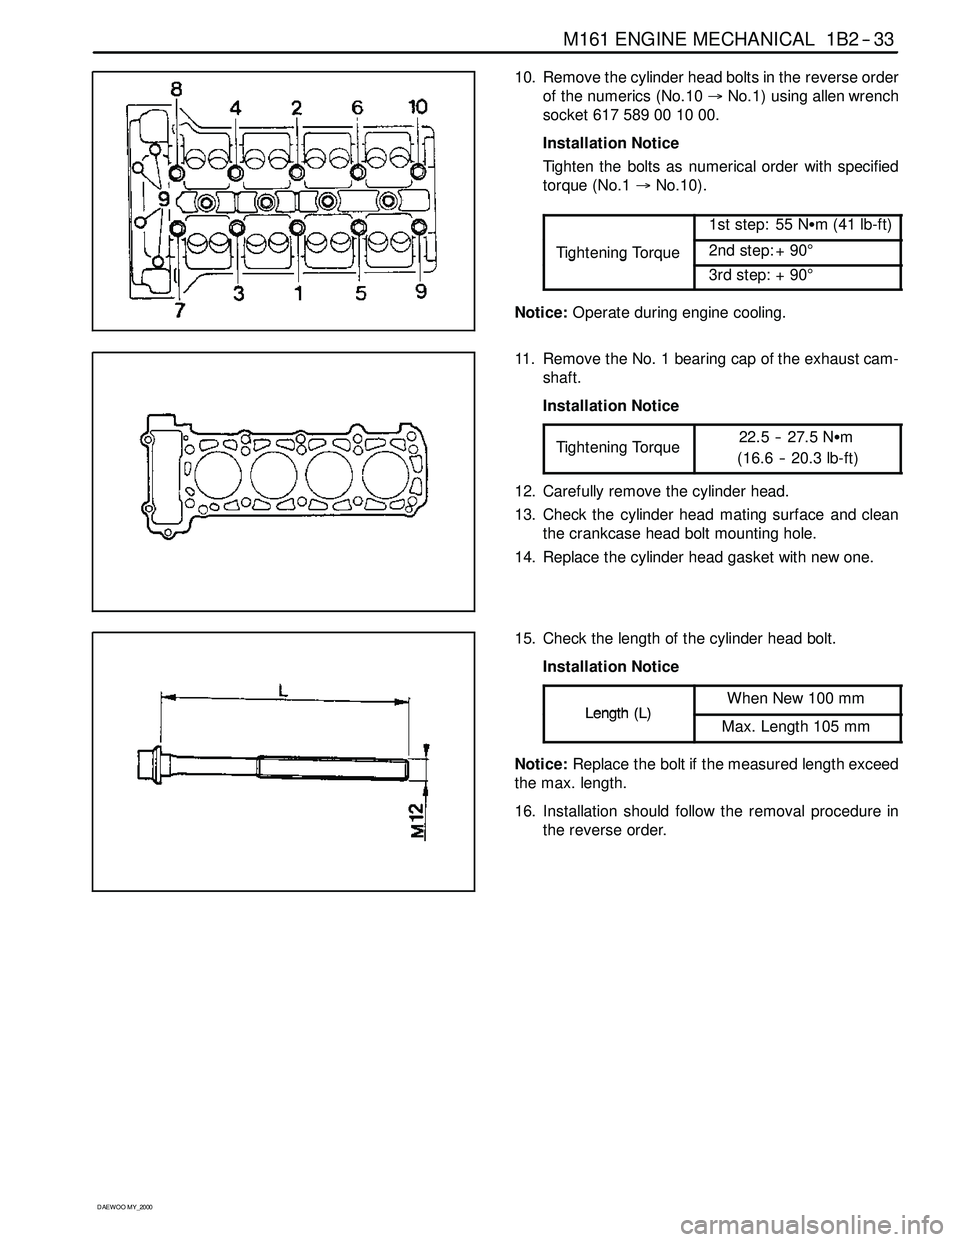
10. Remove the cylinder head bolts in the reverse order
of the numerics (No.10→No.1) using allen wrench
socket617589001000.
Installation Notice
Tighten the bolts as numerical order with specified
torque (No.1→No.10).
1st step: 55 NSm (41 lb-ft)
Tightening Torque2nd step: + 90°ggq
3rd step: + 90°
Notice:Operate during engine cooling.
11. Remove the No. 1 bearing cap of the exhaust cam-
shaft.
Installation Notice
Tightening Torque
22.5 -- 27.5 NSm
(16.6 -- 20.3 lb-ft)
12. Carefully remove the cylinder head.
13. Check the cylinder head mating surface and clean
the crankcase head bolt mounting hole.
14. Replace the cylinder head gasket with new one.
15. Check the length of the cylinder head bolt.
Installation Notice
Length(L)When New 100 mmLength(L)Max. Length 105 mm
Notice:Replace the bolt if the measured length exceed
the max. length.
16. Installation should follow the removal procedure in
the reverse order.
Page 327 of 2053

1B2 -- 34 M161 ENGINE MECHANICAL
D AEW OO M Y_2000
TIMING GEAR CASE COVER
Preceding Work: Removal of viscous clutch
Removal of cylinder head front cover
Removal of tensioning device
Removal of water pump
Removal of oil filter element
Removal of oil pan
Removal of generator bracket
1 Bolt (M8 X 60, 3 pieces)
22.5-- 27.5 NSm (16.6-- 20.3 lb-ft) .............
2 Bolt (M8 X 75, 1 piece)
22.5-- 27.5 NSm (16.6-- 20.3 lb-ft) .............3Seal
4 Timing gear case cover
5O--ring
6 Sleeve
Page 328 of 2053

M161 ENGINE MECHANICAL 1B2 -- 35
D AEW OO M Y_2000
Tools Required
116 589 20 33 00 Sliding Hammer
116 589 01 34 00 Threaded Pin
Removal & Installation Procedure
1. Remove the power steering belt pulley and A/C com-
pressor bracket.
2. Remove the oil line from power steering pump.
3. Rotate the crankshaft so that the piston of number,
cylinder is at ATDC20°.
4. Put the alignment marks (arrows) on the timing chain
and camshaft sprocket.
5. Remove the chain tensioner.
Installation Notice
Tightening Torque
72 -- 88 NSm (53 -- 65 lb-ft)
6. Remove the intake and exhaust camshaft sprocket
(remove the camshaft adjuster assembly in E23 en-
gine).
Installation Notice
Ti
ghteningTo rque
1st step: 18 -- 22 NSm
(13 -- 16 lb-ft)
TighteningTorque
2nd step: 60°±5°
Notice:The flange bolt is designed to be used only
once, so always replace with new one.
7. Remove the guide rail pin using the sliding hammer
116 589 20 33 00 (02) and the threaded pin 116 589
01 34 00 (03).
Notice:Apply the sealant on guide rail pin when installa-
tion.
Page 329 of 2053

1B2 -- 36 M161 ENGINE MECHANICAL
D AEW OO M Y_2000
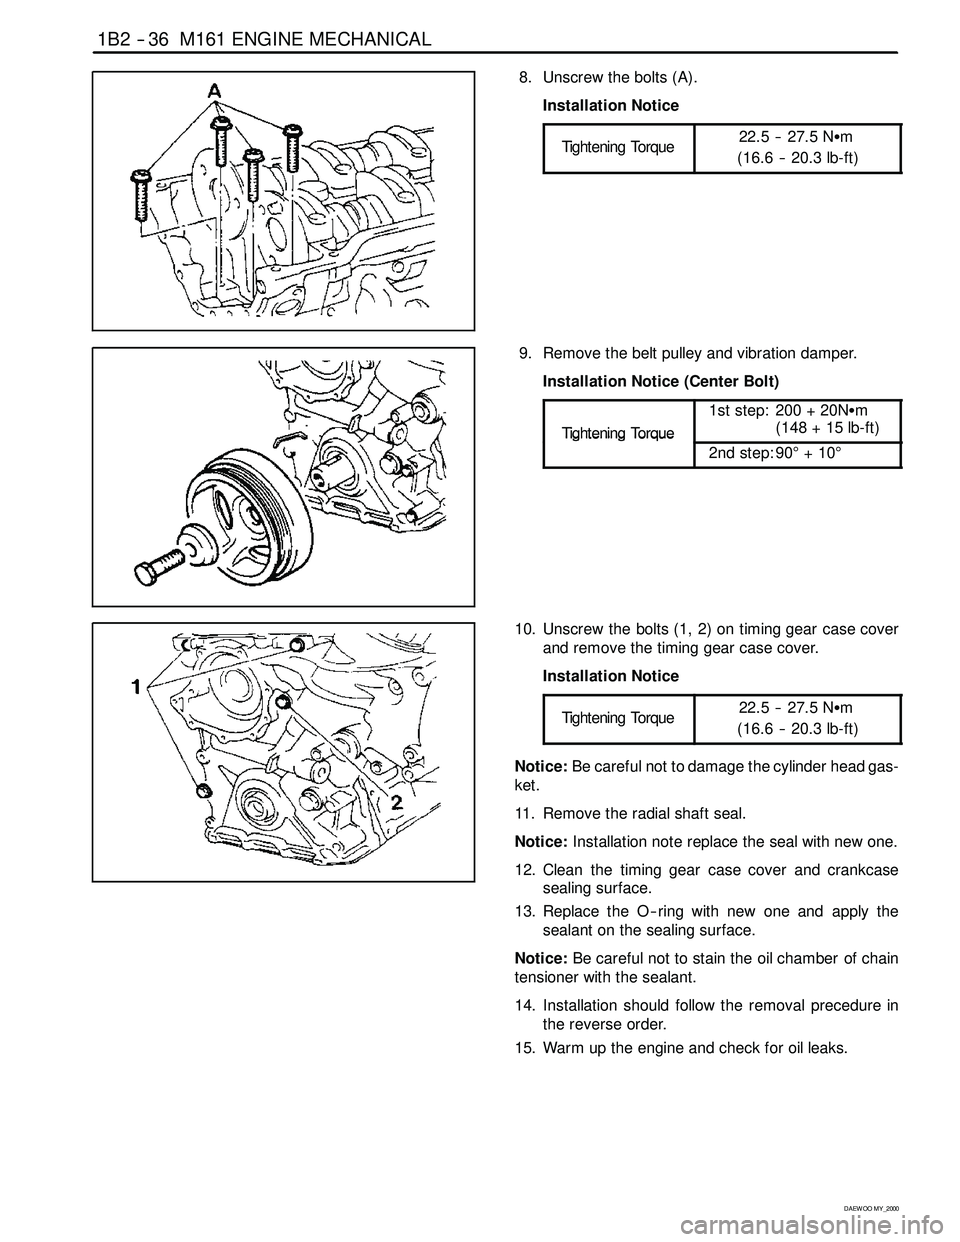
8. Unscrew the bolts (A).
Installation Notice
Tightening Torque
22.5 -- 27.5 NSm
(16.6 -- 20.3 lb-ft)
9. Remove the belt pulley and vibration damper.
Installation Notice (Center Bolt)
Ti
ghteningTo rque
1st step: 200 + 20NSm
(148 + 15 lb-ft)
TighteningTorque
2nd step: 90°+10°
10. Unscrew the bolts (1, 2) on timing gear case cover
and remove the timing gear case cover.
Installation Notice
Tightening Torque
22.5 -- 27.5 NSm
(16.6 -- 20.3 lb-ft)
Notice:Be careful not to damage the cylinder head gas-
ket.
11. Remove the radial shaft seal.
Notice:Installation note replace the seal with new one.
12. Clean the timing gear case cover and crankcase
sealing surface.
13. Replace the O -- ring with new one and apply the
sealant on the sealing surface.
Notice:Be careful not to stain the oil chamber of chain
tensioner with the sealant.
14. Installation should follow the removal precedure in
the reverse order.
15. Warm up the engine and check for oil leaks.