washer fluid SSANGYONG KORANDO 1997 Service Repair Manual
[x] Cancel search | Manufacturer: SSANGYONG, Model Year: 1997, Model line: KORANDO, Model: SSANGYONG KORANDO 1997Pages: 2053, PDF Size: 88.33 MB
Page 13 of 2053

GENERAL INFORMATION 0B -- 13
D AEW OO M Y_2000
OWNER INSPECTIONS AND SERVICES
WHILE OPERATING THE VEHICLE
Horn Operation
Blow the horn occasionally to make sure it works. Check
all the button locations.
Brake System Operation
Be alert for abnormal sounds, increased brake pedal
travel or repeated puling to one side when braking. Also,
if the brake warning light goes on, or flashes, something
may be wrong with part of the brake system.
Exhaust System Operation
Be alert to any changes inthe sound of the system or
the smell of the fumes. These are signs that the system
may be leaking or overheating. Have the system in-
spected and repaired immediately.
Tires, Wheels and Alignment Operation
Be alert to any vibration of the steering wheel or the
seats at normal highway speeds. This may mean a
wheel needs to be balanced. Also, a pull right or left on a
straight, level road may show the need for a tire pres-
sure adjustment or a wheel alignment.
Steering System Operation
Be alert to changes in the steering action. An inspection
is needed when the steering wheel is hard to turn or has
too much free play, or is unusual sounds are noticed
when turning or parking.
Headlight Aim
Take note of the light pattern occasionally. Adjust the
headlights if the beams seem improperly aimed.
AT EACH FUEL FILL
A fluid loss in any (except windshield washer) system
may indicate a problem. Have the system inspected and
repaired immediately.
Engine Oil Level
Check the oil level and add oil if necessary. The best
time to check the engine oil level is when the oil is warm.
1. After stopping the engine, wait a few minutes for the
oil to drain back to the oil pan.
2. Pull out the oil level indicator (dip stick).
3. Wipe it clean, and push the oil level indicator back
down all the way.
4. Pull out the oil level indicator and look at the oil level
on it.
5. Add oil, if needed, to keep the oil level above the low-
er mark. Avoid overfilling theengine, since this may
cause engine damage.
6. Push the indicator all the way back down into the en-
gine after taking the reading.If you check the oil level when the oil is cold, do not run
the engine first. The cold oil will not drain back to the pan
fast enough to give a true oil level reading.
Engine Coolant Level and Condition
Check the coolant level in the coolant reservoir tank and
add coolant if necessary. Inspect the coolant. Replace
dirty or rusty coolant.
Windshield Washer Fluid Level
Check the washer fluid level in the reservoir. Add fluid if
necessary.
AT LEAST TWICE A MONTH
Tire And Wheel Inspection and Pressure
Check
Check the tire for abnormal wear or damage. Also check
for damaged wheels. Check the tire pressure when the
tires are cold ( check the spare also, unless it is a stow-
away). Maintain the recommended pressures. Refer to
“Tire and Wheel” is in section 0B.
AT LEAST MONTHLY
Light Operation
Check the operation of the license plate light, the head-
lights (including the high beams), the parking lights, the
fog lights, the taillight, the brake lights, the turn signals,
the backup lights and the hazard warning flasher.
Fluid Leak Check
Periodically inspect the surface beneath the vehicle for
water, oil, fuel or other fluids, after the vehicle has been
parked for a while. Water dripping from the air condition-
ing system after use is normal. If you notice fuel leaks or
fumes, find the cause and correct it at once.
AT LEAST TWICE A YEAR
Power Steering System Reservoir Level
Check the power steering fluid level. Keep the power
steering fluid at the proper level. Refer to Section 6A,
Power Steering System.
Brake Master Cylinder Reservoir Level
Check the fluid and keep it at the proper level. A low fluid
level can indicate worn disc brake pads which may need
to be serviced. Check the breather hole in the reservoir
cover to be free from dirt and check for an open pas-
sage.
Weather- Strip Lubrication
Apply a thin film silicone grease using a clean cloth.
Page 16 of 2053

0B -- 16 GENERAL INFORMATION
D AEW OO M Y_2000
GENERAL DESCRIPTION AND SYSTEM OPERATION
GENERAL REPAIR INSTRUCTIONS
DIf a floor jack is used, the following precautions are
recommended.
DPark the vehicle on level ground, “block” the front or
rear wheels, set the jack against the frame, raise the
vehicle and support it with chassis stands and then
perform the service operation.
DBefore performing the service operation, disconnect
the negative battery cable in order to reduce the
chance of cable damaged and burning due to short --
cir cuiting.
DUse a cover on the body, the seats and the floor to
protect them against damage and contamination.
DHandle brake fluid and antifreeze solution with care
as they can cause paint damage.
DThe use of proper tools, and the recommended es-
sential and available tools where specified, are impor-
tant for efficient and reliable performance of the
service repairs.
DUse genuine DAEWOO parts.DDiscard used cotter pins, gaskets, O -- rings, oil seals,
lock washers and self -- locking nuts. Prepare new
ones for installation. Normal function of these parts
cannot be maintained if these parts are reused.
DKeep the disassembled parts neatly in groups to facil-
itate proper and smooth reassembly.
DKeep attaching bolts and nuts separated, as they
vary in hardness and design depending on the posi-
tion of the installation.
DClean the parts before inspection or reassembly.
DAlso clean the oil parts, etc. Use compressed air to
make certain they are free of restrictions.
DLubricate rotating and sliding faces of parts with oil or
grease before installation.
DWhen necessary, use a sealer on gaskets to prevent
leakage.
DCarefully observe all specifications for bolt and nut
torques.
DWhen service operation is completed, make a final
check to be sure service was done properly and the
problem was corrected.
Page 1109 of 2053

AUTOMATIC TRANSMISSION 5A-15
SSANGYONG MY2002
3-4
OWC
X
X
X
X
X 1-2
OWC
X B2
X
X B1
X
X C4
X
X
X
Gear set-sprag-centre support
C1 -C2 -C3 -C4 clutch sub-assembly
Pump assembly
Valve body assembly
One, or a combination of selective washers are used
between the input shaft flange and the number 4
bearing to control the transmission end float. This
arrangement allows for extensive subassembly testing
and simplistic final assembly during production.
A general description of the operation of the Power
Train System is detailed below.
First gear is engaged by applying the C2 clutch and
locking the 1-2 One Way Clutch (1-2 OWC). The 1-2
shift is accomplished by applying the B1 band and
overrunning the 1-2 OWC. The 2-3 shift is
accomplished by applying the C1 clutch and releasingthe B1 band. The 3-4 shift is accomplished by re-
applying the B1 band and overrunning the 3-4 OWC.
Reverse gear is engaged by applying the C3 clutch
and the B2 band.
The C4 clutch is applied in the Manual 1, 2 and 3 ranges
to provide engine braking. In addition, the C4 clutch
is also applied in the Drive range for second and third
gears to eliminate objectionable freewheel coasting.
The B2 band is also applied in the Manual 1 range to
accomplish the low-overrun shift.
Both the front and rear servos are dual area designs
to allow accurate friction element matching without the
need for secondary regulator valves. All the friction
elements have been designed to provide low shift
energies and high static capacities when used with
the new low static co-efficient transmission fluids. Non-
asbestos friction materials are used throughout.
Gear
First
Second
Third
Fourth
Reverse
Manual 1Gear
Ratio
2.741
1.508
1.000
0.708
2.428
2.741C1
X
XC2
X
X
X
X
XC3
XLU
CLUTCH
X*
X ELEMENTS ENGAGED
* For Certain Vehicle Applications, Refer to the Owner's Manual.
KAA5A250
Page 1271 of 2053

5A-176 AUTOMATIC TRANSMISSION
SSANGYONG MY2002
Planet Carrier Assembly and Centre Support
1. Check the carrier and planet assembly for any
damage or irregularity and ensure that all pinions
rotate freely and that the pinion end float is within
0.10 mm - 0.50 mm.
2. Install the One Way Clutch (OWC) retainer (1) to
the planet carrier with the inner edge pointing down-
wards. Inspect the OWC race and the sprag
assemblies for wear or damage. Replace if
necessary.
3. Install the outer (3) race in the drum. Press the
race to the bottom of the drum and install the
retaining circlip (2). Ensure the circlip is firmly
seated in its groove.
4. Install the OWC (1) into the outer race with the lip
edge uppermost. Lubricate the sprags with auto-
matic transmission fluid.
5. Check that the plugs are fitted to the centre
support, then assemble the centre support into
the OWC, ensuring that the support will rotate in
an anti-clock-wise direction only.
6. Lubricate the No. 9 needle bearing and washer
with petroleum jelly and fit them to the rear face
of the planet carrier.
7. In s t a l l th e
KAA5A0A0
KAA5A760
KAA5A750
KAA5A560
Tightening Torque20 - 27 Nm
(15 - 20 lb-ft)
Page 1272 of 2053

AUTOMATIC TRANSMISSION 5A-177
SSANGYONG MY2002
Adaptor Housing Assembly
1. Install a new seal to the adaptor housing.
2. Position a new gasket onto the adaptor housing.
Notice: Do not use petroleum jelly to hold the gasket
in position.
3. Apply additional Loctite 202 or equivalent as required
to the adapter housing bolts. Install the adaptor
housing and torque the bolts to specification.
Installation Notice
Front Servo Assembly
1. Lubricate the cover ‘O’ ring with automatic
transmission fluid and fit to the cover.
2. Lubricatethepiston‘O’ rings with automatic trans-
mission fluid and fit to the piston.
3. Assemble the piston, push rod, spring, belleville
washer, seat and retaining ring.
4. Fit the piston push rod assembly into the front
servo cover.
5. Install the front servo block and spring into the
case.
6. Install the front servo assembly into the case.
KAA5A0C0
KAA5A520 KAA5A0B0
Tightening Torque30 - 35 Nm
(22 - 26 lb-ft)
7. Compress the servo cover and fit the servo cover
retaining circlip, aligning the gap with the pan rail,
and ensuring that it is completely seated in its
groove.
Notice: Ensure that the front servo snap ring is
installed correctly. Orient the circlip with the gap at
the bottom, near the pan rail.
KAA5A0D0
Page 1278 of 2053

AUTOMATIC TRANSMISSION 5A-183
SSANGYONG MY2002
C3 Clutch and Reverse Sun Gear Assembly
Tools Required
0555-336259Clutch Spring Compressor
0555-336260Clutch Pack Clearance Kit
1. Check the orifices in the cylinder are clear of ob-
structions.
2. Check the C3 cylinder bush outside diameter and
the centre support inside diameter are in good
condition and not damaged. Coat the sealing rings
with automatic transmission fluid and fit into the
C3 cylinder grooves.
3. Check the reverse sun gear splines, grooves and
thrust face for condition. Coat the ‘O’ ring with
automatic transmission fluid and fit it to the groove
of the reverse sun gear.
4. Lubricate the C3 washer with petroleum jelly and
fit to the inner face of the reverse sun gear.
5. Install the reverse sun gear in the C3 cylinder,
ensuring that the ‘O’ ring compression is
adequate but not excessive.
Notice: ‘O’ rings must not be twisted in the
grooves.
KAA5A0P0
6. Coat the C3 piston ‘O’ rings with automatic trans-
mission fluid and fit the small ‘O’ ring onto the
inner ring and the large ‘O’ ring onto the outer
ring of the C3 piston.
7. Check that the bleed orifices of the piston are
clean and clear of obstructions.
8. Install the C3 piston in the cylinder until the
outside diameter of the piston enters the inside
diameter of the cylinder.
Notice: Take care not to cut the ‘O’ ring.
9. Assemble the spring and spring retainer on the
piston. Using 0555-336259 clutch spring
compressor compress the spring sufficiently to
enable the installation of the retaining circlip,
ensuring that the circlip is firmly seated in the
groove, and remove the tool.
10. Fit the C3 wave plate to the C3 piston face,
ensuring that one crest of the wave plate of the
C3 piston face is aligned over one of the piston
orifices.
KAA5A0Q0
KAA5A730
Page 1280 of 2053

AUTOMATIC TRANSMISSION 5A-185
SSANGYONG MY2002
Notice: With the clutch pack supporting a weight
of 2kg, the clearance between the snap ring and
the top of the pressure plate is to be between 1.07
- 1.45 mm.
15. If new friction plates are being fitted, remove the
clutch pack and soak the friction elements in auto-
matic transmission fluid for a minimum of five min-
utes prior to reassembly.
Notice: The clutch pack clearance must be taken
before the elements are soaked in automatic
transmission fluid.
Forward Sun Gear and C3 Clutch Pack
Assembly
1. Fit the No. 7 needle bearing assembly over the
for-ward sun gear, ensuring that the thrust washer
is between the bearing and the sun gear.
2. Lubricate the lipped thrust plate with petroleum
jelly and fit the thrust plate onto the reverse sun
gear.
KAA5A0U0 KAA5AOTA
3. Align and fit the C3 clutch assembly over the for-
ward sun gear.
4. Lubricate the No. 6 needle bearing with petroleum
jelly and fit it to the thrust plate. Ensure the lugs
on the outside diameter of the bearing fit in the
thrust plate counterbore.
5. Align and fit the plastic thrust washer to the thrust
plate with petroleum jelly.
6. Install the assembly over the forward sun gear
shaft against the No. 6 needle bearing.
7. Place the assembly to one side.
KAA5A0W0KAA5A0V0
Page 1396 of 2053

SSANGYONG MY2002
5D1-74 TRANSFER CASE
KAA5D470
KAA5D480
KAA5D490
KAA5D500
28. Remove the external snap ring from the input shaft.
29. Place the input shaft in a vise and remove the
bear ing.
30. Remove the thrust washer, thrust plate and the
sun gear off the input shaft.
Assembly Procedure
Important: Lubricate all parts with automatic transmis-
sion fluid (ATF) or equivalent before assemble. Remove
all traces of gasket sealant from the front case and
mounting adapter mating surfaces
1. Install the front output shaft bearing, if removed.
Notice: Press the bearing in straight, making sure
it is not cocked in the bore.
2. Install the internal snap ring that retains the front
output shaft bearing. 33. Remove the external snap ring retaining the front
output shaft.
34. Remove the front output shaft/flange.
35. Remove and discard front output shaft oil seal,
as required.
36. Remove the internal snap ring and remove the front
output shaft bearing, as required. 31. Position the input shaft on SST input shaft support.
32. Remove the needle bearing and bushing using
SST bearing installer/remover, as required.
Notice: Under normal use, the needle bearing and
bushing may not require replacement. After
inspection, If replacement is required, the bushing
and needle bearing must be replaced as a set.
Page 1400 of 2053

SSANGYONG MY2002
5D1-78 TRANSFER CASE
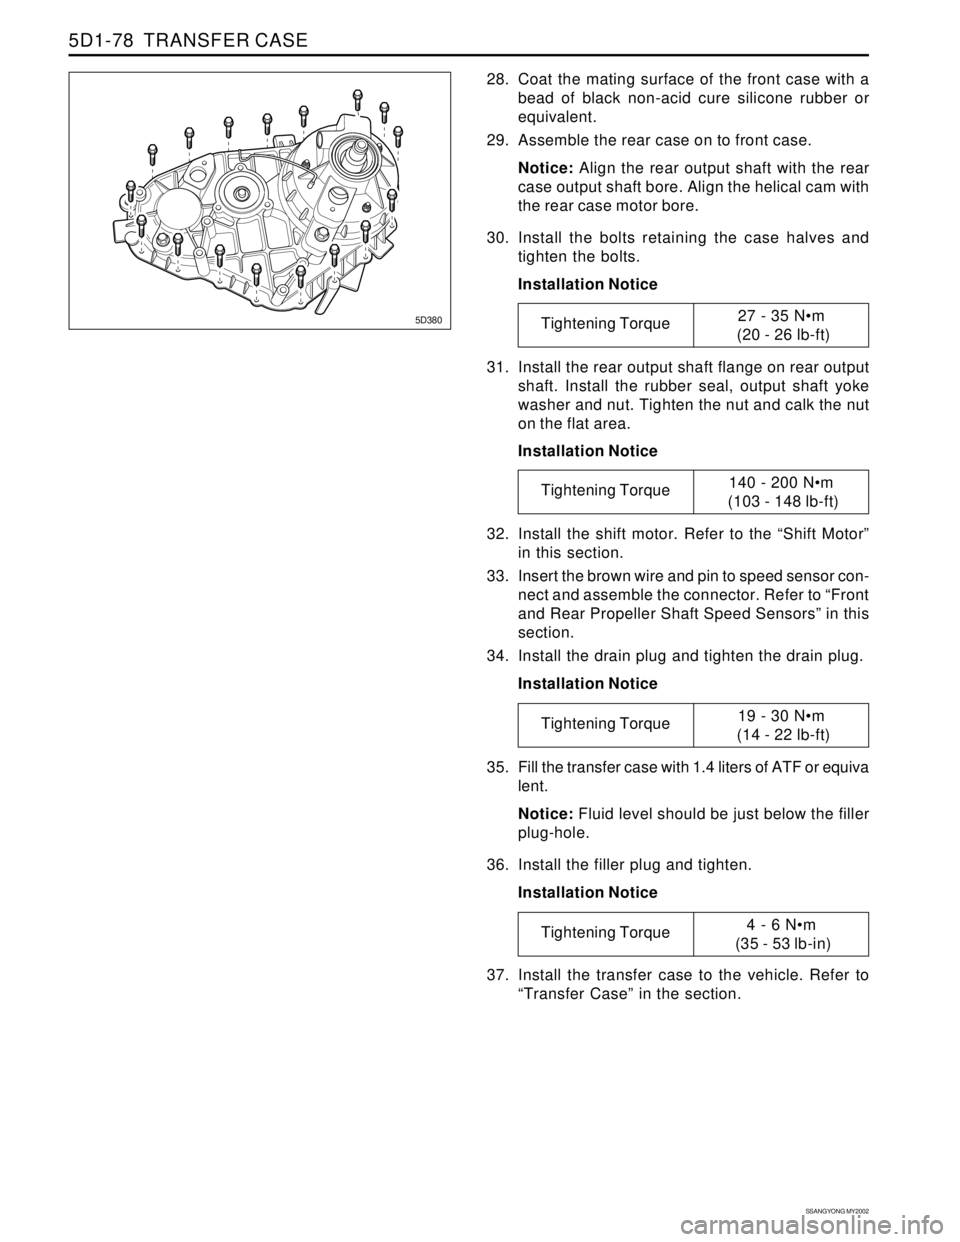
31. Install the rear output shaft flange on rear output
shaft. Install the rubber seal, output shaft yoke
washer and nut. Tighten the nut and calk the nut
on the flat area.
Installation Notice
32. Install the shift motor. Refer to the “Shift Motor”
in this section.
33. Insert the brown wire and pin to speed sensor con-
nect and assemble the connector. Refer to “Front
and Rear Propeller Shaft Speed Sensors” in this
section.
34. Install the drain plug and tighten the drain plug.
Installation Notice
35. Fill the transfer case with 1.4 liters of ATF or equiva
lent.
Notice: Fluid level should be just below the filler
plug-hole.
36. Install the filler plug and tighten.
Installation Notice
37. Install the transfer case to the vehicle. Refer to
“Transfer Case” in the section.
5D380
28. Coat the mating surface of the front case with a
bead of black non-acid cure silicone rubber or
equivalent.
29. Assemble the rear case on to front case.
Notice: Align the rear output shaft with the rear
case output shaft bore. Align the helical cam with
the rear case motor bore.
30. Install the bolts retaining the case halves and
tighten the bolts.
Installation Notice
Tightening Torque27 - 35 Nm
(20 - 26 lb-ft)
Tightening Torque140 - 200 Nm
(103 - 148 lb-ft)
Tightening Torque19 - 30 Nm
(14 - 22 lb-ft)
Tightening Torque4 - 6 Nm
(35 - 53 lb-in)
Page 1664 of 2053

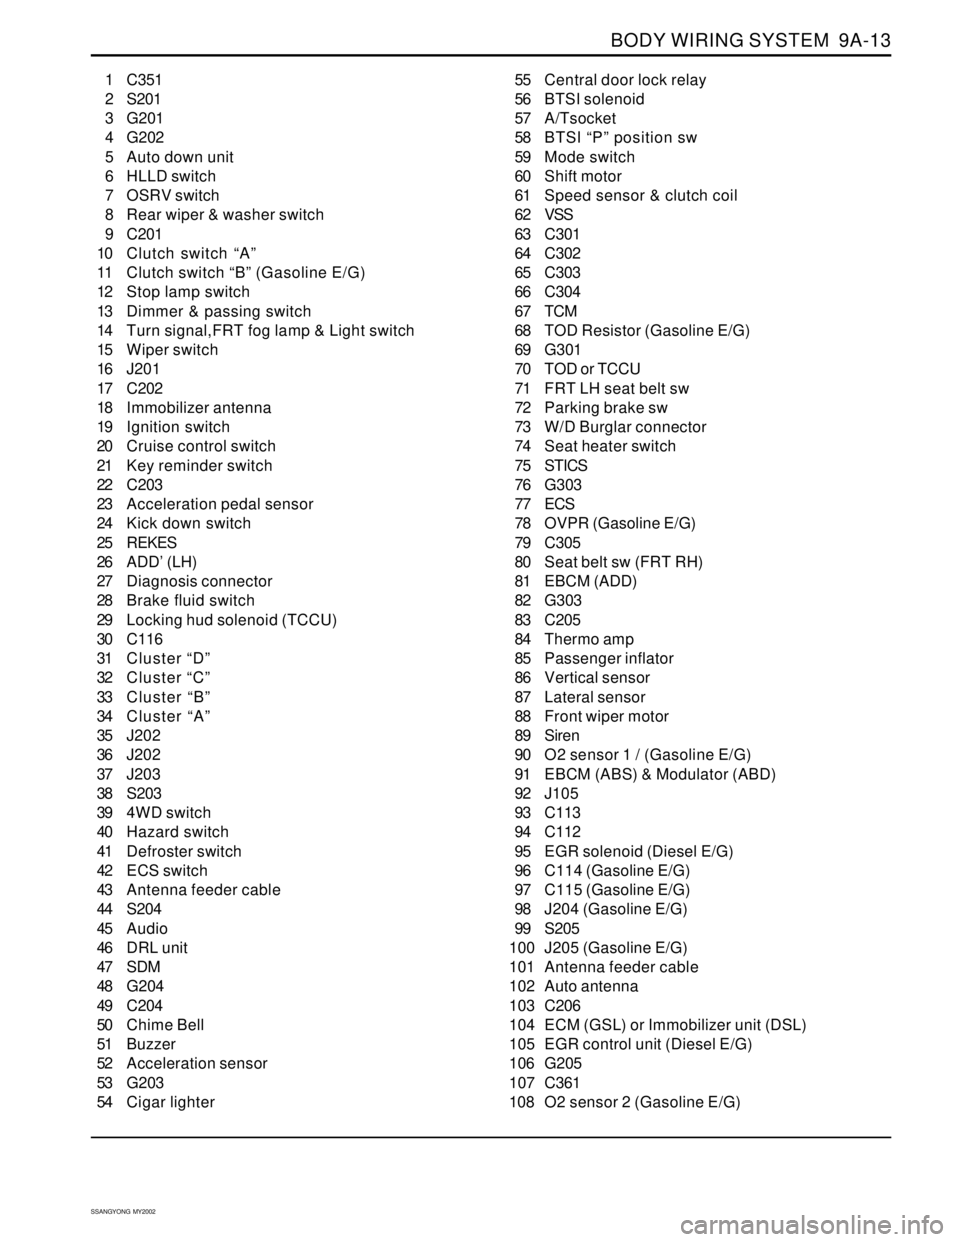
BODY WIRING SYSTEM 9A-13
SSANGYONG MY2002
1 C351
2 S201
3 G201
4 G202
5 Auto down unit
6 HLLD switch
7 OSRV switch
8 Rear wiper & washer switch
9 C201
10 Clutch switch “A”
11 Clutch switch “B” (Gasoline E/G)
12 Stop lamp switch
13 Dimmer & passing switch
14 Turn signal,FRT fog lamp & Light switch
15 Wiper switch
16 J201
17 C202
18 Immobilizer antenna
19 Ignition switch
20 Cruise control switch
21 Key reminder switch
22 C203
23 Acceleration pedal sensor
24 Kick down switch
25 REKES
26 ADD’ (LH)
27 Diagnosis connector
28 Brake fluid switch
29 Locking hud solenoid (TCCU)
30 C116
31 Cluster “D”
32 Cluster “C”
33 Cluster “B”
34 Cluster “A”
35 J202
36 J202
37 J203
38 S203
39 4WD switch
40 Hazard switch
41 Defroster switch
42 ECS switch
43 Antenna feeder cable
44 S204
45 Audio
46 DRL unit
47 SDM
48 G204
49 C204
50 Chime Bell
51 Buzzer
52 Acceleration sensor
53 G203
54 Cigar lighter55 Central door lock relay
56 BTSI solenoid
57 A/Tsocket
58 BTSI “P” position sw
59 Mode switch
60 Shift motor
61 Speed sensor & clutch coil
62 VSS
63 C301
64 C302
65 C303
66 C304
67 TCM
68 TOD Resistor (Gasoline E/G)
69 G301
70 TOD or TCCU
71 FRT LH seat belt sw
72 Parking brake sw
73 W/D Burglar connector
74 Seat heater switch
75 STICS
76 G303
77 ECS
78 OVPR (Gasoline E/G)
79 C305
80 Seat belt sw (FRT RH)
81 EBCM (ADD)
82 G303
83 C205
84 Thermo amp
85 Passenger inflator
86 Vertical sensor
87 Lateral sensor
88 Front wiper motor
89 Siren
90 O2 sensor 1 / (Gasoline E/G)
91 EBCM (ABS) & Modulator (ABD)
92 J105
93 C113
94 C112
95 EGR solenoid (Diesel E/G)
96 C114 (Gasoline E/G)
97 C115 (Gasoline E/G)
98 J204 (Gasoline E/G)
99 S205
100 J205 (Gasoline E/G)
101 Antenna feeder cable
102 Auto antenna
103 C206
104 ECM (GSL) or Immobilizer unit (DSL)
105 EGR control unit (Diesel E/G)
106 G205
107 C361
108 O2 sensor 2 (Gasoline E/G)