brake SSANGYONG KORANDO 2012 Service Manual
[x] Cancel search | Manufacturer: SSANGYONG, Model Year: 2012, Model line: KORANDO, Model: SSANGYONG KORANDO 2012Pages: 1082, PDF Size: 96.1 MB
Page 103 of 1082
01-70000-00
3) General Instructions
Before lifting up the vehicle with a lift, correctly support the lifting points.
When using a jack, park the vehicle on a level ground and place the wheel chocks under the tires.
Position the jack under the frame and lift up the vehicle and then support with chassis stand before
service work.
Make sure to disconnect the negative (-) cable from the battery to prevent any damage to electric
systems.
If you have to work on vehicle, cover the seats and floor with protection covers to avoid any
damage and contamination.
Brake fluid and anti-freeze can damage the painted surface of body. So carefully handle them
during service work.
To improve the efficiency of service work, use only recommended and specified tools.
Use only Ssangyong genuine spare parts.
Never reuse the cotter pin, gasket, O-ring, oil seal, lock washer and self-locking nut. Replace them
with new ones. If reused, normal functions cannot be maintained.
Store the disassembled parts as a set based on disassembly order and unit.
Pay particular attention not to miss or mix the fasteners.
If necessary, especially for inspection, clean the removed parts completely.
Apply the oil or grease on the running and sliding surfeces before installation. Use the specified
sealant and gasket to prevent leakage if necessary.
Tighten the fasteners with the specified tightening torque.
As a final stage of service work, check if the serviced system is working properly and the problem
has been eliminated clearly. (1)
(2)
(3)
(4)
(5)
(6)
(7)
(8)
(9)
(10)
(11)
(12)
(13)
(14)
(15) Remove the engine and transaxle as a set.
Korando is FF (Front Engine Front Drive) type vehicle, and engine and powertrain system are
integrated into a module. Therefore, 2-post lift and general equipment are necessary when working
on the engine and transmission.
Major equipment: Engine and transmission jack, Engine stand, Engine crane, Transmission jack,
Engine hanger -
-
Page 104 of 1082
01-8
4) Basic Inspection
(1) Horn operation
Listen for the horn sound when pressing the horn pad on the steering wheel. -
(2) Brake operation
Check if there is any abnormal noise, unusually long braking distance, or uneven braking force. If the
brake warning lamp does not go out even after starting the engien or are flashing during driving,
have the brake system checked immediately.
Check the brake pipes and hoses for connection, oil leak, crack or interference after changing the
position of tires. When replacing the tires, check the brake disc for surface condition and wear.
Check the parking brake cable and brake operation. Shorten the checking interval if the parking
brake is used frequently. -
-
-
(3) Exhaust system
Be aware to any changes in sound or smell from the exhaust system. These may be caused by leak or
overheat. Have the exhaust system checked and repaired immediately.
Inspect the exhaust system including catalytic converter. Inspect all the components and body frame
near the exhaust system. -
-
(4) Tires
Unusual vibration of the steering wheel and seats or pulling to one side on the straight and level roads
may indicates the uneven tire inflation pressure or poor wheel balance. -
(5) Steering and suspension system
Inspect the front and rear suspension and the steering system for damage, looseness or missing
parts, signs of wear or lack of lubrication. Inspect the power steering line and the hoses for
connection, leak, crack and chafing. Inspect the drive axle boot and seals for damage, tear or leak.
Replace or repair the system if necessary. -
(6) Engine oil
Check the oil level when the engine is still warm and add the specified engine oil if necessary. -
(7) Coolant
Check the coolant level in the coolant reservoir, coolant conditions (contamination, foreign material),
and hoses for damage and leak. Replace or add the Ssangyong genuine coolant, if needed. -
(8) Engine drive belt
Check all drive belts on the engine for wear, crack and looseness. Retighten or replace the belt, if
needed. -
Page 118 of 1082
02-110000-00
3. CHECK AND INSPECTION
1) Cylinder
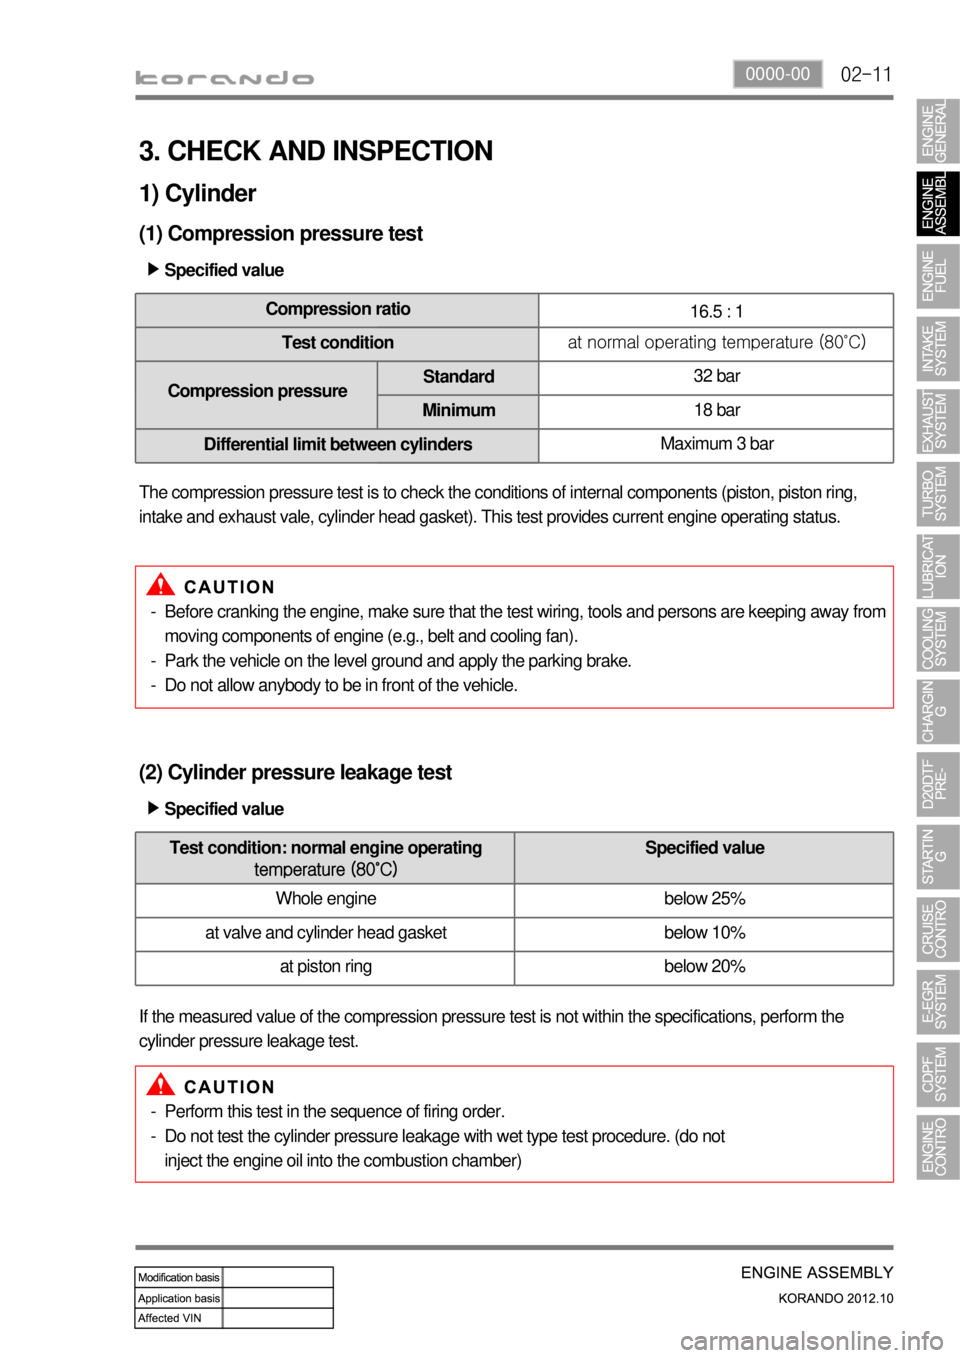
(1) Compression pressure test
Specified value ▶
Compression ratio
16.5 : 1
Test conditionat normal operating temperature (80˚C)
Compression pressureStandard32 bar
Minimum18 bar
Differential limit between cylindersMaximum 3 bar
The compression pressure test is to check the conditions of internal components (piston, piston ring,
intake and exhaust vale, cylinder head gasket). This test provides current engine operating status.
Before cranking the engine, make sure that the test wiring, tools and persons are keeping away from
moving components of engine (e.g., belt and cooling fan).
Park the vehicle on the level ground and apply the parking brake.
Do not allow anybody to be in front of the vehicle. -
-
-
(2) Cylinder pressure leakage test
If the measured value of the compression pressure test is not within the specifications, perform the
cylinder pressure leakage test.Specified value ▶
Perform this test in the sequence of firing order.
Do not test the cylinder pressure leakage with wet type test procedure. (do not
inject the engine oil into the combustion chamber) -
-
Test condition: normal engine operating
temperature (80˚C)Specified value
Whole engine below 25%
at valve and cylinder head gasket below 10%
at piston ring below 20%
Page 124 of 1082
02-170000-00
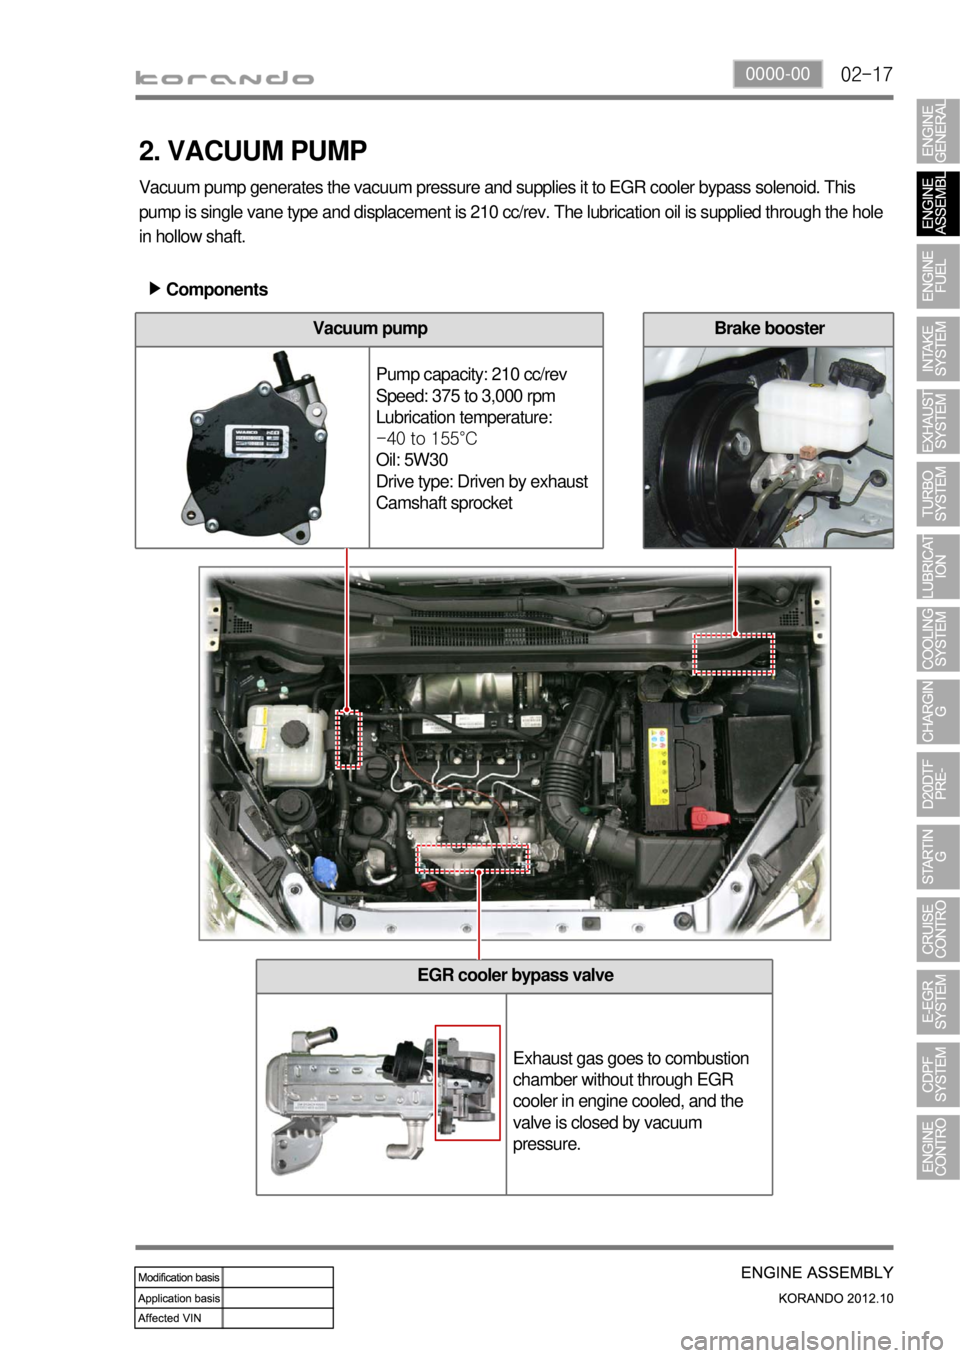
EGR cooler bypass valve
Exhaust gas goes to combustion
chamber without through EGR
cooler in engine cooled, and the
valve is closed by vacuum
pressure.
2. VACUUM PUMP
Vacuum pump generates the vacuum pressure and supplies it to EGR cooler bypass solenoid. This
pump is single vane type and displacement is 210 cc/rev. The lubrication oil is supplied through the hole
in hollow shaft.
Components ▶
Vacuum pump
Pump capacity: 210 cc/rev
Speed: 375 to 3,000 rpm
Lubrication temperature:
-40 to 155°C
Oil: 5W30
Drive type: Driven by exhaust
Camshaft sprocketBrake booster
Page 201 of 1082
07-4
2. MAINTENANCE
1) Level Check
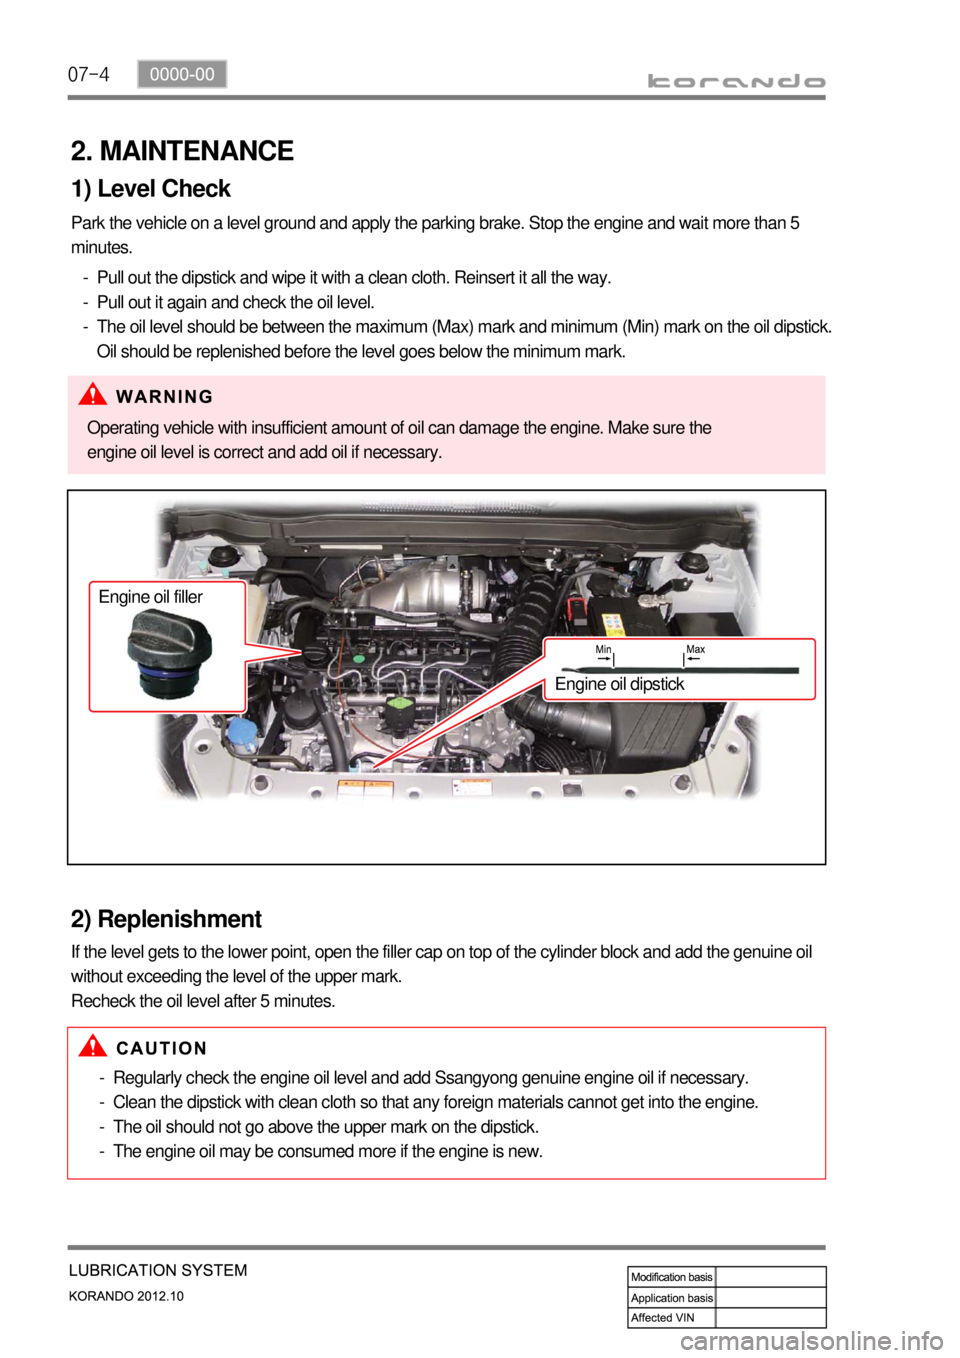
Park the vehicle on a level ground and apply the parking brake. Stop the engine and wait more than 5
minutes.
Pull out the dipstick and wipe it with a clean cloth. Reinsert it all the way.
Pull out it again and check the oil level.
The oil level should be between the maximum (Max) mark and minimum (Min) mark on the oil dipstick.
Oil should be replenished before the level goes below the minimum mark. -
-
-
Operating vehicle with insufficient amount of oil can damage the engine. Make sure the
engine oil level is correct and add oil if necessary.
2) Replenishment
If the level gets to the lower point, open the filler cap on top of the cylinder block and add the genuine oil
without exceeding the level of the upper mark.
Recheck the oil level after 5 minutes.
Regularly check the engine oil level and add Ssangyong genuine engine oil if necessary.
Clean the dipstick with clean cloth so that any foreign materials cannot get into the engine.
The oil should not go above the upper mark on the dipstick.
The engine oil may be consumed more if the engine is new. -
-
-
- Engine oil filler
Engine oil dipstick
Page 208 of 1082
08-50000-00
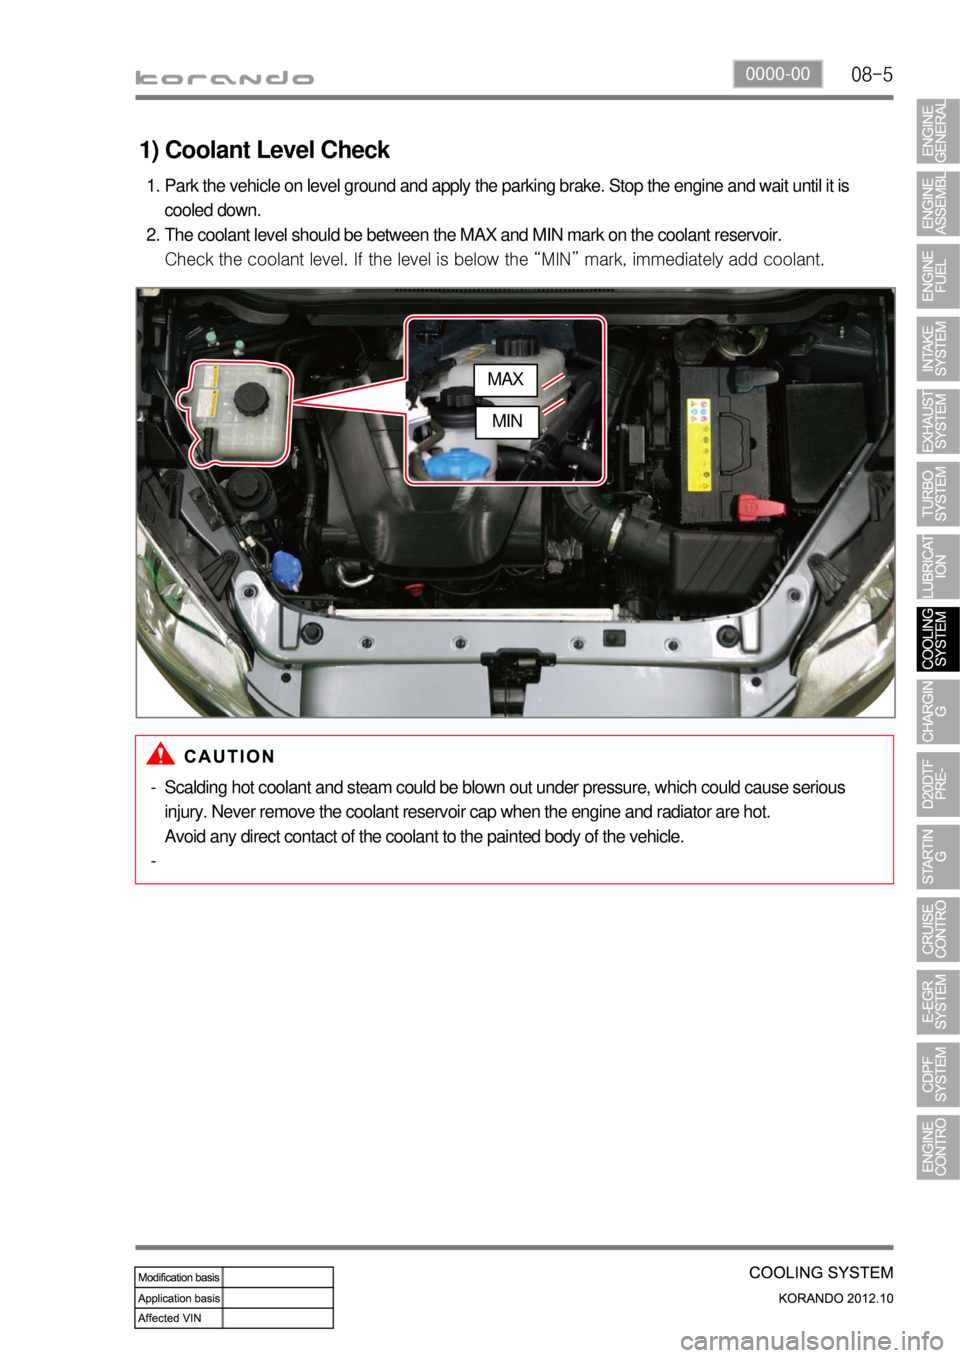
1) Coolant Level Check
Park the vehicle on level ground and apply the parking brake. Stop the engine and wait until it is
cooled down.
The coolant level should be between the MAX and MIN mark on the coolant reservoir.
Check the coolant level. If the level is below the “MIN” mark, immediately add coolant. 1.
2.
Scalding hot coolant and steam could be blown out under pressure, which could cause serious
injury. Never remove the coolant reservoir cap when the engine and radiator are hot.
Avoid any direct contact of the coolant to the painted body of the vehicle. -
-
MAX
MIN
Page 220 of 1082
09-8
(3) Starting with jumper cable
If the battery is weak or terminated, the battery from another vehicle can be used with jumper cables to
start the engine.
Connecting order ▶
The positive (+) terminal of the discharged battery
The positive (+) terminal of the booster battery
The negative (-) terminal of the booster battery
Connect one end of the other jumper cable to the body of the discharged vehicle, such as the
engine block or a front towing hook. 1.
2.
3.
4.
Starting ▶
Prepare a set of jumper cables.
Place another vehicle that has the same 12 V of power near to the discharged vehicle.
Switch off all electrical accessories for the discharged vehicle.
Apply the parking brake and shift the transaxle to the P position (automatic transaxle) or neutral (N)
position (manual transaxle).
Connect the jumper cables.
Try to start the discharged vehicle while accelerating the engine rpm in the booster vehicle.
Attempt to start the engine with the discharged battery.
After starting the engine, carefully disconnect the jumper cables in the reverse sequence of
connection. 1.
2.
3.
4.
5.
6.
7.
8.
Page 242 of 1082
11-6
2. OPERATING PROCESS
1) System Layout
(1) Engine start
SKM performs the authentication process for the SMART key and sends the engine start request to
EMS if there is a normally coded SMART key when pressing the Engine Start/Stop button with the
<0089009900880092008c00470097008c008b008800930047008b008c00970099008c009a009a008c008b004700880095008b0047008e008c008800990047009a008f0090008d009b00470093008c009d008c0099004700900095004702c8007702c9004700
960099004702c8007502c9004700970096009a0090009b0090>on.
SKM sends the start request signal to PCAN network and the cranking request to BCAN network by
“SMART key location” signal when receiving the engine start signal by Engine Start/Stop
button.
SKM turns off the IGN2/ACC relay during cranking to shut down the electric loads.
SKM receives the starting status signal from EMS throug PCAN.
<0068008d009b008c00990047008a009900880095009200900095008e00530047007a007200740047009b009c00990095009a0047009600950047009b008f008c00470068006a006a00560070006e0075005900470099008c0093008800a000470088009500
8b0047009a008c0095008b009a0047009b008f008c00470097>ower status signal of “IGN
after started” through BCAN.
EMS starts to crank the engine after checking the pre-heating condition if it receives the engine
cranking request 1 when pressing the Engine Start/Stop button. EMS starts to crank the engine
immediately if it receives the engine cranking request 2 when pressing the Engine Start/Stop button. 1.
2.
3.
4.
5.
6.
Engine cranking request 1: when pressing the Engine Start/Stop button shortly in normal
conditions
Engine cranking request 2: when pressing the Engine Start/Stop button again after first press or
when pressing the Engine Start/Stp button for more than 3 seconds -
-
Engine start during driving 7.
When pressing the Engine Start/Stop button with IGN ON, the engine start is requested if the
<009d008c008f0090008a0093008c0047009a0097008c008c008b00470090009a00470093008c009a009a0047009b008f008800950047005800570047009200940056008f0047009600990047009500960047009a0090008e00950088009300530047009b00
8f008c0047008e008c008800990047009a008f0090008d009b> lever is in ‘N” position and
the brake switch is ON (no need authentication for 30 seconds).
When pressing the Engine Start/Stop button with IGN ON, the engine start is requested
regardless of brake signal if the vehicle s
p<008c008c008b00470090009a00470096009d008c00990047005800570047009200940056008f004700880095008b0047009b008f008c0047008e008c008800990047009a008f0090008d009b00470093008c009d008c009900470090009a00470090009500
47>‘
position (no need authentication for 30 seconds).
Except input of brake switch signal
In vehicle equipped with A/T, when pressing the Engine Start/Stop button for more than 10
seconds with ACC ON, the engine start is requested regardless of brake signal if the gear shift
lever is in “P” or ‘N” position in IGN ON. -
-
*
-
Page 256 of 1082

12-98530-00
3) Decelerating with the Cruise Control System
(1) While the cruise control system is running
Push down the DECEL switch of the cruise control lever and hold it until the desired speed is reached
without a brake pedal intervention. But the cruise control system cannot maintain the cruise function at
less than 38 km/h.
When the desired speed is reached, release the lever. 1.
2.
(2) When the cruise control system is not running
To decrease the vehicle speed with the cruise control system when the system is not running, follow the
procedures below.
Push down the cruise control switch lever to DECEL side and hold it until the desired speed is
reached while the vehicle speed is over 40 km/h.
And then release the accelerator pedal slowly.
When the desired speed is reached, release the lever. But the cruise control system cannot maintain
the cruise function at less than 38 km/h. 1.
2.
3.
(3) Tap-down while the cruise control system is running
To decrease the vehicle speed in stages while the cruise control system is running, follow the
procedures below.
Push down the DECEL switch of the cruise control lever less than 0.5 second per one switching while
the cruise control system is running. This is a tap-down switching. When you operate a tap-down
switching, the vehicle is decelerated for 1 km/h below the previous set speed.
If you want to decelerate for 10 km/h, operate the tap-down switching ten times without the brake
pedal intervention. 1.
2.
Page 257 of 1082

12-10
4) Recovery of Set Speed (RESUME)
Even if the cruise control is cancelled, the previous set cruise speed can be recovered by pulling up the
cruise control lever when the current vehicle speed is over 38 km/h without an acceleration intervention.
But if you turn off the ignition switch, the memorized set speed is cleared and you cannot recover the
previous set speed.
But the driver should know the previous set speed to react to the changed vehicle speed properly. If
the vehicle speed increases abruptly, depress the brake pedal to adjust the vehicle speed properly.