Back seat SSANGYONG KORANDO 2013 User Guide
[x] Cancel search | Manufacturer: SSANGYONG, Model Year: 2013, Model line: KORANDO, Model: SSANGYONG KORANDO 2013Pages: 1336, PDF Size: 92.18 MB
Page 1263 of 1336

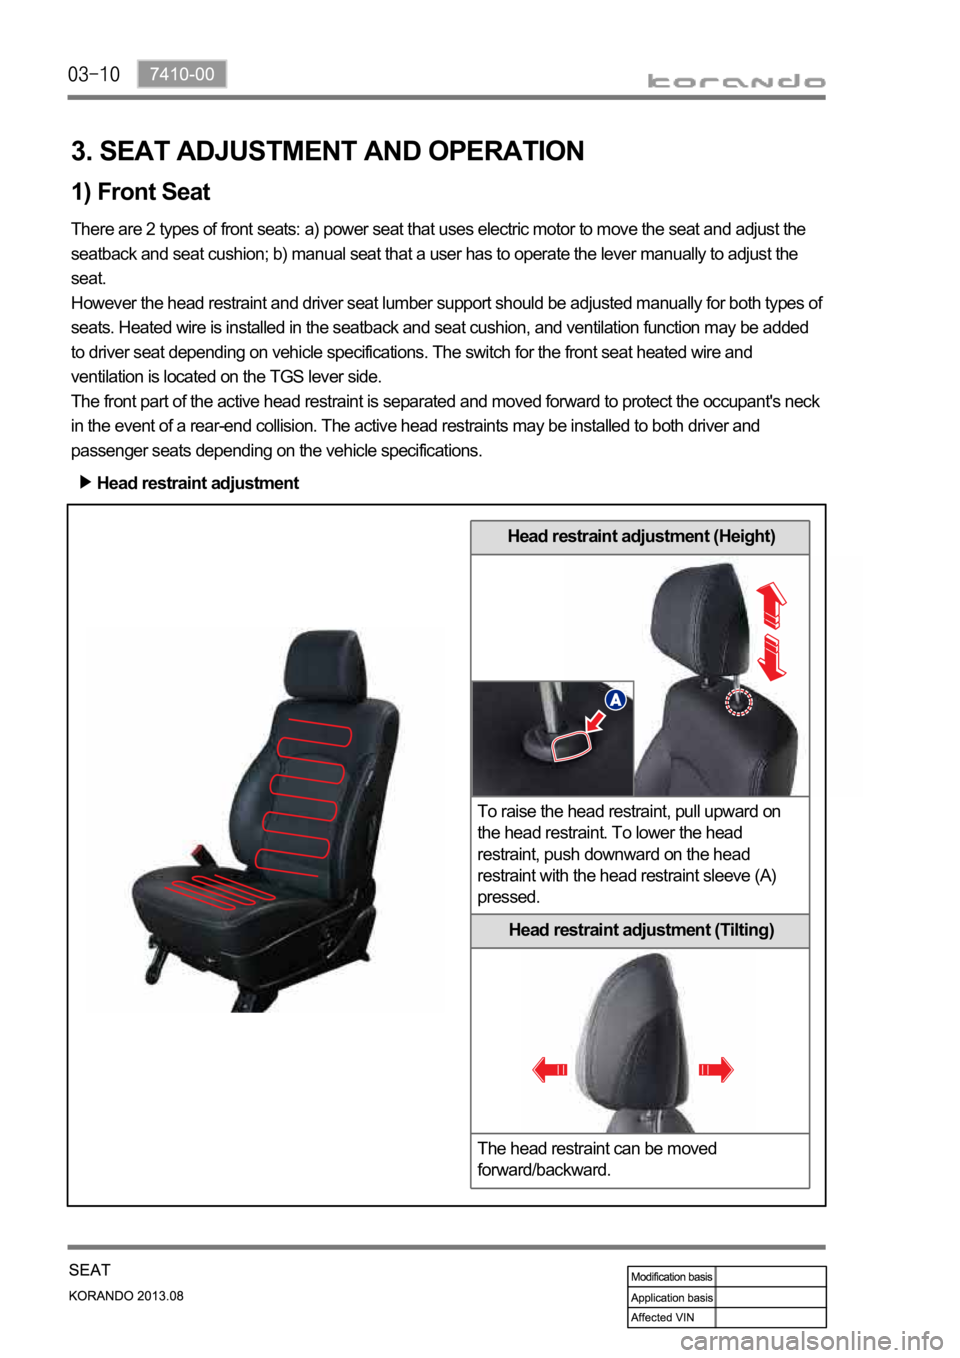
Head restraint adjustment (Height)
To raise the head restraint, pull upward on
the head restraint. To lower the head
restraint, push downward on the head
restraint with the head restraint sleeve (A)
pressed.
Head restraint adjustment (Tilting)
The head restraint can be moved
forward/backward.
3. SEAT ADJUSTMENT AND OPERATION
1) Front Seat
There are 2 types of front seats: a) power seat that uses electric motor to move the seat and adjust the
seatback and seat cushion; b) manual seat that a user has to operate the lever manually to adjust the
seat.
However the head restraint and driver seat lumber support should be adjusted manually for both types of
seats. Heated wire is installed in the seatback and seat cushion, and ventilation function may be added
to driver seat depending on vehicle specifications. The switch for the front seat heated wire and
ventilation is located on the TGS lever side.
The front part of the active head restraint is separated and moved forward to protect the occupant's neck
in the event of a rear-end collision. The active head restraints may be installed to both driver and
passenger seats depending on the vehicle specifications.
Head restraint adjustment
Page 1264 of 1336

7410-00
Power seat Manual seat
Moving the upper part of the recliner knob
forward/backward adjusts the seatback angle by
activating the recliner motor. Pull the recliner knob upward and adjust the
seatback angle with the seatback lock released.
Then release the recliner knob at the desired angle
to lock the seatback.
Power seat Manual seat
Moving the slide knob forward/backward moves
the seat forward/backward by activating the slide
motor.To move the seat forward or backward, pull up and
hold the seat slide lever and move the seat to the
desired position.
(1) Driver seat operation
Seat slide adjustment (forward/rearward)
Seatback reclining adjustment
Page 1265 of 1336

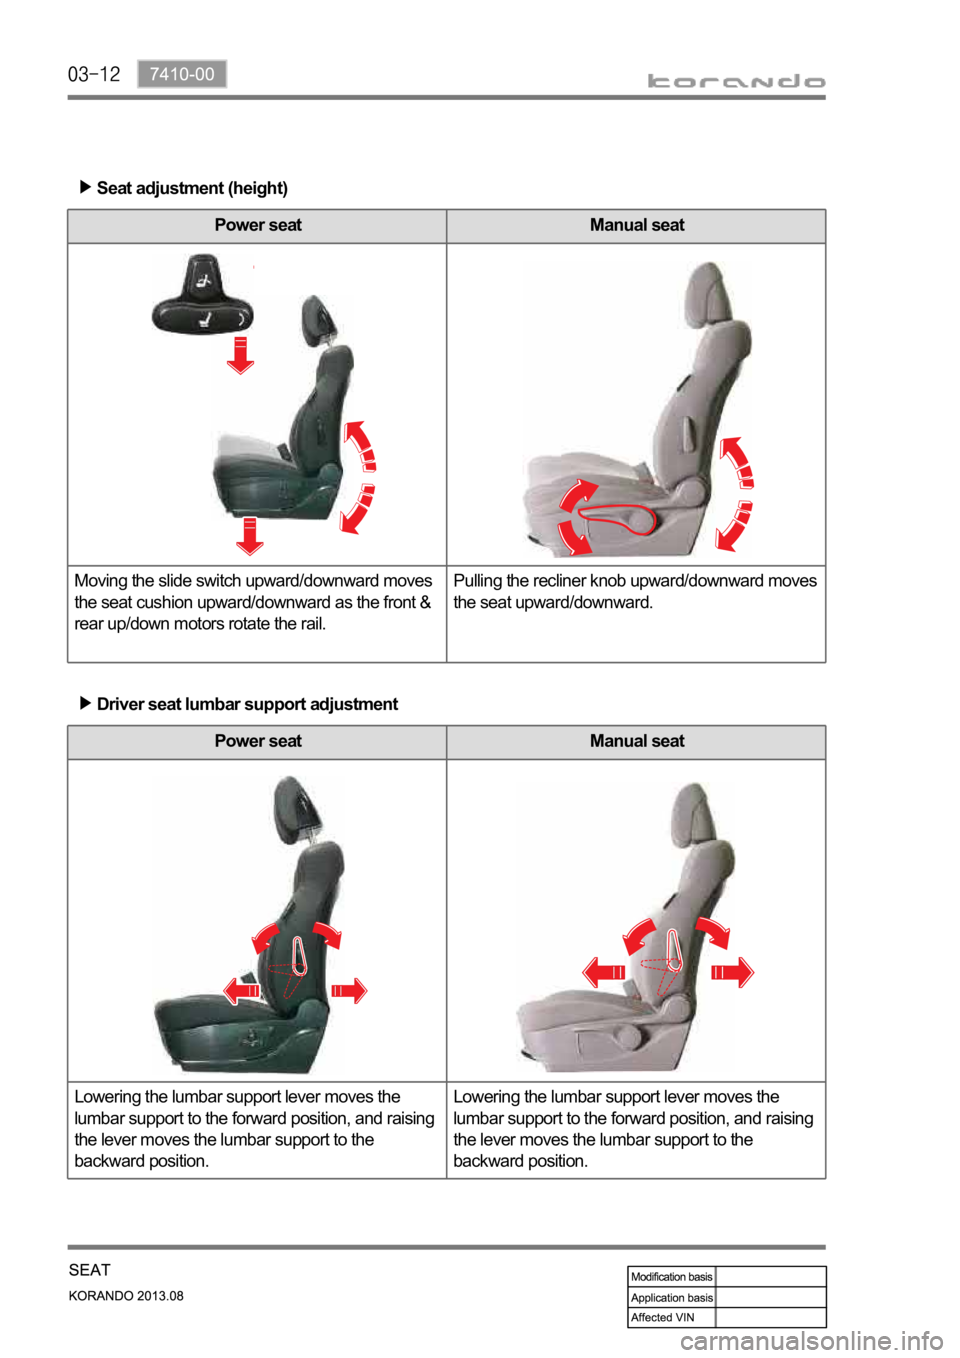
Power seat Manual seat
Lowering the lumbar support lever moves the
lumbar support to the forward position, and raising
the lever moves the lumbar support to the
backward position.Lowering the lumbar support lever moves the
lumbar support to the forward position, and raising
the lever moves the lumbar support to the
backward position.
Power seat Manual seat
Moving the slide switch upward/downward moves
the seat cushion upward/downward as the front &
rear up/down motors rotate the rail.Pulling the recliner knob upward/downward moves
the seat upward/downward.
Seat adjustment (height)
Driver seat lumbar support adjustment
Page 1266 of 1336

7410-00
Driver seat ventilation
Driver seat heated wireDriver seat heated wire switch
(vehicle with heated wire function only)
Driver seat heated wire and ventilation
switch (vehicle with heated wire and
ventilation functions)
Seat back board
(2) Driver seat heated wire and ventilation functions
Page 1267 of 1336

Seatback reclining adjustment
Pull the recliner knob upward and adjust the
seatback angle with the seatback lock released.
Then release the recliner knob at the desired
angle to lock the seatback.
Seat slide adjustment (forward/rearward)
To move the seat forward or backward, pull up
and hold the seat slide lever and move the seat
to the desired position.
Passenger seat heated wire switch
Heated wire and
ventilationHeated wirePassenger seat heated wire
(3) Passenger seat operation
Passenger seat
(4) Passenger seat heated wire and functions
Seat back board
Page 1271 of 1336

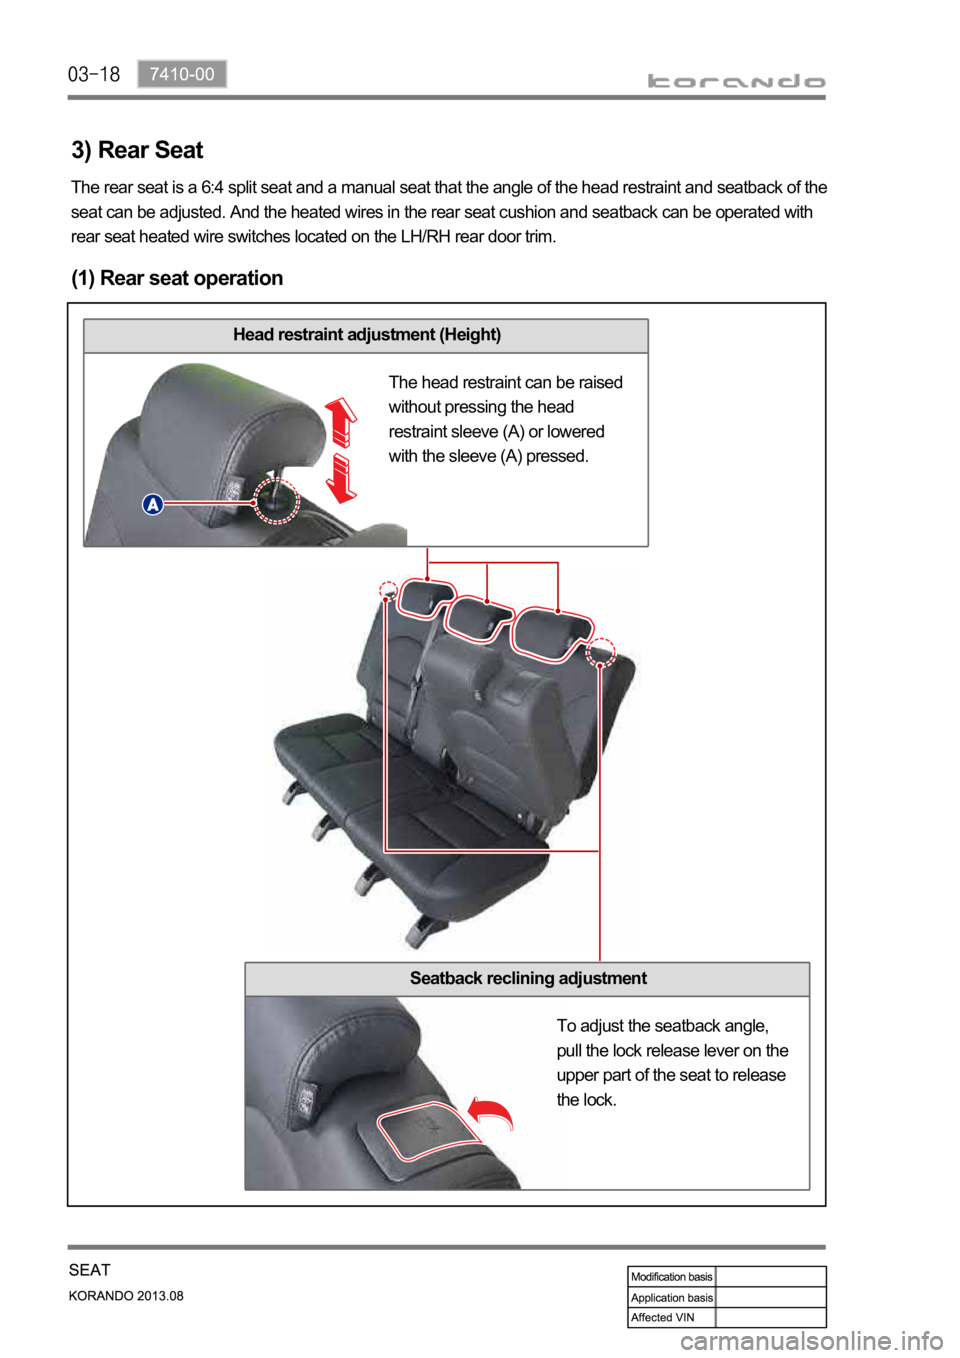
Head restraint adjustment (Height)
3) Rear Seat
(1) Rear seat operation
The rear seat is a 6:4 split seat and a manual seat that the angle of the head restraint and seatback of the
seat can be adjusted. And the heated wires in the rear seat cushion and seatback can be operated with
rear seat heated wire switches located on the LH/RH rear door trim.
The head restraint can be raised
without pressing the head
restraint sleeve (A) or lowered
with the sleeve (A) pressed.
Seatback reclining adjustment
To adjust the seatback angle,
pull the lock release lever on the
upper part of the seat to release
the lock.
Page 1272 of 1336

7410-00
Seatback folding
Rear seat heated wire
Rear seat heated wire switch
(2) Rear seat heated wire functions
Rear armrest
LH
RH
Page 1273 of 1336

Mounting location Seat heated wire and
ventilation unit
4) Front Seat Heated Wire and Ventilation Unit
(1) Front seat heated wire and ventilation unit operation
The seat heated wire and ventilation unit is mounted at the bottom of the driver seat. The temperature of
ventilation switch. Every time the seat heated wire and ventilation switch is pressed, the temperature
level goes down by one level. Pressing the switch a third time will turn off the operation. Pressing the
desired side of the switch heats the seat cushion and seatback or activates the seat ventilation function.
The temperature of the seat is kept uniform by cutting off or connecting power through thermistor fitted in
the seat. The seat heated wire and ventilation unit controls the rpm of the motor using PWM control to
operate the seat ventilation.
Seat heated wire and ventilation unit & switch application
The seat heated wire and ventilation unit is not fitted in a vehicle without seat ventilation function. -
Page 1275 of 1336

(3) Connector pin description
Seat heated wire and
ventilation unit side
Seat heated wire and
ventilation unit wiring side Pin No. Function
1IGN2
2-
3-
4 Ventilation switch
5 Heater switch (LH)
6 Heater switch (RH)
7 Heater level 1 (LH)
8 Heater level 1 (RH)
9 Ventilation level 1 (LH)
10 Heater back (LH) NTC -
11 Heater back (RH) NTC +
12 Cushion ventilation power (+)
13 Heater back (LH) HTR
14 ALT
15 -
16 -
17 -
18 -
19 -
20 Heater level 2 (LH)
21 Heater level 2 (RH)
22 Ventilation level 2 (LH)
23 Heater back (LH) NTC +
24 Heater back (RH) NTC -
25 Heater back (RH) HTR
26 Ground
Page 1282 of 1336

7410-00
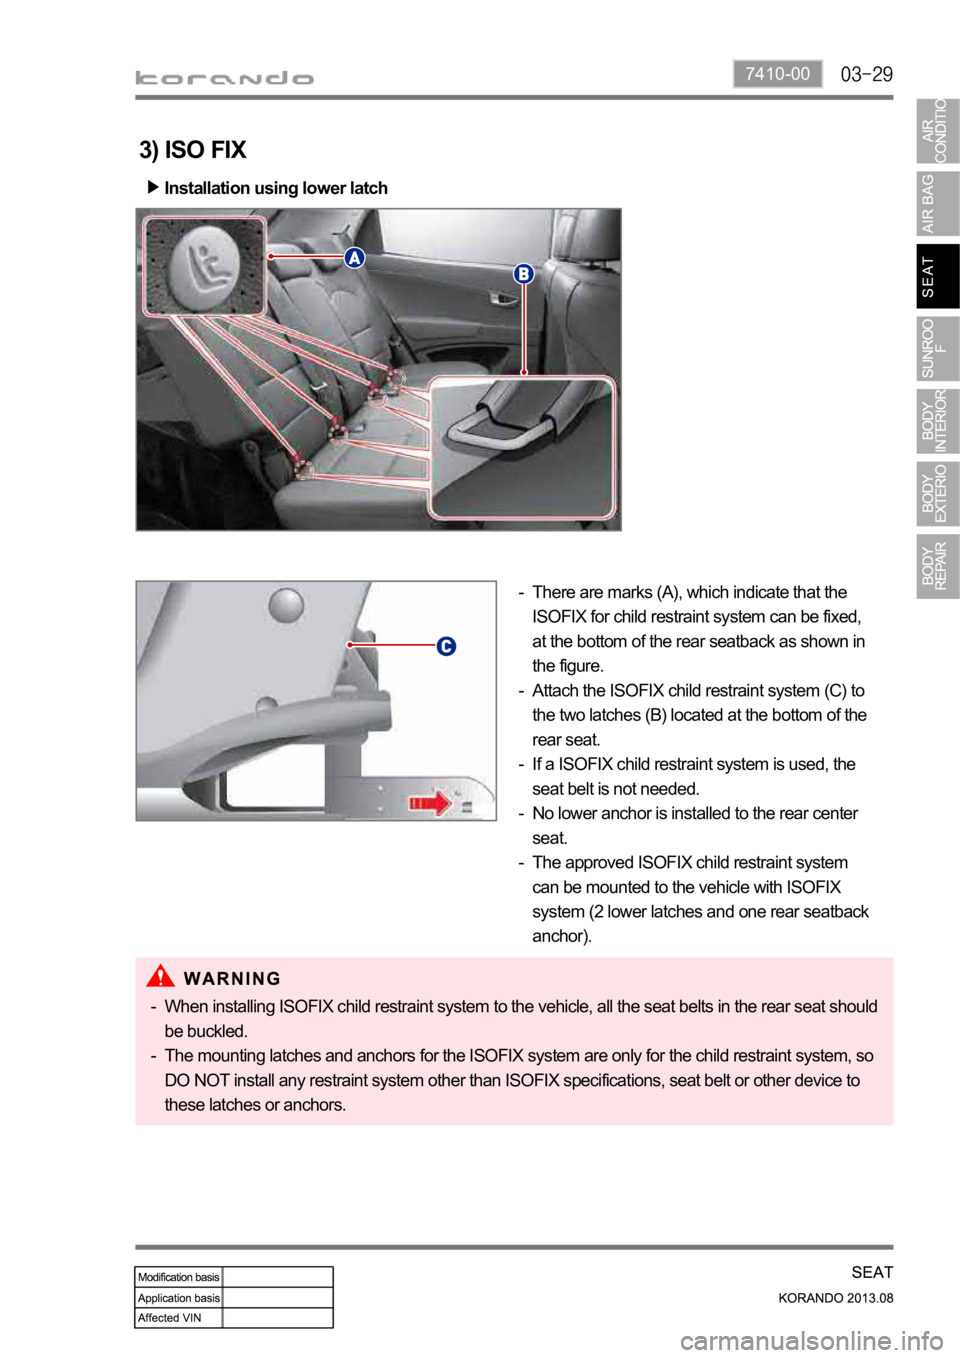
3) ISO FIX
Installation using lower latch
There are marks (A), which indicate that the
ISOFIX for child restraint system can be fixed,
at the bottom of the rear seatback as shown in
the figure.
Attach the ISOFIX child restraint system (C) to
the two latches (B) located at the bottom of the
rear seat.
If a ISOFIX child restraint system is used, the
seat belt is not needed.
No lower anchor is installed to the rear center
seat.
The approved ISOFIX child restraint system
can be mounted to the vehicle with ISOFIX
system (2 lower latches and one rear seatback
anchor). -
-
-
-
-
When installing ISOFIX child restraint system to the vehicle, all the seat belts in the rear seat should
be buckled.
The mounting latches and anchors for the ISOFIX system are only for the child restraint system, so
DO NOT install any restraint system other than ISOFIX specifications, seat belt or other device to
these latches or anchors. -
-