clock SSANGYONG MUSSO 2003 Service Manual
[x] Cancel search | Manufacturer: SSANGYONG, Model Year: 2003, Model line: MUSSO, Model: SSANGYONG MUSSO 2003Pages: 1574, PDF Size: 26.41 MB
Page 56 of 1574

1B1-20 M162 ENGINE MECHANICAL Removal & Installation Procedure
1. Remove the belt pulley.Installation Notice
2. Disconnect the hydraulic pipe of the power steering pump and drain the oil.
3. Unscrew the bolts (arrows) and remove the steering pump. Installation Notice
Notice Pull the tensioning pulley clockwise as shown in the figure.
4. Remove the compressor after disconnecting the wiring connector and refrigerant pipe of A/C compressor. Notice Discharge all the refrigerant before removing the pipes.
Tightening Torque 40.5 - 49.5 Nm
Tightening Torque 22.5 - 27.5 Nm
Page 61 of 1574

M162 ENGINE MECHANICAL 1B1-25
POLY V - BELT Preceding Work : Removal of cooling fan
1 Poly V-belt
Removal & Installation Procedure
1. Release the belt tension by turning the belt tensioning pulley nut clockwise.
2. Remove the poly v-belt.
Notice Check the belt for damage and tensioning pulley bearing
point for wear and replace them if necessary.
3. Install the belt by turning the nut of tensioning pulley clockwise.2 Belt Tensioning Pulley
Page 63 of 1574

M162 ENGINE MECHANICAL 1B1-27
TENSIONING DEVICE Preceding Work : Removal of poly v-belt
1 Belt (L = 2245)
2 Bolt Combi(M8 x 14, 3 pieces) + Washer....................................................... 22.5-27.5Nm
Removal & Installation Procedure
1. Remove the poly v-belt.
2. Remove the tensioning pulley by turning its mounting nut counter clockwise as shown in figure. Installation Notice 3 Water Pump Pulley
4 Nut
5 Tensioning Pulley
Tightening Torque 40.5 - 49.5 Nm
Page 97 of 1574

M162 ENGINE MECHANICAL 1B1-61
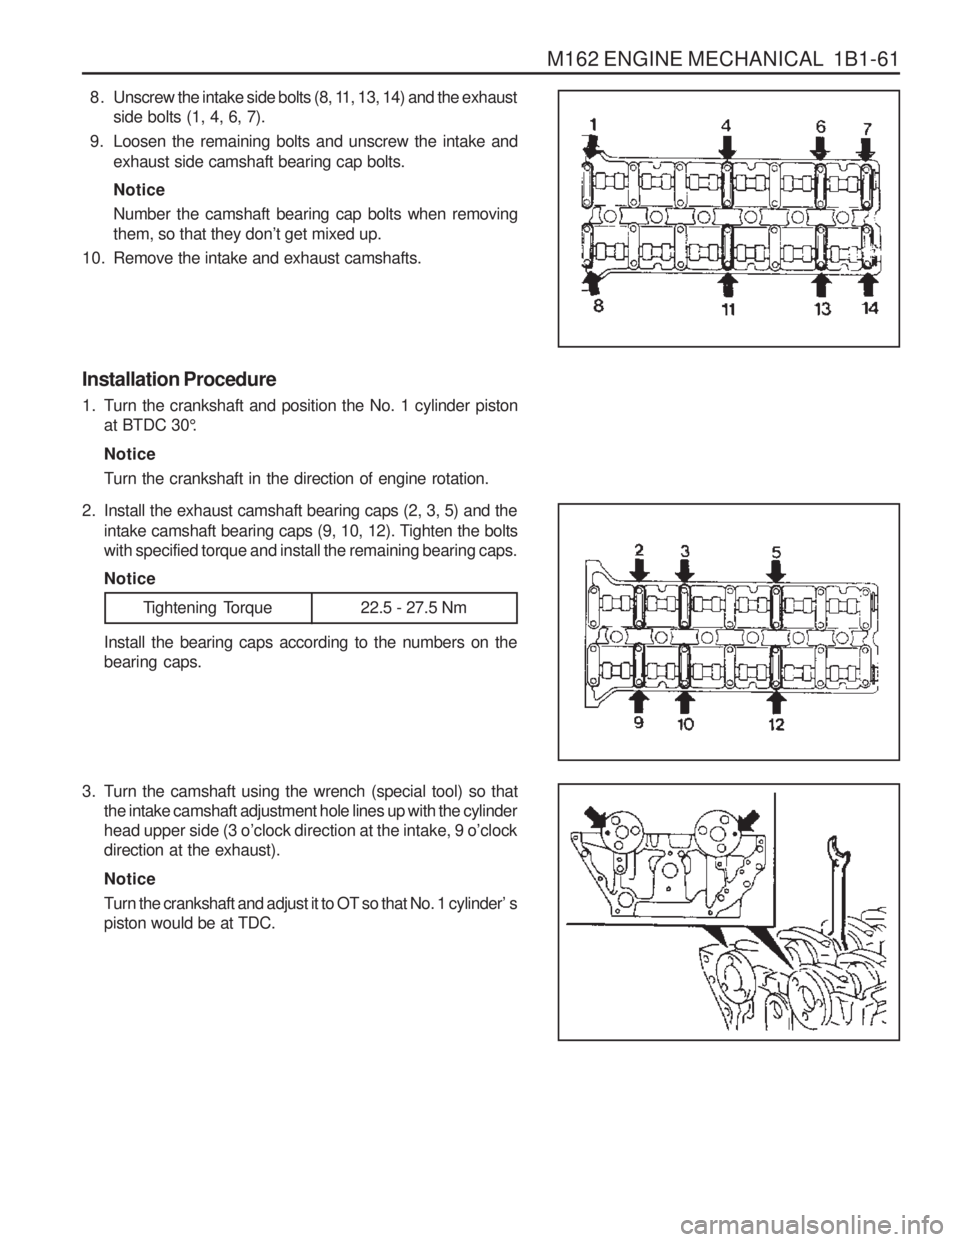
8 . Unscrew the intake side bolts (8, 11, 13, 14) and the exhaustside bolts (1, 4, 6, 7).
9. Loosen the remaining bolts and unscrew the intake and exhaust side camshaft bearing cap bolts. Notice Number the camshaft bearing cap bolts when removing them, so that they don ’t get mixed up.
10. Remove the intake and exhaust camshafts.
Installation Procedure
1. Turn the crankshaft and position the No. 1 cylinder piston at BTDC 30 °.
Notice
Turn the crankshaft in the direction of engine rotation.
3. Turn the camshaft using the wrench (special tool) so that the intake camshaft adjustment hole lines up with the cylinder head upper side (3 o ’clock direction at the intake, 9 o ’clock
direction at the exhaust). Notice
Turn the crankshaft and adjust it to OT so that No. 1 cylinder ’ s
piston would be at TDC.
Install the bearing caps according to the numbers on the bearing caps.
Tightening Torque 22.5 - 27.5 Nm
2. Install the exhaust camshaft bearing caps (2, 3, 5) and the
intake camshaft bearing caps (9, 10, 12). Tighten the bolts with specified torque and install the remaining bearing caps. Notice
Page 101 of 1574

M162 ENGINE MECHANICAL 1B1-65
Adjustment Procedure
1. Position the No.1 cylinder to BTDC 30° .
2. Remove the chain tensioner.
3. Remove the exhaust camshaft sprocket.
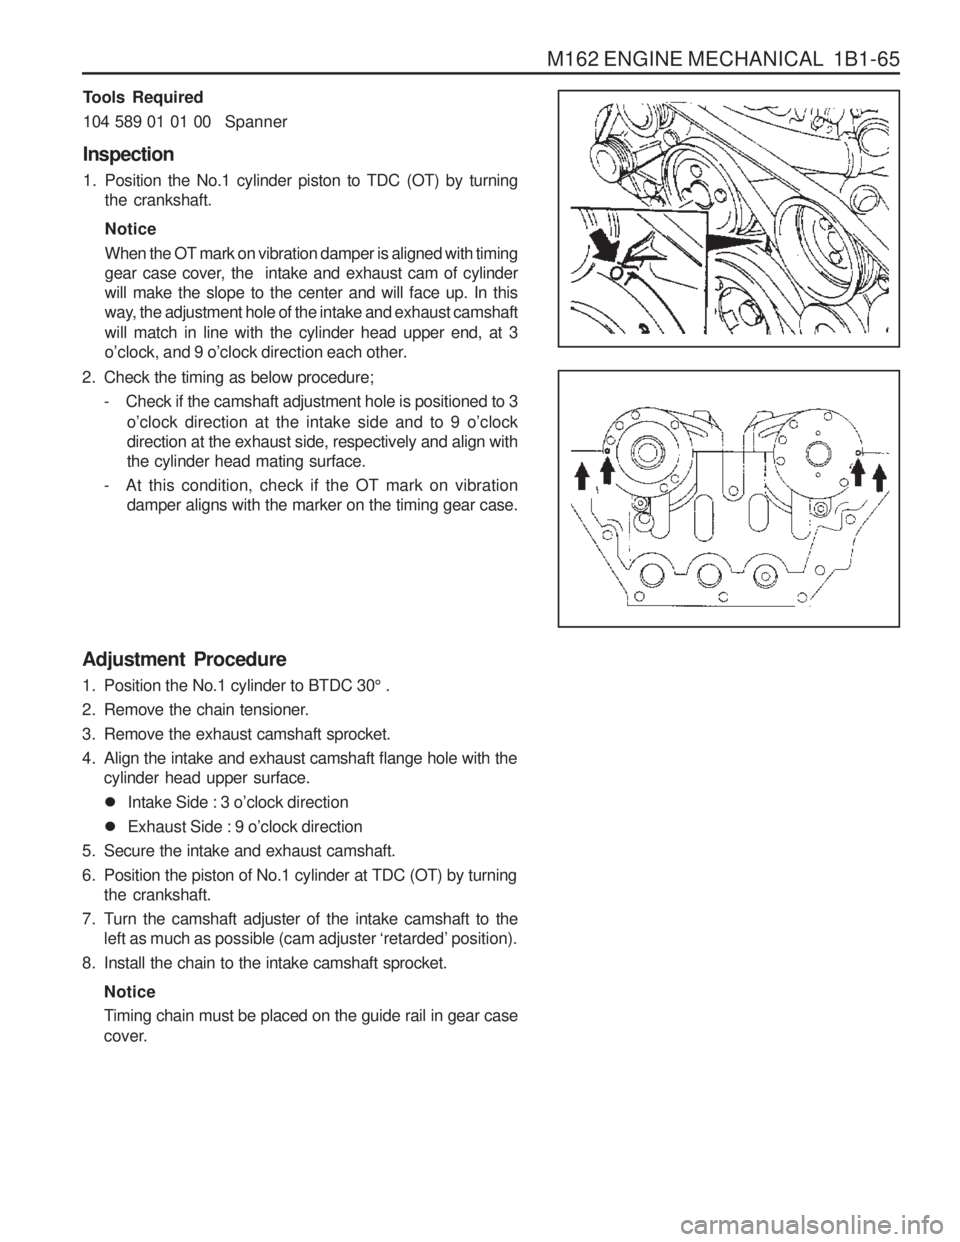
4. Align the intake and exhaust camshaft flange hole with the cylinder head upper surface.
� Intake Side : 3 o ’clock direction
� Exhaust Side : 9 o ’clock direction
5. Secure the intake and exhaust camshaft.
6. Position the piston of No.1 cylinder at TDC (OT) by turning the crankshaft.
7. Turn the camshaft adjuster of the intake camshaft to the left as much as possible (cam adjuster ‘retarded ’ position).
8. Install the chain to the intake camshaft sprocket.
Notice
Timing chain must be placed on the guide rail in gear case
cover.
Tools Required 104 589 01 01 00
Spanner
Inspection
1. Position the No.1 cylinder piston to TDC (OT) by turning the crankshaft. Notice When the OT mark on vibration damper is aligned with timing
gear case cover, the intake and exhaust cam of cylinderwill make the slope to the center and will face up. In this
way, the adjustment hole of the intake and exhaust camshaft will match in line with the cylinder head upper end, at 3
o’clock, and 9 o ’clock direction each other.
2. Check the timing as below procedure; - Check if the camshaft adjustment hole is positioned to 3 o’clock direction at the intake side and to 9 o ’clock
direction at the exhaust side, respectively and align withthe cylinder head mating surface.
- At this condition, check if the OT mark on vibration damper aligns with the marker on the timing gear case.
Page 175 of 1574

M161 ENGINE MECHANICAL 1B2-23
Removal & Installation Procedure
1. Remove the belt pulley after removal of poly v-belt.Installation Notice
2. Disconnect the hydraulic pipe of the power steering pump and drain the oil.
3. Unscrew the bolts (arrows) and remove the steering pump. Installation Notice
Notice Pull the tensioning pulley counterclockwise as shown in the figure.
4. Remove the compressor after disconnecting the wiring connector and refrigerant pipe of A/C compressor. Notice Discharge all the refrigerant before removing the pipes.
Tightening Torque 40.5 - 49.5 Nm
Tightening Torque 22.5 - 27.5 Nm
Page 180 of 1574

1B2-28 M161 ENGINE MECHANICAL
POLY V-BELT Preceding Work : Removal of cooling fan
1 Poly V-belt (2,155 mm)
2 Belt Tensioning Pulley
Removal & Installation Procedure
1. Release the belt tension by turning the stud on the cap with 12 sided wrench or spanner counterclockwise.
2. Remove the poly v-belt.
Notice Check the belt for damage and tensioning pulley bearing
point for wear and replace them if necessary.
3. Install the belt after prying the tensioning pulley.3 Belt Tensioner
Page 182 of 1574

1B2-30 M161 ENGINE MECHANICAL TENSIONING DEVICE Preceding Work : Removal of tensioning device shock absorber
1 Bolt (M8 x 75, 2 pieces) +Washer .......................................... 22.5-27.5 Nm
2 Bolt (M8 x 25, 1 pieces) + Washer .......................................... 22.5-27.5 Nm
Removal & Installation Procedure
1. Turn the stud bolt to counterclockwise.
2. Insert the pin (111 589 01 15 00) into the hole in tensioning arm.
3. Unscrew the bolts (1, 2) and remove the tensioning device.
Installation Notice
4. Installation should follow the removal procedure in the reverse order. 3 Tensioning Device
4 Stud bolt
5 Tensioning Arm
Tightening Torque 22.5 - 27.5 Nm
Page 301 of 1574

1B3-36 OM600 ENGINE MECHANICAL Setting (with cylinder head installed)
1. Remove the prechamber of No. 1 cylinder.
2. Position the piston of No.1 cylinder at BTDC 10.
3. Install the measuring device into the prechamber bore andposition the dial gauge with a preload of 5mm. Dial Gauge 001 589 53 21 00
Depth Gauge 601 589 07 21 00
4. Slowly rotate the crankshaft in the direction of engine rotation until the large pointer on the dial gauge stops (TDC position). Notice The position of TDC is when the large pointer on the dial gauge is stopped before moving back.
5. remove the reinstall the measuring device and position the dial gauge scale at ‘0’.
6. Slowly rotate the crankshaft in the direction of engine rotation until the dial gauge has moved back (counterclockwise) by3.65mm.
7. Insert fixing device into the sensor bracket. Notice The pin on the vibration damper must engage into the slot of the fixing device. Fixing Device 667 589 01 21 00
8. If the pin does not engage, adjust the setting of the sensor bracket by removing and tightening of the sensor bracketbolts.
Tightening Torque 10 Nm
Notice
The timing mark on the damper must be positioned at ATDC 20.
Page 614 of 1574

OM600 ENGINE CONTROLS 1F3-3
FUEL INJECTION PUMP CODING Model Code
PES 4M 55C 320 RS 167 PES 5M 55C 320 RS 168
Fuel Injection Pump Code Example) PES 5M 55C 320 RS 168
P Pump
E Self-Driven
S End Flange Mounting
5 Number of Cylinders (5EA)
M Pump Size
55 Element Diameter
C Modification Letter
320 Assembly Number
R Direction of Rotation (clockwise)
S188 Special Version
RSF Governor
R Governor
S Coil Spring
F Drive Governor
Component Location
1. Fuel Injection Pump
2. Vacuum Unit (Stop Unit)
3. Control Lever
4. PLA Vacuum Unit (Idle Speed Adjustment)
5. Governor
6. Fuel Pump
OM661 LA Engine OM662 LA Engine