oil pressure SSANGYONG NEW REXTON 2012 User Guide
[x] Cancel search | Manufacturer: SSANGYONG, Model Year: 2012, Model line: NEW REXTON, Model: SSANGYONG NEW REXTON 2012Pages: 600, PDF Size: 73.29 MB
Page 264 of 600

(3) Cautions before service
Prolonged exposure to the engine oil make cause a skin cancer or an irritation.
Used engine cotains the hazardous material that may cause the skin cancer. Do not allow the used
engine to make contact with your skin.
Make sure to wear the protection gloves and goggle when handling the engine oil. If contact happens,
rinse affected areas immediately with plenty of water. Do not wash it with gasoline or solvent. If
irritation persists, consult a doctor.
Improperly disposed engine oil can pollute the environment. Dispose used engine oil in accordance
with local environmental regulations. -
-
-
(5) Tightening the fastener
If fine dust or foreign material enters into DI engine's fuel system, there can be serious damages
between HP pump and injectors. So, be sure to cover removed fuel system components with cap
and protect removed parts not to be contaminated with dirt. (Refer to cleanness in this manual
while working on DI engine fuel system)
When working on the fuel line between priming pump and injector (including return line), always
plug the openings with caps to prevent foreign materials or dust from entering to the openings and
connections.
The HP fuel supply pipe (HP pump to fuel rail) and HP fuel pipe (Fuel rail to injector)
should be replaced with new ones when removed. 1.
2.
3. Scalding hot coolant and steam could be blown out under pressure, which could cause serious injury.
Never remove the coolant reservoir cap when the engine and radiator are hot.
(4) Lubrication system
3) Fuel and Oil System
If work on the fluid system such as fuel and oil, working area should be well ventilated and smoking
should be prohibited.
Gasket or seal on the fuel/lubrication system should be replaced with new ones and bolts and nuts
should be tightened as specified. -
-Clean the mating surfaces before tightening.
Place the marks with paint to tighten by angle if the angle wrench is not available. -
-
Page 266 of 600

6. TIGHTENING TORQUE
Name SizeNumbers of
fastenerTightening
torque (Nm)Note (total
tightening
torque)
Main bearing cap
10 Not-reusable
Connecting rod cap
8 50 ~80Nm
Crankshaft rear seal
6 -
Oil pump
3 -
Drive plate
8 Not-reusable
Isolation damper center
bolt
1 660~720 Nm
Not-reusable
Oil pan
18 -
2 -
2 -
2 -
2 -
Mounting nut for high
pressure pump
1 -
Mounting bolt for high
pressure pump
3 -
Cylinder head
12 85Nm-
Camshaft cap
16 -
4 -
Exhaust stud bolt 10
-
Exhaust sprocket
1 -
Chain tensioner screw
plug
1 -
Coolant temperature
sensor1
-
Belt auto tensioner
1 -
1 -
Water pump
7 -
Page 267 of 600

0000-00
Hot water inlet pipe2 -
1 -
1 -
4 25~2.5Nm -
4 -
2 -
6 -
6 -
1 -
2 -
2 -
1 10~14Nm -
1 -
M8 10
-
M8 3
-
1
-
M8 1
-
T/C oil supply pipe M6(to block) 1
-
M6
(to turbocharger)1
-
T/C oil return pipe
2 -
(to turbocharger)2
-
EGR valve
3 -
EGR pipe bolt (to exhaust
manifold)
2 -
EGR pipe bolt (to EGR
cooler)
2 -
Name SizeNumbers of
fastenerTightening
torque (Nm)Note (total
tightening
torque)
Hot water inlet pipe
2 -
Alternator
1 -
1 -
Air conditioner
compressor
4 25~2.5Nm -
Air conditioner bracket
4 -
Intake manifold
2 -
6 -
Oil filter module
6 -
1 -
2 -
Knock sensor
2 -
Camshaft position sensor
1 10~14Nm -
T-MAP pressure sensor
1 -
Exhaust manifold M8 10
-
Turbocharger M8 3
-
T/C support bolt M8 1
-
Page 268 of 600

Name SizeNumbers of
fastenerTightening
torque (Nm)Note (total
tightening
torque)
Idler pulley/tensioner
pulley1
-
Glow plug M5 4
-
Vacuum pump
3 -
Timing gear case cover
7 -
1 -
3 -
Cylinder head cover
21 -
Oil dipstick gauge cover
1 -
Oil filter cap 1
-
Fuel rail
2 -
Injector clamp bolt
2 -
High pressure pipe
(between high pressure
pump and fuel rail
assembly)M17 1
-
High pressure pipe
(between fuel rail
assembly and injector)M17 4
-
Crankshaft position
sensor
1 -
Main wiring
5 -
Intake duct
3 -
Power steering pump
3 -
Cylinder head front cover
5 -
Page 272 of 600

0000-00
Component SizeBolt
QuantitySpecified torque
(Nm)Remark
(Total torque)
Hot water inlet pipe
2 -
Alternator
1 -
1 -
A/C bracket
4 7.8~11.8Nm -
A/C sub bracket
4 -
Intake manifold
2 -
6 -
Oil filter module
6 -
1 -
2 -
Knock sensor
2 -
Cam position sensor
1 10~14Nm -
Booster pressure sensor
2 -
Exhaust manifold M8 10
-
Turbocharger M8 3
-
Support bolt 1
-
Support nut M8 1
-
T/C oil supply pipe M6(block side) 1
-
M6(turbo side) 1
-
T/C oil return pipe
2 -
2 -
EGR valve
2 -
EGR pipe bolt
(Intake side)
2 -
EGR pipe bolt
(EGR cooler side)
2 -
EGR combination bolt
4 -
16 -
Idle pulley/Tensioner
pulley1
-
Page 273 of 600

Component SizeBolt
QuantitySpecified torque
(Nm)Remark
(Total torque)
Glow plug M5 4
-
Vacuum pump
3 -
Timing gear case cover
3 -
7 -
1 -
3 -
Cylinder head cover
21 -
Oil gauge tube
1 -
Oil filter cap 1
-
Fuel rail
2 -
Injector clamp bolt
2 -
High pressure pipe
(between HP pump and
fuel rail)M17 1
-
High pressure pipe
(between fuel rail and
injector)M17 4
-
Crank position sensor
1 -
Main wiring
5 -
Intake duct M8x25 4
-
Power steering pump
3 -
Cylinder head front cover
5 -
Ladder frame
5 -
Oil pump
3 -
Page 275 of 600

(2) Cylinder pressure leakage test
If the measured value of the compression pressure test is not within the specifications, perform the
cylinder pressure leakage test.Specified value
Perform this test in the sequence of firing order.
Do not test the cylinder pressure leakage with wet type test procedure. (do not inject the engine oil
into the combustion chamber) -
-
Test condition: normal engine operating Specified value
Whole engine below 25%
at valve and cylinder head gasket below 10%
at piston ring below 20%
Crank the engine for approx. 10 seconds by
using the start motor. 2.
Record the test result and measure the
compression pressure of other cylinders with
same manner. 3.
If the measured value is out of specified
value, perform the cylinder pressure leakage
test. 4.
Page 285 of 600

Brake booster and naster
cylinderVacuum pump
Pump capacity: 210 cc/rev
Camshaft speed: 375 to 3,000 rpm
Lubrication temperature: -40 to
Oil: 5W30
Drive type: Driven by exhaust
Camshaft sprocket
2. VACUUM PUMP
Vacuum pump generates the vacuum pressure and supplies it to EGR cooler bypass solenoid. This
pump is single vane type and displacement is 210 cc/rev. The lubrication oil is supplied through the hole
in hollow shaft.
Components
EGR cooler bypass valve
This valve is controlled by ECU.
When the engine is cooled, the
exhaust gas goes to combustion
chamber without passing through
EGR cooler because the valve is
closed by vacuum pressure.
Page 297 of 600

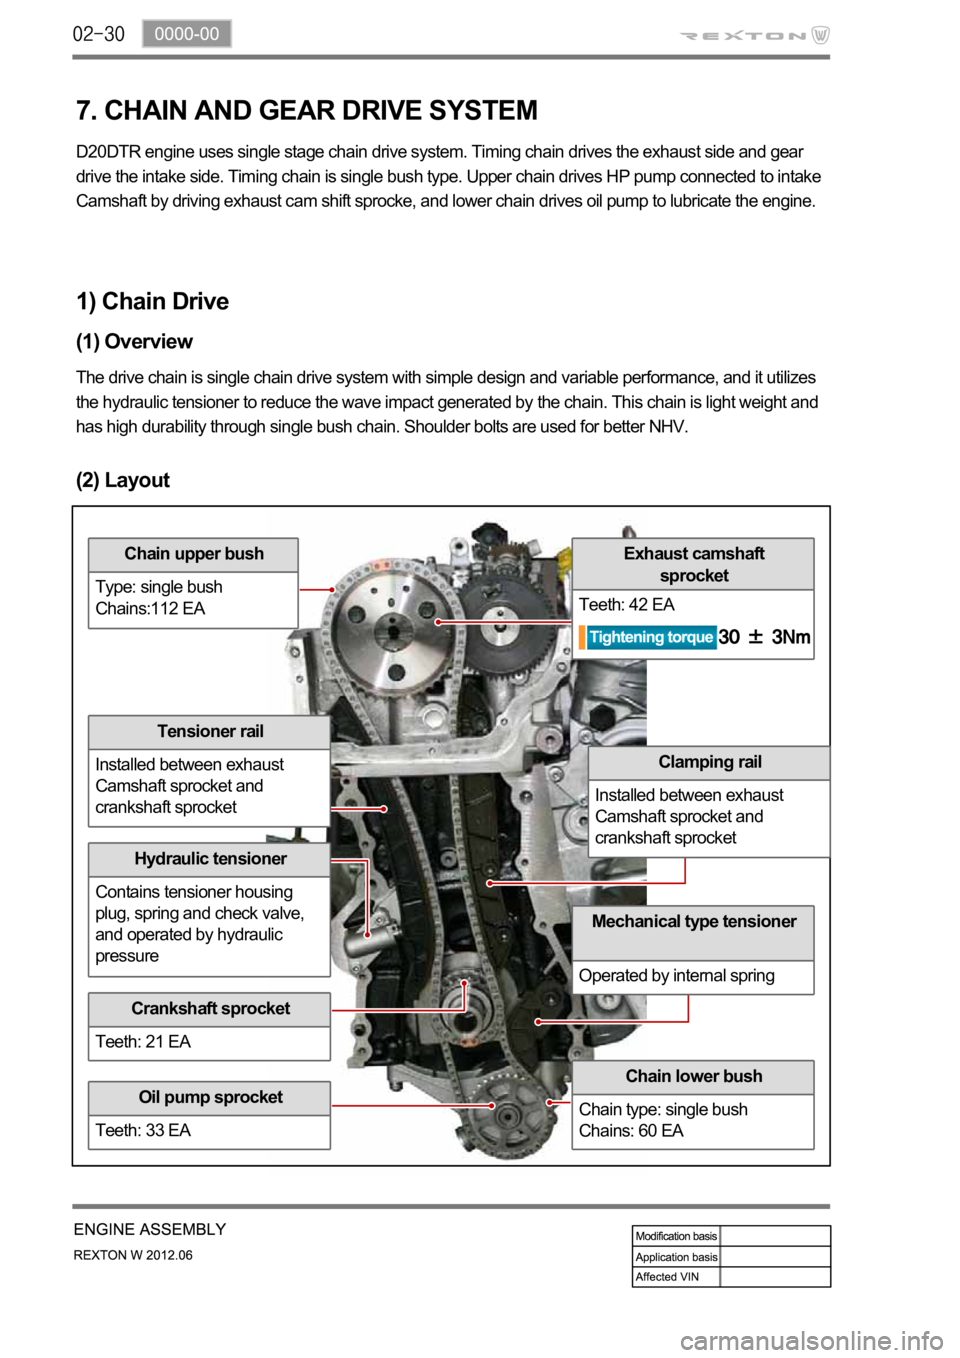
(2) Layout
Chain upper bush
Type: single bush
Chains:112 EA
Tensioner rail
Installed between exhaust
Camshaft sprocket and
crankshaft sprocket
Hydraulic tensioner
Contains tensioner housing
plug, spring and check valve,
and operated by hydraulic
pressure
Crankshaft sprocket
Teeth: 21 EA
Oil pump sprocket
Teeth: 33 EA
Chain lower bush
Chain type: single bush
Chains: 60 EA
Mechanical type tensioner
Operated by internal spring
Clamping rail
Installed between exhaust
Camshaft sprocket and
crankshaft sprocket
Exhaust camshaft
sprocket
Teeth: 42 EA
1) Chain Drive
(1) Overview
The drive chain is single chain drive system with simple design and variable performance, and it utilizes
the hydraulic tensioner to reduce the wave impact generated by the chain. This chain is light weight and
has high durability through single bush chain. Shoulder bolts are used for better NHV.
7. CHAIN AND GEAR DRIVE SYSTEM
D20DTR engine uses single stage chain drive system. Timing chain drives the exhaust side and gear
drive the intake side. Timing chain is single bush type. Upper chain drives HP pump connected to intake
Camshaft by driving exhaust cam shift sprocke, and lower chain drives oil pump to lubricate the engine.
Page 318 of 600

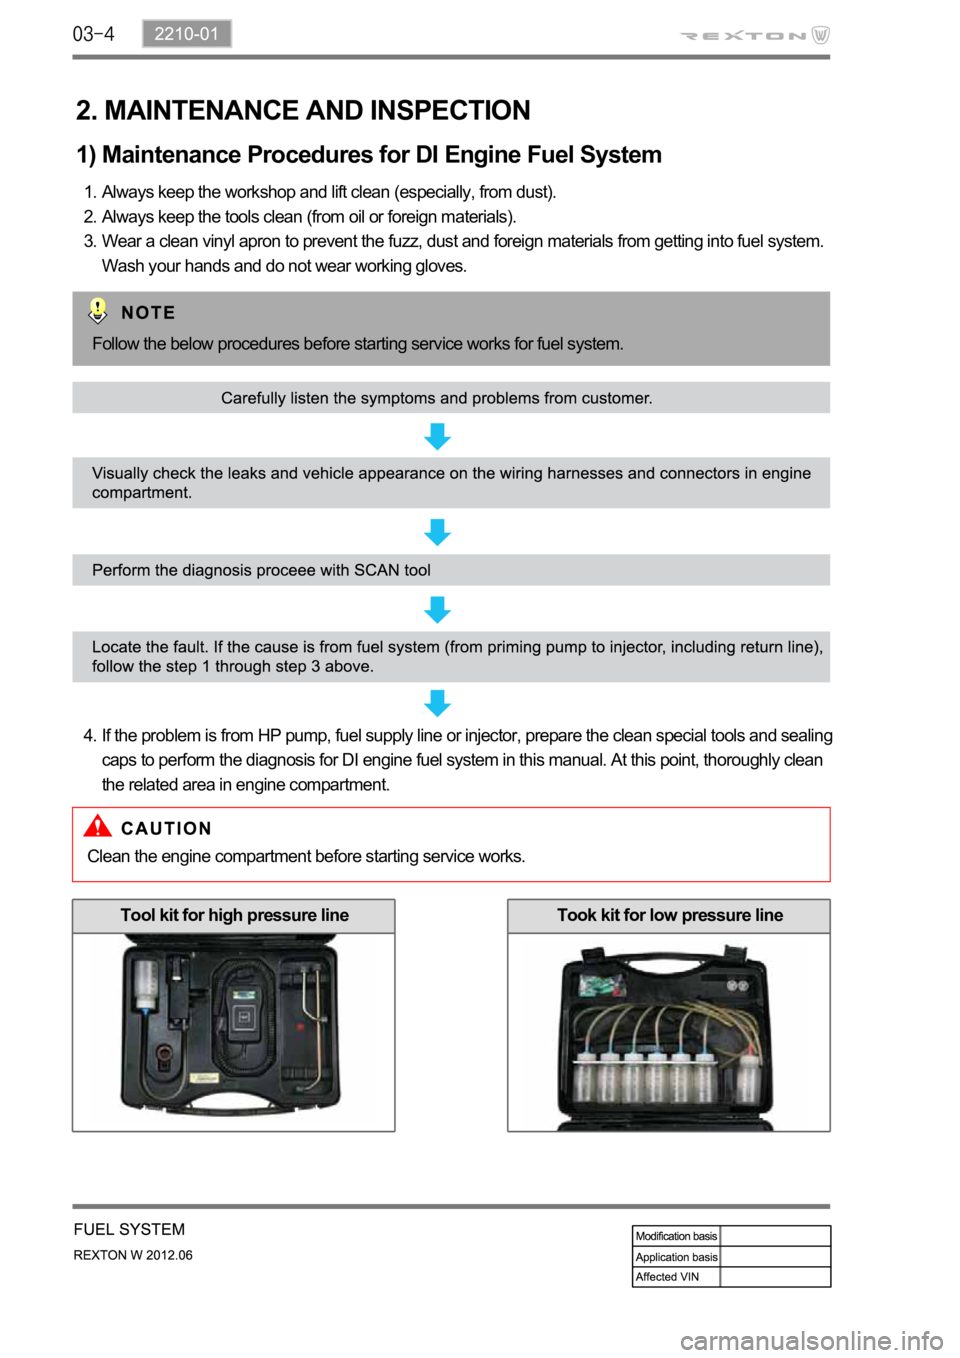
2. MAINTENANCE AND INSPECTION
1) Maintenance Procedures for DI Engine Fuel System
Always keep the workshop and lift clean (especially, from dust).
Always keep the tools clean (from oil or foreign materials).
Wear a clean vinyl apron to prevent the fuzz, dust and foreign materials from getting into fuel system.
Wash your hands and do not wear working gloves. 1.
2.
3.
Follow the below procedures before starting service works for fuel system.
If the problem is from HP pump, fuel supply line or injector, prepare the clean special tools and sealing
caps to perform the diagnosis for DI engine fuel system in this manual. At this point, thoroughly clean
the related area in engine compartment. 4.
Clean the engine compartment before starting service works.
Tool kit for high pressure lineTook kit for low pressure line