light SSANGYONG RODIUS 2005 Service Manual
[x] Cancel search | Manufacturer: SSANGYONG, Model Year: 2005, Model line: RODIUS, Model: SSANGYONG RODIUS 2005Pages: 502, PDF Size: 70.43 MB
Page 4 of 502

0-4RODIUS 2005.07
0000-00
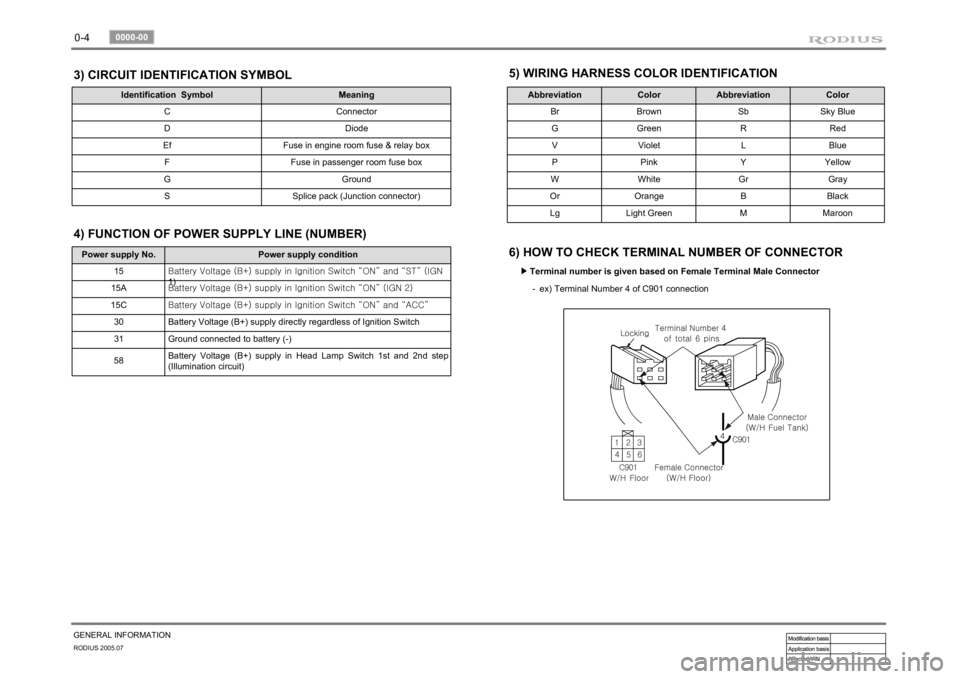
GENERAL INFORMATION3) CIRCUIT IDENTIFICATION SYMBOL
Identification Symbol Meaning
C Connector
D Diode
Ef Fuse in engine room fuse & relay box
F Fuse in passenger room fuse box
G Ground
S Splice pack (Junction connector)
5) WIRING HARNESS COLOR IDENTIFICATION
Abbreviation Color Abbreviation Color
Br Brown Sb Sky Blue
G Green R Red
V Violet L Blue
P Pink Y Yellow
W White Gr Gray
Or Orange B Black
Lg Light Green M Maroon
6) HOW TO CHECK TERMINAL NUMBER OF CONNECTOR
Terminal number is given based on Female Terminal Male Connector ▶
ex) Terminal Number 4 of C901 connection -
Power supply No. Power supply condition
15<00690088009b009b008c009900a00047007d00960093009b0088008e008c0047004f0069005200500047009a009c00970097009300a000470090009500470070008e00950090009b0090009600950047007a009e0090009b008a008f004702c80076007502
c9004700880095008b004702c8007a007b02c90047004f0070>GN
1)
15A<00690088009b009b008c009900a00047007d00960093009b0088008e008c0047004f0069005200500047009a009c00970097009300a000470090009500470070008e00950090009b0090009600950047007a009e0090009b008a008f004702c80076007502
c90047004f0070006e0075004700590050>
15C<00690088009b009b008c009900a00047007d00960093009b0088008e008c0047004f0069005200500047009a009c00970097009300a000470090009500470070008e00950090009b0090009600950047007a009e0090009b008a008f004702c80076007502
c9004700880095008b004702c80068006a006a02c9>
30 Battery Voltage (B+) supply directly regardless of Ignition Switch
31 Ground connected to battery (-)
58Battery Voltage (B+) supply in Head Lamp Switch 1st and 2nd step
(Illumination circuit)4) FUNCTION OF POWER SUPPLY LINE (NUMBER)
Page 5 of 502

0-5
GENERAL INFORMATION
RODIUS 2005.07
0000-00
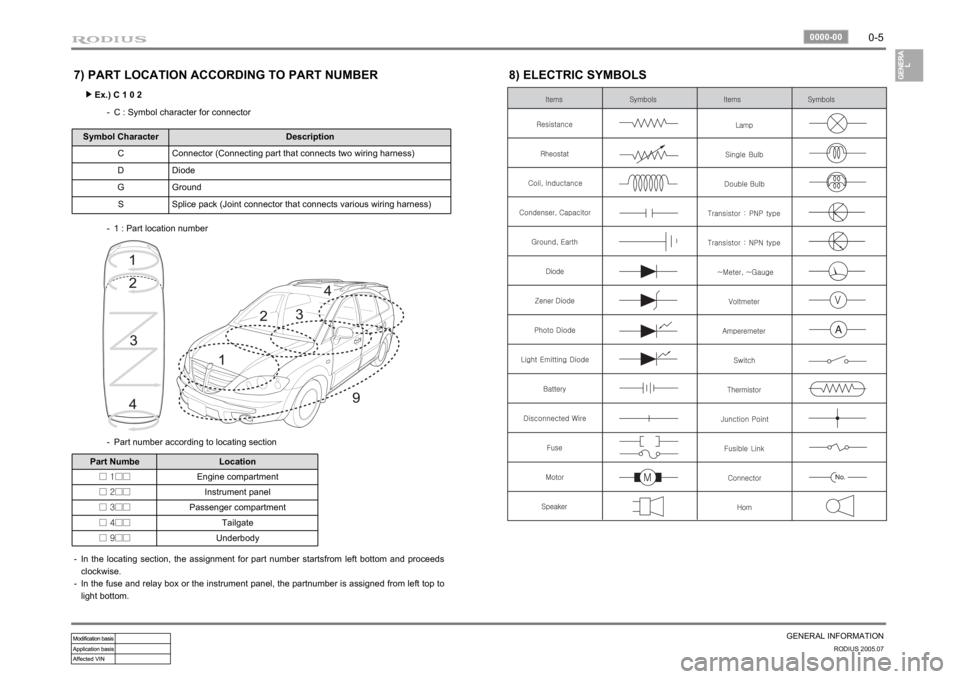
7) PART LOCATION ACCORDING TO PART NUMBER
Ex.) C 1 0 2 ▶
C : Symbol character for connector -
Symbol Character Description
C Connector (Connecting part that connects two wiring harness)
D Diode
G Ground
S Splice pack (Joint connector that connects various wiring harness)
1 : Part location number -
Part number according to locating section -
Part Numbe Location
□ 1□□Engine compartment
□ 2□□Instrument panel
□ 3□□Passenger compartment
□ 4□□Tailgate
□ 9□□Underbody
In the locating section, the assignment for part number startsfrom left bottom and proceeds
clockwise.
In the fuse and relay box or the instrument panel, the partnumber is assigned from left top to
light bottom. -
-
8) ELECTRIC SYMBOLS
Page 47 of 502

CIRCUIT
1461-01/2820-01/1491-01/1491-01/8210-01/3670-01/3670-03/3410-01/4891-01/4920-01/4480-01/8810-01/8010-01/8610-04/8610-11/7421-60/8510-52/8610-17/8510
-
20
/
8710-03/8510-03/8710-03/8510-12/8610-09/7630-02/7340-03/8310-01/8510-00/8320-01/8510-26/8510-24/4810-10/8610-01/7770-07/8910-01/8730-01/6810-21/6910
-
01
/
6810-30/6810-30
CIRCUIT
ENGINE
8910-01 AUDIO (MULTI VISION)................
8910-01 AUDIO..........................................
8730-01 PARKING AID CIRCUIT................
6810-21 PTC HEATER (POSITIVE
TEMPERATURE
COEFFICIENT).............................
6910-01 FFH (FUEL FIRED HEATER).........
6810-30 FATC (FULL AUTO TEMP.
CONTROL) CIRCUIT....................
6810-30 AIR-CON (MANUAL).....................
CHASSIS3670-01 TCU (5-SPEED)............................
3670-03 TOD.............................................
3410-01 TCCU...........................................
4891-01 ABS/ESP......................................
4920-01 EPB..............................................
4480-01 EAS..............................................ELECTRIC
8610-17 DEFFOGER (FRT GLASS, RR
GLASS, OUTSIDE MIRROR)........
8510-20 FRT SEAT WARMER...................
8510-20 AUTO LIGHT CORTROL CIRC.....
8710-03 STICS..........................................
8510-03 POWER WINDOW CIRCUIT.........
8710-03 CENTRAL DOOR LOCKING
CIRCUIT.......................................
8510-12 RR WIPER & WASHER
CIRCUIT.......................................
8610-09 HORN...........................................
7630-02 CIGAR LIGHTER, POWER
OUTLET......................................
7340-03 SUN ROOF CIRCUIT....................
8310-01 HEAD LAMP & DRL (DAY TIME
RUNNING LIGHT) UNIT
CIRCUIT.......................................
8510-00 HEAD LAMP LEVELING DEVICE
CIRCUIT.......................................
8320-01 TAIL LAMP CIRCUIT...................
8510-26 TURN SIGNAL & HAZARD LAMP
CIRCUIT.......................................
8510-24 FOG LAMP CIRCUIT....................
4810-10 STOP & BACK-UP LAMP
CIRCUIT.......................................
8610-01 INTERIOR LAMP(ROOM,
G/HENDLE, DOOR COURTESY)
CIRCUIT......................................
7770-07 AUTO DIMMING ROOM MIRROR
CIRCUIT....................................... 8810-01 AIR-BAG.......................................
8010-01 CLUSTER.....................................
8610-04 MULTI METER.............................
8610-11 RAIN SENSING WIPER
CIRCUIT.......................................
7421-60 DRIVER POWER SEAT
CIRCUIT.......................................
8510-52 ELECTRIC OUTSIDE MIRROR &
FOLDING CIRCUIT.......................49
52
53
54
55
56
59
12
14
15
16
18
19
20
21
24
25
26
2728
29
30
31
35
36
37
38
39
40
41
42
43
44
45
46
47
48 1461-01 STARTING & CHARGING............
2820-01 PREHEATING UNIT CIRCUIT
(XDi))............................................
1491-01 ECU (ENGINE CONTROL UNIT -
XDi)..............................................
1491-01 ECU (GSL G32)............................
8210-01 DIAGNOSIS CIRCUIT...................3
4
5
8
11
Page 76 of 502

0-30RODIUS 2005.07
8510-20
CIRCUIT8510-20
AUTO LIGHT CORTROL CIRC
1) CONNECTOR INFORMATION 2) CONNECTOR IDENTIFICATION SYMBOL & PIN NUMBER POSITION
Page 85 of 502

0-39
CIRCUIT
RODIUS 2005.07
7630-02
7630-02
CIGAR LIGHTER, POWER OUTLET
2) CONNECTOR IDENTIFICATION SYMBOL & PIN NUMBER POSITION
1) CONNECTOR INFORMATION
Page 87 of 502

0-41
CIRCUIT
RODIUS 2005.07
8310-01
8310-01
HEAD LAMP & DRL
2) CONNECTOR IDENTIFICATION SYMBOL & PIN NUMBER POSITION
1) CONNECTOR INFORMATION
HEAD LAMP & DRL
(DAY TIME RUNNING LIGHT) UNIT CIRCUIT
Page 122 of 502

07-6
RODIUS 2005.07
2110-01
ENGINE COOLING SYSTEM
2. DESCRIPTION AND OPERATION
1) GENERAL DESCRIPTION
The cooling system maintains the engine temperature at an efficient level during all engine
operating conditions. When the engine is cold, the cooling system cools the engine slowly o
r
not at all. This slow cooling of the engine allows the engine to warm up quickly.
The cooling system includes a radiator and recovery subsystem, cooling fans, a thermostat and
housing, a water pump, and a water pump drive belt. The timing belt drives the water pump.
All components must function properly for the cooling system to operation. The water pump
draws the coolant from the radiator. The coolant then circulates through water jackets in the
engine block, the intake manifold, and the cylinder head. When the coolant reaches the
operating
temperature of the thermostat, the thermostat opens. The coolant then goes back to the
radiator where it cools.
This system directs some coolant through the hoses to the heat core. This provides for heating
and defrosting. The coolant reservoir is connected to the radiator to recover the coolant
displaced by expansion from the high temperatures. The coolant reservoir maintains the correct
coolant level.
The cooling system for this vehicle has no radiator cap or filler neck. The coolant is added to
the cooling system through the coolant reservoir.
2) RADIATOR
This vehicle has a lightweight tube-and-fin aluminum radiator. Plastic tanks are mounted on the
upper and the lower sides of the radiator core.
On vehicles equipped with automatic transaxles, the transaxle fluid cooler lines run through the
radiator tank. A radiator drain plug is on this radiator.
To drain the cooling system, open the drain plug.
Page 131 of 502

05-5
ENGINE EXHAUST SYSTEM
RODIUS 2005.07
2411-01
4. CATALYTIC CONVERTE STRUCTURE
The Catalytic converter of monolith type
consists of 2 walled metal bodies which is
made of Cordierite.
The principal element of converter consists
of the materials like Alumina or oxidized
Serume in order to apply to Ceramic
Monolith.
Washer coat operates first, and catalytic
metal elements (Pt, Pd, Rh) operates to
washer coat next.
Monolith type is lighter than other types,
easy to manufacture and quickly approaches
to proper temperature.
Washer coat is used to make a contact
surface with exhaust gas bigger by adhering
closely to small holes of inner layer.
If a lead compound or phosphorus adheres
to the surface and the temperature rises, its
surface is decreased.
The total area of general monolith converte
r
is about 45,000 ~ 500,000 ft3. (10 times of a
football field)
Generally Alumina (AL2 O3) is used as a
raw material and its 7 phases of gamma,
delta, theta have big areas and high stability
for the temperature, and nowadays gamma
Alumina is used usually.
Page 143 of 502

08-5
ENGINE ELECTRIC SYSTEM
RODIUS 2005.07
1452-01
1. DESCRIPTION AND OPERATION OF ENGINE
ELECTRICAL SYSTEM
1) BATTERY
The sealed battery is standard on all cars. There are no vent plugs in the cover. The battery is
completely sealed, except for two small vent holes in the sides.
These vent holes allow the small amount of gas pro-duced in the battery to escape. The battery
has the following advantages over conventional batteries:
No water addition for the life of the battery.
Overcharge protection. If too much voltage is applied to the battery, it will not accept as
much current as a conventional battery. In a conventional battery, the excess voltage will
still try to charge the battery, leading to gassing, which causes liquid loss.
Not as liable to self-discharge as a conventional battery. This is particularly important when
a battery is left standing for long periods of time.
More power available in a lighter, smaller case. -
-
-
-
The battery has three major functions in the electrical system. First, the battery provides a
source of energy for cranking the engine. Second, the battery acts as a voltage stabilizer for the
electrical system. Finally, the battery can, for a limited time, provide energy when the electrical
demand exceeds the output of the alternator.
2) RATINGS
A battery has two ratings: (1) a reserve capacity rating designated at 27°C (80°F), which
is the time a fully charged battery will provide 25 amperes of current flow at or above 10.5 volts;
(2) a cold cranking amp rating determined under testing at -18°C (0°F), which indicates
the cranking
load capacity.
▶Reserve Capacity
The reserve capacity (RC) is the maximum length of time it is possible to travel at night with the
minimum electrical load and no alternator output. Expressed in minutes, the RC rating is the
time required for a fully charged battery, at a temperature of 27 °C (80 °F) and being
discharged at
a current of 25 amperes, to reach a terminal voltage of 10.5 volts.
▶Cold Cranking Amperage
The cold cranking amperage test is expressed at a battery temperature of -18°C (0°F).
The current rating is the minimum amperage, which must be maintained by the battery for 30
seconds at the specified temperature, while meeting a minimum voltage requirement of 7.2
volts. This
rating is a measure of cold cranking capacity.
The battery is not designed to last indefinitely. However, with proper care, the battery will
provide many years of service. If the battery tests well, but fails to perform satisfactorily
in service for no apparent reason, the following factors may point to the cause of the trouble:
Page 146 of 502

08-8
RODIUS 2005.07
1452-01
ENGINE ELECTRIC SYSTEM
6) JUMP STARTING PROCEDURE
Position the vehicle with the charged battery so that the jumper cables will reach from the
charged battery to the battery that requires charging.
Turn off the ignition, all the lights, and all the electrical loads in both vehicles.
Leave the hazard flasher on if jump starting where there may be other traffic and any other
lights needed for the work area.
Apply the parking brake firmly in both vehicles. 1.
2.
3.
4.
In order to avoid damaging the vehicle make sure the cables are not on or near pulleys, fans,
or
other parts that will move when the engine starts.
Shift an automatic transmission to PARK. 5.
In order to avoid injury, do not use cables that have loose or missing insulation.
Clamp one end of the first jumper cable to the positive terminal on the booster battery. Make
sure it does not touch any other metal parts.
Clamp the other end of the same cable to the positive terminal on the discharged battery.
Never connect the other end to the negative terminal of the discharged battery. 6.
7.
Do not attach the cable directly to the neg-ative terminal of the discharged battery. Doing so
could cause sparks and possible battery explosion.
Clamp one end of the second cable to the negative terminal of the booster battery.
Make the final connection to a solid engine ground, such as the engine lift bracket at least
450 millimeters (18 inches) from the discharged battery.
Start the engine of the vehicle with the good battery.
Run the engine at a moderate speed for several minutes.
Then start the engine of the vehicle with the discharged battery.
Remove the jumper cables by reversing the above sequence exactly, removing the
negative cable from the vehicle with the discharged battery first. While removing each
clamp, take care that it does not touch any other metal while the other end remains
attached. 8.
9.
10.
11.
12.
7) ALTERNATOR
Alternators are equipped with internal regulators. Unlike three-wire alternators, the alternator
may be used with only two connections: battery positive and an “D+” terminal to the
charge indicator lamp.
As with other charging systems, the charge indicator lamp lights when the ignition switch is
turned to RUN, and goes out when the engine is running. If the charge idicator is on with the
engine running, a charging system defect is indicated. This indicator light will glow at full
brilliance for several kinds of defects as well as when the system voltage is too high or too low.
The regulator voltage setting varies with temperature and limits the system voltage by
controlling rotor field current. Achieve correct average field current for proper system voltage
control by varying the on-off time. At high speeds, the on-time may be 10 percent and the off-
time 90 percent. At low speeds, with high electrical loads, the on-time may be 90 percent and
the off-time 10 percent.