lock SUBARU ASCENT 2021 Getting Started Guide
[x] Cancel search | Manufacturer: SUBARU, Model Year: 2021, Model line: ASCENT, Model: SUBARU ASCENT 2021Pages: 140, PDF Size: 45.48 MB
Page 4 of 140
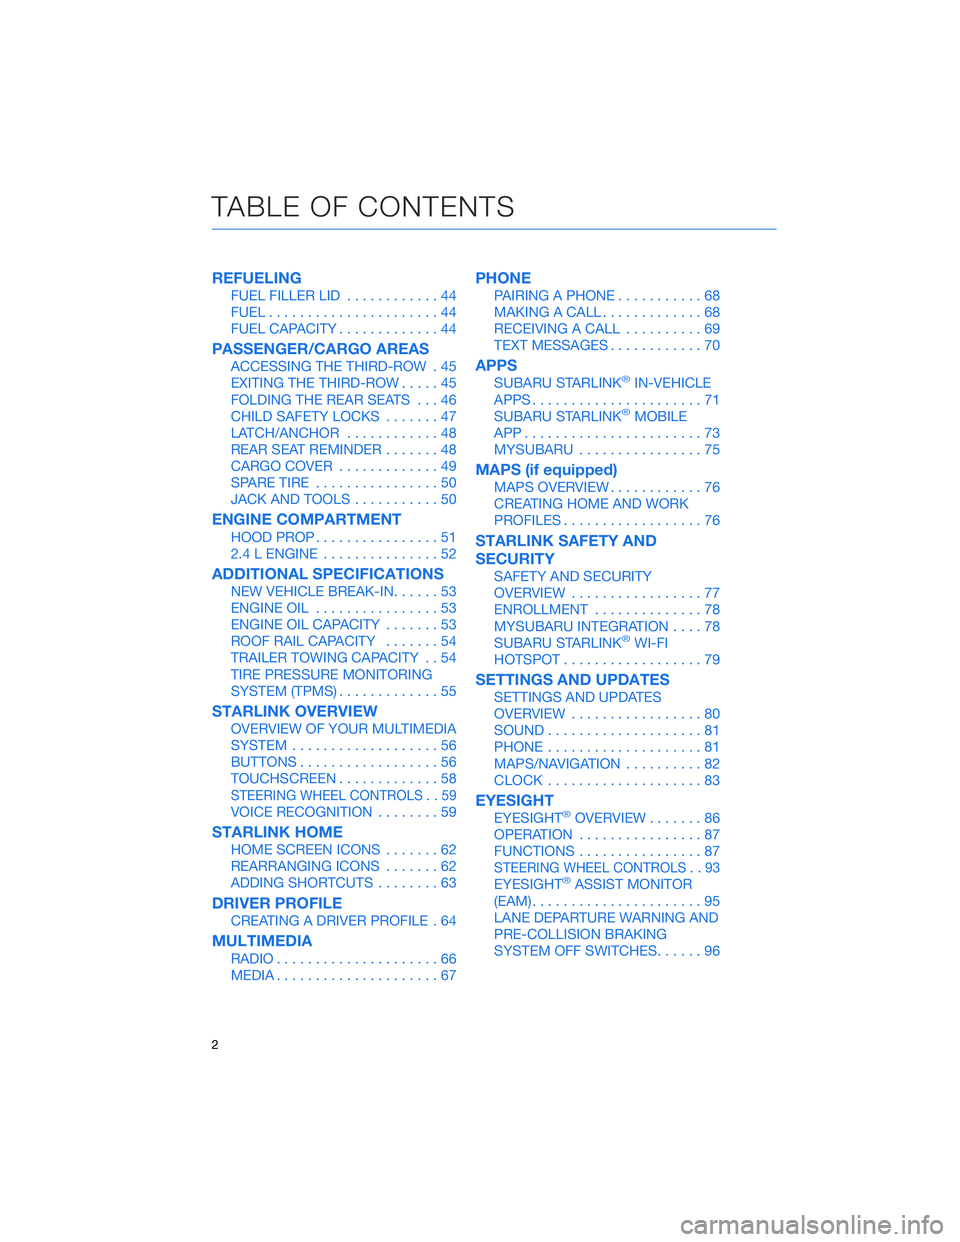
REFUELING
FUEL FILLER LID............44
FUEL......................44
FUEL CAPACITY.............44
PASSENGER/CARGO AREAS
ACCESSING THE THIRD-ROW . 45
EXITING THE THIRD-ROW.....45
FOLDING THE REAR SEATS...46
CHILD SAFETY LOCKS.......47
LATCH/ANCHOR............48
REAR SEAT REMINDER.......48
CARGO COVER.............49
SPARE TIRE................50
JACK AND TOOLS...........50
ENGINE COMPARTMENT
HOOD PROP................51
2.4 L ENGINE...............52
ADDITIONAL SPECIFICATIONS
NEW VEHICLE BREAK-IN......53
ENGINE OIL................53
ENGINE OIL CAPACITY.......53
ROOF RAIL CAPACITY.......54
TRAILER TOWING CAPACITY . . 54
TIRE PRESSURE MONITORING
SYSTEM (TPMS).............55
STARLINK OVERVIEW
OVERVIEW OF YOUR MULTIMEDIA
SYSTEM...................56
BUTTONS..................56
TOUCHSCREEN.............58
STEERING WHEEL CONTROLS . . 59
VOICE RECOGNITION........59
STARLINK HOME
HOME SCREEN ICONS.......62
REARRANGING ICONS.......62
ADDING SHORTCUTS........63
DRIVER PROFILE
CREATING A DRIVER PROFILE . 64
MULTIMEDIA
RADIO.....................66
MEDIA.....................67
PHONE
PAIRING A PHONE...........68
MAKING A CALL.............68
RECEIVING A CALL..........69
TEXT MESSAGES............70
APPS
SUBARU STARLINK®IN-VEHICLE
APPS......................71
SUBARU STARLINK
®MOBILE
APP.......................73
MYSUBARU................75
MAPS (if equipped)
MAPS OVERVIEW............76
CREATING HOME AND WORK
PROFILES..................76
STARLINK SAFETY AND
SECURITY
SAFETY AND SECURITY
OVERVIEW.................77
ENROLLMENT..............78
MYSUBARU INTEGRATION....78
SUBARU STARLINK
®WI-FI
HOTSPOT..................79
SETTINGS AND UPDATES
SETTINGS AND UPDATES
OVERVIEW.................80
SOUND....................81
PHONE....................81
MAPS/NAVIGATION..........82
CLOCK....................83
EYESIGHT
EYESIGHT®OVERVIEW.......86
OPERATION................87
FUNCTIONS................87
STEERING WHEEL CONTROLS . . 93
EYESIGHT®ASSIST MONITOR
(EAM)......................95
LANE DEPARTURE WARNING AND
PRE-COLLISION BRAKING
SYSTEM OFF SWITCHES......96
TABLE OF CONTENTS
2
Page 7 of 140
IN CASE OF EMERGENCY
SUBARU STARLINK®Safety and Security(subscription required)
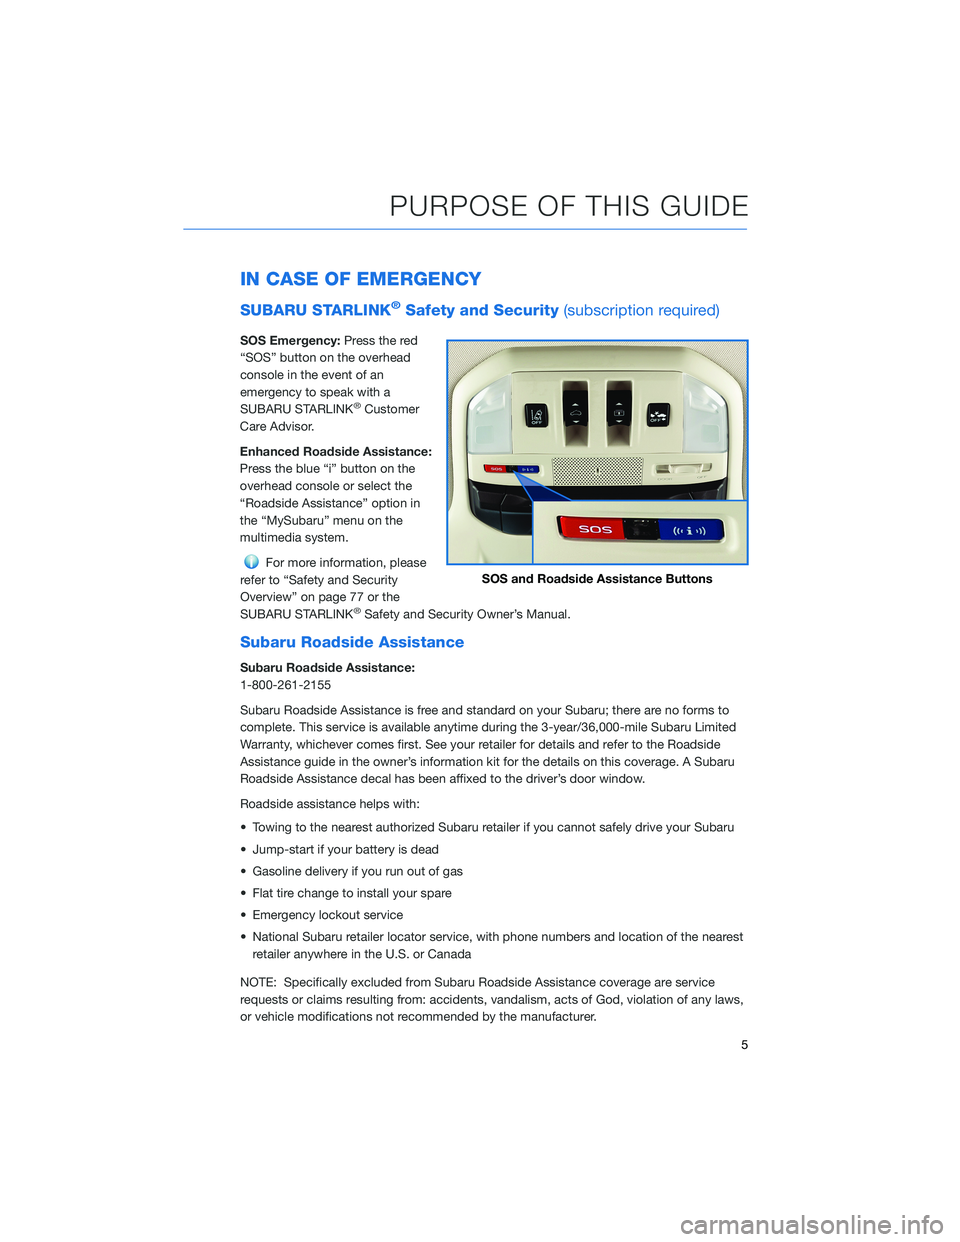
SOS Emergency:Press the red
“SOS” button on the overhead
console in the event of an
emergency to speak with a
SUBARU STARLINK
®Customer
Care Advisor.
Enhanced Roadside Assistance:
Press the blue “i” button on the
overhead console or select the
“Roadside Assistance” option in
the “MySubaru” menu on the
multimedia system.
For more information, please
refer to “Safety and Security
Overview” on page 77 or the
SUBARU STARLINK
®Safety and Security Owner’s Manual.
Subaru Roadside Assistance
Subaru Roadside Assistance:
1-800-261-2155
Subaru Roadside Assistance is free and standard on your Subaru; there are no forms to
complete. This service is available anytime during the 3-year/36,000-mile Subaru Limited
Warranty, whichever comes first. See your retailer for details and refer to the Roadside
Assistance guide in the owner’s information kit for the details on this coverage. A Subaru
Roadside Assistance decal has been affixed to the driver’s door window.
Roadside assistance helps with:
• Towing to the nearest authorized Subaru retailer if you cannot safely drive your Subaru
• Jump-start if your battery is dead
• Gasoline delivery if you run out of gas
• Flat tire change to install your spare
• Emergency lockout service
• National Subaru retailer locator service, with phone numbers and location of the nearest
retailer anywhere in the U.S. or Canada
NOTE: Specifically excluded from Subaru Roadside Assistance coverage are service
requests or claims resulting from: accidents, vandalism, acts of God, violation of any laws,
or vehicle modifications not recommended by the manufacturer.
SOS and Roadside Assistance Buttons
PURPOSE OF THIS GUIDE
5
Page 9 of 140
KEYLESS ENTRY
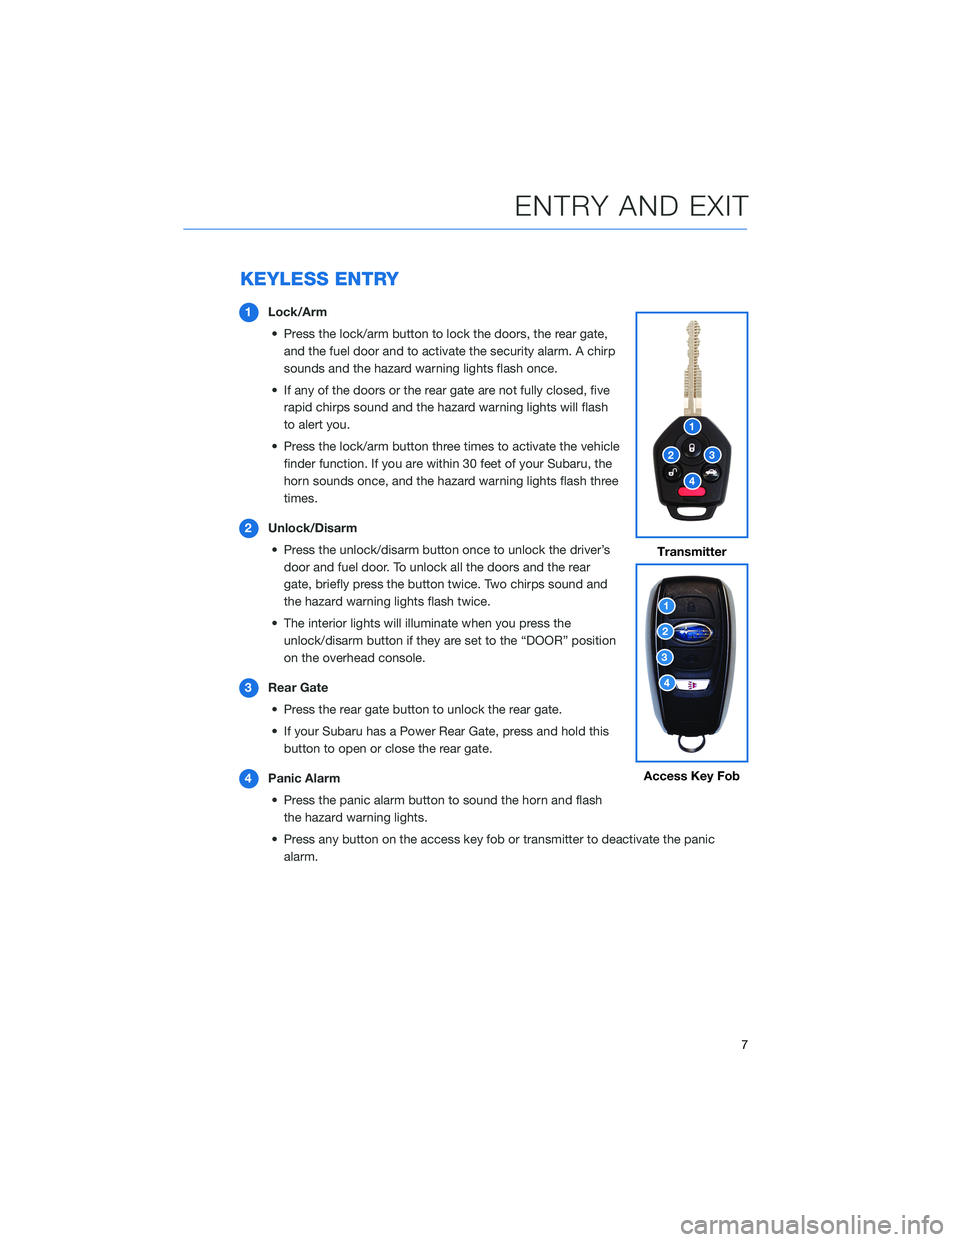
1Lock/Arm
• Press the lock/arm button to lock the doors, the rear gate,
and the fuel door and to activate the security alarm. A chirp
sounds and the hazard warning lights flash once.
• If any of the doors or the rear gate are not fully closed, five
rapid chirps sound and the hazard warning lights will flash
to alert you.
• Press the lock/arm button three times to activate the vehicle
finder function. If you are within 30 feet of your Subaru, the
horn sounds once, and the hazard warning lights flash three
times.
2Unlock/Disarm
• Press the unlock/disarm button once to unlock the driver’s
door and fuel door. To unlock all the doors and the rear
gate, briefly press the button twice. Two chirps sound and
the hazard warning lights flash twice.
• The interior lights will illuminate when you press the
unlock/disarm button if they are set to the “DOOR” position
on the overhead console.
3Rear Gate
• Press the rear gate button to unlock the rear gate.
• If your Subaru has a Power Rear Gate, press and hold this
button to open or close the rear gate.
4Panic Alarm
• Press the panic alarm button to sound the horn and flash
the hazard warning lights.
• Press any button on the access key fob or transmitter to deactivate the panic
alarm.
Transmitter
Access Key Fob
ENTRY AND EXIT
7
Page 10 of 140
Automatic Door Locking/Unlocking
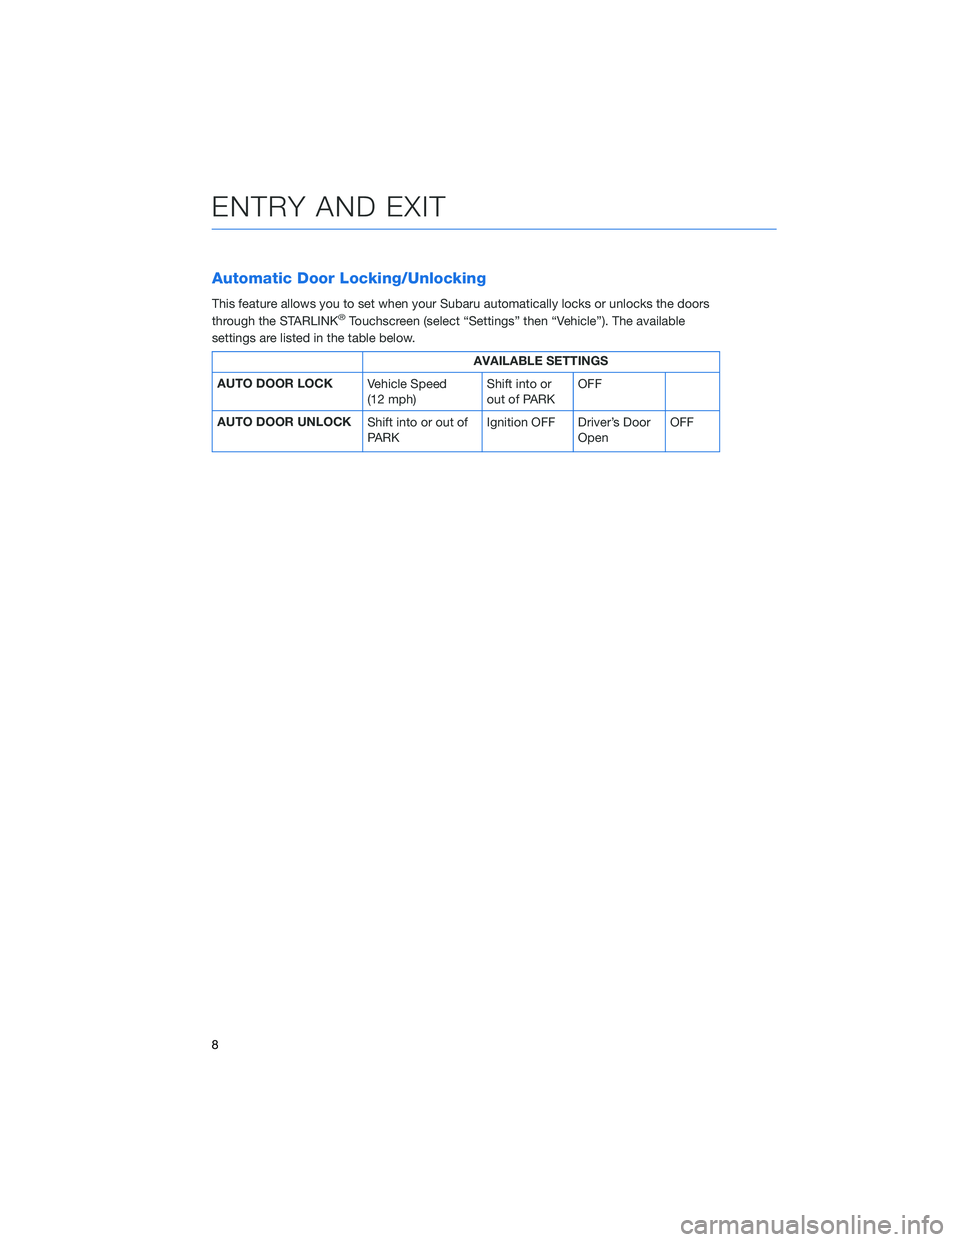
This feature allows you to set when your Subaru automatically locks or unlocks the doors
through the STARLINK®Touchscreen (select “Settings” then “Vehicle”). The available
settings are listed in the table below.
AVAILABLE SETTINGS
AUTO DOOR LOCK
Vehicle Speed
(12 mph)Shift into or
out of PARKOFF
AUTO DOOR UNLOCK
Shift into or out of
PARKIgnition OFF Driver’s Door
OpenOFF
ENTRY AND EXIT
8
Page 11 of 140
KEYLESS ACCESS WITH PUSH BUTTON START(if
equipped)
The Keyless Access with Push-Button Start system features touch-activated door locking
or unlocking and push-button start functions without the key ever leaving your pocket or
purse. You can customize the touch-activated door locking or unlocking settings using the
i/Set switch to navigate to “Vehicle Setting” then “Keyless Entry System” in the
Combination Meter Display or through the STARLINK
®Touchscreen by selecting
“Settings” then “Vehicle”.
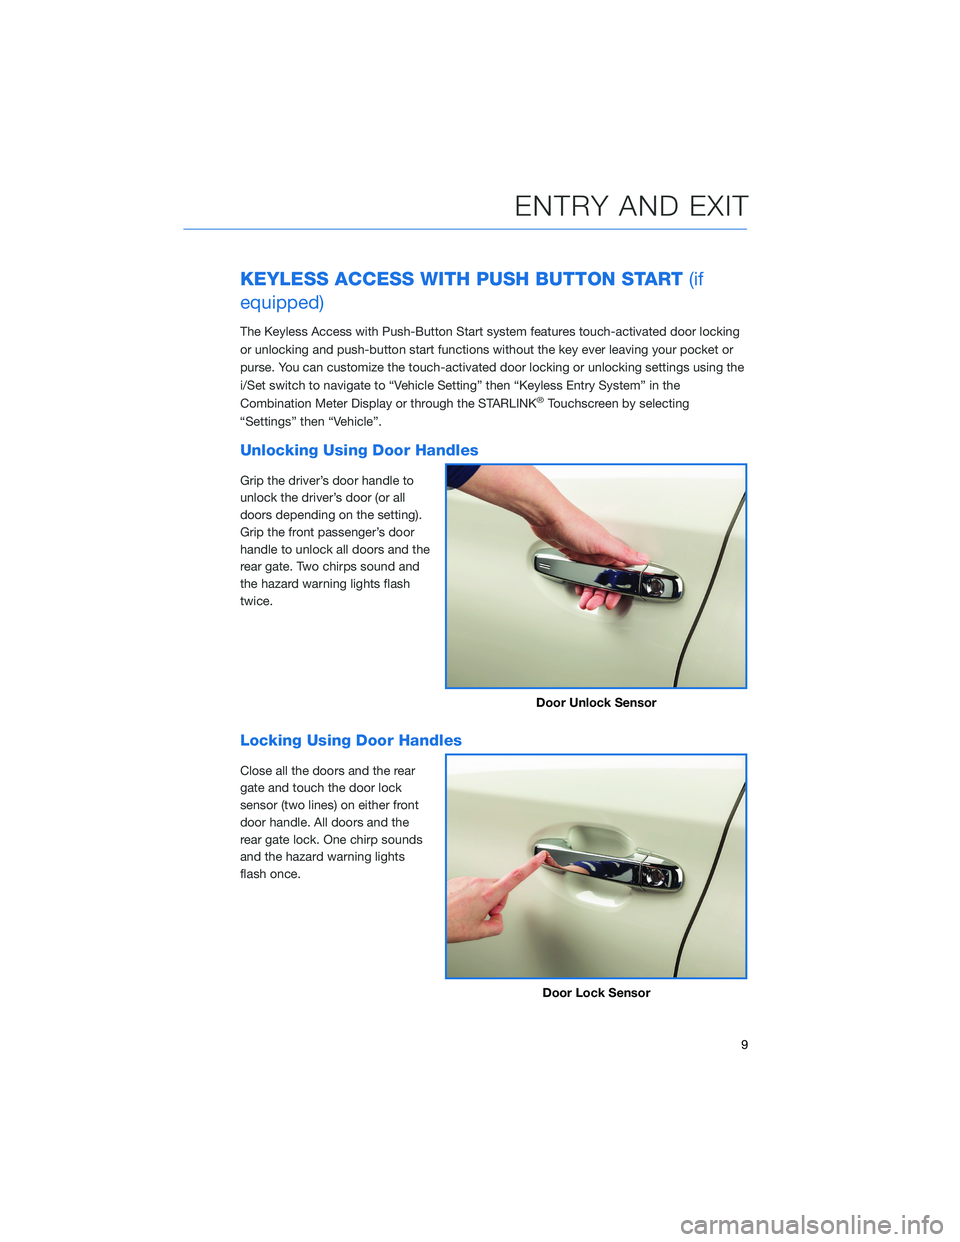
Unlocking Using Door Handles
Grip the driver’s door handle to
unlock the driver’s door (or all
doors depending on the setting).
Grip the front passenger’s door
handle to unlock all doors and the
rear gate. Two chirps sound and
the hazard warning lights flash
twice.
Locking Using Door Handles
Close all the doors and the rear
gate and touch the door lock
sensor (two lines) on either front
door handle. All doors and the
rear gate lock. One chirp sounds
and the hazard warning lights
flash once.
Door Unlock Sensor
Door Lock Sensor
ENTRY AND EXIT
9
Page 12 of 140
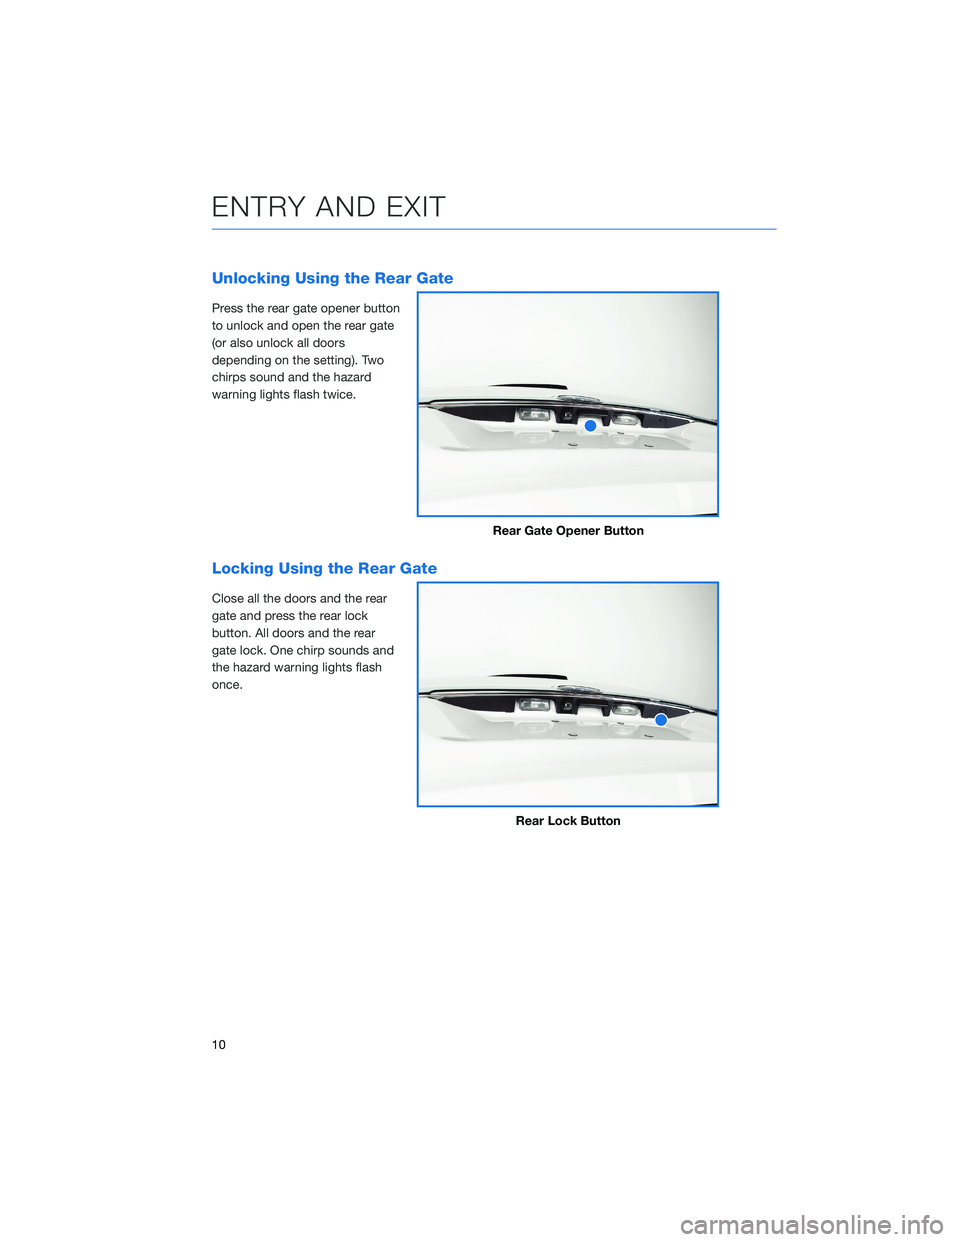
Unlocking Using the Rear Gate
Press the rear gate opener button
to unlock and open the rear gate
(or also unlock all doors
depending on the setting). Two
chirps sound and the hazard
warning lights flash twice.
Locking Using the Rear Gate
Close all the doors and the rear
gate and press the rear lock
button. All doors and the rear
gate lock. One chirp sounds and
the hazard warning lights flash
once.
Rear Gate Opener Button
Rear Lock Button
ENTRY AND EXIT
10
Page 13 of 140
POWER REAR GATE (PRG)(if equipped)
The Power Rear Gate allows automatic opening even when your arms are full, and a single
touch on the gate button lets it close and lock the entire vehicle. The opening height can
also be adjusted for spaces where clearance is limited.
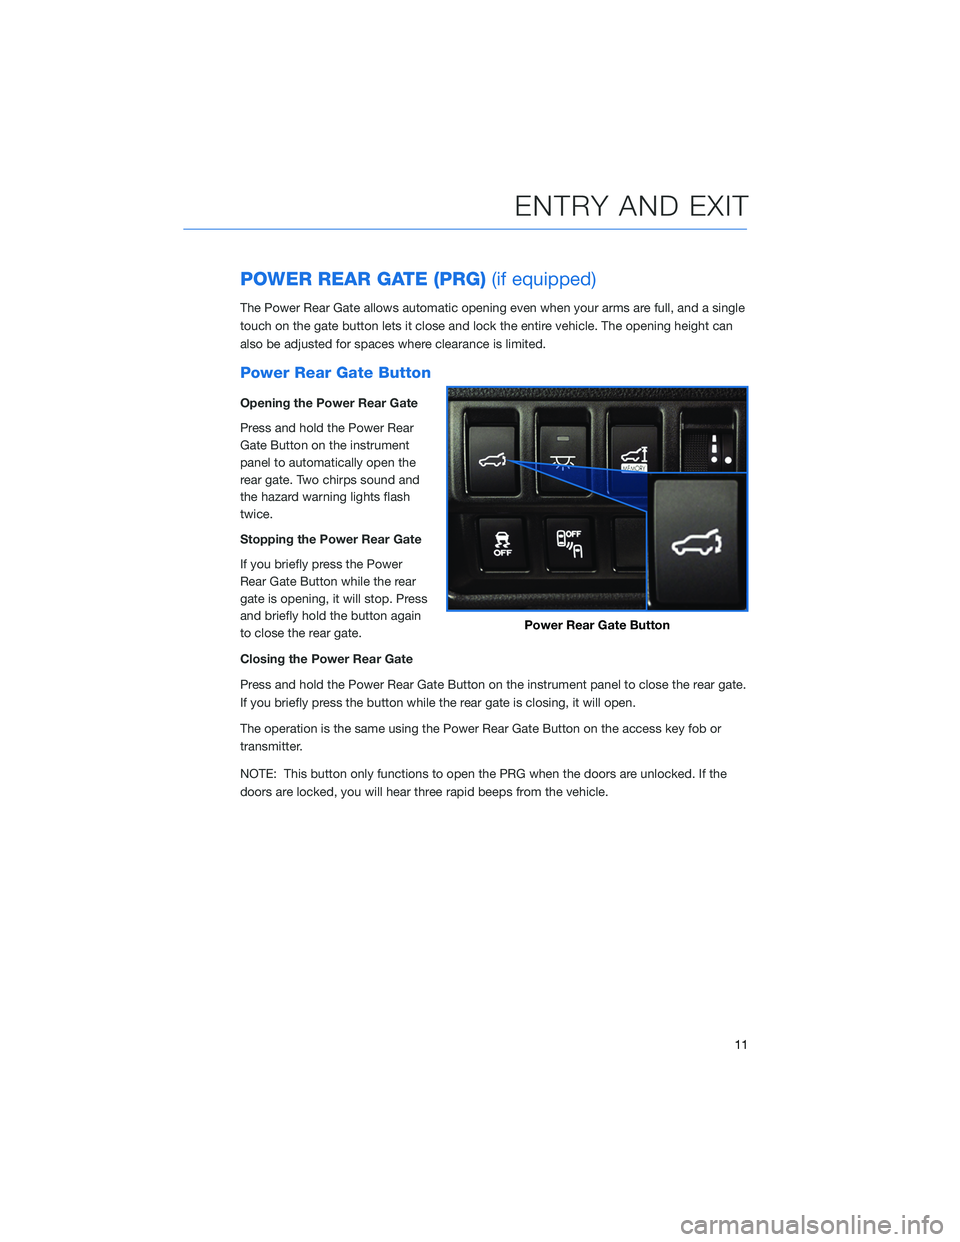
Power Rear Gate Button
Opening the Power Rear Gate
Press and hold the Power Rear
Gate Button on the instrument
panel to automatically open the
rear gate. Two chirps sound and
the hazard warning lights flash
twice.
Stopping the Power Rear Gate
If you briefly press the Power
Rear Gate Button while the rear
gate is opening, it will stop. Press
and briefly hold the button again
to close the rear gate.
Closing the Power Rear Gate
Press and hold the Power Rear Gate Button on the instrument panel to close the rear gate.
If you briefly press the button while the rear gate is closing, it will open.
The operation is the same using the Power Rear Gate Button on the access key fob or
transmitter.
NOTE: This button only functions to open the PRG when the doors are unlocked. If the
doors are locked, you will hear three rapid beeps from the vehicle.
Power Rear Gate Button
ENTRY AND EXIT
11
Page 15 of 140
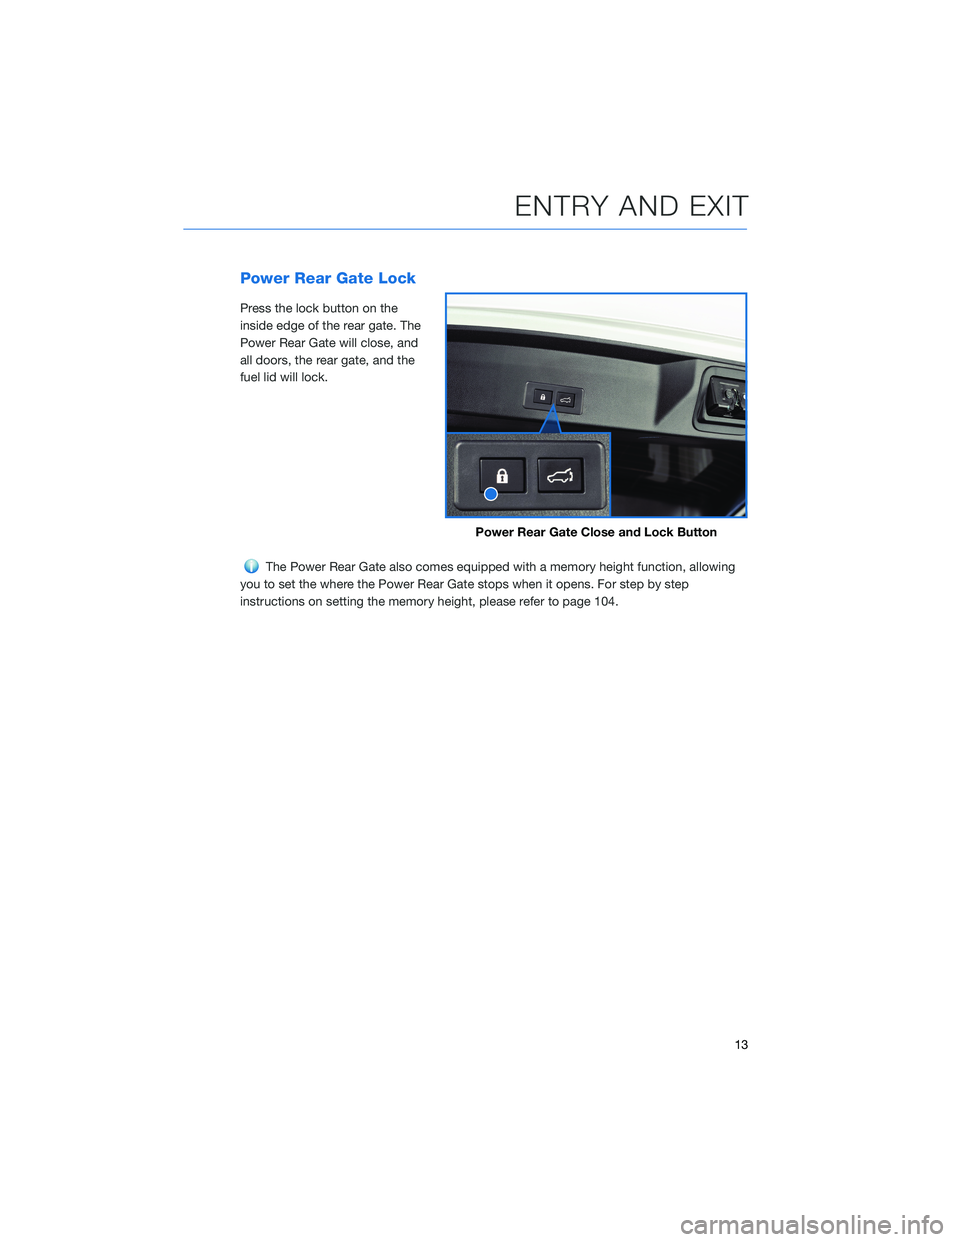
Power Rear Gate Lock
Press the lock button on the
inside edge of the rear gate. The
Power Rear Gate will close, and
all doors, the rear gate, and the
fuel lid will lock.
The Power Rear Gate also comes equipped with a memory height function, allowing
you to set the where the Power Rear Gate stops when it opens. For step by step
instructions on setting the memory height, please refer to page 104.
Power Rear Gate Close and Lock Button
ENTRY AND EXIT
13
Page 18 of 140
SEATING
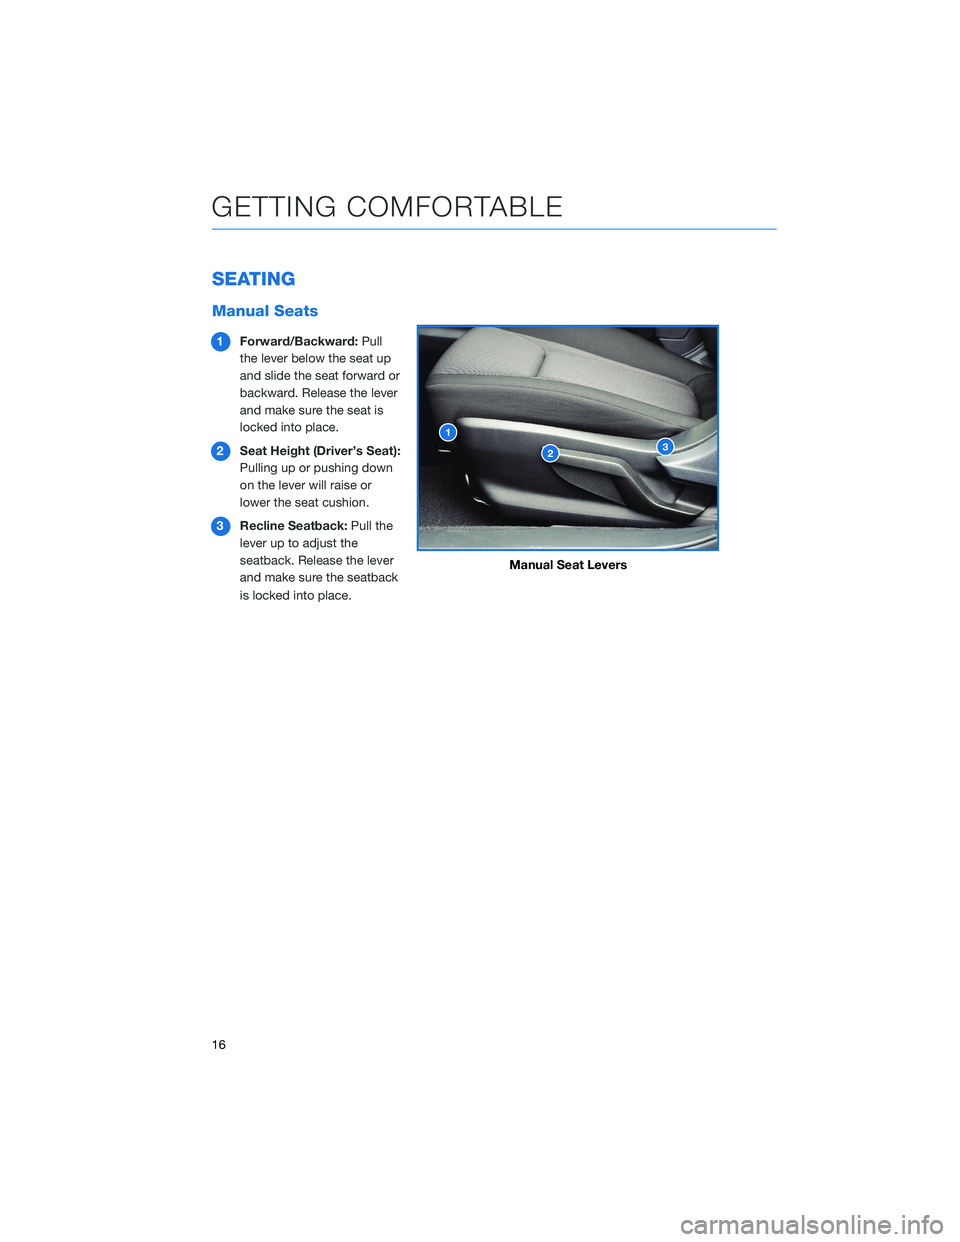
Manual Seats
1Forward/Backward:Pull
the lever below the seat up
and slide the seat forward or
backward. Release the lever
and make sure the seat is
locked into place.
2Seat Height (Driver’s Seat):
Pulling up or pushing down
on the lever will raise or
lower the seat cushion.
3Recline Seatback:Pull the
lever up to adjust the
seatback. Release the lever
and make sure the seatback
is locked into place.
Manual Seat Levers
GETTING COMFORTABLE
16
Page 20 of 140
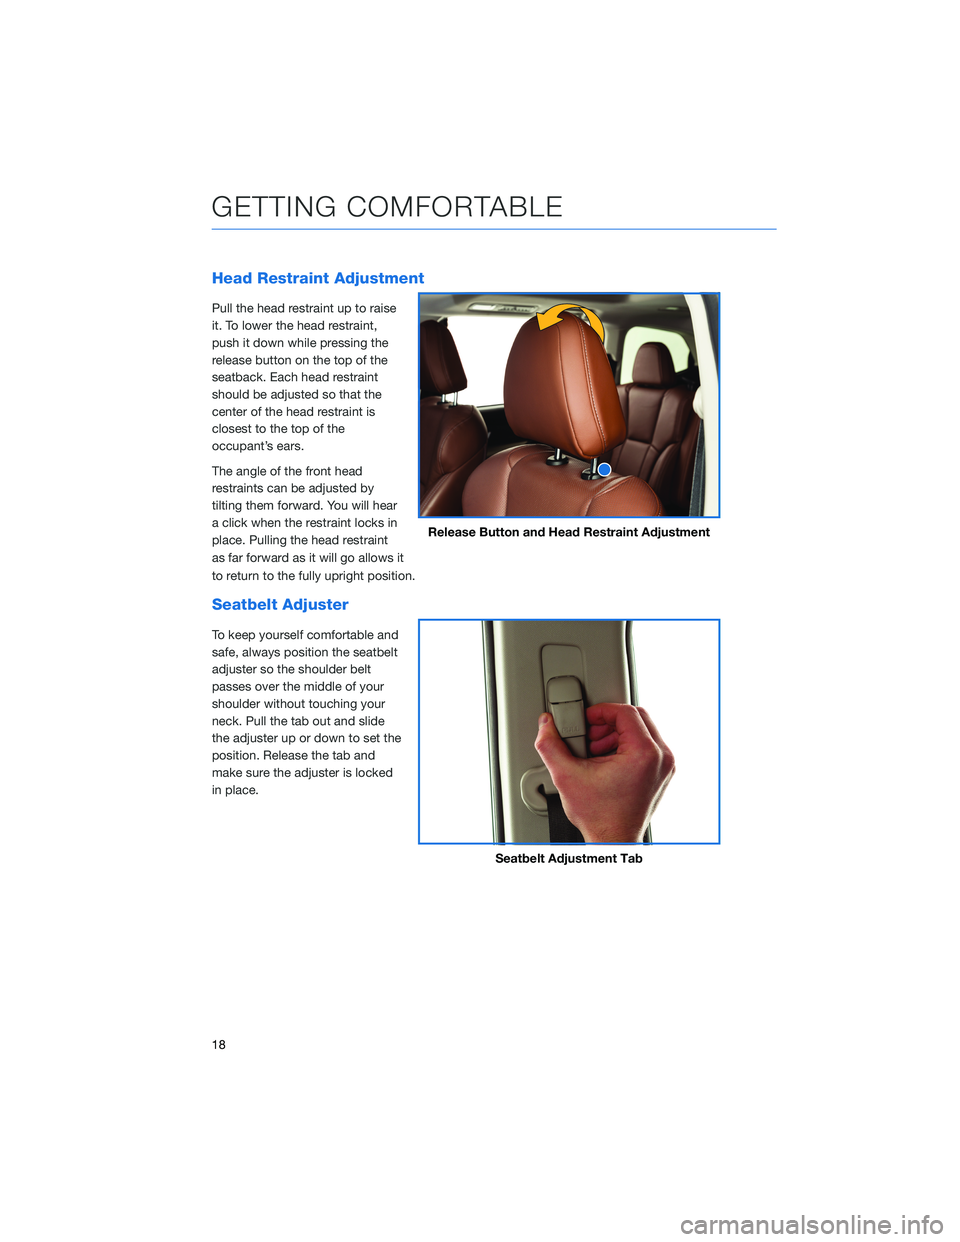
Head Restraint Adjustment
Pull the head restraint up to raise
it. To lower the head restraint,
push it down while pressing the
release button on the top of the
seatback. Each head restraint
should be adjusted so that the
center of the head restraint is
closest to the top of the
occupant’s ears.
The angle of the front head
restraints can be adjusted by
tilting them forward. You will hear
a click when the restraint locks in
place. Pulling the head restraint
as far forward as it will go allows it
to return to the fully upright position.
Seatbelt Adjuster
To keep yourself comfortable and
safe, always position the seatbelt
adjuster so the shoulder belt
passes over the middle of your
shoulder without touching your
neck. Pull the tab out and slide
the adjuster up or down to set the
position. Release the tab and
make sure the adjuster is locked
in place.
Release Button and Head Restraint Adjustment
Seatbelt Adjustment Tab
GETTING COMFORTABLE
18