stop SUBARU ASCENT 2022 Getting Started Guide
[x] Cancel search | Manufacturer: SUBARU, Model Year: 2022, Model line: ASCENT, Model: SUBARU ASCENT 2022Pages: 148, PDF Size: 40.03 MB
Page 98 of 148
Conventional Cruise Control
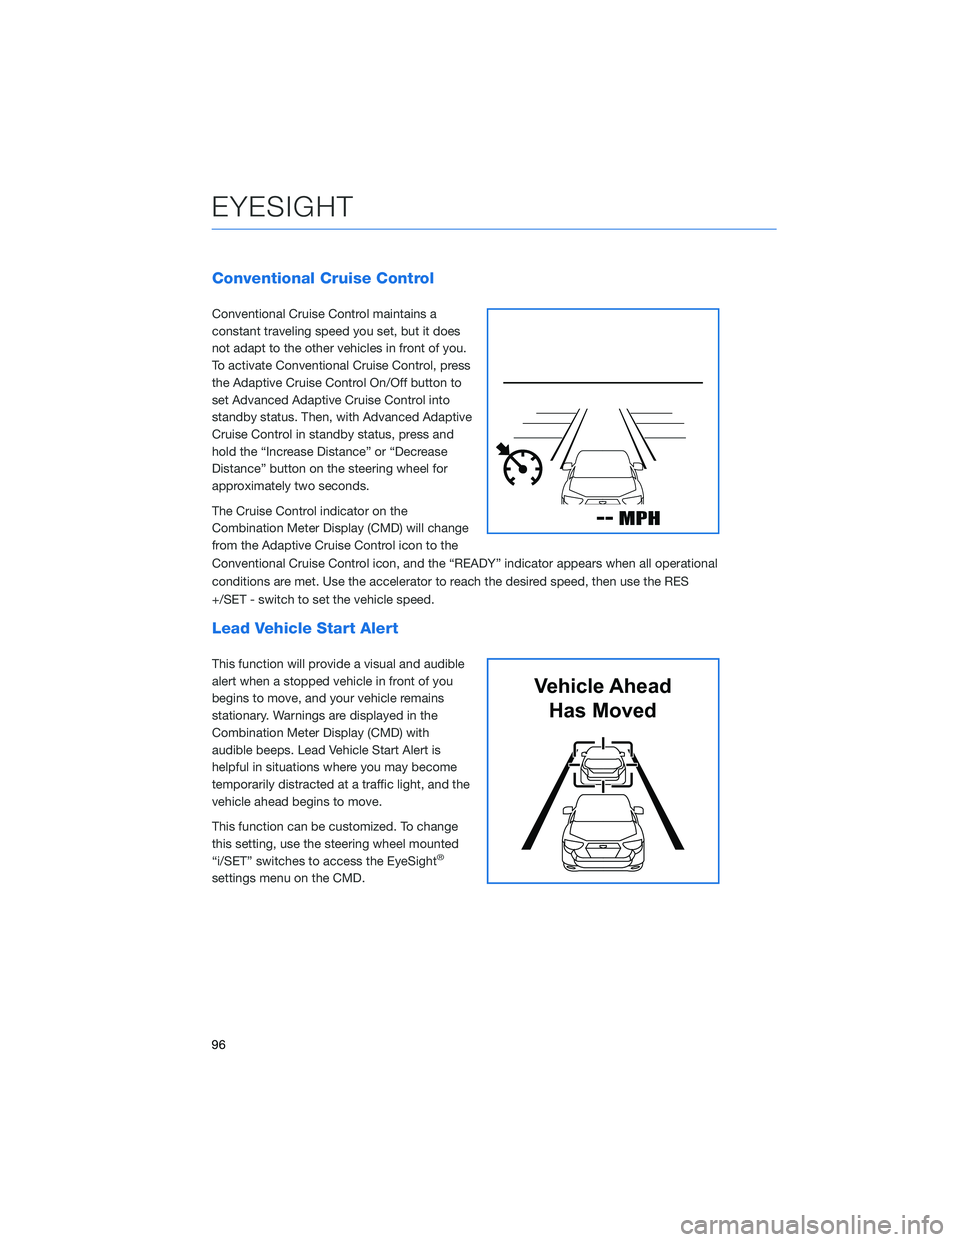
Conventional Cruise Control maintains a
constant traveling speed you set, but it does
not adapt to the other vehicles in front of you.
To activate Conventional Cruise Control, press
the Adaptive Cruise Control On/Off button to
set Advanced Adaptive Cruise Control into
standby status. Then, with Advanced Adaptive
Cruise Control in standby status, press and
hold the “Increase Distance” or “Decrease
Distance” button on the steering wheel for
approximately two seconds.
The Cruise Control indicator on the
Combination Meter Display (CMD) will change
from the Adaptive Cruise Control icon to the
Conventional Cruise Control icon, and the “READY” indicator appears when all operational
conditions are met. Use the accelerator to reach the desired speed, then use the RES
+/SET - switch to set the vehicle speed.
Lead Vehicle Start Alert
This function will provide a visual and audible
alert when a stopped vehicle in front of you
begins to move, and your vehicle remains
stationary. Warnings are displayed in the
Combination Meter Display (CMD) with
audible beeps. Lead Vehicle Start Alert is
helpful in situations where you may become
temporarily distracted at a traffic light, and the
vehicle ahead begins to move.
This function can be customized. To change
this setting, use the steering wheel mounted
“i/SET” switches to access the EyeSight
®
settings menu on the CMD.
Vehicle Ahead
Has Moved
EYESIGHT
96
Page 105 of 148
HIGH BEAM ASSIST (HBA)
This function uses the EyeSight®cameras to automatically switch the
headlights between high and low beam settings, enhancing safety for
both you and other drivers on the road. To activate High Beam Assist,
set the headlight control switch to the “AUTO” position and push the
headlight lever forward to the high beam position. The green HBA
indicator illuminates on the Combination Meter.
HBA automatically activates the high beams when the forward area is dark, there are no
preceding/oncoming vehicles or sharp curves in the road, and your speed is approximately
20 mph or greater. When a preceding/oncoming vehicle is detected, the forward area is
bright, your speed decreases to 10 mph or less, or the EyeSight
®system is malfunctioning
or is temporarily stopped, HBA automatically switches to low beams.
STEERING RESPONSIVE HEADLIGHTS (SRH)
The Steering Responsive Headlights (SRH) system aims the headlight beams in the
direction you are steering, improving visibility at corners and intersections when driving at
night. You can turn the SRH system on or off using the steering wheel mounted “i/SET”
switches to access the settings menu on the Combination Meter Display (CMD).
For more information, please refer to “Instruments and Controls” in your Owner’s
Manual.
REVERSE AUTOMATIC BRAKING (RAB)(if equipped)
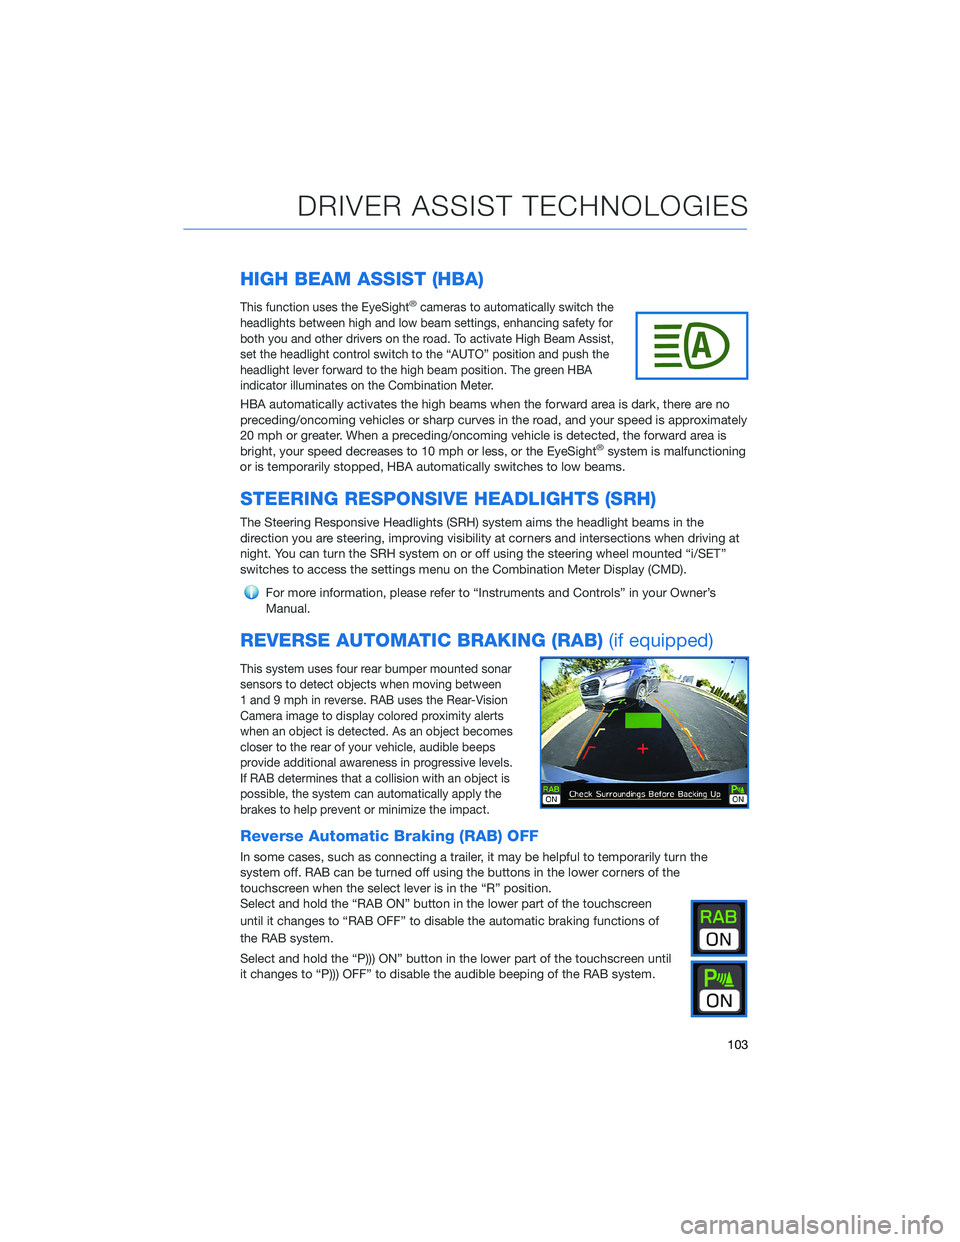
This system uses four rear bumper mounted sonar
sensors to detect objects when moving between
1 and 9 mph in reverse. RAB uses the Rear-Vision
Camera image to display colored proximity alerts
when an object is detected. As an object becomes
closer to the rear of your vehicle, audible beeps
provide additional awareness in progressive levels.
If RAB determines that a collision with an object is
possible, the system can automatically apply the
brakes to help prevent or minimize the impact.
Reverse Automatic Braking (RAB) OFF
In some cases, such as connecting a trailer, it may be helpful to temporarily turn the
system off. RAB can be turned off using the buttons in the lower corners of the
touchscreen when the select lever is in the “R” position.
Select and hold the “RAB ON” button in the lower part of the touchscreen
until it changes to “RAB OFF” to disable the automatic braking functions of
the RAB system.
Select and hold the “P))) ON” button in the lower part of the touchscreen until
it changes to “P))) OFF” to disable the audible beeping of the RAB system.
DRIVER ASSIST TECHNOLOGIES
103
Page 110 of 148
MEMORY HEIGHT(if equipped)
You can set where the Power Rear Gate stops when it opens.
This is a great feature to limit the upward travel of the rear gate to
ensure you can reach it or to prevent the rear gate from contacting a
garage ceiling. You can learn more about setting the Power Rear
Gate Memory Height from the how-to video linked in the QR code
and the following steps.
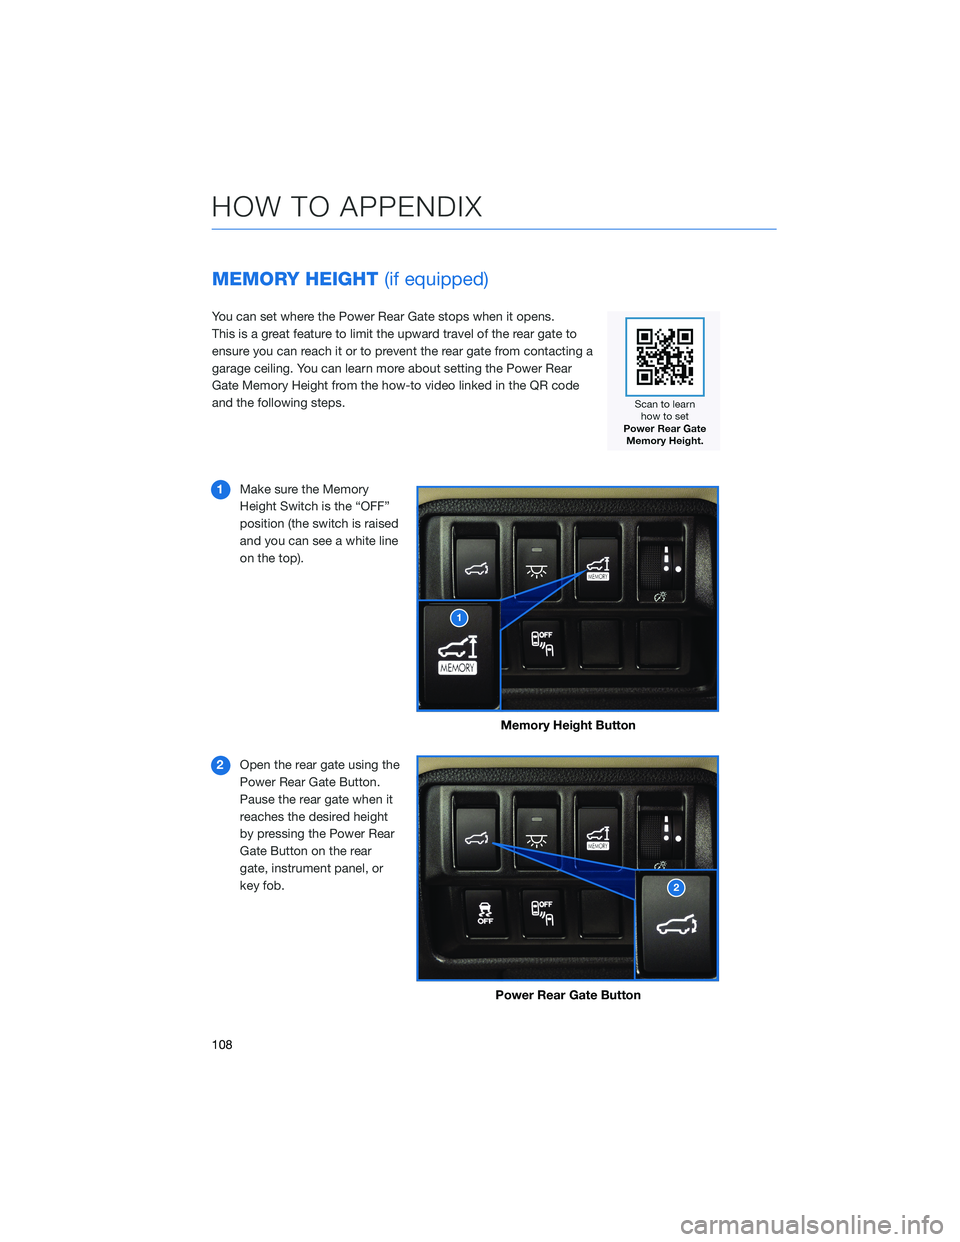
1Make sure the Memory
Height Switch is the “OFF”
position (the switch is raised
and you can see a white line
on the top).
2Open the rear gate using the
Power Rear Gate Button.
Pause the rear gate when it
reaches the desired height
by pressing the Power Rear
Gate Button on the rear
gate, instrument panel, or
key fob.
Memory Height Button
Power Rear Gate Button
HOW TO APPENDIX
108
Page 111 of 148
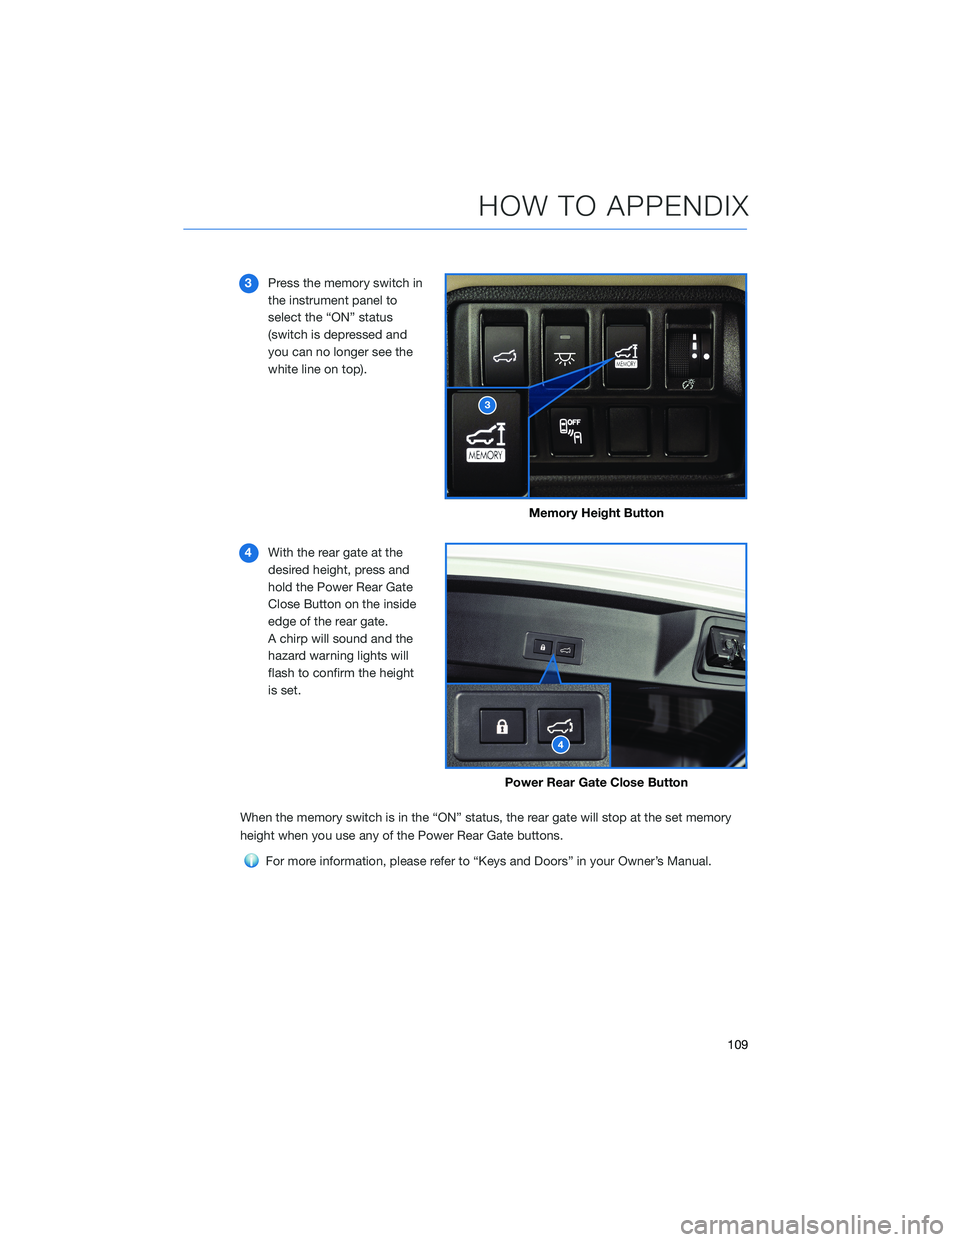
3Press the memory switch in
the instrument panel to
select the “ON” status
(switch is depressed and
you can no longer see the
white line on top).
4With the rear gate at the
desired height, press and
hold the Power Rear Gate
Close Button on the inside
edge of the rear gate.
A chirp will sound and the
hazard warning lights will
flash to confirm the height
is set.
When the memory switch is in the “ON” status, the rear gate will stop at the set memory
height when you use any of the Power Rear Gate buttons.
For more information, please refer to “Keys and Doors” in your Owner’s Manual.
Memory Height Button
Power Rear Gate Close Button
HOW TO APPENDIX
109
Page 134 of 148
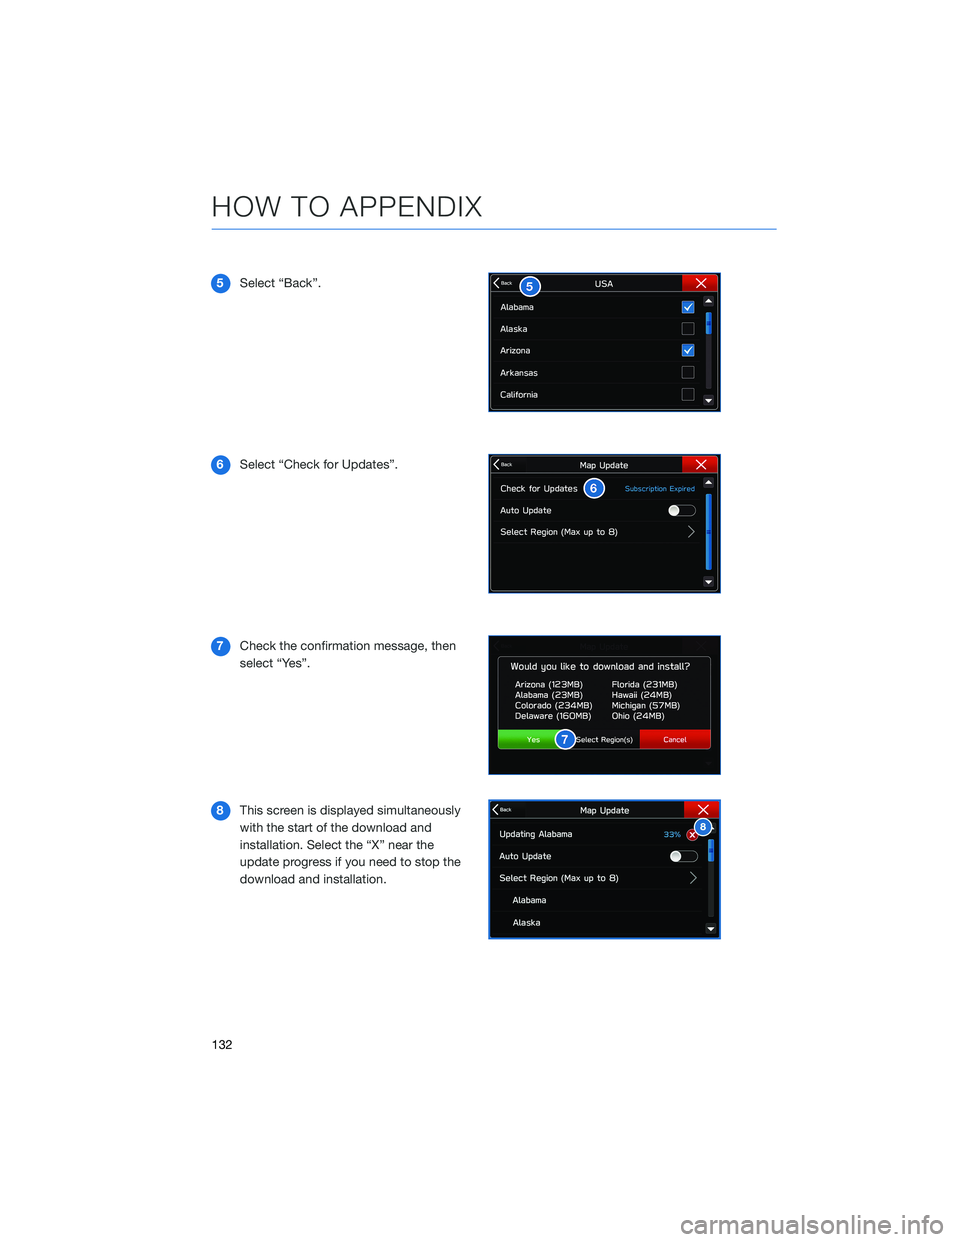
5Select “Back”.
6Select “Check for Updates”.
7Check the confirmation message, then
select “Yes”.
8This screen is displayed simultaneously
with the start of the download and
installation. Select the “X” near the
update progress if you need to stop the
download and installation.
HOW TO APPENDIX
132
Page 135 of 148
FIRMWARE AND SOFTWARE UPDATES
For 8.0–inch Multimedia Plus and 8.0–inch Multimedia Navigation systems, you can
update the system software via a Wi-Fi connection or the aha®application on your
smartphone (depending on your smartphone communication and transfer speed).
To accurately check for updates, make sure the clock is set to “Auto” with a GPS signal
available (system with navigation) or a phone paired via Bluetooth
®(system without
navigation). See page 87 for step by step directions on setting the clock. System
functionality will be restricted during installation.
1. Connect to a Wi-Fi network or start the aha application on your smartphone
(see page 122).
2. Return to the general settings screen (if needed, press the “Home” button, select
“Settings”, and then select “General”).
3. Select “Check for Updates”.
• If “Automatically Check for Updates” is turned on at the general settings screen,
an update check will be performed automatically before proceeding to the next step.
• If “Automatically Download Updates” is turned on at the general settings screen,
the software update will be downloaded automatically before proceeding to “Update
Installation”.
4. If the “Software Update Ready to Download” pop-up is displayed, select “Download
Now” to begin the download. The download status progress is displayed in the upper
right of the screen.
5. Select “Install Now” to start the installation process. The installation process will take
several minutes to complete. If you need to stop the installation process, press
“Cancel”.
6. When the installation is complete, select “I Agree” on the confirmation message to
complete the update process. By selecting “I Agree”, the system will restart
automatically.
HOW TO APPENDIX
133