stop SUBARU ASCENT 2022 Getting Started Guide
[x] Cancel search | Manufacturer: SUBARU, Model Year: 2022, Model line: ASCENT, Model: SUBARU ASCENT 2022Pages: 148, PDF Size: 40.03 MB
Page 13 of 148
POWER REAR GATE (PRG)(if equipped)
The Power Rear Gate allows automatic opening, and a single touch
of a button can close the gate and lock the entire vehicle. The
opening height can also be adjusted for spaces where clearance is
limited.
You can learn more about the Power Rear Gate from the video
linked in the QR code and “Keys and Doors” in your Owner’s Manual.
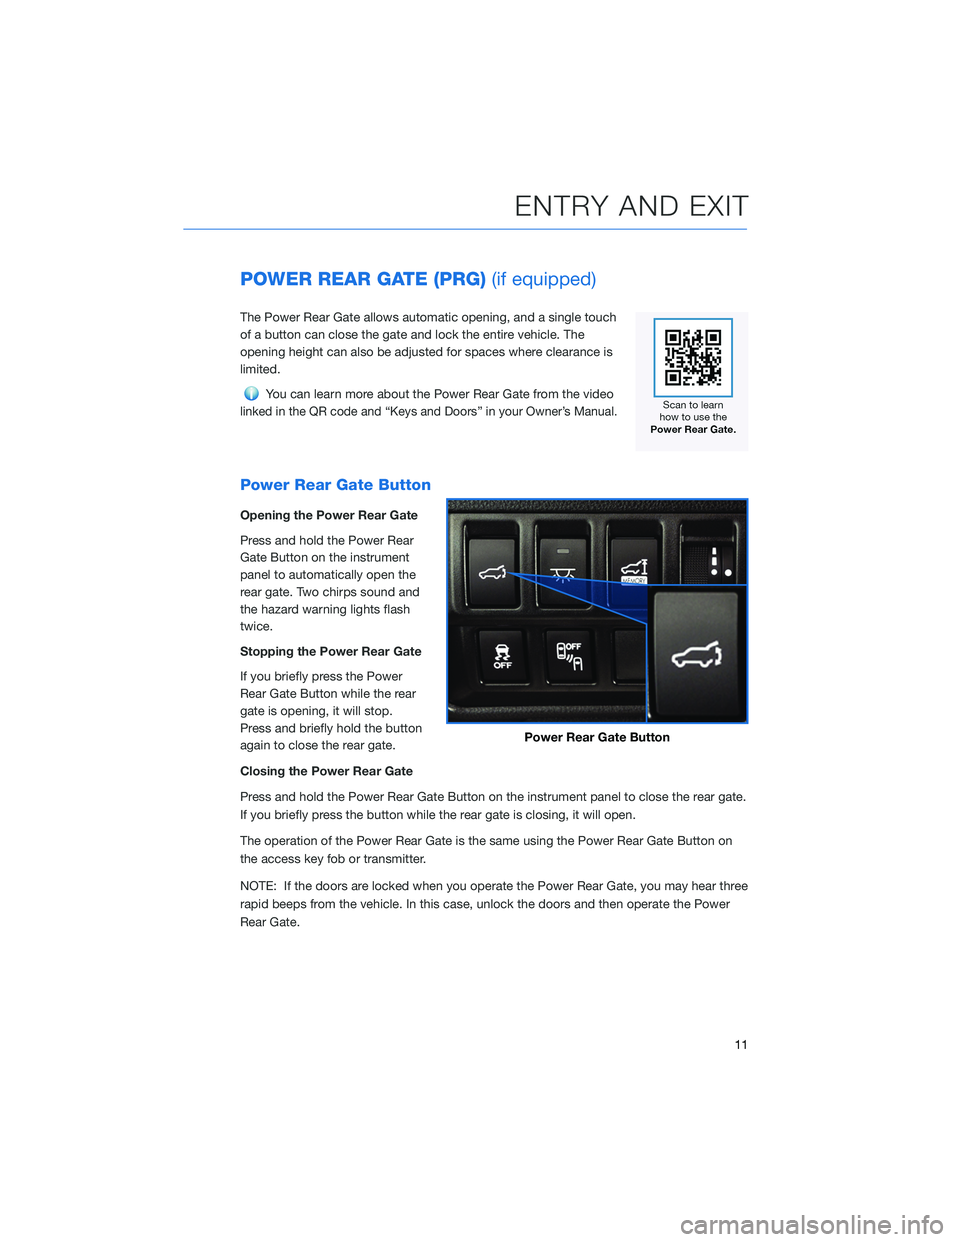
Power Rear Gate Button
Opening the Power Rear Gate
Press and hold the Power Rear
Gate Button on the instrument
panel to automatically open the
rear gate. Two chirps sound and
the hazard warning lights flash
twice.
Stopping the Power Rear Gate
If you briefly press the Power
Rear Gate Button while the rear
gate is opening, it will stop.
Press and briefly hold the button
again to close the rear gate.
Closing the Power Rear Gate
Press and hold the Power Rear Gate Button on the instrument panel to close the rear gate.
If you briefly press the button while the rear gate is closing, it will open.
The operation of the Power Rear Gate is the same using the Power Rear Gate Button on
the access key fob or transmitter.
NOTE: If the doors are locked when you operate the Power Rear Gate, you may hear three
rapid beeps from the vehicle. In this case, unlock the doors and then operate the Power
Rear Gate.
Power Rear Gate Button
ENTRY AND EXIT
11
Page 14 of 148
From the Rear of the Vehicle
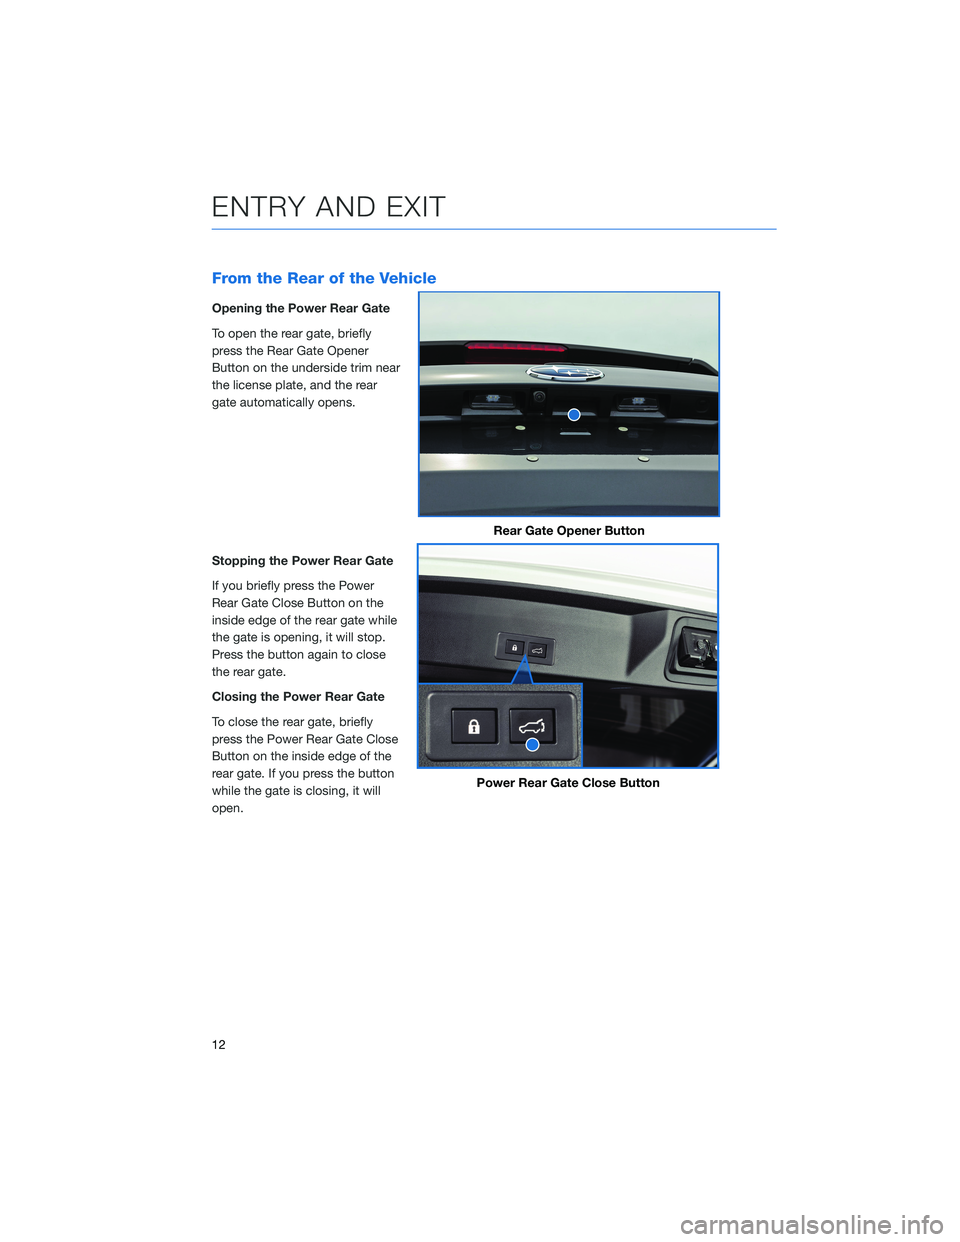
Opening the Power Rear Gate
To open the rear gate, briefly
press the Rear Gate Opener
Button on the underside trim near
the license plate, and the rear
gate automatically opens.
Stopping the Power Rear Gate
If you briefly press the Power
Rear Gate Close Button on the
inside edge of the rear gate while
the gate is opening, it will stop.
Press the button again to close
the rear gate.
Closing the Power Rear Gate
To close the rear gate, briefly
press the Power Rear Gate Close
Button on the inside edge of the
rear gate. If you press the button
while the gate is closing, it will
open.
Rear Gate Opener Button
Power Rear Gate Close Button
ENTRY AND EXIT
12
Page 15 of 148
Power Rear Gate Lock
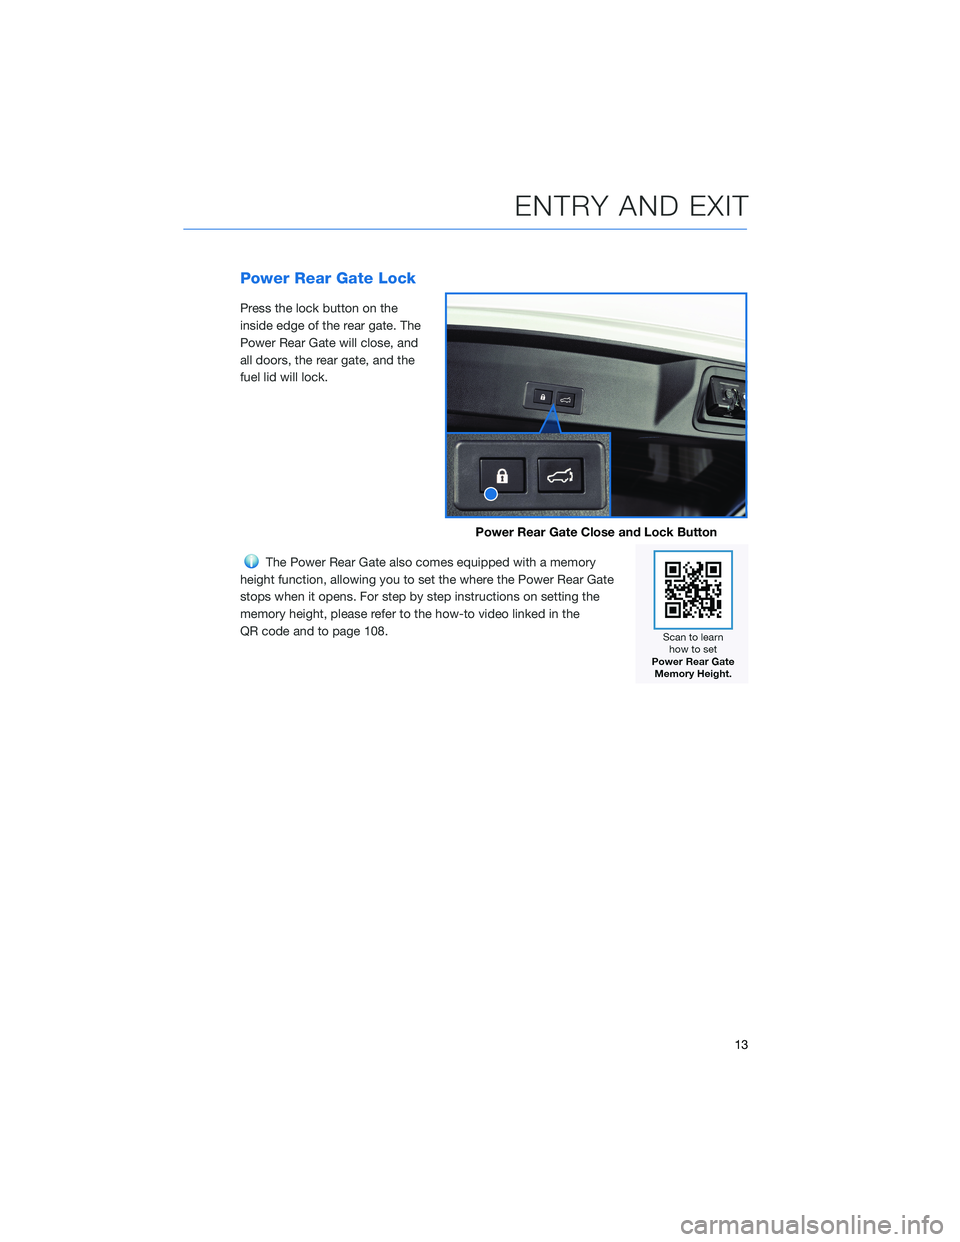
Press the lock button on the
inside edge of the rear gate. The
Power Rear Gate will close, and
all doors, the rear gate, and the
fuel lid will lock.
The Power Rear Gate also comes equipped with a memory
height function, allowing you to set the where the Power Rear Gate
stops when it opens. For step by step instructions on setting the
memory height, please refer to the how-to video linked in the
QR code and to page 108.
Power Rear Gate Close and Lock Button
ENTRY AND EXIT
13
Page 35 of 148
POWER MOONROOF(if equipped)
With the ignition in the “ON” position, you can tilt and slide the moonroof.
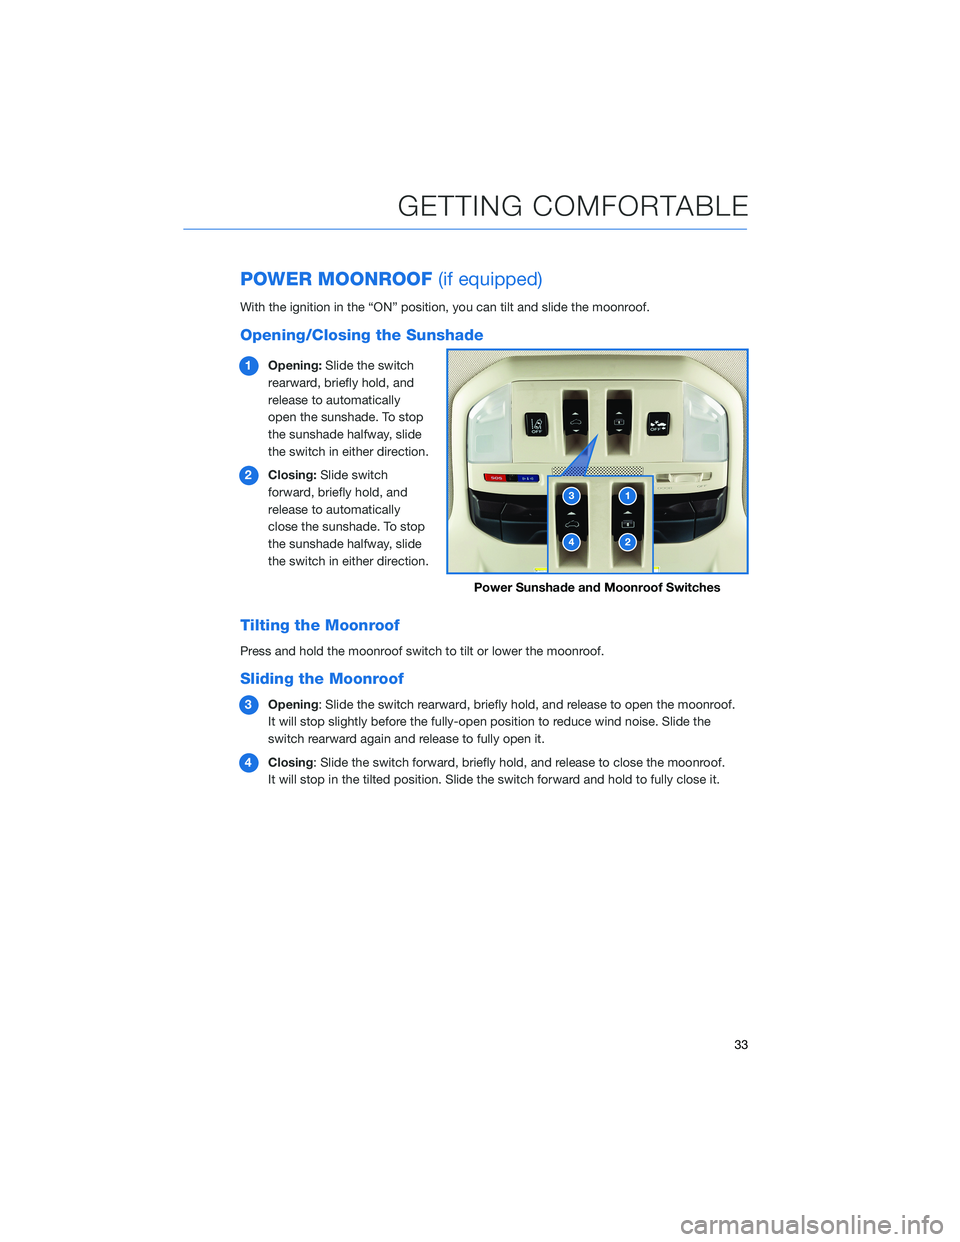
Opening/Closing the Sunshade
1Opening:Slide the switch
rearward, briefly hold, and
release to automatically
open the sunshade. To stop
the sunshade halfway, slide
the switch in either direction.
2Closing:Slide switch
forward, briefly hold, and
release to automatically
close the sunshade. To stop
the sunshade halfway, slide
the switch in either direction.
Tilting the Moonroof
Press and hold the moonroof switch to tilt or lower the moonroof.
Sliding the Moonroof
3Opening: Slide the switch rearward, briefly hold, and release to open the moonroof.
It will stop slightly before the fully-open position to reduce wind noise. Slide the
switch rearward again and release to fully open it.
4Closing: Slide the switch forward, briefly hold, and release to close the moonroof.
It will stop in the tilted position. Slide the switch forward and hold to fully close it.
Power Sunshade and Moonroof Switches
GETTING COMFORTABLE
33
Page 43 of 148
IGNITION SWITCH
The ignition switch has four positions:
LOCK:You can only insert or remove the key in this position.
ACC (Accessory):Provides power to the audio system and accessory power outlets.
ON:All electrical systems are available. The key returns to this position after starting the
engine.
START:Turn the key to this position to start the engine.
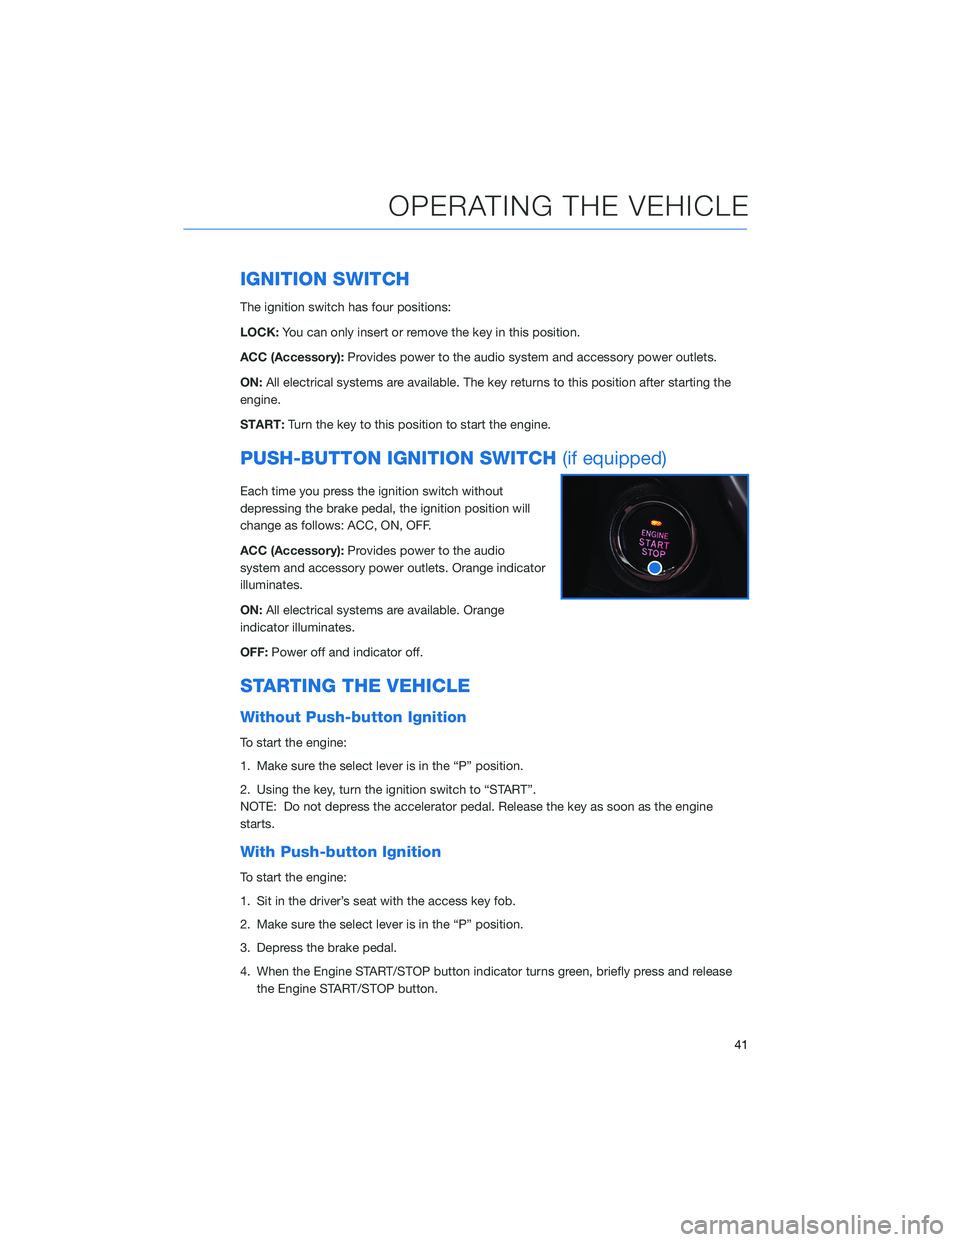
PUSH-BUTTON IGNITION SWITCH(if equipped)
Each time you press the ignition switch without
depressing the brake pedal, the ignition position will
change as follows: ACC, ON, OFF.
ACC (Accessory):Provides power to the audio
system and accessory power outlets. Orange indicator
illuminates.
ON:All electrical systems are available. Orange
indicator illuminates.
OFF:Power off and indicator off.
STARTING THE VEHICLE
Without Push-button Ignition
To start the engine:
1. Make sure the select lever is in the “P” position.
2. Using the key, turn the ignition switch to “START”.
NOTE: Do not depress the accelerator pedal. Release the key as soon as the engine
starts.
With Push-button Ignition
To start the engine:
1. Sit in the driver’s seat with the access key fob.
2. Make sure the select lever is in the “P” position.
3. Depress the brake pedal.
4. When the Engine START/STOP button indicator turns green, briefly press and release
the Engine START/STOP button.
OPERATING THE VEHICLE
41
Page 46 of 148
Auto Vehicle Hold (AVH)
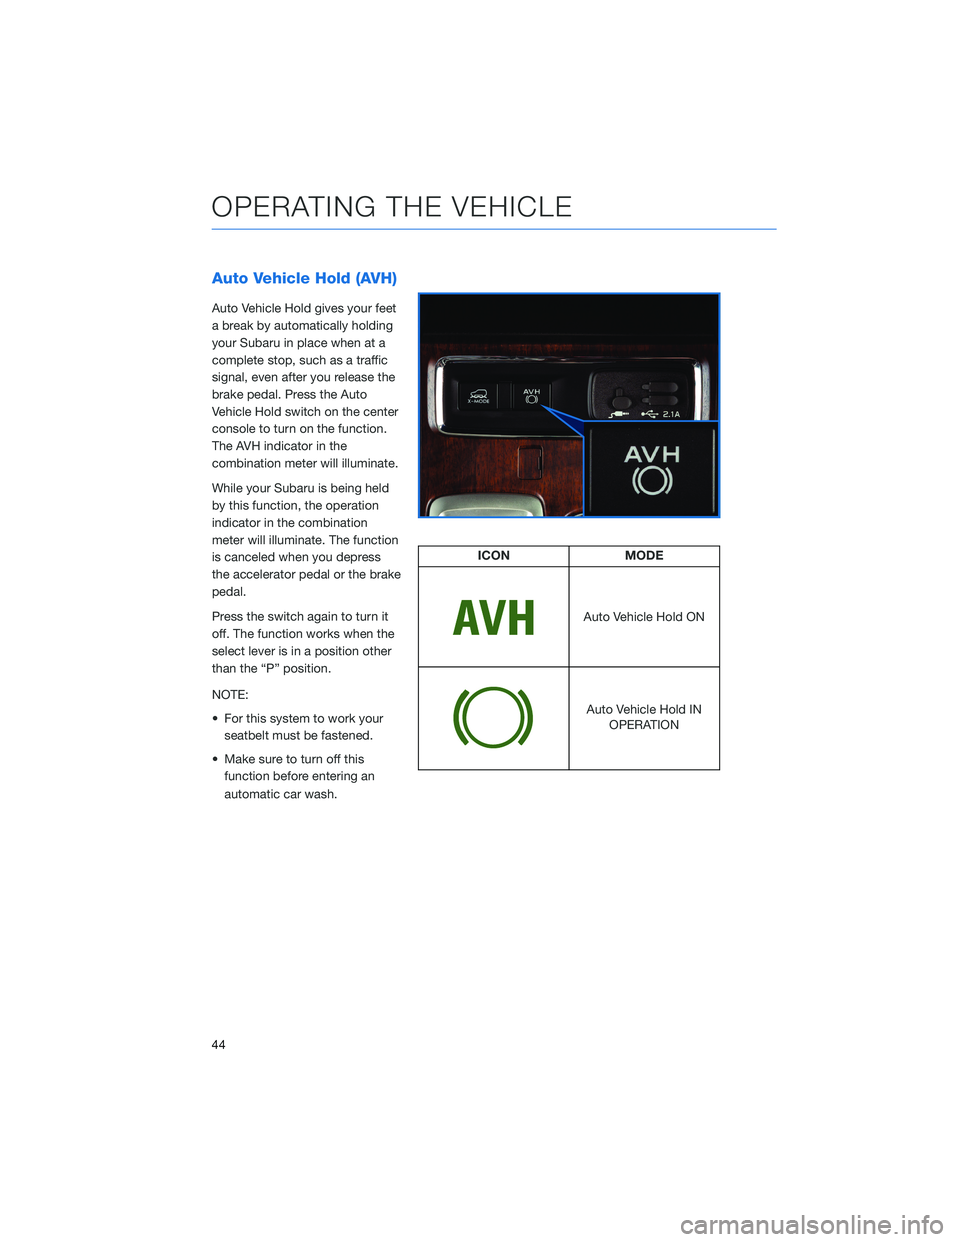
Auto Vehicle Hold gives your feet
a break by automatically holding
your Subaru in place when at a
complete stop, such as a traffic
signal, even after you release the
brake pedal. Press the Auto
Vehicle Hold switch on the center
console to turn on the function.
The AVH indicator in the
combination meter will illuminate.
While your Subaru is being held
by this function, the operation
indicator in the combination
meter will illuminate. The function
is canceled when you depress
the accelerator pedal or the brake
pedal.
Press the switch again to turn it
off. The function works when the
select lever is in a position other
than the “P” position.
NOTE:
• For this system to work your
seatbelt must be fastened.
• Make sure to turn off this
function before entering an
automatic car wash.
ICON MODE
Auto Vehicle Hold ON
Auto Vehicle Hold IN
OPERATION
OPERATING THE VEHICLE
44
Page 48 of 148
TURNING OFF THE VEHICLE
Without Push-button Ignition
To stop the engine:
1. Stop your Subaru completely.
2. Move the select lever to the “P” position.
3. Turn the ignition switch to LOCK/OFF.
NOTE: If equipped, the windows will remain active for about 40 seconds or until a front
door is opened, whichever occurs first
With Push-button Ignition
To stop the engine:
1. Stop your Subaru completely.
2. Move the select lever to the “P” position.
3. Press the ignition switch to stop the engine.
NOTE: If equipped, the windows will remain active for about 40 seconds or until a front
door is opened, whichever occurs first
OPERATING THE VEHICLE
46
Page 49 of 148
FUEL FILLER LID
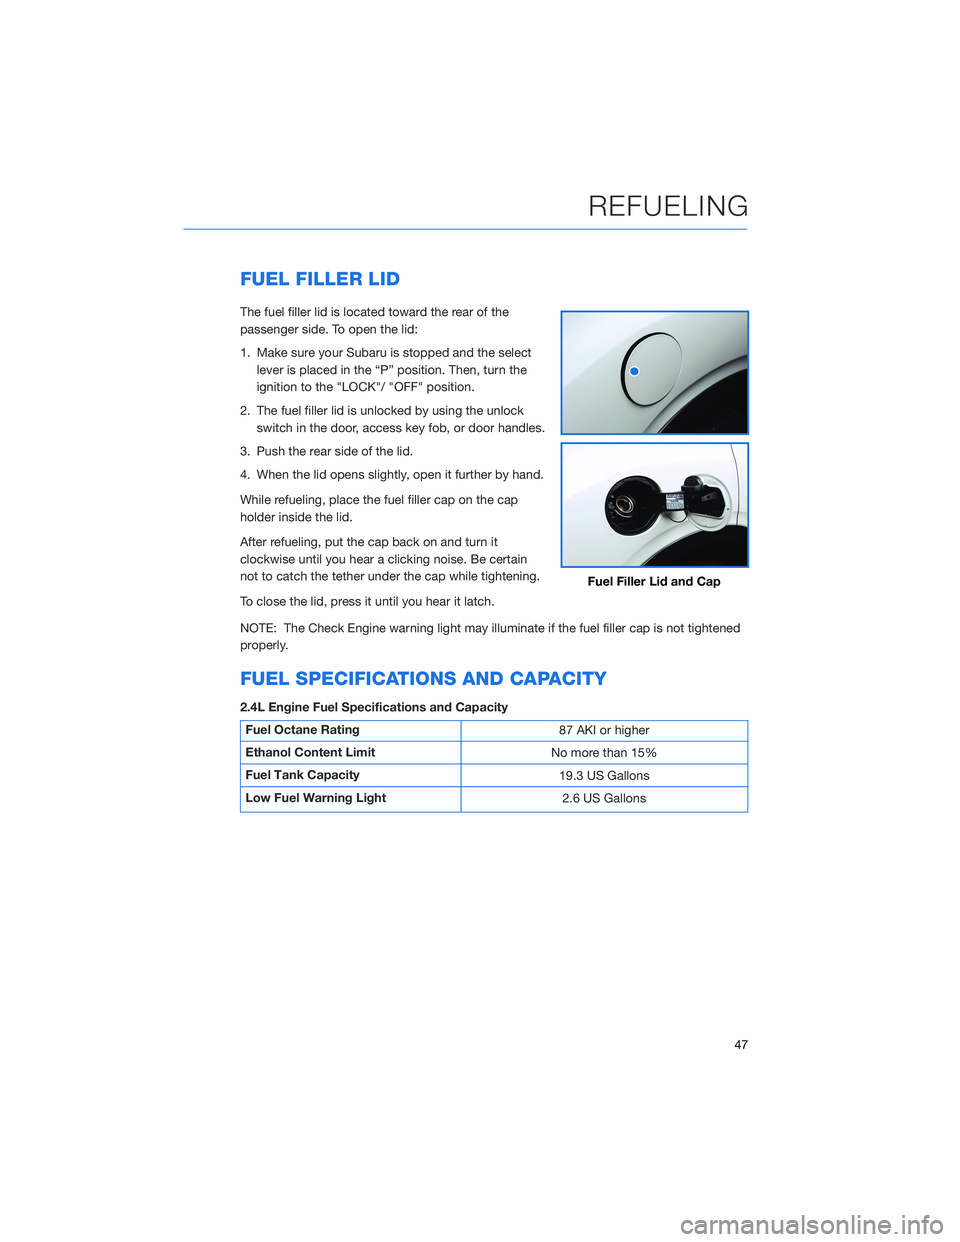
The fuel filler lid is located toward the rear of the
passenger side. To open the lid:
1. Make sure your Subaru is stopped and the select
lever is placed in the “P” position. Then, turn the
ignition to the "LOCK"/ "OFF" position.
2. The fuel filler lid is unlocked by using the unlock
switch in the door, access key fob, or door handles.
3. Push the rear side of the lid.
4. When the lid opens slightly, open it further by hand.
While refueling, place the fuel filler cap on the cap
holder inside the lid.
After refueling, put the cap back on and turn it
clockwise until you hear a clicking noise. Be certain
not to catch the tether under the cap while tightening.
To close the lid, press it until you hear it latch.
NOTE: The Check Engine warning light may illuminate if the fuel filler cap is not tightened
properly.
FUEL SPECIFICATIONS AND CAPACITY
2.4L Engine Fuel Specifications and Capacity
Fuel Octane Rating
87 AKI or higher
Ethanol Content Limit
No more than 15%
Fuel Tank Capacity
19.3 US Gallons
Low Fuel Warning Light
2.6 US Gallons
Fuel Filler Lid and Cap
REFUELING
47
Page 88 of 148
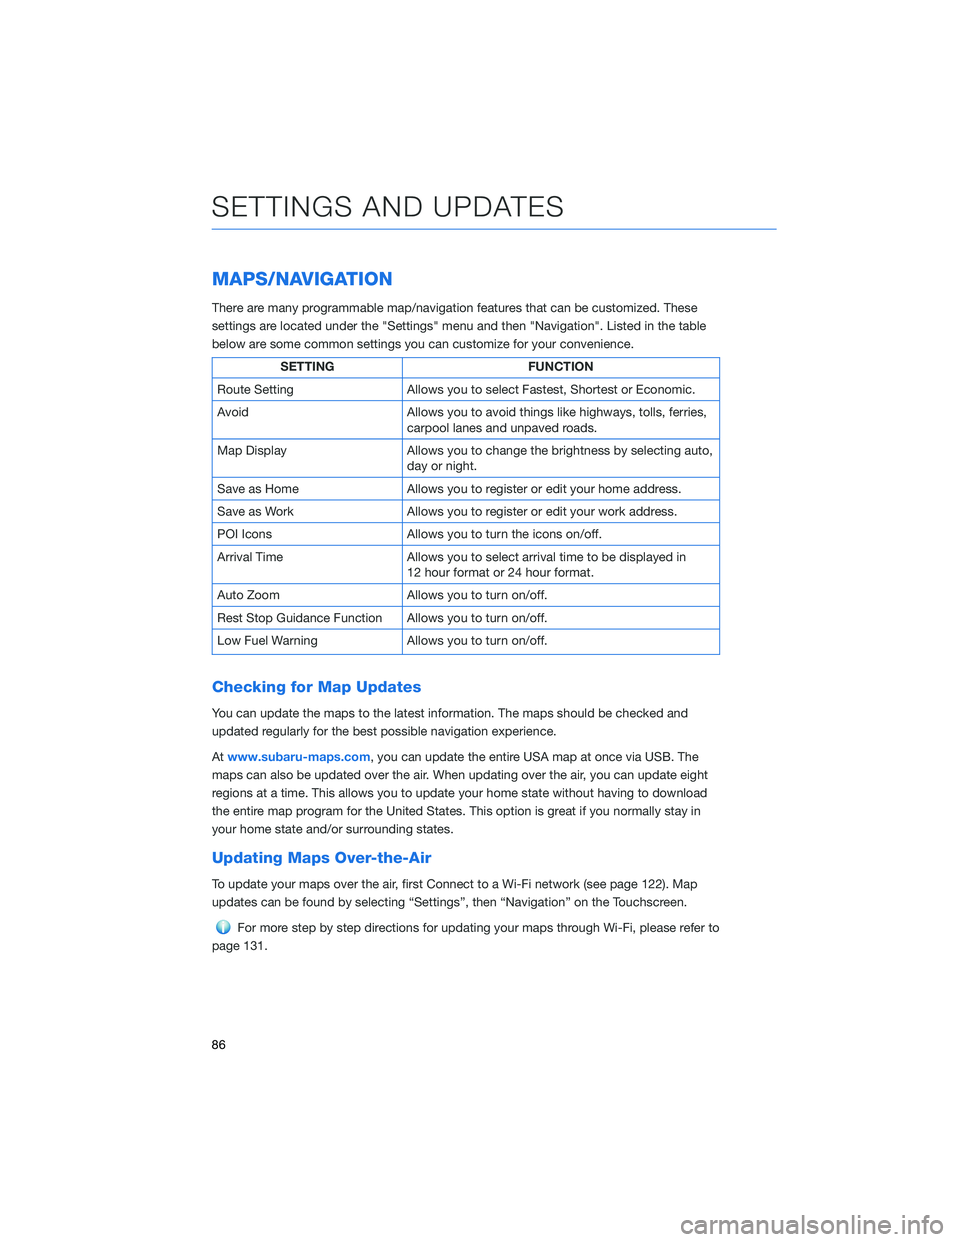
MAPS/NAVIGATION
There are many programmable map/navigation features that can be customized. These
settings are located under the "Settings" menu and then "Navigation". Listed in the table
below are some common settings you can customize for your convenience.
SETTING FUNCTION
Route Setting Allows you to select Fastest, Shortest or Economic.
Avoid Allows you to avoid things like highways, tolls, ferries,
carpool lanes and unpaved roads.
Map Display Allows you to change the brightness by selecting auto,
day or night.
Save as Home Allows you to register or edit your home address.
Save as Work Allows you to register or edit your work address.
POI Icons Allows you to turn the icons on/off.
Arrival Time Allows you to select arrival time to be displayed in
12 hour format or 24 hour format.
Auto Zoom Allows you to turn on/off.
Rest Stop Guidance Function Allows you to turn on/off.
Low Fuel Warning Allows you to turn on/off.
Checking for Map Updates
You can update the maps to the latest information. The maps should be checked and
updated regularly for the best possible navigation experience.
Atwww.subaru-maps.com, you can update the entire USA map at once via USB. The
maps can also be updated over the air. When updating over the air, you can update eight
regions at a time. This allows you to update your home state without having to download
the entire map program for the United States. This option is great if you normally stay in
your home state and/or surrounding states.
Updating Maps Over-the-Air
To update your maps over the air, first Connect to a Wi-Fi network (see page 122). Map
updates can be found by selecting “Settings”, then “Navigation” on the Touchscreen.
For more step by step directions for updating your maps through Wi-Fi, please refer to
page 131.
SETTINGS AND UPDATES
86
Page 94 of 148
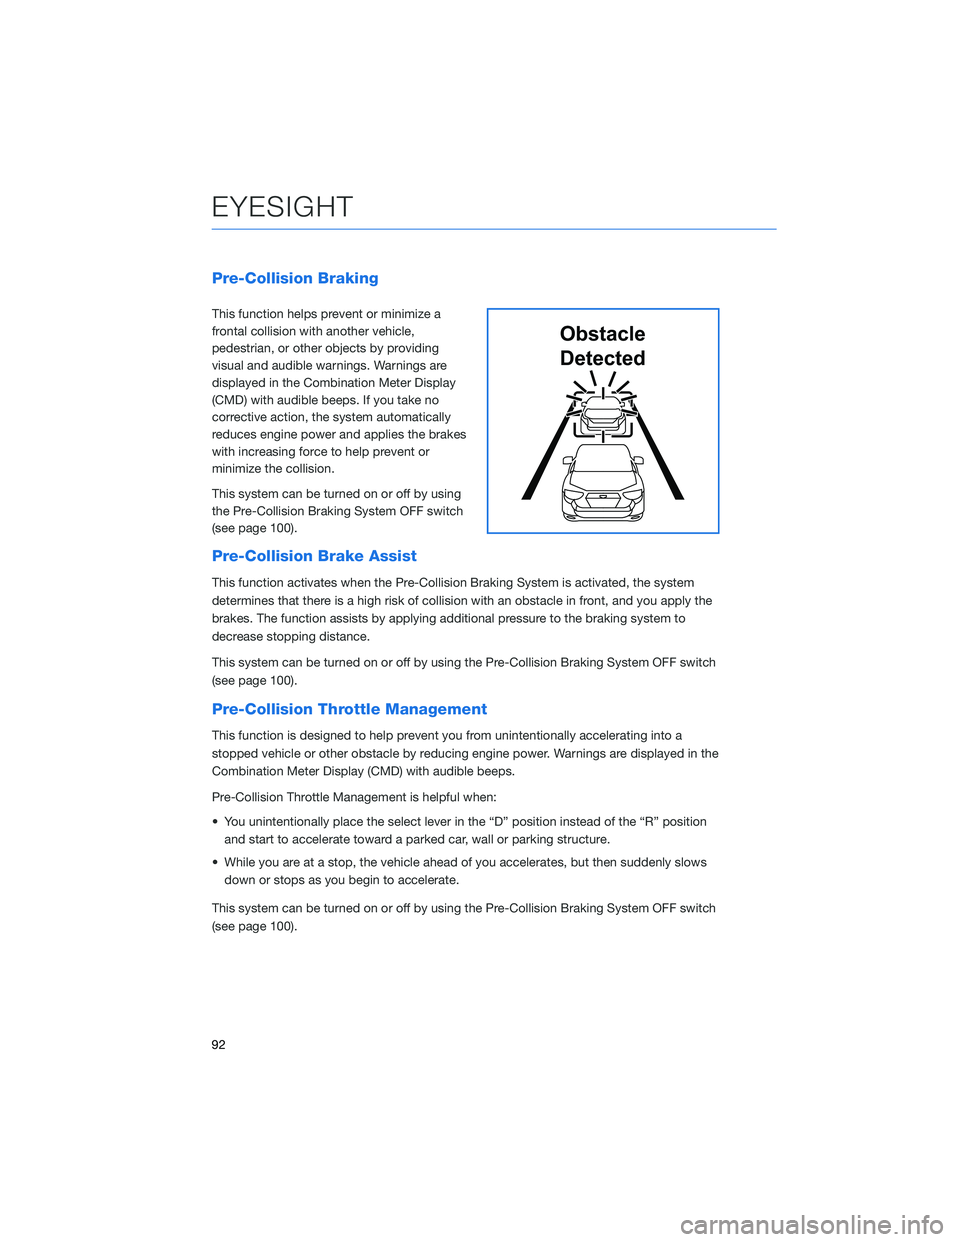
Pre-Collision Braking
This function helps prevent or minimize a
frontal collision with another vehicle,
pedestrian, or other objects by providing
visual and audible warnings. Warnings are
displayed in the Combination Meter Display
(CMD) with audible beeps. If you take no
corrective action, the system automatically
reduces engine power and applies the brakes
with increasing force to help prevent or
minimize the collision.
This system can be turned on or off by using
the Pre-Collision Braking System OFF switch
(see page 100).
Pre-Collision Brake Assist
This function activates when the Pre-Collision Braking System is activated, the system
determines that there is a high risk of collision with an obstacle in front, and you apply the
brakes. The function assists by applying additional pressure to the braking system to
decrease stopping distance.
This system can be turned on or off by using the Pre-Collision Braking System OFF switch
(see page 100).
Pre-Collision Throttle Management
This function is designed to help prevent you from unintentionally accelerating into a
stopped vehicle or other obstacle by reducing engine power. Warnings are displayed in the
Combination Meter Display (CMD) with audible beeps.
Pre-Collision Throttle Management is helpful when:
• You unintentionally place the select lever in the “D” position instead of the “R” position
and start to accelerate toward a parked car, wall or parking structure.
• While you are at a stop, the vehicle ahead of you accelerates, but then suddenly slows
down or stops as you begin to accelerate.
This system can be turned on or off by using the Pre-Collision Braking System OFF switch
(see page 100).
Obstacle
Detected
EYESIGHT
92