instrument panel SUBARU BRZ 2018 Quick Guide
[x] Cancel search | Manufacturer: SUBARU, Model Year: 2018, Model line: BRZ, Model: SUBARU BRZ 2018Pages: 33, PDF Size: 3.52 MB
Page 3 of 33
Table of Contents
2-3 Getting Started
4-5 Instrument Panel
6-9 Gauges
10-11 Personalize
12-19 Controls
20-21 While Operating
22-23 Safety/In Case of Emergency
24-26 Additional Information
3156598_18a_BRZ_QRG_100217.indd 510/3/17 8:55 AM
Page 5 of 33
3
Seating
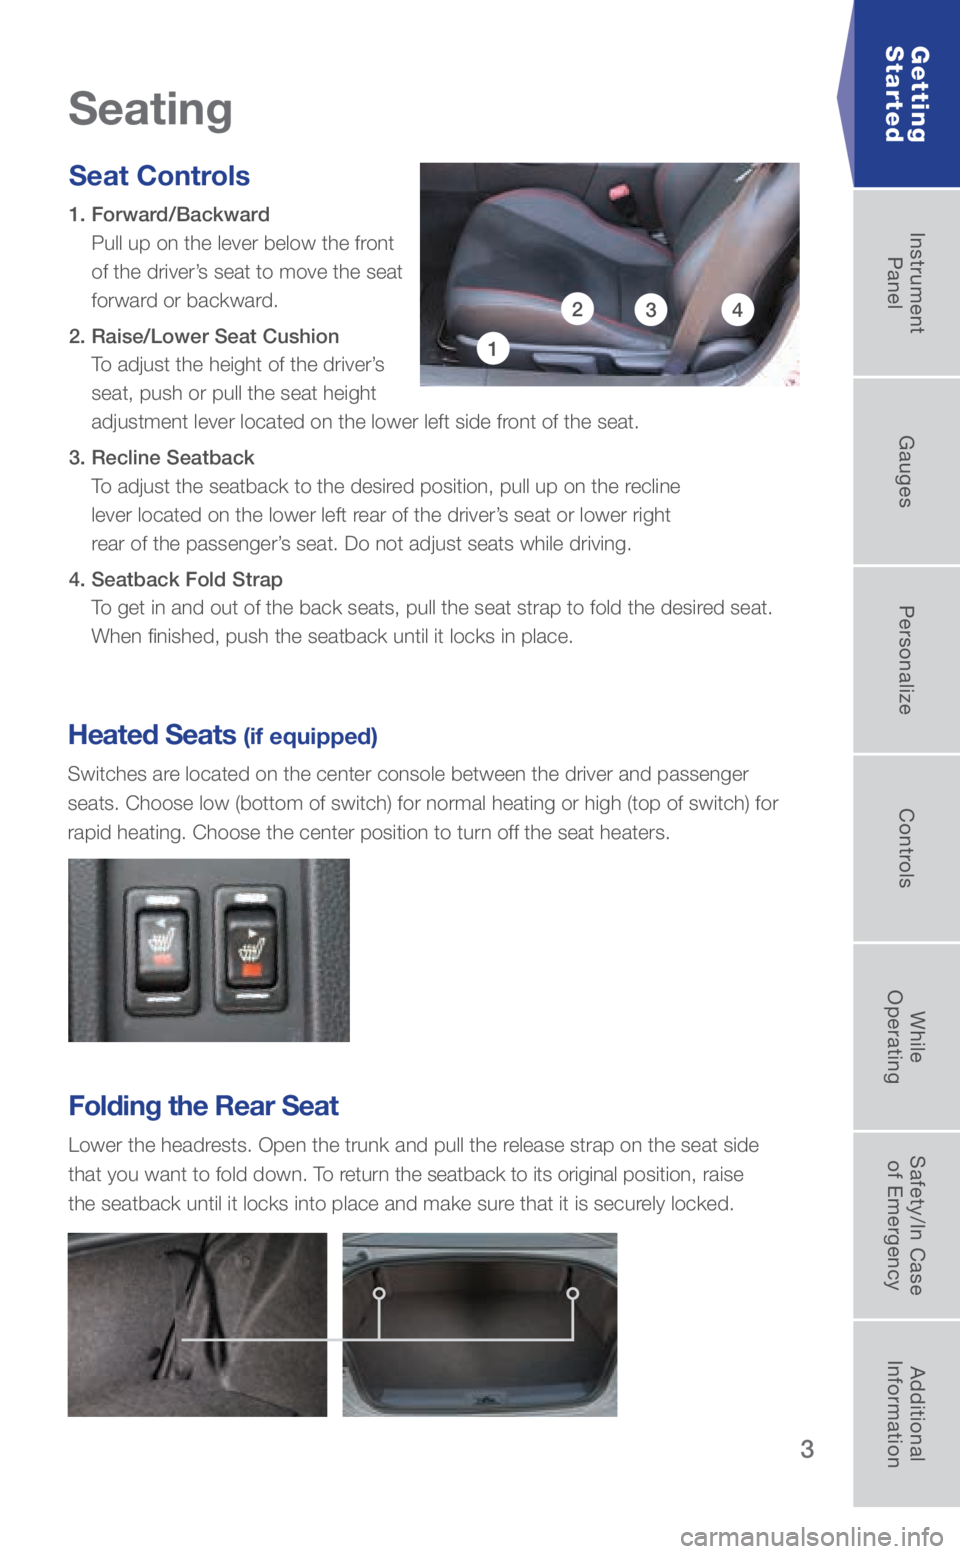
Seat Controls
1. Forward/Backward
Pull up on the lever below the front
of the driver’s seat to move the seat
forward or backward.
2. Raise/Lower Seat Cushion To adjust the height of the driver’s
seat, push or pull the seat height
adjustment lever located on the lower left side front of the seat.
3. Recline Seatback To adjust the seatback to the desired position, pull up on the recline
lever located on the lower left rear of the driver’s seat or lower right
rear of the passenger’s seat. Do not adjust seats while driving.
4. Seatback Fold Strap To get in and out of the back seats, pull the seat strap to fold the desi\
red seat.
When finished, push the seatback until it locks in place.
Heated Seats (if equipped)
Switches are located on the center console between the driver and passenger
seats. Choose low (bottom of switch) for normal heating or high (top \
of switch) for
rapid heating. Choose the center position to turn off the seat heaters.
1
234
Folding the Rear Seat
Lower the headrests. Open the trunk and pull the release strap on the seat side
that you want to fold down. To return the seatback to its original position, raise
the seatback until it locks into place and make sure that it is securely locked.
Getting
Started
3156598_18a_BRZ_QRG_100217.indd 310/3/17 8:56 AM
Getting
Started Instrument
Panel Gauges
Personalize ControlsWhile
Operating Safety/In Case
of Emergency Additional
Information
Page 6 of 33
4
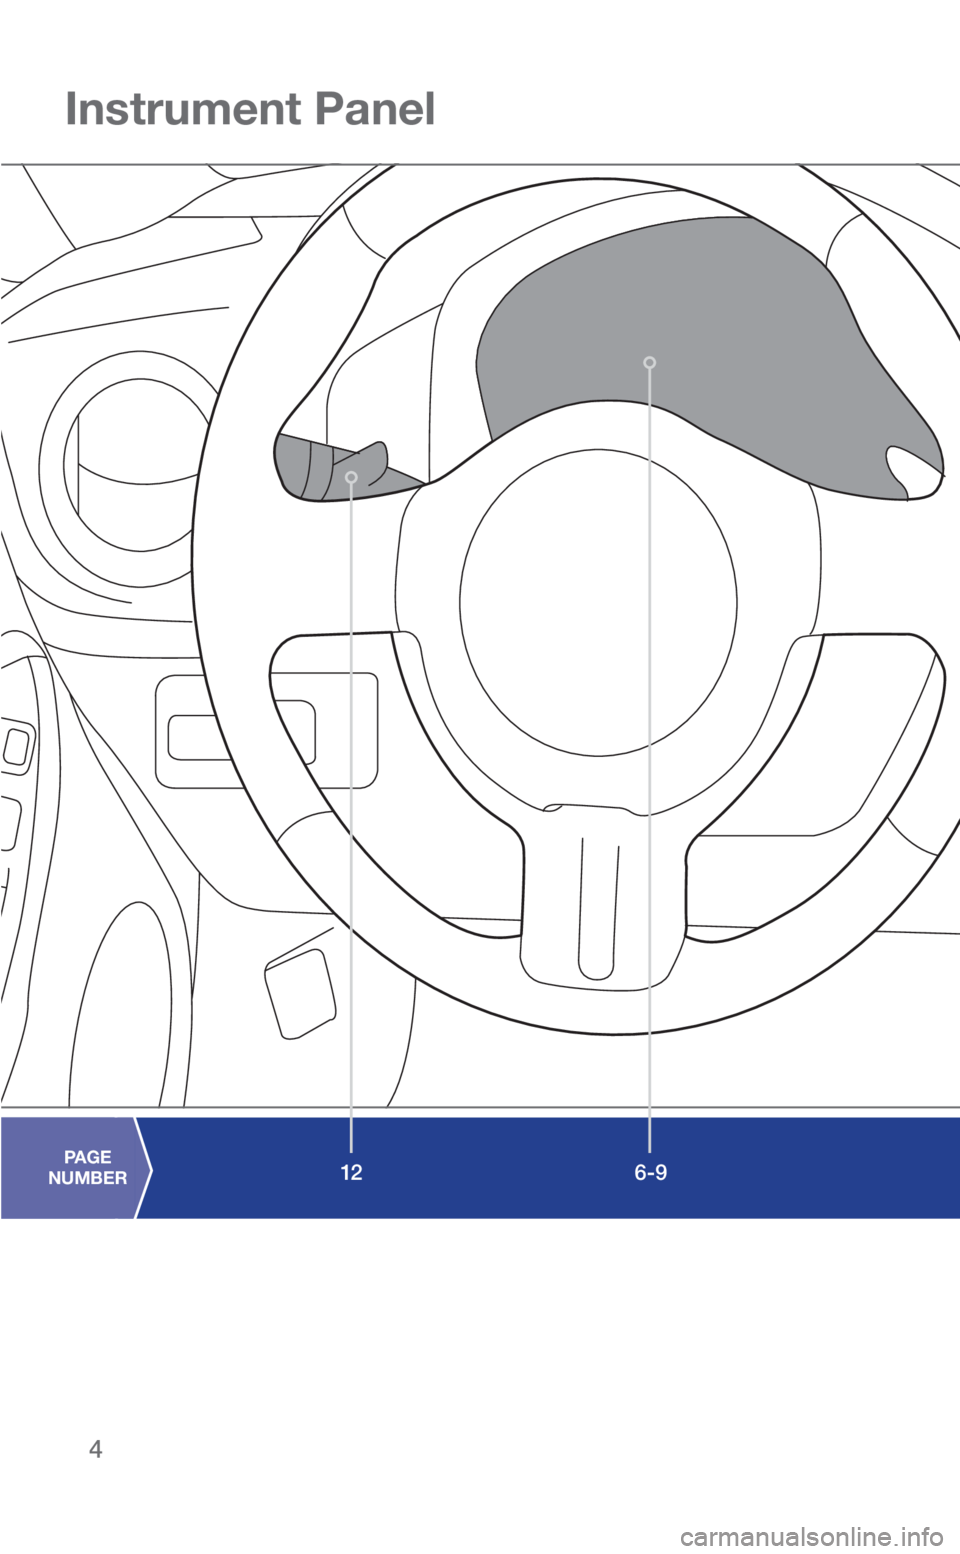
Instrument Panel
6-9PAGE
NUMBER12PAGE
NUMBER
3156598_18a_BRZ_QRG_100217.indd 410/3/17 8:56 AM
Page 7 of 33
5
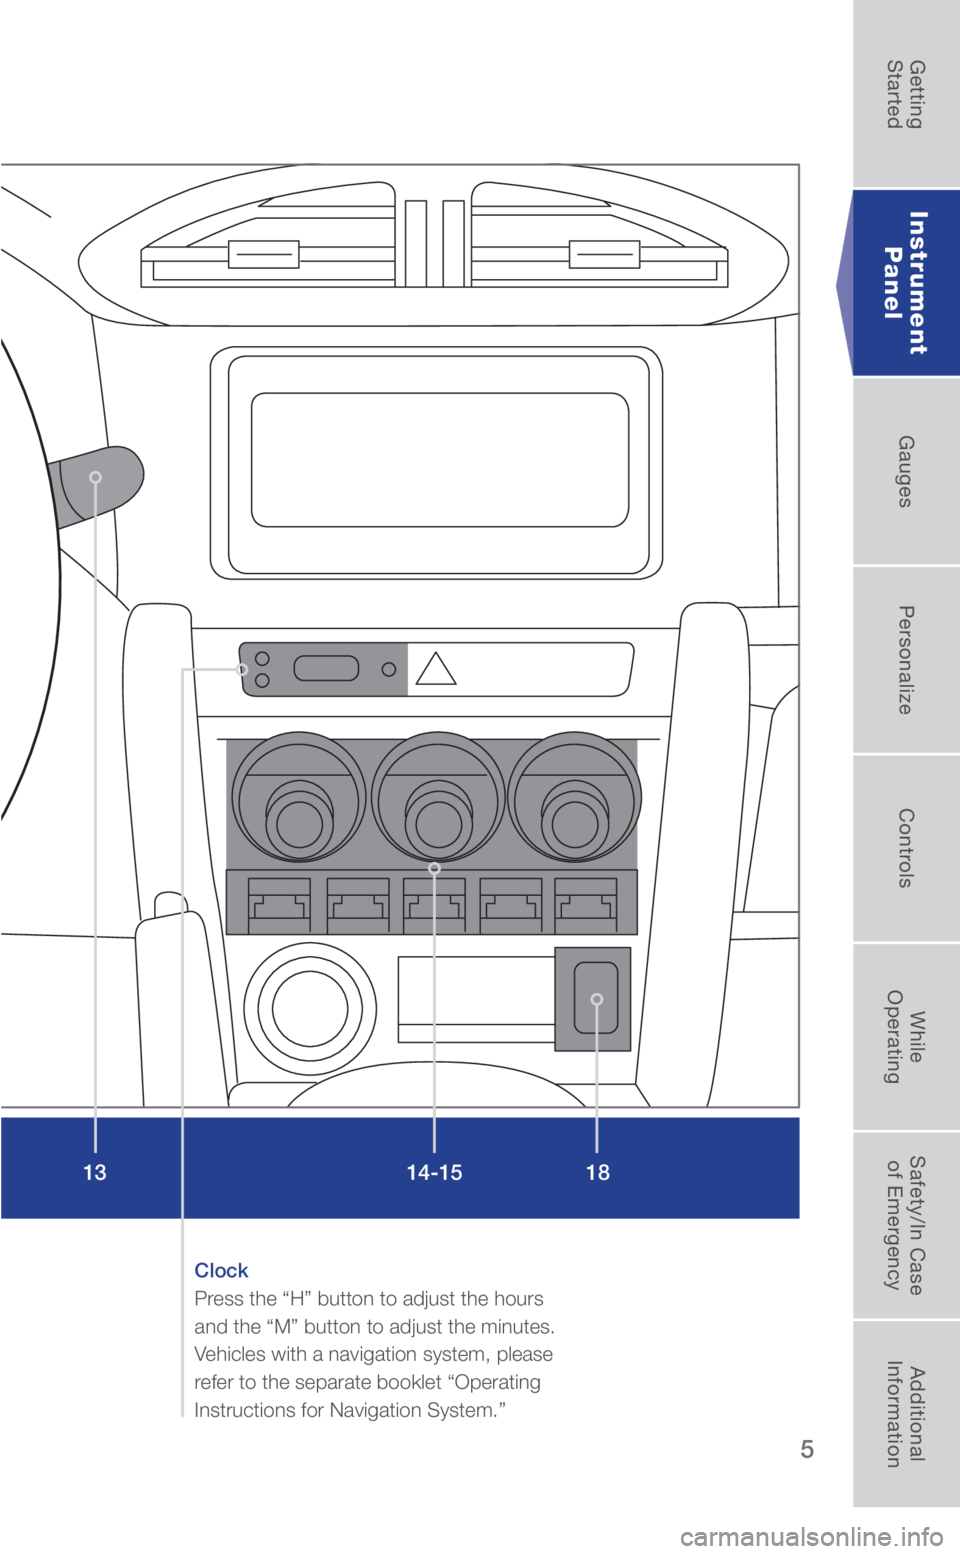
Clock
Press the “H” button to adjust the hours
and the “M” button to adjust the minutes.
Vehicles with a navigation system, please
refer to the separate booklet “Operating
Instructions for Navigation System.”
18
1314-15
Instrument
Panel
3156598_18a_BRZ_QRG_100217.indd 510/3/17 8:56 AM
Getting
Started Instrument
Panel Gauges
Personalize ControlsWhile
Operating Safety/In Case
of Emergency Additional
Information
Page 9 of 33
7
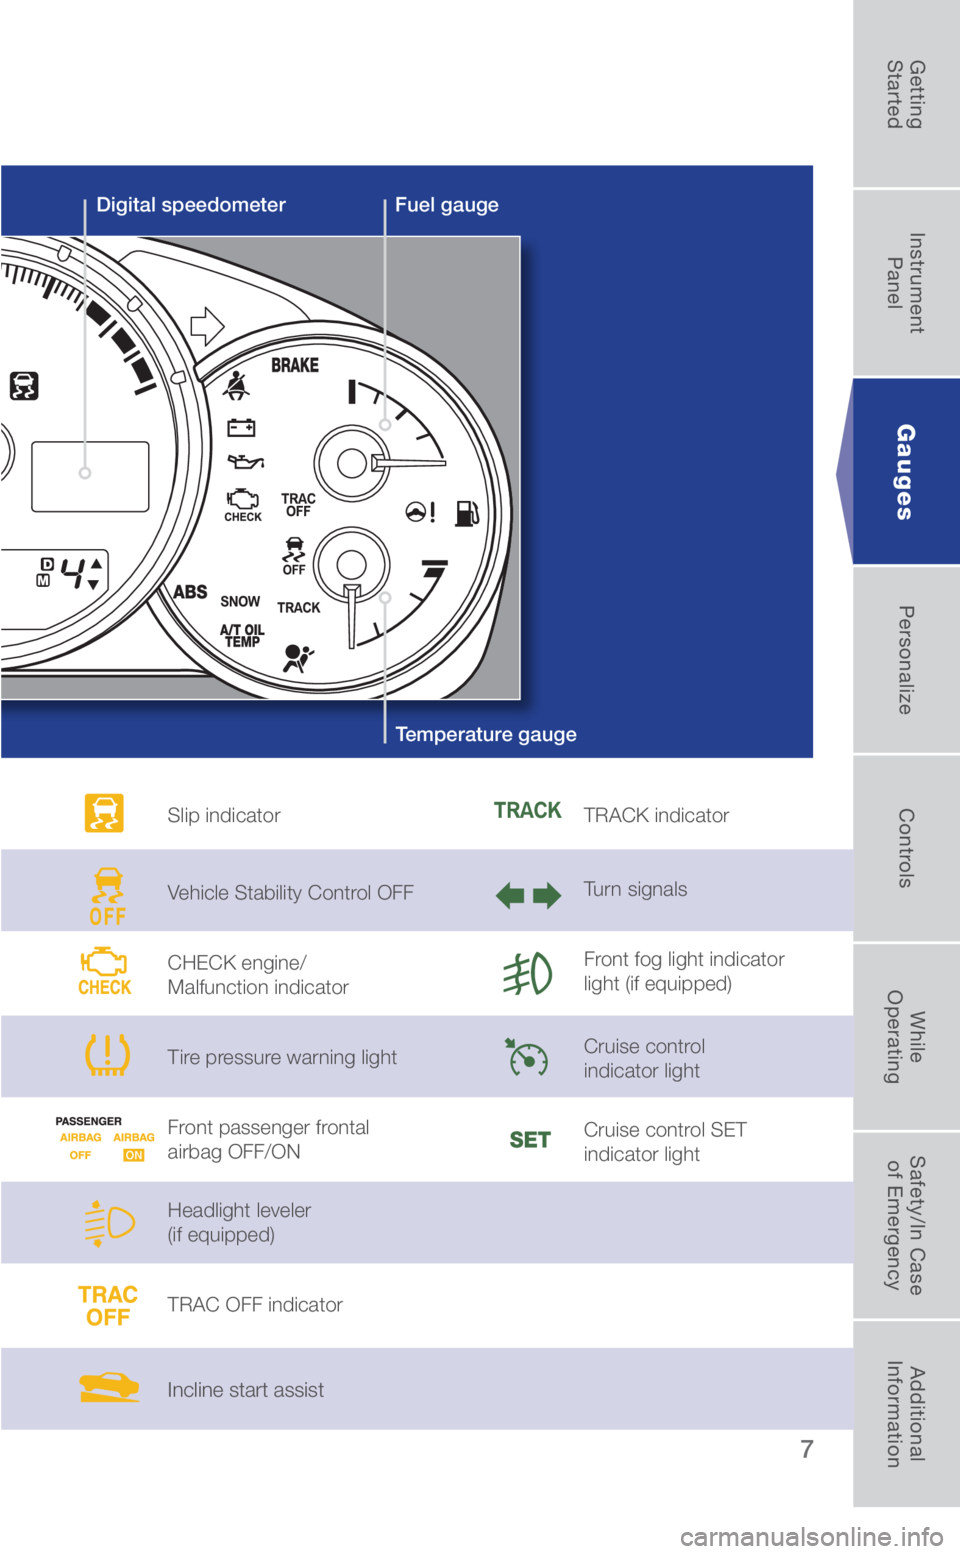
Slip indicator
Vehicle Stability Control OFF
CHECK engine/
Malfunction indicator
Tire pressure warning light
Front passenger frontal
airbag OFF/ON
Headlight leveler
(if equipped)
TRAC OFF indicator
Incline start assist
TRACK indicator
Turn signals
Front fog light indicator
light (if equipped)
Cruise control
indicator light
Cruise control SET
indicator light
Gauges
Digital speedometerFuel gauge
Temperature gauge
3156598_18a_BRZ_QRG_100217.indd 710/3/17 8:56 AM
Getting
Started Instrument
Panel Gauges
Personalize ControlsWhile
Operating Safety/In Case
of Emergency Additional
Information
Page 11 of 33
9
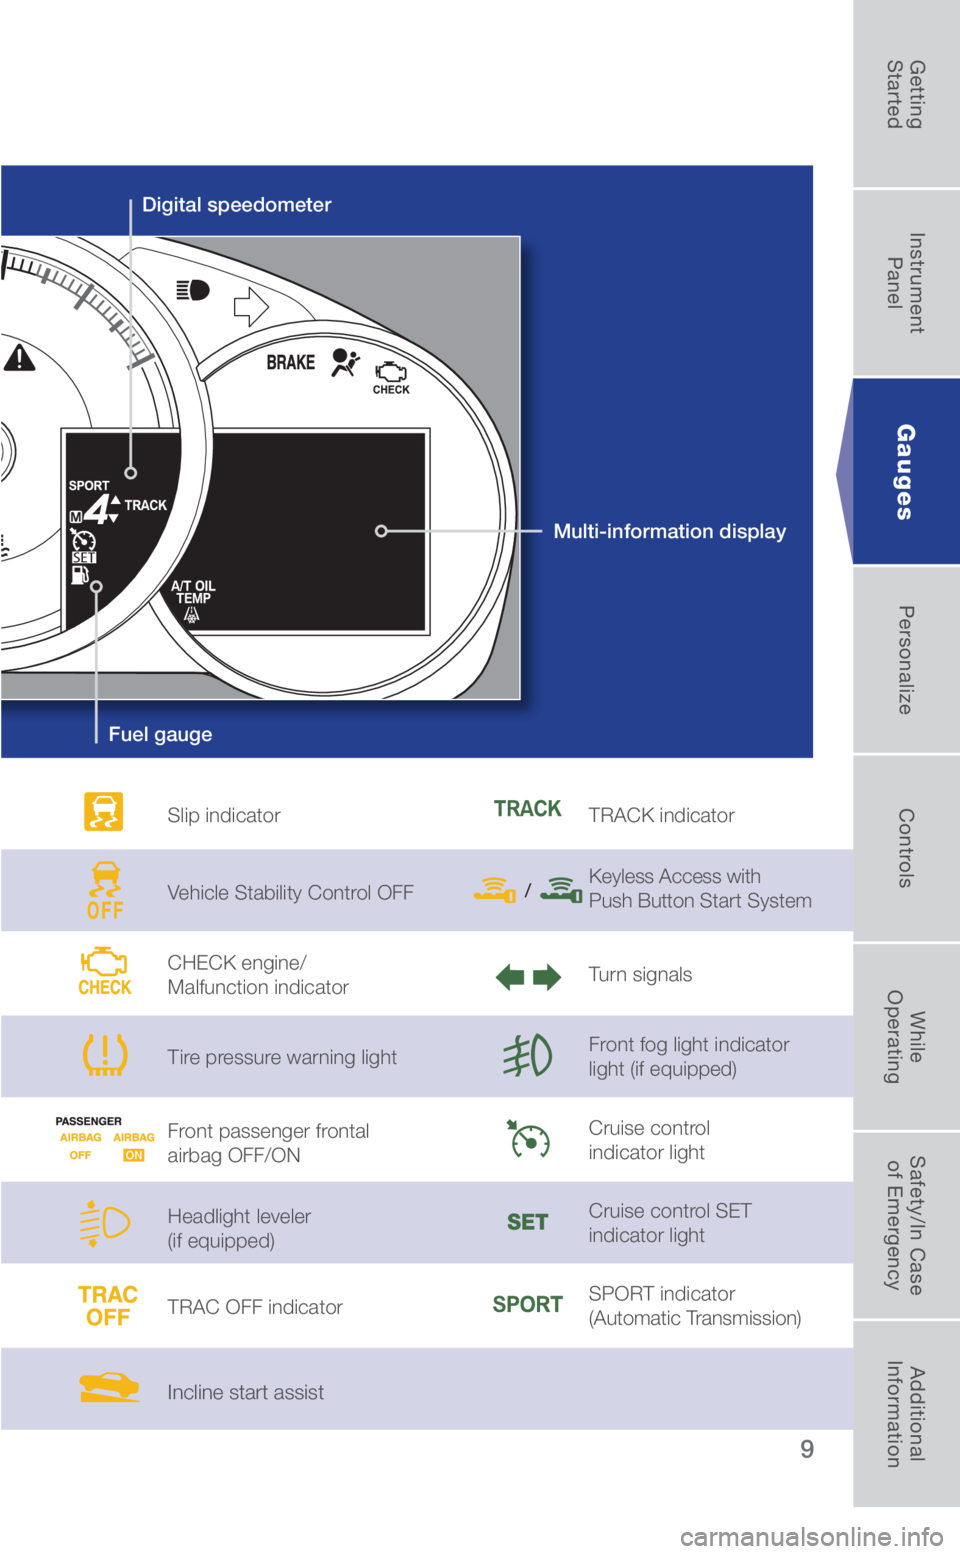
Slip indicator
Vehicle Stability Control OFF
CHECK engine/
Malfunction indicator
Tire pressure warning light
Front passenger frontal
airbag OFF/ON
Headlight leveler
(if equipped)
TRAC OFF indicator
Incline start assist
TRACK indicator
Keyless Access with
Push Button Start System
Turn signals
Front fog light indicator
light (if equipped)
Cruise control
indicator light
Cruise control SET
indicator light
SPORT indicator
(Automatic Transmission)
Gauges
Digital speedometer
Multi-information display
Fuel gauge
3156598_18a_BRZ_QRG_100217.indd 910/3/17 8:56 AM
Getting
Started Instrument
Panel Gauges
Personalize ControlsWhile
Operating Safety/In Case
of Emergency Additional
Information
Page 13 of 33
11
Trunk Lid Cancel Button
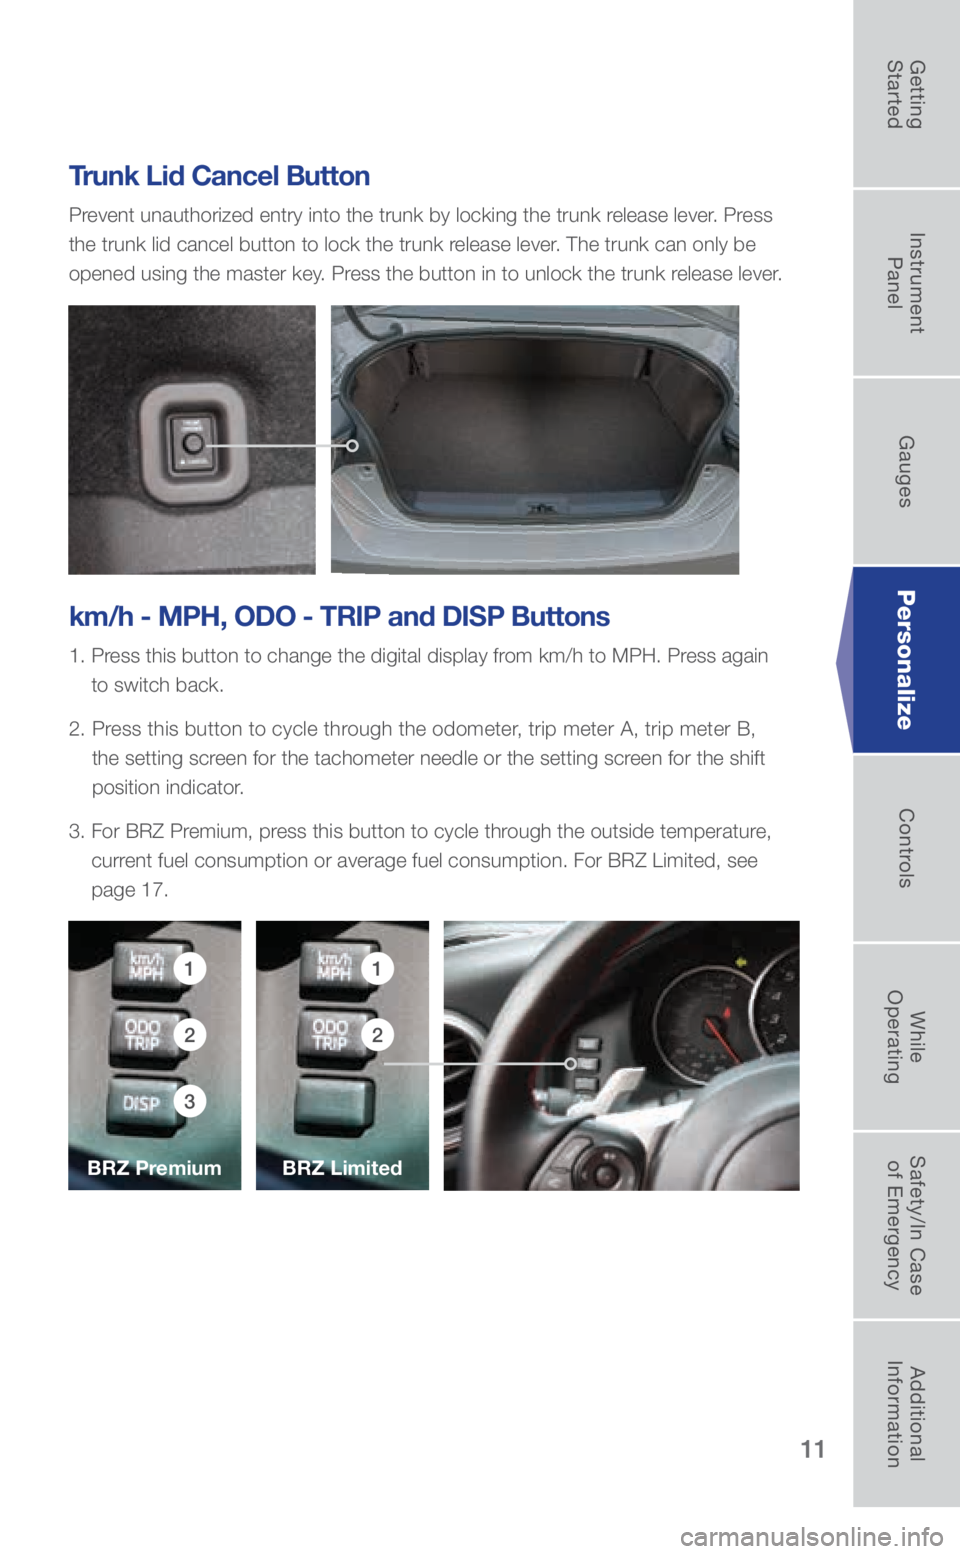
Prevent unauthorized entry into the trunk by locking the trunk release lever. Press
the trunk lid cancel button to lock the trunk release lever. The trunk can only be
opened using the master key. Press the button in to unlock the trunk release lever.
km/h - MPH, ODO - TRIP and DISP Buttons
1. Press this button to change the digital display from km/h to MPH. Press again
to switch back.
2. Press this button to cycle through the odometer, trip meter A, trip meter B,
the setting screen for the tachometer needle or the setting screen for the shift
position indicator.
3. For BRZ Premium, press this button to cycle through the outside temperature,
current fuel consumption or average fuel consumption. For BRZ Limited, see
page 17.
11
22
3
Personalize
BRZ Limited
BRZ Premium
3156598_18a_BRZ_QRG_100217.indd 1110/3/17 8:57 AM
Getting
Started Instrument
Panel Gauges
Personalize ControlsWhile
Operating Safety/In Case
of Emergency Additional
Information
Page 14 of 33
12
Controls
Light Controls
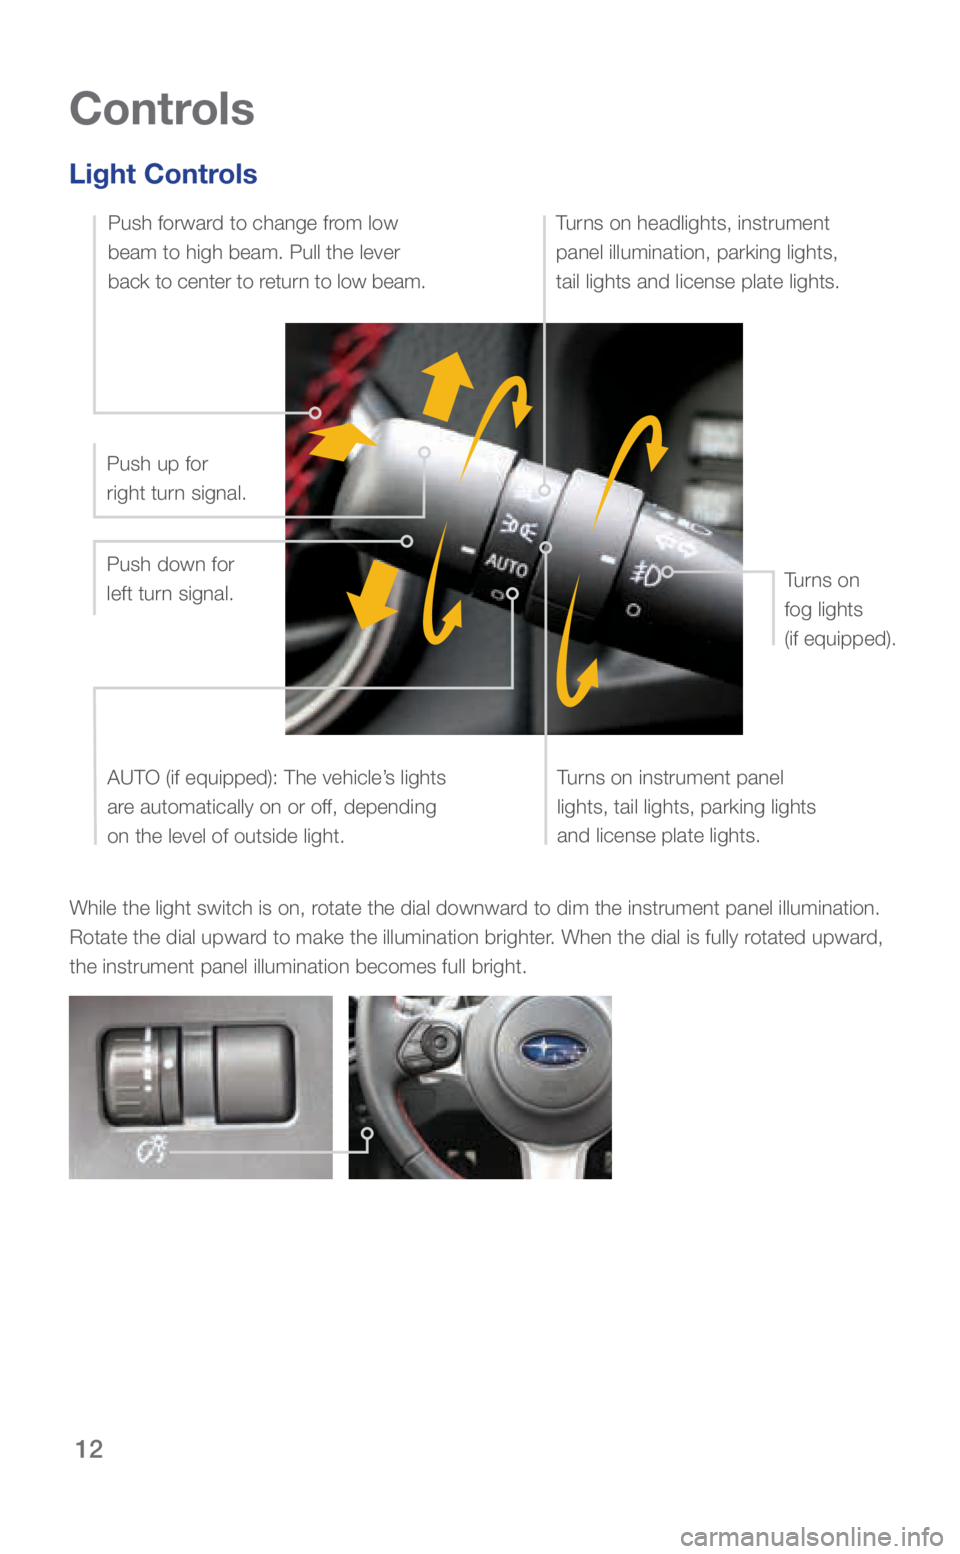
While the light switch is on, rotate the dial downward to dim the instrument panel illumination.
Rotate the dial upward to make the illumination brighter. When the dial is fully rotated upward,
the instrument panel illumination becomes full bright.
Turns on instrument panel
lights, tail lights, parking lights
and license plate lights.
Turns on headlights, instrument
panel illumination, parking lights,
tail lights and license plate lights.
Turns on
fog lights
(if equipped).
Push up for
right turn signal.
Push down for
left turn signal.AUTO (if equipped): The vehicle’s lights
are automatically on or off, depending
on the level of outside light.
Push forward to change from low
beam to high beam. Pull the lever
back to center to return to low beam.
3156598_18a_BRZ_QRG_100217.indd 1210/3/17 8:57 AM
Page 15 of 33
13
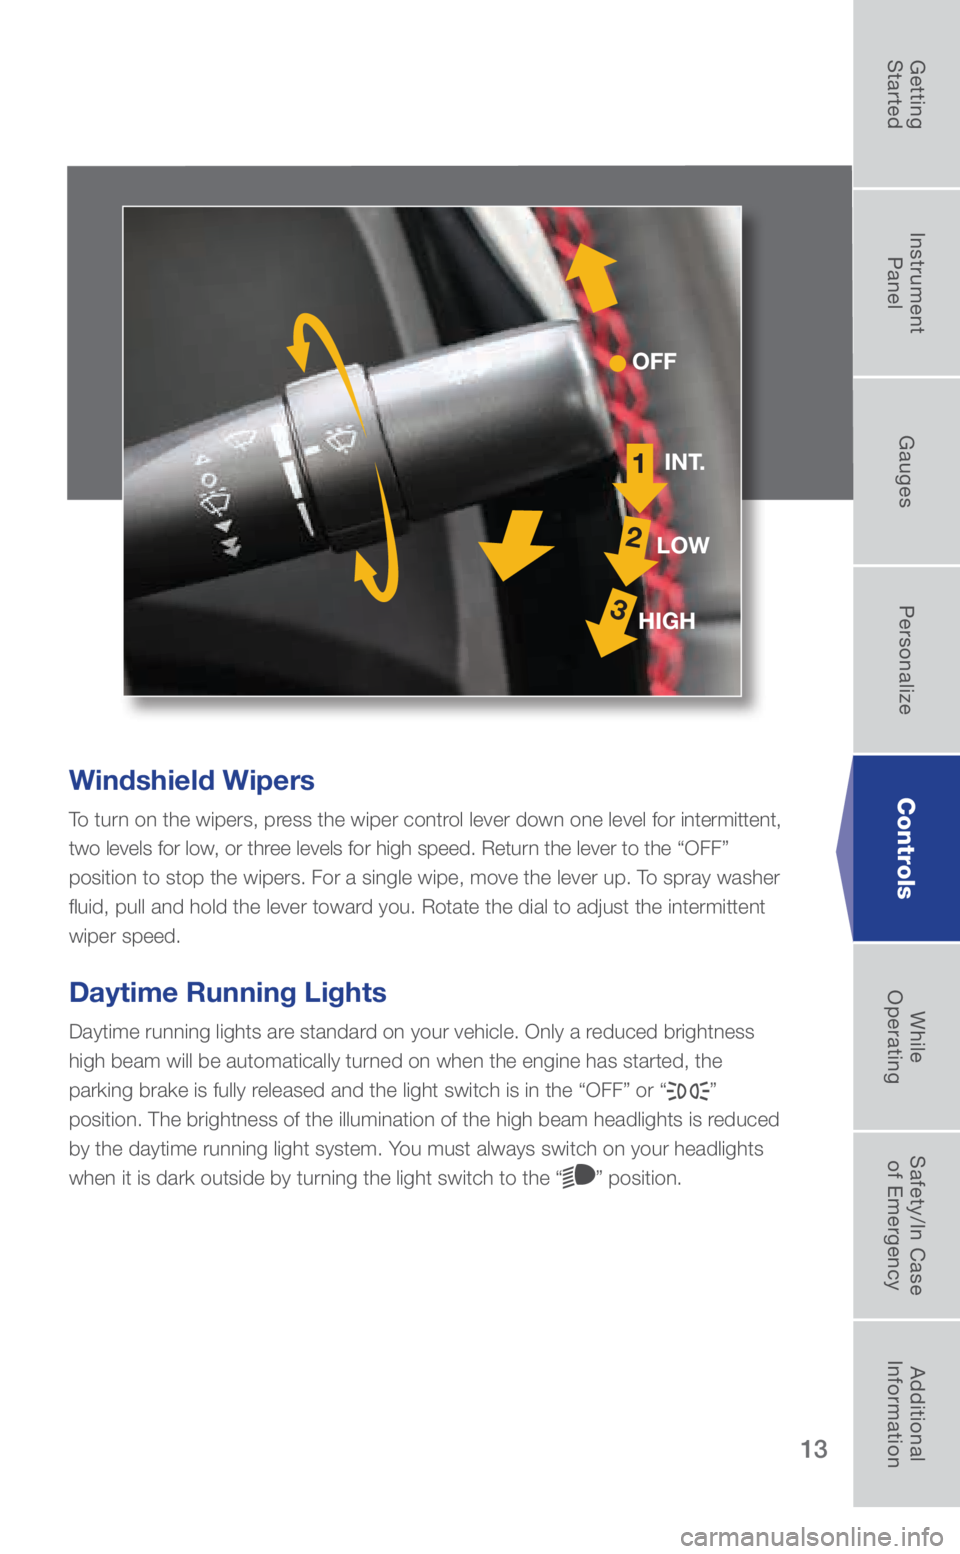
Windshield Wipers
To turn on the wipers, press the wiper control lever down one level for intermittent,
two levels for low, or three levels for high speed. Return the lever to the “OFF”
position to stop the wipers. For a single wipe, move the lever up. To spray washer
fluid, pull and hold the lever toward you. Rotate the dial to adjust the intermittent
wiper speed.
Daytime Running Lights
Daytime running lights are standard on your vehicle. Only a reduced brightness
high beam will be automatically turned on when the engine has started, the
parking brake is fully released and the light switch is in the “OFF” or “
”
position. The brightness of the illumination of the high beam headlights\
is reduced
by the daytime running light system. You must always switch on your headlights
when it is dark outside by turning the light switch to the “
” position.
OFF
1
2
3
INT.
LOW
HIGH
Controls
3156598_18a_BRZ_QRG_100217.indd 1310/3/17 8:57 AM
Getting
Started Instrument
Panel Gauges
Personalize ControlsWhile
Operating Safety/In Case
of Emergency Additional
Information
Page 17 of 33
15
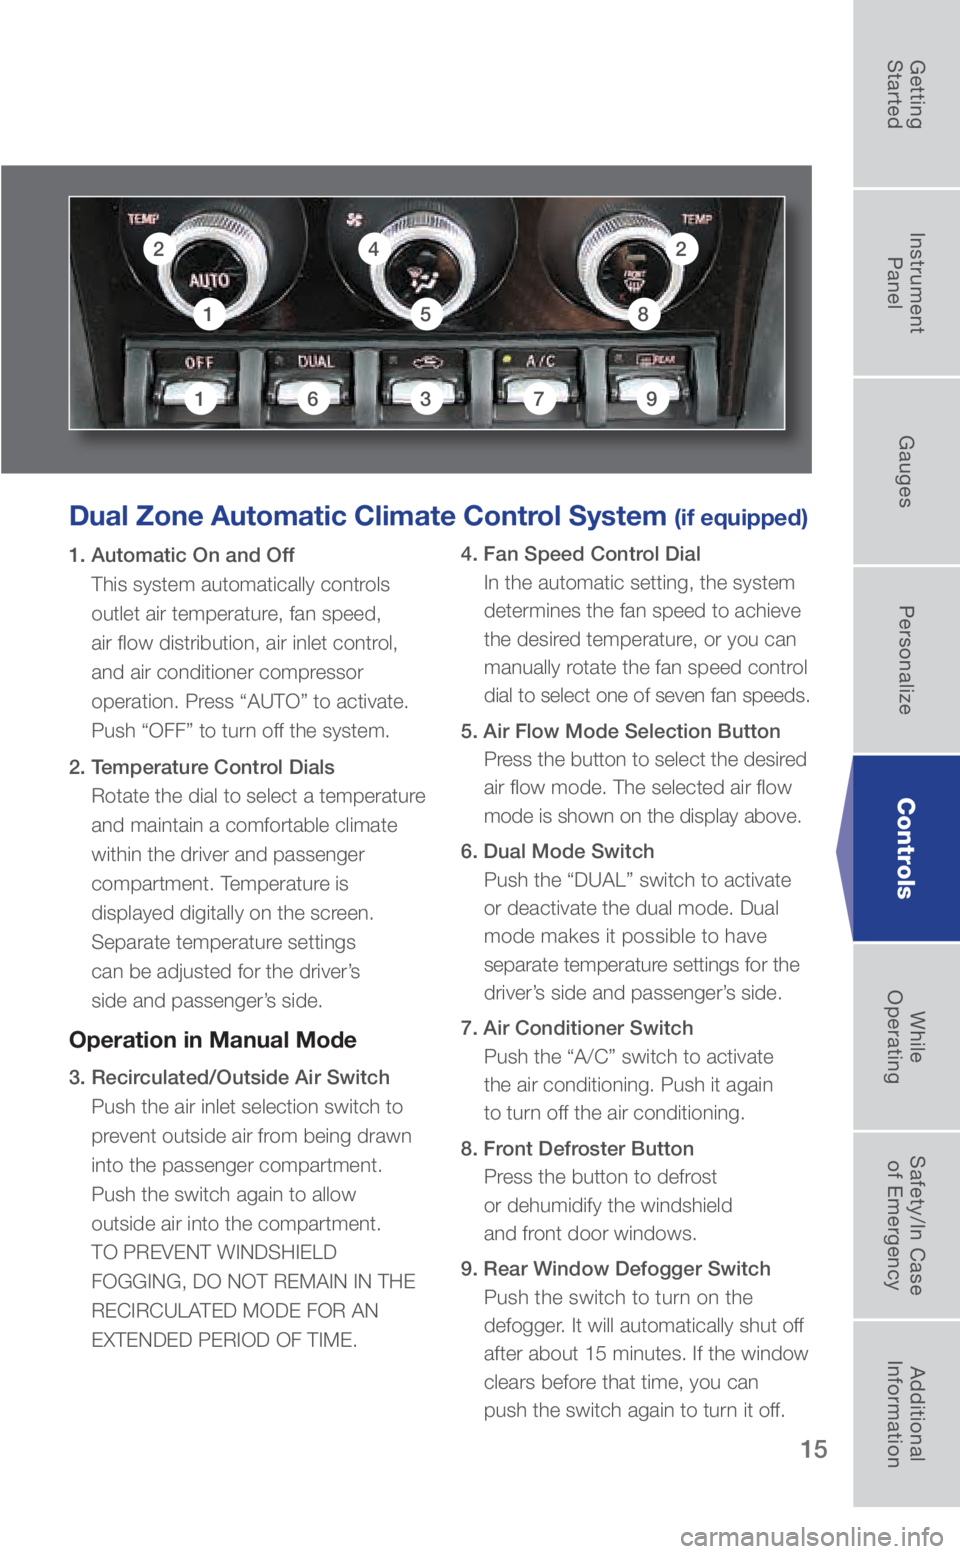
Dual Zone Automatic Climate Control System (if equipped)
1. Automatic On and Off This system automatically controls
outlet air temperature, fan speed,
air flow distribution, air inlet control,
and air conditioner compressor
operation. Press “AUTO” to activate.
Push “OFF” to turn off the system.
2. Temperature Control Dials
Rotate the dial to select a temperature
and maintain a comfortable climate
within the driver and passenger
compartment. Temperature is
displayed digitally on the screen.
Separate temperature settings
can be adjusted for the driver’s
side and passenger’s side.
Operation in Manual Mode
3. Recirculated/Outside Air Switch Push the air inlet selection switch to
prevent outside air from being drawn
into the passenger compartment.
Push the switch again to allow
outside air into the compartment.
TO PREVENT WINDSHIELD
FOGGING, DO NOT REMAIN IN THE
RECIRCULATED MODE FOR AN
EXTENDED PERIOD OF TIME.
4. Fan Speed Control Dial
In the automatic setting, the system
determines the fan speed to achieve
the desired temperature, or you can
manually rotate the fan speed control
dial to select one of seven fan speeds.
5. Air Flow Mode Selection Button Press the button to select the desired
air flow mode. The selected air flow
mode is shown on the display above.
6. Dual Mode Switch Push the “DUAL” switch to activate
or deactivate the dual mode. Dual
mode makes it possible to have
separate temperature settings for the
driver’s side and passenger’s side.
7. Air Conditioner Switch Push the “A/C” switch to activate
the air conditioning. Push it again
to turn off the air conditioning.
8. Front Defroster Button Press the button to defrost
or dehumidify the windshield
and front door windows.
9. Rear Window Defogger Switch Push the switch to turn on the
defogger. It will automatically shut off
after about 15 minutes. If the window
clears before that time, you can
push the switch again to turn it off.
2
36917
4
158
2
Controls
3156598_18a_BRZ_QRG_100217.indd 1510/3/17 8:58 AM
Getting
Started Instrument
Panel Gauges
Personalize ControlsWhile
Operating Safety/In Case
of Emergency Additional
Information