instrument panel SUBARU BRZ 2022 Getting Started Guide
[x] Cancel search | Manufacturer: SUBARU, Model Year: 2022, Model line: BRZ, Model: SUBARU BRZ 2022Pages: 108, PDF Size: 29.44 MB
Page 3 of 108
PURPOSE OF THIS GUIDE
WELCOME................. 4
IMPORTANT SAFETY
INFORMATION.............. 4
OWNER’S RESOURCES....... 4
IN CASE OF EMERGENCY..... 5
TOWING YOUR SUBARU...... 6
ENTRY AND EXIT
KEYLESS ENTRY............ 7
KEYLESS ACCESS WITH PUSH
BUTTON START............. 7
INSTRUMENT PANEL........10
GETTING COMFORTABLE
SEATING...................12
TILT AND TELESCOPIC STEERING
COLUMN...................13
POWER EXTERIOR MIRRORS . . 14
REAR VIEW MIRROR.........14
POWER WINDOWS..........15
CLIMATE CONTROL..........16
ACCESSORY CONNECTIONS . . 19
CONTROLS
INSTRUMENT PANEL SWITCHES
(LOWER LEFT)..............20
AUDIO CONTROLS...........20
CRUISE CONTROL...........21
ADAPTIVE CRUISE CONTROL . . 21
COMBINATION METER DISPLAY
CONTROLS................22
LIGHT CONTROLS...........22
TURN SIGNALS.............24
WINDSHIELD WIPERS........24
OVERHEAD CONSOLE........25
GAUGES AND WARNING
LIGHTS
COMBINATION METER.......26
WARNING AND INDICATOR
LIGHTS....................28
OPERATING THE VEHICLE
PUSH-BUTTON IGNITION
SWITCH...................29
STARTING THE VEHICLE......29
DRIVING THE VEHICLE.......29
DRIVING SYSTEMS/MODES...31
TURNING OFF THE VEHICLE...32
REFUELING
FUEL FILLER LID............33
FUEL SPECIFICATIONS AND
CAPACITY..................33
PASSENGER/CARGO AREAS
FOLDING THE REAR
SEATBACK.................34
LATCH/ANCHOR.............36
TABLE OF CONTENTS
Page 12 of 108
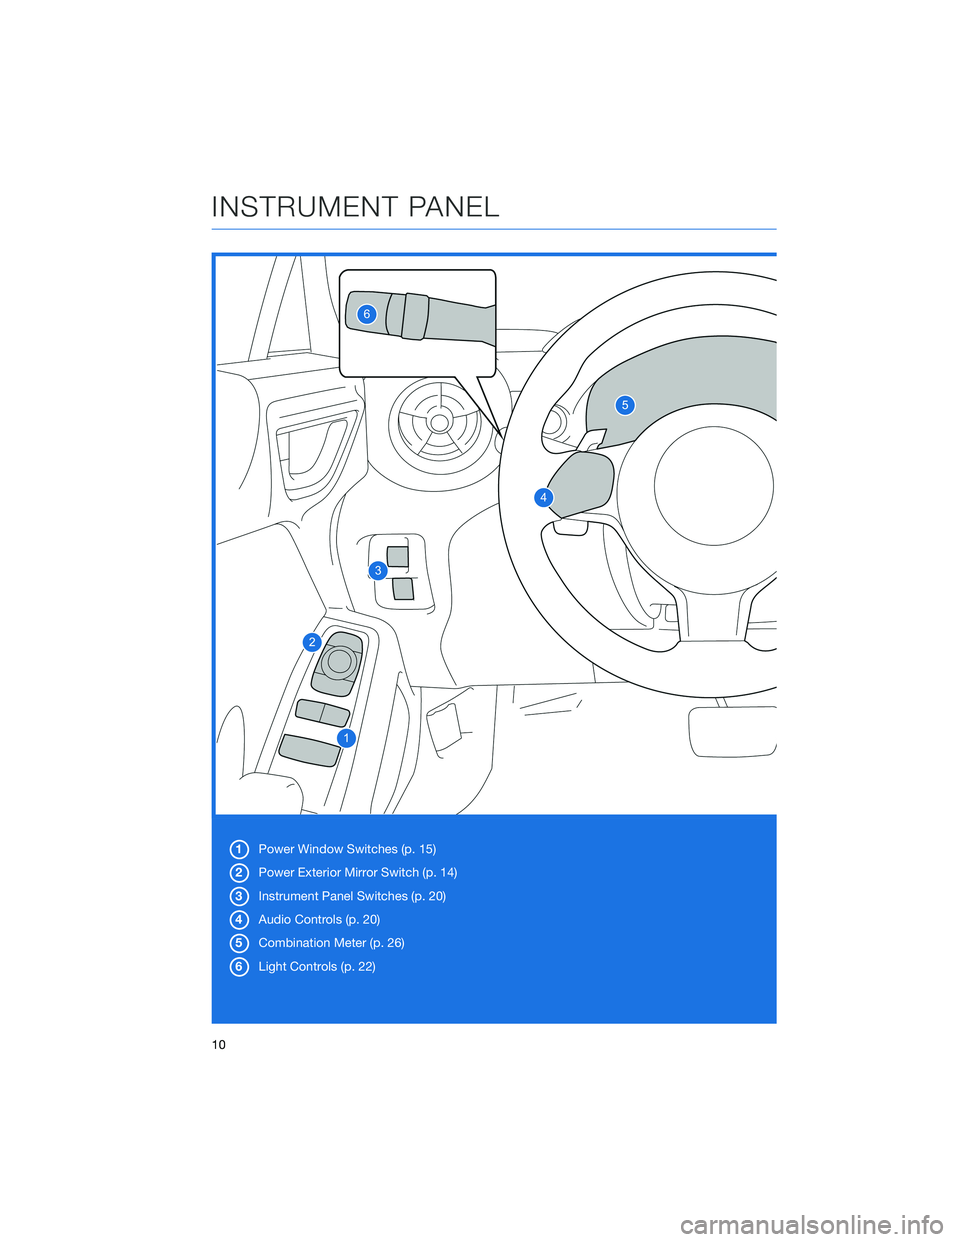
1Power Window Switches (p. 15)
2Power Exterior Mirror Switch (p. 14)
3Instrument Panel Switches (p. 20)
4Audio Controls (p. 20)
5Combination Meter (p. 26)
6Light Controls (p. 22)
INSTRUMENT PANEL
10
Page 13 of 108
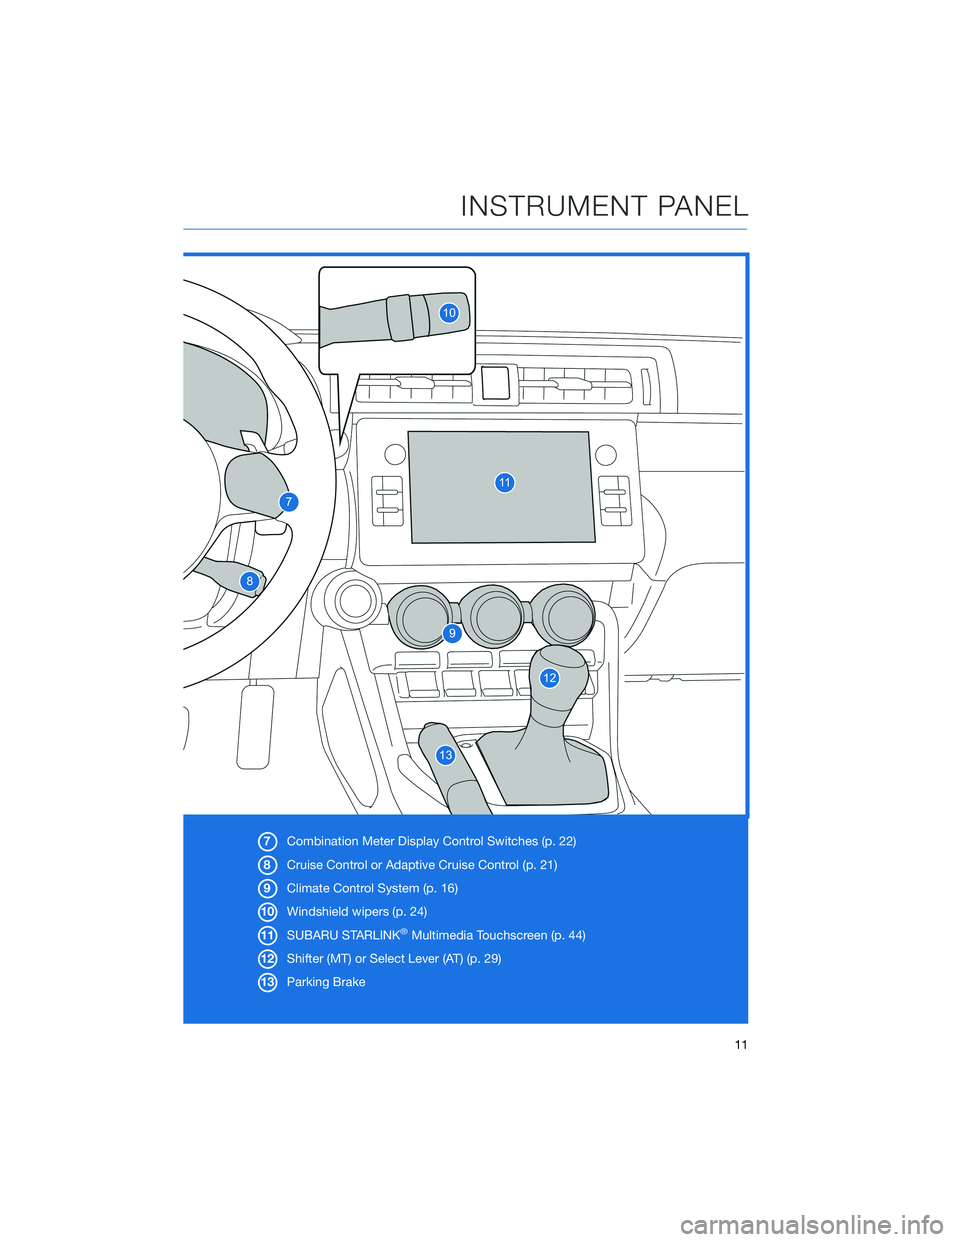
7Combination Meter Display Control Switches (p. 22)
8Cruise Control or Adaptive Cruise Control (p. 21)
9Climate Control System (p. 16)
10Windshield wipers (p. 24)
11SUBARU STARLINK
®Multimedia Touchscreen (p. 44)
12Shifter (MT) or Select Lever (AT) (p. 29)
13Parking Brake
INSTRUMENT PANEL
11
Page 19 of 108
Operation in Manual Mode
5Air Inlet Selection Button:Select this button to activate recirculation mode and
recirculate the interior air inside the vehicle. Recirculation mode is helpful when
driving on a dusty road or when you want cooling performance to increase. Select the
button again to return to outside air circulation mode and allow outside air to be
drawn into your Subaru.
NOTE: To prevent windshield fogging, do not remain in the recirculated mode for an
extended period of time.
6Fan Speed Control Dial:Turn the fan speed control dial to increase or decrease fan
speed.
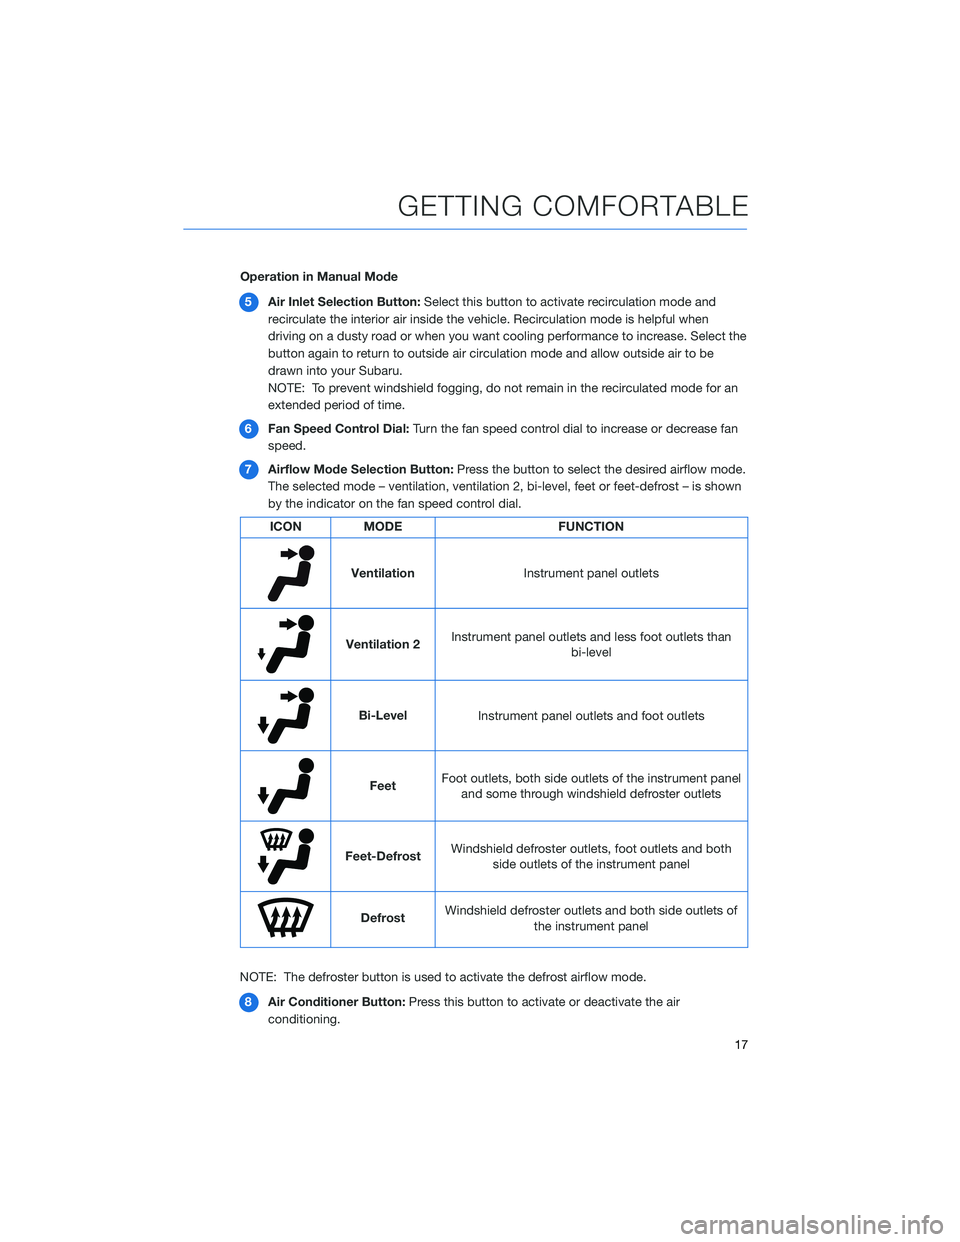
7Airflow Mode Selection Button:Press the button to select the desired airflow mode.
The selected mode – ventilation, ventilation 2, bi-level, feet or feet-defrost – is shown
by the indicator on the fan speed control dial.
ICON MODE FUNCTION
Ventilation
Instrument panel outlets
Ventilation 2Instrument panel outlets and less foot outlets than
bi-level
Bi-Level
Instrument panel outlets and foot outlets
FeetFoot outlets, both side outlets of the instrument panel
and some through windshield defroster outlets
Feet-DefrostWindshield defroster outlets, foot outlets and both
side outlets of the instrument panel
DefrostWindshield defroster outlets and both side outlets of
the instrument panel
NOTE: The defroster button is used to activate the defrost airflow mode.
8Air Conditioner Button:Press this button to activate or deactivate the air
conditioning.
GETTING COMFORTABLE
17
Page 22 of 108
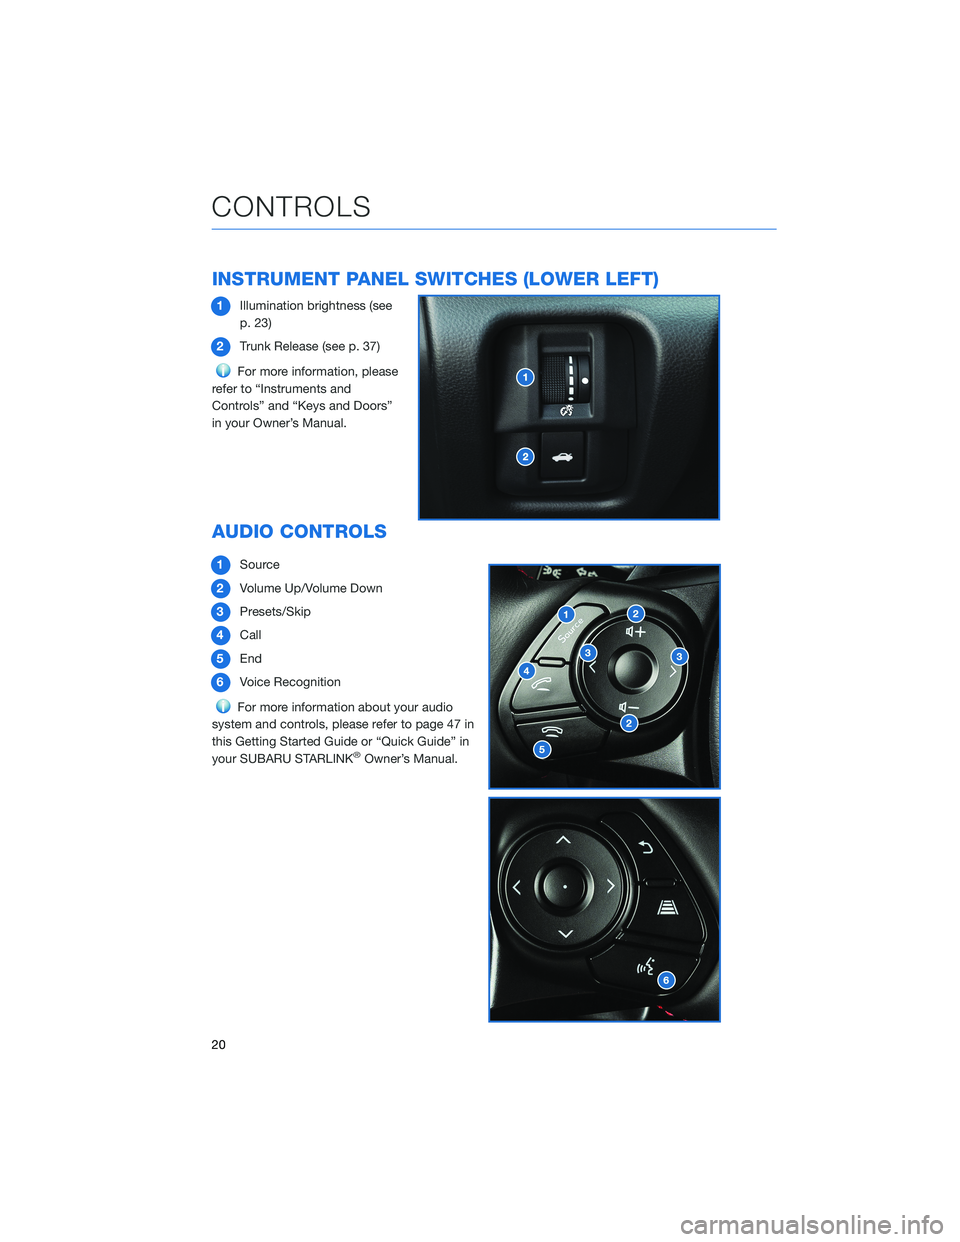
INSTRUMENT PANEL SWITCHES (LOWER LEFT)
1Illumination brightness (see
p. 23)
2Trunk Release (see p. 37)
For more information, please
refer to “Instruments and
Controls” and “Keys and Doors”
in your Owner’s Manual.
AUDIO CONTROLS
1Source
2Volume Up/Volume Down
3Presets/Skip
4Call
5End
6Voice Recognition
For more information about your audio
system and controls, please refer to page 47 in
this Getting Started Guide or “Quick Guide” in
your SUBARU STARLINK
®Owner’s Manual.
CONTROLS
20
Page 24 of 108
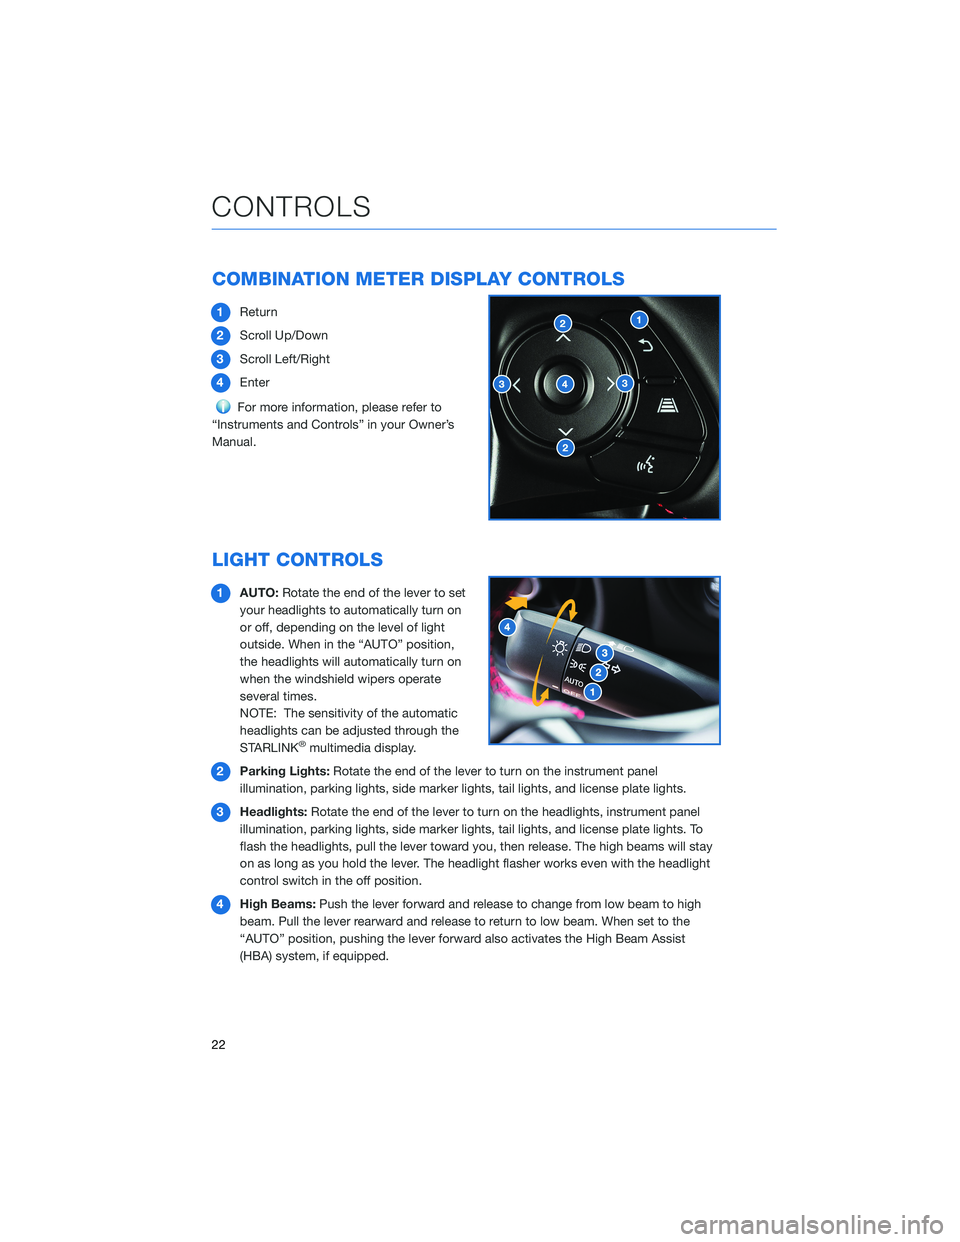
COMBINATION METER DISPLAY CONTROLS
1Return
2Scroll Up/Down
3Scroll Left/Right
4Enter
For more information, please refer to
“Instruments and Controls” in your Owner’s
Manual.
LIGHT CONTROLS
1AUTO:Rotate the end of the lever to set
your headlights to automatically turn on
or off, depending on the level of light
outside. When in the “AUTO” position,
the headlights will automatically turn on
when the windshield wipers operate
several times.
NOTE: The sensitivity of the automatic
headlights can be adjusted through the
STARLINK
®multimedia display.
2Parking Lights:Rotate the end of the lever to turn on the instrument panel
illumination, parking lights, side marker lights, tail lights, and license plate lights.
3Headlights:Rotate the end of the lever to turn on the headlights, instrument panel
illumination, parking lights, side marker lights, tail lights, and license plate lights. To
flash the headlights, pull the lever toward you, then release. The high beams will stay
on as long as you hold the lever. The headlight flasher works even with the headlight
control switch in the off position.
4High Beams:Push the lever forward and release to change from low beam to high
beam. Pull the lever rearward and release to return to low beam. When set to the
“AUTO” position, pushing the lever forward also activates the High Beam Assist
(HBA) system, if equipped.
CONTROLS
22
Page 25 of 108
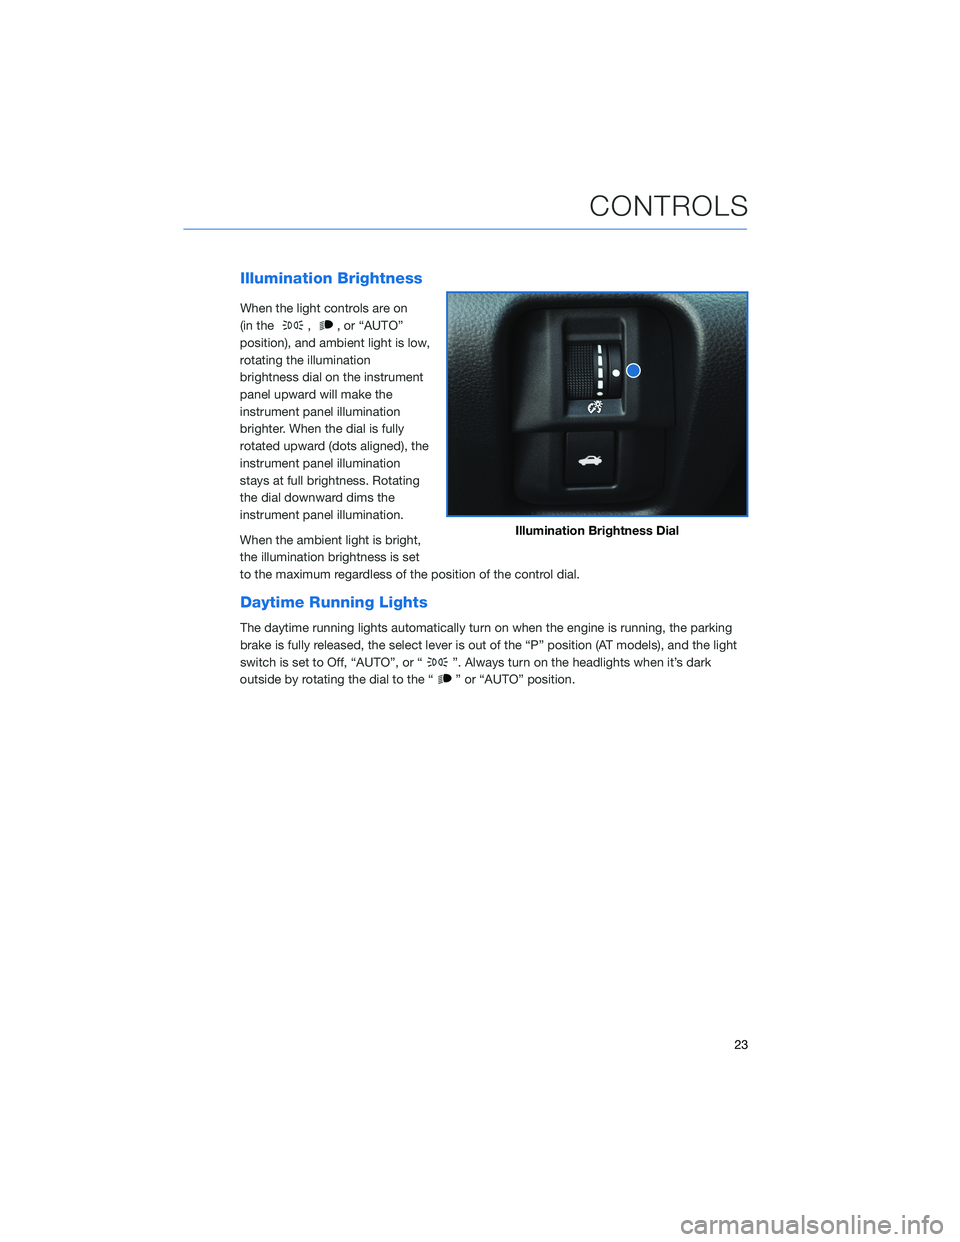
Illumination Brightness
When the light controls are on
(in the
,, or “AUTO”
position), and ambient light is low,
rotating the illumination
brightness dial on the instrument
panel upward will make the
instrument panel illumination
brighter. When the dial is fully
rotated upward (dots aligned), the
instrument panel illumination
stays at full brightness. Rotating
the dial downward dims the
instrument panel illumination.
When the ambient light is bright,
the illumination brightness is set
to the maximum regardless of the position of the control dial.
Daytime Running Lights
The daytime running lights automatically turn on when the engine is running, the parking
brake is fully released, the select lever is out of the “P” position (AT models), and the light
switch is set to Off, “AUTO”, or “
”. Always turn on the headlights when it’s dark
outside by rotating the dial to the “
” or “AUTO” position.
Illumination Brightness Dial
CONTROLS
23
Page 39 of 108
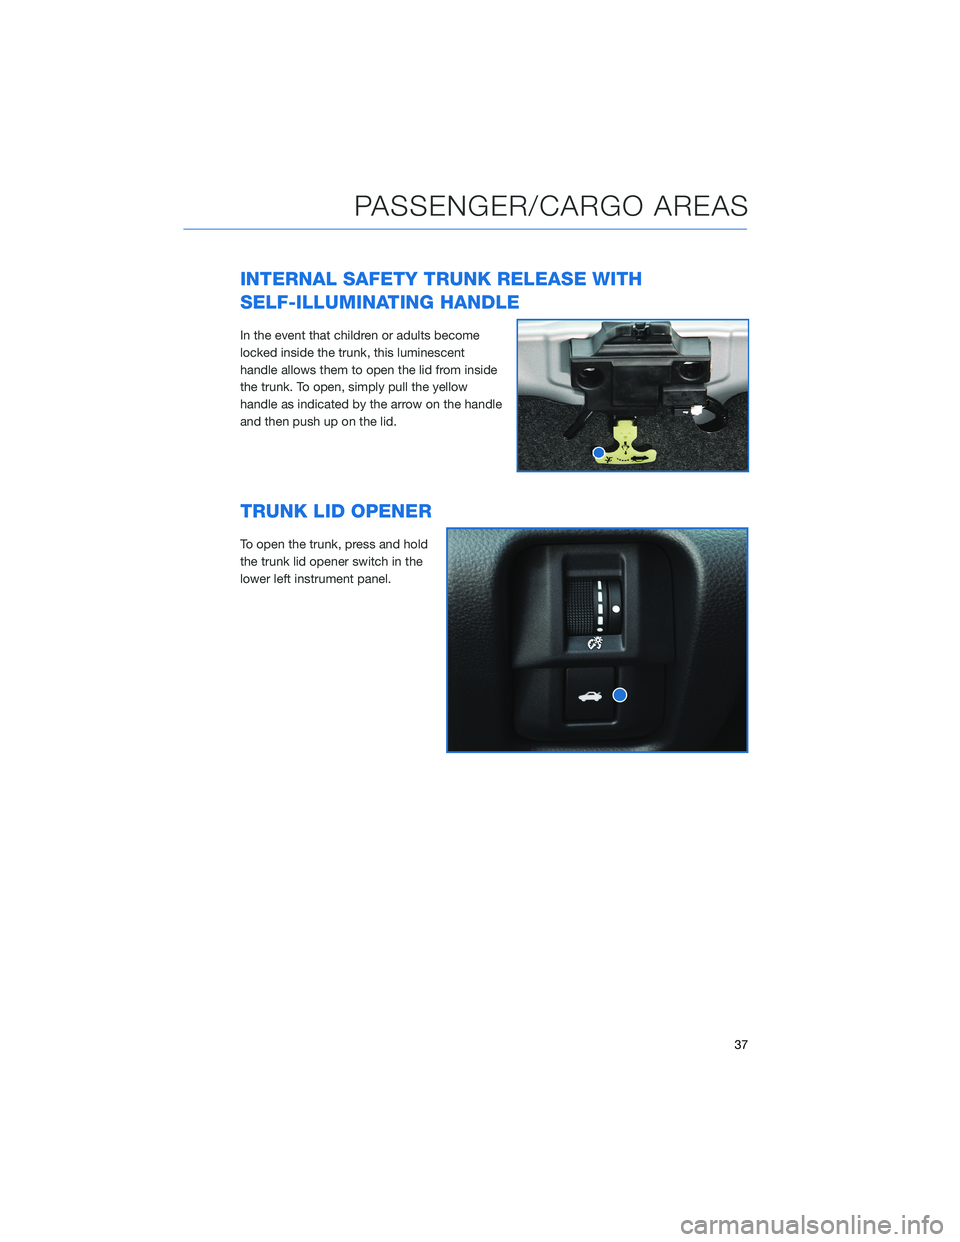
INTERNAL SAFETY TRUNK RELEASE WITH
SELF-ILLUMINATING HANDLE
In the event that children or adults become
locked inside the trunk, this luminescent
handle allows them to open the lid from inside
the trunk. To open, simply pull the yellow
handle as indicated by the arrow on the handle
and then push up on the lid.
TRUNK LID OPENER
To open the trunk, press and hold
the trunk lid opener switch in the
lower left instrument panel.
PASSENGER/CARGO AREAS
37
Page 104 of 108
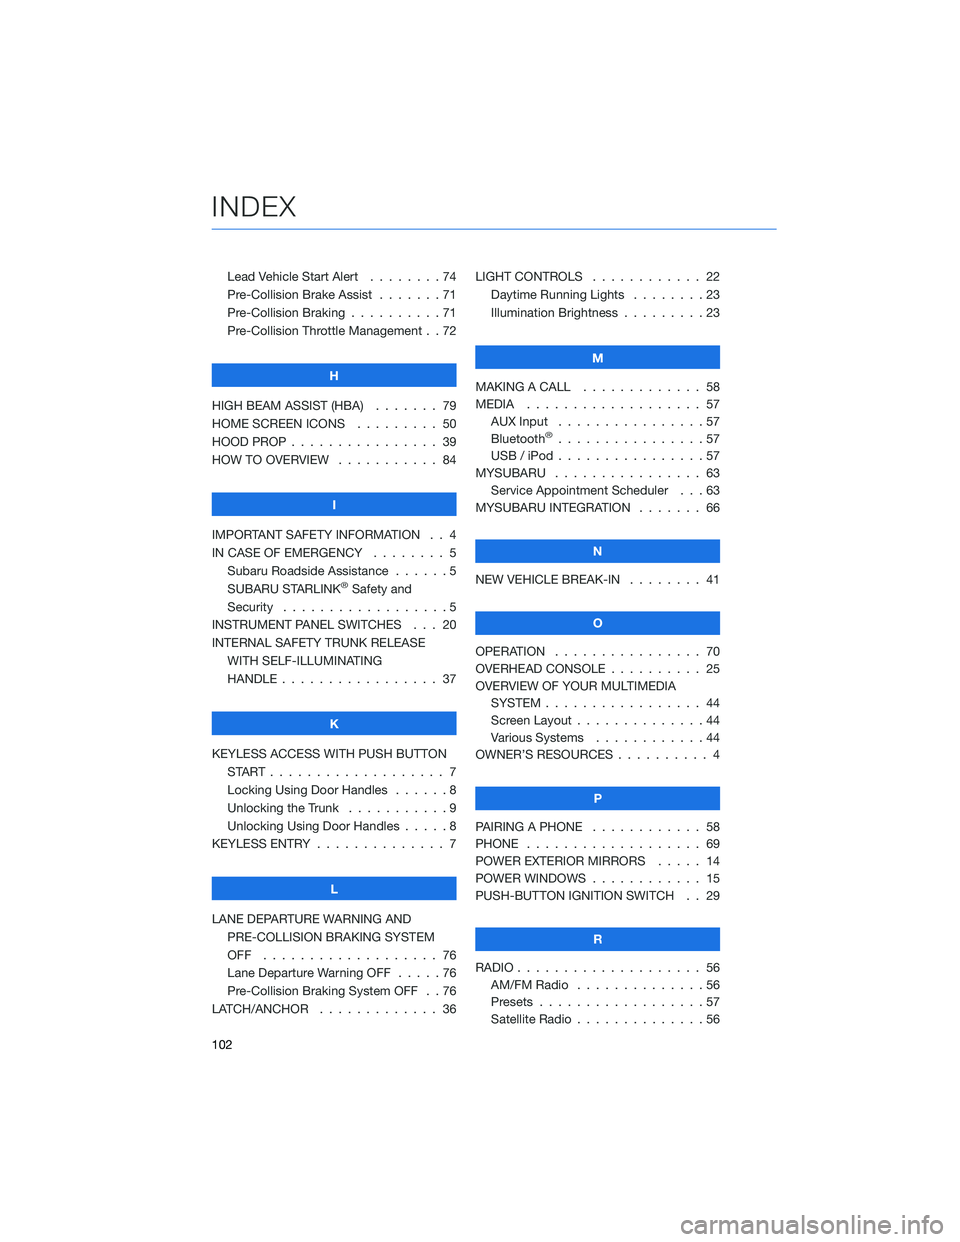
Lead Vehicle Start Alert........74
Pre-Collision Brake Assist . . .....71
Pre-Collision Braking ..........71
Pre-Collision Throttle Management . . 72
H
HIGH BEAM ASSIST (HBA)....... 79
HOME SCREEN ICONS ......... 50
HOOD PROP . . . . . . . . ........ 39
HOW TO OVERVIEW . .......... 84
I
IMPORTANT SAFETY INFORMATION . . 4
IN CASE OF EMERGENCY . . . . . . . . 5
Subaru Roadside Assistance . . . . . . 5
SUBARU STARLINK
®Safety and
Security . . . . . . . . ..........5
INSTRUMENT PANEL SWITCHES . . . 20
INTERNAL SAFETY TRUNK RELEASE
WITH SELF-ILLUMINATING
HANDLE . . . . . . . .......... 37
K
KEYLESS ACCESS WITH PUSH BUTTON
START................... 7
Locking Using Door Handles......8
Unlocking the Trunk . . .........9
Unlocking Using Door Handles . . . . . 8
KEYLESS ENTRY . . . . . . ........ 7
L
LANE DEPARTURE WARNING AND
PRE-COLLISION BRAKING SYSTEM
OFF ................... 76
Lane Departure Warning OFF . . . . . 76
Pre-Collision Braking System OFF . . 76
LATCH/ANCHOR . . . . . . . . . . . . . 36LIGHT CONTROLS . ........... 22
Daytime Running Lights . . . . . . . . 23
Illumination Brightness . . . . . . . . . 23
M
MAKING A CALL . . . . . . . ...... 58
MEDIA................... 57
AUX Input . . ..............57
Bluetooth
®................57
USB / iPod . . . . . . . .........57
MYSUBARU . . . . . . . . . . . . . . . . 63
Service Appointment Scheduler . . . 63
MYSUBARU INTEGRATION....... 66
N
NEW VEHICLE BREAK-IN . . . . . . . . 41
O
OPERATION . . . . ............ 70
OVERHEAD CONSOLE . . . . . ..... 25
OVERVIEW OF YOUR MULTIMEDIA
SYSTEM................. 44
Screen Layout ..............44
Various Systems . . ..........44
OWNER’S RESOURCES .......... 4
P
PAIRING A PHONE ............ 58
PHONE . . ................. 69
POWER EXTERIOR MIRRORS..... 14
POWER WINDOWS............ 15
PUSH-BUTTON IGNITION SWITCH . . 29
R
RADIO.................... 56
AM/FM Radio..............56
Presets..................57
Satellite Radio . . . . . . . . . . . . . . 56
INDEX
102