set clock SUBARU BRZ 2022 Getting Started Guide
[x] Cancel search | Manufacturer: SUBARU, Model Year: 2022, Model line: BRZ, Model: SUBARU BRZ 2022Pages: 108, PDF Size: 29.44 MB
Page 4 of 108
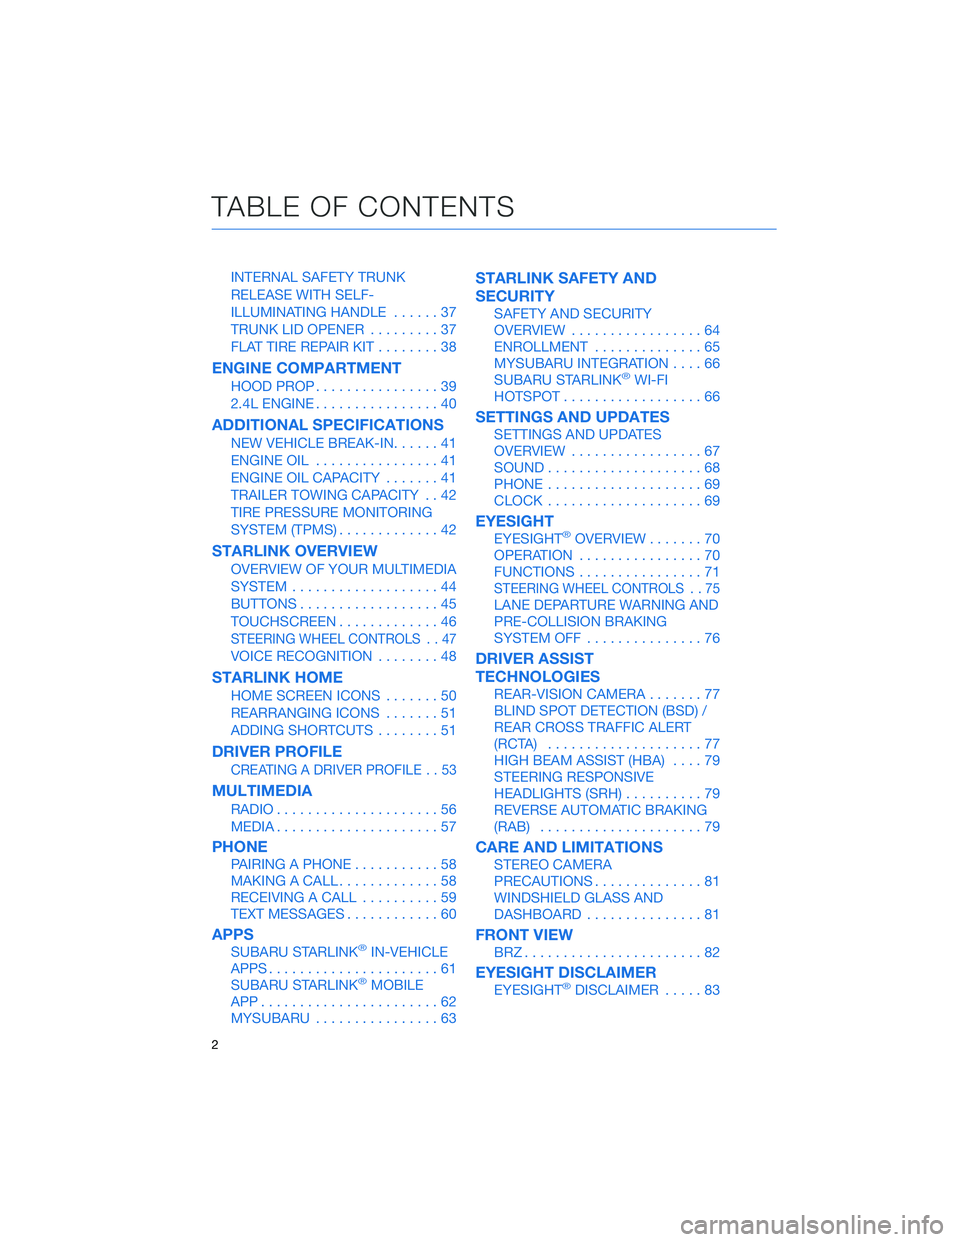
INTERNAL SAFETY TRUNK
RELEASE WITH SELF-
ILLUMINATING HANDLE......37
TRUNK LID OPENER.........37
FLAT TIRE REPAIR KIT........38
ENGINE COMPARTMENT
HOOD PROP................39
2.4L ENGINE................40
ADDITIONAL SPECIFICATIONS
NEW VEHICLE BREAK-IN......41
ENGINE OIL................41
ENGINE OIL CAPACITY.......41
TRAILER TOWING CAPACITY . . 42
TIRE PRESSURE MONITORING
SYSTEM (TPMS).............42
STARLINK OVERVIEW
OVERVIEW OF YOUR MULTIMEDIA
SYSTEM...................44
BUTTONS..................45
TOUCHSCREEN.............46
STEERING WHEEL CONTROLS . . 47
VOICE RECOGNITION........48
STARLINK HOME
HOME SCREEN ICONS.......50
REARRANGING ICONS.......51
ADDING SHORTCUTS........51
DRIVER PROFILE
CREATING A DRIVER PROFILE . . 53
MULTIMEDIA
RADIO.....................56
MEDIA.....................57
PHONE
PAIRING A PHONE...........58
MAKING A CALL.............58
RECEIVING A CALL..........59
TEXT MESSAGES............60
APPS
SUBARU STARLINK®IN-VEHICLE
APPS......................61
SUBARU STARLINK
®MOBILE
APP.......................62
MYSUBARU................63
STARLINK SAFETY AND
SECURITY
SAFETY AND SECURITY
OVERVIEW.................64
ENROLLMENT..............65
MYSUBARU INTEGRATION....66
SUBARU STARLINK
®WI-FI
HOTSPOT..................66
SETTINGS AND UPDATES
SETTINGS AND UPDATES
OVERVIEW.................67
SOUND....................68
PHONE....................69
CLOCK....................69
EYESIGHT
EYESIGHT®OVERVIEW.......70
OPERATION................70
FUNCTIONS................71
STEERING WHEEL CONTROLS . . 75
LANE DEPARTURE WARNING AND
PRE-COLLISION BRAKING
SYSTEM OFF...............76
DRIVER ASSIST
TECHNOLOGIES
REAR-VISION CAMERA.......77
BLIND SPOT DETECTION (BSD) /
REAR CROSS TRAFFIC ALERT
(RCTA)....................77
HIGH BEAM ASSIST (HBA)....79
STEERING RESPONSIVE
HEADLIGHTS (SRH)..........79
REVERSE AUTOMATIC BRAKING
(RAB).....................79
CARE AND LIMITATIONS
STEREO CAMERA
PRECAUTIONS..............81
WINDSHIELD GLASS AND
DASHBOARD...............81
FRONT VIEW
BRZ.......................82
EYESIGHT DISCLAIMER
EYESIGHT®DISCLAIMER.....83
TABLE OF CONTENTS
2
Page 5 of 108
HOW TO APPENDIX
HOW TO OVERVIEW..........84
SETTING THE CLOCK........84
BLUETOOTH
®PAIRING.......87
ANDROID AUTO™...........93
APPLE CARPLAY
®...........96
WI-FI......................98
FIRMWARE AND SOFTWARE
UPDATES.................100
INDEX.....................101
TABLE OF CONTENTS
3
Page 18 of 108
CLIMATE CONTROL
Dual-zone Automatic Climate Control
You can set separate temperatures for the driver and passenger seats. Set your desired
temperature and let the system automatically make the adjustments for you. At any time,
you can manually take control of the climate settings.
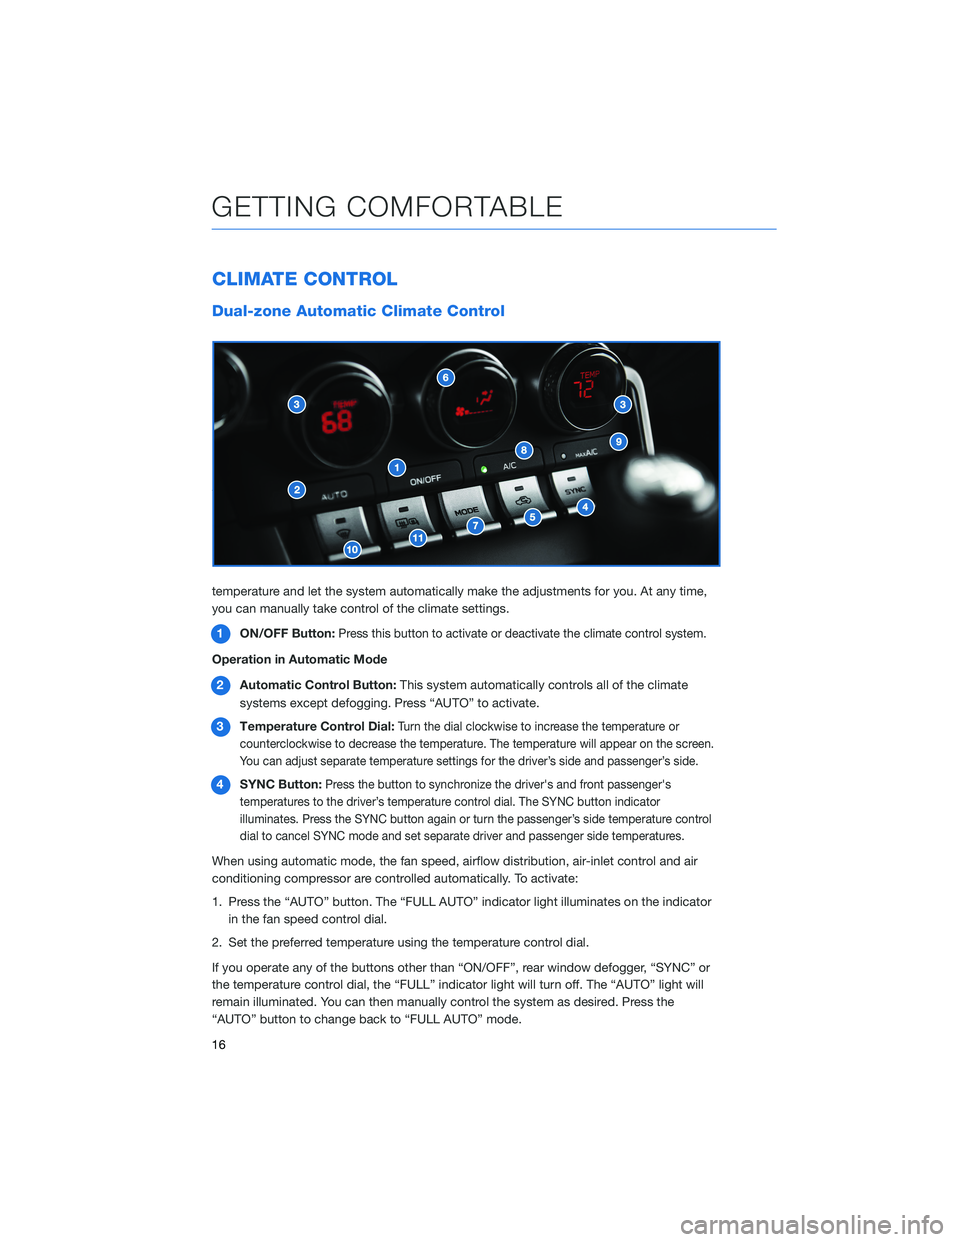
1ON/OFF Button:
Press this button to activate or deactivate the climate control system.
Operation in Automatic Mode
2Automatic Control Button:This system automatically controls all of the climate
systems except defogging. Press “AUTO” to activate.
3Temperature Control Dial:
Turn the dial clockwise to increase the temperature or
counterclockwise to decrease the temperature. The temperature will appear on the screen.
You can adjust separate temperature settings for the driver’s side and passenger’s side.
4SYNC Button:Press the button to synchronize the driver's and front passenger's
temperatures to the driver’s temperature control dial. The SYNC button indicator
illuminates. Press the SYNC button again or turn the passenger’s side temperature control
dial to cancel SYNC mode and set separate driver and passenger side temperatures.
When using automatic mode, the fan speed, airflow distribution, air-inlet control and air
conditioning compressor are controlled automatically. To activate:
1. Press the “AUTO” button. The “FULL AUTO” indicator light illuminates on the indicator
in the fan speed control dial.
2. Set the preferred temperature using the temperature control dial.
If you operate any of the buttons other than “ON/OFF”, rear window defogger, “SYNC” or
the temperature control dial, the “FULL” indicator light will turn off. The “AUTO” light will
remain illuminated. You can then manually control the system as desired. Press the
“AUTO” button to change back to “FULL AUTO” mode.
GETTING COMFORTABLE
16
Page 46 of 108
OVERVIEW OF YOUR MULTIMEDIA SYSTEM
SUBARU STARLINK®Multimedia combines the radio along with the ability to connect your
phone* through Bluetooth®to the multimedia system for making calls, sending text
messages and listening to your favorite songs on your phone.
* Compatible smartphone and application required. For applications to operate, latest version of each
application required. Data provided by smartphone is displayed on the Touchscreen. Some state laws
prohibit the operation of handheld electronic devices while operating a vehicle. Smartphone apps
should only be launched when vehicle is safely parked. Your wireless carrier’s rates may apply.
Various Systems
Depending on your model and trim level there are several types of SUBARU STARLINK®
Multimedia systems. Some of the functions described in this guide will vary by system.
Screen Layout
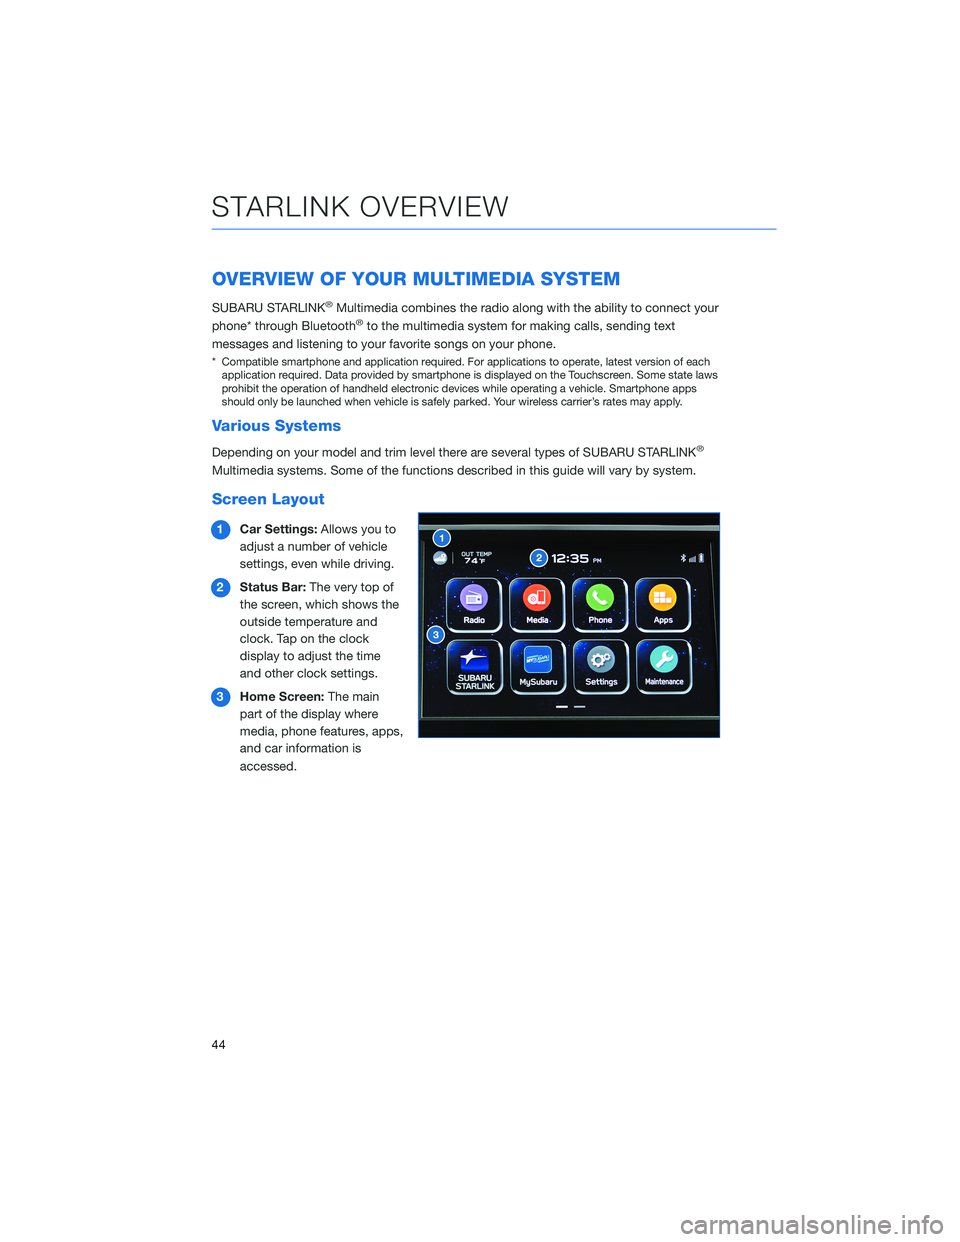
1Car Settings:Allows you to
adjust a number of vehicle
settings, even while driving.
2Status Bar:The very top of
the screen, which shows the
outside temperature and
clock. Tap on the clock
display to adjust the time
and other clock settings.
3Home Screen:The main
part of the display where
media, phone features, apps,
and car information is
accessed.
STARLINK OVERVIEW
44
Page 71 of 108
SETTING FUNCTION
Call
VolumeSets the call volume.
SMS/
MMS
Ringtone
VolumeSets the SMS/MMS ringtone volume.
SMS/
MMS
Read Out
VolumeSets the SMS/MMS read out volume.
Voice
VolumeSets the voice recognition prompts volume.
PHONE
This system supports Bluetooth®, a wireless data system, allowing you to make and
receive calls without taking your hands off the steering wheel.
In the settings menu, you will be able to manage devices, adjust phone book and message
settings, and adjust other phone/Bluetooth
®settings.
To access the phone settings screen, press the “Home” button, select “Settings”, then
select the “Phone” menu.
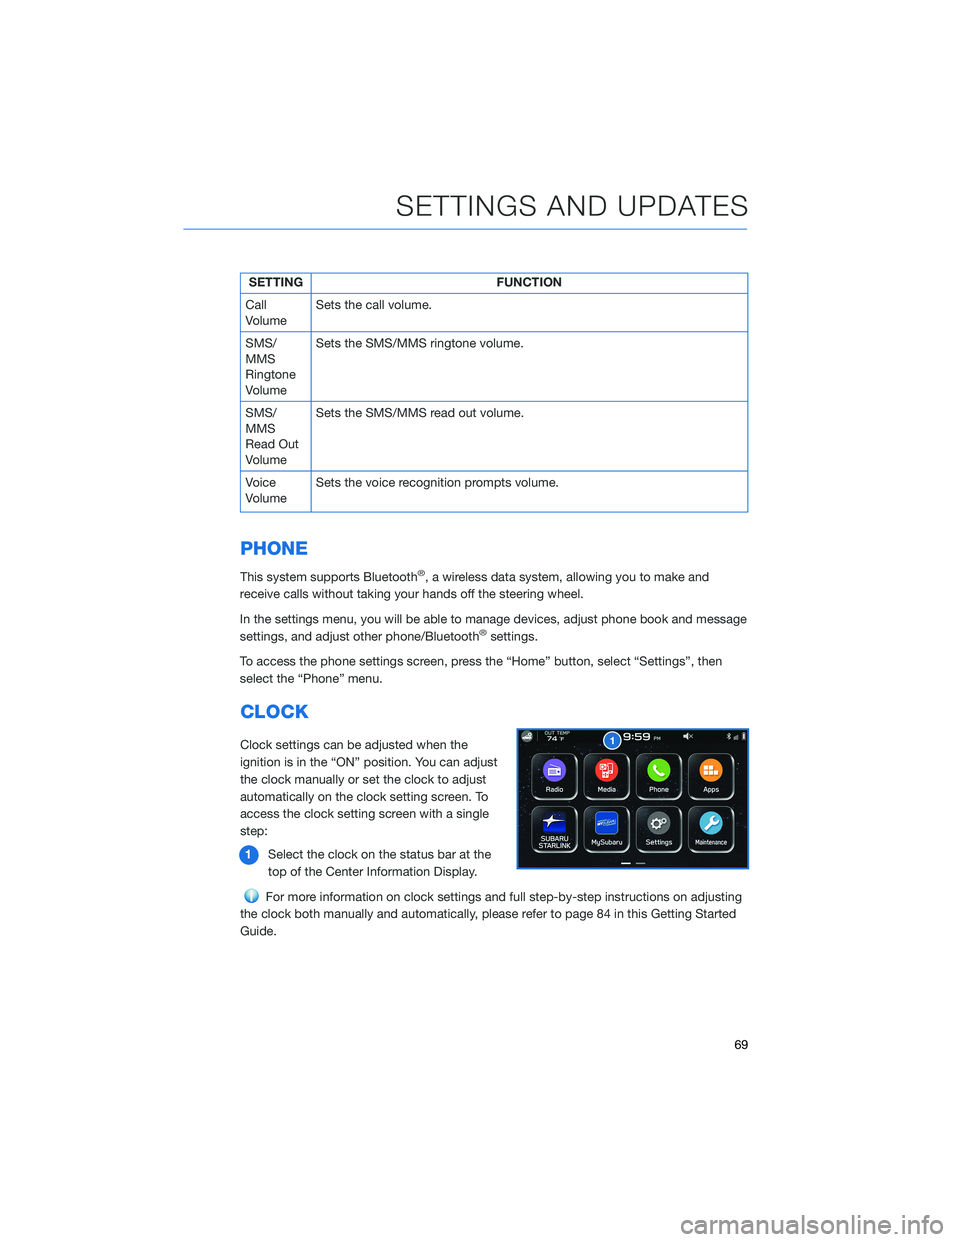
CLOCK
Clock settings can be adjusted when the
ignition is in the “ON” position. You can adjust
the clock manually or set the clock to adjust
automatically on the clock setting screen. To
access the clock setting screen with a single
step:
1Select the clock on the status bar at the
top of the Center Information Display.
For more information on clock settings and full step-by-step instructions on adjusting
the clock both manually and automatically, please refer to page 84 in this Getting Started
Guide.
SETTINGS AND UPDATES
69
Page 86 of 108
HOW TO OVERVIEW
This “How To” appendix provides detailed, step-by-step instructions to easily connect with
features of your BRZ.
If you need some help with these features or want to
learn more, we are here to assist you:
Your Subaru Owner’s Manuals:
Located in the glovebox
Online Subaru Owner’s Resources:
www.subaru.com/owners
Subaru Customer Support:
www.subaru.com/customer-support
1-800-782-2783 (1-800-SUBARU3 )
SETTING THE CLOCK
Clock settings can be adjusted when the ignition is in the “ON” position. You can adjust
the clock manually or set the clock to adjust automatically in the clock setting screen. To
directly access the clock setting screen, you can select the clock on the status bar at the
top of the Center Information Display. Full directions for accessing the clock settings and
adjusting the clock manually or automatically are given below.
For more information, please refer to “Quick Guide” in your STARLINK®Owner’s
Manual.
HOW TO APPENDIX
84
Page 87 of 108
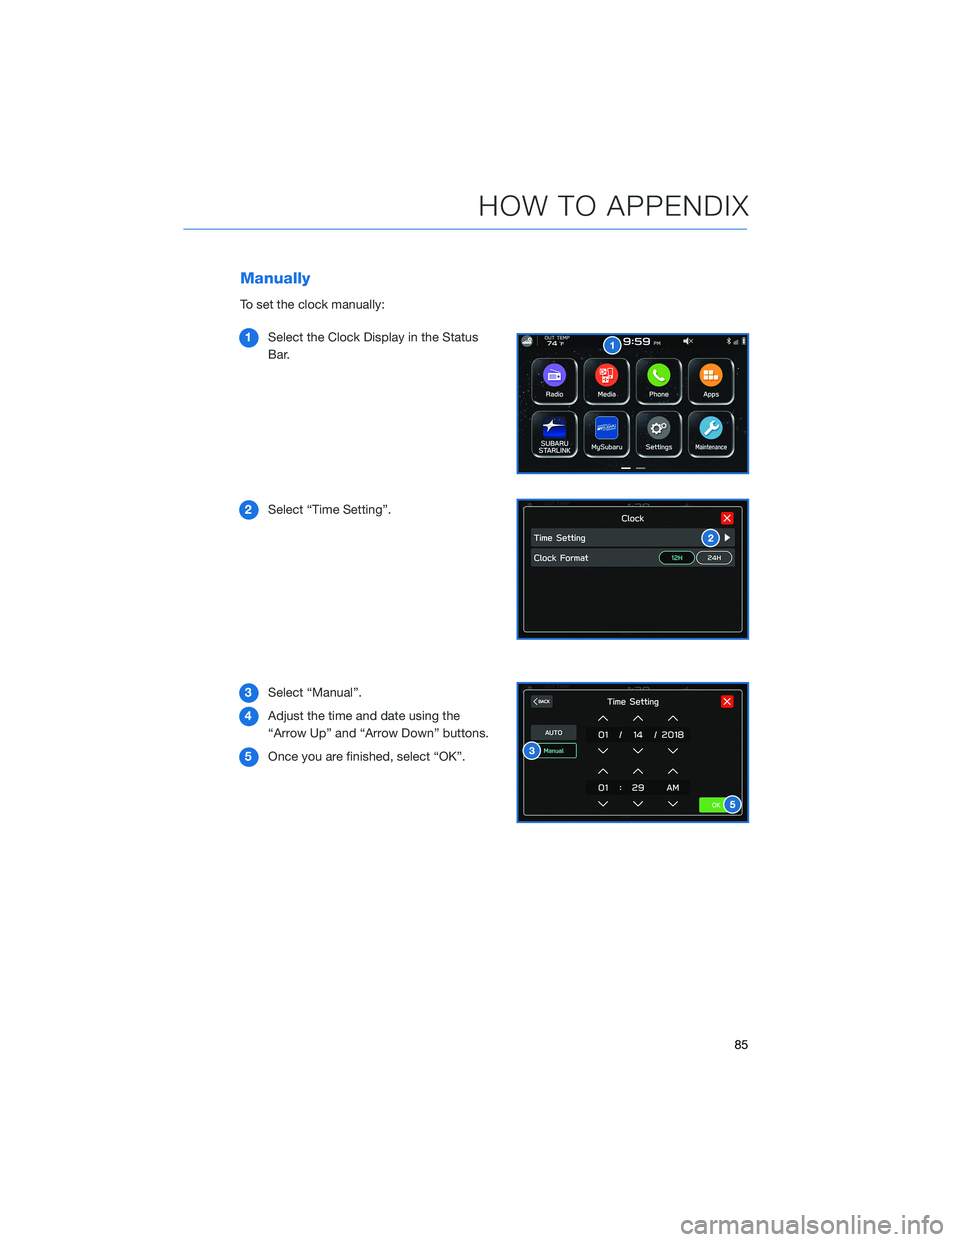
Manually
To set the clock manually:
1Select the Clock Display in the Status
Bar.
2Select “Time Setting”.
3Select “Manual”.
4Adjust the time and date using the
“Arrow Up” and “Arrow Down” buttons.
5Once you are finished, select “OK”.
HOW TO APPENDIX
85
Page 88 of 108
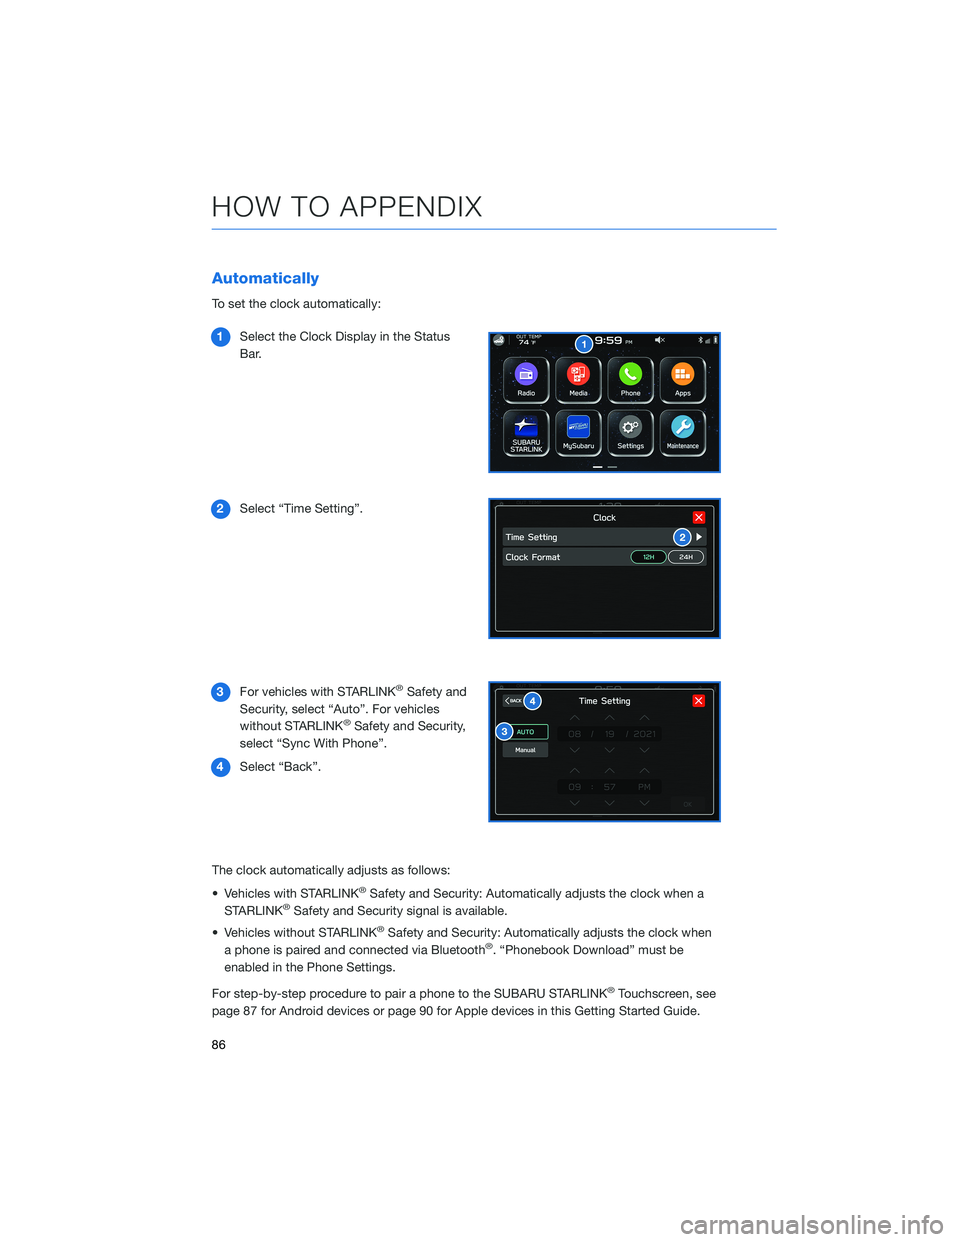
Automatically
To set the clock automatically:
1Select the Clock Display in the Status
Bar.
2Select “Time Setting”.
3For vehicles with STARLINK
®Safety and
Security, select “Auto”. For vehicles
without STARLINK
®Safety and Security,
select “Sync With Phone”.
4Select “Back”.
The clock automatically adjusts as follows:
• Vehicles with STARLINK
®Safety and Security: Automatically adjusts the clock when a
STARLINK®Safety and Security signal is available.
• Vehicles without STARLINK
®Safety and Security: Automatically adjusts the clock when
a phone is paired and connected via Bluetooth®. “Phonebook Download” must be
enabled in the Phone Settings.
For step-by-step procedure to pair a phone to the SUBARU STARLINK
®Touchscreen, see
page 87 for Android devices or page 90 for Apple devices in this Getting Started Guide.
HOW TO APPENDIX
86
Page 102 of 108
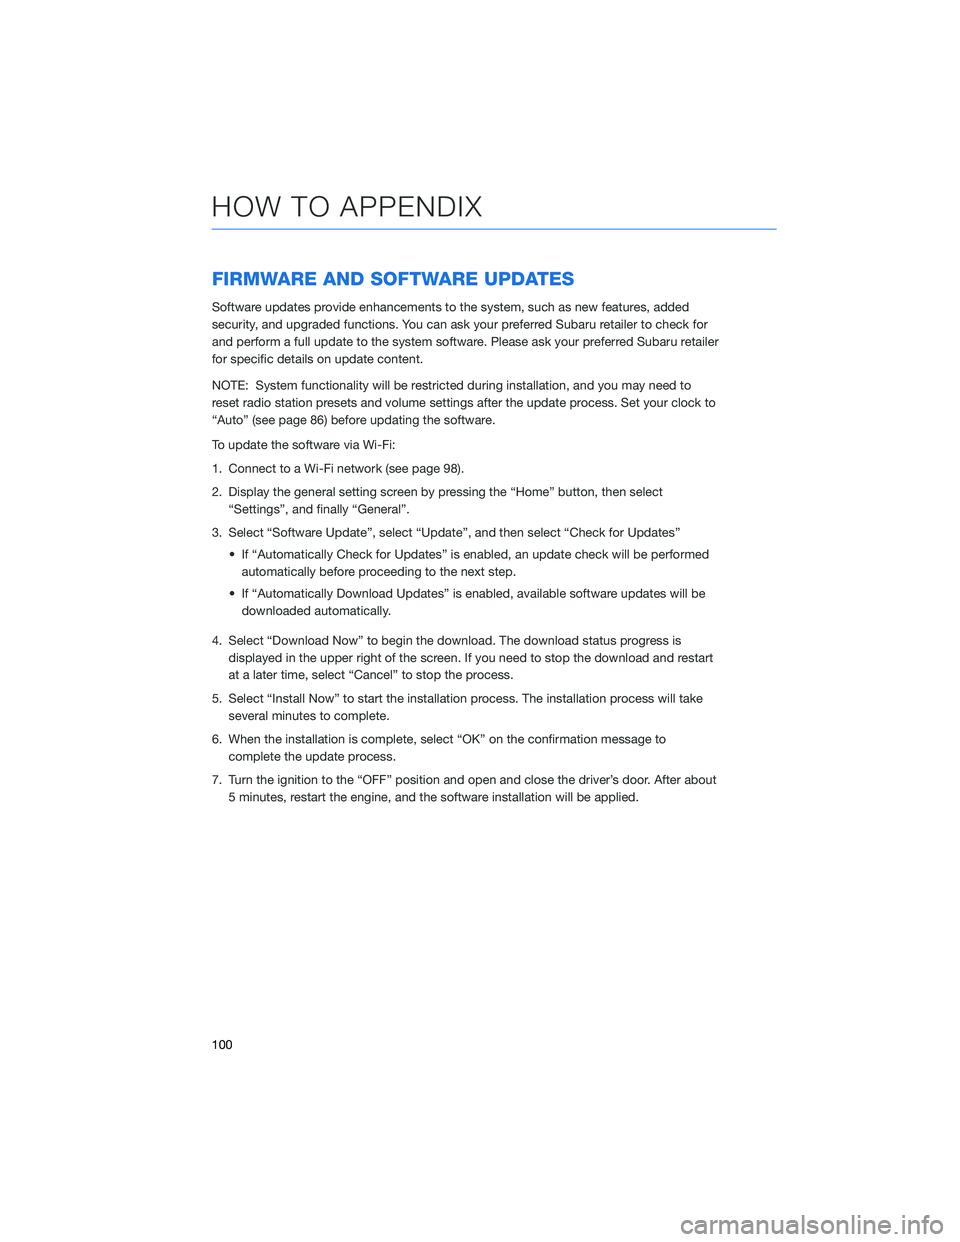
FIRMWARE AND SOFTWARE UPDATES
Software updates provide enhancements to the system, such as new features, added
security, and upgraded functions. You can ask your preferred Subaru retailer to check for
and perform a full update to the system software. Please ask your preferred Subaru retailer
for specific details on update content.
NOTE: System functionality will be restricted during installation, and you may need to
reset radio station presets and volume settings after the update process. Set your clock to
“Auto” (see page 86) before updating the software.
To update the software via Wi-Fi:
1. Connect to a Wi-Fi network (see page 98).
2. Display the general setting screen by pressing the “Home” button, then select
“Settings”, and finally “General”.
3. Select “Software Update”, select “Update”, and then select “Check for Updates”
• If “Automatically Check for Updates” is enabled, an update check will be performed
automatically before proceeding to the next step.
• If “Automatically Download Updates” is enabled, available software updates will be
downloaded automatically.
4. Select “Download Now” to begin the download. The download status progress is
displayed in the upper right of the screen. If you need to stop the download and restart
at a later time, select “Cancel” to stop the process.
5. Select “Install Now” to start the installation process. The installation process will take
several minutes to complete.
6. When the installation is complete, select “OK” on the confirmation message to
complete the update process.
7. Turn the ignition to the “OFF” position and open and close the driver’s door. After about
5 minutes, restart the engine, and the software installation will be applied.
HOW TO APPENDIX
100
Page 105 of 108
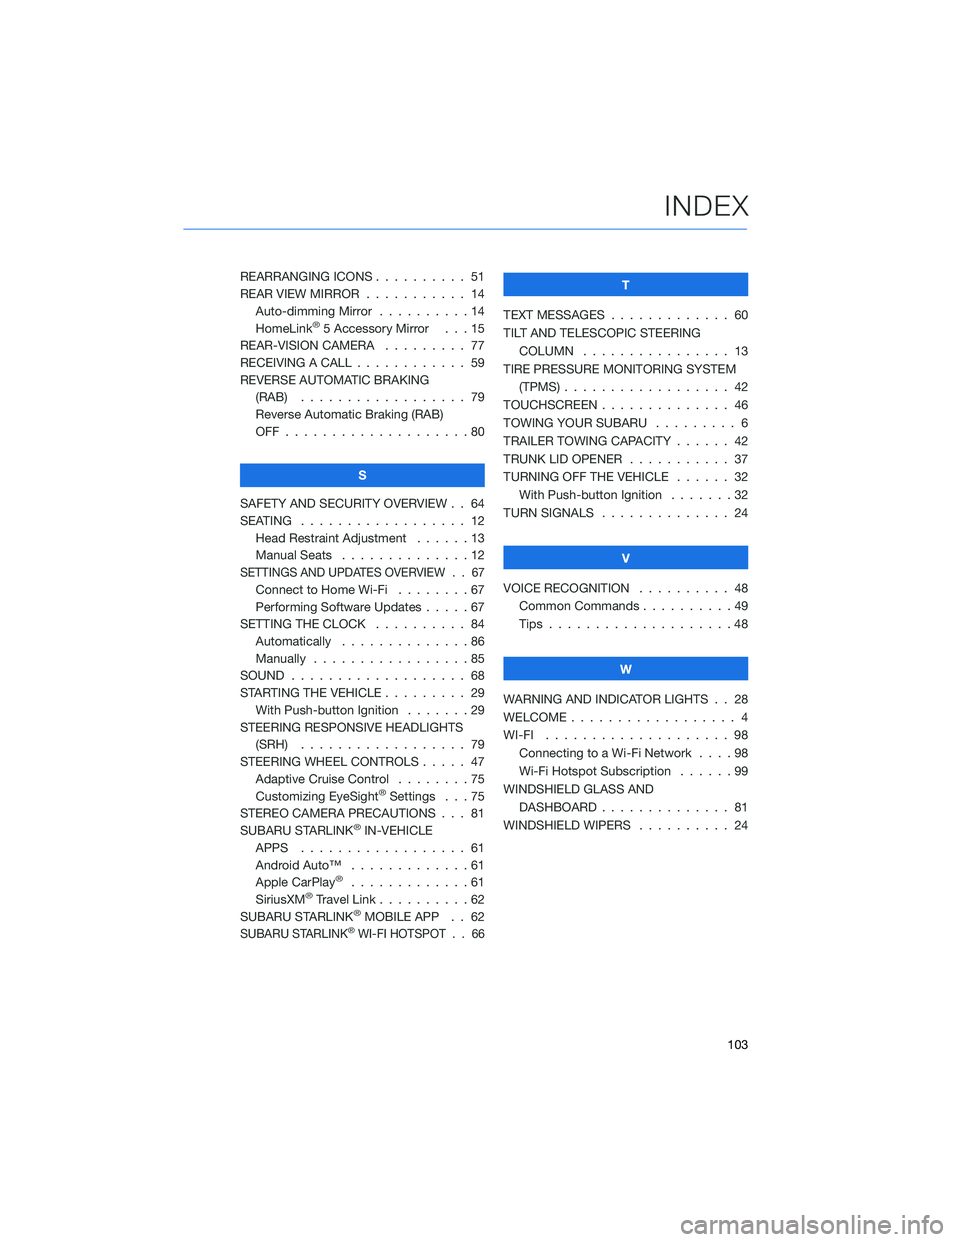
REARRANGING ICONS .......... 51
REAR VIEW MIRROR ........... 14
Auto-dimming Mirror . . . . . . . . . . 14
HomeLink
®5 Accessory Mirror . . . 15
REAR-VISION CAMERA......... 77
RECEIVING A CALL . . . . . . . . . . . . 59
REVERSE AUTOMATIC BRAKING
(RAB) . . . . . . ............ 79
Reverse Automatic Braking (RAB)
OFF....................80
S
SAFETY AND SECURITY OVERVIEW . . 64
SEATING . . . . . ............. 12
Head Restraint Adjustment . .....13
Manual Seats . .............12
SETTINGS AND UPDATES OVERVIEW . . 67
Connect to Home Wi-Fi . . . . . . . . 67
Performing Software Updates.....67
SETTING THE CLOCK . . . . ...... 84
Automatically . . . . . . . . . . . . . . 86
Manually . . . . .............85
SOUND . . . . . . . . . . . . . . ..... 68
STARTING THE VEHICLE . . . . . . . . . 29
With Push-button Ignition.......29
STEERING RESPONSIVE HEADLIGHTS
(SRH) . . . . . . . . . . ........ 79
STEERING WHEEL CONTROLS..... 47
Adaptive Cruise Control........75
Customizing EyeSight
®Settings . . . 75
STEREO CAMERA PRECAUTIONS . . . 81
SUBARU STARLINK
®IN-VEHICLE
APPS . . . . . . . ........... 61
Android Auto™ . . . ..........61
Apple CarPlay
®.............61
SiriusXM®Travel Link . . . . . . . . . . 62
SUBARU STARLINK®MOBILE APP . . 62
SUBARU STARLINK®WI-FI HOTSPOT . . 66
T
TEXT MESSAGES . . . . . ........ 60
TILT AND TELESCOPIC STEERING
COLUMN . . . ............. 13
TIRE PRESSURE MONITORING SYSTEM
(TPMS) . . . . . . . . . . ........ 42
TOUCHSCREEN . . . . . . . . ...... 46
TOWING YOUR SUBARU . ........ 6
TRAILER TOWING CAPACITY . . . . . . 42
TRUNK LID OPENER . . . ........ 37
TURNING OFF THE VEHICLE . . . . . . 32
With Push-button Ignition . . . . . . . 32
TURN SIGNALS . . . . .......... 24
V
VOICE RECOGNITION.......... 48
Common Commands..........49
Tips....................48
W
WARNING AND INDICATOR LIGHTS . . 28
WELCOME . . . . . . . . . ......... 4
WI-FI.................... 98
Connecting to a Wi-Fi Network . . . . 98
Wi-Fi Hotspot Subscription . .....99
WINDSHIELD GLASS AND
DASHBOARD . . . . . . . ....... 81
WINDSHIELD WIPERS . . . ....... 24
INDEX
103